Használati útmutató Graco Sequel 65
Olvassa el alább 📖 a magyar nyelvű használati útmutatót Graco Sequel 65 (192 oldal) a autósülés kategóriában. Ezt az útmutatót 5 ember találta hasznosnak és 2 felhasználó értékelte átlagosan 4.5 csillagra
Oldal 1/192

Sequel™65
CONVERTIBLE CAR SEAT


37
3 Rear
Facing
continue next page
8. Extend the LATCH Strap.
CLICK!
9. Attach LATCH Connectors to
Vehicle’s Lower LATCH Anchors.


41
3 Rear
Facing
1. Store Top Tether and LATCH Strap
6
5
Forward Facing
2
1
Rear Facing
4
3
PD34942 6A
3-C Install Rear-Facing with
Vehicle Seat Belt
2. Recline the Car Seat

Place rear-facing in vehicle seat. The
base should sit as flat as possible on the
vehicle seat.

43
3 Rear
Facing
continue next page
5. Check the Level Indicator

3 Rear
Facing
Thread vehicle seat belt through the
rear-facing belt path (marked with a blue
label) and out the other side. Buckle
it. The seat belt should lie as flat as
possible and not be twisted.
Note: It may be easier to route the
vehicle seat belt by lifting seat pad up to
expose the belt path.
Make sure the vehicle seat belt is in
front of the buckle strap when the buckle
is in the inner-most position, and in
behind when in the outter-most position.


CLICK!


58
4 Forward
Facing
Review your vehicle’s owner manual for vehicle seat belt use
6. Route the Vehicle Seat Belt
Thread vehicle seat belt through the
forward-facing belt path (marked with
a orange label) and out the other side.
Buckle it. The seat belt should lie as flat
as possible and not be twisted.
7. Lock the Vehicle Seat Belt
In most vehicles today, slowly pull the
shoulder belt all the way out and then let it
go back in. You will hear a clicking sound.
Slowly pull out on the belt and it should
be locked. If not, review your car’s owner
manual and section 8-D.

59
4 Forward
Facing
it
d.
er
9. Attach Top Tether Strap
Extend the top tether by
pressing the grey button
and pulling on the strap
and attach. Consult
vehicle’s owner manual
for specific location.
8. Tighten the Vehicle Seat Belt
Press down firmly in the center of the car
seat. Pull on the shoulder belt to tighten
while feeding the slack back in the retractor.
10. Tighten the Top Tether Strap
Push the car seat back while tightening the
top tether strap to remove all the slack.
continue next page

60
4 Forward
Facing
11. Test For Tightness
Grab the sides of the seat where the
vehicle seat belt is and slide the car
seat side-to-side and front-to-back.
If the seat moves less than 1” (2.5
cm), it is tight enough.
See section 5-A to secure your child.

61
4 Forward
Facing
Is Everything Correct?
Car Seat Does Not Move More than
1” (2.5 cm) at the Belt Path
Harness Straps at or Just Above the
Child’s Shoulders.
Review section 5
Chest Clip Even With Armpits
Review section 5
Cannot Pinch Harness Straps at the
Shoulder
Review section 5

62
1.
Loosen Harness Straps


You will hear a “click” when the chest
clip is securely buckled.
Pull up on the harness strap while
pushing the chest clip down. Do this to
both sides.

69
5 Securing
Child
13.
Tighten the Harness by Pulling
the Harness Adjustment Strap
When you are not able to pinch any
of the harness webbing at your child’s
shoulder, the harness is tight enough.
A snug harness should not allow any
slack. It lies in a relatively straight line
without sagging. It does not press on
the child’s flesh or push the child’s
body into an unnatural position.
14.
Raise the Chest Clip to Child’s
Armpit Level

70
6 Accessories
6-A Accessories (on select models)
Harness Covers
Make sure that harness covers do not
interfere with placement of the chest clip
at armpit level.
To remove, undo the fastening strips and
remove.

71
6 Accessories
Body Support
Use only in the rear-facing mode.
Body support must be used if shoulders
are below the lowest harness setting.
Never allow body support to bunch or
fold behind child.

72
7 Moving
LATCH
7-A
Moving the LATCH Strap
B
A
1. For Ease of Moving the LATCH Strap
A. Undo Snaps and fastening strips in front
of child restraint.
B. Pull the LATCH straps out of the belt path
opening, so that the LATCH hooks end up
on the same side of the child restraint.

7 Moving
LATCH

74
7 Moving
LATCH
4. Replace the Seat Pad Fabric on the
Front of the Child Restraint.
Forward-Facing: Make sure the
strap is flat and not twisted.

75
8 Additional
Information
Top Tether Strap
To remove, press the grey button
and pull on the strap to release
the tension. Press in on the
hook’s spring. Push tether hook
in, then lift up and pull away
from tether anchor.
8-A How to Remove LATCH and Top Tether
LATCH
Push gray button in while pulling on LATCH strap to loosen. Press in on
the hook’s spring. Push hook in, lift hook up, twist and pull out away from
anchor point.

76
8 Additional
Information
Review your vehicle owner’s manual for seating locations.
The best seating location for this car seat is one that:
• Is recommended by your vehicle owner’s manual, and
• Results in a secure installation of this car seat
In the event there is no available back seat and / or you have no other option than
to place a child in a front passenger seating position (other than rear-facing), the
National Highway Traffic Safety Administration (NHTSA) recommends that you take
the following steps:
• Ensure the child is properly restrained according to their age and size
• Move the seat as far back as possible
• Make sure the child is not leaning out of position, such as leaning forward into the
deployment path of the air bag
• Set the air bag ON-OFF switch, if available, to the OFF position

77
8 Additional
Information

8 Additional
Information
This car seat can be installed using a vehicle seat belt. To do this, you will need to change
the seat belt to a locked mode for use with car seats. With some vehicle seat belts, this is
done with the latchplate; with other vehicle seat belts, this is done with the retractor.
A device that winds up the unused vehicle seat belt.
It is often hidden inside the panels on the walls of the
vehicle or in the vehicle seatback.
The male end of the seat belt with the silver tongue.
The crease where the vehicle seat back and seat
bottom meet.

8 Additional
Information
There are two different types of vehicle seat belts that can be used with this car seat:
Lap Belt Only
2 connection points.
Lap/Shoulder Belt
3 connections points. Can be used in
all car seats modes of use.
The following types of vehicle seat belts be used safely with this car seat: CANNOT
Lap Belt with Motorized
Shoulder Belt Lap Belt or Shoulder
Belt Mounted on Door Belts Forward of the
Seat Bight

80
8 Additional
Information
Lap/Shoulder Belt Installation - Rear-Facing/Forward Facing Modes
S
R

8 Additional
Information

8 Additional
Information
A latchplate that holds the lap belt snug
after it has been adjusted; contains a metal
bar on the underside of the hardware that
“locks” the belt in position.
When installing the car seat, route the
vehicle seat belt through the proper belt
path and buckle it in. Then, pull upwards
on the shoulder belt so that the lap belt gets
tight around the car seat.
Grab the sides of the seat at the belt path and
slide the seat side-to-side and front-to-back.
The seat should not move more than 1”
(2.5 cm).

8 Additional
Information

8 Additional
Information

8 Additional
Information
Always review your vehicle owner’s manual for specific information about your
vehicle seat belts.
Slowly pull the lap belt all the way out.

9 Care
&
Cleaning
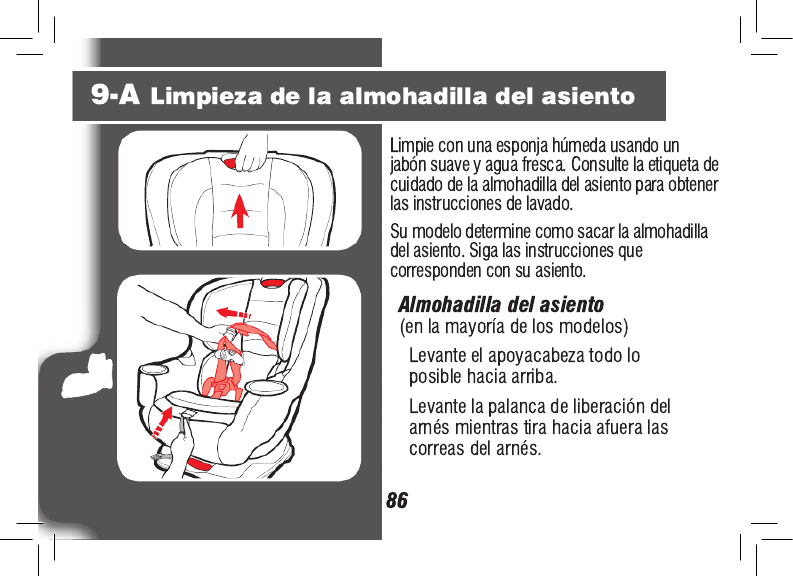
9-A
Cleaning Seat Pad
Clean with a damp sponge using mild soap
and cool water. Refer to seat pad care tag for
washing instructions.
Your model determines how to remove the
seat pad. Follow the instructions that match
your seat.
Raise the headrest all the way up.
Lift up on the harness release lever while
pulling out on the harness straps.
(on most models)

87
9 Care &
Cleaning
Unbuckle the chest clip and the buckle
strap.
Face the rear of the seat and remove the
belt straps from splitter plate as shown.

88
9 Care
&
Cleaning
Grab hold of the shoulder straps and pull
them out of their slots on the seat pad.
From the back of the seat, undo the elastic
straps and plastic hooks.
Undo both plastic hooks from the front of
the seat.

89
9 Care &
Cleaning
Remove pad from shell.
Machine wash pad in cold water on
delicate cycle and drip-dry. DO NOT
USE BLEACH.
To put the seat pad back on, reverse
preceding steps. Make sure that you
rethread the harness straps OVER
THE METAL BAR. The harness straps
MUST not be twisted.

90
9 Care
&
Cleaning
Head Support Cover
Undo elastic loop underneath head
support cover. Pull tab out from
behind head support.
Undo the elastic loops on the sides of
the headrest.
Peel cover off head support.
Machine wash pad in cold water on
delicate cycle and drip-dry. DO NOT
USE BLEACH.
To put the head support cover back
on, reverse preceding steps.

91
9 Care &
Cleaning
9-B Cleaning Crotch Buckle
WARNING! Inspect and clean
buckle from time to time to
remove any objects or debris that
could prevent latching.
Recline the car seat and locate the metal
retainer. Rotate the metal retainer up through
the shell and pad. From the front, pull the
crotch buckle out.
To clean buckle, place in a cup of warm water
and gently agitate the buckle. Press the red
button several times while in the water.
DO NOT SUBMERGE THE BUCKLE
STRAP. DO NOT USE SOAPS, HOUSEHOLD
DETERGENTS or LUBRICANTS.
Shake out excess water and allow to air dry.
Repeat steps as needed until it fastens with a
click. Re-insert the buckle into the same slot
it was removed. Pull up on crotch buckle to
make sure it is secured.
92
9 Care
&
Cleaning
9-C Cleaning Harness and LATCH
Straps
Surface wash only with mild soap and damp cloth. DO NOT IMMERSE
THE HARNESS STRAPS or LATCH STRAP IN WATER Doing so may
weaken the straps. If harness straps or LATCH belt are frayed or heavily
soiled, contact Customer Service at www.gracobaby.com or
1-800-345-4109.

93
Notes:

94
Notes:

95
Notes:

96
To purchase parts or accessories in the United States, please contact us at the following:
www.gracobaby.com
or
1-800-345-4109
Replacement Parts
Store instruction manual behind the tab with
the instruction book icon as shown.

Sequel
™65
ASIENTO DE AUTOMÓVIL CONVERTIBLE


1 Importante

1 Importante

1 Importante

1 Importante

1 Importante
DEBE
continúa en la página siguiente

1 Importante
11
Altura del arnés, orientado hacia adelante (A)
Las correas del arnés al nivel de o apenas
por arriba de los hombros del niño. Parte
superior de las orejas del niño por debajo de la
parte superior del apoyacabeza . Revise la (B)
sección 5.
Posición de la hebilla (C)
La correa de la entrepierna debe estar en la
ranura más delantera cuando esté orientado
hacia adelante.
Tensión del arnés (D)
Si los dedos pueden deslizarse de las correas
del arnés sin apretar las correas, está
tensionado lo suficiente. Revise la sección 5.
Para orientado hacia adelante, usted necesita ajustar:
A
C
B
D

1 Importante
12
El asiento de automóvil no se
mueve más de 1 pulgada (2.5 cm)
en la vía del cinturón (A)
Revise la sección 3
Verifique el indicador del nivel (B)
Revise la sección 3
Las correas del arnés al nivel de o
apenas por debajo de los hombros
del niño (C)
Revise la sección 5
Presilla del pecho al nivel de las
axilas (D)
Revise la sección 5
No puede apretar las correas del
arnés al nivel de los hombros (E)
Revise la sección 5
Instalación orientado hacia atrás
B
A
D E
C

1 Importante
Utilice la correa de sujeción
superior cuando lo use orientado
hacia adelante (A) Cuando la use
correctamente, la sujeción superior ayuda
a reducir las lesiones en un accidente o al
parar repentinamente.
Revise la sección 4.
El asiento de automóvil no se mueve
más de 1 pulgada (2.5 cm) en la vía del
cinturón (B)
Revise la sección 4
Las correas del arnés al nivel de o
apenas por debajo de los hombros
del niño (C)
Revise la sección 5
Presilla del pecho al nivel de las
axilas del niño (D)
Revise la sección 5
No puede apretar las correas del
arnés al nivel de los hombros (E)
Revise la sección 5

1 Importante
14
1-B ¡Bienvenido a la familia Graco!
La seguridad de su niño depende de usted. Ningún asiento de automóvil
garantiza la protección contra lesiones en toda situación, pero su utilización
correcta ayuda a reducir el riesgo de lesiones serias o la muerte.
Aunque parezca fácil determinar cómo usar este asiento de automóvil
por su cuenta, debe seguir las instrucciones detalladas en este manual
de instrucciones para asegurar que los pasos que siguen se cumplan
correctamente.

1 Importante
15
1-C Modo correcto de uso
Nota:
Bebés prematuros o de bajo peso al nacer podrían correr peligro adicional en un vehículo
o aeronave. Según la Academia Americana de Pediatría, estos bebés podrían sufrir dificultades
respiratorias si se recuestan de forma incorrecta en un asiento de automóvil. Cuando instala el
asiento orientado hacia atrás, use la edad corregida para prematuros. Graco aconseja que pida
a su médico o al personal del hospital que examinen a su bebé y que le recomienden el asiento
de automóvil adecuado o una cama para automóviles antes de que usted y su bebé salgan del
hospital.
4 libras
(1.8 kg) 22 libras
(10 kg) 40 libras
(18 kg) 65 libras
(30 kg)
Orientado hacia atrás con arnés de 5 puntos
4 a 22 libras (1.8 a 10 kg) y menos de 1 año estar DEBE
orientado hacia atrás.
22 a 40 libras (10 a 18 kg) estar orientado hacia PUEDE
atrás.
Orientado hacia adelante con arnés de 5 puntos
22 a 40 libras (10 a 18 kg) y puede sentirse verticalmente sin ayuda PUEDE
estar orientado hacia adelante.
40 a 65 libras (18 a 30 kg) estar orientados hacia adelante.DEBE

1 Importante
16
1-D Antes de empezar
Por favor, llene la tarjeta de registro con franqueo prepagado sujetada al arnés y
envíela hoy mismo por correo o regístrese en línea en www.gracobaby.com/
carseatregistration.
Los sistemas de seguridad para niños pueden ser retirados del mercado por
problemas de seguridad. Debe registrar este sistema para que lo podamos
contactar en dicho caso. Envíe su nombre, dirección y el número del modelo
del sistema de seguridad y la fecha de fabricación a:
Graco Children’s Products, Inc.
Attn: Customer Service
P.O. Box 169, Elverson, PA 19520-9901
o llame al 1-800-345-4109
o inscríbase en línea en www.gracobaby.com/carseatregistration
Para obtener información sobre el retiro del mercado, llame a la línea gratuita
de información de seguridad del vehículo automotor del Gobierno de EE.UU. al
1-888-327-4236 (TTY: 1-800-424-9153) o visite http://www.NHTSA.gov.
Registre este sistema de seguridad para niños
continúa en la página siguiente

1 Importante
17
Nombre del modelo ___________________
Número de modelo ____________________
Fecha de fabricación __________________
Fecha de compra _____________________
Como referencia futura o si cambia de dirección, anote el nombre del modelo, número
del modelo, fecha de fabricación y fecha de compra de este asiento de automóvil en el
lugar que sigue. Puede encontrar esta información en la tarjeta de registro si todavía la
tiene o en la etiqueta con la fecha ubicada en el respaldo del asiento de automóvil.
En los EE.UU., por favor, comuníquese con nuestro Departamento de Servicio al Cliente
con cualquier pregunta que pudiera tener sobre piezas, uso o mantenimiento. Cuando
se comunica con nosotros, por favor tenga listo el número de modelo y la fecha de
fabricación para que lo podamos ayudar más eficientemente. Estos números pueden
encontrarse en una etiqueta ubicada en el respaldo de su asiento de automóvil.
Para recursos adicionales o para que un técnico en seguridad de pasajeros infantiles
inspeccione su asiento, por favor visite los siguientes sitios Web:
www.nhtsa.gov • www.seatcheck.org • www.safekids.org
Si necesita ayuda

1 Importante
18
DEJE de usar este asiento de automóvil y tírelo 10 años después de la fecha de
fabricación. Busque la etiqueta en el respaldo del asiento de automóvil.
Graco Children’s Products Inc. aconseja no prestar ni transferir un asiento de automóvil
a menos que usted conozca la historia completa del producto. Tampoco aconsejamos la
compra de un asiento de automóvil de segunda mano.
Este sistema de seguridad para niños cumple con o excede todos los requisitos aplicables
de la Norma Federal 213 de Seguridad de Automóviles para uso en automóviles.
Este sistema de seguridad para niños ha sido certificado para el uso en
aeronaves. Úselo solamente en un asiento de la aeronave orientado hacia
adelante. Siga las instrucciones de instalación en un vehículo. Para la instalación
orientada hacia atrás, vea las secciones 3-C y 8-D Instalación de cinturón de
seguridad para la falda. Para la instalación orientada hacia adelante, vea las
secciones 4-C y 8-D Instalación de cinturón de seguridad para la falda, pero no
use el anclaje superior. Consulte a la aerolínea sobre sus políticas específicas.
Certificación
Vida útil del asiento de automóvil
Proteja el asiento del vehículo. Use una alfombrilla, una toalla o una manta fina debajo y
detrás del asiento de automóvil.
Protección del asiento del vehículo

1 Importante
¡ADVERTENCIA!

1 Importante
20
! NUNCA PONGA ESTE SISTEMA DE SEGURIDAD PARA NIÑOS
ORIENTADO HACIA ATRÁS EN UN LUGAR DEL ASIENTO DEL VEHÍCULO
EQUIPADO CON UNA BOLSA DE AIRE DELANTERA ACTIVA.
Si la bolsa de aire se infla, puede golpear al niño y al asiento de automóvil con
mucha fuerza y causar lesiones serias o la muerte de su niño.
! Consulte el manual del dueño de su vehículo para obtener más
información sobre las bolsas de aire y el uso de un asiento de automóvil.
! Si su vehículo no tiene un asiento trasero, consulte el manual del
dueño de su vehículo.
continúa en la página siguiente

1 Importante
21
! La Academia Norteamericana de Pediatras (AAP por sus siglas en inglés) y
la Administración Nacional de Seguridad en Carreteras (NHTSA por sus siglas
en inglés) recomiendan que los niños viajen orientados hacia atrás hasta
los 2 años o hasta que alcancen la altura o el peso máximo para sentarse
orientados hacia atrás que corresponden con su asiento, y que cuando se
sienten orientados hacia adelante, los niños deben usar el sistema del arnés
incorporado siempre que sea posible hasta que alcancen la altura o el peso
máximo para sentarse orientados hacia adelante que corresponden con su
asiento de automóvil.
! Elija el modo de empleo correcto para el asiento de automóvil de acuerdo
al tamaño de su niño. Los niños que pesan menos de 22 libras (10 kg)
DEBEN usar este asiento de automóvil orientado hacia atrás.
! Elija el lugar adecuado para el asiento de automóvil en su vehículo.
! Sujete el asiento de automóvil con el cinturón de seguridad del vehículo o
el sistema LATCH que se ha colocado correctamente según las indicaciones
en este manual.
! El sistema de cinturones de seguridad del vehículo DEBE sujetar
firmemente el asiento de automóvil. No todos los cinturones de seguridad
de todos los vehículos se pueden utilizar con un asiento de automóvil.

1 Importante
22
! Si el cinturón de seguridad del vehículo no sujeta firmemente el asiento de
automóvil, lea la sección 8-D “Cinturones de seguridad del vehículo” y el
manual del propietario de su vehículo.
! Sujete siempre el asiento de automóvil con el sistema LATCH o el cinturón
de seguridad del vehículo, incluso cuando esté desocupado. En un accidente,
un asiento de automóvil sin sujetar puede lastimar a los pasajeros.
! Se debe reemplazar el asiento de automóvil tras haber sido sometido a un
accidente. ¡NO lo use de nuevo! Un accidente podría causar daños ocultos y
su uso después podría causar lesiones serias o la muerte.
! NO use el asiento de automóvil si ha resultado dañado o si faltan piezas.
! NO use accesorios o piezas de repuesto que no sean los que son provistos
por Graco. Su uso podría alterar el rendimiento del asiento de automóvil.
! NO retire el sistema LATCH del asiento de automóvil. Si usa el cinturón de
seguridad del vehículo para sujetar el asiento de automóvil, debe almacenar
los conectores del sistema LATCH.
! Nunca deje al niño sin atender, inclusive cuando duerme. El niño podría
enredarse en las correas del arnés y estrangularse o asfixiarse.

1 Importante
23
! El asiento de automóvil orientado hacia atrás debe nivelarse
correctamente:
• Una posición demasiado reclinada podría causar lesiones o la
eyección del asiento.
• Una posición demasiado vertical podría causar dificultad
respiratoria.
! No conecte nunca dos conectores del sistema LATCH a un punto de
anclaje inferior del vehículo a menos que el fabricante del vehículo lo
especifique.
! No use ambos el cinturón de seguridad del vehículo y los cinturones del
LATCH al mismo tiempo cuando usa el asiento de automóvil orientado hacia
atrás o adelante.

24
2 Características
2-A
Características del asiento de automóvil
A
B
E
F
C
G
H
I
D

25
2 Características
A Palanca de ajuste de la altura
B Apoyacabeza
C Funda del arnés
D Apoyavasos
E Correa de ajuste del arnés
F Presilla del pecho
G Hebilla del arnés
H Palanca de liberación del arnés
(debajo de la almohadilla del asiento)
I Manija de reclinación de la base

26
2 Características
A
E
B
D
C
F
G
A
B
C
D
E
F

27
2 Características
A Almacenamiento de la sujeción
B Gancho de sujeción
C Correa de sujeción
D Almacenamiento del LATCH
E Correa del LATCH
F Ajustador del LATCH
G Apoyavasos
H Indicador del nivel
H

28
2 Características
AG
F
B
C
D
E

29
2 Características
A Correa de sujeción
B Correas del arnés
C Barras de almacenamiento del LATCH
D Placa divisoria
E Almacenamiento del manual de
instrucciones
F Barra de almacenamiento de la
sujeción
G Gancho de sujeción

3 Orientado
hacia atrás
30
3-A Orientado hacia atrás
Orientado hacia atrás:
4 a 40 libras (1.8 a 18 kg)
• Los bebés de peso inferior a 22 libras (10 kg) DEBEN
estar orientados hacia atrás.
• Ponga el asiento de automóvil orientado hacia atrás en
el asiento trasero del vehículo.
• Asegúrese de que la correa del LATCH o cinturón de
seguridad del vehículo pase por la vía del cinturón
orientada hacia atrás marcada con una etiqueta azul.
• Instale este asiento de automóvil apretadamente en
su vehículo. El asiento de automóvil no debería
moverse en la vía del cinturón más de 1 pulgada
(2.5 cm) de un lado a otro, o de adelante hacia atrás.
• Verifique el nivel de reclinación asegurándose que la
burbuja esté en el área azul.
Correa del LATCH

3 Orientado
hacia atrás
31
Cinturón de seguridad del
vehículo para la falda
¡ADVERTENCIA
NUNCA use el sistema de
seguridad para niños orientado
hacia atrás en un asiento del
vehículo equipado con bolsa de
aire delantera activa.
• Las correas del arnés necesitan estar parejas o
apenas por debajo de la parte de arriba de los
hombros del niño y la presilla del pecho al nivel de
las axilas.
La AAP y la NHTSA recomiendan que
los niños viajen orientados hacia atrás
hasta los 2 años o hasta que alcancen
la altura o el peso máximo para sentarse
orientados hacia atrás que corresponden
con su asiento de automóvil. Este asiento
de automóvil puede permanecer orientado
hacia atrás hasta las 40 libras (18 kg).
Cinturón de seguridad del vehículo
para la falda y el hombro

3 Orientado
hacia atrás
32
Leer el indicador del nivel,
- Si la burbuja está totalmente en el azul claro, el
sistema de seguridad está nivelado para recién
nacidos.
- Si la burbuja está entre el azul claro y
oscuro, el sistema de seguridad está
nivelado para niños de 3 meses de edad y
mayores.
- Si la burbuja aparece en , el sistema de ROJO
seguridad para niños está nivelado. Debe NO
ajustar su posición de reclinación.
El vehículo estar en piso nivelado. DEBE
Use la edad corregida para bebés prematuros.

3 Orientado
hacia atrás
33
3-B Instalar orientado hacia atrás
con las correas del LATCH
1. Almacene la correa de sujeción
superior
Conecte el gancho de sujeción a la
parte trasera del asiento como se indica.
2. Saque la correa del LATCH del
lugar de almacenamiento
Empuje los botones rojos en los
conectores del LATCH y sáquelos de la
posición de almacenamiento.
continúa en la página siguiente
Consulte el manual del propietario de su vehículo para obtener el lugar y uso del LATCH.

3 Orientado
hacia atrás
34
3. Asegúrese que la correa del LATCH
esté en la vía del cinturón orientada
hacia atrás marcada con una
etiqueta azul
Caso contrario, consulte la sección 7 para
mover la correa del LATCH.
4. Recline el asiento de automóvil
Tire de la manija del frente del sistema
de seguridad para niños y ajústelo
en una de las 3 posiciones orientado
hacia atrás.
6
5
Forward Facing
2
1
Rear Facing
4
3
PD3494 26A

3 Orientado
hacia atrás
35
5. Ponga el asiento de automóvil
orientado hacia atrás en el
asiento trasero del vehículo

3 Orientado
hacia atrás

3 Orientado
hacia atrás
¡CLIC!

3 Orientado
hacia atrás

3 Orientado
hacia atrás

3 Orientado
hacia atrás

3 Orientado
hacia atrás

3 Orientado
hacia atrás

3 Orientado
hacia atrás

3 Orientado
hacia atrás

3 Orientado
hacia atrás

3 Orientado
hacia atrás

3 Orientado
hacia atrás

4 Orientado
hacia adelante

4 Orientado
hacia adelante

4 Orientado
hacia adelante

4 Orientado
hacia adelante

4 Orientado
hacia adelante
¡CLIC!

4 Orientado
hacia adelante

4 Orientado
hacia adelante

4 Orientado
hacia adelante

4 Orientado
hacia adelante

4 Orientado
hacia adelante

4 Orientado
hacia adelante

4 Orientado
hacia adelante

4 Orientado
hacia adelante

4 Orientado
hacia adelante

5 Asegurar
al niño
¡ADVERTENCIA!

5 Asegurar
al niño

5 Asegurar
al niño

5 Asegurar
al niño

5 Asegurar
al niño

5 Asegurar
al niño

5 Asegurar
al niño

5 Asegurar
al niño

6 Accesorios

7 Mover
el LATCH


7 Mover
el LATCH

8 Información
adicional

8 Información
adicional

8 Información
adicional

8 Información
adicional

8 Información
adicional

8 Información
adicional

8 Información
adicional

8 Información
adicional

8 Información
adicional
Una placa de seguridad que se desliza con
libertad en la correa del cinturón y no puede, por
su cuenta, mantener el cinturón apretado contra
un asiento de automóvil.
Tire lentamente el cinturón de seguridad
del vehículo para el hombro todo lo
posible hacia afuera.
Pase el cinturón de
seguridad del vehículo por la vía apropiada
del cinturón y trábelo. Luego, a medida que
tira el cinturón de seguridad del vehículo para
ajustarlo, ponga el resto de la correa en el
retractor.
Agarre los costados del asiento a la vía de
la correa y deslice el asiento de lado a lado
y de adelante hacia atrás. El asiento no debe
moverse más de 1 pulgada (2.5 cm).

8 Información
adicional
9 Cuidado y
limpieza

9 Cuidado y
limpieza

9 Cuidado y
limpieza

9 Cuidado y
limpieza

9 Cuidado y
limpieza
Deshaga el nudo elástico debajo de la
funda del soporte de la cabeza.
Deshaga los nudos elásticos de los
costados del apoyacabeza.
Saque la funda del soporte de la
cabeza.
Lave la almohadilla a máquina
en agua fría en el ciclo delicado
y séquela al aire. NO USE
BLANQUEADOR.
Para volver a poner la funda del
soporte de la cabeza, invierta los
pasos anteriores.

91
9 Cuidado y
limpieza
9-B Limpieza de la hebilla de la entrepierna
¡ADVERTENCIA! Inspeccione y
limpie la hebilla de vez en cuando
para eliminar cualquier objeto o
desecho que pudiera prevenir que
se trabe.
Recline el asiento de automóvil y busque el
retén de metal. Gire el retén de metal hacia
arriba por el armazón y la almohadilla. Desde
adelante, tire la hebilla de la entrepierna hacia
afuera.
Para limpiar la hebilla, póngala en una taza
de agua tibia y agite suavemente la hebilla.
Oprima el botón rojo varias veces mientras
está en el agua.
NO SUMERJA LA CORREA DE LA HEBILLA.
NO USE JABONES, DETERGENTES DE USO
DOMÉSTICO ni LUBRICANTES.
Elimine el exceso de agua y deje secar al aire.
Repita los pasos lo necesario hasta que se
trabe con un clic. Vuelva a poner la hebilla
en la misma ranura de que la sacó. Tire de la
hebilla de la entrepierna para asegurarse de
que esté bien instalada.

92
9 Cuidado y
limpieza
9-C Limpieza del arnés y de las
correas del LATCH
Lave la superficie solamente con un jabón suave y un paño húmedo.
NO
SUMERJA LAS CORREAS DEL ARNÉS o LA CORREA DEL LATCH EN
AGUA.
Hacerlo podría debilitar las correas. Si las correas del arnés o cinturón
del LATCH están deshilachados o muy sucios, comuníquese con Servicio al
cliente en www.gracobaby.com o al 1-800-345-4109.

94
Notas:
Termékspecifikációk
| Márka: | Graco |
| Kategória: | autósülés |
| Modell: | Sequel 65 |
Szüksége van segítségre?
Ha segítségre van szüksége Graco Sequel 65, tegyen fel kérdést alább, és más felhasználók válaszolnak Önnek
Útmutatók autósülés Graco

15 Január 2025
27 Augusztus 2024
22 Augusztus 2024
19 Augusztus 2024
14 Augusztus 2024
13 Augusztus 2024
13 Augusztus 2024
13 Augusztus 2024
12 Augusztus 2024
12 Augusztus 2024
Útmutatók autósülés
- autósülés Dometic
- autósülés Ultimate Speed
- autósülés Storchenmuhle
- autósülés Sena
- autósülés Cybex
- autósülés Be Cool
- autósülés Joie
- autósülés Bugaboo
- autósülés Hauck
- autósülés Britax-Römer
- autósülés Peg Perego
- autósülés Nania
- autósülés Kindercraft
- autósülés Chicco
- autósülés Evenflo
- autósülés Lionelo
- autósülés Fisher Price
- autósülés Maxi-Cosi
- autósülés Stokke
- autósülés Jane
- autósülés Lorelli
- autósülés BeSafe
- autósülés Concord
- autósülés Inglesina
- autósülés Bebe Confort
- autósülés Chipolino
- autósülés Joolz
- autósülés Kinderkraft
- autósülés Mountain Buggy
- autósülés Foppapedretti
- autósülés Recaro
- autósülés Brevi
- autósülés InfaSecure
- autósülés Xomax
- autósülés GB
- autósülés ABC Design
- autósülés Britax
- autósülés Nuna
- autósülés Osann
- autósülés Plebani
- autósülés Safety 1st
- autósülés Baninni
- autósülés Clek
- autósülés Hema
- autósülés Silver Cross
- autósülés X-Adventure
- autósülés Phil And Teds
- autósülés Baby Jogger
- autósülés Kiddy
- autósülés Bertoni
- autósülés BabyGO
- autósülés Xadventure
- autósülés Uppababy
- autósülés Giordani
- autósülés Romer
- autósülés Cosatto
- autósülés Heyner
- autósülés Migo
- autósülés Bellelli
- autósülés Burigotto
- autósülés Ellermeyer
- autósülés Disney
- autósülés Axkid
- autósülés Gesslein
- autósülés Takata
- autósülés Renolux
- autósülés Caretero
- autósülés Avova
- autósülés Cangaroo
- autósülés Beemoo
- autósülés Klippan
- autósülés Quax
- autósülés Kikka Boo
- autósülés Hipod
- autósülés Walser
- autósülés Baby Trend
- autósülés Casualplay
- autósülés Kiwy
- autósülés Dreambee
- autósülés Hamron
- autósülés Apramo
- autósülés Mothers Choice
- autósülés Petex
Legújabb útmutatók autósülés

2 Április 2025
2 Április 2025
1 Április 2025
15 Január 2025
15 Január 2025
12 Január 2025
12 Január 2025
12 Január 2025
11 Január 2025
11 Január 2025