Használati útmutató GoClever TAB R73
Olvassa el alább 📖 a magyar nyelvű használati útmutatót GoClever TAB R73 (63 oldal) a Tablet pc kategóriában. Ezt az útmutatót 5 ember találta hasznosnak és 2 felhasználó értékelte átlagosan 4.5 csillagra
Oldal 1/63

GoClever TAB R73
USER’S MANUAL
INSTRUKCJA OBSŁUGI
www.goclever.com

2
Declaration of Conformity
Hereby GOCLEVER Technology declares that the product complies with the essential
requirements and other provisions of Directive 199/5/WE.
Environmental Protection
The device is subject to the WEEE Directive 2002/96/EC. The symbol next to mean that the
product must be disposed of separately and should be shipped to the appropriate collector.
This allows you to limit pollution and the impact on human health.
Also like to inform that our company has the obligations under the Act on waste electronic
equipment, including in his collection, treatment, recovery and recycling is supported by
KARAT ELECTRO-RECYCLING Ltd. If you have any questions or concerns you can contact
Karat call 056-623-80-91.
Responsibility
GOCLEVER Technology Company nor any of its licensors shall not be liable for any loss of
data or profits, as well as for any other consequential or indirect damages resulting from the
use of equipment brand, in any case and the maximum permitted by law. GOCLEVER
Technology is not responsible for any problems related to the malfunctioning of the operating
system and applications operating under its control.
Changes
GOCLEVER Technology reserves the right to revise this document and the specifications of
the device, without notice to you. These features and images may vary depending on the
services offered by the operator and software version of the device.
Before using
Remember that the battery is not charged. Opening or attempt to disassemble the outer
casing of the device will void the warranty.
Google is a registered trademark, and Google Maps is a trademark of Google Inc.. in the
United States and other countries. YouTube is a trademark of Google Inc..
GOCLEVER Technology Company is not liable for technical or editorial errors or for
omissions contained herein is not responsible for incidental or consequential damages
resulting from furnishing this material.
Information is presented in such a state in which you adopt them, and are not covered by any
warranty. Subject to change without notice. GOCLEVER Technology Company reserves the
right to change the contents of this document without prior notice. The manual describes
basic functions of the device.
Security
Please refer to these guidelines. Failure to comply with them may cause danger to life or
health or may be illegal. For further information, please read the entire
podręcznikiem.Urządzenie was designed to operate from battery and mains supply with the
charger. Using the device in a different way can be dangerous and will void the warranty.
Charging Battery
The unit should be connected only to a power source in accordance with the parameters set
out in the specification. In case of doubt as to the type of power source required, consult an
authorized service provider or local power company. If the product is powered from a battery
or other sources, follow the instructions supplied with the product.
The impact of external factors and the electromagnetic field
The device is not waterproof. Make sure that it was always dry, protect from moisture. The
device also must be protected against high and low temperatures, dust, sand, do not expose

3
it to shock, throw, as this may damage it or its components.
• Do not use the device in a damp and very high or low temperatures.
• Do not leave the device in the vehicle or in places where temperatures exceed 50
degrees Celsius.
• Do not use the equipment on board aircraft and in areas where it is not allowed to
use equipment that may emit an electromagnetic field for example a hospital,
petrol station, a warehouse of explosives violations of these rules may result in
fire or explosion.
• Do not use the device while driving.
• Do not use the device near strong electromagnetic sources, such as microwave
ovens, sound speakers, TV and radio.
• Use only original manufacturer-approved accessories, or accessories that do not
contain metals.
Service and Repair
For repair use the authorized service and qualified staff, any attempt to repair
yourself, or by unauthorized service will void the warranty.

4
Safety Precautions
Do not subject the device to severe impact or drop it from heights.
Do not use the device in extreme hot or cold, dusty or damp conditions. Do not
expose it to direct sunlight.
Avoid using the device near strong magnetic fields.
Normal functioning of the product may be disturbed by ESD. If so, simply reset
and restart the device following the instruction manual. During file transmission,
please handle with care and operate in a static-free environment.
Keep the device away from water and other liquids. In the event that water or
other liquids enter the device, power off the product immediately and clean the
device.
Do not use chemicals to clean the device in order to avoid corrosion. Clean it
with a dry cloth.
Do not install this equipment in a confined space such as a book case or similar
unit. The ventilation should not be impeded by covering the ventilation openings
with items such as newspaper, table-cloths, curtains etc.
No naked flame sources, such as lighted candles, should be placed on the
apparatus.
Attention should be drawn to environmental aspects of battery disposal.
Use the apparatus in moderate climates.
We are not responsible for damage or lost data caused by malfunction, misuse,
modification of the device or battery replacement.
Do not attempt to disassemble, repair or modify the product. This will invalidate
the warranty.
If the device will not be used for an extended period of time, please charge the
battery at least once per month to maintain battery life.
Charge the battery if:
a) The battery level icon displays (An empty battery)
b) The device powers off automatically when restarted.
c) There is no response when pressing keys with keys unlocked and battery full.
Do not interrupt the connection when the device is being formatted or
transferring files. Otherwise, data may be corrupted or lost.
When the device is used as a portable HD, please use only per the instructions.
Otherwise, permanent data loss could occur.
Please use and install data using the attachments/accessories provided and only
according to the manufacturer’s instruction.
Please refer to the information on the bottom of the device for electrical and
safety information before installing data or operating the device.
To reduce the risk of fire or electric shock, do not expose this device to rain or
moisture. The device should not be exposed to dripping or splashing. Never
place objects filled with liquids, such as vases, on the device.
There is danger of explosion if the battery is replaced incorrectly. Replace only
5
with the same or equivalent type.
The battery (battery or batteries or battery pack) should not be exposed to
excessive heat such as sunlight, fire or the like.
Please follow responsible procedures for battery disposal.
If the power adaptor disconnected from the device, the device will remain
operable as long as the battery has sufficient charge.
The power adaptor is a CLASS II apparatus with double insulation, and no
external ground is provided.
Safety symbol explanation:
- The lightning flash with arrowhead symbol within an equilateral triangle is
intended to alert the user to the presence of non-insulated “dangerous
voltage” within the product’s enclosure that may be of sufficient magnitude
to constitute a risk of electric shock.
- To reduce the risk of electric shock, do not remove the cover (or back) as
there are no user-serviceable parts inside. Refer servicing to qualified
personnel.
- The exclamation point within an equilateral triangle is intended to alert the
user to the presence of important operating and maintenance instructions
in the literature accompanying the device.
- Correct Disposal of this product. This marking indicates that this
product should not be disposed of with other household waste in the EU. To
prevent possible harm to the environment or human health from
uncontrolled waste disposal, recycle it responsibly to promote the
sustainable reuse of material resources. To dispose of your used device,
please use the return and collection systems available in your area or
contact the retailer where the product was purchased. They can take this
product for safe environmental recycling.
This equipment should be installed and operated with minimum distance 20cm
between the radiator and your body.
CE in which countries where the product may be used freely: Germany, UK, Italy
, Spain, Belgium, Netherlands, Portugal, Greece, Ireland, Denmark, Luxembourg
, Austria, Finland, Sweden, Norway and Iceland. In France, except the channel
10 through 13, law prohibits the use of other channels.

6
Listening Cautions
This product respects the current regulations for limiting the output volume of
consumer audio devices to a safe level. By listening to your device with
headphones or earbuds at high volumes, you run the risk of permanent damage
to your ears. Even if you get used to listening at high volumes and it seems
normal to you, you still risk the possibility of damaging your hearing. Reduce the
volume of your device to a reasonable level to avoid permanent hearing damage.
If you hear ringing in your ears, reduce the volume or shut off your device. This
device has been tested with the supplied earphones. In order to preserve your
hearing, it is advised that you use only the following headphone models: the
earphones supplied with your device, or any other headphones that respect the
current regulations. Other types of headphones may produce higher volume
levels.(At full power ,the prolonged listening of the walkman can damage the ear
of the use)
Maximum output voltage<=150mv
Do not use while operating a motorized vehicle. It may create a traffic hazard
and is illegal in many areas.
You should use extreme caution or temporarily discontinue use in potentially
hazardous situations created by obstructed hearing.
Even if your headphones or earphones are the open-air type designed to let you
hear outside sounds, don’t turn up the volume so high that you can’t hear what’s
around you.
Sound can be deceiving. Over time your hearing “comfort level” adapts to higher
volumes of sound. What sounds “normal” can actually be loud and harmful to
your hearing. Guard against this by setting the volume of your device at a safe
level BEFORE your hearing adapts.
To establish a safe volume level:
a. Start your volume control at a low setting.
b. Slowly increase the sound until you can hear it comfortably and clearly,
and without distortion. Once you have established a comfortable sound
level, leave it there.
This manual may not reflect your actual device’s operation. All information is subject to change
without prior notification. Please follow your actual device’s operational procedures.
7
Table of Content
Safety Precautions............................................................................................ 4
Listening Cautions ............................................................................................ 6
Feature Summary ............................................................................................. 8
Accessories ...................................................................................................... 8
Buttons & Ports ................................................................................................. 8
Charging Battery ............................................................................................... 9
Transferring Files .............................................................................................. 9
Turning On/Off ................................................................................................ 10
Home Screen.................................................................................................. 10
Unlocking the Screen ...................................................................................... 12
Touch Screen & Buttons Usage ...................................................................... 12
Accessing Internet .......................................................................................... 13
Reading E-Books ............................................................................................ 15
Playing Music ................................................................................................. 17
Playing Video .................................................................................................. 19
Viewing Photos ............................................................................................... 20
Exploring Files ................................................................................................ 22
Sending/Receiving E-mails ............................................................................. 25
Reading Office Document ............................................................................... 27
Voice Recording ............................................................................................. 28
Camcorder/Camera ........................................................................................ 29
HDMI Output................................................................................................... 29
Managing 3
rd
Party Applications ...................................................................... 29
Managing Tasks .............................................................................................. 30
System Settings .............................................................................................. 31
Troubleshooting .............................................................................................. 32
Specifications.................................................................................................. 32
FCC Statement ............................................................................................... 34

8
Feature Summary
Wi-Fi Connectivity
With the latest Wi-Fi technology, this device can connect you to the Internet wherever
you are.
7.0” Touch Screen
Touch or slide your finger on the screen, the screen responds instantly.
Third-party Application Support
With the built-in Android
TM
OS, you can install a large number of third-party
applications in this device.
Built-in G-sensor
The screen changes to landscape or portrait automatically when the device rotates.
Entertainment
You can enjoy music, movies, pictures and e-books with the Mobile Internet Tablet.
Office Document Reader
With the built-in OfficeSuite, you can read documents in Word, Excel, PPT etc.
Accessories
USB Cable
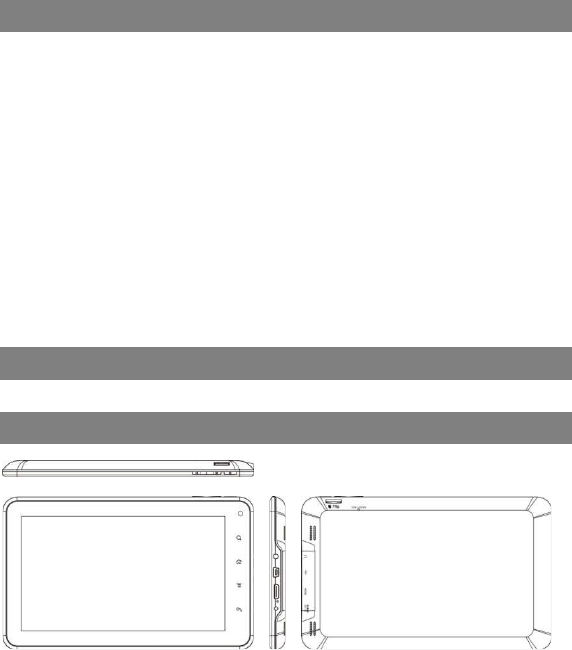
Buttons & Ports
Power Adaptor
Pouch
i. Menu – Display menu options.
j. ESC – Return
k. Earphone Port – connects to stereo
earphones.
l. USB Port – connects to a computer
through the USB cable.
m. HDMI Interface
n. Charge indicator
o. DC-IN port – connect to power adaptor
p. Reset Pin hole/built-in microphone
a. Memory card slot
b. Volume down
c. Volume up
d. Power Button – press and hold to
turn on or off the device; briefly press
to turn the screen on or off.
e. Touch Screen
f. Camera Lens
g. Search – Go to Google Search page
h. Home – Go to the Home Screen.
a
b
c
d
e
f
g
h
i
k
j
l
m
n
o
p
9
Charging Battery
The device has a built-in rechargeable battery. No extra battery installation is required.
Just charge the device when it indicates low battery.
To charge the battery, connect the device to any standard wall outlet via the DC-IN
port using the power adaptor. It takes about 5 hours to fully charge the battery. During
charging, the indicator lights up in red. When the battery is fully charged, the charge
indicator should light up in golden yellow.
Note:
a. You are strongly recommended to charge the battery immediately when the device indicates the
battery is lower than 15%!
b. Be sure to use the supplied power adaptor only!
c. You can operate the device even when it is being charged. But for extended battery life, it is suggested
NOT to use the device when it is charging.
d. It is recommended to charge the battery before you use the device for the first time.
e. For maximum performance, lithium-ion batteries need to be used often. If you don’t use the device
often, be sure to recharge the battery at least once per month.
Transferring Files
Before reading or playing files, you need to transfer media files from a computer to the
device.
(1) Connect the device to a computer with the supplied USB cable.
(2) Tap “Turn on USB storage” to connect the device to computer.
(3) Once connected, two removable disk drives will show on your computer. One
represents the internal memory of the device, and the other represents the
memory card inserted into the device. Now you can copy files from or to these disk
drives just as you would on your hard drive.
(4) As you complete file transfer, choose “Turn off USB storage” to disconnect the
device.
(5) Remove the device from the computer safely.
Note:
a. You can operate the device without removing the device from computer. During operation, you can
drag from the top bar downwards to check the USB connection status, and then choose “USB
Connected” to turn on the USB connection or choose “Turn off storage” to disconnect.
b. The pre-installed applications and Android OS occupy a considerable part of capacity – nearly more
than 1GB, it is normal that you see huge difference between available memory space and total
capacity.
Drag downwards

10
Turning On/Off
To turn on the device, press and hold the Power button on the unit until you see the
boot-up screen then release. It may take a few minutes to start up the system, please
wait before you proceed.
To turn off the device, press and hold the Power button until you see the option
“Power Off”, tap on “Power Off” and then tap on “OK”.
Tip: This device will sleep with the screen off if it stays inactive for a few seconds. You can briefly press the
Power button to turn on the screen and wake it up.
Home Screen
a
b
c
d
e
f
g
a. Quick Internet Search - You can input anything you wish you
search on the searching bar (required WIFI connection)
b. Current time
c. Weather forecast – worldwide cities (required Wi-Fi connection)
• You can change the city by tapping the weather forecast indicator.
d. Default shortcuts - Tap on an icon to open the corresponding
application. You can add or remove shortcuts, see “Customizing the
Home Screen” on the next page.
e. Shortcut to E-book Reader
f. Shortcut to Applications page
g. Shortcut to System Settings
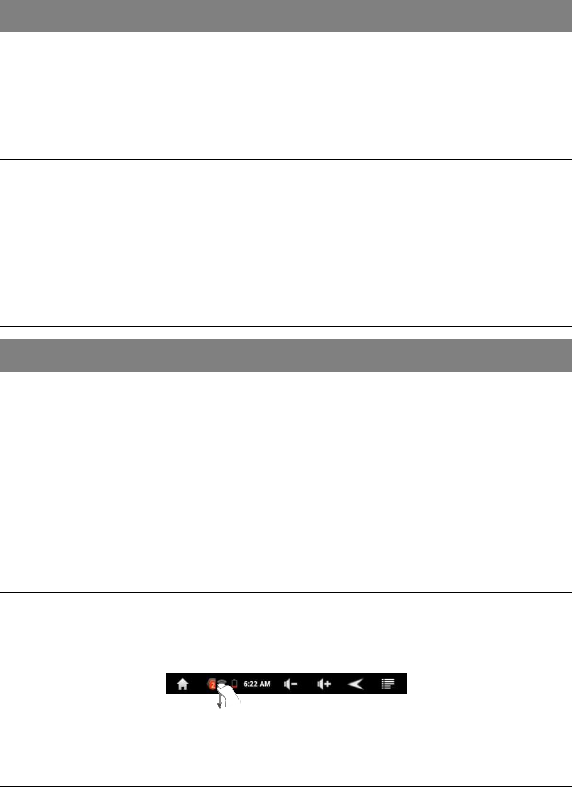
Go to Home
Screen
Drag the top bar downwards to
display the notification message
WiFi connection
Battery level
Time Return
Display
menu
options
Volume
down/up

11
The extended Home Screen
Slide your finger horizontally on the screen to go to the left or right panel of the extended
Home Screen.
Customizing the Home Screen
You can customize the Home Screen by adding/removing shortcuts and widgets,
changing the wallpaper.
To add a Home Screen item (shortcuts, widgets, folders etc.), tap on the Menu
icon and then select “Add” . You can also hold your finger on the screen
and then choose an item from the list.
You can add a folder onto the Home Screen by holding your finger on the screen
and then choose Folders New Folder. You can drag shortcuts or widgets to the
folder.
To rename the folder, a) tap to open the folder, b) hold your finger on the title bar
of the opened folder until the Rename window pops up, c) input folder name.
To move a Home Screen item, hold your finger onto it until it is highlighted, then
drag it to the desired location, and release it.
To remove a Home Screen item, hold your finger onto it until it is highlighted,
drag it to the recycle bin which turns from the E-book Reader / Applications /
Settings Tab, and then release your finger.
To change the wallpaper, from the Home Screen, tap on the Menu icon , a list
of options appears. Tap on “Wallpaper” and then choose a picture as the desktop
wallpaper.
To change the System Settings, from the Home Screen, tap on the Menu icon
, and then tap on “Settings” . Choose a category: “Wireless & Networks”,
“Sound & Display”, “Date & Time”, etc. For more information on the different
settings, see the System Settings section.
Weather Forecast Setting
You can choose a worldwide city you are interested in by tapping the weather
forcast indicator. Locate the city by selecting the
state where the city is and then selecting the city,
or inputing the city name directly in the “Search
City” filed.
You can change the default temperature unit by
checking or unchecking the “Use Celsius” option.

12
Applications Page
The device has many useful applications pre-installed. You can tap the Application
Tab to display them.
Tip: Holding your tap on an application icon can add a shortcut to the desktop (Home Screen).
Unlocking the Screen
The screen will lock itself after standing by for a few
seconds. You need to unlock the screen by dragging the
lock icon to the arrow direction before you continue
to use the device.
Note: Dragging the icon to the arrow direction will mute the sound.
Touch Screen & Buttons Usage
Main Touch Screen Actions
In different applications, you can go back one level in the interface by tapping on
the Back icon (in the top right corner of the screen).
Wherever you are in the interface, you can go back directly to the Home screen by
tapping on the Home icon (in the top left corner of the screen).
In different applications, you can tap the Menu icon to display menu options.
While playing a video or song, you can pause/resume it by tapping on the Pause
/ Play icon.
Other Touch Screen Actions
When watching a video or listening to music, you can tap on the
progression bar to go directly to a different location in the video
or song. You can also use your finger to drag the cursor in the
progression bar to another location in the video or song.
In different browsers (File, Music, Video, Photo, etc.), you can
hold your finger on the screen and then drag up and down to
scroll the file list up and down.
In some browsers (File, Music, Video, Photo, Web etc.), you
may hold your finger on an item to display options.

13
Accessing Internet
Your Internet Tablet features built-in Wi-Fi technology so that you can access the
internet over Wi-Fi network.
First of all, you need to configure a Wi-Fi network. For the Wi-Fi configuration
procedure to work, you need to be in a Wi-Fi zone that will allow you to connect to it.
Every time your Internet Tablet is in range of a network that you have already
configured once, it will attempt to make a connection.
Making WIFI Connection
(1) In the Home screen, tap on the WiFi icon.
(2) Tap on the “Wi-Fi” setting to turn on the Wi-Fi.
(3) Tap the “Wi-Fi settings”, your Internet Tablet will scan
automatically for available WiFi networks and display
them. The list of available networks shows all the
wireless networks in range of your device.
Note:
a) The available network list is constantly refreshed automatically.
b) When the Wi-Fi is enabled, your Internet Tablet will connect automatically to your configured networks
when they are in range.
c) If your Internet Tablet finds a network that has never been configured, it will display a notification icon.
(4) Tap on the network you want to connect to, enter the required network informa-
tion (password) and then tap on “Connect”. Your Internet Tablet will now attempt
to establish a connection to that WiFi hot spot with the network parameters you
entered. If the connection is successful, the message Connected to XXX will
appear under the WIFI setting.
Advanced Connection
To manually scan for available Wi-Fi networks,
In the “Wi-Fi settings” screen, tap the Menu icon , and then tap “Scan.”
If the Wi-Fi network you want to connect to does not appear in the list, scroll down
the screen, then tap “Add a Wi-Fi network.” Enter the required information, and then
tap “Save.”
To set up IP address manually, tap the Menu icon , tap “Advanced” and then
input all required network parameters (“Regulatory domain,” “IP address,” etc). You
can obtain these parameters from the network administrator.
Launching the Web browser
Tap the Applications icon to display all applications, and then tap the Browser icon
to launch the Web browser.
If you are already connected to a network, the Web browser will simply open and you
can start browsing the Web. To access a new website, tap the Menu icon to
display the menu, and then select “New Window” to input another address.
14
Note: Not all wireless networks offer access to the Internet. Some Wi-Fi networks only link several
computers together, without any Internet connection.
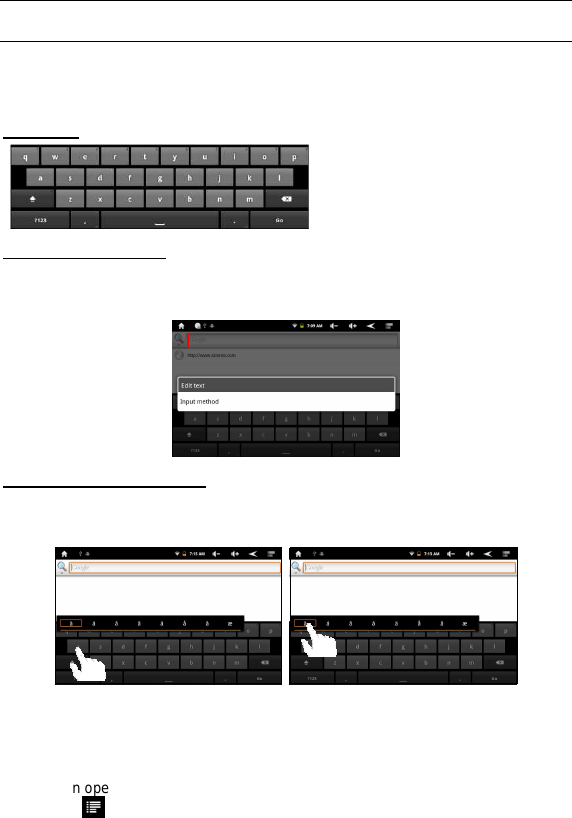
Using the Virtual Keyboard
Tapping on any text input field can open the virtual board. With the virtual keyboard,
you can enter a website address or any text required.
Indications
Selecting Input Method
If you have installed more than one input method in this device, you can select one by
a) holding your tap in the text input filed until the “Input method” box appear; b)
choosing “Input Method” and then choosing your desired text input method.
Inputting special characters
To input a special character like “à”, hold your finger on “a” to see a special character
keyboard and then slide your finger to a character on the keyboard. Release your
finger if you see two lines appear on the character.
Using the Web Browser
You can scroll the screen up and down by tapping on the page and dragging it up
or down (be careful not to tap a link until you are ready!).
To open a link, simply tap it.
You can open several web pages at a time, view them all at once on the screen by
tapping and then “Windows”, and then tap one of them to view it in full
screen.
a. Caps Lock
b. Backspace
c. Number and Characters /Letter
Keyboard Switch
d. Space
e. Enter/Confirm
c
b
d
a
e

15
To go back to the previous page that you browsed, tap the Back icon .
To display the available menu items, tap the Menu icon .
To go back directly to the Home screen, tap the Home icon .
Depending on where you are in the web browser, holding down on an item will
give you access to more options.
To fill in a text field, tap in the field, then use the virtual keyboard to type in the
required text.
Web Browser Menu Items
When you are viewing a page, you can tap the menu icon to display the menu
items.
New window Allows you to open new windows.
Bookmarks Will open the “Bookmarks” manager. You will see three tabs:
“Bookmarks,” “Most visited,” and “History.”
“Bookmarks” shows you a list of bookmarks. Just tap one of them to
open it in the current window. Holding down a bookmark will give you
access to several options (you will be able to edit it, rename it, delete
it, etc.). You can also use the Menu icon which will allow you to
bookmark the last-viewed page.
“Most visited” and “History” allow you to access your “Most visited”
sites and your visit history. In the “History” tab, the Menu icon
allows you to clear the history.
Refresh/
Stop “Stop” will stop loading the web page, if it is currently loading.
“Refresh” will refresh the current web page, if it has stopped loading.
Windows When you have several windows currently opened, tap “Windows” to
display them all at once on the screen. Just tap one of the small
windows to view it in full screen, or tap the Close icon in the small
window to close the window.
Forward Will go to the next page that you browsed.
More Will give you access to other options (“Find on page,” “Select text,”
“Page info,” “Downloads,” “Settings” etc.).
Reading E-Books
Transfer E-books from Computer
Before reading, you need to transfer or download e-books to the device. You can copy
e-books from your computer’s local drive to the device by USB connection (see the
“Transferring files” section mentioned before).
Note: Make sure your e-books are in format of PDF, EPUB, TXT, FB2, RTF or PDB supported by
the device.

16
Start Reading
(1) In the Home Screen, tap the E-book Reader shortcut to enter the e-book reader
mode.
(2) Slide your finger left and right on the “Book Shelf” to select an e-book.
(3) Tap an e-book to start reading immediately.
History and My Library
You can tap “History” to view your reading history or tap “My
Library” to enter the e-book library. “History” shows all of the
e-books that you have read by date. “My Library” shows all of
e-books stored in the device.
Note: E-book cover will show as defaulted cover by the device if the e-book has no cover data. That’s why
you see some e-book covers are the same.
Page Up/Down
When you are reading the e-book, you can slide your finger on the
screen left and right to page up or down.
You can let the ebook page up and down automatically by: a)
tapping the Men Menu icon to display e-book settings; b) Tap
“Auto Flip”; c) Selecting a flip interval time.
Increase Font Size
(1) When you are reading, tap the Menu icon to display
e-book settings.
(2) Tap “Font Size” to adjust the font size.
(3) Tap a size that you want, and then tap “OK” to confirm.
Jump to a Page
You can directly go to a page that you have specified.
(1) When you are reading, tap the Menu icon to display e-book settings.

17
(2) Tap “Go to”.
(3) Tap the page number input field to display the virtual keyboard.
(4) Tap the numbers to input the page number.
(5) Once you finish inputting the page number, tap “OK” to jump to the specified page.
Use Bookmarks
You can add, delete or load bookmarks on the page.
(1) When you are reading, tap the Menu icon to display e-book settings.
(2) Tap “Bookmarks” to display a bookmark menu. Use the menu to add, delete or
display bookmarks.
Show Outline of the e-book
You can view the outline of the e-book and then choose your desired chapter or
section to read.
(1) When you are reading, tap on the Menu icon to display e-book settings.
(2) Tap on “TOC” to display the outline of the e-book, and then tap the chapter that
you want to read.
Playing Music
In the Home Screen, tap the Music icon to enter the music player mode. Optionally,
you can tap the Applications shortcut to display all applications and then tap the Music
icon to enter the music mode.
Music Library
You should enter the music library once you
start the music player. The Music Library shows
your music files sorted by categories (Artist,
Album, etc.) if your music files contain these
song information tags. If some of your music
files do not contain information tags, they will be
classified as (Unknown) in the Music Library.
When new music is copied to the device, the Music Library will be updated
automatically.
You can drag your finger up and down on the file list to scroll through the list.
Tap a track to play a track.
To return to the Home Screen, tap / .
Songs List all music files.
Artist List music files by artist.
Album List music files by album.
Playlist List your favorite songs.
Now Playing Go to the Now Playing screen.

18
Music Library Menu
In the library, holding your finger on a track can
display the following menu options.
Play – start playing the song
Add to playlist – add the song to playlist.
Delete – delete the song.
Search – search for information about the song.
Shuffle Tracks
In the library, tap the Menu icon to display options – Play all, Party shuffle and
Shuffle all.
Play all – play tracks in normal order.
Party shuffle – is an automatically generated playlist. It will pick songs in a random
order making sure that songs do not repeat too often.
Shuffle all – shuffle all tracks stored in the device.
Playback Screen
To pause or resume the playback, tap on the
Pause / Play icon.
To play the previous/next song, tap on
/ .
You can tap on the progression bar to go
directly to a different location in the song.
You can also drag the cursor in the
progression bar to another location in the song.
Tap to adjust the volume.
To preview songs on the list, tap , and then tap a song for preview.
To change the repeat mode, tap .
To display menu options, tap .
Tapping continuously on the track title can search for information about the track
on the Internet.
To go back directly to the Home screen, tap on the Home icon or Return
icon .
Playing Menu
When the track is playing, you can tap the
Menu icon to display the following menu
options.
Library – go back to the music library.
Party shuffle –is an automatically generated
playlist. It will pick songs in a random order
making sure that songs do not repeat too often.
Add to playlist – add the track to the playlist.
19
Delete – delete the song.
Sound effects – change equalizer mode.
Playlist
The playlist is a list of audio tracks that you
have added manually.
To play the playlist,
(1) In the Music Library, tap the Playlist icon
to display all the playlist. All songs that
you have added are listed.
(2) Tap a song to start playing.
Playing Video
In the Home Screen, tap the Video Player icon to enter the video player mode.
Optionally, you can tap the Applications shortcut to display all applications and then
tap the Video Player icon to enter the video mode.
Navigate through Video Files
You should see the video list when you enter the video player.
You can drag your finger up and down on the video list to scroll the video list up
and down.
Tap a video to start playing.
You can go back directly to the Home screen by tapping on the Return icon
or Home icon .
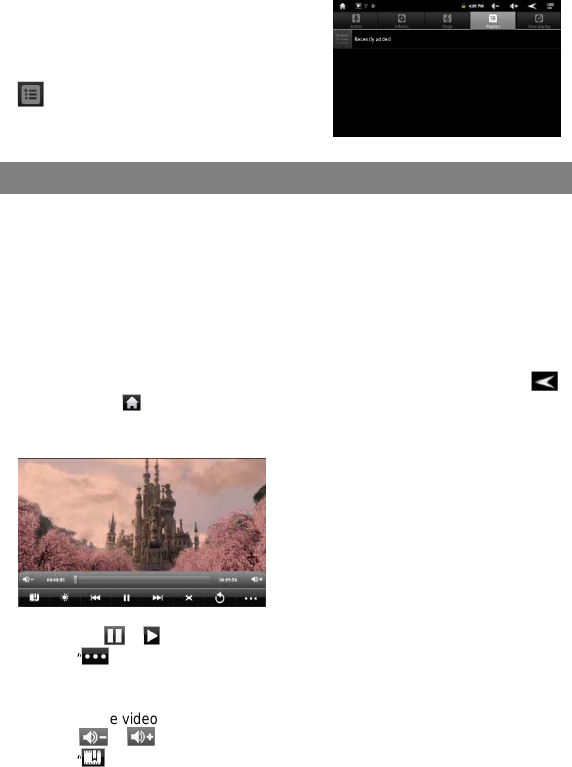
Playback Screen
Tap on the / icon to pause/resume the video.
Tap on “ ” to display the menu items.
Tap on the progression bar to go directly to a different location in the video. You
can also use your finger to drag the cursor in the progression bar to another
location in the video.
Tap on / to adjust the volume.
Tap on “ ” to set a bookmark at the current spot in the video. Please note only
one bookmark can be set for one video, and the new bookmark should cover the
a. VOL-
b. Progression bar
c. VOL+
d. Bookmark
e. Brightness
f. Previous video/Rewind
g. Play/Pause
h. Next video / Fast forward
i. View Mode
j. Exit
k. Video settings
a
b
d
e f g h i
j
k
c

20
old one. To resume playing a video from the bookmark, go to the Home Screen,
enter the Video Player, and tap on the bookmarked video. You should be
prompted to “Play from beginning” and “Play from bookmark”. Select “Play from
bookmark”. In default, the video plays from beginning. To remove the bookmark,
tap on “ ” to display the menu, and then choose “Delete Bookmark”.
Tap on to adjust the brightness of screen.
Tap on / to play the previous or next video.
Tap on to change the aspect ratio of screen.
Tap on to stop playing and return the video list.
Note: Some video files may not be played correctly with the device. Refer to the Technical Specifications at
the end of the manual, and make sure the video resolution, encoding format or file type is supported.
Video Playback Settings
Tap on the icon to display the video settings.
Delete BookMark and Play
from beginning
Delete bookmark and play from beginning.
Delete Bookmark Delete the video bookmark.
Play Mode Single – plays the current video and then stops after
playing.
Repeat One – Repeat the current video.
Repeat All – Repeat all videos.
Help Get instructions for playing video.
Return Exit from the menu.
Viewing Photos
In the Home Screen, tap the Gallery icon to enter the photo viewer mode. Optionally,
you can tap the Applications shortcut to display all applications and then tap the
Gallery icon to enter the photo mode.
Viewing Photo
(1) Folders containing photos should be listed once you enter the Gallery. Tap a
folder to open it.
(2) Photos in the open folder are listed in thumbnails. You can:
Slide your finger on the screen or tap to view thumbnails.
Tap the Thumbnail/Group toggle button to display photo
thumbnails or group photos by date.
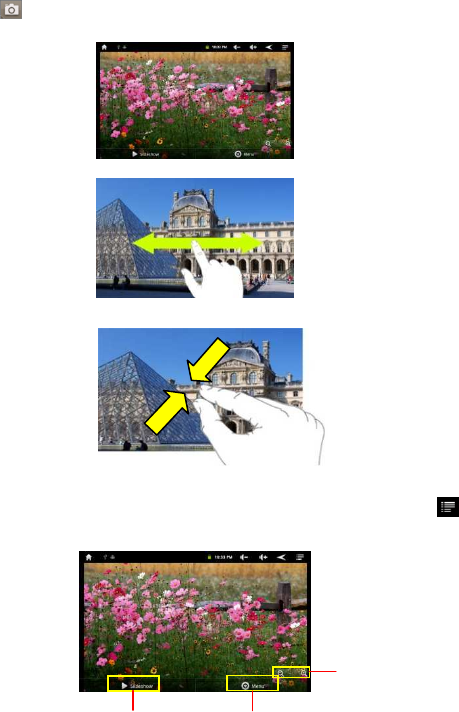
21
Tap to take picture into the gallery.
(3) Tap a photo thumbnail to view the photo in full screen.
(4) To display the previous/next picture, slide your finger on the screen horizontally.
(5) To zoom in or out the picture, pinch your finger on the picture.
Using the Menu
When you are viewing the picture, you can tap on the screen or the Menu icon to
show a floating menu.
Start slideshow Display menu options
Zoom in/Out
22
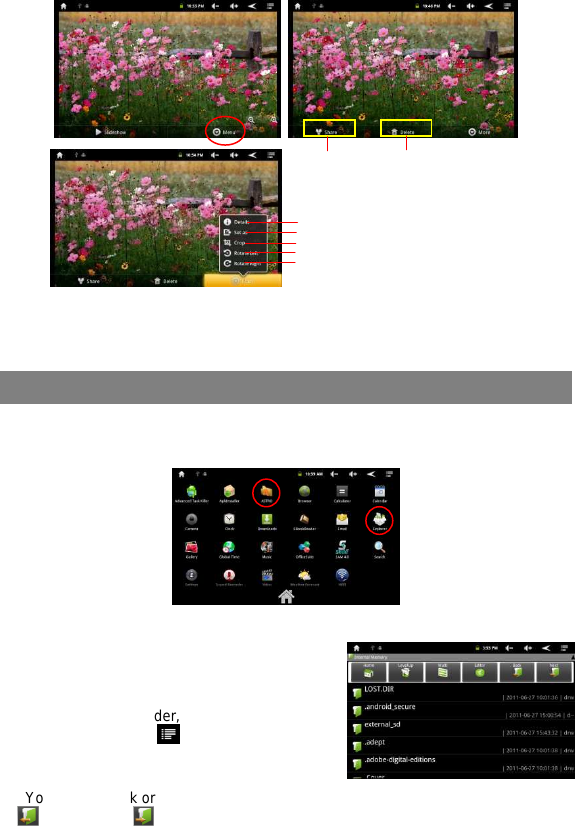
Tapping “Menu” can display other menu options.
Slide Show
To start an automatic slideshow, tap on the screen to show a floating menu, and then
tap the Slideshow menu on the toolbar. To stop the slideshow, tap the screen.
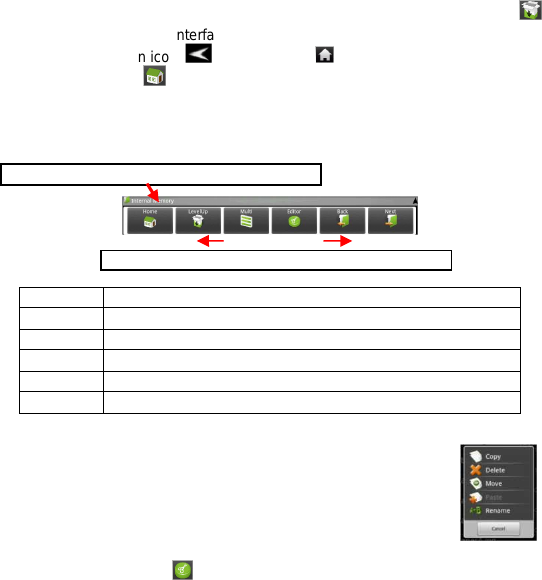
Exploring Files
You can explore files and folders with the Explorer and Astro application. In the Home
Screen, tap the Applications shortcut to display all applications and then tap the
Explorer icon or ASTRO to enter the file explorer mode.
Using the Explorer
Navigate through Files and Folders
You can drag your finger up and down to
scroll the file list up and down.
To open a file or folder, tap the file/folder.
Tap the menu icon , you can manage the
applications (see details in the “Managing 3rd
party Applications” section).
You can go back or forward one level in the interface by tapping on the Back icon
or Next icon .
Send picture to
friend by e-mail
(email account
login required)
Delete picture
Information about the picture
Set the picture as desktop background
Crop a part from the picture
Rotate the picture left
Rotate the picture right
23
You can go back one level in the directory by tapping on the LevelUp button .
Wherever you are in the interface, you can go back directly to the Home screen by
tapping on the Return icon or Home icon .
Tap the Home icon to go to the root directory.
Using the Toolbar
You can use the toolbar to navigate through your device’s internal memory/ memory
card and delete or copy files.
Home Go to the Home Screen.
LevelUp Go back one level in the directory.
Multi Select more than one file.
Editor Copy, delete, move, paste or rename the file or folder.
Back Go back one level in the interface.
Next Go forward one level in the interface.
Copy/Move Files and Folders
(1) In the file list, scroll up and down by sliding your finger to select
the file/folder that you want to copy or move.
(2) Hold the selected file/folder until a pop-up menu appears.
(3) Select “Copy” or “Move” from the pop-up menu.
(4) Navigate to the location where you wish to copy or move the
file/folder to.
(5) Select the Editor icon from the toolbar and then choose “Paste.”
Delete Files and Folders
(1)
In the file list, scroll up and down the list by sliding finger to select the file/folder
that you want to delete.
(2)
Hold the selected file/folder until a pop-up menu appears.
(3)
Select “Delete” from the pop-up menu, then select “Delete” to confirm or “Cancel”
to quit.
Rename Files and Folders
(1)
In the file list, scroll up and down the list by sliding finger to select the file/folder
that you want to rename.
(2)
Hold the selected file/folder until a pop-up menu appears.
(3)
Select “Rename” from the pop-up menu.
(4)
Tap the input field to display the virtual keyboard, and then choose letters from
the virtual keyboard to rename the file/folders.
(5)
Tap “OK” to confirm the new name.
Tapping on the grey area can hide/display the toolbar.
Sliding your finger on the toolbar can scroll through all tools.

24
Select Multiple Items
You can select more than one file or folder together.
(1) In the top toolbar, tap the Multi icon “ .”
(2) Tap the files/folders you want to choose. The file/folder name turns red when
selected. (To deselect the file/folder, tap it again.)
(3) Once you finished selection, you can delete, copy or move the selected files by
tapping on the Editor icon .
Using the ASTRO
Navigate through Files and Folders
You can drag your finger up and down to
scroll the file list up and down.
To open a file or folder, tap the file/folder.
Tap the menu icon , you can manage the
applications (see details in the “Managing 3rd
party Applications” section).
You can go back or forward one level in the
interface by tapping on the Back icon or Next icon .
You can go back one level in the directory by tapping on the LevelUp button .
Wherever you are in the interface, you can go back directly to the Home screen by
tapping on the Return icon or Home icon .
Tap the Home icon to go to the root directory.
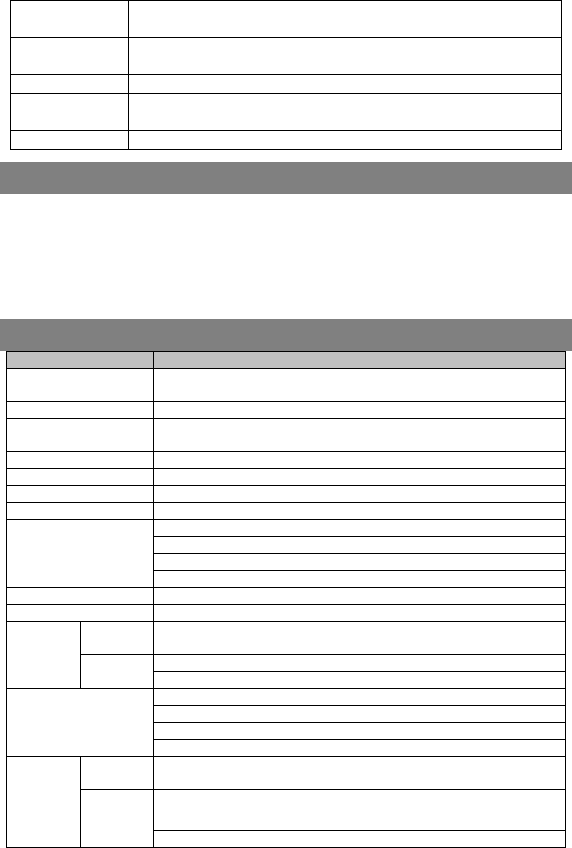
Using the Toolbar
You can use the toolbar to navigate through your device’s internal memory/ memory
card and delete or copy files.
Home Go to the Home Screen.
Up Go back one level in the directory.
Multi Select more than one file.
Edit Copy, delete, move, paste or rename the file or folder.
Search Search for a specific file or folder
Back Go back one level in the interface.
Next Go forward one level in the interface.
View Display files and folders in list or icons.
Sort Sort files and folders by name, date, size or file type.
Prefs Preferences for the ASTRO
Network Enable the Wi-Fi network or Bluetooth (if available).
Tapping on the grey area can hide/display the toolbar.
Sliding your finger on the toolbar can scroll through all tools.

25
Copy/Move Files and Folders
(1) Navigate through the file/folder and locate the file/folder you want.
(2) Tap the Multi icon and then tap the file(s) /folder(s) that you want. You can
select multiple items by tapping. To deselect the item(s), tap the Cancel icon .
(3) Select “Copy” or “Move” from the pop-up menu.
(4) Navigate to the location where you wish to copy or move the file/folder to.
(5) Select the Edit icon from the toolbar and then choose “Paste.”
Delete Files and Folders
(1) Navigate through the file/folder and locate the file/folder you want.
(2) Tap the Multi icon and then tap the file(s) /folder(s) that you want. You can
select multiple items by tapping. To deselect the item(s), tap the Cancel icon .
(3) Select “Delete” from the pop-up menu and then select “Delete” to confirm.
Compress Files/Folder with Zip
(1) Navigate through the file/folder and locate
the file/folder you want.
(2) Tap the Multi icon and then tap the
file(s) /folder(s) that you want. You can
select multiple items by tapping. To deselect
the item(s), tap the Cancel icon .
(3) Select “Zip” from the pop-up menu.
(4) Enter a name for the zip file and then tap “Create”.
File Options
You can hold your finger on an item to display the following options:
Details – file information
Open As – open the file with another application.
Edit – copy, delete, move, zip the file
Send – send the file by e-mail (email account login required.)
Set As – set the file as desktop
Sending/Receiving E-mails
This device has an E-mail application pre-installed. You can send or receive e-mails
from the Internet at any time with this device. Make sure you have an Internet
connection before using the email service.
In the Home Screen, tap the Applications shortcut to display all applications and then
tap the Email icon to launch the e-mail application.
Setup Email Account
First you need to setup an E-mail account for receiving or sending emails.
(1) Start up the email application by tapping the Email application icon and you are
prompted to setup an account.

26
(2) Input your email address and login password. You can set the account as default
by selecting the option “Send email from this account by default”.
(3) Tap “Manual Setup” to set the email server information.
(4) Choose the server type from POP3, IMAP or Exchange for incoming emails. To
know what type of your email server is, you can consult the service provider,
network administrator or search for information in the Internet.
(5) Input required information (server, port etc.). You can
obtain the information from the service provider, network
administrator or the Internet.
(6) Choose the server type for outgoing emails, and input
required server information.
(7) Click “Next” to continue. Your Internet Tablet will check the server settings. When
it prompts you that “Your account is set up, and email is on its way”, your account
is set up successfully.
(8) Input your name and then tap on “Done” to finish.
Note: If you have more than one account, every time when you start up the email application, you enter the
default email account.
Manage Accounts
You can setup more than one account and manage these accounts by checking
information about the account, adding another account or deleting an account.
Add another Account
Following these steps to add another account if you want.
(1) Launch the email application and then tap on the Menu icon to display the
menu item. Choose “Accounts” to display accounts.
(2) Tap on the Menu icon to display the menu item, and then choose “Add
account”.
(3) Follow the steps of setting up a Email Account to add an account.
Delete an Email Account
(1) When you are in the email box, tap on the Menu icon to display the menu
items.
(2) Tap on “Accounts” to display all email accounts.
(3) Hold your tap on the account that you want to delete until a menu pop up.
(4) Tap on “Remove Account”,and then tap on “OK” to confirm.
Check the Account Setting
(1) When you are in the email box, tap on the Menu icon to display the menu
items.
(2) Tap on “Accounts” to display all email accounts.
(3) Hold your tap on the account that you want to check until a menu pop up.
(4) Tap “Account settings”,and then you should see all setting information about the
account. You can edit these settings as you want.

27
View Emails
You should enter your mailbox when you start up the email application.
In the mailbox, you can slide your finger up and down to scroll through the email
list.
Tap on an email to open it.
Holding your tap on the email can display a menu. With the menu, you can open,
reply, forward or delete the email.
Email Menu Items
In the email list, tap on the Menu icon to display the menu.
Refresh Refresh the emails.
Compose Compose a new email.
Folders Go back to email box.
Accounts View all email accounts.
Account Settings Check your account settings.
Reading Office Document
The device provides support to Microsoft Office document with its built-in OfficeSuite
application. You can read documents in Word, Excel or PPT etc.
(1) Copy Office documents to the device by USB connection.
(2) Launch the OfficeSuite application.
(3) Locate an Office document by navigation. (The following illustrations show how to
select a document from the internal memory.)
(4) Tap the document to open it. On the opening page, you can slide your finger up
and down to turn over the page.

28
(5) You can tap the Menu icon to display menu options. With these options, you can
search for specific texts or count words in the document.
Voice Recording
Record
(1) In the Home Screen, tap on the Application
Tap to reveal all applications.
(2) Tap on the “Sound Recorder” icon to enter
the recorder mode.
(3) Tap on the “ ” icon to start recording.
(4) Tap on the “ ”icon to stop recording.
(5) Tap to preview the recording if you
want to.
(6) Tap on “Use this recording” and then use the Audio Player to play the recording.
To discard the recording, tap on “Discard”.
(7) Tap on to go back to the Home Screen.
Play Recording
(1) Enter the music library by choosing “Music”
application.
(2) Tap “Playlist” to show My Recording list.
(3) Tap “My Recording” to display all recording
files.
(4) Tap a recording to start playing.
Optionally, you can locate the recording file with the explorer, and then tap it to start
playing.

29
Camcorder/Camera
The device features built-in camera which allows you make video clips or take photos.
Tap on the Application Tab to display applications, and then select “Camcorder”/
“Camera” to enter the VCR/Photography mode.
To start making video clips,
tap on the Start/Stop button
to start video recording.
Tap on the Start/Stop button
again to stop video
recording or photographing.
The video clip / photo can be previewed in the Preview Window.
To play the video clip that you have made, enter the Video Player, and then tap the
video.
To view the photo that you have taken, enter the Photo Viewer mode, and then tap
the photo.
HDMI Output
The device features a HDMI interface with which you can connect the device to digital
audio devices, computer monitors or digital televisions. HDMI connection can deliver
high-definition audio and video quality.
To use the HDMI function on digital televisions,
(1) Make sure the visual device like digital television that the device connects has a
HDMI interface also.
(2) Turn on the digital television, and switch its mode to HDMI.
(3) Connect the HDMI cable to the HDMI interface of the device and the digital
television.
(4) Turn on the Internet Tablet and enjoy the sharpest image quality on the wide
screen of television.
Managing 3
rd
Party Applications
Your Internet Tablet provides support to many useful third-party applications. You can
purchase the applications to add more functions to your device. They are available
online at the Internet or directly on your product.
Pre
view
VCR/Photography
Mode Switch
Start/Stop
Viewfinder
Return

30
Pre-installed Applications
The device has pre-installed applications when it was manufactured. You can see
them by tapping the Applications icon . They are video player, audio player,
browser, alarm clock, calculator etc.
Install Applications
You can install applications manually following these steps:
(1) Download the installation file directly from the built-in application library (e.g.
SLIDEME) or Internet. Make sure the file is in format of .apk which is supported by
your Internet Tablet system.
(2) Copy the installation file to your Internet Tablet by USB connection.
(3) Turn on your Internet Tablet and locate the installation file with the Explorer.
(4) Tap the installation file and follow the on-screen instructions to install the
application. If the installation was blocked by the following message, tap “Setting”
and then check the “Unknown Source” so that the installation can proceed.
(5) Once the application is installed successfully, you can find it in the application tab.
Uninstall Applications
(1) Tap the Settings shortcut in the Home Screen to display all system settings.
(2) Select “Applications”.
(3) Select “Manage Applications”.
(4) Tab on the application that you want to uninstall.
(5) Tab on “Uninstall” to uninstall the application.
Note:
You cannot uninstall the pre-installed applications.
Some of the applications developed for Android mobile might not run properly in the Internet Tablet.
Please consult the respective software developer for further information.
Managing Tasks
Your Internet Tablet can handle multiple tasks at the same time. For example, you
can view photos while listening to music. Multitasking is helpful but inefficient if too
many tasks are running. In order to save system memory and enhance system
performance, you can end some tasks that you don’t use at the moment.

31
(1) Tap “Advanced Task Killer”
application.
(2) Tap the task that you want to
end.
(3) Tap “KILL selected apps” to end the task.
System Settings
In the Home screen, tap “Settings” and choose a category: “Wireless & Networks,”
“Sound & Display,” “Date & Time,” etc.
When a down arrow appears on the right of a parameter, this means that this
setting includes sub-parameters. Tap it to display the list of sub-parameters.
When a check box appears on the right of a parameter, tap it to enable or disable
this option.
When it is possible, you can use your finger to scroll the screen up and down to
reveal settings that you don’t initially see.
When you have finished adjusting your settings, tap the Back icon to go back
to the list of settings, or tap the Home icon to go directly to the Home screen.
Your settings are saved instantly.
Wireless &
networks Wi-Fi – tap on this line to enable or disable the Wi-Fi connection.
Wi-Fi settings – allows you to set up and manage your Wi-Fi networks.
Sound Silent Mode – mute sound except of media and alarm.
Volume – volume level for notifications.
Notification Ringtone – Set your default notification ringtone.
Audible selection – enables/disables the touchscreen click sound.
Screen lock sounds – enable/disable sound when locking or unlocking the
screen.
Display Brightness – allows you to adjust the brightness of the screen.
Auto-rotate screen – switch the screen orientation automatically when the
device rotates.
Animation – enables/disables the display of animations when opening and
closing applications.
Screen timeout – allows you to adjust the delay before the screen
automatically turns off and locks itself. To turn the screen back on, press the
Power button once, and press it again to unlock the screen.
Location &
Security This screen gives you the possibility to allow certain Android™ applications to
determine your current location. You can also define a screen unlock pattern
and other security parameters.
Applications This screen allows you to manage your Android™ applications. You can view
information about all the applications installed on your device.
Privacy This setting allows you back up or restore your system settings or data.
32
Storage This setting allows you un-mount the SD card or check SD card and internal
storage space.
Language &
keyboard Set your preferred language and region, and configure text settings for faster
and more accurate text input.
Date & Time This setting allows you set up the date, time, time zone and formats.
Update Media
Library Update the media library of your Internet Tablet manually.
About Device Display information about your Internet Tablet system.
Troubleshooting
Reset this device
In the event that the device freezes, you can force the device to shut down by
holding the Power button for 15 seconds.
If the Power button does not reset your device, use the “pinhole reset” button,
located on the back the device.
Specifications
Item Description
CPU Based on Cortex-A8
Main CPU frequency:1GHz
DDR 2X256MB
Built-in operating
system Android OS 2.3
Hardware IBM PC or compatible PC, Note-book or Macintosh with USB port
Internal Memory 2GB, 4GB, 8GB, 16GB(optional)
Memory Card type MicroSD card: 1GB, 2GB, 4GB (SDHC), 8GB(SDHC), 16GB(SDHC)
Operation System Windows2000/XP/Vista/windows 7/Linux2.4/ MAC OS 10.6.7 above
Interface
USB2.0 High speed
Micro SD card slot (compatible SDHC)
3.5mm Earphone port
HDMI Interface
Connection Agreement WiFi (802.11 b/g/n)
G-sensor Support 360 rotation
E-Book
File
Format PDF/EPUB/TXT/FB2/PDB/RTF
Coding
Format PDF / EPUB Format: .Open.
TXT / FB2/PDB/RTF Format: .Open
Photo Format
JPEG(Baseline) :96*32pixels to 8000*8000 pixels
BMP
GIF (Static)
PNG
Audio
File
Format MP3/WAV/OGG/FLAC/APE/AAC
Coding
Format
MP3 (MPEG1/2/2.5 Audio Layer 1/2/3): 8~48KHZ/8~320Kbps,CBR and
VBR
WAV (MS-ADPCM, IMA-ADPCM, PCM): 8~48KHZ
33
WAV (MS-ADPCM, IMA-ADPCM, PCM): 8
~
48KHZ
OGG (Q1- Q10): 8~48KHZ
FLAC(Compress Level 0~8): 8~48KHZ
APE (Version 3.95,3.97,3.98,3.99,normal and fast) : 8~48KHZ
AAC(ADIF, ATDS Header AAC-LC and AAC-HE): 8~48KHZ
Video
File
Format AVI, 3GP, MP4, RM, RMVB, FLV, MKV, MOV, VOB, DAT, WMV
Coding
Format
AVI(MPEG4,XVID,DIVX3/4/
5/6, MS MPEG4 V3)
1920*1088pixels/30FPS/38.4Mbps
(Max.)
Audio Codec:
MP2/MP3/AC3/AAC/PCM/DTS
3GP/MP4(H.264,H.263,
MPEG4,XVID,DIVX3/4/5/6,
MS MPEG4 V3)
MPEG4,XVID,DIVX3/4/5/6:
1920*1088pixels/30FPS/38.4Mbps
(Max.)
H.264:
1920*1088pixels/30FPS/20Mbps(Max.)
Audio Codec: MP2/MP3/AC3/AAC/PCM
RM/RMVB(Real video 8/9)
1920*1088pixels/30FPS/38.4Mbps
(Max.)
Audio Codec: Cook/AAC
FLV(Sorenson Spark) 1920*1088pixels/30FPS/38.4Mbps
(Max.)
Audio Codec: MP3
MKV(H.264,MPEG4,XVID,D
IVX3/4/5/6,MS MPEG4 V3)
Audio Codec: MP2/MP3/AC3/AAC/PCM
MPEG4,XVID,DIVX3/4/5/6:1920*1088
pixels /30FPS(Max.)
H.264:
1920*1088pixels/30FPS//57.2Mbps
(Max.)
MOV(H.264,
H.263,MPEG4,XVID,DIVX3/
4/5/6, MS MPEG4 V3)
MPEG4,XVID,DIVX3/4/5/6, MS MPEG4
V3: 1920*1088 pixels /30FPS/38.4Mbps
(Max.)
H.264:
1920*1088pixels/30FPS/20Mbps(Max.)
Audio Codec: MP2/MP3/AC3/AAC/AMR
MPG/DAT/VOB(MPEG1/2) 1920*1088pixels/30FPS/80Mbps (Max.)
Audio Codec: MP2/MP3
Read speed 8 –10 MB/S (MLC flash)
Write speed 3.0 – 4.0 MB/S (MLC flash)
Battery Charge Time About 5 Hours
Battery Life About 7 hours of music playback;
About 6 hours of video playback;
About 6 hours of web browsing.
Display 7.0-inch TFT LCD, Touchpad (capacitive touch pad), 800X480 pixels.
SNR >=80dB
Frequency Response
Range 20Hz—20KHz
Power Supply Rechargeable lithium-ion polymer battery;
AC Adapter: AC Input 100-240V~50/60Hz, DC Output 5V/2A
Storage Temp. -20 ~ +65℃
Ambient Temp. 0 ~ +50℃
34
Operation Relative
Humidity 20% ~ 90%(40℃)
Storage Relative
Humidity 20% ~ 93%(40℃)
FCC Statement
This equipment has been tested and found to comply with the limits for a Class B
digital device, pursuant to Part 15 of the FCC Rules. These limits are designed to
provide reasonable protection against harmful interference in a residential installation.
This equipment generates, uses and can radiate radio frequency energy and, if not
installed and used in accordance with the instructions, may cause harmful
interference to radio communications. However, there is no guarantee that
interference will not occur in a particular installation. If this equipment does cause
harmful interference to radio or television reception, which can be determined by
turning the equipment off and on, the user is encouraged to try to correct the
interference by one or more of the following measures:
-- Reorient or relocate the receiving antenna.
-- Increase the separation between the equipment and receiver.
-- Connect the equipment into an outlet on a circuit different from that to which the
receiver is connected.
-- Consult the dealer or an experienced radio/TV technician for help.
Caution: Any changes or modifications to this device not explicitly approved by
manufacturer could void our authority to operate this equipment.
USA:
This device complies with Part 15 of the FCC Rules. Operation is subject to the
following two conditions:
(1) this device may not cause harmful interference, and
(2) this device must accept any interference received, including interference that may
cause undesired operation.
Changes or modifications not expressly approved by the party responsible for
compliance could void the user’s authority to operate the equipment.
Canada:
This device complies with Industry Canada license-exempt RSS standard(s).
Operation is subject to the following two conditions: (1) this device may not cause
interference, and (2) this device must accept any interference, including interference
that may cause undesired operation of the device.
FCC RF warning statement:
The device has been evaluated to meet general RF exposure requirement. The
device can be used in portable exposure condition without restriction.
35
Deklaracja zgodności
Niniejszym GOCLEVER Technology oświadcza iż produkt jest zgodny z zasadniczymi
wymogami oraz pozostałymi postanowieniami Dyrektywy 199/5/WE.
Ochrona środowiska
Urządzenie podlega dyrektywie WEEE 2002/96/EC. Symbol obok oznacza, że produkt musi
być utylizowany oddzielnie i powinien być dostarczony do odpowiedniego punktu
zbierającego odpady. Pozwala to ograniczać zanieczyszczenie środowiska i pozytywnie
wpływa na ludzkie zdrowie.
Informujemy ponadto, iż nasza firma w zakresie obowiązków wynikających z ustawy o
zużytym sprzęcie elektronicznym, w tym w zakresie jego zbierania, przetwarzania, odzysku
i recyklingu jest obsługiwana przez KARAT ELEKTRO-RECYKLING Sp.z o.o. W razie
jakichkolwiek pytań lub wątpliwości możecie się Państwo kontaktować z Karat pod
numerem telefonu 056-623-80-91.
Odpowiedzialność
Firma GOCLEVER Technology ani żaden z jej licencjobiorców nie ponosi
odpowiedzialności za jakąkolwiek utratę danych lub zysków, jak również za żadne inne
wtórne i pośrednie szkody powstały w wyniku użytkowania urządzeń marki, w żadnym
wypadku i maksymalnym dopuszczalnym przez prawo zakresie. GOCLEVER Technology
nie odpowiada za problemy związane z nieprawidłowym działaniem systemu operacyjnego i
aplikacji działających pod jego kontrolą.
Zmiany
GOCLEVER Technology zastrzega sobie prawo do dokonywania zmian w niniejszym
dokumencie jak i specyfikacji urządzenia, bez konieczności informowania o tym
użytkownika. Opisane funkcje oraz obrazki mogą się różnić w zależności od usług
oferowanych przez operatora jak i wersji oprogramowania danego urządzenia.
Przed użyciem
Pamiętaj, że akumulator nie jest naładowany. Otwarcie lub próba rozebrania zewnętrznej
obudowy urządzenia powoduje utratę gwarancji.
Google jest zastrzeżonym znakiem towarowym, a Google Maps jest znakiem handlowym
firmy Google, Inc. w Stanach Zjednoczonych i innych krajach. YouTube jest znakiem
towarowym firmy Google, Inc.
Firma GOCLEVER Technology nie ponosi odpowiedzialności za błędy techniczne lub
redakcyjne ani za pominięcia w niniejszym tekście; nie ponosi również odpowiedzialności za
szkody przypadkowe lub następcze spowodowane korzystaniem z niniejszego materiału.
Informacje są przedstawione w takim stanie, w jakim przyjmuje je użytkownik, i nie są objęte
żadną gwarancją. Mogą ulec zmianie bez powiadomienia. Firma GOCLEVER Technology
zastrzega również prawo do zmiany zawartości niniejszego dokumentu bez uprzedniego
powiadomienia. W podręczniku zostały opisane tylko podstawowe funkcje urządzenia.
Bezpieczeństwo
Należy zapoznać się z tymi wytycznymi. Niezastosowanie się do nich może spowodować

36
powstanie zagrożenia życia lub zdrowia albo może być niezgodne z prawem. Aby uzyskać
dalsze informacje, należy zapoznać się z całym podręcznikiem.Urządzenie zostało
stworzone do pracy przy zasilaniu akumulatorowym jak i podłączeniu do sieci elektrycznej
za pomocą ładowarki. Korzystając z urządzenia w inny sposób może być niebezpieczne i
spowoduje utratę gwarancji.
Ładowanie
Urządzenie należy podłączać tylko do źródeł zasilania zgodnych z parametrami
określonymi w specyfikacji. W przypadku wątpliwości co do typu wymaganego źródła
zasilania należy skonsultować się z autoryzowanym punktem usługowym lub lokalnym
dostawcą energii elektrycznej. Jeśli produkt zasilany jest z akumulatora lub innych źródeł,
należy przestrzegać instrukcji dołączonej do produktu.
Oddziaływanie czynników zewnętrznych oraz pola
elektromagnetycznego
Urządzenie nie jest wodoodporne. Należy dopilnować, aby zawsze było suche, chronić
przed wilgocią. Urządzenie należy chronić również przed wysokimi oraz niskimi
temperaturami, zapyleniem, piaskiem, nie należy narażać go na wstrząsy, rzucać nim, gdyż
może to spowodować jego uszkodzenie, bądź jego elementów.
Nie korzystać z urządzenia w pomieszczeniach wilgotnych i w bardzo wysokich lub niskich
temperaturach.
Nie pozostawiaj urządzenia w pojazdach ani miejscach, w których temperatura może
przekroczyć 50 stopni Celsjusza.
Nie korzystaj urządzenia na pokładzie samolotu oraz w miejscach gdzie nie jest dozwolone
korzystanie z urządzeń mogących emitować pole elektromagnetyczne Np. szpital, stacja
benzynowa, magazyn materiałów wybuchowych; nieprzestrzeganie tych zasad może
spowodować pożar lub wybuch.
Nie korzystaj z urządzenia podczas prowadzenia samochodu.
Nie korzystaj z urządzenia w pobliżu źródeł silnego promieniowania
elektromagnetycznego, takich jak kuchenki mikrofalowe, głośniki, telewizory a nawet radia.
Stosować tylko oryginalne akcesoria zalecane przez producenta albo akcesoria, które nie
zawierają metali.
Serwis i naprawy
Do napraw korzystaj z autoryzowanego serwisu i wykwalifikowanego personelu, wszelkie
próby naprawy samodzielnej, bądź też przez nieautoryzowany serwis będzie skutkować
utratą gwarancji.
Bezpieczeństwo
Nie upuść urządzenia z dużej wysokości.
Unikaj używania urządzenia w kurzu, dużej wilgoci oraz nie wystawiaj
urządzenia na bezpośrednie słońce.
Unikaj silnego pola elektromagnetycznego w pobliżu urządzenia.
Działanie urządzenia może być zakłócone ładunkami elektrostatycznymi, w
przypadku braku reakcji urządzenia użyj przycisku reset.

37
Unikaj kontaktu urządzenia z wodą. Jeśli urządzenie wymaga czyszczenia
najpierw je wyłącz.
Nie używaj silnych środków czyszczących do usuwania zabrudzeń ani ostrych
przedmiotów, użyj czystej suchej ścierki.
Nie zasłaniaj otworów wentylacyjnych urządzenia gdyż grozi to przegrzaniem
urządzenia.
Unikaj kontaktu urządzenia z ogniem, grozi wybuchem urządzenia.
Utylizacja baterii powinna być wykonana zgodnie z normami odnośnie
szkodliwych odpadów.
Używaj urządzenia w klimacie umiarkowanym.
Nie odpowiadamy za uszkodzenia i utratę danych oraz używanie niewłaściwych
baterii.
Nie otwieraj urządzenia, nie wykonuj napraw oraz modyfikacji, wiąże się to z
utratą gwarancji.
Jeśli urządzenie nie będzie długo używane pamiętaj aby co najmniej raz w
miesiącu podładować baterię.
Naładuj baterię gdy:
a) Ikona baterii wygląda tak (pusta bateria)
b) Kiedy urządzenie po restarcie automatycznie się wyłącza.
c) Kiedy urządzenie nie reaguje na włącznik.
Nie wyłączaj urządzenia podczas kopiowania plików może to uszkodzić pliki
urządzenia.
Podczas używania urządzenia jako przenośny stosuj się do poleceń na ekranie
urządzenia, nie odłączaj urządzenia przed zakończeniem kopiowania plików.
Aby zredukować możliwość porażenia prądem elektrycznym unikaj kontaktu
urządzenia z płynami nie stawiaj na urządzeniu naczyń z wodą.
Istnieje ryzyko wybuchu baterii jeśli wymieniona bateria jest innego typu niż
fabryczna.
Bateria nie powinna być wystawiona na działanie wysokich temperatur, światło
słoneczne czy bezpośredni kontakt z ogniem
Po odłączeniu ładowarki urządzenie będzie działać na baterii aż do
rozładowania baterii.
Zasilacz posiada podwójną izolację brak uziemienia.
Symbol bezpieczeństwa:
- Uwaga urządzenie posiada nie izolowane elementy płyty głównej na
których występuje zagrożenie porażenia prądem.
- Nie otwierać urządzenia samodzielnie, należy to zlecić serwisowi.

38
- Prawidłowa utylizacja tego produktu. Znak ten oznacza, że produktu
nie należy wyrzucać wraz z innymi odpadami w UE. Aby uniknąć
szkodliwego wpływu na środowisko i zdrowie ludzi wskutek
niekontrolowanego usuwania odpadów, odpowiedzialny recykling w celu
promowania ponownego użycia zasobów materialnych. Aby pozbyć się
zużytych urządzeń, należy skorzystać z systemów zwrotu i zbiórki
dostępnych w danym kraju lub skontaktować się ze sprzedawcą w którym
produkt został zakupiony.
Urządzenie powinno być używane w odległości 20cm od ciała.
Ostrzeżenia
Ten produkt jest zgodny z aktualnymi przepisami ograniczającymi głośność
wyjściową urządzeń audio do bezpiecznego poziomu. Słuchając urządzenia ze
słuchawkami przy dużej głośności, grozi trwałym uszkodzeniem słuchu. Nawet
jeśli użytkownik jest przyzwyczajony do bardzo głośnej muzyki i wydaje się to
normalne, nadal istnieje możliwość uszkodzenia słuchu. Zmniejszyć głośność
urządzenia do rozsądnego poziomu, aby uniknąć trwałego uszkodzenia słuchu.
Jeśli słyszysz dzwonienie w uszach, zmniejsz głośność lub wyłączyć urządzenie.
To urządzenie zostało przetestowane z dołączonymi słuchawkami(opcja). W celu
zachowania słuchu, zaleca się stosowanie wyłącznie następujących modeli
słuchawek: słuchawki dołączone do urządzenia, lub inne słuchawki, że
obowiązujące normy prawne. Inne typy słuchawek mogą charakteryzować się
wyższym poziomem głośności.
Maksymalne napięcie wyjściowe<=150mv
Nie korzystaj z urządzenia podczas prowadzenia pojazdów, grozi wypadkiem.
Podczas korzystania z słuchawek unikaj sytuacji kiedy nie słyszysz dźwięków
otoczenia, grozi wypadkiem.
W celu ustalenia bezpiecznego poziomu głośności:
- Ustaw głośność na niskim poziomie.
- Zwiększaj do poziomu kiedy będzie wyraźny i bez zniekształceń. Pozostaw
na tym poziomie nie zwiększaj jeśli nie ma takiej potrzeby.
39
Spis treści
Bezpieczeństwo .............................................................................................. 36
Ostrzeżenia .................................................................................................... 38
Podstawowe funcje ......................................................................................... 40
Akesoria ......................................................................................................... 40
Przyciski i porty ............................................................................................... 40
Ładowanie baterii ........................................................................................... 41
Kopiowanie plików .......................................................................................... 41
Włącznie/Wyłączanie ...................................................................................... 42
Ekran główny (HOME) .................................................................................... 42
Odblowowanie ekranu .................................................................................... 44
Ekran dotykowy/ przyciski ............................................................................... 44
Dostęp do internetu ........................................................................................ 44
Czytanie E-Booków ........................................................................................ 47
Odtwarzanie muzyki ....................................................................................... 48
Odtwarzanie filmów ........................................................................................ 19
Przeglądanie zdjęć ......................................................................................... 50
Przeglądanie plików ........................................................................................ 22
Wysyłanie odbieranie poczty ........................................................................... 25
Czytanie dokumentów pakietu Office .............................................................. 57
Nagrywanie głosu ........................................................................................... 28
Aparat/Kamera ............................................................................................... 58
Wyjście HDMI ................................................................................................. 29
Zarządzanie aplikacjami ................................................................................. 29
Zarządzanie zadaniami ................................................................................... 30
Ustawienia ...................................................................................................... 60
Rozwiązywanie problemów ............................................................................. 61
Specyfikacja ................................................................................................... 32
40
Podstawowe funkcje
Wi-Fi Połączenie
Dzięki karcie Wi-Fi urządzenie ma dostęp do Internet gdziekolwiek jesteś.
7.0” Ekran dotykowy
Dotknij ekranu urządzenia by zmienić opcje uruchamiać aplikacje.
Możliwość instalacji aplikacji
Wbudowany Android
TM
OS, pozwala instalować niezliczoną ilość aplikacji.
Wbudowany G-sensor
Urządzenie automatycznie zmienia orientacje ekranu poziomo lub pionowo.
Rozrywka
Możesz odtwarzać filmy zdjęcia pliki audio oraz czytać eBook.
Dokumenty pakietu Office
Wbudowana aplikacja OfficeSuite, możesz odwierać dokumenty Word, Excel, PPT
etc.
Akcesoria
USB kabel
Przyciski & gniazda
Ładowarka
Etui
i Menu – wyświetla opcje.
j ESC – Cofnij
k Wyjście audio – gniazdo dla słuchawek.
l USB gniazdo – port komunikacji z
komputerem.
m HDMI wyjście
n Dioda ładowania
o Gniazdo ładowania – podłącz
ładowarkę
p Reset / mikrofon
a Gniazdo kart micro SD
b Ciszej poziom głośności
c Głośniej poziom głośności
d Włącznik – wciśnij i przytrzymaj aby
włączyć lub wyłączyć urządzenie; wciśnij
aby wygasić ekran.
e Ekran dotykowy
f Kamera
g Wyszukaj
h Home
a
b
c
d
e
f
g
h
i
k
j
l
m
n
o
p

41
Ładowanie baterii
Urządzenie posiada wbudowaną baterię, nie jest konieczne podłączanie dodatkowej,
jeśli się rozładuje po prostu ją naładuj.
Aby naładować urządzenie, podłącz ładowarkę dostarczoną w zestawie. Do
naładowania baterii do pełna potrzeba około 5 godzin. Podczas lądowania kontrolka
baterii jest czerwona. Po naładowaniu baterii kontrolka zmienia kolor na jasny zielony.
Uwaga:
f. Zalecamy podłączyć ładowarkę w przypadku gdy stan baterii jest poniżej 15%!
g. Używaj tylko ładowarki załączonej w zestawie !
h. Możesz podczas ładowania baterii korzystać z urządzenia jednak wydłuży to czas ładowania baterii
oraz obniży żywotność baterii.
i. Zalecamy naładować baterię urządzenia przed pierwszym użyciem.
j. Dla uzyskania optymalnej wydajności ogniw litowo-jonowych zalecanie jest częste ładowanie, unikaj
przechowywania urządzenia w stanie pełnego rozładowania oraz pełnego naładowania.
Kopiowanie plików
Zanim będziesz mógł dotwarzać filmy i piosenki musisz je wgrać do urządzenia.
(1) Podłącz urządzenie z komputerem przy pomocy kabla USB z zestawu.
(2) Dotknij “Włącz pamięć USB” aby udostępnić pamięć urządzenia.
(3) Po podłączeniu, dwa wymienne dyski twarde pojawią się na komputerze. Jeden
reprezentuje wewnętrzną pamięć urządzenia, a drugi przedstawia kartę pamięci
włożoną do urządzenia. Teraz można kopiować pliki z lub do tych dysków tak jak na
dysku twardym.
(4) Po wgraniu plików wybierz “Wyłącz pamięć USB” aby móc odłączyć urządzenie.
(5) Możesz odłączyć urządzenie od komputera.
Uwaga:
a) można obsługiwać urządzenia bez odłączania urządzenia od komputera. Podczas pracy
można przeciągnąć od góry do dołu bar, aby sprawdzić stan połączenia USB, a następnie
wybierz "USB Connected", aby włączyć port USB lub wybierz opcję "Wyłącz nośnik" aby
się rozłączyć.
b) System Android OS oraz zainstalowane aplikacje zajmują cześć pamięci około 1GB jest to
normalne zjawisko. Dlatego ilość dostępnego miejsca jest mniejsza niż wielkość
zainstalowanej pamięci NAND.
Pasek stanu przeciągnij na dół
Termékspecifikációk
| Márka: | GoClever |
| Kategória: | Tablet pc |
| Modell: | TAB R73 |
Szüksége van segítségre?
Ha segítségre van szüksége GoClever TAB R73, tegyen fel kérdést alább, és más felhasználók válaszolnak Önnek
Útmutatók Tablet pc GoClever

5 Október 2024
23 Szeptember 2024
22 Szeptember 2024
21 Augusztus 2024
21 Augusztus 2024
21 Augusztus 2024
16 Augusztus 2024
16 Augusztus 2024
16 Augusztus 2024
15 Augusztus 2024
Útmutatók Tablet pc
- Tablet pc Samsung
- Tablet pc Sony
- Tablet pc Panasonic
- Tablet pc Lenovo
- Tablet pc Toshiba
- Tablet pc HP
- Tablet pc Apple
- Tablet pc Fellowes
- Tablet pc Medion
- Tablet pc Motorola
- Tablet pc Alcatel
- Tablet pc TCL
- Tablet pc Gigaset
- Tablet pc Polaroid
- Tablet pc Huawei
- Tablet pc PEAQ
- Tablet pc PocketBook
- Tablet pc Sencor
- Tablet pc Parrot
- Tablet pc Viewsonic
- Tablet pc Amazon
- Tablet pc ZTE
- Tablet pc Vodafone
- Tablet pc Overmax
- Tablet pc Archos
- Tablet pc Kogan
- Tablet pc Prestigio
- Tablet pc Media-Tech
- Tablet pc IRiver
- Tablet pc Maxell
- Tablet pc Orion
- Tablet pc Schaub Lorenz
- Tablet pc Packard Bell
- Tablet pc IGET
- Tablet pc Vivitar
- Tablet pc A-Rival
- Tablet pc Aiptek
- Tablet pc Airis
- Tablet pc Ecom
- Tablet pc Tomtec
- Tablet pc Lexibook
- Tablet pc Maxdata
- Tablet pc Easypix
- Tablet pc Sunstech
- Tablet pc Blackberry
- Tablet pc Wolder
- Tablet pc Evga
- Tablet pc ATT
- Tablet pc Ricatech
- Tablet pc Mpman
- Tablet pc Vizio
- Tablet pc Logicom
- Tablet pc Hannspree
- Tablet pc Ingo
- Tablet pc Infinix
- Tablet pc Difrnce
- Tablet pc Hipstreet
- Tablet pc Cmx
- Tablet pc Klipad
- Tablet pc Memup
- Tablet pc Qware
- Tablet pc BQ
- Tablet pc Odys
- Tablet pc Eken
- Tablet pc Zipy
- Tablet pc HKC
- Tablet pc Woxter
- Tablet pc Storage Options
- Tablet pc Ninetec
- Tablet pc Hiteker
- Tablet pc SIM
- Tablet pc Kurio
- Tablet pc Mustek
- Tablet pc Bluetech
- Tablet pc Viewpia
- Tablet pc Handheld
- Tablet pc I-onik
- Tablet pc Velocity Micro
- Tablet pc KLIVER
- Tablet pc Empire Electronix
- Tablet pc Smartak
- Tablet pc Wintec
- Tablet pc Storex
- Tablet pc Skytex
- Tablet pc Sensation
- Tablet pc Visual Land
- Tablet pc GPCT Mid
- Tablet pc Motion Computing
- Tablet pc Vinci
- Tablet pc Smartbook
- Tablet pc Axxion
- Tablet pc IONIK
- Tablet pc Latte
- Tablet pc Wondermedia
- Tablet pc PENTAGRAM
- Tablet pc Telekom
- Tablet pc Lenovo A8-50
- Tablet pc Tobii
- Tablet pc Time2
- Tablet pc Synchro Digital
- Tablet pc Time 2
- Tablet pc Diversen
- Tablet pc NuVision
- Tablet pc Ice-Phone
Legújabb útmutatók Tablet pc
5 Október 2024
5 Október 2024
27 Szeptember 2024
27 Szeptember 2024
27 Szeptember 2024
23 Szeptember 2024
23 Szeptember 2024
23 Szeptember 2024
22 Szeptember 2024
17 Szeptember 2024