Használati útmutató Fusion MS-RA70NSX
Olvassa el alább 📖 a magyar nyelvű használati útmutatót Fusion MS-RA70NSX (30 oldal) a rádió kategóriában. Ezt az útmutatót 11 ember találta hasznosnak és 2 felhasználó értékelte átlagosan 4.5 csillagra
Oldal 1/30

®
F U S IO N E N T E R T A I N M E N T . C OM
FUSION®
MS-RA70NSX
O W N E R ’ S M A N U A L
ENGLISH

© 2018 Garmin Ltd. or its subsidiaries
All rights reserved. Under the copyright laws, this manual may not be copied, in whole or in part, without the written consent of Garmin. Garmin reserves the right to change or improve its
products and to make changes in the content of this manual without obligation to notify any person or organization of such changes or improvements. Go to for www.fusionentertainment.com
current updates and supplemental information concerning the use of this product.
Garmin®, the Garmin logo, FUSION®, and the Fusion logo are trademarks of Garmin Ltd. or its subsidiaries, registered in the USA and other countries. Connect IQ ™, FUSION-Link™, and FUSION-
Link Lite™ are trademarks of Garmin Ltd. or its subsidiaries. These trademarks may not be used without the express permission of Garmin.
Apple®, the Apple logo, iPod touch®, and iPhone® are trademarks of Apple Inc., registered in the U.S. and other countries. App Store SM is a service mark of Apple Inc., registered in the USA and
other countries. Android ™ and Google Play™ are trademarks of Google Inc. Bluetooth ® word mark and logos are owned by the Bluetooth SIG, Inc. and any use of such marks by Garmin is under
license. NMEA®, NMEA 2000®, and the NMEA 2000 logo are registered trademarks of the National Marine Electronics Association. SiriusXM ® and all related marks and logos are trademarks of
Sirius XM Radio Inc. All rights reserved. Other trademarks and trade names are those of their respective owners.
A02834 B02834

Table of Contents
Getting Started 1
Stereo Controls 1
Using the Dial to Select Items 1
Selecting a Source 1
Entering Text 1
Adjusting the Backlight Brightness and Contrast 1
Stereo Screen 1
Adjusting the Volume 1
Adjusting the Tones 1
Speaker Zones 1
Media Player Connection 2
USB Device Compatibility 2
Connecting a USB Device 2
Connecting an Auxiliary Device 2
Adjusting the Gain for an Auxiliary Device 2
Connecting to a Garmin® Watch 2
Bluetooth Device Playback 3
Connecting a Compatible Bluetooth Device 3
Bluetooth Range Information 3
Selecting a Different Bluetooth Source 3
Bluetooth Source Settings 3
USB Device Playback 3
Controlling Music Playback on a Connected Smartphone or
Media Player 3
Controlling Music Playback on a USB Flash Drive 3
Shuffling Songs 3
Setting a Song to Repeat 3
Radio 4
Setting the Tuner Region 4
Changing the Radio Station 4
Presets 4
Saving a Station as a Preset 4
Selecting a Preset from a List 4
Removing Presets 4
SiriusXM Satellite Radio 4
Enabling the SiriusXM Source 4
Locating the SiriusXM Radio ID 4
Activating a SiriusXM Subscription 4
Selecting a Category 4
Using Replay Mode 4
Enabling the TuneStart™ Feature 5
TuneMix™ Feature 5
Starting and Stopping a TuneMix Collection 5
Creating and Customizing a TuneMix Collection 5
Parental Controls 5
Unlocking the Parental Controls 5
Locking Channels 5
Clearing All Locked Channels 5
Changing the Parental Control Passcode 5
SiriusXM Troubleshooting 5
General Settings 6
Additional Stereo Control Options 6
FUSION-Link™ Wireless Remote Control App 6
FUSION-Link Lite Connect IQ App 6
FUSION-Link Network Technology 6
NMEA 2000 Remote Control and Display 6
Appendix 6
Registering Your MS-RA70NSX 6
Software Updates 7
Troubleshooting 7
The stereo does not respond to key presses 7
The stereo keeps locking up when connected to an Apple
device 7
The stereo is not finding my connected Apple device 7
My Bluetooth audio is interrupted by short breaks 7
The stereo does not display all song information from my
Bluetooth source 7
Specifications 7
Stereo Dimension Drawings 7
Front Dimensions 7
Side Dimensions 7
Top Dimensions 8
NMEA 2000 Information 8
Index 9
Table of Contents i


Getting Started
Stereo Controls
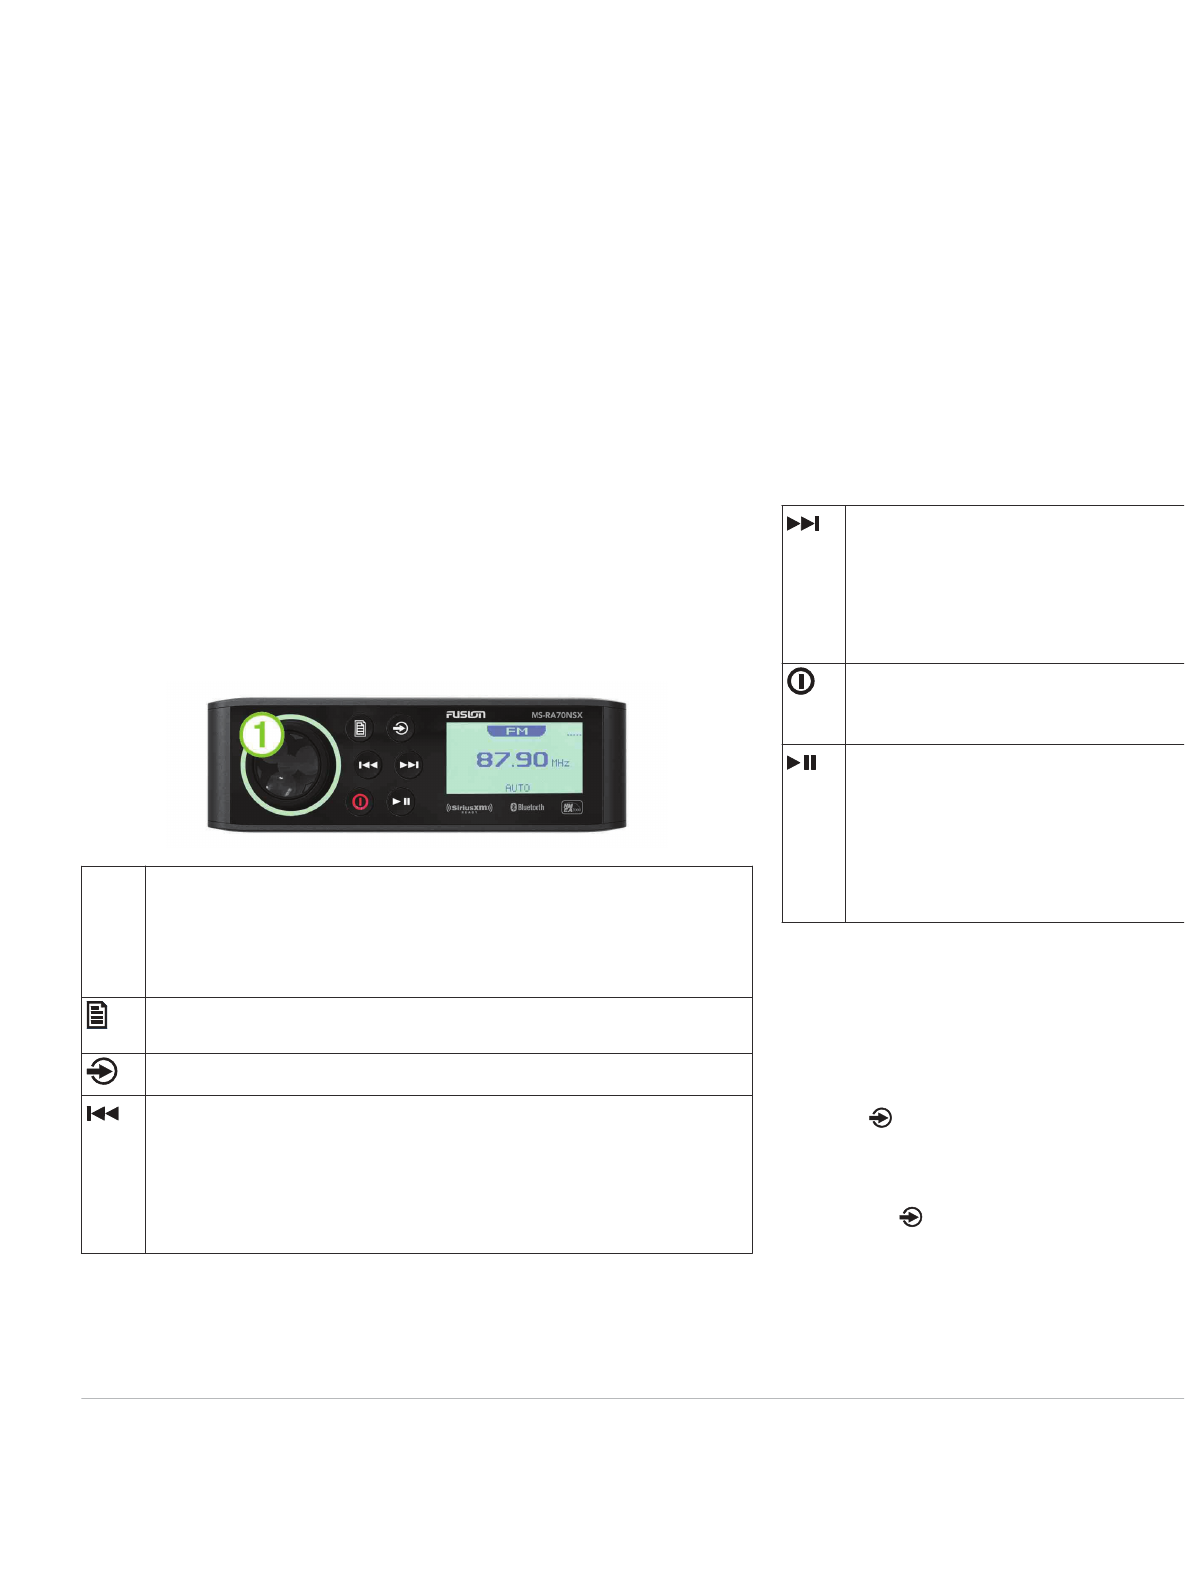
Dial
À
• Turn to adjust the volume.
• Press to switch between zones.
• Press and hold for at least one second to adjust the
subwoofer levels.
• Turn to move through the menus or adjust a setting.
• Press to select the highlighted option.
• Press to open a menu.
• Press to return to the previous screen or menu.
Press to change the source ( ).Selecting a Source, page 1
• Press to skip to the previous track, when using an applicable
source.
• AM or FM source:
◦ Press to tune to the previous station.
◦ Hold for faster tuning (manual mode only).
• AUX source: Select to decrease the gain for the connected
source.
• SIRIUSXM (in Live Mode) source:
◦ Press to tune to the previous channel, category, or preset.
◦ Hold for faster tuning.
• SIRIUSXM (in Replay Mode) source:
◦ Press to skip to the previous track.
◦ Hold to rewind the current track.
• Press to skip to the next track, when using an applicable
source.
• AM or FM source:
◦ Press to tune to the next station.
◦ Press and hold for faster tuning (manual mode only).
• AUX source: Press to increase the gain for the connected
source.
• SIRIUSXM (in Live Mode) source:
◦ Press to tune to the next channel, category, or preset.
◦ Hold for faster tuning.
• SIRIUSXM (in Replay Mode) source:
◦ Press to skip to the next track, if applicable.
◦ Hold to fast-forward the current track, if applicable.
• Press to turn on the stereo.
• When the stereo is on, press to mute the stereo.
• Press and hold to turn off the stereo.
• Press to pause or resume.
• AM or FM source:
◦ Press to cycle through the tuning modes: auto, manual,
and presets (when two or more presets are saved).
◦ Press and hold to save this station as a preset.
• SIRIUSXM source:
◦ Hold to switch between Replay Mode and Live Mode
( ).Using Replay Mode, page 4
◦ Replay Mode: press to pause and play the channel.
◦ Live Mode: Press to cycle through the tuning modes:
manual, category, and presets (when two or more presets
are saved).
Using the Dial to Select Items
You can use the dial to highlight and select items on the screen.
• Turn the dial to highlight an item on the screen.
• Press the dial to select the highlighted option.
Selecting a Source
1Select .
2Select an option:
• Turn the dial to highlight a source.
• Select repeatedly to highlight a source.
3Press the dial to select the source.
Entering Text
You can enter text to change some settings field values on this
device.
1In a settings field that allows you to enter text, select to
erase the existing characters.
2Use the dial to choose a letter, and press the dial to select it.
3Add additional letters to finish entering the text.
4Select to save the new text.
Adjusting the Backlight Brightness and Contrast
1Select > > .SETTINGS LCD
2Press the dial to select brightness or contrast.
3Adjust the brightness or contrast.
4Select to exit the menu.
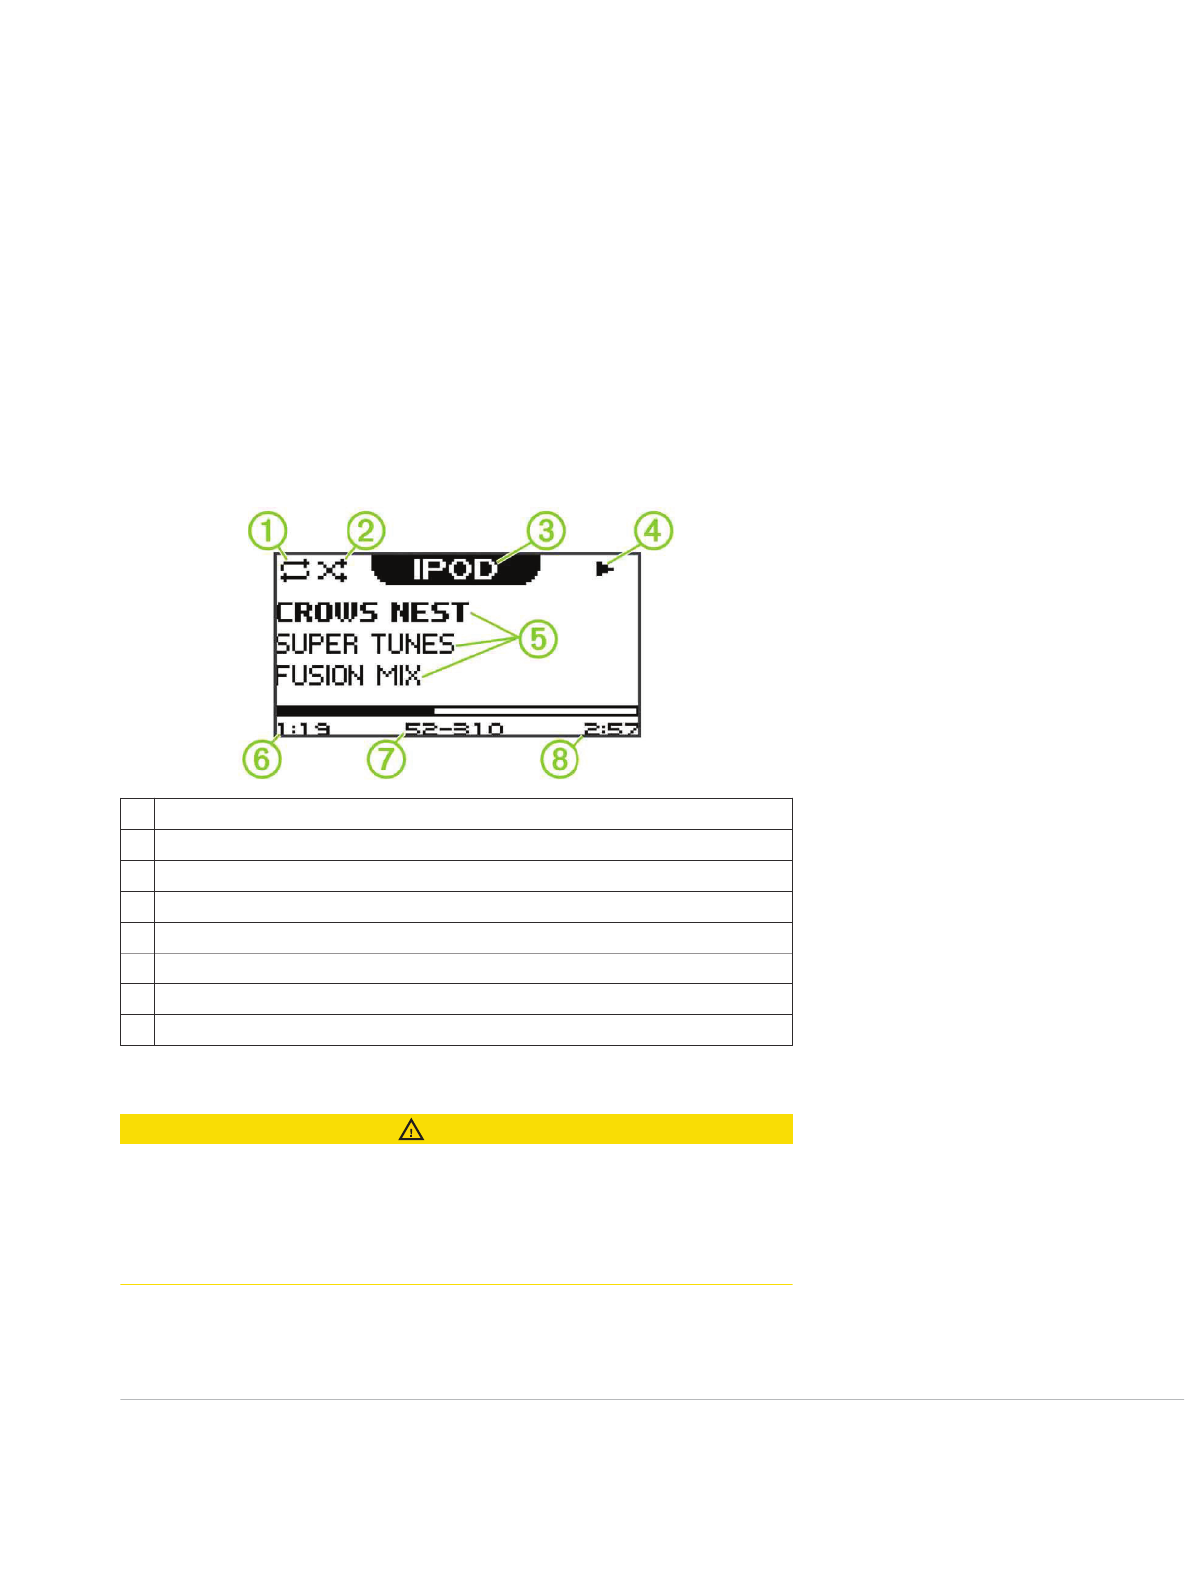
Stereo Screen
The information displayed on the stereo screen varies
depending on the source selected. This example shows the
stereo playing a track on an iPhone® mobile digital device.
ÀRepeat status icon
ÁShuffle status icon
ÂSource
ÃPlay status icon
ÄTrack details (if available)
ÅElapsed time
ÆCurrent track number out of total number of tracks in the playlist (if
available)
ÇTrack duration
Adjusting the Volume
1Use the dial to adjust the volume.
2If necessary, press the dial to switch between zones.
TIP: To control all zones at the same time, press the dial until
all zones are highlighted.
Adjusting the Tones
1Select > > .SETTINGS TONE
2Use the dial to adjust the level.
3Press the dial to switch between , , and .BASS MID TREBLE
Speaker Zones
You can group speakers in one area into speaker zones. This
enables you to control the audio level of the zones individually.
For example, you could make the audio quieter in the cabin and
louder on deck.
Getting Started 1

Zones 1 and 2 are powered by the on-board, Class AB amplifier.
To use the two line outputs and the two subwoofer outputs, you
must connect external amplifiers.
You can set the balance, volume limit, and name for each zone.
You can set the subwoofer level for zone 1.
Setting up Speaker Zones
1Select > > .SETTINGS ZONE
2Select a zone.
3Select one or more options:
NOTE: Not all options are available for all zones.
• To link zones 1 and 2, select to fill the LINK TO ZONE 1
option button (zone 2 only).
• To adjust the right and left speaker balance of this zone,
select , and use the dial to set the balance.BALANCE
• To limit the maximum volume output of this zone, select
VOLUME LIMIT, and use the dial to set the limit.
• To set the subwoofer filter, select , and use SUB FILTER
the dial to set the filter (zone 1 only).
• To set the subwoofer level, select , and use SUB LEVEL
the dial to set the level (zone 1 only).
TIP: To open the subwoofer level from any screen, press
and hold the dial for three seconds.
• To give the zone a specific name, select SET ZONE
NAME ( ).Entering Text, page 1
Linking Zones
Linking zones allows you to keep the volume levels of two zones
synchronized. Adjusting the volume of either of the linked zones
affects both zones.
1Select > > > .SETTINGS ZONE ZONE 2
2Select .LINK TO ZONE 1
When zones 1 and 2 are linked, appears between zones 1
and 2 on the volume screen.
NOTE: After zones 1 and 2 are linked, you cannot adjust the
volume of each zone individually.
Adjusting the Subwoofer Filter
You can use the subwoofer filter setting to control the subwoofer
cutoff frequency, which can enhance the blend of the sound
produced by the speakers and the subwoofer. Audio signals
above the selected frequency are not passed to the subwoofer.
The setting applies to both subwoofer outputs.
1Select > > > > .SETTINGS ZONE ZONE 1 SUB FILTER
2Select a frequency.
3Press the dial to save the selection.
Media Player Connection
CAUTION
Always disconnect your media player from the stereo when not
in use and do not leave it in your vessel. This helps reduce the
risk of theft and damage from extreme temperatures.
Do not remove the media player or use your stereo in a
distracting manner while operating the vessel. Check and obey
all marine laws in association with use.
The stereo accepts a variety of media players, including
smartphones and other mobile devices. You can connect a
compatible media player using a Bluetooth® wireless connection
or a USB connection to the USB port.
USB Device Compatibility
You can use a USB flash drive or the USB cable included with
your media player to connect a media player or mobile device to
the USB port.
The stereo is compatible with iAP2 Apple® devices such as the
iPhone X, iPhone 8 Plus, iPhone 8, iPhone 7 Plus, iPhone 7,
iPhone SE, iPhone 6s Plus, iPhone 6s, iPhone 6 Plus, iPhone 6,
iPhone 5s, iPhone 5c, iPhone 5, and iPod touch
® (5th and 6th
generation).
The stereo is compatible with Android™ devices that support the
Android Open Accessory (AOA) protocol.
NOTE: The stereo is not compatible with Android devices in
MTP or PTP mode. See the instructions for your Android device
to connect using AOA, if necessary.
The stereo is compatible with media players and other USB
mass storage devices, including USB flash drives. Music on
USB drives must meet these conditions:
• The USB mass storage device must be formatted using the
FAT32 file system.
• The music files must be formatted as MP3 files.
• Each folder on the storage device can contain a maximum of
250 MP3 files.
Connecting a USB Device
You can connect a USB device to the USB port on the stereo.
1Locate the USB port on the back of the stereo.
2Connect the USB device to the USB port.
3Select the USB source.
Connecting an Auxiliary Device
You can connect various auxiliary devices to the stereo. These
devices have either RCA connectors, a line output, or a
headphone output jack.
1Locate the auxiliary connectors on the wiring harness.
2If necessary, connect an RCA-to-3.5 mm adapter cable to the
auxiliary device.
3Connect the auxiliary device to the RCA connectors AUX IN
on the wiring harness.
4Select the source.AUX
Adjusting the Gain for an Auxiliary Device
You can adjust the gain for a connected auxiliary device to
achieve a volume level similar to that of other media sources.
You can adjust the gain in 1 dB increments.
1Select an auxiliary source.
2Select an option:
• To increase the gain, select .
• To decrease the gain, select .
NOTE: To achieve the best audio quality when using a
portable media player with headphone output, it may be
necessary to adjust the volume control on the media player,
instead of adjusting the gain.
Connecting to a Garmin® Watch
For a list of a compatible Garmin watches, go to
www.fusionentertainment.com.
For more information about the watch, see the watch manual at
www.garmin.com/manuals.
1Following the instructions in the watch manual, install the
FUSION-Link Lite™ app from the Connect IQ™ store onto the
watch.
2On the stereo, select the source.BT
3Select > .DISCOVERABLE
The stereo remains discoverable for two minutes.
4Bring the watch within 3 m (10 ft.) of the stereo.
NOTE: Stay 10 m (33 ft.) away from other ANT® devices
while pairing.
2 Media Player Connection

Radio
To listen to AM or FM radio, you must have a suitable marine
AM/FM antenna properly connected to the stereo and be within
range of a broadcasting station. For instructions on connecting
an AM/FM antenna, see the stereo installation instructions.
To listen to SiriusXM® radio, you must have the appropriate
equipment and subscriptions SiriusXM Satellite Radio,
page 4. For instructions on connecting a SiriusXM Connect
Vehicle Tuner, see the stereo installation instructions.
Setting the Tuner Region
You must select the region you are in to receive AM and FM
stations properly.
If you are connected to a compatible SiriusXM tuner and
antenna, and have a subscription (USA only), you must select
the region you are in to receive SiriusXM stations properly.
NOTE: SiriusXM is not available in all regions.
1Select > > .SETTINGS TUNER REGION
2Select the region you are in.
Changing the Radio Station
1Select an applicable source, such as .FM
2Select repeatedly to move through the tuning modes, and
select an option:
• Select to scan and stop on the next available AUTO
station.
• Select to select a station manually.MANUAL
• Select to select a saved station preset.PRESET
3Select or to tune to the station.
When in MANUAL tuning mode, you can hold or to
quickly advance through the stations.
Presets
You can save your favorite AM stations and FM stations as
presets for easy access.
You can save your favorite SiriusXM channels if you are
connected to an optional SiriusXM tuner and antenna.
Saving a Station as a Preset
1With an applicable source selected, tune the stereo to a
station.
2Select > .PRESETS
3Select .SAVE CURRENT
TIP: You can quickly save the selected station as a preset by
holding .
Selecting a Preset from a List
Before you can select a preset from a list, you must save at
least one station as a preset.
1Select the applicable source.
2Select > .PRESETS
3Select a preset from the list.
Removing Presets
1With an applicable source selected, select > > PRESETS
REMOVE PRESET.
2Select an option:
• To remove one preset, select the preset.
• To remote all presets, select .REMOVE ALL PRESETS
SiriusXM Satellite Radio
Only SiriusXM brings you more of what you love to listen to, all
in one place. Get over 140 channels, including commercial-free
music plus the best sports, news, talk, comedy and
entertainment. Welcome to the world of satellite radio. A
SiriusXM Vehicle Tuner and subscription are required. For more
information, go to .www.siriusxm.com
Enabling the SiriusXM Source
You must enable the SiriusXM source before you can listen to
SiriusXM Satellite Radio.
Select > > > .SETTINGS TUNER REGION USA
Locating the SiriusXM Radio ID
You must have the radio ID of your SiriusXM Connect Tuner
before you can activate your SiriusXM subscription. You can
locate the SiriusXM Radio ID on the back of the SiriusXM
Connect Tuner or its packaging, or by tuning your stereo to
channel 0.
With the SiriusXM source selected, select > > CHANNELS
ALL CHANNELS 000 RADIO ID > .
The SiriusXM Radio ID does not include the letters I, O, S, or F.
Activating a SiriusXM Subscription
1With the SiriusXM source selected, tune to channel 1.
You should be able to hear the preview channel. If not, check
the SiriusXM Connect Tuner and antenna installation and
connections, and try again.
2Tune to channel 0 to locate the Radio ID.
3Contact SiriusXM listener care by phone at (866) 635-2349 or
go to to subscribe in the www.siriusxm.com/activatenow
United States. Contact SiriusXM by phone at (877) 438-9677
or go to to subscribe in Canada. www.siriusxm.ca/activatexm
4Provide the Radio ID.
The activation process usually takes 10 to 15 minutes, but
can take up to an hour. For the SiriusXM Connect Tuner to
receive the activation message, it must be turned on and
receiving the SiriusXM signal.
5If the service is not activated within the hour, go to
http://care.siriusxm.com/refresh or contact SiriusXM by phone
at 1-855-MYREFRESH (697-3373).
Selecting a Category
You can control which categories of channels are available
when using the CATEGORY tuning method.
1With the SiriusXM source selected, select > .CATEGORY
2Select a category.
Using Replay Mode
You can use Replay Mode to control playback of a SiriusXM
broadcast.
NOTE: The device enables Replay Mode automatically when
playing saved preset channels.
1If necessary, hold to enable Replay Mode.
A symbol appears at the top of the screen, and a progress
bar appears at the bottom.
2Select an option:
• Press to pause and resume playback.
• Hold to exit Replay Mode.
• Hold or to rewind or fast-forward the track.
• Press or to skip backward or forward in increments.
NOTE: If you fast-forward or skip forward to the end of the
progress bar, the stereo exits Replay Mode automatically.
4 Radio

Enabling the TuneStart™ Feature
When you enable the TuneStart feature and tune to a preset
channel, the stereo starts the current song from the beginning of
the song instead of starting it from the point it is at in the live
broadcast.
NOTE: The TuneStart feature is available when tuning to preset
channels only.
If necessary, select > > .SXM SETTINGS TUNESTART
When the TuneStart feature starts a song from the beginning, a
progress bar appears and you can control the track using the
same controls as Replay Mode ( ).Using Replay Mode, page 4
TuneMix™ Feature
Starting and Stopping a TuneMix Collection
Before you can start playing a TuneMix collection, you must
create one (Creating and Customizing a TuneMix Collection,
page 5).
The TuneMix feature enables you mix your favorite music
channels to create a custom listening experience.
1Select > .TUNEMIX
2Select a TuneMix collection.
The stereo begins playing the TuneMix collection.
3To stop playing a TuneMix collection, select > , CHANNELS
and select a channel.
The stereo stops playing the TuneMix collection and begins
playing the selected channel.
Creating and Customizing a TuneMix Collection
You can create up to 10 unique TuneMix collections on the
stereo.
1Select > > .SXM SETTINGS TUNEMIX
2Select a TuneMix collection.
3Select a channel to fill the check box and add it to the
TuneMix collection.
4After you are finished customizing the TuneMix collection,
select .
5Repeat steps 2 through 4 for each TuneMix collection you
want to customize.
Parental Controls
The parental control feature allows you to limit access to any
SiriusXM channels, including those with mature content. When
the parental control feature is enabled, you must enter a
passcode to tune to the locked channels. You can also change
the 4-digit passcode.
Unlocking the Parental Controls
You can unlock the parental controls to access locked channels.
1With the source selected, select > .SIRIUSXM PARENTAL
2Select the check box.UNLOCK
3Enter the passcode.
TIP: The default passcode is 0000.
The parental controls remain unlocked until you turn off the
vehicle or until you lock them again.
Locking Channels
1With the source selected, select > .SIRIUSXM PARENTAL
2Select the check box.UNLOCK
3Enter the passcode.
TIP: The default passcode is 0000.
4Select .LOCK/UNLOCK
A list of available channels appears.
5Select one or more channels to lock, and select .
6Clear the check box to lock the parental controls.UNLOCK
You cannot access the locked channels while the parental
controls are locked. You must unlock the parental controls to
tune the locked channels.
Clearing All Locked Channels
1With the source selected, select > SIRIUSXM PARENTAL
> .UNLOCK
2Enter the passcode.
3Select > > .PARENTAL CLEAR ALL LOCKED
Changing the Parental Control Passcode
1With the source selected, select > SIRIUSXM PARENTAL
> .UNLOCK
2Enter the passcode.
3Select > > .PARENTAL CHANGE PIN
4Follow the on-screen instructions.
SiriusXM Troubleshooting
Advisory Description Resolutions
Check Antenna The radio has detected a fault with the SiriusXM
antenna. The antenna cable may be disconnected or
damaged.
• Verify the antenna cable is connected to the SiriusXM Connect
Vehicle Tuner.
• Inspect the antenna cable for damage and kinks. Replace the antenna
if the cable is damaged. SiriusXM products are available at your local
car audio retailer, or at .www.shop.siriusxm.com
Check Tuner The stereo is having difficulty communicating with the
SiriusXM Connect Vehicle Tuner. The tuner may be
disconnected or damaged.
Verify the SiriusXM Connect Vehicle Tuner cable is connected securely
to the stereo.
No Signal The SiriusXM Connect Vehicle Tuner is having
difficulty receiving the SiriusXM satellite signal.
• Verify the SiriusXM antenna is outdoors with a clear view of the sky.
• Verify the SiriusXM antenna is mounted securely.
• Remove obstructions above or next to the SiriusXM antenna.
• Inspect the cable antenna for damage and kinks. Replace the antenna
if the cable is damaged. SiriusXM products are available at your local
car audio retailer or at .www.shop.siriusxm.com
• Consult the SiriusXM Connect Vehicle Tuner installation instructions
for more information on antenna installation.
SiriusXM Satellite Radio 5

Advisory Description Resolutions
Subscription
Updated
The radio has detected a change in your SiriusXM
subscription status.
• Select any button to clear the message.
• Go to or call 866-635-2349 with questions about www.siriusxm.com
your subscription.
Channel Not
Available
The channel you requested is not a valid SiriusXM
channel, or the channel that you were listening to is no
longer available. You may see this message briefly the
first time you connect a new SiriusXM Connect Vehicle
Tuner.
Go to for more information about the SiriusXM www.siriusxm.com
channel lineup.
Channel Not
Subscribed
The channel you requested is not included in your
SiriusXM subscription package, or the channel you
were listening to is no longer included in your SiriusXM
subscription package.
Go to or call 866-635-2349 for more information www.siriusxm.com
about your subscription package or to subscribe to the channel.
Channel Locked The channel you requested is locked by the parental
control feature.
Refer to the parental control section in the owner's manual to unlock
channels.
General Settings
Select > SETTINGS.
NOTE: When a check box is filled, the option is on. When a
check box is clear, the option is off.
ZONE: Enables you to configure the speaker zones (Speaker
Zones, page 1).
ZONE > TONE: Adjusts the bass, middle, and treble tones.
LCD: Adjusts the backlight brightness and contrast settings
( ).Adjusting the Backlight Brightness and Contrast, page 1
POWER SAVE: Disables the LCD backlight after one minute of
inactivity to save battery power.
LANGUAGE: Sets the language on the device.
TUNER REGION: Sets the region used by the FM, AM, and
SIRIUSXM sources.
TEL MUTE: Sets the behavior of the mute function when the
device is connected to a hands-free mobile phone. When a
call is received, the device can either mute the audio or
broadcast the call through the AUX input. See your hands-
free kit instructions.
SET DEVICE NAME: Sets a name for this stereo (Entering Text,
page 1).
UPDATE > HEAD UNIT: Updates the stereo using a valid
software update file on a connected USB flash drive.
UPDATE > MS-NRX300/MS-NRX200: Updates compatible NRX
series remote controls on the same NMEA 2000
® network
using a valid software update file on a connected USB flash
drive.
UPDATE > FACTORY RESET: Resets all settings to the factory
default values.
ABOUT: Shows the software versions for the stereo, FUSION-
Link™, and connected remote.
Additional Stereo Control Options
FUSION-Link™ Wireless Remote Control App
You can use the FUSION-Link remote control app on your
compatible Apple or Android device to adjust the stereo volume,
change the source, control playback, select and manage radio
presets, and adjust some stereo settings.
The app communicates with the stereo using a wireless
connection to the mobile device. You must connect your
compatible device to the stereo using Bluetooth technology to
use the app.
For information about the FUSION-Link remote control app for
compatible Apple or Android devices, go to the Apple App
StoreSM or the Google Play™ store.
FUSION-Link Lite Connect IQ App
You can use the FUSION-Link Lite Connect IQ app on your
compatible Garmin watch to adjust the volume, change the
source, and control media playback on the stereo (Connecting
to a Garmin® Watch, page 2).
FUSION-Link Network Technology
FUSION-Link network technology allows you to fully control
compatible FUSION® entertainment systems on compatible
multi-function displays installed at the helm, flybridge, or
navigation station of the vessel. This provides integrated
entertainment control and a less cluttered console.
The partnered multi-function display becomes the portal on
which you can control all audio on the vessel, no matter where
on the vessel the connected stereo is installed. The FUSION-
Link equipped stereo can be installed out of sight if space is an
issue and users need to access the stereo only to replace
removable media.
FUSION-Link technology offered on this device can
communicate using existing industry-standard NMEA 2000
networks.
For a list of FUSION-Link capable products from companies
partnered with FUSION, go to .www.fusionentertainment.com
NMEA 2000 Remote Control and Display
The stereo can be controlled by compatible FUSION wired
remote controls installed in the audio zones throughout the
vessel. Operating the entertainment system from the remote
control is similar to operating it from the main stereo.
FUSION wired remote controls operate over an existing NMEA
2000 network, so wiring the remote controls directly to the
stereo is not necessary. All remote controls connected to the
same NMEA 2000 network as the stereo can control the stereo.
If your vessel does not have a NMEA 2000 network, you can
directly connect a single FUSION remote control or create a
FUSION remote control network to connect multiple FUSION
wired remote controls directly to the NMEA connector on the
stereo. See the installation instructions provided with your stereo
and remote for more information.
The FUSION wired remote control can also serve as an NMEA®
display showing NMEA navigation data or vessel performance
data from other NMEA devices on an existing NMEA 2000
network. See the instructions provided with your remote control
for information on supported NMEA 2000 PGN information.
Appendix
Registering Your MS-RA70NSX
Help us better support you by completing our online registration
today.
6 General Settings

• Go to .www.fusionentertainment.com
• Keep the original sales receipt, or a photocopy, in a safe
place.
Software Updates
For best results, you should update the software in all FUSION
devices at the time of installation to ensure compatibility.
You can update the software using a USB flash drive. For
software updates and instructions on updating the device using
the USB flash drive, go to the device product page at
www.fusionentertainment.com/marine.
Troubleshooting
The stereo does not respond to key presses
• Turn off power to the stereo for two minutes to reset the
stereo.
The stereo keeps locking up when connected to an
Apple device
• Press and hold the power button to reset the stereo.
• Reset the Apple device. Go to for more www.apple.com
information.
• Make sure you have the latest version of iTunes® and the
latest operating software on your Apple device.
The stereo is not finding my connected Apple device
• Make sure you have the latest version of iTunes and the
latest operating software on your Apple device.
• Make sure you have the latest version of the FUSION-Link
application on your Apple device.
• Reset the Apple device.
Go to for more information.www.apple.com
• Contact your FUSION dealer or send an email to FUSION
from .www.fusionentertainment.com
My Bluetooth audio is interrupted by short breaks
• Ensure the media player is not covered or obstructed.
Bluetooth technology performs best with line-of-sight
operation.
• Bring the media player within 10 m (33 ft.) of the stereo.
• Turn off the setting after pairing a DISCOVERABLE
Bluetooth device to the stereo.
The stereo does not display all song information from
my Bluetooth source
The availability of song information such as song title, artist
name, track duration, and album cover artwork depends on the
capability of the media player and music application.
Specifications
General
Weight 556 g (19.6 oz.)
Water resistance IEC 60529 IPX7 (front), IEC 60529 IPX3
(rear)
Operating temperature
range
From 0 to 50°C (from 32 to 122°F)
Storage temperature range From -20 to 70°C (from -4 to 158°F)
Input voltage From 10.8 to 16 Vdc
Current (max.) 15 A
Current (muted) Less than 900 mA
Current (standby) Less than 15 mA
NMEA 2000 LEN 1 (50 mA)
ANT wireless range Up to 3 m (10 ft.)
General
Compass-safe distance 15 cm (5.9 in.)
Wireless frequencies/
protocols
Bluetooth: Class 2
Bluetooth/ANT frequency: 2,402 through
2,480 MHz
Bluetooth/ANT transmit power:
1.9 dBm EIRP nominal
On-board, Class AB Amplifier
Output music power per channel 50 W max. x 4 channels at 4 ohm per
channel
Total output music power 200 W max.
Tuner Europe and
Australasia
USA Japan
FM radio
frequency range
87.5 to 108 MHz 87.5 to
107.9 MHz
76 to 95 MHz
FM frequency
step
50 kHz 200 kHz 50 kHz
AM radio
frequency range
522 to 1620 kHz 530 to
1710 kHz
522 to
1620 kHz
AM frequency
step
9 kHz 10 kHz 9 kHz
Stereo Dimension Drawings
Front Dimensions
À188 mm (7.40 in.)
Á60 mm (2.36 in.)
Side Dimensions
À23.5 mm (0.93 in.)
Á100 mm (3.94 in.)
Â50 mm (1.97 in.)
Appendix 7

Top Dimensions
À161 mm (6.34 in.)
Á23.5 mm (0.93 in.)
Â12 mm (0.47 in.)
NMEA 2000 Information
NMEA 2000 is the most popular marine standard for data
communication within vessels. It has become the standard for
sending navigation and engine management data within
vessels. FUSION introduces an industry-first product by
incorporating NMEA 2000 functionality in its audio remote
control devices. This enables the user to monitor a series of
NMEA sentences available over the NMEA 2000 network on a
connected remote control.
Go to for a full list of supported www.fusionentertainment.com
NMEA sentences.
8 Appendix

Index
A
AM 4
Android device 3
Android devices 6
ANT devices 2
Apple device 3, 7
Apple devices 6
auxiliary input 2
B
backlight 1
bass 1
Bluetooth devices 2, 3, 6
D
device
keys 1
registration 6
F
FM 4
FUSION-Link 6
G
gain 2
K
keys 1, 6
L
language 6
M
media player 2
menu key 1
N
NMEA 2000 8
P
power key 1
presets 4
product registration 6
R
radio
AM 4
FM 4
SiriusXM 4, 5
registering the device 6
remote control 6
repeat 3
S
SiriusXM 4
parental controls 5
Satellite Radio 4, 5
source 1
speaker zones 1, 2
subwoofer 2
T
time
format 6
setting 6
tone 1, 6
treble 1
U
USB 2, 3
flash drive 3
USB devices 2
V
volume 2
adjusting 1
W
watch 2
Index 9

®
F U S IO N E N T E R T A IN M E N T . CO M
FUSION SUPPORT
New Zealand 09 369 2900
Australia 1300 736 012
Europe +44 (0) 370 850 1244
USA 623 580 9000
Pacific +64 9 369 2900
July 2018 190-02431-00_0A

F U S I O N E N T E
FUSION® M
Quick S
Quick Start Manual 2
Manuel de démarrage rapide 5
Guía de inicio rápido 9
065$16;
4XLFN6WDUW0DQXDO
*HWWLQJ6WDUWHG
6WHUHR&RQWUROV
'LDO➀ 7XUQWRDGMXVWWKHYROXPH
3UHVVWRVZLWFKEHWZHHQ]RQHV
3UHVVDQGKROGIRUDWOHDVWRQHVHFRQGWRDGMXVWWKHVXEZRRIHUOHYHOV
7XUQWRPRYHWKURXJKWKHPHQXVRUDGMXVWDVHWWLQJ
3UHVVWRVHOHFWWKHKLJKOLJKWHGRSWLRQ
3UHVVWRRSHQDPHQX
3UHVVWRUHWXUQWRWKHSUHYLRXVVFUHHQRUPHQX
3UHVVWRFKDQJHWKHVRXUFHSDJH
3UHVVWRVNLSWRWKHSUHYLRXVWUDFNZKHQXVLQJDQDSSOLFDEOHVRXUFH
$0RU)0VRXUFH
ƕ 3UHVVWRWXQHWRWKHSUHYLRXVVWDWLRQ
ƕ +ROGIRUIDVWHUWXQLQJPDQXDOPRGHRQO\
$8;VRXUFH6HOHFWWRGHFUHDVHWKHJDLQIRUWKHFRQQHFWHGVRXUFH
6,5,86;0VRXUFH3UHVVWRUHWXUQWRWKHSUHYLRXVFKDQQHO
3UHVVWRVNLSWRWKHQH[WWUDFNZKHQXVLQJ
$0RU)0VRXUFH
ƕ 3UHVVWRWXQHWRWKHQH[WVWDWLRQ
ƕ 3UHVVDQGKROGIRUIDVWHUWXQLQJPDQXD
$8;VRXUFH3UHVVWRLQFUHDVHWKHJDLQIRU
6,5,86;0VRXUFH3UHVVWRDGYDQFHWRWKH
3UHVVWRWXUQRQWKHVWHUHR
:KHQWKHVWHUHRLVRQSUHVVWRPXWHWKHVW
3UHVVDQGKROGWRWXUQRIIWKHVWHUHR
3UHVVWRSDXVHRUUHVXPH
$0RU)0VRXUFH
ƕ 3UHVVWRF\FOHWKURXJKWKHWXQLQJPRGHV
ZKHQWZRRUPRUHSUHVHWVDUHVDYHG
ƕ 3UHVVDQGKROGWRVDYHWKLVVWDWLRQDVD
6,5,86;0VRXUFH3UHVVWRPRYHWKURXJK
SUHVHWV
8VLQJWKH'LDOWR6HOHFW,WHPV
<RXFDQXVHWKHGLDOWRKLJKOLJKWDQGVHOHFWLWHPV
7XUQWKHGLDOWRKLJKOLJKWDQLWHPRQWKHVFUHH
3UHVVWKHGLDOWRVHOHFWWKHKLJKOLJKWHGRSWLRQ
6HOHFWLQJD6RXUFH
6HOHFW
6HOHFWDQRSWLRQ
7XUQWKHGLDOWRKLJKOLJKWDVRXUFH
6HOHFW UHSHDWHGO\WRKLJKOLJKWDVRXUFH
3UHVVWKHGLDOWRVHOHFWWKHVRXUFH
6WHUHR6FUHHQ
7KHLQIRUPDWLRQGLVSOD\HGRQWKHVWHUHRVFUHHQYD
VHOHFWHG7KLVH[DPSOHVKRZVWKHVWHUHRSOD\LQJ
GHYLFH
➀5HSHDWVWDWXVLFRQ
➁6KXIIOHVWDWXVLFRQ
➂6RXUFH
➃3OD\VWDWXVLFRQ
➄7UDFNGHWDLOVLIDYDLODEOH
➅(ODSVHGWLPH
➆&XUUHQWWUDFNQXPEHURXWRIWRWDOQXPEHURIWUDFNVLQWKHSOD\OLVWLIDYDLODEOH
➇7UDFNGXUDWLRQ
0HGLD3OD\HU&RQQHFWLRQ
&$87,21
$OZD\VGLVFRQQHFW\RXUPHGLDSOD\HUIURPWKHVWHUHRZKHQQRWLQXVHDQGGRQRW
OHDYHLWLQ\RXUYHVVHO7KLVKHOSVUHGXFHWKHULVNRIWKHIWDQGGDPDJHIURP
H[WUHPHWHPSHUDWXUHV
'RQRWUHPRYHWKHPHGLDSOD\HURUXVH\RXUVWHUHRLQDGLVWUDFWLQJPDQQHUZKLOH
RSHUDWLQJWKHYHVVHO&KHFNDQGREH\DOOPDULQHODZVLQDVVRFLDWLRQZLWKXVH
7KHVWHUHRDFFHSWVDYDULHW\RIPHGLDSOD\HUVLQFOXGLQJVPDUWSKRQHVDQGRWKHU
PRELOHGHYLFHV<RXFDQFRQQHFWDFRPSDWLEOHPHGLDSOD\HUXVLQJD%OXHWRRWK
ZLUHOHVVFRQQHFWLRQRUD86%FRQQHFWLRQWRWKH86%SRUW
127(,I\RXFRQQHFWDVXSSRUWHGPHGLDSOD
GLVDEOH%OXHWRRWKRQWKHPHGLDSOD\HURUXQ
WKHVWHUHRWRDYRLGSRVVLEOHPHGLDSOD\EDFN
86%'HYLFH&RPSDWLELOLW\
<RXFDQXVHD86%IODVKGULYHRUWKH86%FD
WRFRQQHFWDPHGLDSOD\HURUPRELOHGHYLFHW
7KHVWHUHRLVFRPSDWLEOHZLWKL$3$SSOHGH
L3KRQHL3KRQHV3OXVL3KRQHVL3KRQH
L3KRQHFL3KRQHDQGL3RGWRXFKWKDQ
7KHVWHUHRLVFRPSDWLEOHZLWK$QGURLGGHYLF
$FFHVVRU\$2$SURWRFRO
127(7KHVWHUHRLVQRWFRPSDWLEOHZLWK$QG
6HHWKHLQVWUXFWLRQVIRU\RXU$QGURLGGHYLFH
7KHVWHUHRLVFRPSDWLEOHZLWKPHGLDSOD\HUV
GHYLFHVLQFOXGLQJ86%IODVKGULYHV0XVLFR
FRQGLWLRQV
7KH86%PDVVVWRUDJHGHYLFHPXVWEHIR
V\VWHP
7KHPXVLFILOHVPXVWEHIRUPDWWHGDV03
(DFKIROGHURQWKHVWRUDJHGHYLFHFDQFR
&RQQHFWLQJD86%'HYLFH
<RXFDQFRQQHFWD86%GHYLFHWRWKH86%S
/RFDWHWKH86%SRUWRQWKHEDFNRIWKHV
&RQQHFWWKH86%GHYLFHWRWKH86%SRUW
6HOHFWWKH86%VRXUFH
&RQQHFWLQJD&RPSDWLEOH%OXHWRRWK'HYLF
<RXFDQSOD\PHGLDIURPDFRPSDWLEOH%OXHW
ZLUHOHVVFRQQHFWLRQ
<RXFDQFRQWUROWKHPXVLFSOD\EDFNZLWKWKH
XVLQJWKH)86,21/LQNVPDUWSKRQHDSS)
4XLFN6WDUW0DQXDO

/LQNDSSIRUFRPSDWLEOH$SSOHRU$QGURLGGHYLFHVJRWRWKH$SSOH$SS6WRUH 60RU
WKH*RRJOH3OD\VWRUH
6HOHFWWKH%OXHWRRWKVRXUFH
6HOHFW ! WRPDNHWKHVWHUHRYLVLEOHWR\RXUFRPSDWLEOH',6&29(5$%/(
%OXHWRRWKGHYLFH
(QDEOH%OXHWRRWKRQ\RXUFRPSDWLEOH%OXHWRRWKGHYLFH
%ULQJWKHFRPSDWLEOH%OXHWRRWKGHYLFHZLWKLQPIWRIWKHVWHUHR
2Q\RXUFRPSDWLEOH%OXHWRRWKGHYLFHVHDUFKIRU%OXHWRRWKGHYLFHV
2Q\RXUFRPSDWLEOH%OXHWRRWKGHYLFHVHOHFWWKHVWHUHRIURPWKHOLVWRI
GHWHFWHGGHYLFHV
2Q\RXUFRPSDWLEOH%OXHWRRWKGHYLFHIROORZWKHRQVFUHHQLQVWUXFWLRQVWRSDLU
DQGFRQQHFWWRWKHGLVFRYHUHGVWHUHR
:KHQSDLULQJ\RXUFRPSDWLEOH%OXHWRRWKGHYLFHPD\DVN\RXWRFRQILUPD
FRGHRQWKHVWHUHR7KHVWHUHRGRHVQRWGLVSOD\DFRGHEXWLWGRHVFRQQHFW
FRUUHFWO\ZKHQ\RXFRQILUPWKHPHVVDJHRQWKH%OXHWRRWKGHYLFH
,I\RXUFRPSDWLEOH%OXHWRRWKGHYLFHGRHVQRWLPPHGLDWHO\FRQQHFWWRWKH
VWHUHRUHSHDWVWHSVWKURXJK
7RSUHYHQWLQWHUUXSWLRQWRDXGLRVWUHDPLQJRYHU%OXHWRRWKZLUHOHVV\RXFDQWXUQ
RIIWKH',6&29(5$%/(VHWWLQJDIWHUSDLULQJD%OXHWRRWKGHYLFHWRWKHVWHUHR
%OXHWRRWK5DQJH,QIRUPDWLRQ
7KHVWHUHRDQG%OXHWRRWKZLUHOHVVGHYLFHVKDYHDUDQJHRIPIW)RU
RSWLPDOSHUIRUPDQFHWKH%OXHWRRWKZLUHOHVVGHYLFHVKRXOGDOVRKDYHDFOHDUOLQH
RIVLJKWWRWKHVWHUHR
&RQQHFWLQJWKH6WHUHRWRD*DUPLQ:DWFK
)RUPRUHLQIRUPDWLRQDERXWWKHZDWFKVHHWKHZDWFKPDQXDODWZZZJDUPLQFRP
PDQXDOV
)ROORZLQJWKHLQVWUXFWLRQVLQWKHZDWFKPDQXDOLQVWDOOWKH)86,21/LQNDSS
IURPWKH&RQQHFW,4VWRUHRQWRWKHZDWFK
2QWKHVWHUHRVHOHFWWKH VRXUFH%7
6HOHFW ! ',6&29(5$%/(
7KHVWHUHRUHPDLQVGLVFRYHUDEOHIRUWZRPLQX
%ULQJWKHZDWFKZLWKLQPIWRIWKHVWHUHR
127(6WD\PIWDZD\IURPRWKHU$1
2SHQWKH)86,21/LQNDSSRQWKHZDWFK
7KHILUVWWLPH\RXRSHQWKHDSSRQWKHZDWFK
ZLWKDQGFRQQHFWVWRWKHVWHUHR,I\RXQHHGWR
)86,21/LQNDSSVHOHFW !6HWWLQJV 3DLUQHZ
&RQWUROWKHDXGLRSOD\EDFNXVLQJWKH)86,21
$IWHUWKHGHYLFHVDUHSDLUHGWKH\FRQQHFWDXWRPD
ZLWKLQUDQJHDQGWKHDSSLVRSHQRQWKHZDWFK
3OD\LQJ0HGLD
6HOHFWLQJD6RXUFH
6HOHFW
6HOHFWDQRSWLRQ
7XUQWKHGLDOWRKLJKOLJKWDVRXUFH
6HOHFW UHSHDWHGO\WRKLJKOLJKWDVRXUFH
3UHVVWKHGLDOWRVHOHFWWKHVRXUFH
6HWWLQJWKH7XQHU5HJLRQ
<RXPXVWVHOHFWWKHUHJLRQ\RXDUHLQWRUHFHLYH$
,I\RXDUHFRQQHFWHGWRDFRPSDWLEOH6LULXV;0WX
VXEVFULSWLRQ86$RQO\\RXPXVWVHOHFWWKHUHJLR
6LULXV;0VWDWLRQVSURSHUO\
127(6LULXV;0LVQRWDYDLODEOHLQDOOUHJLRQV
6HOHFW ! ! 6(77,1*6 781(55(*,21
6HOHFWWKHUHJLRQ\RXDUHLQ
&KDQJLQJWKH5DGLR6WDWLRQ
6HOHFWDQDSSOLFDEOHVRXUFHVXFKDV )0


F U
FUSION SUPPORT
New Zealand 09 369 2900
Australia 1300 736 012
Europe +44 (0) 370 850 1244
USA 623 580 9000
Pacific +64 9 369 2900
Garmin®, the Garmin logo, FUSION®, and the Fusion logo are trademarks of Garmin Ltd. or its subsidiaries, registered in the USA and other countries. These
trademarks may not be used without the express permission of Garmin.
Apple®, the Apple logo, iPod touch®, and iPhone® are trademarks of Apple Inc., registered in the U.S. and other countries. App Store
SM is a service mark of
Apple Inc., registered in the USA and other countries. Android™ is a trademark of Google Inc. Bluetooth® word mark and logos are owned by the Bluetooth
SIG, Inc. and any use of such marks by Garmin is under license. NMEA
®, NMEA 2000®, and the NMEA 2000 logo are registered trademarks of the National
Marine Electronics Association. SiriusXM® and all related marks and logos are trademarks of Sirius XM Radio Inc. All rights reserved. Other trademarks and
trade names are those of their respective owners.
A02834 B02834
El número de registro COFETEL/IFETEL puede ser revisado en el manual a través de la siguiente página de internet.
190
Jun
Pri

®
FUSION® MS-RA70NSX Installation
Instructions
Important Safety Information
WARNING
Failure to follow these warnings and cautions could result in
personal injury, damage to the vessel, or poor product
performance.
See the guide in the Important Safety and Product Information
product box for product warnings and other important
information.
This device must be installed according to these instructions.
Disconnect the vessel's power supply before beginning to install
this product.
Before applying power to this product, make sure it has been
correctly grounded, following the instructions in the guide.
CAUTION
Always wear safety goggles, ear protection, and a dust mask
when drilling, cutting, or sanding.
NOTICE
When drilling or cutting, always check what is on the opposite
side of the surface.
You must read all installation instructions before beginning the
installation. If you experience difficulty during the installation,
contact FUSION Product Support.
What's In the Box
• DIN mounting plate
• Four 8-gauge, self-tapping screws
• Power and speaker wiring harness
• Auxiliary-in, line-out, and subwoofer-out wiring harness
Tools Needed
• Phillips screwdriver
• Electric drill
• Drill bit (size varies based on surface material and screws
used)
• Rotary cutting tool or jigsaw
• Marine sealant (optional)
Mounting Considerations
• The stereo can be mounted on a flat surface or in a single-
DIN opening as a replacement for an existing stereo.
• The stereo must be mounted in a location that allows open
airflow around the rear of the stereo for heat ventilation.
• If you are installing the stereo in a location that may be
exposed to water, it must be mounted within 45 degrees of
the horizontal plane.
• If you are installing the stereo in a location that may be
exposed to water, the cable should have a drip loop to allow
water to drip down off the cable and avoid damage to the
stereo.
• If you need to mount the stereo outside a boat, it must be
mounted in a location far above the waterline, where it is not
submerged.
• If you need to mount the stereo outside a boat, it should be
mounted in a location where it cannot be damaged by docks,
pilings, or other pieces of equipment.
• To avoid interference with a magnetic compass, the stereo
should be installed at least 15 cm (5.9 in.) away from a
compass.
Mounting the Stereo in a New Location
NOTICE
Be careful when cutting the hole to mount the stereo. There is
only a small amount of clearance between the case and the
mounting holes, and cutting the hole too large could
compromise the stability of the stereo after it is mounted.
Before you can mount the stereo in a new location on the
mounting surface, you must select a location in accordance with
the mounting considerations.
1Trim the template and make sure it fits at the mounting
location.
2Adhere the template to the mounting surface.
3Using a drill bit appropriate for the mounting surface, drill a
hole inside the corner of the dashed line on the template to
prepare the mounting surface for cutting.
4Using a rotary-cutting tool, cut the mounting surface along
the inside of the dashed line on the template.
5Place the stereo in the cutout to test the fit.
6If necessary, use a file and sandpaper to refine the size of
the cutout.
7After the stereo fits correctly in the cutout, ensure the
mounting holes on the stereo line up with the pilot holes on
the template.
8If the mounting holes on the stereo do not line up, mark the
new pilot-hole locations.
9Using an appropriately sized drill bit for the mounting surface
and screw type, drill the pilot holes.
10Remove the template from the mounting surface.
11Make the necessary wiring connections (Connection
Considerations, page 2).
12Place the mounting gasket on the back of the stereo .
November 2018
190-02431-02_0B

13 Place the stereo in the cutout.
14 Secure the stereo to the mounting surface using the included
screws .
15 Snap the screw covers in place .
Replacing an Existing Stereo
1Remove and disconnect the existing stereo.
2If necessary, remove the existing wiring harness or install a
vehicle- or vessel-specific wiring-harness adapter (not
included) to provide access to the power and speaker wiring.
3Place the mounting gasket on the back of the stereo .
4Place the mounting bracket behind the mounting surface.
5Make the necessary wiring connections (Connection
Considerations, page 2).
6Place the stereo in the opening.
7Secure the stereo to the mounting bracket using the included
screws .
NOTE: You might need to reach behind the mounting surface
to hold the bracket in place when securing the stereo to the
bracket.
8Snap the screw covers in place .
Connection Considerations
The stereo must be connected to power, to speakers, and to
media input sources to function correctly. You should carefully
plan the layout of the stereo, wired remote, speakers, optional
NMEA 2000® network, and your input sources before making
any connections.
Port Identification
Item Description
ANT Connects the stereo to a typical AM/FM antenna using an
RF coaxial connector.
If you are installing the stereo on a boat with a metal hull,
you must use a ground-dependent antenna, and if you are
installing the stereo on a boat with a non-metal hull, you
must use a ground-independent antenna. See the
installation instructions provided with your antenna for
more information.
SXM
TUNER
Connects to a SiriusXM
® tuner to receive SiriusXM
channels where available (not included).
NMEA Connects the stereo to a NMEA 2000 network (NMEA
2000 System Wiring Diagram, page 4).
USB Connects the stereo to a USB source.
FUSE Contains the fuse for the device.
See the device specifications for replacement fuse
information.
Connects the stereo to the power and speaker wiring
harness.
Connects the stereo to the auxiliary in and line/subwoofer
out wiring harness.
Reserved for future use.
Wiring Harness Wire and Connector Identification
Wire Function Wire Color/
Number
Notes
Power (+) Red (yellow
on some wire
harnesses)
Connects to the positive terminal of
a 12 Vdc power source capable of
supplying 15 A.
Ground (-) Black Connects to the negative terminal of
a 12 Vdc power source capable of
supplying 15 A. This wire should be
connected before connecting the red
(or yellow) wire. All accessories
connected to the stereo must share
a common ground location.
Amplifier on Blue Connects to an optional external
amplifier to turn it on when the
stereo turns on.
2 FUSION MS-RA70NSX Installation Instructions

Wire Function Wire Color/
Number
Notes
Mute Brown Activates when connected to
ground.
For example, when connected to a
compatible hands-free mobile kit,
the audio mutes or the input
switches to AUX when a call is
received and the kit connects this
wire to ground. This functionality can
be configured from the settings
menu.
Dim Orange Connects to the boat's illumination
wire to dim the stereo screen when
the lights are on.
The gauge of the illumination wire
must be suitable for the fuse
supplying the circuit it is connected
to.
Speaker zone 1
left (+)
White
Speaker zone 1
left (-)
White/black
Speaker zone 1
right (+)
Gray
Speaker zone 1
right (-)
Gray/black
Speaker zone 2
left (+)
Green
Speaker zone 2
left (-)
Green/black
Speaker zone 2
right (+)
Purple
Speaker zone 2
right (-)
Purple/black
Auxiliary in left
Auxiliary in right
Provides a red and white RCA
stereo line input for audio sources,
such as a CD or MP3 player.
Zone 1 line out
(left)
Zone 1 line out
(right)
Provides a full-range output to an
external amplifier, and is associated
with the volume control for zone 1.
Zone 2 line out
(left)
Zone 2 line out
(right)
Provides a full-range output to an
external amplifier, and is associated
with the volume control for zone 2.
Subwoofer out Each cable provides a single mono
output to a powered subwoofer or
subwoofer amplifier, and one or both
cables can be used, depending on
the connection requirements of the
subwoofer or amplifier.
A connected subwoofer is
associated with the volume control
for zone 1.
Connecting to Power
When connecting the stereo to power, you should connect it
through the ignition or another manual switch.
If it is necessary to extend the power and ground wires, use
14 AWG (2.08 mm2) wire. For extensions longer than 1 m (3 ft.),
use 12 AWG (3.31 mm2) wire.
1Route the power wire to the ignition or another manual
switch , and route the black ground wire to the battery.
2If necessary, route a wire between the switch and the
battery .
3Route the wiring-harness plug to the stereo.
Do not connect the wiring harness to the stereo until after all
of the bare wire connections have been made.
4Connect the black wire to the negative (-) battery terminal.
5Connect the power wire to the ignition or another manual
switch, and connect the switch to the positive (+) battery
terminal if necessary.
6Connect the wiring harness plug to the stereo.
Speaker Zones
You can group speakers in one area into speaker zones. This
enables you to control the audio level of the zones individually.
For example, you could make the audio quieter in the cabin and
louder on deck.
You can set the balance, volume limit, subwoofer level, and
name for each zone.
Single-Zone System Wiring Diagram
Speakers
Water-tight connection
Complete System Wiring
FUSION MS-RA70NSX Installation Instructions 3
Item Description
Zone 2 speakers
Water-tight connection
Powered amplifier
Zone 2 line out
Amplifier-on signal wire
Zone 1 speakers
Zone 1 line out
Zone 1 subwoofer out
Each cable provides a single mono output to a powered
subwoofer or subwoofer amplifier, and one or both cables can be
used, depending on the connection requirements of the
subwoofer or amplifier.
Powered subwoofer
Connecting a SiriusXM Tuner Module
This device is compatible with a SiriusXM SXV300 or newer
vehicle tuner module.
1If you have already connected an FM/AM antenna, a NMEA
2000 cable, or both, disconnect them from the stereo.
2Connect the cable from the SiriusXM tuner module to the
SXM TUNER port on the back of the stereo.
3Follow the instructions provided with the SiriusXM tuner
module and antenna to complete the SiriusXM installation.
4If necessary, reconnect the FM/AM antenna, the NMEA 2000
cable, or both.
5Complete the stereo installation.
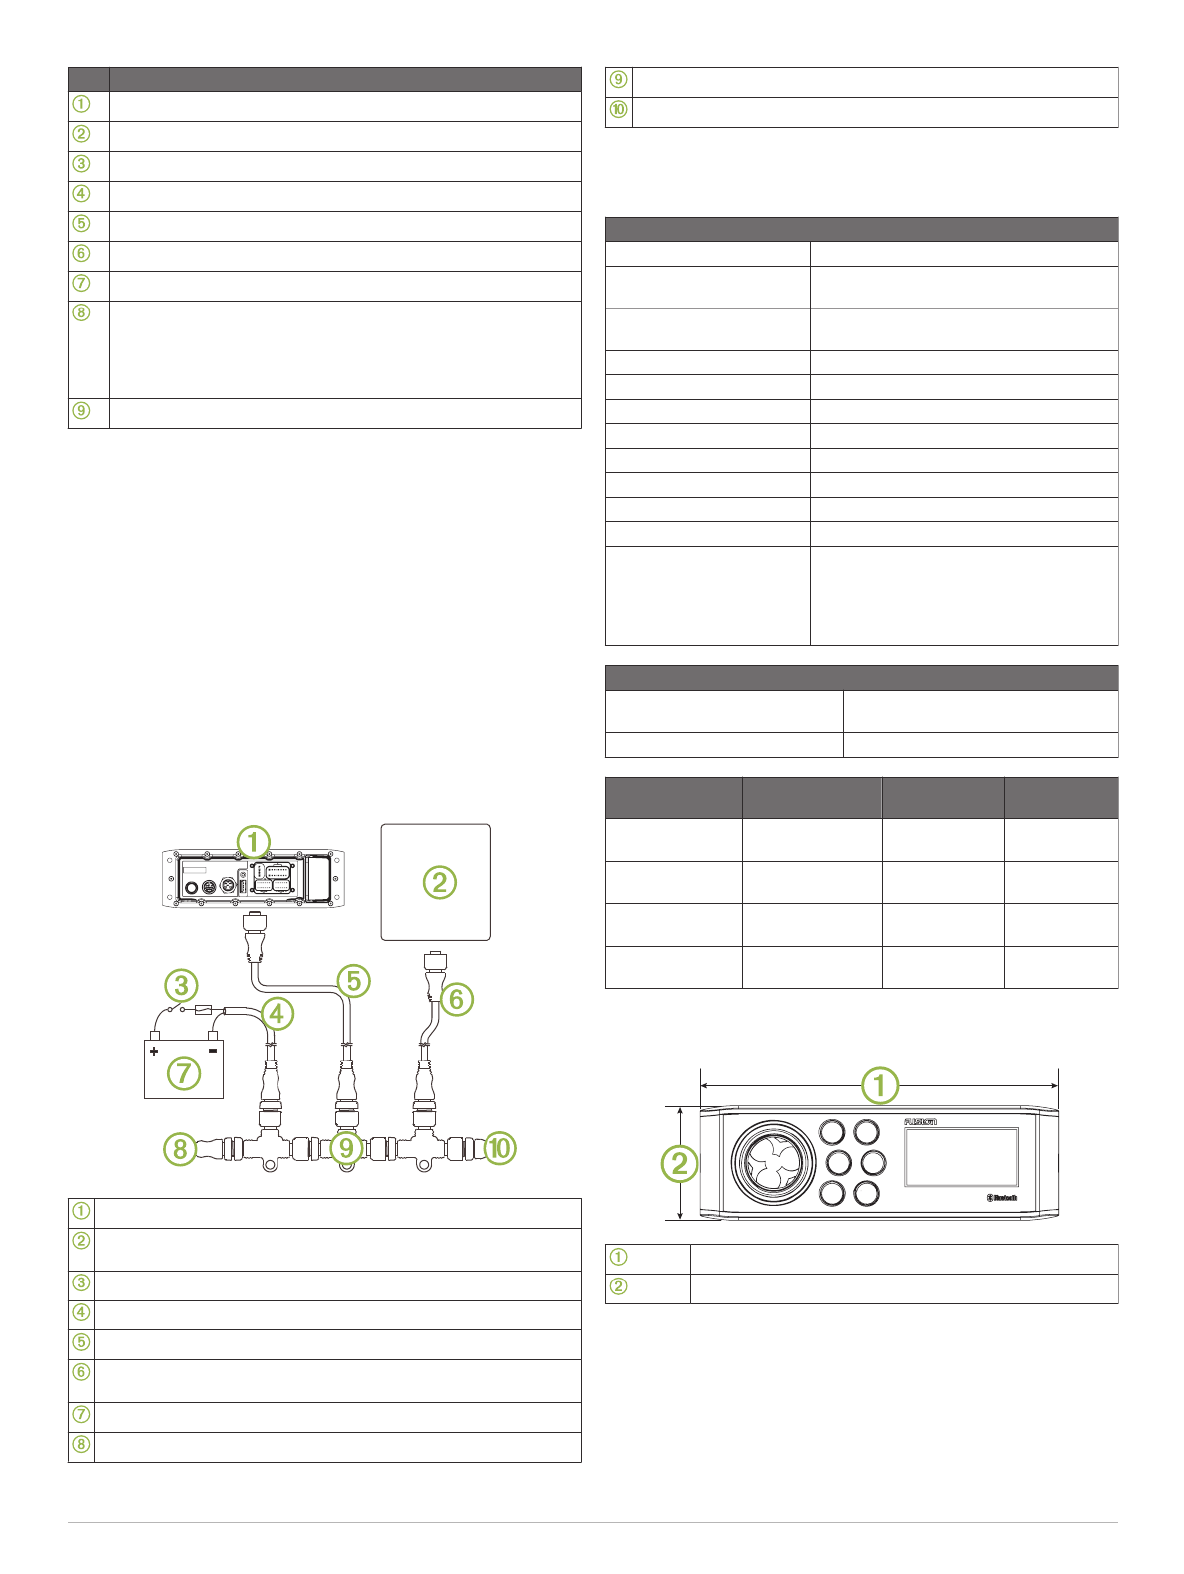
NMEA 2000 System Wiring Diagram
NOTE: NMEA 2000 is available on FUSION MS-RA70NSX
models only.
Stereo
Supported chartplotter MFD or compatible FUSION NMEA 2000
remote control
In-line switch
NMEA 2000 power cable
NMEA 2000 drop cable from the stereo, up to 6 m (20 ft.)
NMEA 2000 drop cable from the chartplotter MFD or compatible
FUSION NMEA 2000 remote control
9 to 16 Vdc power supply
NMEA 2000 terminator or backbone cable
NMEA 2000 T-connector
NMEA 2000 terminator or backbone cable
Stereo Information
Specifications
General
Weight 556 g (19.6 oz.)
Water resistance IEC 60529 IPX7 (front), IEC 60529 IPX3
(rear)
Operating temperature
range
From 0 to 50°C (from 32 to 122°F)
Storage temperature range From -20 to 70°C (from -4 to 158°F)
Input voltage From 10.8 to 16 Vdc
Current (max.) 15 A
Current (muted) Less than 900 mA
Current (standby) Less than 15 mA
NMEA 2000 LEN 1 (50 mA)
ANT® wireless range Up to 3 m (10 ft.)
Compass-safe distance 15 cm (5.9 in.)
Wireless frequencies/
protocols
Bluetooth®: Class 2
Bluetooth/ANT frequency: 2,402 through
2,480 MHz
Bluetooth/ANT transmit power:
1.9 dBm EIRP nominal
On-board, Class AB Amplifier
Output music power per channel 50 W max. x 4 channels at 4 ohm per
channel
Total output music power 200 W max.
Tuner Europe and
Australasia
USA Japan
FM radio
frequency range
87.5 to 108 MHz 87.5 to
107.9 MHz
76 to 95 MHz
FM frequency
step
50 kHz 200 kHz 50 kHz
AM radio
frequency range
522 to 1620 kHz 530 to
1710 kHz
522 to
1620 kHz
AM frequency
step
9 kHz 10 kHz 9 kHz
Stereo Dimension Drawings
Front Dimensions
188 mm (7.40 in.)
60 mm (2.36 in.)
4 FUSION MS-RA70NSX Installation Instructions

Side Dimensions
23.5 mm (0.93 in.)
100 mm (3.94 in.)
50 mm (1.97 in.)
Top Dimensions
161 mm (6.34 in.)
23.5 mm (0.93 in.)
12 mm (0.47 in.)
Registering Your FUSION MS-RA70NSX
Help us better support you by completing our online registration
today.
• Go to .www.fusionentertainment.com
• Keep the original sales receipt, or a photocopy, in a safe
place.
Software Updates
For best results, you should update the software in all FUSION
devices at the time of installation to ensure compatibility.
Go to to download the www.fusionentertainment.com/marine
latest software. Software updates and instructions are available
on your device product page.
© 2018 Garmin Ltd. or its subsidiaries
Garmin®, the Garmin logo, FUSION®, and the Fusion logo are trademarks of Garmin Ltd.
or its subsidiaries, registered in the USA and other countries. These trademarks may not
be used without the express permission of Garmin.
Bluetooth® word mark and logos are owned by the Bluetooth SIG, Inc. and any use of
such marks by Garmin is under license. NMEA®, NMEA 2000®, and the NMEA 2000 logo
are registered trademarks of the National Marine Electronics Association. SiriusXM® and
all related marks and logos are trademarks of Sirius XM Radio Inc. All rights reserved.
Other trademarks and trade names are those of their respective owners.
A02834 B02834
FUSION MS-RA70NSX Installation Instructions 5

www.fusionentertainment.com

Printing a Mounting Template
NOTICE
It is not recommended that you print a mounting template on your own. Use the template that came in the product box.
If you do print the template, you must follow these instructions for printing a mounting template precisely. To print large templates,
you need large enough paper and printer. Failure to have the correct sized paper and printer, or a failure to follow these instructions,
may result in an incorrectly sized template and therefore an incorrect cutout (too large or too small) on the mounting surface of your
boat.
1 Select File > Print.
➋
➌
➍
➎
➊
2 Select None for .Page Scaling ➊
3 Ensure the check mark is next to Auto-Rotate and Center ➋.
4 Drag the arrow to the right, to view page 2 in the window below.➌
4 Verify that the paper size is larger than the template ➍.
In this example, the paper is not larger than the template.
5 If the paper size is not large enough, select and select a that is larger than the template.Properties ➎Page Size
NOTICE
Fusion is not responsible for any damages or expenses resulting from a miscut mounting surface arising from a failure to follow
these instructions.
Termékspecifikációk
| Márka: | Fusion |
| Kategória: | rádió |
| Modell: | MS-RA70NSX |
Szüksége van segítségre?
Ha segítségre van szüksége Fusion MS-RA70NSX, tegyen fel kérdést alább, és más felhasználók válaszolnak Önnek
Útmutatók rádió Fusion

14 Augusztus 2024
14 Augusztus 2024
13 Augusztus 2024
13 Augusztus 2024
13 Augusztus 2024
13 Augusztus 2024
12 Augusztus 2024
12 Augusztus 2024
12 Augusztus 2024
11 Augusztus 2024
Útmutatók rádió
- rádió Sony
- rádió August
- rádió Yamaha
- rádió Moulinex
- rádió Nedis
- rádió Milwaukee
- rádió Grundig
- rádió Philips
- rádió Pioneer
- rádió Kärcher
- rádió Adler
- rádió Oregon Scientific
- rádió SilverCrest
- rádió Garmin
- rádió Bosch
- rádió Panasonic
- rádió JVC
- rádió AEG
- rádió Sharp
- rádió Einhell
- rádió Harman Kardon
- rádió Toshiba
- rádió Sven
- rádió Ozito
- rádió Makita
- rádió Hyundai
- rádió HQ
- rádió Emos
- rádió Medion
- rádió Onkyo
- rádió Motorola
- rádió Vimar
- rádió Technics
- rádió JBL
- rádió Camry
- rádió DAP-Audio
- rádió Zebra
- rádió Xiaomi
- rádió GoGen
- rádió Futaba
- rádió Boss
- rádió Be Cool
- rádió Thomson
- rádió Technaxx
- rádió Aiwa
- rádió Kenwood
- rádió Tesco
- rádió Duronic
- rádió Clatronic
- rádió Hama
- rádió PEAQ
- rádió Renkforce
- rádió Midland
- rádió Sencor
- rádió GPX
- rádió Bose
- rádió Lowrance
- rádió Hitachi
- rádió BLUEPALM
- rádió Telefunken
- rádió Nevir
- rádió Sennheiser
- rádió Tangent
- rádió Cambridge
- rádió Alpine
- rádió Acoustic Solutions
- rádió Roadstar
- rádió Logitech
- rádió Klein Tools
- rádió Parrot
- rádió Cobra
- rádió Hilti
- rádió Sonoro
- rádió Denver
- rádió Bush
- rádió Power Dynamics
- rádió Black & Decker
- rádió Trevi
- rádió Memphis Audio
- rádió Elta
- rádió Albrecht
- rádió Aluratek
- rádió Audio-Technica
- rádió NGS
- rádió Daewoo
- rádió Lenoxx
- rádió PowerPlus
- rádió Denon
- rádió Muse
- rádió OK
- rádió JL Audio
- rádió Metabo
- rádió SPC
- rádió Auna
- rádió Hitec
- rádió Mac Audio
- rádió TriStar
- rádió BaseTech
- rádió Bogen
- rádió RYOBI
- rádió Terratec
- rádió DreamGEAR
- rádió HiKOKI
- rádió Intertechno
- rádió Manhattan
- rádió Alecto
- rádió Festool
- rádió Furrion
- rádió Velleman
- rádió Teac
- rádió Clarion
- rádió Scott
- rádió Monacor
- rádió ION
- rádió Manta
- rádió Blaupunkt
- rádió Oricom
- rádió Viper
- rádió Easy Home
- rádió Sagem
- rádió Delta
- rádió Busch-Jaeger
- rádió Olympia
- rádió Logik
- rádió Tronic
- rádió Timex
- rádió La Crosse Technology
- rádió Infinity
- rádió AKAI
- rádió Porter-Cable
- rádió Konig
- rádió Stabo
- rádió TechniSat
- rádió GlobalTronics
- rádió Jensen
- rádió Pyle
- rádió Emerson
- rádió DeWalt
- rádió Sanyo
- rádió Salora
- rádió Telestar
- rádió Lenco
- rádió CRUX
- rádió Schneider
- rádió Roberts
- rádió Audizio
- rádió ECG
- rádió Stanley
- rádió Uniden
- rádió Victrola
- rádió Majority
- rádió Hertz
- rádió Vonroc
- rádió Soundmaster
- rádió Monitor Audio
- rádió Cotech
- rádió Audac
- rádió Rockford Fosgate
- rádió Krüger&Matz
- rádió Dual
- rádió ICOM
- rádió Kathrein
- rádió Yaesu
- rádió RCA
- rádió Imperial
- rádió Kicker
- rádió Sangean
- rádió Topcom
- rádió Sirius
- rádió MB Quart
- rádió H-Tronic
- rádió OneConcept
- rádió ILive
- rádió Schwaiger
- rádió EasyMaxx
- rádió Orava
- rádió Lexon
- rádió Vitek
- rádió Geneva
- rádió Craftsman
- rádió Majestic
- rádió Graphite
- rádió Reflexion
- rádió Smartwares
- rádió Teufel
- rádió Sogo
- rádió Crosley
- rádió REVO
- rádió Artsound
- rádió Matsui
- rádió Quigg
- rádió Acoustic Energy
- rádió Argon
- rádió Icy Box
- rádió Brennenstuhl
- rádió Lexibook
- rádió Tevion
- rádió GPO
- rádió Caliber
- rádió Swan
- rádió Exibel
- rádió Brigmton
- rádió Sunstech
- rádió Maginon
- rádió Marquant
- rádió Nordmende
- rádió AudioAffairs
- rádió Binatone
- rádió Steren
- rádió Audiosonic
- rádió Proline
- rádió Coby
- rádió Envivo
- rádió Bigben Interactive
- rádió Pure
- rádió Audiovox
- rádió Terris
- rádió Switel
- rádió Hager
- rádió Bigben
- rádió Sunwind
- rádió Laser
- rádió Alba
- rádió Clas Ohlson
- rádió Naxa
- rádió Ricatech
- rádió Boston Acoustics
- rádió Mpman
- rádió Sweex
- rádió Ices
- rádió Nikkei
- rádió PerfectPro
- rádió Freecom
- rádió Navman
- rádió Gira
- rádió Jung
- rádió Dnt
- rádió Balance
- rádió MT Logic
- rádió Audio Pro
- rádió Kunft
- rádió Difrnce
- rádió Noveen
- rádió Karcher Audio
- rádió PAC
- rádió IHome
- rádió AIC
- rádió Ruarkaudio
- rádió Tivoli Audio
- rádió Go Green
- rádió Wolfgang
- rádió Linn
- rádió Numan
- rádió Iluv
- rádió TELEX
- rádió Multiplex
- rádió Clint
- rádió Soundstream
- rádió Xoro
- rádió Zolid
- rádió Sagemcom
- rádió Block
- rádió Berker
- rádió Woxter
- rádió Xhdata
- rádió View Quest
- rádió Harley Davidson
- rádió Noxon
- rádió Brionvega
- rádió Ferguson
- rádió Wet Sounds
- rádió Eissound
- rádió Dcybel
- rádió Tecsun
- rádió JGC
- rádió Scansonic
- rádió TFA Dostmann
- rádió Audisse
- rádió ETON
- rádió Kruger Matz
- rádió Equity
- rádió EKO
- rádió Pinell
- rádió Videologic
- rádió Tivoli
- rádió Mtx Audio
- rádió Aquatic AV
- rádió Roswell
- rádió Intek
- rádió Digitalbox
- rádió Whistler
- rádió Xact
- rádió Ruark Audio
- rádió Magnavox
- rádió Digitech
- rádió GME
- rádió NUVO
- rádió Narex
- rádió Tiny Audio
- rádió R-MUSIC
- rádió E-bench
- rádió Konig Electronic
- rádió Peha
- rádió SiriusXM
- rádió Sanwa
- rádió SW-Stahl
- rádió Sailor
- rádió SSV Works
- rádió Microlab
- rádió QFX
- rádió Voxx
- rádió SACK It
- rádió BasicXL
- rádió Roth
- rádió Ices Electronics
- rádió AmpliVox
- rádió Elbe
- rádió GBS Elettronica
- rádió Sang
- rádió Gewiss
- rádió Lutron
- rádió Axxess
- rádió Retekess
- rádió Wintal
- rádió Atlantis Land
- rádió Ranger
- rádió MAAS
- rádió Weather X
- rádió Aconatic
- rádió Mebby
- rádió Yamazen
- rádió Blonder Tongue
- rádió RoadKing
Legújabb útmutatók rádió

10 Április 2025
2 Április 2025
1 Április 2025
1 Április 2025
31 Március 2025
30 Március 2025
29 Március 2025
26 Március 2025

25 Március 2025
16 Január 2025