Használati útmutató Festo VSVA
Festo
nincs kategorizálva
VSVA
Olvassa el alább 📖 a magyar nyelvű használati útmutatót Festo VSVA (2 oldal) a nincs kategorizálva kategóriában. Ezt az útmutatót 16 ember találta hasznosnak és 8.5 felhasználó értékelte átlagosan 5.0 csillagra
Oldal 1/2
Montageanleitung (de)
713 886 / 2007-08NH
†‡
Grundventil
VSVA-B-...-A...-P1
Festo SE & Co.
KG
Postfach
D-73726 Esslingen
++49/(0)711/347-0
www.festo.com
1. Teileliste
11347d_1
1 Grun
dventil (1x)
VSVA-B-...-A...-P1
2 Dichtung VSVA-B-A... (1x)
3 Zylinderschraube (2x)
Bei bistabil:
4 Dichtung VSVA-B (2x)
5 Zylinderschraube (4x)
6 Vorsteuerventil (2x)
Bei monostabil:
4 Dichtung VSVA-B (1x)
5 Zylinderschraube (2x)
6 Vorsteuerventil (1x)
2. Montage Vorsteuerventil auf Grundventil
11347d_3
• Drücken Sie die Dichtun-
gen 4 in die dafür vor-
gesehenen Senkungen im
Grundventil 1.
11347d_4
• Platzieren Sie die Vorsteuer-
ventile 6 auf dem Grund-
ventil 1.
• Drehen Sie die Schrauben 5
fest.
• Halten Sie das Anziehdreh-
moment ein.
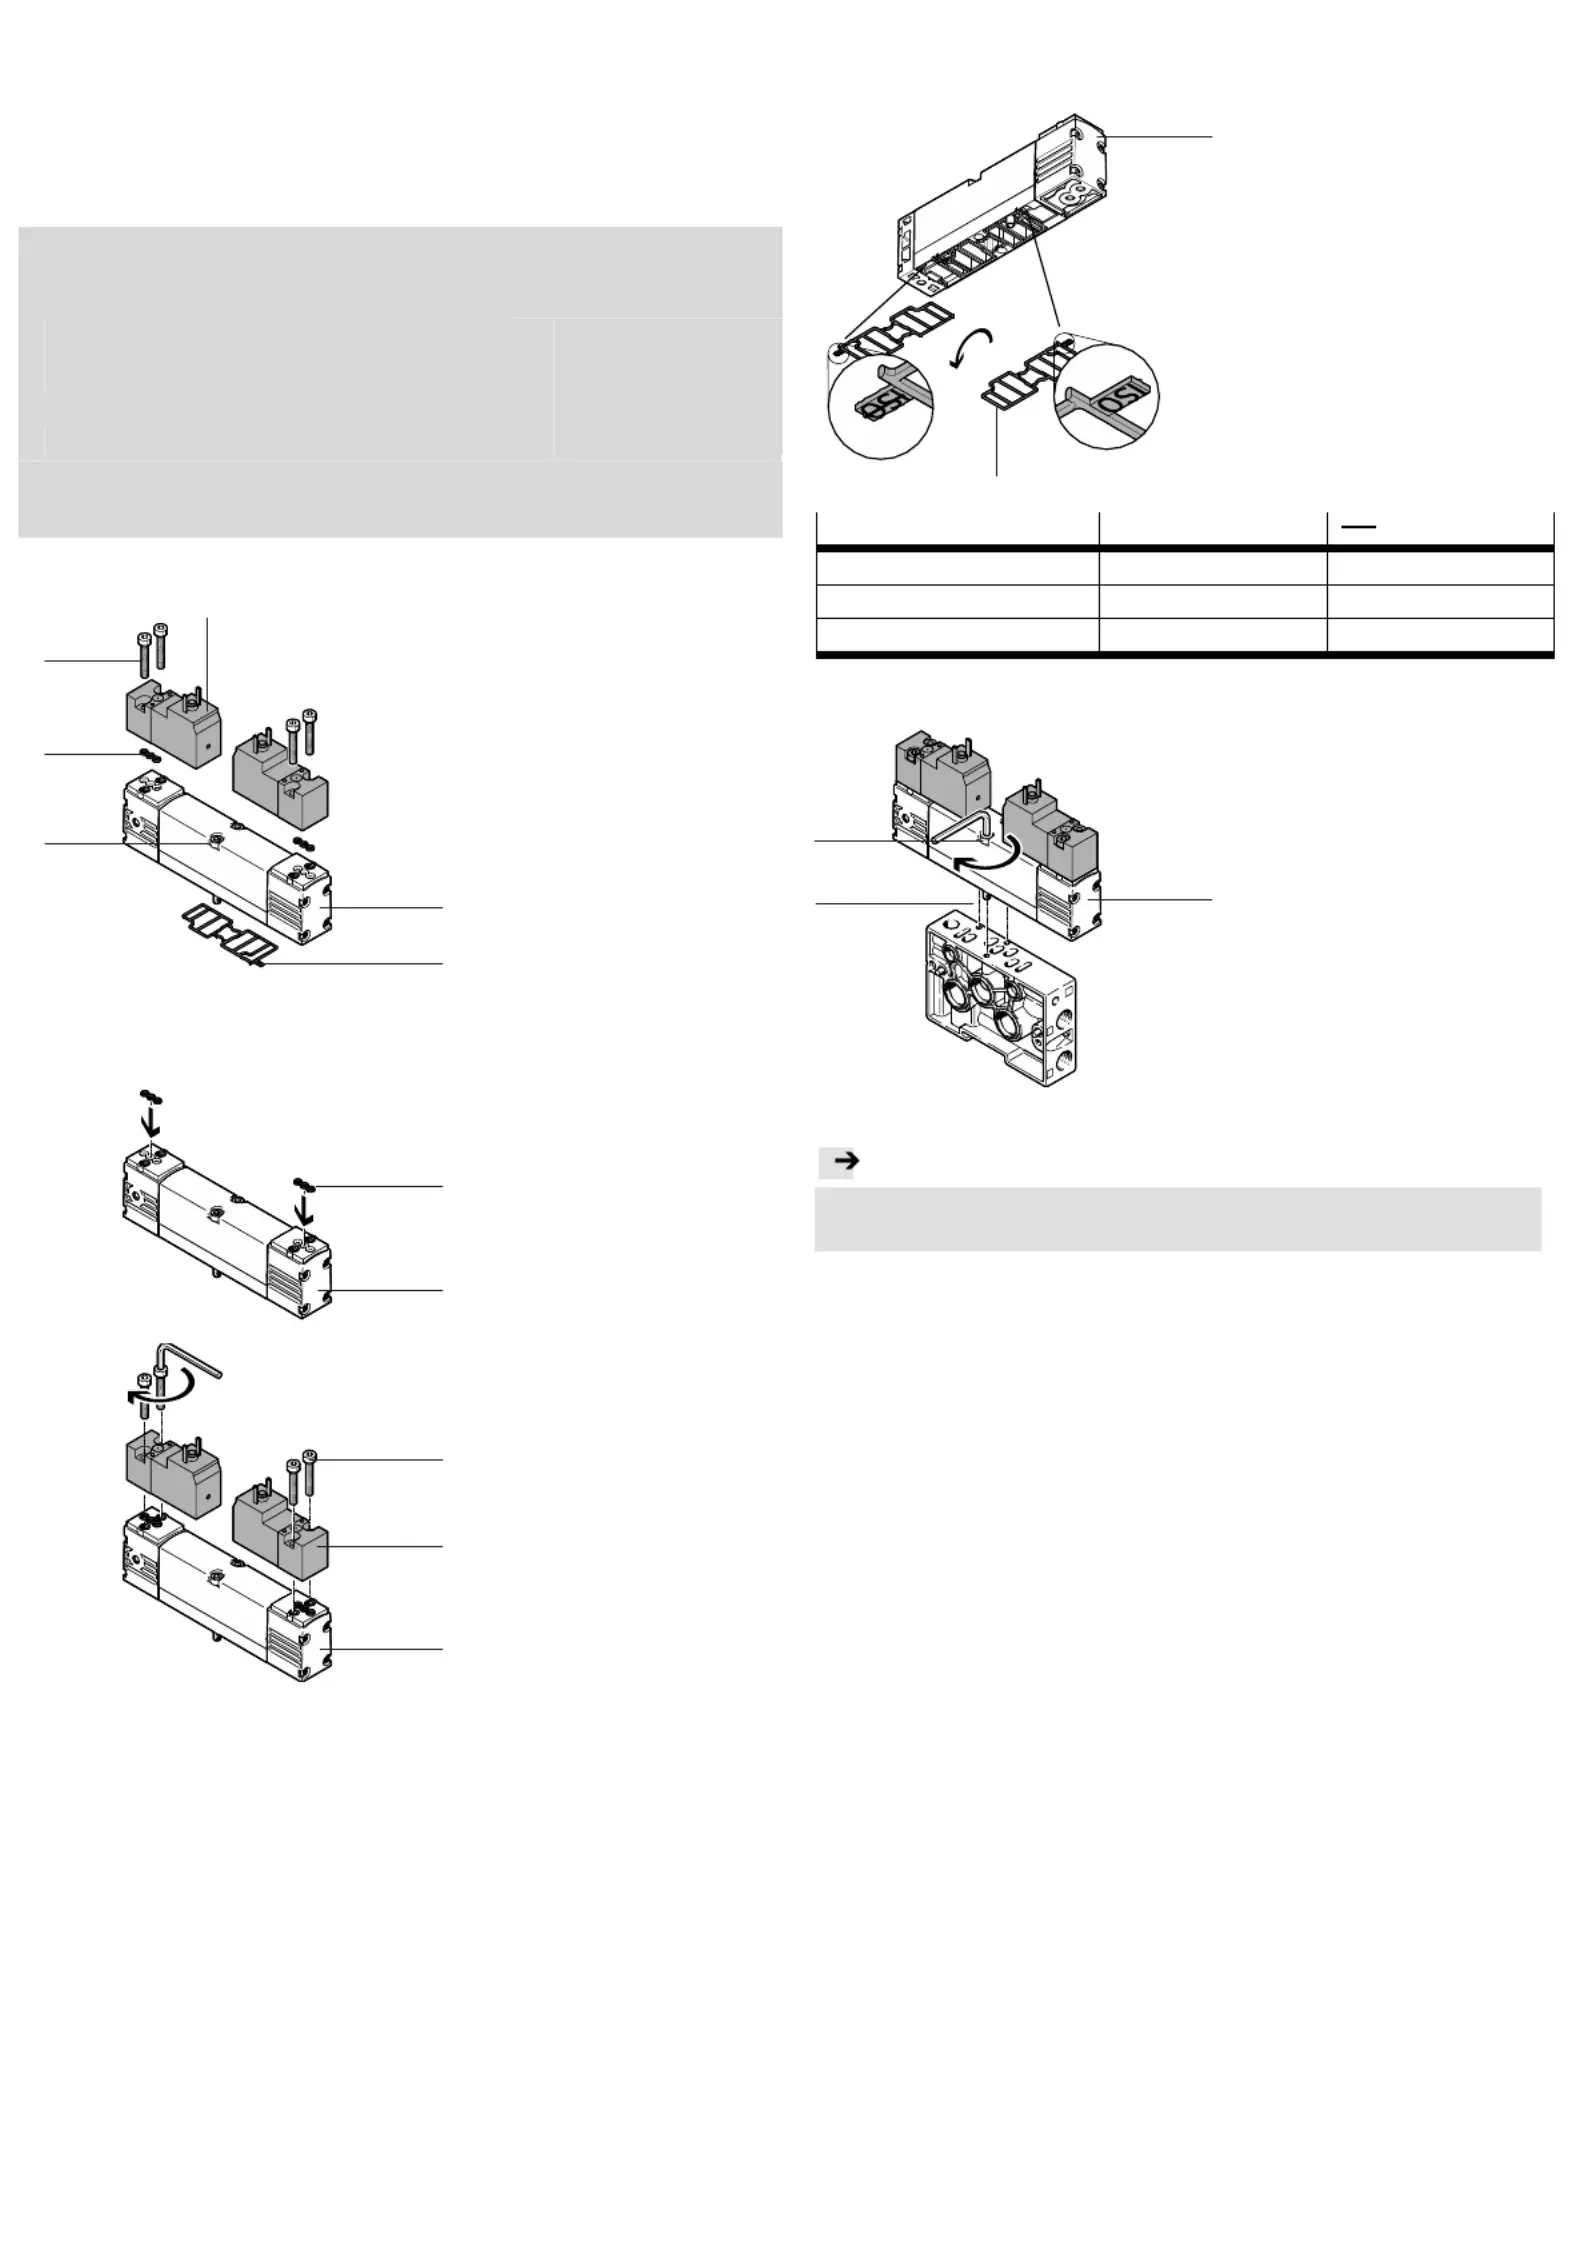
3. Montage Dichtung
11347d_2
• Prüfen Sie die Lage der
Dichtung 2 am Grund-
ventil 1.
• Achten Sie dabei auf die
ISO Beschriftung
(! Tabelle).
• Drehen Sie die Dichtung
gegebenenfalls in die
gewünschte Lage.
Beschriftu
ng ISO
ISO
Vorsteuerabluft Ungefasst (Standard) Gefasst
Sichtfenster auf Steuerseite 14 Steuerseite 12
Vorsteuerabluft-Anschluss — 12
4. Montage Magnetventil
11347d_5
• Achten Sie auf den einge-
pressten Codierstift (A), um
das Ventil lageorientiert zu
montieren.
• Platzieren Sie das Grundven-
til 1 auf der Ventilinsel.
• Drehen Sie die Schrauben 3
fest.
• Halten Sie das Anziehdreh-
moment ein.
Hinweis
• Beachten Sie zusätzlich alle weiteren Informationen, aus der Pneuma-
tikbeschreibung ihrer Ventilinsel von Festo.
1
2
3
4
5
6
0,8 Nm _ 15%
4
1
6
1
5
2
1
VSVA-B-…
-A1: 2 Nm 10% _
-A2: 1 Nm 10% _
1
3
A
Termékspecifikációk
| Márka: | Festo |
| Kategória: | nincs kategorizálva |
| Modell: | VSVA |
Szüksége van segítségre?
Ha segítségre van szüksége Festo VSVA, tegyen fel kérdést alább, és más felhasználók válaszolnak Önnek
Útmutatók nincs kategorizálva Festo

30 Március 2025

30 Március 2025

30 Március 2025

30 Március 2025

30 Március 2025

30 Március 2025

30 Március 2025

30 Március 2025

30 Március 2025

30 Március 2025
Útmutatók nincs kategorizálva
- nincs kategorizálva Ark
- nincs kategorizálva Asrock
- nincs kategorizálva Field Optics
- nincs kategorizálva Lowel
- nincs kategorizálva Betso
- nincs kategorizálva FontaFit
- nincs kategorizálva Medicinalis
- nincs kategorizálva Sirius
- nincs kategorizálva AXESS
- nincs kategorizálva Mio
- nincs kategorizálva H.Koenig
- nincs kategorizálva Toparc
- nincs kategorizálva QUIO
- nincs kategorizálva Guzzanti
- nincs kategorizálva Mount-It!
Legújabb útmutatók nincs kategorizálva

10 Április 2025

10 Április 2025

10 Április 2025

9 Április 2025

9 Április 2025

9 Április 2025

9 Április 2025

9 Április 2025

9 Április 2025

9 Április 2025