Használati útmutató EZVIZ C3X
Olvassa el alább 📖 a magyar nyelvű használati útmutatót EZVIZ C3X (176 oldal) a Térfigyelő kamera kategóriában. Ezt az útmutatót 7 ember találta hasznosnak és 2 felhasználó értékelte átlagosan 4.5 csillagra
Oldal 1/176

Scan the QR code with the EZVIZ App
to add the device to your account.
Please keep it for further reference.

COPYRIGHT © Hangzhou EZVIZ Software Co., Ltd.. ALL RIGHTS RESERVED.
Any and all information, including, among others, wordings, pictures, graphs are the
properties of Hangzhou EZVIZ Software Co., Ltd. (hereinafter referred to as “EZVIZ”).
This user manual (hereinafter referred to as “the Manual”) cannot be reproduced,
changed, translated, or distributed, partially or wholly, by any means, without the
prior written permission of EZVIZ. Unless otherwise stipulated, EZVIZ does not
make any warranties, guarantees or representations, express or implied, regarding
to the Manual.
About this Manual
The Manual includes instructions for using and managing the product. Pictures,
charts, images and all other information hereinafter are for description and
explanation only. The information contained in the Manual is subject to change,
without notice, due to firmware updates or other reasons. Please find the latest
version in the ™ website (http://www.ezvizlife.com).
Revision Record
New release – January, 2019
Trademarks Acknowledgement
™, ™, and other EZVIZ’s trademarks and logos are the properties of
EZVIZ in various jurisdictions. Other trademarks and logos mentioned below are the
properties of their respective owners.
Legal Disclaimer
TO THE MAXIMUM EXTENT PERMITTED BY APPLICABLE LAW, THE PRODUCT
DESCRIBED, WITH ITS HARDWARE, SOFTWARE AND FIRMWARE, IS PROVIDED
“AS IS”, WITH ALL FAULTS AND ERRORS, AND EZVIZ MAKES NO WARRANTIES,
EXPRESS OR IMPLIED, INCLUDING WITHOUT LIMITATION, MERCHANTABILITY,
SATISFACTORY QUALITY, FITNESS FOR A PARTICULAR PURPOSE, AND NON-
INFRINGEMENT OF THIRD PARTY. IN NO EVENT WILL EZVIZ, ITS DIRECTORS,
OFFICERS, EMPLOYEES, OR AGENTS BE LIABLE TO YOU FOR ANY SPECIAL,
CONSEQUENTIAL, INCIDENTAL, OR INDIRECT DAMAGES, INCLUDING, AMONG
OTHERS, DAMAGES FOR LOSS OF BUSINESS PROFITS, BUSINESS INTERRUPTION,
OR LOSS OF DATA OR DOCUMENTATION, IN CONNECTION WITH THE USE OF THIS
PRODUCT, EVEN IF EZVIZ HAS BEEN ADVISED OF THE POSSIBILITY OF SUCH
DAMAGES.
TO THE MAXIMUM EXTENT PERMITTED BY APPLICABLE LAW, IN NO EVENT SHALL
EZVIZ’S TOTAL LIABILITY FOR ALL DAMAGES EXCEED THE ORIGINAL PURCHASE
PRICE OF THE PRODUCT.
EZVIZ DOES NOT UNDERTAKE ANY LIABILITY FOR PERSONAL INJURY OR
PROPERTY DAMAGE AS THE RESULT OF PRODUCT INTERRUPTION OR SERVICE
TERMINATION CAUSED BY: A) IMPROPER INSTALLATION OR USAGE OTHER THAN
AS REQUESTED; B) THE PROTECTION OF NATIONAL OR PUBLIC INTERESTS; C)
FORCE MAJEURE; D) YOURSELF OR THE THIRD PARTY, INCLUDING WITHOUT
LIMITATION, USING ANY THIRD PARTY’S PRODUCTS, SOFTWARE, APPLICATIONS,
AND AMONG OTHERS. REGARDING TO THE PRODUCT WITH INTERNET ACCESS,
THE USE OF PRODUCT SHALL BE WHOLLY AT YOUR OWN RISKS. EZVIZ SHALL
NOT TAKE ANY RESPONSIBILITES FOR ABNORMAL OPERATION, PRIVACY

LEAKAGE OR OTHER DAMAGES RESULTING FROM CYBER ATTACK, HACKER
ATTACK, VIRUS INSPECTION, OR OTHER INTERNET SECURITY RISKS; HOWEVER,
EZVIZ WILL PROVIDE TIMELY SUPPORT IF REQUIRED.SURVEILLANCE TECHNICAL
LAWS AND DATA PROTECTION LAWS VARY BY JURISDICTION. PLEASE CHECK
ALL RELEVANT LAWS IN YOUR JURISDICTION BEFORE USING THIS PRODUCT
IN ORDER TO ENSURE THAT YOUR USE CONFORMS TO THE APPLICABLE LAW.
EZVIZ SHALL NOT BE LIABLE IN THE EVENT THAT THIS PRODUCT IS USED WITH
ILLEGITIMATE PURPOSES.
IN THE EVENT OF ANY CONFLICTS BETWEEN THE ABOVE AND THE APPLICABLE
LAW, THE LATTER PREVAILS.
Regulatory Information
FCC Information
This Camera complies with Part 15 of the FCC Rules. Operation is subject to the
following two conditions:
(1) This Camera may not cause harmful interference, and
(2) This Camera must accept any interference received, including interference that
may cause undesired operation.
Note: This product has been tested and found to comply with the limits for a Class
B digital Camera, pursuant to Part 15 of the FCC Rules. These limits are designed
to provide reasonable protection against harmful interference in a residential
installation. This product generates, uses, and can radiate radio frequency energy
and, if not installed and used in accordance with the instructions, may cause
harmful interference to radio communications. However, there is no guarantee that
interference will not occur in a particular installation. If this product does cause
harmful interference to radio or television reception, which can be determined
by turning the equipment off and on, the user is encouraged to try to correct the
interference by one or more of the following measures:
—Reorient or relocate the receiving antenna.
—Increase the separation between the equipment and receiver.
—Connect the equipment into an outlet on a circuit different from that to which the
receiver is connected.
—Consult the dealer or an experienced radio/TV technician for help.
Please take attention that changes or modication not expressly approved by the
party responsible for compliance could void the user’s authority to operate the
equipment.
This equipment should be installed and operated with a minimum distance 20cm
between the radiator and your body.
This Camera complies with Industry Canada licence-exempt RSS standard(s).
Operation is subject to the following two conditions:
(1) this Camera may not cause interference, and
(2) this Camera must accept any interference, including interference that may cause
undesired operation of the Camera.
Under Industry Canada regulations, this radio transmitter may only operate using
an antenna of a type and maximum (or lesser) gain approved for the transmitter by
Industry Canada. To reduce potential radio interference to other users, the antenna
type and its gain should be so chosen that the equivalent isotropically radiated

SAVE THIS MANUAL FOR FUTURE REFERENCE
power (e.i.r.p.) is not more than that necessary for successful communication.
EU Conformity Statement
This product and - if applicable - the supplied accessories too
are marked with "CE" and comply therefore with the applicable
harmonized European standards listed under the Radio Equipment
Directive 2014/53/EU, the EMC Directive 2014/30/EU, the RoHS
Directive 2011/65/EU.
2012/19/EU (WEEE directive): Products marked with this symbol
cannot be disposed of as unsorted municipal waste in the European
Union. For proper recycling, return this product to your local supplier
upon the purchase of equivalent new equipment, or dispose of
it at designated collection points. For more information see:
www.recyclethis.info.
2006/66/EC (battery directive): This product contains a battery that
cannot be disposed of as unsorted municipal waste in the European
Union. See the product documentation for specic battery information.
The battery is marked with this symbol, which may include lettering
to indicate cadmium (Cd), lead (Pb), or mercury (Hg). For proper
recycling, return the battery to your supplier or to a designated
collection point. For more information see: www.recyclethis.info.
EC DECLARATION OF CONFORMITY
Hereby, Hangzhou EZVIZ Software Co., Ltd . declares that the radio equipment type
[CS-CV310] is in compliance with Directive 2014/53/EU.
The full text of the EC DECLARATION OF CONFORMITY is available at the following
web link:
http://www.ezvizlife.com/declaration-of-conformity.
Safety Instruction
CAUTION: RISK OF EXPLOSION IF BATTERY IS REPLACED BY AN INCORRECT
TYPE. DISPOSE OF USED BATTERIES ACCORDING TO THE INSTRUCTIONS.
BATTERY IS NOT USER REPLACEABLE.
Due to the product shape and dimension, the name and address of the importer/
manufacturer are printed on the package.
Customer Service
For more information, please visit www.ezvizlife.com.
Need help? Contact us:
Telephone: +31 20 204 0128
Technical Inquires Email: support.eu@ezvizlife.com

BEWAHREN SIE DIESES HANDBUCH FÜR SPÄTERES NACHSCHLAGEN AUF
Verstärkung ist, die von Industry Canada für den Sender zugelassen wurde. Um
mögliche Funkstörungen anderer Benutzer zu reduzieren, müssen Antennentyp und
Verstärkung so gewählt werden, dass die äquivalente isotrope Strahlungsleistung
(EIRP) nicht höher ist, als die für eine erfolgreiche Kommunikation erforderliche.
EU-Konformitätserklärung
Dieses Produkt und – ggf. – auch das mitgelieferte Zubehör sind mit „CE“
gekennzeichnet und entsprechen somit den geltenden harmonisierten
europäischen Normen, die unter der Funkgeräterichtlinie 2014/53/EU,
der EMV-Richtlinie 2014/30/EU und der RoHS-Richtlinie 2011/65/EU
aufgeführt sind.
2012/19/EU (Elektroaltgeräte-Richtlinie): Produkte, die mit diesem
Symbol gekennzeichnet sind, dürfen innerhalb der Europäischen Union
nicht mit dem Hausmüll entsorgt werden. Für korrektes Recycling geben
Sie dieses Produkt an Ihren örtlichen Fachhändler zurück oder entsorgen
Sie es an einer der Sammelstellen. Weitere Informationen finden Sie
unter: www.recyclethis.info.
2006/66/EG und deren Änderung 2013/56/EU (Batterie-Richtlinie):
Dieses Produkt enthält eine Batterie, die innerhalb der Europäischen
Un io n nic ht mit dem Hausmüll entsorg t werde n dar f. Siehe
Produktdokumentation für spezifische Hinweise zu Batterien. Die
Batterie ist mit diesem Symbol gekennzeichnet, das zusätzlich die
Buchstaben Cd für Cadmium, Pb für Blei oder Hg für Quecksilber
enthalten kann. Für korrektes Recycling geben Sie die Batterie
an Ihren örtlichen Fachhändler zurück oder entsorgen Sie sie an
einer der Sammelstellen. Weitere Informationen finden Sie unter:
www.recyclethis.info.
EG-KONFORMITÄTSERKLÄRUNG
Hiermit erklärt Hangzhou EZVIZ Software Co., Ltd., dass der Funkgerätetyp [CS-CV310]
mit der Richtlinie 2014/53/EU übereinstimmt.
Der vollständige Text der EU-Konformitätserklärung ist unter folgendem Weblink
verfügbar:
http://www.ezvizlife.com/declaration-of-conformity.
Sicherheitshinweis
VORSICHT: EXPLOSIONSGEFAHR, WENN DIE BATTERIE DURCH EINEN FALSCHEN TYP
ERSETZT WIRD. ENTSORGEN SIE GEBRAUCHTE BATTERIEN ENTSPRECHEND DEN
ANWEISUNGEN. DER AKKU IST NICHT VOM BENUTZER AUSTAUSCHBAR.
Aufgrund der Produktform und -abmessungen sind Name und Anschrift des
Importeurs/Herstellers auf der Verpackung vermerkt.
Kundendienst
Weitere Informationen erhalten Sie auf www.ezvizlife.com
Benötigen Sie Hilfe? Setzen Sie sich mit uns in Verbindung:
Telefon: (+49) 0 696 640 4321
Technische Anfragen E-Mail: support.eu@ezvizlife.com
1
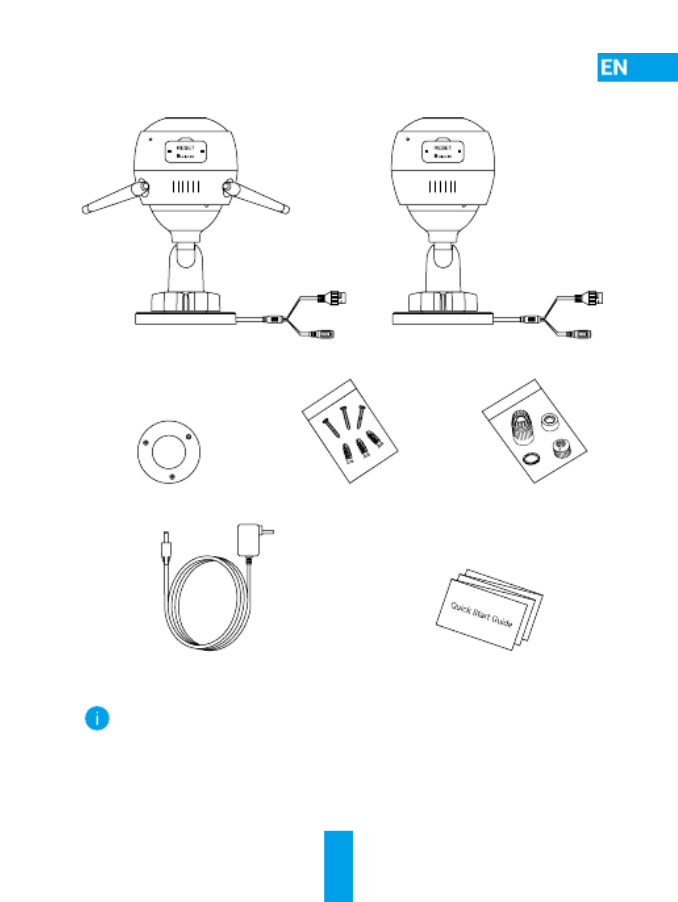
Package Contents
or
Wi-Fi Camera PoE Camera
Drill Template Screw Kit Waterproof Kit
Power Adapter Quick Start Guide
• The camera appearance is subject to the actual model you have
purchased.
• Power adapter is not included with the PoE camera model.

2
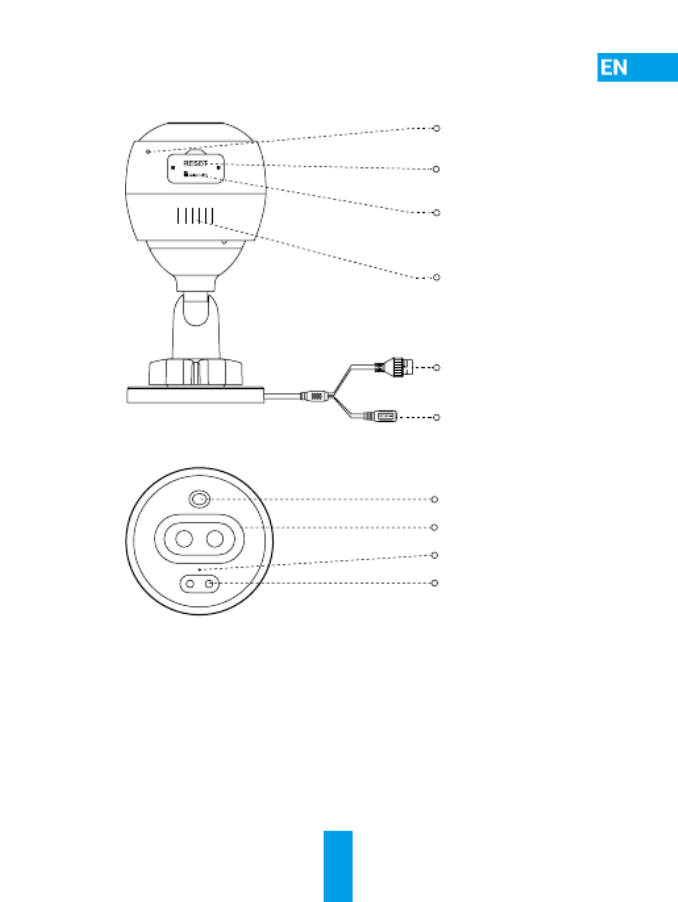
Basics
Wi-Fi Camera
Micro SD Card Slot
(Behind the cover)
Reset Button
(Behind the cover)
MIC
Ethernet Port
Power Port
Speaker
Antenna
LED Indicator
Dual-lens
Spotlight
IR Light
Name Description
LED Indicator Solid Red: Camera starting up.•
• Slow-ashing Red: Wi-Fi connection failed.
• Fast-ashing Red: Camera exception (e.g. Micro SD
card error).
• Solid Blue: Video being viewed in the EZVIZ app.
• Slow-ashing Blue: Camera running properly.
• Fast-ashing Blue: Camera ready for Wi-Fi connection.
3
Basics
PoE Camera
Micro SD Card Slot
(Behind the cover)
Reset Button
(Behind the cover)
MIC
PoE Port
Power Port
Speaker
LED Indicator
Dual-lens
Spotlight
IR Light
Name Description
LED Indicator Solid Red: Camera starting up.•
• Slow-ashing Red: Network connection failed.
• Fast-ashing Red: Camera exception (e.g. Micro SD
card error).
• Solid Blue: Video being viewed in the EZVIZ app.
• Slow-ashing Blue: Camera running properly.

4
Get the EZVIZ app
1. Connect your mobile phone to Wi-Fi using your network. 2.4GHz
2. Search for “EZVIZ” in App Store or Google Play
(TM).
3. Download and install the EZVIZ app.
4. Launch the app, and register an EZVIZ user account.
Setup
Follow the steps to set your camera:
1. Power on your camera.
2. Log in to your EZVIZ app user account.
3. Connect your camera to the Internet.
4. Add your camera to your EZVIZ account.
How to Set Your Wi-Fi Camera?
1 Power-on
Steps:
1. Connect the power adapter cable to the camera's power port.
2. Plug the power adapter into an electrical outlet.
Power Outlet
Power Adapter
The LED turning fast-ashing blue indicates that the camera is powered
on and ready for Wi-Fi conguration.

5
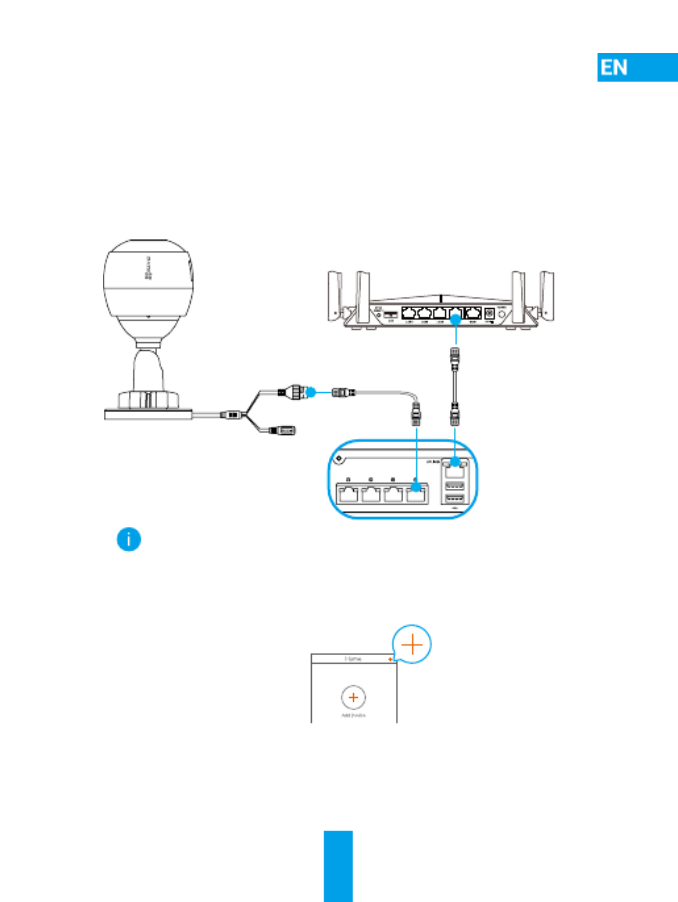
2 Connect to the Internet
• Wireless Connection: Connect the camera to Wi-Fi. Refer to Option 1.
• Wired Connection: Connect the camera to a router. Refer to Option 2.
Option 1: Use the EZVIZ app to congure Wi-Fi.
Steps:
1. Log in to your account using the EZVIZ app.
2. On the Home screen, tap “+” on the upper-right corner to go to the
Scan QR Code interface.
3. Scan the QR code on the Quick Start Guide cover or on the body of
the camera.
4. Follow the EZVIZ app wizard to nish Wi-Fi conguration.
Please choose to connect the same Wi-Fi for your camera as your
mobile phone has connected.
Hold the reset button for 5s to restart and set all parameters to
default.
Hold the reset button for 5s in any of the following cases:
• The camera fails to connect to your Wi-Fi network.
• You want to change to another Wi-Fi network.

6
Option 2: Connect your Wi-Fi camera to a router.
Steps:
1. Connect the camera to the LAN port of your router with the
Ethernet cable.
Ethernet Cable
2. Log in to your account using the EZVIZ app.
3. On the Home screen, tap “+” on the upper-right corner to go to the
Scan QR Code interface.
4. Scan the QR code on the Quick Start Guide cover or on the body of
the camera.
5. Follow the wizard to add the camera to the EZVIZ app.
7
How to Set Your PoE Camera?
Option 1: Connect your PoE camera to a PoE Switch/NVR.
Steps:
1. Connect the Ethernet cable to the PoE port of your camera.
2. Connect the other end of the Ethernet cable to the PoE port of your
PoE switch or NVR.
3. Connect the LAN port of your PoE switch or NVR to the LAN port of
a router via the Ethernat cable.
Router
For PoE Port For LAN Port
For LAN Port
PoE Switch/NVR
The PoE switch, NVR and Ethernet cable are not included in the package.
4. Log in to your account using the EZVIZ app.
5. On the Home screen, tap “+” on the upper-right corner to go to the
Scan QR Code interface.
6. Scan the QR code on the Quick Start Guide cover or on the body of
the camera.
7. Follow the wizard to add the camera to the EZVIZ app.

9
Installation (Optional)
1 Install the Micro SD Card (Optional)
1. Remove the cover on the camera.
2. Insert the micro SD card (sold separately) into the card slot as
shown in the gure below.
3. Place the cover back on.
After installing the micro SD card, you should initialize the card in
the EZVIZ app before using it.
This Side Up
4. In the EZVIZ app, tap the Storage Status in the Device Settings
interface to check the SD card status.
5. If the memory card status displays as Uninitialized, tap to initialize it.
The status will then change to Normal and it can store videos.

10
2 Install the Camera
The camera can be mounted on the wall or ceiling. Here we take
wall mounting as an example.
• Recommended installation height: 3 m (10 ft).
• Make sure the wall/ceiling is strong enough to withstand three
times the weight of the camera.
• Avoid positioning the camera in an area that gets a lot of light
shining directly into the camera lens.
- Place the drill template onto the surface you have chosen to mount
the camera.
- (For cement wall/ceiling only) Drill screw holes according to the
template, and insert three anchors.
- Use three metal screws to x the camera according to the template.
Drill Template
Anchors Metal Screws
Please tear up the drill template after installing the base if needed.

13
Grundlagen
WLAN-Kamera
MicroSD-Kartensteckplatz
(hinter der Abdeckung)
Rücksetztaste
(hinter der Abdeckung)
Mikrofon
Ethernet-Anschluss
Netzanschluss
Lautsprecher
Antenne
LED-Betriebsanzeige
Doppeltes Objektiv
Scheinwerfer
IR-Licht
Name Beschreibung
LED-
Betriebsanzeige
• Stetiges Rot: Kamera fährt hoch.
• Blinkt langsam Rot: WLAN-Verbindung fehlgeschlagen.
• Blinkt schnell Rot: Kameraausnahme
(z.B. microSD-Karte Fehler).
• Stetiges Blau: Ein Video wird in der EZVIZ-App angezeigt.
• Blinkt langsam Blau: Kamera funktioniert einwandfrei.
• Blinkt schnell Blau: Kamera ist zur WLAN-Verbindung
bereit.

14
Grundlagen
PoE-Kamera
MicroSD-Kartensteckplatz
(hinter der Abdeckung)
Rücksetztaste
(hinter der Abdeckung)
Mikrofon
PoE-Anschluss
Netzanschluss
Lautsprecher
LED-Betriebsanzeige
Doppeltes Objektiv
Scheinwerfer
IR-Licht
Name Beschreibung
LED-Betriebsanzeige Stetiges Rot: Kamera fährt hoch.•
• Blinkt langsam Rot: Netzwerkverbindung
fehlgeschlagen.
• Blinkt schnell Rot: Kameraausnahme
(z.B. microSD-Karte Fehler).
• Stetiges Blau: Ein Video wird in der EZVIZ-App
angezeigt.
• Blinkt langsam Blau: Kamera funktioniert
einwandfrei.

15
Herunterladen der EZVIZ-App
1. Verbinden Sie Ihr Mobiltelefon über Ihr -Netzwerk mit 2,4-GHz
dem WLAN.
2. Suchen Sie im App Store oder bei Google Play
(TM) nach „EZVIZ“.
3. Laden Sie die EZVIZ-App herunter und installieren Sie sie.
4. Starten Sie die App und registrieren Sie ein EZVIZ-Benutzerkonto.
Einrichtung
Befolgen Sie die Schritte zur Einrichtung Ihrer Kamera:
1. Schalten Sie Ihre Kamera ein.
2. Melden Sie sich bei Ihrem EZVIZ-Benutzerkonto an.
3. Verbinden Sie Ihre Kamera mit dem Internet.
4. Fügen Sie Ihre Kamera Ihrem EZVIZ-Konto hinzu.
Wie richte ich meine WLAN-Kamera ein?
1 Einschalten
Schritte:
1. Schließen Sie das Netzteil an den Stromanschluss der Kamera an.
2. Stecken Sie das Netzteil in eine Steckdose.
Steckdose
Netzteil
Die blau blinkende LED zeigt an, dass die Kamera eingeschaltet und zur
WLAN-Konguration bereit ist.

16
2 Mit dem Internet verbinden
• Kabellose Verbindung: Verbinden Sie die Kamera mit dem WLAN.
Beachten Sie .Option 1
• Kabelverbindung: Verbinden Sie die Kamera mit einem Router.
Beachten Sie .Option 2
Möglichkeit 1: Kongurieren Sie das WLAN über die EZVIZ-App.
Schritte:
1. Melden Sie sich mit der EZVIZ-App bei Ihrem Konto an.
2. Tippen Sie auf der Startseite auf „+“ oben rechts, um das Menü
„QR-Code scannen“ aufzurufen.
3. Scannen Sie den QR-Code auf dem Einband der Schnellstartanleitung
oder auf dem Kameragehäuse.
4. Befolgen Sie die Anweisungen des EZVIZ-App-Assistenten zum
Abschließen der WLAN-Konguration.
Verbinden Sie die Kamera mit demselben WLAN, mit dem auch Ihr
Mobiltelefon verbunden ist.
Halten Sie die Rücksetztaste 5 Sekunden gedrückt, um neu zu starten
und alle Parameter auf die Standardwerte zurückzusetzen.
Halten Sie die Rücksetztaste in einem der folgenden Fälle für 5 Sekunden
gedrückt:
• Die Kamera kann keine Verbindung mit Ihrem WLAN-Netzwerk aufbauen.
• Sie möchten zu einem anderen WLAN-Netzwerk wechseln.

22
3 Betrachtungswinkel einstellen
- Lösen Sie die Einstellschraube.
- Passen Sie den Betrachtungswinkel für eine optimale Sicht
Ihrer Kamera an.
- Ziehen Sie die Einstellschraube fest.
Einstellschraube
0 bis 90°
0 bis 360°
Stellen Sie sicher, dass der Steckplatz der microSD-Karte nach
unten zeigt.
Weitere Informationen erhalten Sie auf www.ezvizlife.com.
Termékspecifikációk
| Márka: | EZVIZ |
| Kategória: | Térfigyelő kamera |
| Modell: | C3X |
Szüksége van segítségre?
Ha segítségre van szüksége EZVIZ C3X, tegyen fel kérdést alább, és más felhasználók válaszolnak Önnek
Útmutatók Térfigyelő kamera EZVIZ

1 Október 2024
27 Szeptember 2024
12 Szeptember 2024
1 Szeptember 2024
1 Szeptember 2024
1 Szeptember 2024
1 Szeptember 2024
1 Szeptember 2024
1 Szeptember 2024
30 Augusztus 2024
Útmutatók Térfigyelő kamera
- Térfigyelő kamera Samsung
- Térfigyelő kamera Sony
- Térfigyelő kamera August
- Térfigyelő kamera Nedis
- Térfigyelő kamera Grundig
- Térfigyelő kamera Philips
- Térfigyelő kamera Pioneer
- Térfigyelő kamera Reolink
- Térfigyelő kamera Garmin
- Térfigyelő kamera Bosch
- Térfigyelő kamera Panasonic
- Térfigyelő kamera Canon
- Térfigyelő kamera JVC
- Térfigyelő kamera Evolveo
- Térfigyelő kamera Toshiba
- Térfigyelő kamera Ubiquiti Networks
- Térfigyelő kamera TP-Link
- Térfigyelő kamera Emos
- Térfigyelő kamera Motorola
- Térfigyelő kamera LogiLink
- Térfigyelő kamera Digitus
- Térfigyelő kamera Zebra
- Térfigyelő kamera Xiaomi
- Térfigyelő kamera TRENDnet
- Térfigyelő kamera Boss
- Térfigyelő kamera Crestron
- Térfigyelő kamera ORNO
- Térfigyelő kamera Strong
- Térfigyelő kamera Gigaset
- Térfigyelő kamera MEE Audio
- Térfigyelő kamera Conceptronic
- Térfigyelő kamera Thomson
- Térfigyelő kamera Technaxx
- Térfigyelő kamera Speco Technologies
- Térfigyelő kamera Ricoh
- Térfigyelő kamera Hikvision
- Térfigyelő kamera Netgear
- Térfigyelő kamera Asus
- Térfigyelő kamera Vtech
- Térfigyelő kamera Rollei
- Térfigyelő kamera Hama
- Térfigyelő kamera Mitsubishi
- Térfigyelő kamera Synology
- Térfigyelő kamera Avidsen
- Térfigyelő kamera Raymarine
- Térfigyelő kamera DSC
- Térfigyelő kamera Kodak
- Térfigyelő kamera Ring
- Térfigyelő kamera V-TAC
- Térfigyelő kamera ZyXEL
- Térfigyelő kamera Logitech
- Térfigyelő kamera Dahua Technology
- Térfigyelő kamera Withings
- Térfigyelő kamera Denver
- Térfigyelő kamera First Alert
- Térfigyelő kamera Minox
- Térfigyelő kamera Trevi
- Térfigyelő kamera DiO
- Térfigyelő kamera Planet
- Térfigyelő kamera Burg Wächter
- Térfigyelő kamera Ernitec
- Térfigyelő kamera Tenda
- Térfigyelő kamera Qian
- Térfigyelő kamera Aluratek
- Térfigyelő kamera Extech
- Térfigyelő kamera Gembird
- Térfigyelő kamera Cisco
- Térfigyelő kamera Niceboy
- Térfigyelő kamera SPC
- Térfigyelő kamera Bea-fon
- Térfigyelő kamera Powerfix
- Térfigyelő kamera Edimax
- Térfigyelő kamera Eufy
- Térfigyelő kamera APC
- Térfigyelő kamera Overmax
- Térfigyelő kamera Lorex
- Térfigyelő kamera Foscam
- Térfigyelő kamera Manhattan
- Térfigyelő kamera Kogan
- Térfigyelő kamera Alecto
- Térfigyelő kamera Honeywell
- Térfigyelő kamera EnGenius
- Térfigyelő kamera Imou
- Térfigyelő kamera Marshall
- Térfigyelő kamera Acme
- Térfigyelő kamera Furrion
- Térfigyelő kamera Velleman
- Térfigyelő kamera Western Digital
- Térfigyelő kamera Grandstream
- Térfigyelő kamera D-Link
- Térfigyelő kamera Avanti
- Térfigyelő kamera Milesight
- Térfigyelő kamera Monacor
- Térfigyelő kamera IDIS
- Térfigyelő kamera Epiphan
- Térfigyelő kamera ION
- Térfigyelő kamera Blaupunkt
- Térfigyelő kamera Chacon
- Térfigyelő kamera Elro
- Térfigyelő kamera GVI Security
- Térfigyelő kamera Moxa
- Térfigyelő kamera Olympia
- Térfigyelő kamera Delta Dore
- Térfigyelő kamera ZKTeco
- Térfigyelő kamera Abus
- Térfigyelő kamera Vivotek
- Térfigyelő kamera AG Neovo
- Térfigyelő kamera Arlo
- Térfigyelő kamera Trust
- Térfigyelő kamera Konig
- Térfigyelő kamera Marmitek
- Térfigyelő kamera Stabo
- Térfigyelő kamera Pyle
- Térfigyelő kamera Lumens
- Térfigyelő kamera AVer
- Térfigyelő kamera AVMATRIX
- Térfigyelő kamera Sanyo
- Térfigyelő kamera DataVideo
- Térfigyelő kamera CRUX
- Térfigyelő kamera Atlona
- Térfigyelő kamera Schneider
- Térfigyelő kamera Lindy
- Térfigyelő kamera Uniden
- Térfigyelő kamera Quantum
- Térfigyelő kamera Marshall Electronics
- Térfigyelő kamera Trebs
- Térfigyelő kamera M-e
- Térfigyelő kamera Provision-ISR
- Térfigyelő kamera Somfy
- Térfigyelő kamera AViPAS
- Térfigyelő kamera Axis
- Térfigyelő kamera Brilliant
- Térfigyelő kamera Orion
- Térfigyelő kamera EverFocus
- Térfigyelő kamera SereneLife
- Térfigyelő kamera I3International
- Térfigyelő kamera Equip
- Térfigyelő kamera Genius
- Térfigyelő kamera Valueline
- Térfigyelő kamera Swann
- Térfigyelő kamera Adj
- Térfigyelő kamera Anker
- Térfigyelő kamera Genie
- Térfigyelő kamera Petcube
- Térfigyelő kamera ClearView
- Térfigyelő kamera Sitecom
- Térfigyelő kamera ACTi
- Térfigyelő kamera Schwaiger
- Térfigyelő kamera Elmo
- Térfigyelő kamera Vitek
- Térfigyelő kamera Alfatron
- Térfigyelő kamera Laserliner
- Térfigyelő kamera Smartwares
- Térfigyelő kamera REVO
- Térfigyelő kamera Belkin
- Térfigyelő kamera KJB Security Products
- Térfigyelő kamera Kramer
- Térfigyelő kamera BZBGear
- Térfigyelő kamera BirdDog
- Térfigyelő kamera Allnet
- Térfigyelő kamera Aldi
- Térfigyelő kamera Airlive
- Térfigyelő kamera Aritech
- Térfigyelő kamera Flamingo
- Térfigyelő kamera Yale
- Térfigyelő kamera Caliber
- Térfigyelő kamera Eminent
- Térfigyelő kamera Exibel
- Térfigyelő kamera Fortinet
- Térfigyelő kamera KlikaanKlikuit
- Térfigyelő kamera Maginon
- Térfigyelő kamera Profile
- Térfigyelő kamera Marquant
- Térfigyelő kamera Ednet
- Térfigyelő kamera AVerMedia
- Térfigyelő kamera Steren
- Térfigyelő kamera Perel
- Térfigyelő kamera Flir
- Térfigyelő kamera Netis
- Térfigyelő kamera Buffalo
- Térfigyelő kamera GeoVision
- Térfigyelő kamera Nest
- Térfigyelő kamera LevelOne
- Térfigyelő kamera Siedle
- Térfigyelő kamera Hive
- Térfigyelő kamera Netatmo
- Térfigyelő kamera Switel
- Térfigyelő kamera InFocus
- Térfigyelő kamera Hombli
- Térfigyelő kamera Clas Ohlson
- Térfigyelő kamera Naxa
- Térfigyelő kamera BRK
- Térfigyelő kamera EVE
- Térfigyelő kamera Waeco
- Térfigyelő kamera QSC
- Térfigyelő kamera Xavax
- Térfigyelő kamera Vaddio
- Térfigyelő kamera Gira
- Térfigyelő kamera Jung
- Térfigyelő kamera Interlogix
- Térfigyelő kamera Boyo
- Térfigyelő kamera IC Intracom
- Térfigyelő kamera Adesso
- Térfigyelő kamera Satel
- Térfigyelő kamera POSline
- Térfigyelő kamera Notifier
- Térfigyelő kamera Hawking Technologies
- Térfigyelő kamera Lanberg
- Térfigyelő kamera Friedland
- Térfigyelő kamera Nexxt
- Térfigyelő kamera Monoprice
- Térfigyelő kamera Watec
- Térfigyelő kamera Beafon
- Térfigyelő kamera Chuango
- Térfigyelő kamera ETiger
- Térfigyelő kamera Videcon
- Térfigyelő kamera INSTAR
- Térfigyelő kamera Advantech
- Térfigyelő kamera Digital Watchdog
- Térfigyelő kamera Ferguson
- Térfigyelő kamera Ganz
- Térfigyelő kamera Kwikset
- Térfigyelő kamera Intellinet
- Térfigyelő kamera ClearOne
- Térfigyelő kamera Ebode
- Térfigyelő kamera Oplink
- Térfigyelő kamera Kerbl
- Térfigyelő kamera Dorr
- Térfigyelő kamera Sonic Alert
- Térfigyelő kamera Linear PRO Access
- Térfigyelő kamera Summer Infant
- Térfigyelő kamera SMC
- Térfigyelő kamera Topica
- Térfigyelő kamera Iiquu
- Térfigyelő kamera Verint
- Térfigyelő kamera Brinno
- Térfigyelő kamera Rostra
- Térfigyelő kamera Caddx
- Térfigyelő kamera Spyclops
- Térfigyelő kamera EKO
- Térfigyelő kamera Inovonics
- Térfigyelő kamera Kguard
- Térfigyelő kamera Woonveilig
- Térfigyelő kamera Mobi
- Térfigyelő kamera Surveon
- Térfigyelő kamera Hollyland
- Térfigyelő kamera Epcom
- Térfigyelő kamera Indexa
- Térfigyelő kamera Lutec
- Térfigyelő kamera Whistler
- Térfigyelő kamera Hanwha
- Térfigyelő kamera VideoComm
- Térfigyelő kamera IMILAB
- Térfigyelő kamera 3xLOGIC
- Térfigyelő kamera Pelco
- Térfigyelő kamera Leviton
- Térfigyelő kamera EtiamPro
- Térfigyelő kamera Inkovideo
- Térfigyelő kamera Pentatech
- Térfigyelő kamera Weldex
- Térfigyelő kamera SecurityMan
- Térfigyelő kamera Canyon
- Térfigyelő kamera CNB Technology
- Térfigyelő kamera Tapo
- Térfigyelő kamera Aigis
- Térfigyelő kamera Exacq
- Térfigyelő kamera Brickcom
- Térfigyelő kamera Laxihub
- Térfigyelő kamera Securetech
- Térfigyelő kamera EFB Elektronik
- Térfigyelő kamera NetMedia
- Térfigyelő kamera Videotec
- Térfigyelő kamera Illustra
- Térfigyelő kamera Nivian
- Térfigyelő kamera Arenti
- Térfigyelő kamera E-bench
- Térfigyelő kamera Blow
- Térfigyelő kamera Syscom
- Térfigyelő kamera Tecno
- Térfigyelő kamera Night Owl
- Térfigyelő kamera Guardzilla
- Térfigyelő kamera Astak
- Térfigyelő kamera Blink
- Térfigyelő kamera Milestone Systems
- Térfigyelő kamera Zavio
- Térfigyelő kamera Campark
- Térfigyelő kamera IPX
- Térfigyelő kamera Dedicated Micros
- Térfigyelő kamera Hamlet
- Térfigyelő kamera Annke
- Térfigyelő kamera AVTech
- Térfigyelő kamera Qoltec
- Térfigyelő kamera Approx
- Térfigyelő kamera Digimerge
- Térfigyelő kamera Y-cam
- Térfigyelő kamera Feelworld
- Térfigyelő kamera Wisenet
- Térfigyelő kamera WyreStorm
- Térfigyelő kamera Infortrend
- Térfigyelő kamera HiLook
- Térfigyelő kamera Mach Power
- Térfigyelő kamera Compro
- Térfigyelő kamera Aida
- Térfigyelő kamera Ikegami
- Térfigyelő kamera Accsoon
- Térfigyelő kamera Vimtag
- Térfigyelő kamera Sonoff
- Térfigyelő kamera Gewiss
- Térfigyelő kamera Alula
- Térfigyelő kamera Insteon
- Térfigyelő kamera Costar
- Térfigyelő kamera ALC
- Térfigyelő kamera Security Labs
- Térfigyelő kamera Comtrend
- Térfigyelő kamera Seneca
- Térfigyelő kamera Avigilon
- Térfigyelő kamera American Dynamics
- Térfigyelő kamera Vosker
- Térfigyelő kamera Sentry360
- Térfigyelő kamera Owltron
- Térfigyelő kamera Enabot
- Térfigyelő kamera Luis Energy
- Térfigyelő kamera Sir Gawain
- Térfigyelő kamera VisorTech
- Térfigyelő kamera Atlantis Land
- Térfigyelő kamera B & S Technology
- Térfigyelő kamera Promise Technology
- Térfigyelő kamera Ecobee
- Térfigyelő kamera Turing
- Térfigyelő kamera Wasserstein
- Térfigyelő kamera Qolsys
- Térfigyelő kamera HuddleCamHD
- Térfigyelő kamera Setti+
- Térfigyelő kamera Defender
- Térfigyelő kamera Mobotix
- Térfigyelő kamera IOIO
- Térfigyelő kamera BIRDFY
- Térfigyelő kamera I-PRO
- Térfigyelő kamera DVDO
- Térfigyelő kamera TCP
- Térfigyelő kamera Bolin Technology
- Térfigyelő kamera Nextech
Legújabb útmutatók Térfigyelő kamera

6 Április 2025
5 Április 2025
5 Április 2025
15 Január 2025

14 Január 2025
13 Január 2025
13 Január 2025
13 Január 2025
13 Január 2025
13 Január 2025