Használati útmutató Epson Expression Photo XP-65
Olvassa el alább 📖 a magyar nyelvű használati útmutatót Epson Expression Photo XP-65 (120 oldal) a nyomtató kategóriában. Ezt az útmutatót 7 ember találta hasznosnak és 2 felhasználó értékelte átlagosan 4.5 csillagra
Oldal 1/120

User’s Guide
NPD5068-00 EN

Copyright and Trademarks
Copyright and Trademarks
No part of this publication may be reproduced, stored in a retrieval system, or transmitted in any form or by any
means, electronic, mechanical, photocopying, recording, or otherwise, without the prior written permission of Seiko
Epson Corporation. No patent liability is assumed with respect to the use of the information contained herein. Neither
is any liability assumed for damages resulting from the use of the information herein. The information contained
herein is designed only for use with this Epson product. Epson is not responsible for any use of this information as
applied to other products.
Neither Seiko Epson Corporation nor its affiliates shall be liable to the purchaser of this product or third parties for
damages, losses, costs, or expenses incurred by the purchaser or third parties as a result of accident, misuse, or abuse of
this product or unauthorized modifications, repairs, or alterations to this product, or (excluding the U.S.) failure to
strictly comply with Seiko Epson Corporation’s operating and maintenance instructions.
Seiko Epson Corporation and its affiliates shall not be liable for any damages or problems arising from the use of any
options or any consumable products other than those designated as Original Epson Products or Epson Approved
Products by Seiko Epson Corporation.
Seiko Epson Corporation shall not be held liable for any damage resulting from electromagnetic interference that
occurs from the use of any interface cables other than those designated as Epson Approved Products by Seiko Epson
Corporation.
EPSON
®
is a registered trademark, and EPSON EXCEED YOUR VISION or EXCEED YOUR VISION is a trademark
of Seiko Epson Corporation.
PRINT Image Matching
™
and the PRINT Image Matching logo are trademarks of Seiko Epson Corporation.
Copyright © 2001 Seiko Epson Corporation. All rights reserved.
PictBridge is a trademark.
Intel
®
is a registered trademark of Intel Corporation.
PowerPC
®
is a registered trademark of International Business Machines Corporation.
Microsoft
®
, Windows
®
, and Windows Vista
®
are registered trademarks of Microsoft Corporation.
Apple, Macintosh, Mac OS, and OS X are trademarks of Apple Inc., registered in the U.S. and other countries.
Google Cloud Print
™
is a registered trademark of Google Inc.
Adobe, Adobe Reader, and Acrobat are trademarks of Adobe systems Incorporated, which may be registered in
certain jurisdictions.
User’s Guide
Copyright and Trademarks
2

General Notice: Other product names used herein are for identification purposes only and may be trademarks of their
respective owners. Epson disclaims any and all rights in those marks.
© 2014 Seiko Epson Corporation. All rights reserved.
The contents of this manual and the specifications of this product are subject to change without notice.
User’s Guide
Copyright and Trademarks
3

Contents
Copyright and Trademarks
Copyright and Trademarks. . . . . . . . . . . . . . . . . . . 2
Introduction
Where to Find Information. . . . . . . . . . . . . . . . . . . 7
Caution, Important and Note. . . . . . . . . . . . . . . . . 7
Operating System Versions. . . . . . . . . . . . . . . . . . . 7
Using Epson Connect Service. . . . . . . . . . . . . . . . . 8
Important Instructions
Safety Instructions. . . . . . . . . . . . . . . . . . . . . . . . . 9
Product Advisories and Warnings. . . . . . . . . . . . . . 9
Setting up/using the product. . . . . . . . . . . . . . . . 9
Using the product with a wireless connection
. . . . . . . . . . . . . . . . . . . . . . . . . . . . . . . . . . . . 11
Handling ink cartridges. . . . . . . . . . . . . . . . . . . 11
Restrictions on Copying. . . . . . . . . . . . . . . . . . . . 11
Getting to Know Your Product
Available features for your product. . . . . . . . . . . . 13
Product Parts. . . . . . . . . . . . . . . . . . . . . . . . . . . . 13
Guide to the Control Panel. . . . . . . . . . . . . . . . . . 16
Paper and Media Handling
Introduction to Using, Loading, and Storing
Media.................................. 18
Storing paper. . . . . . . . . . . . . . . . . . . . . . . . . . 18
Selecting Paper. . . . . . . . . . . . . . . . . . . . . . . . . . . 18
Paper type settings from the printer driver. . . . . 20
Loading Paper. . . . . . . . . . . . . . . . . . . . . . . . . . . . 21
Into the paper cassette 1. . . . . . . . . . . . . . . . . . 21
Into the paper cassette 2. . . . . . . . . . . . . . . . . . 23
Into the rear paper feed slot. . . . . . . . . . . . . . . . 28
Loading a CD/DVD. . . . . . . . . . . . . . . . . . . . . . . 31
CD/DVD Handling Precautions. . . . . . . . . . . . 31
Loading a CD/DVD. . . . . . . . . . . . . . . . . . . . . 31
Printing
Basic Operation from the Control Panel. . . . . . . . . 35
Printing photos from a digital camera. . . . . . . . 35
Basic Operation from Your Computer. . . . . . . . . . 36
Printer driver and status monitor. . . . . . . . . . . . 36
Basic Printing. . . . . . . . . . . . . . . . . . . . . . . . . . 38
Canceling Printing. . . . . . . . . . . . . . . . . . . . . . 42
Other Options. . . . . . . . . . . . . . . . . . . . . . . . . . . 44
Printing photos the easy way. . . . . . . . . . . . . . . 44
Adding a Printing Preset. . . . . . . . . . . . . . . . . . 44
2-sided printing. . . . . . . . . . . . . . . . . . . . . . . . 45
Fit to page printing. . . . . . . . . . . . . . . . . . . . . . 48
Pages per sheet printing. . . . . . . . . . . . . . . . . . . 49
Enlarged Printing and Making Posters (for
Windows Only). . . . . . . . . . . . . . . . . . . . . . . . 50
Adjusting the Print Color. . . . . . . . . . . . . . . . . 56
Printing a Watermark (for Windows Only). . . . 57
Printing Web pages with E-Web Print (for
Windows Only). . . . . . . . . . . . . . . . . . . . . . . . 57
Printing a CD/DVD Label with Epson Print
CD. . . . . . . . . . . . . . . . . . . . . . . . . . . . . . . . . . 57
Printing from Smart Devices. . . . . . . . . . . . . . . . . 58
Using Epson iPrint. . . . . . . . . . . . . . . . . . . . . . 58
Sharing the Product for Printing. . . . . . . . . . . . . . 60
Setup for Windows. . . . . . . . . . . . . . . . . . . . . . 60
Setup for Mac OS X. . . . . . . . . . . . . . . . . . . . . . 62
Ink Cartridge Information
Replacing Ink Cartridges
Ink Cartridge Safety Instructions, Precautions,
and Specifications. . . . . . . . . . . . . . . . . . . . . . . . . 64
Safety instructions. . . . . . . . . . . . . . . . . . . . . . . 64
Precautions on ink cartridge replacement. . . . . . 64
Ink Cartridge Specifications. . . . . . . . . . . . . . . . 65
Checking the Ink Cartridge Status. . . . . . . . . . . . . 66
For Windows. . . . . . . . . . . . . . . . . . . . . . . . . . 66
For Mac OS X. . . . . . . . . . . . . . . . . . . . . . . . . . 67
Temporary Printing with Black Ink When Color
Ink Cartridges are Expended. . . . . . . . . . . . . . . . . 68
For Windows. . . . . . . . . . . . . . . . . . . . . . . . . . 68
For Mac OS X. . . . . . . . . . . . . . . . . . . . . . . . . . 69
Conserving Black Ink When the Cartridge is Low
(For Windows Only). . . . . . . . . . . . . . . . . . . . . . . 71
Replacing an ink cartridge. . . . . . . . . . . . . . . . . . . 71
User’s Guide
Contents
4

Maintaining Your Product and
Software
Checking the Print Head Nozzles. . . . . . . . . . . . . . 77
Using the Nozzle Check utility for Windows
. . . . . . . . . . . . . . . . . . . . . . . . . . . . . . . . . . . . 77
Using the Nozzle Check utility for Mac OS X
. . . . . . . . . . . . . . . . . . . . . . . . . . . . . . . . . . . . 77
Using the control panel. . . . . . . . . . . . . . . . . . . 78
Cleaning the Print Head. . . . . . . . . . . . . . . . . . . . 79
Using the Head Cleaning utility for Windows
. . . . . . . . . . . . . . . . . . . . . . . . . . . . . . . . . . . . 79
Using the Head Cleaning utility for Mac OS X
. . . . . . . . . . . . . . . . . . . . . . . . . . . . . . . . . . . . 79
Using the control panel. . . . . . . . . . . . . . . . . . . 80
Aligning the Print Head. . . . . . . . . . . . . . . . . . . . 80
Using the Print Head Alignment utility for
Windows............................. 80
Using the Print Head Alignment utility for
Mac OS X. . . . . . . . . . . . . . . . . . . . . . . . . . . . . 81
Saving Power. . . . . . . . . . . . . . . . . . . . . . . . . . . . 82
For Windows. . . . . . . . . . . . . . . . . . . . . . . . . . 82
For Mac OS X. . . . . . . . . . . . . . . . . . . . . . . . . . 83
Quieter Printer Operations. . . . . . . . . . . . . . . . . . 83
For Windows. . . . . . . . . . . . . . . . . . . . . . . . . . 83
For Mac OS X. . . . . . . . . . . . . . . . . . . . . . . . . . 83
Making Network Service Settings. . . . . . . . . . . . . . 83
Cleaning the Product. . . . . . . . . . . . . . . . . . . . . . 84
Cleaning the exterior of the product. . . . . . . . . . 84
Cleaning the interior of the product. . . . . . . . . . 85
Transporting the Product. . . . . . . . . . . . . . . . . . . 86
Checking and Installing Your Software. . . . . . . . . 88
Checking the software installed on your
computer. . . . . . . . . . . . . . . . . . . . . . . . . . . . . 88
Installing the software. . . . . . . . . . . . . . . . . . . . 88
Uninstalling Your Software. . . . . . . . . . . . . . . . . . 89
For Windows. . . . . . . . . . . . . . . . . . . . . . . . . . 89
For Mac OS X. . . . . . . . . . . . . . . . . . . . . . . . . . 90
Error Indicators
Troubleshooting for Printing
Diagnosing the Problem. . . . . . . . . . . . . . . . . . . . 94
Checking product status. . . . . . . . . . . . . . . . . . 94
Paper Jams. . . . . . . . . . . . . . . . . . . . . . . . . . . . . . 97
Removing jammed paper from the rear cover
. . . . . . . . . . . . . . . . . . . . . . . . . . . . . . . . . . . . 97
Removing jammed paper from inside the
product. . . . . . . . . . . . . . . . . . . . . . . . . . . . . . 98
Removing jammed paper from the paper
cassette. . . . . . . . . . . . . . . . . . . . . . . . . . . . . . . 99
Removing jammed paper from the rear paper
feed slot. . . . . . . . . . . . . . . . . . . . . . . . . . . . . . 99
Preventing paper jams. . . . . . . . . . . . . . . . . . . . 99
Reprinting after a paper jam (for Windows
only). . . . . . . . . . . . . . . . . . . . . . . . . . . . . . . . 100
Print Quality Help. . . . . . . . . . . . . . . . . . . . . . . . 100
Horizontal banding. . . . . . . . . . . . . . . . . . . . . 102
Vertical banding or misalignment. . . . . . . . . . 102
Incorrect or missing colors. . . . . . . . . . . . . . . 102
Blurry or smeared print. . . . . . . . . . . . . . . . . . 103
Miscellaneous Printout Problems. . . . . . . . . . . . . 104
Incorrect or garbled characters. . . . . . . . . . . . . 104
Incorrect margins. . . . . . . . . . . . . . . . . . . . . . 104
Printout has a slight slant. . . . . . . . . . . . . . . . . 104
Inverted image. . . . . . . . . . . . . . . . . . . . . . . . 104
Blank pages print. . . . . . . . . . . . . . . . . . . . . . 105
Printed side is smeared or scuffed. . . . . . . . . . 105
Printing is too slow. . . . . . . . . . . . . . . . . . . . . 105
Paper Does Not Feed Correctly. . . . . . . . . . . . . . 106
Paper does not feed. . . . . . . . . . . . . . . . . . . . . 106
Multiple pages feed. . . . . . . . . . . . . . . . . . . . . 106
Paper is improperly loaded. . . . . . . . . . . . . . . 106
Paper is not ejected fully or is wrinkled. . . . . . . 107
The Product Does Not Print. . . . . . . . . . . . . . . . 107
All lights are off. . . . . . . . . . . . . . . . . . . . . . . . 107
Lights came on and then went out. . . . . . . . . . 107
Only the power light is on. . . . . . . . . . . . . . . . 107
An ink error is indicated after you replace the
cartridge. . . . . . . . . . . . . . . . . . . . . . . . . . . . . 108
Increasing the Print Speed (For Windows Only)
. . . . . . . . . . . . . . . . . . . . . . . . . . . . . . . . . . . . . 110
Product Information
System Requirements. . . . . . . . . . . . . . . . . . . . . 112
For Windows. . . . . . . . . . . . . . . . . . . . . . . . . 112
For Mac OS X. . . . . . . . . . . . . . . . . . . . . . . . . 112
Technical Specifications. . . . . . . . . . . . . . . . . . . . 112
Printer specifications. . . . . . . . . . . . . . . . . . . . 112
Network interface specification. . . . . . . . . . . . 114
Photo data specifications. . . . . . . . . . . . . . . . . 115
Mechanical. . . . . . . . . . . . . . . . . . . . . . . . . . . 115
Electrical. . . . . . . . . . . . . . . . . . . . . . . . . . . . . 115
Environmental. . . . . . . . . . . . . . . . . . . . . . . . 116
Standards and approvals. . . . . . . . . . . . . . . . . 116
Interface. . . . . . . . . . . . . . . . . . . . . . . . . . . . . 116
User’s Guide
Contents
5

Where To Get Help
Technical Support Web Site. . . . . . . . . . . . . . . . . 117
Contacting Epson Support. . . . . . . . . . . . . . . . . . 117
Before Contacting Epson. . . . . . . . . . . . . . . . . 117
Help for Users in Europe. . . . . . . . . . . . . . . . . 118
Index
User’s Guide
Contents
6

Introduction
Where to Find Information
The latest version of the following manuals are available on the Epson support website.
http://www.epson.eu/Support (Europe)
❏Start Here (paper):
Provides you with information on setting up the product and installing the software.
❏User’s Guide (PDF):
Provides you with detailed operating, safety, and troubleshooting instructions. See this guide when using this
product with a computer, or when using advanced features such as 2 sided printing.
To view the PDF manual, you need Adobe Acrobat Reader 5.0 or later, or Adobe Reader.
❏Network Guide (PDF):
Provides network administrators with information on both the printer driver and network settings.
Caution, Important and Note
Caution, Important and Note in this manual are indicated as below and have the following meaning.
!
Caution
must be followed carefully to avoid bodily injury.
c
Important
must be observed to avoid damage to your equipment.
Note
contain useful tips and restrictions on product operation.
Operating System Versions
In this manual, the following abbreviations are used.
❏Windows 8.1 refers to Windows 8.1 and Windows 8.1 Pro.
❏Windows 8 refers to Windows 8 and Windows 8 Pro.
❏Windows 7 refers to Windows 7 Home Basic, Windows 7 Home Premium, Windows 7 Professional, and
Windows 7 Ultimate.
User’s Guide
Introduction
7

Important Instructions
Safety Instructions
Read and follow these instructions to ensure safe use of this product. Make sure you keep this guide for future
reference. Also, be sure to follow all warnings and instructions marked on the product.
❏Use only the power cord supplied with the product and do not use the cord with any other equipment. Use of other
cords with this product or the use of the supplied power cord with other equipment may result in fire or electric
shock.
❏Be sure your AC power cord meets the relevant local safety standard.
❏Never disassemble, modify, or attempt to repair the power cord, plug, printer unit, or options by yourself, except
as specifically explained in the product’s guides.
❏Unplug the product and refer servicing to qualified service personnel under the following conditions: The power
cord or plug is damaged; liquid has entered the product; the product has been dropped or the casing damaged; the
product does not operate normally or exhibits a distinct change in performance. Do not adjust controls that are
not covered by the operating instructions.
❏Place the product near a wall outlet where the plug can be easily unplugged.
❏Do not place or store the product outdoors, near excessive dirt or dust, water, heat sources, or in locations subject
to shocks, vibrations, high temperature or humidity.
❏Take care not to spill liquid on the product and not to handle the product with wet hands.
❏Keep this product at least 22 cm away from cardiac pacemakers. Radio waves from this product may adversely
affect the operation of cardiac pacemakers.
Note:
The following provides safety instructions for ink cartridges.
& “Replacing Ink Cartridges” on page 64
Product Advisories and Warnings
Read and follow these instructions to avoid damaging the product or your property. Make sure you keep this guide for
future reference.
Setting up/using the product
❏Do not block or cover the vents and openings in the product.
❏Use only the type of power source indicated on the product’s label.
❏Avoid using outlets on the same circuit as photocopiers or air control systems that regularly switch on and off.
User’s Guide
Important Instructions
9

❏Avoid electrical outlets controlled by wall switches or automatic timers.
❏Keep the entire computer system away from potential sources of electromagnetic interference, such as
loudspeakers or the base units of cordless telephones.
❏The power-supply cords should be placed to avoid abrasions, cuts, fraying, crimping, and kinking. Do not place
objects on top of the power-supply cords and do not allow the power-supply cords to be stepped on or run over. Be
particularly careful to keep all the power-supply cords straight at the ends and the points where they enter and
leave the transformer.
❏If you use an extension cord with the product, make sure that the total ampere rating of the devices plugged into
the extension cord does not exceed the cord’s ampere rating. Also, make sure that the total ampere rating of all
devices plugged into the wall outlet does not exceed the wall outlet’s ampere rating.
❏If you plan to use the product in Germany, the building installation must be protected by a 10 or 16 amp circuit
breaker to provide adequate short-circuit protection and over-current protection for the product.
❏When connecting the product to a computer or other device with a cable, ensure the correct orientation of the
connectors. Each connector has only one correct orientation. Inserting a connector in the wrong orientation may
damage both devices connected by the cable.
❏Place the product on a flat, stable surface that extends beyond the base of the product in all directions. If you place
the product by the wall, leave more than 10 cm between the back of the product and the wall. The product will not
operate properly if it is tilted at an angle.
❏When storing or transporting the product, avoid tilting it, placing it vertically, or turning it upside down;
otherwise ink may leak.
❏Allow spaces behind the product for the cables, and space above the product so that you can fully raise the
document cover.
❏Leave enough space in front of the product for the paper to be fully ejected.
❏Avoid places subject to rapid changes in temperature and humidity. Also, keep the product away from direct
sunlight, strong light, or heat sources.
❏Do not insert objects through the slots in the product.
❏Do not put your hand inside the product or touch the ink cartridges during printing.
❏Do not touch the white flat cable inside the product.
❏Do not use aerosol products that contain flammable gases inside or around the product. Doing so may cause
fire.
❏Do not move the print head by hand; otherwise, you may damage the product.
❏Always turn the product off using the P button. Do not unplug the product or turn off the power at the outlet until
the P light has turned off completely.
❏Before transporting the product, make sure that the print head is in the home (far right) position and the ink
cartridges are in place.
❏Be careful not to trap your fingers when closing the printer cover.
User’s Guide
Important Instructions
10

❏If you are not going to use the product for a long period, be sure to unplug the power cord from the electrical
outlet.
❏During the life of your product it may be necessary to replace the waste ink pad when it has become full. Whether
and how often this is required will vary according to the number of pages you print, the type of material that you
print and the number of cleaning cycles that the product performs. Epson Status Monitor, or lights on the control
panel will advise you when this part needs replacing. The need for replacement of the pad does not mean that your
product has ceased to operate in accordance with its specifications. The replacement of this part is a routine
product servicing activity within the product’s specification and is not a problem which requires repair. The
Epson warranty does not therefore cover the cost of this replacement. If your product needs the pad replacing this
can be performed for you by any authorised Epson service provider. It is not a user-serviceable part.
Using the product with a wireless connection
❏Do not use this product inside medical facilities or near medical equipment. Radio waves from this product may
adversely affect the operation of electrical medical equipment.
❏Do not use this product near automatically controlled devices such as automatic doors or fire alarms. Radio waves
from this product may adversely affect these devices, and could lead to accidents due to malfunction.
Handling ink cartridges
& “Replacing Ink Cartridges” on page 64
Restrictions on Copying
Observe the following restrictions in order to ensure the responsible and legal use of the product.
Copying of the following items is prohibited by law:
❏Bank bills, coins, government-issued marketable securities, government bond securities, and municipal securities
❏Unused postage stamps, pre-stamped postcards, and other official postal items bearing valid postage
❏Government-issued revenue stamps, and securities issued according to legal procedure
Exercise caution when copying the following items:
❏Private marketable securities (stock certificates, negotiable notes, checks, etc.), monthly passes, concession
tickets, etc.
❏Passports, driver’s licenses, warrants of fitness, road passes, food stamps, tickets, etc.
Note:
Copying these items may also be prohibited by law.
Responsible use of copyrighted materials:
User’s Guide
Important Instructions
11

❏Products can be misused by improperly copying copyrighted materials. Unless acting on the advice of a
knowledgeable attorney, be responsible and respectful by obtaining the permission of the copyright holder before
copying published material.
User’s Guide
Important Instructions
12

Getting to Know Your Product
Available features for your product
Check what is available for your product.
Print
Wi-Fi
Epson Connect services Email Print
Remote Print Driver
iPrint*
Other companies’ services Google Cloud Print
PictBridge USB, LAN, WLAN
* Epson iPrint is an application for iOS and Android. Using Epson iPrint, you can wirelessly print from your smartphone or tablet. For
more information, visit the following website.
http://ipr.to/a
Product Parts
a. Store the CD/DVD tray here.
b. CD/DVD tray
User’s Guide
Getting to Know Your Product
13

a. Printer cover
b. Print head / Ink cartridge holder
c. External interface USB port
d. Output tray
a. Paper cassette 1
b. Paper cassette 2
c. Front cover
User’s Guide
Getting to Know Your Product
14

a. Rear paper feed slot
b. Paper support
a. AC inlet
b. Rear cover
c. Vent
d. LAN port
e. USB port
User’s Guide
Getting to Know Your Product
15

Guide to the Control Panel
Buttons/Lights Function
a Green light (left): turns on while the printer is connected to a wireless (Wi-Fi) network.
Yellow light (right): turns on while the printer is connected to a wired network.
Green light (left): flashes while the printer is communicating with a network.
The lights flash alternately while initializing network settings.
b Turns the printer on or off.
Do not turn off while this light is flashing (such as while operating, processing data, or replacing
ink cartridges).
Unplug the power cord when this light is off.
c Hold this button down for more than three seconds to perform Wi-Fi auto setup (AOSS/WPS).
When a network error occurs, pressing this button cancels the error. See the Network Guide for
more details.
d Prints the network status sheet allowing you to check the network settings and connection status.
The PIN code for PIN Code Setup (WPS) is also printed.
e Press this button to load paper or a CD/DVD.
Turns on or flashes when paper is out or a paper jam occurs.
& “Error Indicators” on page 91
f Open the printer cover and press this button to replace the ink cartridge.
& “Replacing Ink Cartridges” on page 64
Hold this button down for three seconds to run print head cleaning.
Turns on when the ink cartridge needs to be replaced and flashes when the ink is low.
g Press this button to stop printing and eject the paper or CD/DVD.
h. Turns on or flashes when the output tray is not ejected or the printer cover is open.
& “Error Indicators” on page 91
You can press some buttons simultaneously to perform more functions.
Buttons Function
Enable or disable the paper size check feature before printing. While holding down the button, turn the
printer off and then on again. When enabled, if the print setting differs from the paper size you loaded, the
paper is ejected and printing stops. This is enabled by default.
Press the and buttons simultaneously to start PIN Code Setup (WPS). See the Network Guide for
more details.
Turn the printer on while holding down the button to restore the default network settings.
User’s Guide
Getting to Know Your Product
16

Paper and Media Handling
Introduction to Using, Loading, and Storing Media
You can achieve good results with most types of plain paper. However, coated papers provide superior prints because
they absorb less ink.
Epson provides special papers that are formulated for the ink used in Epson ink jet products, and recommends these
papers to ensure high-quality results.
When loading special paper distributed by Epson, read the instruction sheets packed with the paper first and keep the
following points in mind.
Note:
❏Load the paper into the paper cassette printable side down. The printable side is usually whiter or glossier. See the
instruction sheets packed with the paper for more information. Some types of paper have cut corners to help identify the
correct loading direction.
❏If the paper is curled, flatten it or curl it slightly in the opposite direction before loading. Printing on curled paper may
cause ink to smear on your prints.
Storing paper
Return unused paper to the original package as soon as you finish printing. When handling special media, Epson
recommends storing your prints in a resealable plastic bag. Keep unused paper and prints away from high
temperature, humidity, and direct sunlight.
Selecting Paper
The table below lists supported papers. Loading capacity and borderless print availability varies by paper as shown.
User’s Guide
Paper and Media Handling
18

Media Type Size Loading capacity (sheets) Borderless
printing*
4
Paper
cassett
e 1
Paper
cassett
e 2
Rear
paper
feed
slot*
3
Plain paper*
1
Letter*
2
- Up to
the line
indicate
d by the
triangle
symbol
on the
edge
guide.
1 -
A4*
2
- 1 -
B5*
2
- 1 -
A5*
2
- 1 -
A6 20 20 1 -
Legal - 1 1 -
User defined size - 1 1 -
Envelope #10 - 10 1 -
DL - 10 1 -
C6 - 10 1 -
Epson Bright White Ink Jet Paper A4*
2
- 80 1 -
Epson Photo Quality Ink Jet Paper A4 - 80 1 -
Epson Matte Paper-Heavyweight A4 - 20 1 ✓
Epson Double-Sided Matte Paper A4 - 1 1 ✓
Epson Photo Paper A4 - 20 1 ✓
10 × 15 cm (4 × 6 in.) 20 20 1 ✓
13 × 18 cm (5 × 7 in.) 20 20 1 ✓
Epson Premium Glossy Photo Paper A4 - 20 1 ✓
10 × 15 cm (4 × 6 in.) 20 20 1 ✓
13 × 18 cm (5 × 7 in.) 20 20 1 ✓
16:9 wide size
(102 × 181mm)
20 20 1 ✓
Epson Premium Semigloss Photo Paper A4 - 20 1 ✓
10 × 15 cm (4 × 6 in.) 20 20 1 ✓
Epson Photo Paper Glossy A4 - 20 1 ✓
10 × 15 cm (4 × 6 in.) 20 20 1 ✓
13 × 18 cm (5 × 7 in.) 20 20 1 ✓
User’s Guide
Paper and Media Handling
19
C
Slide the side edge guides to the sides of the paper cassette, and then slide the front edge guide to adjust to the
paper size you want to use.
D
Load paper with the printable side face-down and fit the front edge guide to the edge of the paper.
Note:
❏Fan and align the edges of the paper before loading.
❏For plain paper, do not load paper above the line just under the arrow mark inside the edge guide. For
Epson special media, make sure the number of sheets is less than the limit specified for the media.
& “Selecting Paper” on page 18
❏When you select Cassette 1->2 as the Paper Source, load the same size and type of paper in both cassettes.
❏When loading a Photo Stickers sheet, place it face down. Do not use the loading support sheet that came with the
Photo Stickers.
E
Slide the edge guides to the edges of the paper.
User’s Guide
Paper and Media Handling
22
F
Insert paper cassette 1. Line up the alignment marks on the printer and the tray.
G
Completely extend the output tray.
Note:
❏Leave enough space in front of the product for the paper to be fully ejected.
❏Do not remove or insert the paper cassette while the product is operating.
Into the paper cassette 2
A
Open the front cover and pull out the paper cassette 2.
Note:
If the output tray has been ejected, close it before pulling out the paper cassette.
User’s Guide
Paper and Media Handling
23

B
Slide the edge guides to the sides of the paper cassette.
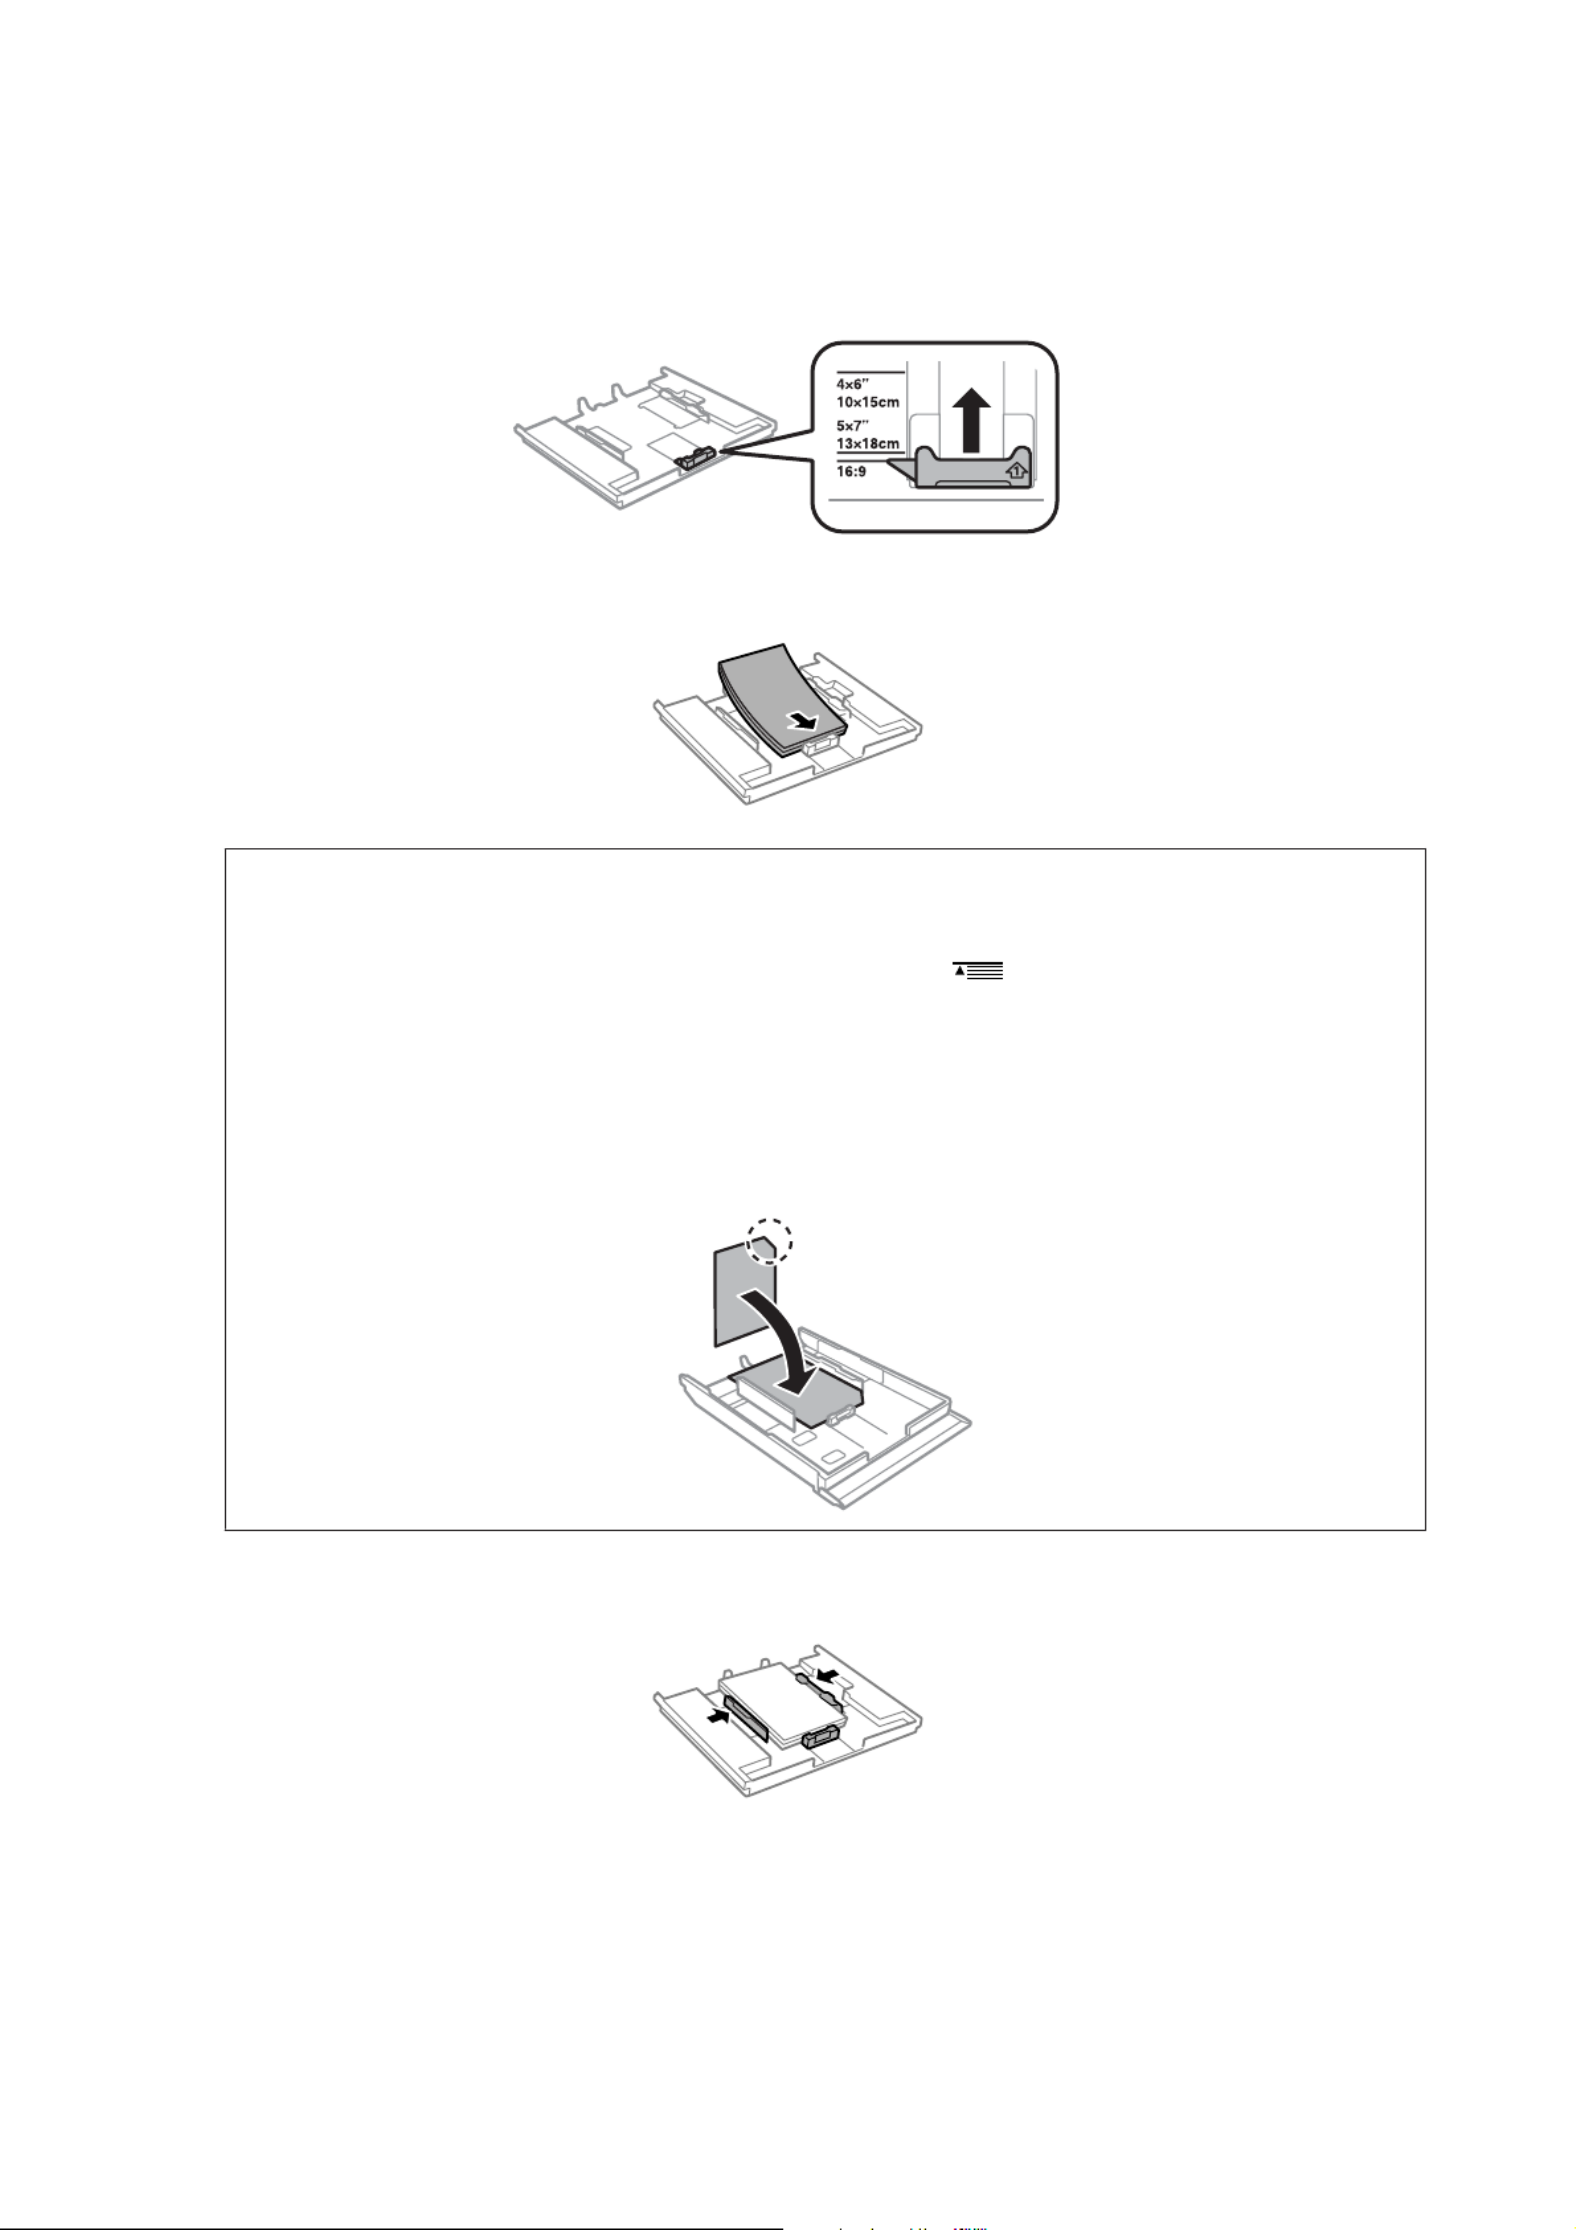
C
Slide the edge guide to adjust to the paper size you will use.
Note:
If you are loading envelopes, skip this step.
D
Load paper toward the edge guide with printable side face-down, and check that the paper is not sticking out
from the end of the cassette.
User’s Guide
Paper and Media Handling
24

Note:
❏Fan and align the edges of the paper before loading.
❏For plain paper, do not load paper above the line just under the arrow mark inside the edge guide. For
Epson special media, make sure the number of sheets is less than the limit specified for the media.
& “Selecting Paper” on page 18
❏When you select Cassette 1->2 as the Paper Source, load the same size and type of paper in both cassettes.
❏When loading a Photo Stickers sheet, place it face down. Do not use the loading support sheet that came with the
Photo Stickers.
Load envelopes short edge first with the flap facing up and to the left. Next, check that the envelopes are not
sticking out from the end of the cassette.
User’s Guide
Paper and Media Handling
25

Note:
❏The thickness of envelopes and their ability to fold vary s of the stack of envelopeswidely. If the total thicknes
exceeds 11 mm, press down on the envelopes to flatten them before loading. If print quality declines when a stack
of envelopes is loaded, load one envelope at a time.
& “Selecting Paper” on page 18
❏Do not use envelopes that are curled or folded.
❏Flatten the envelope and the flaps before loading.
❏Flatten the leading edge of the envelope before loading.
❏Avoid using envelopes that are too thin, as they may curl during printing.
❏Align the edges of the envelopes before loading.
E
Slide the edge guides to the edges of the paper.
Slide the edge guides to the edges of the envelopes.
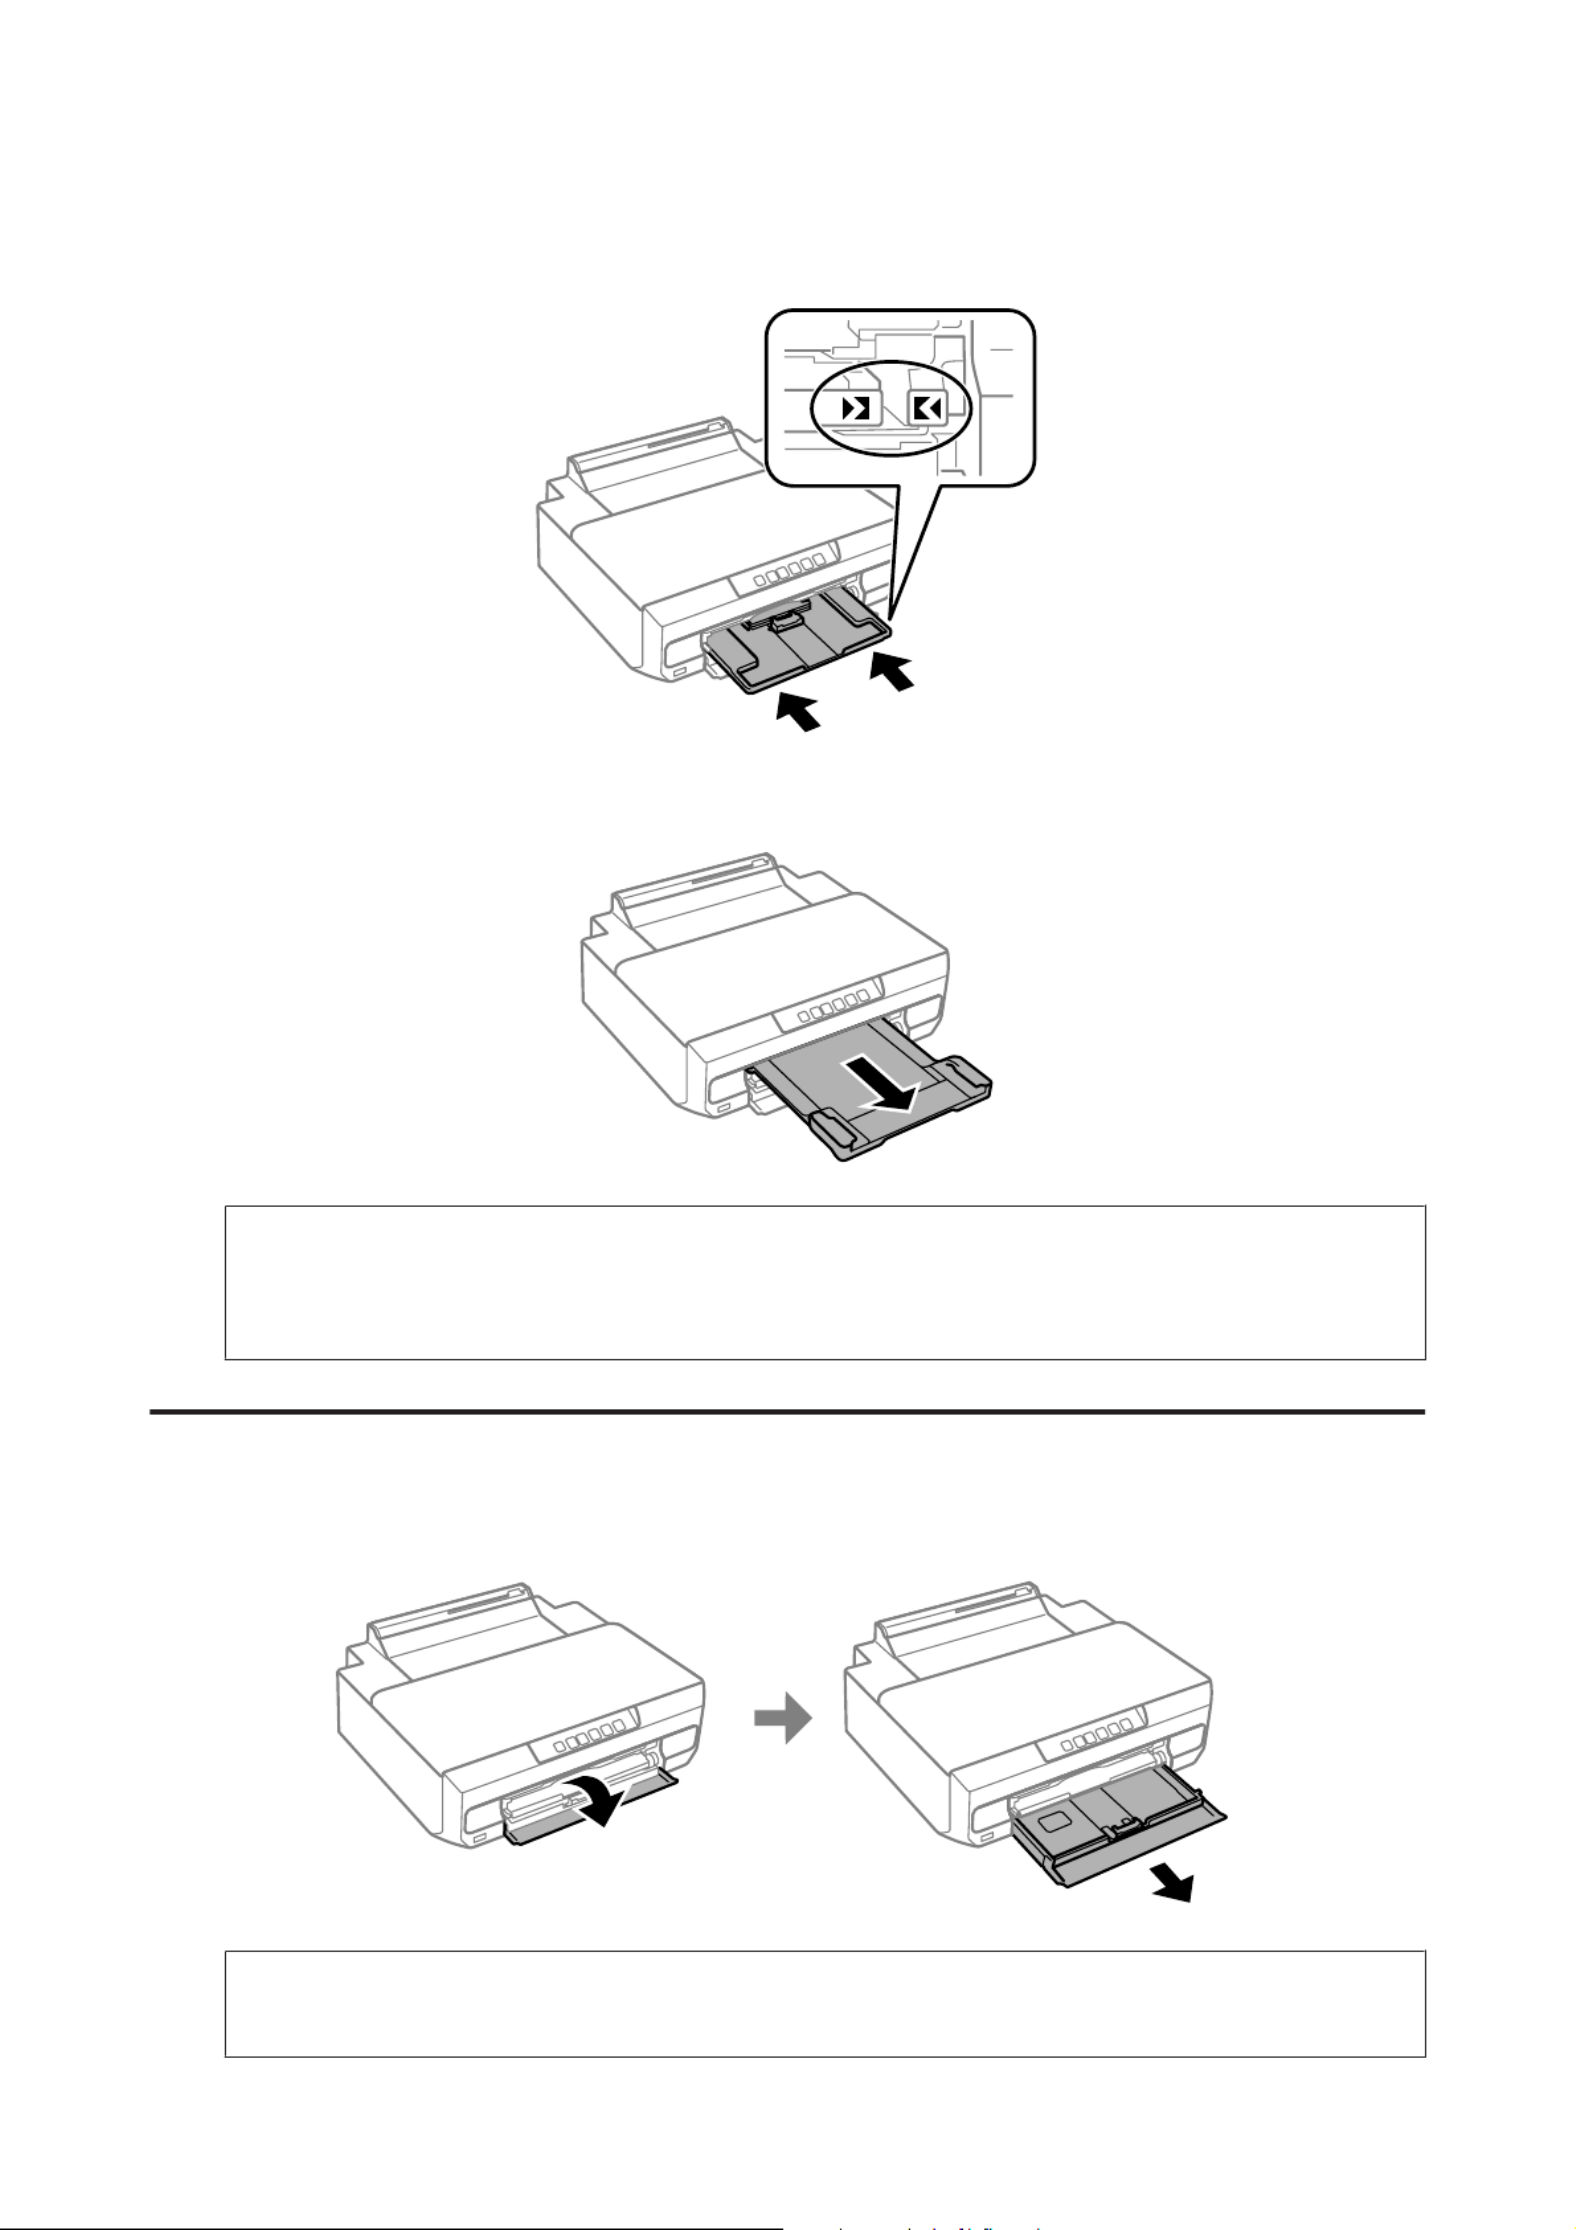
F
Insert the cassette back into the product carefully and slowly.
User’s Guide
Paper and Media Handling
26

G
Completely extend the output tray.
Note:
❏Leave enough space in front of the product for the paper to be fully ejected.
❏Do not remove or insert the paper cassette while the product is operating.
Loading a legal paper or longer than A4 size paper
A
Open the front cover and remove the paper cassette 2.
Note:
Remove the paper cassette 1 beforehand. Do not insert the paper cassette 1 while printing.
B
Load paper toward the d arrow mark in the end of the paper cassette with printable face-down.
Load one sheet at a time and leave the end of the paper protruding from the paper cassette.
User’s Guide
Paper and Media Handling
27

C
Insert the cassette back into the product carefully and slowly.
D
Completely extend the output tray.
Into the rear paper feed slot
Prepare the print data before loading paper.
& “Basic Printing” on page 38
Note:
Even though you can print on paper with a thickness of 0.05 to 0.6 mm, some hard paper may not be fed correctly even if the
thickness is within this range.
A
Completely extend the output tray.
User’s Guide
Paper and Media Handling
28
Termékspecifikációk
| Márka: | Epson |
| Kategória: | nyomtató |
| Modell: | Expression Photo XP-65 |
Szüksége van segítségre?
Ha segítségre van szüksége Epson Expression Photo XP-65, tegyen fel kérdést alább, és más felhasználók válaszolnak Önnek
Útmutatók nyomtató Epson

19 Március 2025
16 Január 2025
16 Január 2025
1 Január 2025
25 December 2024
25 December 2024
15 December 2024
16 Október 2024
13 Október 2024
13 Október 2024
Útmutatók nyomtató
- nyomtató Samsung
- nyomtató Sony
- nyomtató Fujitsu
- nyomtató LG
- nyomtató Olympus
- nyomtató Panasonic
- nyomtató Canon
- nyomtató StarTech.com
- nyomtató Sharp
- nyomtató Lenovo
- nyomtató Toshiba
- nyomtató HP
- nyomtató Roland
- nyomtató Digitus
- nyomtató Zebra
- nyomtató AVM
- nyomtató Fujifilm
- nyomtató Dell
- nyomtató Xerox
- nyomtató Primera
- nyomtató Thomson
- nyomtató Polaroid
- nyomtató Kyocera
- nyomtató Ricoh
- nyomtató Huawei
- nyomtató Renkforce
- nyomtató Mitsubishi
- nyomtató Godex
- nyomtató Brother
- nyomtató Citizen
- nyomtató Microboards
- nyomtató Kodak
- nyomtató MSI
- nyomtató Dymo
- nyomtató Testo
- nyomtató Konica Minolta
- nyomtató Datamax O'Neil
- nyomtató Kogan
- nyomtató Honeywell
- nyomtató Velleman
- nyomtató D-Link
- nyomtató Fargo
- nyomtató TSC
- nyomtató Sagem
- nyomtató Olympia
- nyomtató Tomy
- nyomtató Posiflex
- nyomtató ZKTeco
- nyomtató NEC
- nyomtató CUSTOM
- nyomtató Panduit
- nyomtató OKI
- nyomtató Equip
- nyomtató Pantum
- nyomtató Brady
- nyomtató Bixolon
- nyomtató CSL
- nyomtató Nilox
- nyomtató Seiko
- nyomtató Argox
- nyomtató Royal Sovereign
- nyomtató Lexmark
- nyomtató Olivetti
- nyomtató Intermec
- nyomtató Minolta
- nyomtató DNP
- nyomtató Triumph-Adler
- nyomtató Oce
- nyomtató Paxar
- nyomtató Metapace
- nyomtató Ultimaker
- nyomtató Ibm
- nyomtató Toshiba TEC
- nyomtató Frama
- nyomtató Builder
- nyomtató Star Micronics
- nyomtató Dascom
- nyomtató HiTi
- nyomtató GG Image
- nyomtató Vupoint Solutions
- nyomtató Elite Screens
- nyomtató DTRONIC
- nyomtató Phoenix Contact
- nyomtató Videology
- nyomtató Star
- nyomtató EC Line
- nyomtató Colop
- nyomtató Approx
- nyomtató Fichero
- nyomtató Raspberry Pi
- nyomtató Middle Atlantic
- nyomtató IDP
- nyomtató Evolis
- nyomtató Nisca
- nyomtató Epson 7620
- nyomtató Sawgrass
Legújabb útmutatók nyomtató

10 Április 2025
10 Április 2025

10 Április 2025
10 Április 2025
10 Április 2025

10 Április 2025

9 Április 2025

9 Április 2025

9 Április 2025
3 Április 2025