Használati útmutató ECS N9400GT-512DZ-F
ECS
videokártya
N9400GT-512DZ-F
Olvassa el alább 📖 a magyar nyelvű használati útmutatót ECS N9400GT-512DZ-F (110 oldal) a videokártya kategóriában. Ezt az útmutatót 9 ember találta hasznosnak és 2 felhasználó értékelte átlagosan 4.5 csillagra
Oldal 1/110

Copyright
2005 Elitegroup Computer Systems Co., Ltd. All rights Reserved.
©
No part in this manual may be reproduced in any form by any organization and
individual without written consent of Elitegroup Computer Systems Co., Ltd. (ECS).
Trademark Recognition
All the trademarks, signals and logos used in this manual are the properties of
Elitegroup Computer Systems Co., Ltd. The trademarks and logos are authorized by
ECS to use publicly. All other company and product names used in this manual are
the properties of the respective companies and products.
Disclaimer
The information in this document is subject to change without notice.
NVIDIA and “NVIDIA” marks presented on the related products are trademarks
and/or registered trademarks of NVDIA Corporation
Federal Communications Commission (FCC)
This equipment has been tested and found to comply with the limits for a Class B digital
device, pursuant to Part 15 of the FCC Rules. These limits are designed to provide
reasonable protection against harmful interference in a residential installation. This
equipment generates, uses, and can radiate radio frequency energy and, if not installed
and used in accordance with the instructions, may cause harmful interference to radio
communications. However, there is no guarantee that interference will not occur in a
particular installation. If this equipment does cause harmful interference to radio or
television reception, which can be determined by turning the equipment off and on, the
user is encouraged to try to correct the interference by one or more of the following
measures:
• Reorient or relocate the receiving antenna
• Increase the separation between the equipment and the receiver
• Connect the equipment onto an outlet on a circuit different from that to which
the receiver is connected
• Consult the dealer or an experienced radio/TV technician for help
Shielded interconnect cables and a shielded AC power cable must be employed with this
equipment to ensure compliance with the pertinent RF emission limits governing this
device. Changes or modifications not expressly approved by the system’s manufacturer
could void the user’s authority to operate the equipment.
Preface

1. Introducing the Product .....................................................................................1
System Requirements........................................................................................1
2. Hardware Installation......................................................................................... 2
2.1. Package Contents.......................................................................................2
2.2. Hardware Installation...............................................................................2
3. Software Installation.............................................................................................3
3.1. Install Motherboard Drive Utility.........................................................3
3.2. Install DirectX..............................................................................................4
3.3. Install the Video Card Driver..................................................................5
3.3.1. Uninstall the Old Drivers..................................................................... ..5
3.3.2. Install the Video Card Driver ...............................................................6
3.3.3. Update the Video Card Driver Program.................................................9
4. Software Setup.....................................................................................................11
4.1. Adjust the Screen Resolution and Color Quality.................................11
4.2. Adjust the Monitor Refresh Rate............................................................ 11
4.3. Information on Video Card......................................................................12
4.4. Screen Adjustment.....................................................................................12
4.5. nView Display Settings...........................................................................13
4.6. Display Mode Timing.............................................................................. 13
4.7. Performance and Quality Settings........................................................14
4.8. Color Correction .....................................................................................14
4.9. Overlay Controls .....................................................................................15
4.10. Tools........................................................................................................15
4.11. NVRotate..................................................................................................16
4.12. Temperature Settings.............................................................................16
4.13. Screen Resolution and Refresh Rate..................................................17
4.14. Desktop Management...........................................................................17
4.15. Screen Menu Editing.............................................................................18
4.16. SLI Multi-GPU........................................................................................18
Multi-Language Translation
TT
TTTABLE OF CONTENTSABLE OF CONTENTS
ABLE OF CONTENTSABLE OF CONTENTSABLE OF CONTENTS
Preface

1
System Requirements
• 800 MHz processor or higher
• At least 128 MB system memory
• AGP or PCI Express slot
• CD-ROM or DVD-ROM drive
• Microsoft Windows 2000/XP/2003/VISTA
• At least 100 MB free HD drive space
1. Introducing the Product
Thank you for choosing this ECS VGA card. We are pleased that you
have selected one of the best-engineered VGA cards with enhanced
functions available today. We recommend that you read through this
User’s manual before installing your video card to ensure that the
installation process goes smoothly.

2
2. Hardware Installation
2.1. Package Contents
1. VGA Card with NVIDIA Graphics Engine
2. Software and Driver CD
3. Quick Installation Guide
2.2. Hardware Installation
2. Take the case cover off. If there is any homogeneous device, please
remove them (To avoid damage from static electricity, make sure that
you have discharge the static electricity before installation).
1. Shut down your PC and unplug the system power connector.
4. Put on the case cover and connect the monitor cable to the rear
Video output port of the VGA card.
3. Take the VGA card out from the static-proof bag and install it on the
motherboard carefully (Some cards have an additional power cable; if
your card has one, make sure that the cable is connected with the
power supply, or the card may not work properly!).
5. Reboot your PC.
1. Please do not Plug and Play the VGA card cable while you computer
is still running, or you may damage the VGA card components easily.
2. Ensure you insert the VGA card in the correct slot. PCI-Express
cards differ from AGP cards (Please refer to the pictures below!). Make
sure that you locate the correct slot or you could cause damage to your
PC.
3. Motherboard could possibly come with two PCI-Express slots, please
refer to your motherboard manual for the correct slot location for use
with a single card system.
PCI Express AGP
The model name and illustrations used in this User’s Manual are for
reference only, and may be slightly different from your card.
4. Cable Adapter
3
3. Software Installation
Insert the Software and Driver CD into your CD-ROM, the ECS VGA
INSTALLER program will run automatically (If your system does not
come up this program, please run the Install CD.exe in the sub-menu).
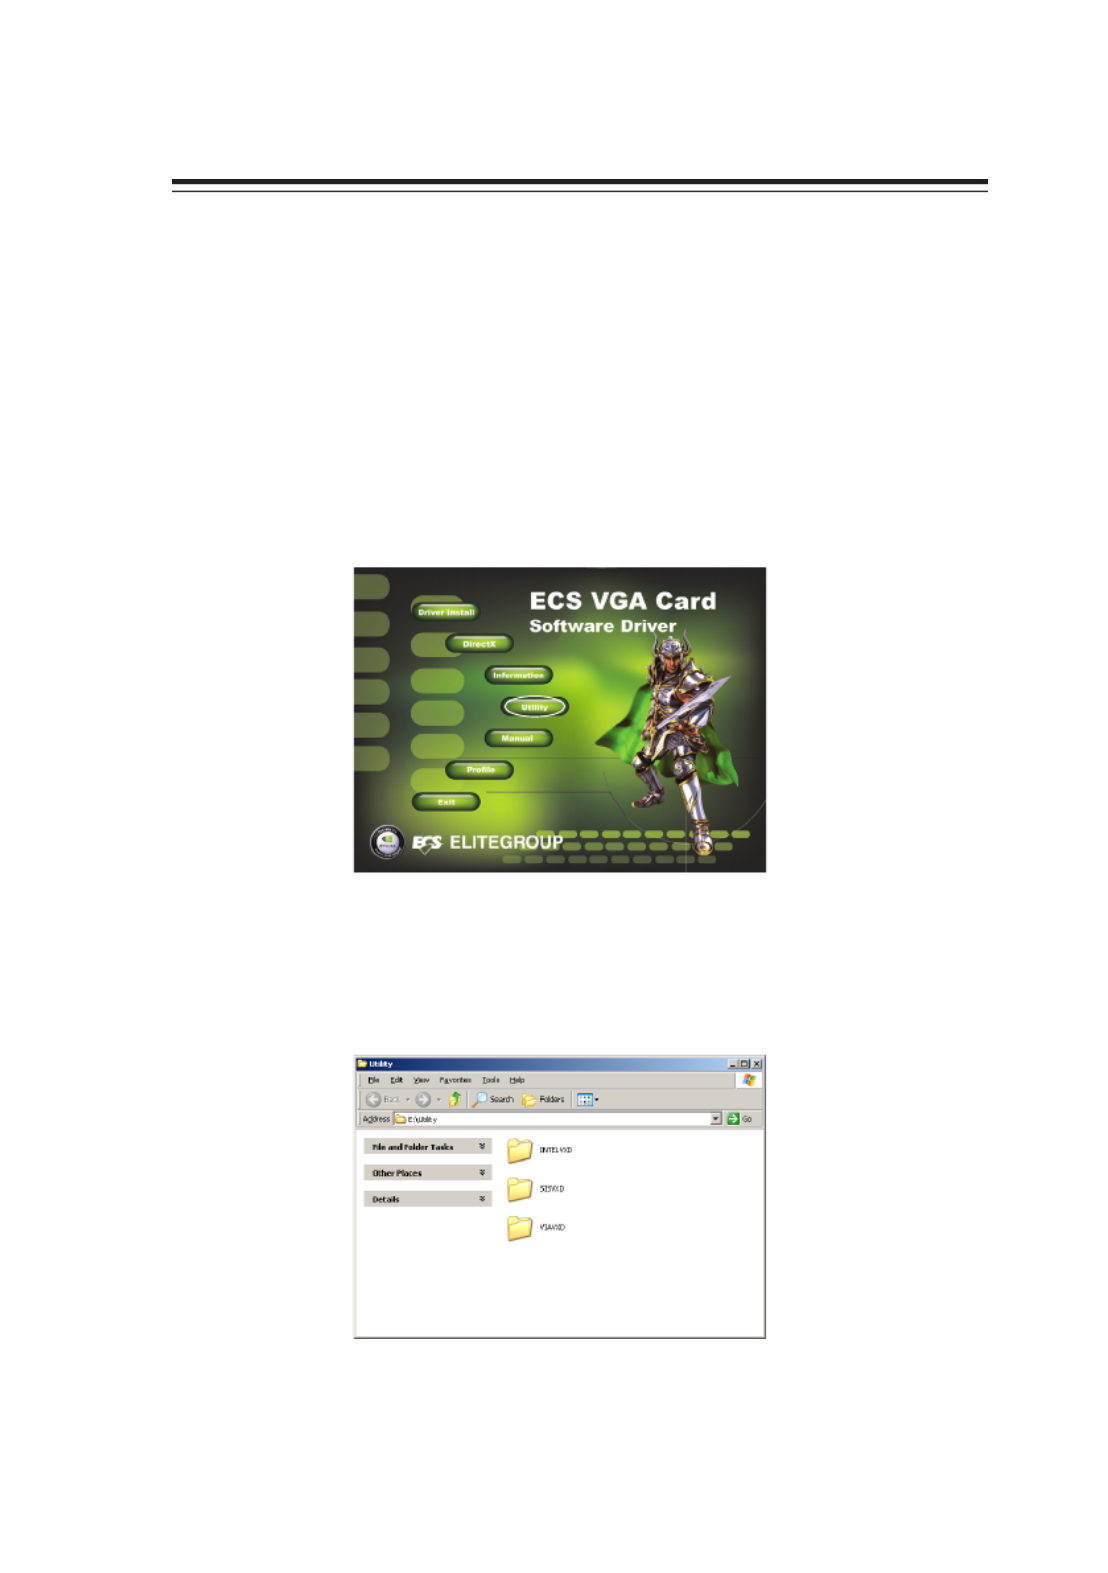
3.1. Install Motherboard Drive Utility
Motherboard drive utility should be installed first if you are not using Intel
chipset.
Step 1:
Select <Utility> item in the Main Menu.
Step 2:
In the following window, select the correct chipset category of your
motherboard and then install the driver.

4
3.2. Install DirectX
DirectX maximizes your VGA cards’ performance, stability and
security. You can skip this step if your operation system is Windows
XP SP2 or above.
Step 1:
Select <DirectX> in the Main Menu.
Step 2:
Install DirectX step by step according to the instructions on the
screen.

5
Step 3:
Restart your computer when the installation is completed.
3.3 Install VGA Card Driver
3.3.1. Uninstall the Old Drivers
If you have drivers installed on your system already, remove these drivers
before installing the new one.
Step 1:
Select Add/Remove Programs in Control Panel window.
Step 2:
Select <NVIDIA Drivers> and delete it.
6
3.3.2. Install the VGA Card Driver
Approach 1:
You may install the VGA card driver through either of the following two
approaches.
Auto-Installation of ECS VGA INSTALLER Program.
Step 1:
Select <Driver Install> item in the Main Menu.
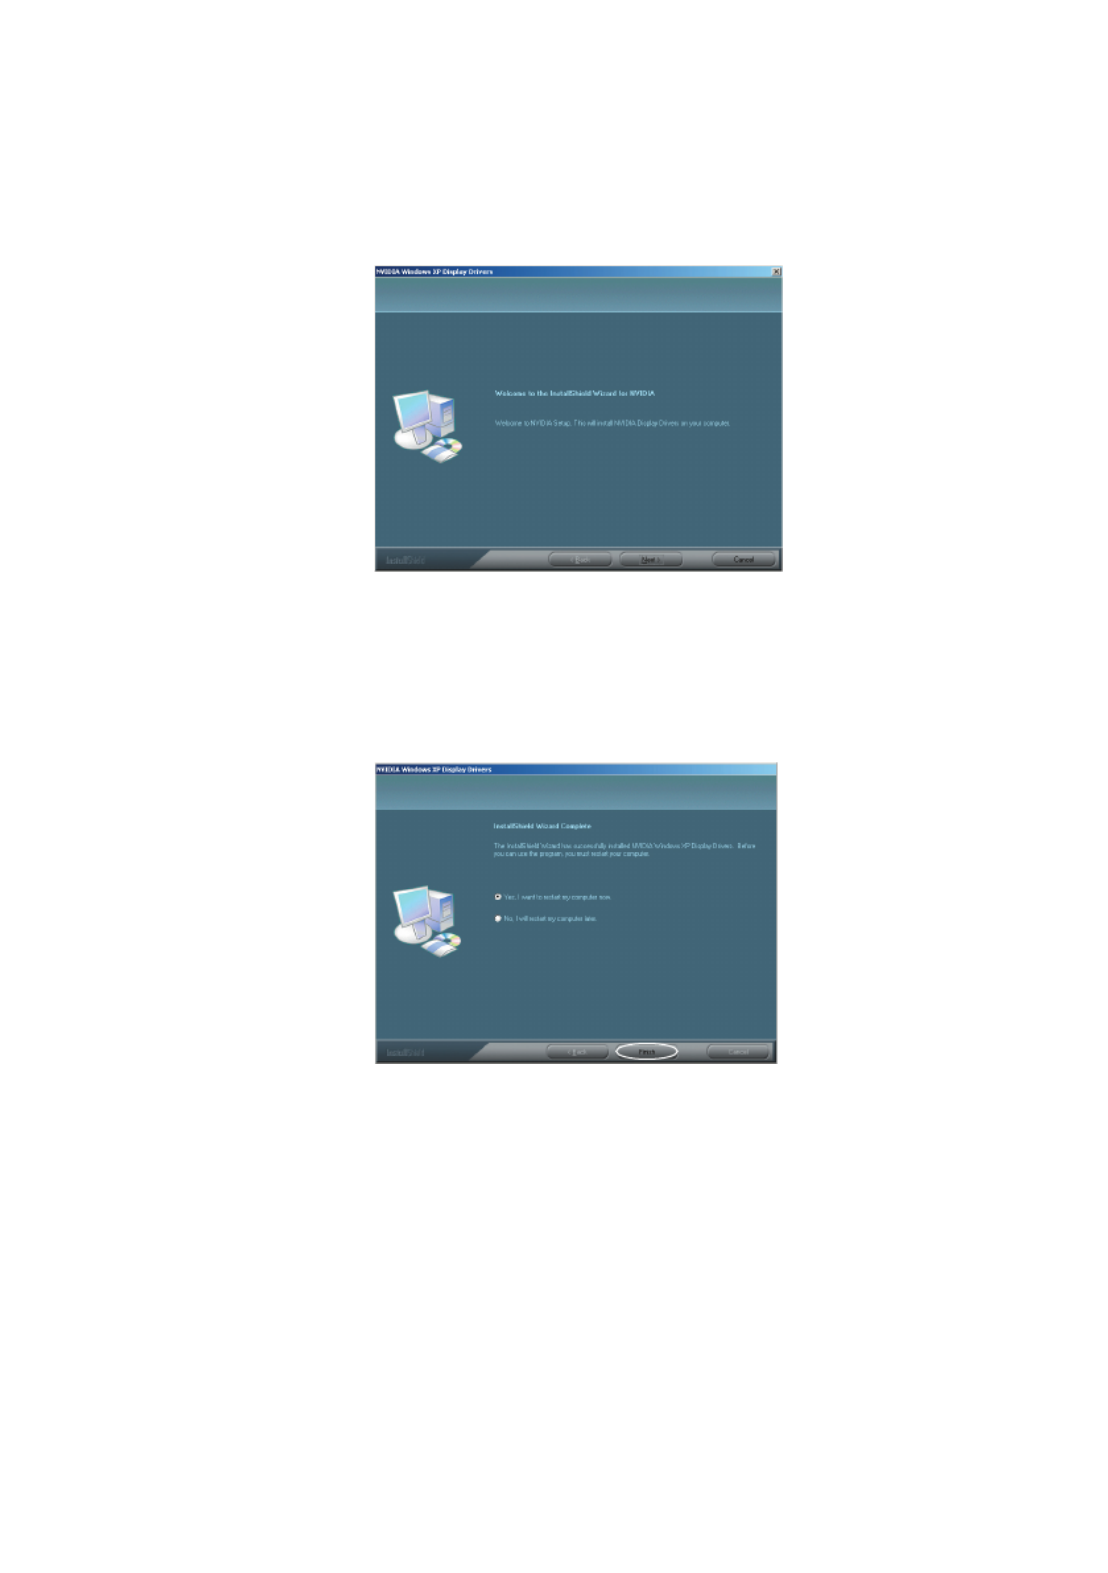
Step 2:
The Installation Program runs automatically

7
Step 3:
Install the Driver following the instructions on the screen.
Step 4:
Click <Finish> button and restart your computer when the
installation is completed.
Approach 2: System Finds New Hardware Device
Start the computer after you finish the installation. The Found New
Hardware window will appear. Insert the installation CD that came with
your graphics card package into your CD-ROM. Now you can also select
<Cancel> and follow the Approach 1 to complete the installation.

8
The system searches for the Software and Driver CD driver program
and install automatically. (Please make sure the driver disk is in
your CD-ROM)
Step 1:
Select <Install the software automatically> in the dialogue box
Found New Hardware, and click <Next>.
Step 2:
Finish the installation and restart your computer.
Step 3:

9
3.3.3. Update the VGA Card Driver Program
ECS Website (www.ecs.com.tw) will update Video Driver Program in
time. Please log on the site and download the latest program to maxi-
mize the system performance. You can update the program through the
following two approaches.
Approach 1: Download the updating program and install directly.
Download and execute the updating program. For the details you can
refer to the installation of VGA card driver program.
Approach 2: Update the drive program manually.
Step 1:
Select System in Control Panel, and select Hardware tab and
click < Device Manager> in the new window
Step 2:
Double-click <Display Adapters>, right-click the device you want
to update, and select <Update Drive Program>

10
Step 3:
In <Hardware Update> dialogue box, select the option <Install
from a list or specific location>. Click <Next>
Step 4:
Select the option <Don’t search. I will choose the driver to
install>. Click <Next>.
Step 5:
In <Hardware Update> dialogue box, follow the instruction, se-
lect the option <Have Disk Installed> and finish the updating.

11
4. Software Setup
After you have installed the driver and any additional features, you may
want to configure the display settings.
4.1 Adjust the Screen Resolution and Color Quality
Step 1:
Right-click your mouse anywhere on an empty space on your Win-
dows desktop and select<Property>.
Step 2:
Select the Settings tab, and now you can set the desired screen
resolution by using your mouse to move the slider to either increase
the resolution (move the slider left towards less).You can also
change the color quality by clicking on the Colors pull-down menu.
It is recommended that you set this at highest setting possible
(Picture 1).
4.2 Adjust the Monitor Refresh Rate
Click the Advanced button in the Display Properties window, select
the Monitor tab, and you can now choose the refresh rate form the
Refresh Frequency pull-down menu (Picture 2).
Picture 1 Picture 2
Not all the functions described below are supported by your card. VGA
card functions differ by the Graphics Engines!

12
4.3 Information on VGA Card
4.4. Screen Adjustment
The item<Information on VGA Card> provides the information on Video
BIOS version, the ForceWare version, the name of NVIDIA chipset,
BUS type, IRQ, the capacity of Video Memory and Operation System,
etc.
Click the arrow icon on the image on the desktop can adjust the location
of the screen.

13
4.5. nView Display Settings
The nView display mode allows you to connect the VGA card to two
display devices (including digital display and TV). nView includes five
modes: Single-Monitor, Duplication, Horizontal Span, Vertical Span, or
Simultaneous Display.
4.6. Display Mode Timing
This item allows you to set the display mode timing for the monitor.

14
4.7. Performance and Quality Settings
The performance and quality function allows you to create custom profiles
depending on different software needs. The NVIDIA Utility comes loaded
with a large selection of profiles for popular games. All profiles can be
customized with the available options.
4.8. Color Correction
You can change a number of color related options in the color correction
tab. Profiles can also be altered, saved and imported for different needs.
The five default settings of your card are Digital Vibrance, Brightness,
Contrast, Gamma and Image Sharpening.

15
4.9. Video Overlay Settings
The Video Overlay Settings function is used to adjust the way video
looks on your display when playback software is using hardware overlay.
4.10. Tools
This item enables you to detect connected TV devices and reset default
settings.
16
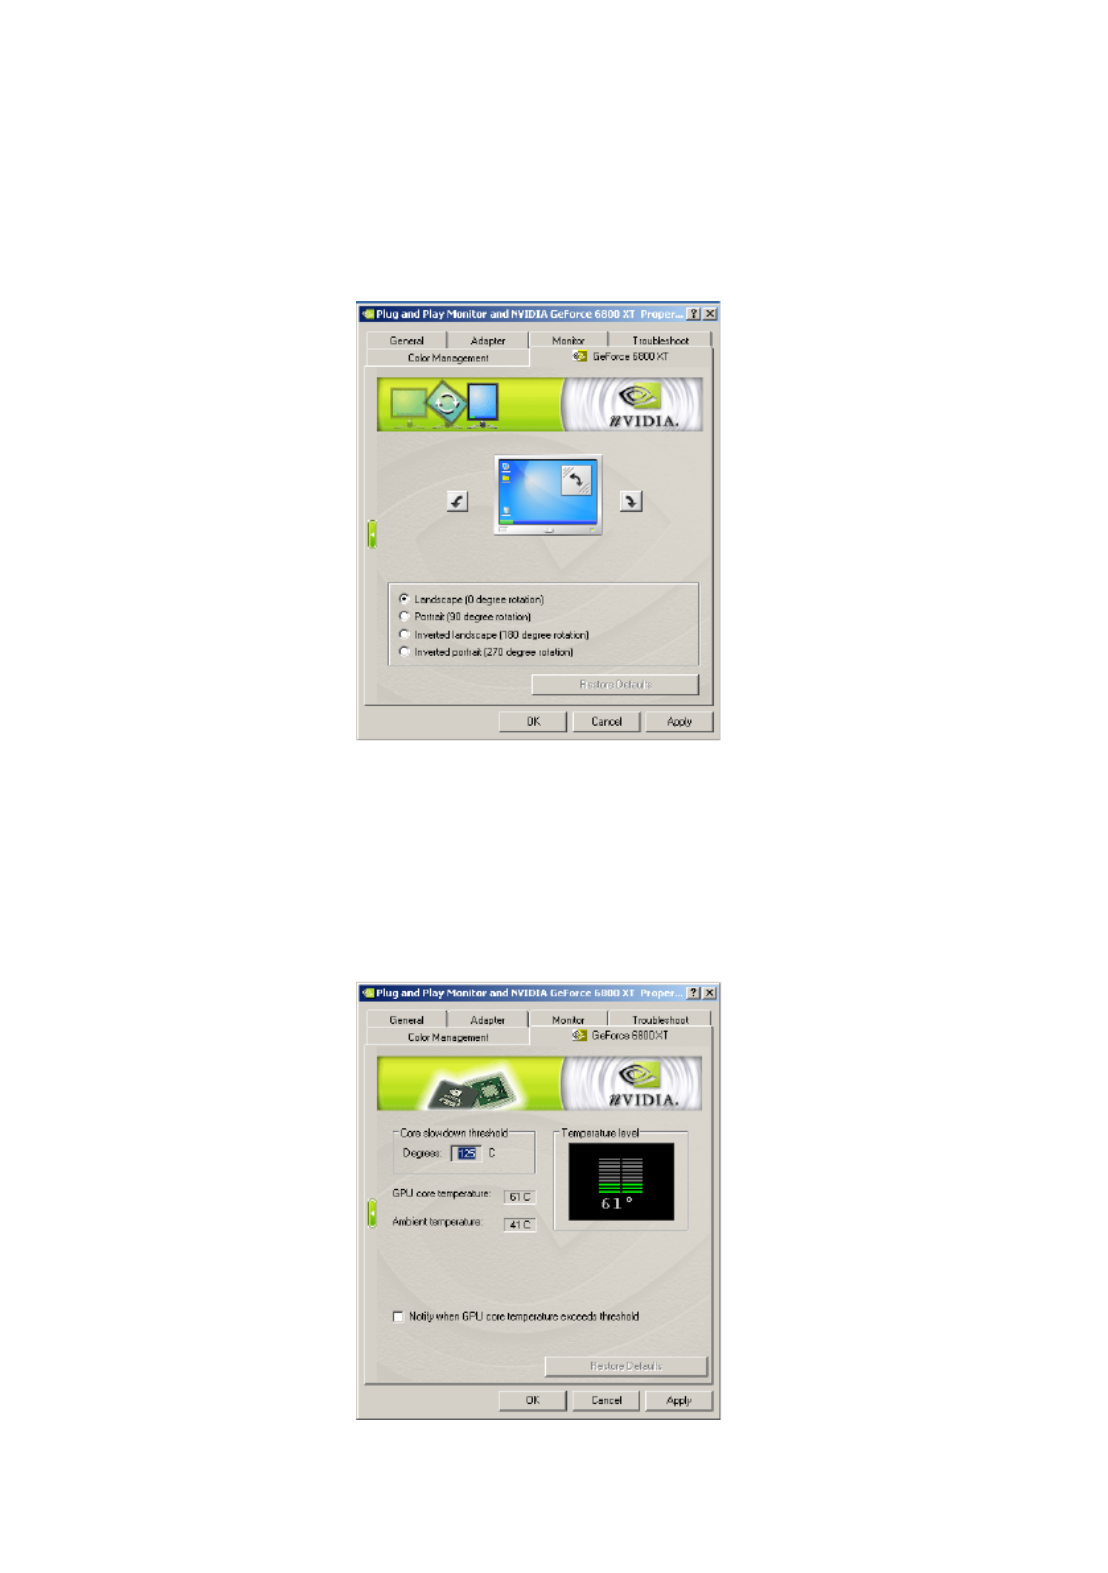
4.11. NVRotate
The NVRotate function allows you to rotate your display area. This is
useful for monitors that can be used in both landscape and portrait modes.
Select between modes using the arrow keys
4.12. Temperature Settings
The Temperature Settings function shows the temperature of your graphics
card and has an alarm function in case your card is in danger of
overheating.

17
4.13. Screen Resolutions and Refresh Rates
This item allows you to quickly adjust resolution, color quality and screen
refresh rate of your monitor.
4.14. Desktop Management
The Desktop Management function is an easy-to-use function allowing
you to fine tune many display settings.

18
4.15. Screen Menu Editing
This function allows user to define tools tab. To delete the menu items
not used frequently, you can pull them down from NVIDIA monitor menu
to the below list. To recover, pull them back to the menu one by one, or
click <Restore Defaults>.
4.16. SLI Multi-GPU
SLI (Scalable Link Interface) technology can improve the rendering
performance dramatically.
NVIDIA SLI Technology supports Windows XP operating system only!2000/

1
Configuration requise
• Processeur de 800 MHz ou supérieur
• Au moins 128 Mo de mémoire système
• Logement AGP ou PCI Express
• Lecteur de CD-ROM ou de DVD-ROM
• Microsoft Windows 2000/XP/2003/VISTA
• Au moins 100 Mo d’espace disponible sur le disque dur
1. Présentation du produit
Merci d’avoir choisi cette carte ECS VGA. Nous sommes heureux que
vous ayez sélectionné l’une des meilleures cartes VGA du marché
avec les fonctions améliorées disponibles de nos jours. Nous vous
recommandons de lire ce manuel de l’utilisateur avant d’installer votre
carte vidéo afin d’assurer que l’installation se déroule correctement.

2
2. Installation matérielle
2.1. Contenu de l’emballage
1. Carte VGA avec moteur graphique NVIDIA
2. CD de logiciels et de pilotes
3. Guide d’installation rapide
2.2. Installation matérielle
1. Eteignez votre PC et débranchez le connecteur d’alimentation du
système.
2. Retirez le capot du boîtier. S’il y a des périphériques homogènes,
retirez-les (pour éviter tout dommage dus à l’électricité statique, vérifiez
que vous avez déchargé l’électricité statique avant l’installation).
3. Sortez la carte VGA du sac antistatique et installez-la avec pré-
caution sur la carte mère (certaines cartes sont équipées d’un câble
d’alimentation supplémentaire; si votre carte en a un, vérifiez que le
câble est connecté à l’alimentation, ou la carte risque de ne pas fonc-
tionner correctement!).
4. Placez le capot du boîtier et connectez le câble du moniteur au port
de sortie vidéo arrière de la carte VGA.
5. Redémarrez votre PC.
1. Ne branchez pas le câble de la carte VGA en Plug & Play quand
votre ordinateur est encore allumé, ou vous risquez d’endommager les
composants de la carte VGA.
2. Vérifiez que vous avez inséré la carte VGA dans le logement correct.
Les cartes PCI-Express sont différentes des cartes AGP (reportez-vous
aux images ci-dessous!). Vérifiez que vous avez localisé le logement
correct, autrement vous risquez d’endommager votre PC.
3. La carte mère peut être équipée de deux logements PCI-Express,
consultez le manuel de votre carte mère pour l’emplacement de logement
correct à utiliser avec un système à carte unique.
PCI Express AGP
Le nom de modèle et les illustrations utilisées dans ce manuel de
l’utilisateur servent uniquement de référence, et peuvent être légèrement
différents pour votre carte.
4. Adaptateur de câble

3
3. Installation du logiciel
Insérez le CD de logiciels et de pilotes dans votre CD-ROM, le
programme ECS VGA INSTALLER s’exécutera automatiquement (Si
votre système n’est pas livré avec ce programme, exécutez Install
CD.exe dans le sous-menu).
3.1. Installer l’utilitaire du pilote de la carte mère
L’utilitaire du pilote de la carte mère doit être installé d’abord si vous
n’utilisez pas de chipset Intel.
Etape 1 :
Sélectionnez l’élément <Utility> dans le menu Principal.
Etape 2 :
Dans la fenêtre suivante, sélectionnez la catégorie de chipset
correcte de votre carte mère et installez le pilote.

4
3.2. Installer DirectX
DirectX optimise les performances, la stabilité et la sécurité de vos cartes
VGA. Vous pouvez sauter cette étape si votre système d’exploitation
est Windows XP SP2 ou supérieur.
Etape 1 :
Sélectionnez < > dans le menu Principal.DirectX
Etape 2 :
Installez DirectX étape par étape conformément aux instructions
à l’écran.

5
Etape 3 :
Redémarrez votre ordinateur quand l’installation est terminée.
3.3 Installer le pilote de la carte VGA
3.3.1. Désinstallez les anciens pilotes
Si vous avez déjà installé les pilotes sur votre système, retirez ces pilotes
avant d’installer les nouveaux.
Etape 1 :
Sélectionnez Ajout/Suppression de programmes dans la fenêtre
Panneau de conguration .
Etape 2 :
Sélectionnez <NVIDIA Drivers> et supprimez-le.

6
3.3.2. Installez le pilote de la carte VGA
Méthode 1 : Installation auto du programme ECS VGA INSTALLER
Vous pouvez installer le pilote de la carte VGA de l’une des deux
manières suivantes.
Etape 1 :
Sélectionnez l’élément < > dans le menu Principal.Driver Install
Etape 2 :
Le programme d’installation s’exécute automatiquement
7
Etape 3 :
Installez le pilote en suivant les instructions à l’écran.
Etape 4 :
Cliquez sur le bouton < Finish> et redémarrez votre ordinateur
quand l’installation est terminée.
Méthode 2 : Le système trouve un nouveau périphérique matériel
Démarrez l’ordinateur après avoir terminé l’installation. La fenêtre
Nouveau matériel détecté apparaîtra. Insérez le CD d’installation qui
accompagne votre carte graphique dans votre lecteur de CD-ROM. Vous
pouvez maintenant aussi sélectionner < Cancel> et suivre la Méthode
1 pour effectuer l’installation.

8
Le système recherche le pilote du CD de logiciels et pilotes et
l’installe automatiquement. (Vériez que le disque de pilotes se
trouve dans votre lecteur de CD-ROM)
Etape 1 :
Sélectionnez <Install the software automatically> dans la boîte
de dialogue Nouveau matériel détecté, et cliquez sur < >.Next
Etape 2 :
Terminez l’installation et redémarrez votre ordinateur.
Etape 3 :

9
3.3.3. Mettre à jour le pilote de la carte VGA
Le site web d’ECS (www.ecs.com.tw) mettra à jour le pilote vidéo
régulièrement. Allez sur le site et téléchargez le dernier programme
pour optimiser les performances du système. Vous pouvez mettre à
jour le programme à l’aide des deux méthodes suivantes.
Méthode 1 : Téléchargez la mise à jour du programme et installez-la
directement. Téléchargez et exécutez la mise à jour du programme.
Pour les détails vous pouvez vous reporter à l’installation du pilote de
la carte VGA.
Méthode 2 : Mettre à jour manuellement le pilote.
Etape 1 :
Sélectionnez Système dans Panneau de conguration, et sélec -
tionnez l’onglet et cliquez sur dans Matériel <Device Manager>
la nouvelle fenêtre
Etape 2 :
Double-cliquez sur < >, faites un clic droit sur Display Adapters
le périphérique que vous voulez mettre à jour, et sélectionnez
< >Update Drive Program

10
Etape 3 :
Dans la boîte de dialogue < >, sélectionnez Hardware Update
l’option < >. Cliquez sur Install from a list or specic location
< >Next
Etape 4 :
Sélectionnez l’option <Don’t search. I will choose the driver to
install Next>. Cliquez sur < >.
Etape 5 :
Dans la boîte de dialogue <Hardware Update>, suivez l’instruction,
sélectionnez l’option < > et terminez la mise Have Disk Installed
à jour.

11
4. Installation du logiciel
Après avoir installé le pilote et toutes les fonctionnalités supplémen-
taires vous voudrez peut-être congurer les paramètres d’afchage.
4.1 Ajuster la résolution et la qualité de couleur de l’écran
Etape 1 :
Cliquez avec le bouton droit de la souris sur un espace vide de
votre bureau de Windows et sélectionnez < > .Property
Etape 2 :
Sélectionnez l’onglet Paramètres, et maintenant vous pouvez
dénir la résolution d’écran désirée à l’aide de votre souris pour
déplacer le curseur pour augmenter la résolution (déplacez le
curseur à gauche vers moins). Vous pouvez aussi changer la
qualité de couleur en cliquant sur le menu déroulant de Couleurs.
Il est recommandé de dénir ceci sur le paramètre le plus élevé
possible (Figure 1).
4.2 Ajuster la vitesse de rafraîchissement du moniteur
Cliquez sur le bouton dans la fenêtre Avancé Propriétés
d’afchage, sélectionnez l’onglet Moniteur, et vous pouvez mainte-
nant choisir la vitesse de rafraîchissement dans le menu déroulant
Fréquence de rafraîchissement (Figure 2).
Figure 1 Figure 2
Les fonctions décrites ci-dessous ne sont pas toutes prises en charge par
votre carte. Les fonctions de la carte VGA changent selon les moteurs
graphiques !

12
4.3 Informations sur la carte VGA
4.4. Réglage de l’écran
L’élément <Information on VGA Card> offre les informations sur la
version du BIOS Vidéo, la version de ForceWare, le nom du chipset
NVIDIA, le type de BUS, IRQ, la capacité de la mémoire vidéo et le
système d’exploitation, etc.
Le fait de cliquer sur l’icône de la èche sur l’image sur le bureau permet
d’ajuster l’emplacement de l’écran.

13
4.5. Paramètres d’afchage nView
Le mode d’afchage nView vous permet de connecter la carte VGA
à deux périphériques d’afchage (afchage numérique et TV). nView
comprend cinq modes: Moniteur unique, Duplication, Extension hori-
zontale, Extension verticale, ou Afchage simultané.
4.6. Synchronisation du mode d’afchage
Cet élément vous permet de dénir le mode d’afchage pour le monit-
eur.
Termékspecifikációk
| Márka: | ECS |
| Kategória: | videokártya |
| Modell: | N9400GT-512DZ-F |
Szüksége van segítségre?
Ha segítségre van szüksége ECS N9400GT-512DZ-F, tegyen fel kérdést alább, és más felhasználók válaszolnak Önnek
Útmutatók videokártya ECS

17 Augusztus 2024
15 Augusztus 2024
13 Augusztus 2024
13 Augusztus 2024
13 Augusztus 2024
12 Augusztus 2024
12 Augusztus 2024
12 Augusztus 2024
11 Augusztus 2024
10 Augusztus 2024
Útmutatók videokártya
- videokártya HP
- videokártya Dell
- videokártya Gigabyte
- videokártya Asus
- videokártya Iogear
- videokártya Biostar
- videokártya Asrock
- videokártya MSI
- videokártya Datapath
- videokártya Barco
- videokártya Zotac
- videokártya Matrox
- videokártya Evga
- videokártya Intel
- videokártya Nvidia
- videokártya Foxconn
- videokártya HIS
- videokártya PNY
- videokártya AMD
- videokártya XFX
- videokártya CLUB3D
Legújabb útmutatók videokártya
2 Április 2025
31 Március 2025
30 Március 2025
30 Március 2025
30 Március 2025
30 Március 2025
30 Március 2025
30 Március 2025
30 Március 2025
30 Március 2025