Használati útmutató Dahua Technology Lite SD1A203T-GN-W
Dahua Technology
Térfigyelő kamera
Lite SD1A203T-GN-W
Olvassa el alább 📖 a magyar nyelvű használati útmutatót Dahua Technology Lite SD1A203T-GN-W (155 oldal) a Térfigyelő kamera kategóriában. Ezt az útmutatót 3 ember találta hasznosnak és 2 felhasználó értékelte átlagosan 4.5 csillagra
Oldal 1/155

i
Dahua Network Speed Dome & PTZ Camera Web3.0
Operation Manual
Version 1.0.0
ZHEJIANG DAHUA VISION TECHNOLOGY CO., LTD.

ii
Table of Contents
1 Network Config ............................................................................................................................ 1
1.1 Network Connection ..................................................................................................... 1
1.2 Log in WEB Interface ................................................................................................... 2
1.2.1 Device Initialization ................................................................................................. 2
1.2.2 Device Login ............................................................................................................ 5
1.2.3 Forget Password ....................................................................................................... 5
2 Live ................................................................................................................................................ 8
2.1 ................................................................................................................ 8 Encode Setup
2.2 ........................................................................................... 9 Video Window Adjustment
2.3 System Menu ............................................................................................................... 12
2.4 Video Window Function Option ................................................................................ 12
2.5 PTZ Config ................................................................................................................... 13
3 Playback ..................................................................................................................................... 18
3.1 ............................................................................................................ 18 Video Playback
3.1.1 Play Function .......................................................................................................... 19
3.1.2 Record Type ........................................................................................................... 20
3.1.3 Assistant Function .................................................................................................. 20
3.1.4 Playback File .......................................................................................................... 21
3.1.5 Playback Clip .......................................................................................................... 24
3.1.6 Progress Bar Time Format ...................................................................................... 25
3.2 Picture Playback ......................................................................................................... 25
3.2.1 Play Function .......................................................................................................... 26
3.2.2 Playback File .......................................................................................................... 26
3.2.3 Snapshot Type ........................................................................................................ 27
4 Setup ........................................................................................................................................... 28
4.1 Camera ......................................................................................................................... 28
4.1.1 Conditions ............................................................................................................... 28
4.1.2 Video ...................................................................................................................... 44
4.1.3 Audio ...................................................................................................................... 53
4.2 Network ......................................................................................................................... 54
4.2.1 TCP/IP .................................................................................................................... 54
4.2.2 Port .......................................................................................................................... 58
4.2.3 PPPoE ..................................................................................................................... 60
4.2.4 ..................................................................................................................... 61 DDNS
4.2.5 IP filter .................................................................................................................... 64

iii
4.2.6 SMTP e-mail) ..................................................................................................... 66 (
4.2.7 UPnP ....................................................................................................................... 67
4.2.8 SNMP ..................................................................................................................... 68
4.2.9 Bonjour ................................................................................................................... 71
4.2.10 Multicast ................................................................................................................. 71
4.2.11 802.1x ..................................................................................................................... 72
4.2.12 QoS ......................................................................................................................... 73
4.2.13 HTTPs ..................................................................................................................... 74
4.3 PTZ Setting .................................................................................................................. 87
4.3.1 Protocol ................................................................................................................... 87
4.3.2 Function .................................................................................................................. 88
4.4 Event ............................................................................................................................. 99
4.4.1 Video Detection ...................................................................................................... 99
4.4.2 Audio Detection .................................................................................................... 104
4.4.3 Smart Plan ............................................................................................................. 105
4.4.4 IVS ........................................................................................................................ 106
4.4.5 Face Detection ...................................................................................................... 114
4.4.6 Heat Map .............................................................................................................. 115
4.4.7 Alarm .................................................................................................................... 116
4.4.8 Abnormity ............................................................................................................. 117
4.5 Storage Management ............................................................................................... 121
4.5.1 Schedule ................................................................................................................ 121
4.5.2 Destination ............................................................................................................ 124
4.5.3 Record control ...................................................................................................... 128
4.6 System ........................................................................................................................ 129
4.6.1 General .................................................................................................................. 129
4.6.2 Account ................................................................................................................. 131
4.6.3 Safety .................................................................................................................... 137
4.6.4 Peripheral .............................................................................................................. 138
4.6.5 Default .................................................................................................................. 140
4.6.6 Import/Export ....................................................................................................... 141
4.6.7 Auto Maintenance ................................................................................................. 141
4.6.8 Upgrade ................................................................................................................ 142
4.7 Information ................................................................................................................. 143
4.7.1 Version .................................................................................................................. 143
4.7.2 Log ........................................................................................................................ 144
4.7.3 Online User ........................................................................................................... 145
4.7.4 Life Statistics ........................................................................................................ 145
5 Alarm ......................................................................................................................................... 147

iv
6 Log out ...................................................................................................................................... 149

v
Important
The following functions are for reference only. Some series products may not
support all the functions listed below.

vi
Cybersecurity Recommendations
Cybersecurity Recommendations
Mandatory actions to be taken towards cybersecurity
1. Change Passwords and Use Strong Passwords:
The number one reason systems get “hacked” is due to having weak or default passwords. It is
recommended to change default passwords immediately and choose a strong password whenever
possible. A strong password should be made up of at least 8 characters and a combination of special
characters, numbers, and upper and lower case letters.
2. Update Firmware
As is standard procedure in the tech-industry, we recommend keeping NVR, DVR, and IP camera
firmware up- -date to ensure the system is current with the latest security patches and fixes. to
“Nice to have” recommendations to improve your network security
1. Change Passwords Regularly
Regularly change the credentials to your devices to help ensure that only authorized users are able to
access the system.
2. Change Default HTTP and TCP Ports:
Change default HTTP and TCP ports for systems. These are the two ports used to communicate
and to view video feeds remotely.
These ports can be changed to any set of numbers between 1025-65535. Avoiding the default
ports reduces the risk of outsiders being able to guess which ports you are using.
3. Enable HTTPS/SSL:
Set up an SSL Certificate to enable HTTPS. This will encrypt all communication between your devices
and recorder.
4. Enable IP Filter:

vii
Enabling your IP filter will prevent everyone, except those with specified IP addresses, from accessing
the system.
5. Change ONVIF Password:
On older IP Camera firmware, the ONVIF password does not change when you change the system’s
credentials. You will need to either update the camera’s firmware to the latest revision or manually
change the ONVIF password.
6. Forward Only Ports You Need:
Only forward the HTTP and TCP ports that you need to use. Do not forward a huge range of
numbers to the device. Do not DMZ the device's IP address.
You do not need to forward any ports for individual cameras if they are all connected to a recorder
on site; just the NVR is needed.
7. Disable Auto-Login on SmartPSS:
Those using SmartPSS to view their system and on a computer that is used by multiple people should
disable auto-login. This adds a layer of security to prevent users without the appropriate credentials
from accessing the system.
8. Use a Different Username and Password for SmartPSS:
In the event that your social media, bank, email, etc. account is compromised, you would not want
someone collecting those passwords and trying them out on your video surveillance system. Using a
different username and password for your security system will make it more difficult for someone to
guess their way into your system.
9. Limit Features of Guest Accounts:
If your system is set up for multiple users, ensure that each user only has rights to features and
functions they need to use to perform their job.
10. UPnP:
UPnP will automatically try to forward ports in your router or modem. Normally this would be a good
thing. However, if your system automatically forwards the ports and you leave the credentials
defaulted, you may end up with unwanted visitors.
If you manually forwarded the HTTP and TCP ports in your router/modem, this feature should be
turned off regardless. Disabling UPnP is recommended when the function is not used in real
applications.

viii
11. SNMP:
Disable SNMP if you are not using it. If you are using SNMP, you should do so only temporarily, for
tracing and testing purposes only.
12. Multicast:
Multicast is used to share video streams between two recorders. Currently there are no known issues
involving Multicast, but if you are not using this feature, deactivation can enhance your network security.
13. Check the Log:
If you suspect that someone has gained unauthorized access to your system, you can check the system
log. The system log will show you which IP addresses were used to login to your system and what was
accessed.
14. Physically Lock Down the Device:
Ideally, you want to prevent any unauthorized physical access to your system. The best way to achieve
this is to install the recorder in a lockbox, locking server rack, or in a room that is behind a lock and key.
15. Connect IP Cameras to the PoE Ports on the Back of an NVR:
Cameras connected to the PoE ports on the back of an NVR are isolated from the outside world and
cannot be accessed directly.
16. Isolate NVR and IP Camera Network
The network your NVR and IP camera resides on should not be the same network as your public
computer network. This will prevent any visitors or unwanted guests from getting access to the same
network the security system needs in order to function properly.
Privacy Protection Notice
As the device user or data controller, you might collect personal data of others' such as face, fingerprints,
car plate number, Email address, phone number, GPS and so on. You need to be in compliance with the
local privacy protection laws and regulations to protect the legitimate rights and interests of other people
by implementing measures include but not limited to: providing clear and visible identification to inform
data subject the existence of surveillance area and providing related contact.

ix
About the Manual
The Manual is for reference only. If there is inconsistency between the Manual and the actual
product, the actual product shall govern.
We are not liable for any loss caused by the operations that do not comply with the Manual.
The Manual would be updated according to the latest laws and regulations of related regions. For
detailed information, see the paper Quick Start Guide, CD-ROM, QR code or our official website. If
there is inconsistency between paper Quick Start Guide and the electronic version, the electronic
version shall prevail.
All the designs and software are subject to change without prior written notice. The product updates
might cause some differences between the actual product and the Manual. Please contact the
customer service for the latest program and supplementary documentation.
There still might be deviation in technical data, functions and operations description, or errors in
print. If there is any doubt or dispute, please refer to our final explanation.
Upgrade the reader software or try other mainstream reader software if the Guide (in PDF format)
cannot be opened.
All trademarks, registered trademarks and the company names in the Manual are the properties of
their respective owners.
Please visit our website, contact the supplier or customer service if there is any problem occurred
when using the device.
If there is any uncertainty or controversy, please refer to our final explanation.
1
1 Network Config
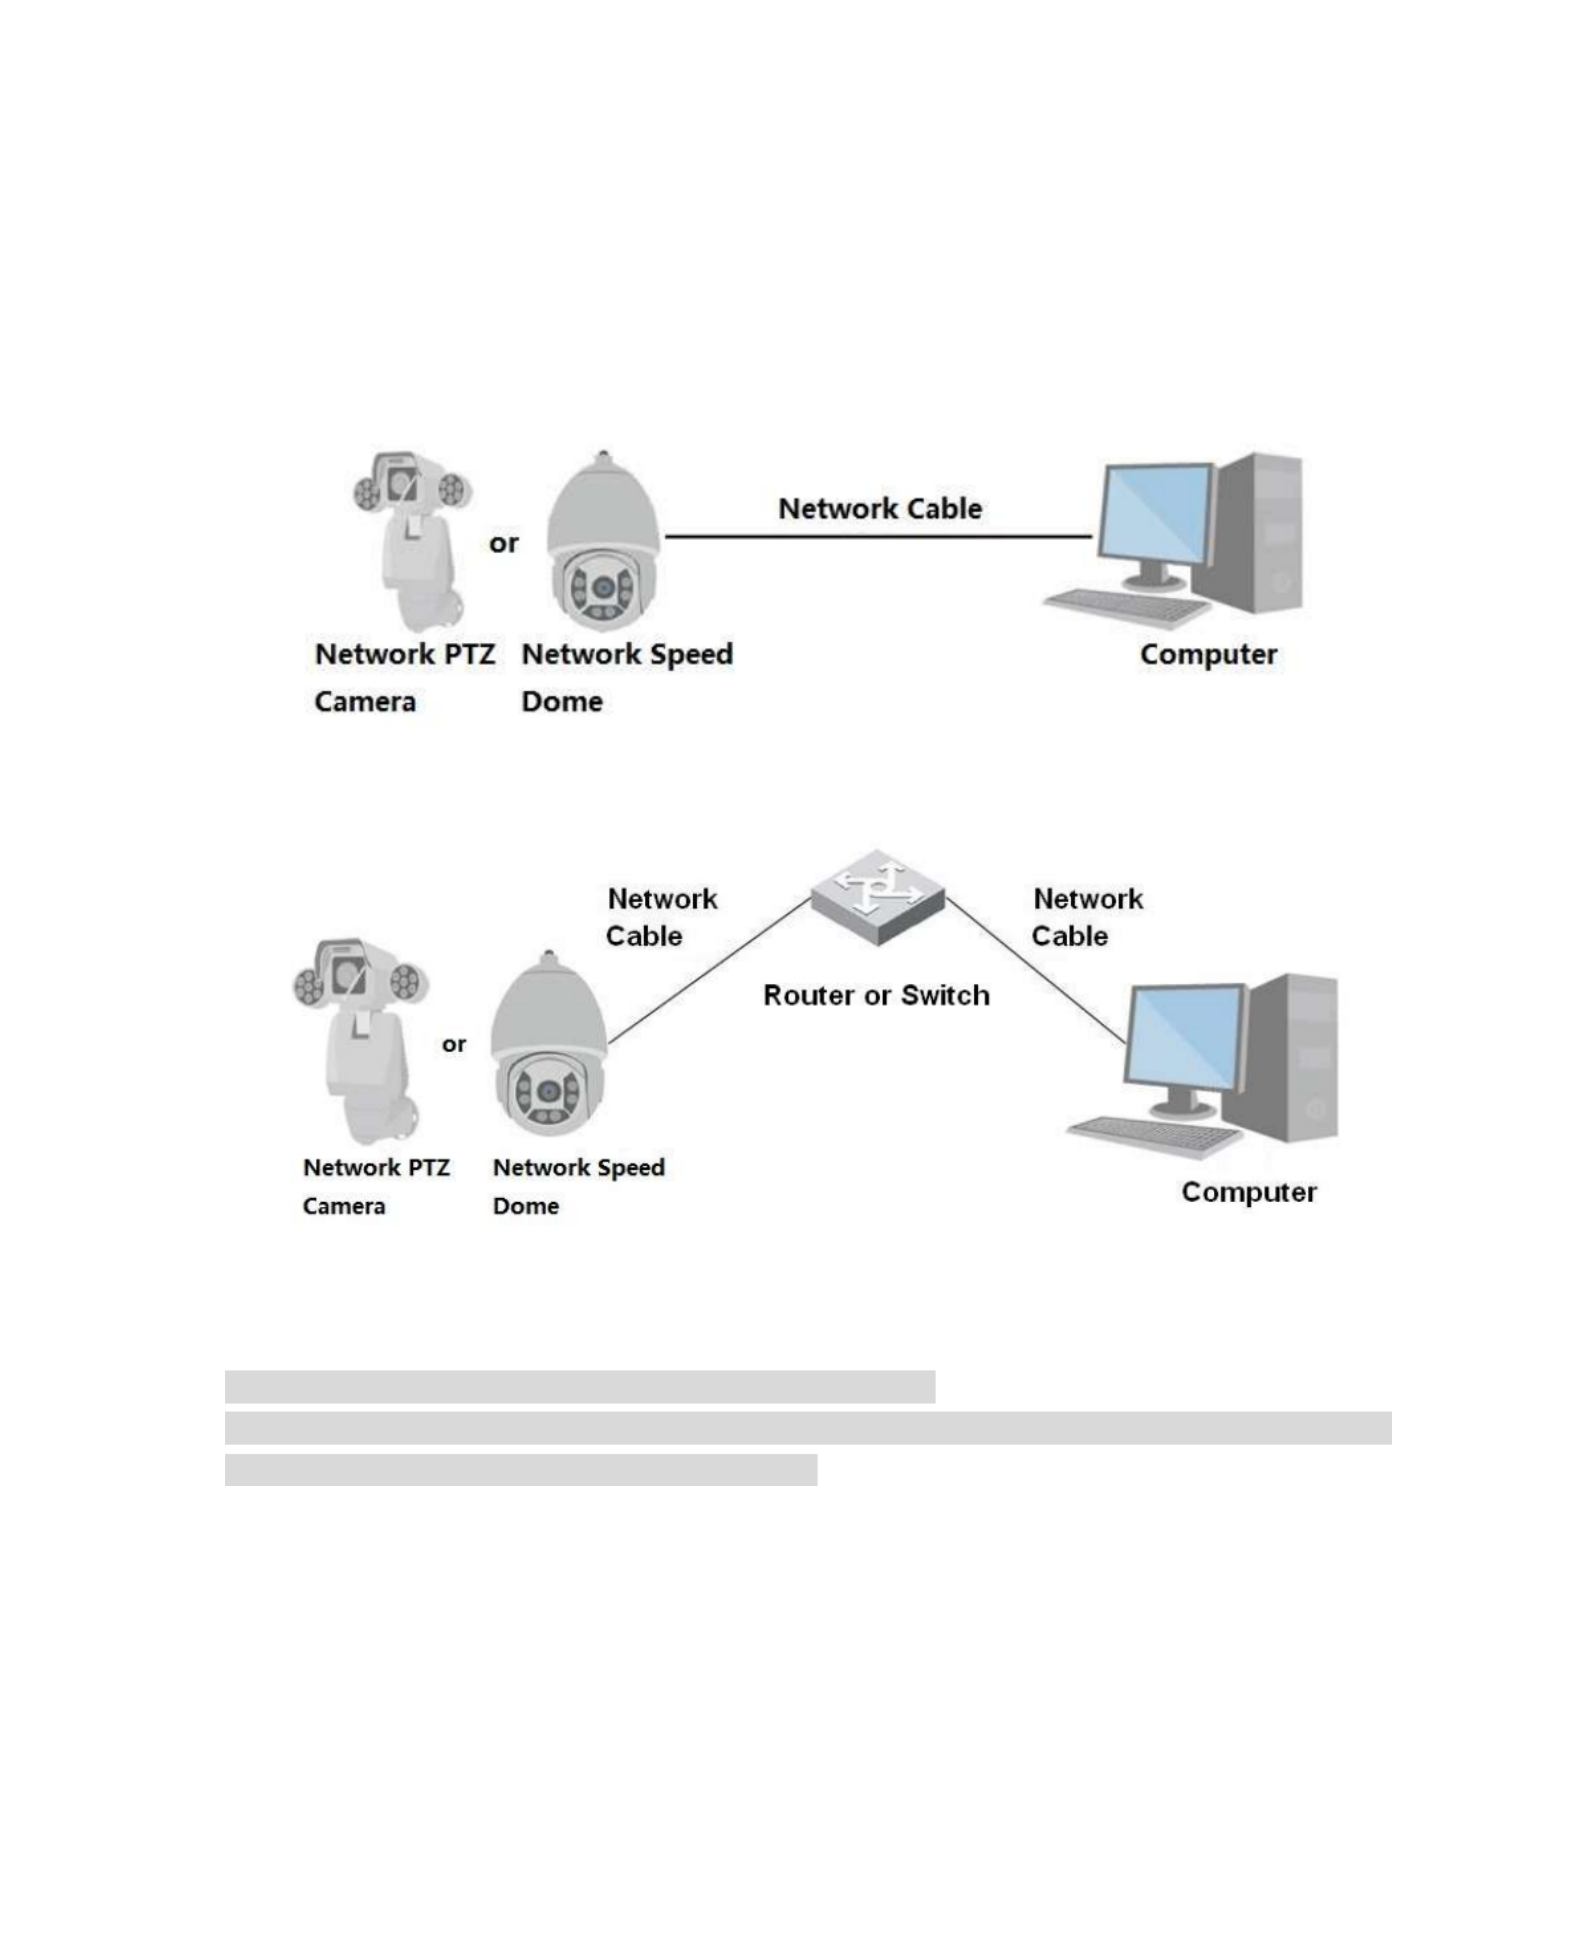
1.1 Network Connection
There are mainly two connection modes between network speed dome and PC Figure 1-1 and . See
Figure 1-2.
Figure 1-1
Figure 1-2
Note:
The models presented in the figure are for reference only.
In order to describe operation steps more conveniently, both network speed dome and network
PTZ camera will be called Camera hereinafter. “ ”
The IP address of all the intelligent speed domes is 192.168.1.108 by default when they are delivered
out of factory; it needs to plan available IP segment reasonably according to practical network
environment in order to make intelligent speed domes get access to network smoothly. Users can
modify IP address via quick config tool in the disk, please refer to <<Quick Configuration Tool User
manual>> for more details.

2
1.2 Log in WEB Interface
1.2.1 Device Initialization
It needs to implement initialization upon the device if it is used for the first time; the steps are shown as
follows:
Step 1
Open IE browser, input IP address of network speed dome in the address bar and press Enter button.
The system will display the interface which is shown in Figure 1-3 after it is successfully connected.
Figure 1-3
Note
Email address function is enabled by default; you can select to disable the function according to the
actual requirement.
Step 2
It is to set the password of admin user.
The config interface is shown in Figure 1-4.
Note
The password can be set as 8 to 32 nonblank characters, which can be made up of upper case, lower
case, number and special character (except ' ,“ ” “ ” “ ”" , ; ,“ ” “: and &”), and it has to contain at
least two types of characters. Make sure the new password is in accordance with the confirm password.
Please set the password with high security according to the password intensity prompt.

3
Figure 1-4
Step 3
Set the email address which is used to reset password. The config interface is shown in Figure 1-5.
Figure 1-5
Step 4
Click Save and the WEB interface is shown in Figure 1-6. “ ”

4
Figure 1-6
Step 5
Install or load plug-in according to the system prompt.
The plug-in installation interface will be closed automatically after plug-in installation is completed, the
WEB client will refresh automatically and it will generate the video interface shown in Figure 1-7.
Figure 1-7
Note
The interface above is for references only, please refer to the actual device for more details.

6
Figure 1-9
Step 2
Please operate according to the instruction described in the interface.
Step 3
Input security code and then click Next . The system will display the interface of Reset Password“ ” “ ”,
which is shown in Figure 1- . 10
Figure 1- 10

7
Step 4
Set the password of admin user again.
Step 5
Click Save to complete setting. “ ”

10
Parameter
Note
6. Rules Info
Click it to enable preview page to display intelligent rules, the default is
enabled.
7. PTZ
Click it to enable live page to display PTZ config item.
8. Panorama
PTZ
Click the button to display panorama window in the live interface, it can
realize quick position, call preset, tour and other operations in the window.
Table 2-3
Image Adjustment
Figure 2-4
Parameter
Note
It is to adjust monitoring image brightness.
It is to adjust monitoring image contrast.
It is to adjust monitoring image hue.
It is to adjust monitoring image saturation.
Restore brightness, contrastness saturation and hue to system default ,
setup.
Table 2-4
Note
The function can only be used to adjust the brightness, contrast, hue and saturation of the monitoring
image in WEB client. It needs to go to Setup > Camera > Conditions to set the brightness, contrast, “ ”
hue and saturation of the device.
11
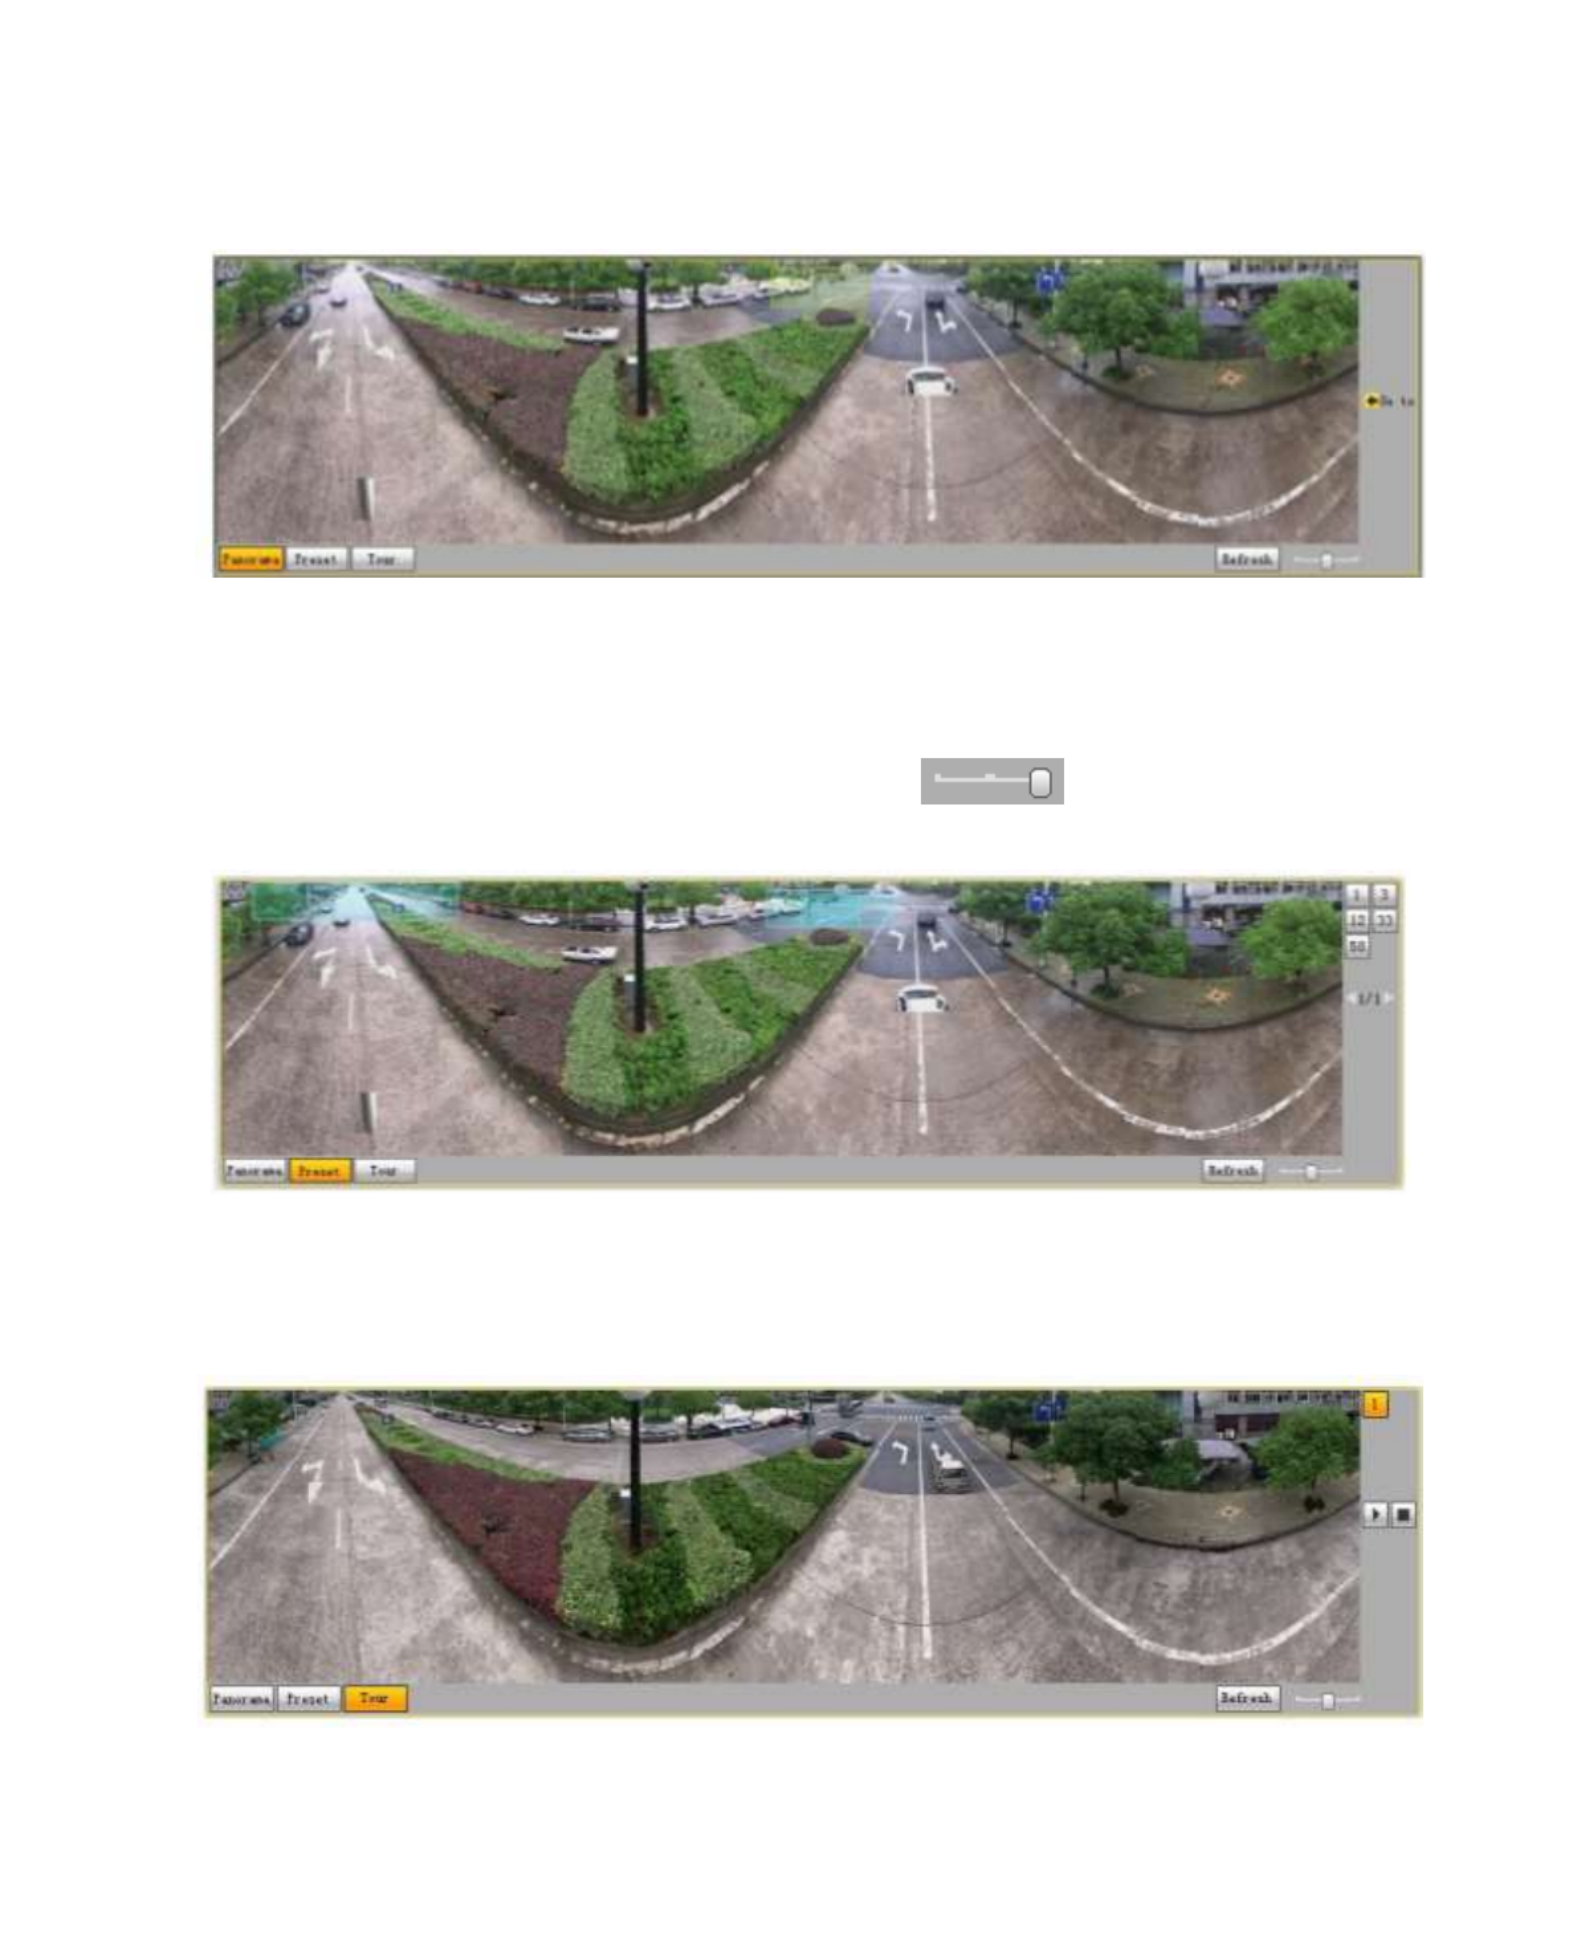
Panorama PTZ
Figure 2-5
Use left mouse button to draw a box to operate positioning in the window, the live page will display the
positioned location and zoom in. Click “Refresh”, and the camera will rotate horizontal 0°~360°, vertical
6°~75°to regain panorama image. Drag the picture ratio bar to adjust the size of panorama
picture.
Figure 2-6
User can use the corresponding preset on the right of the window, please refer to “3.3.2.1 Preset” for
more details about preset setting.

12
Figure 2-7
User can use the corresponding tour on the right of the window, please refer to 3.3.2.2 Tour for more “ ”
details about tour setting.
2.3 System Menu
Click each item to enter corresponding interface.
Figure 2-8
2.4 Video Window Function Option
Figure 2-9
Please refer to the following sheet for detailed information.
SN
Parameter
Function
1
Regional
focus
Click it and use mouse to select any area in the video image,
and it can make the device auto focus in the selected area.
2
Remark
Click it and then select pen color, you can write down the
mark information on the preview interface.
3
Gesture
Control
Click it and control the PTZ via dragging left mouse button in
the preview interface, mouse roller can control zoom rate.
4
Relay out
Click the button to trigger alarm. The light becomes red/gray
when there is relay out/cancel.

13
5
Digital
Zoom
When the video is in the original status, click it you can
select any zone to zoom in. In the non-original status,
you can drag the zoom-in zone in specified range. Right
click mouse to restore previous status.
Click it; you can use the middle button of the mouse to
zoom in/out the video size.
6
Snapshot
Click the button to snapshot, save picture to path in Chapter
3.1.2.5
7
Triple snap
Click it, system can snap at 1f/s. All images are saved to path
in Chapter 3.1.2.5.
8
Record
Click it, system can record. All images are saved to path in
Chapter 3.1.2.5.
9
Manual
track
Click the button and then drag left mouse button to select any
area in the video window, the speed dome will make smart
tracking to the object in the area.
Note: It needs to check Event >IVS Plan> Rule “
Config>Smart Track , otherwise, ”it will be invalid.
10
Audio
output
Turn on or off audio when you are monitoring.
11
Talk
Click it to start or end bidirectional talk.
12
Help
Click it to open help file.
Table 2-5
2.5 PTZ Config
You can control PTZ via PTZ control or virtual joystick; also you can enable the functions of preset, scan
and etc. in the PTZ setting area.
PTZ Control
Note
Users have to set PTZ protocol first before using PTZ control, please refer to Setup > PTZ Settings > “
Protocol for more details. ”
Please refer to Figure 2- for the interface of PTZ control, refer to Table 2-6 for more details about 10
parameters.
14
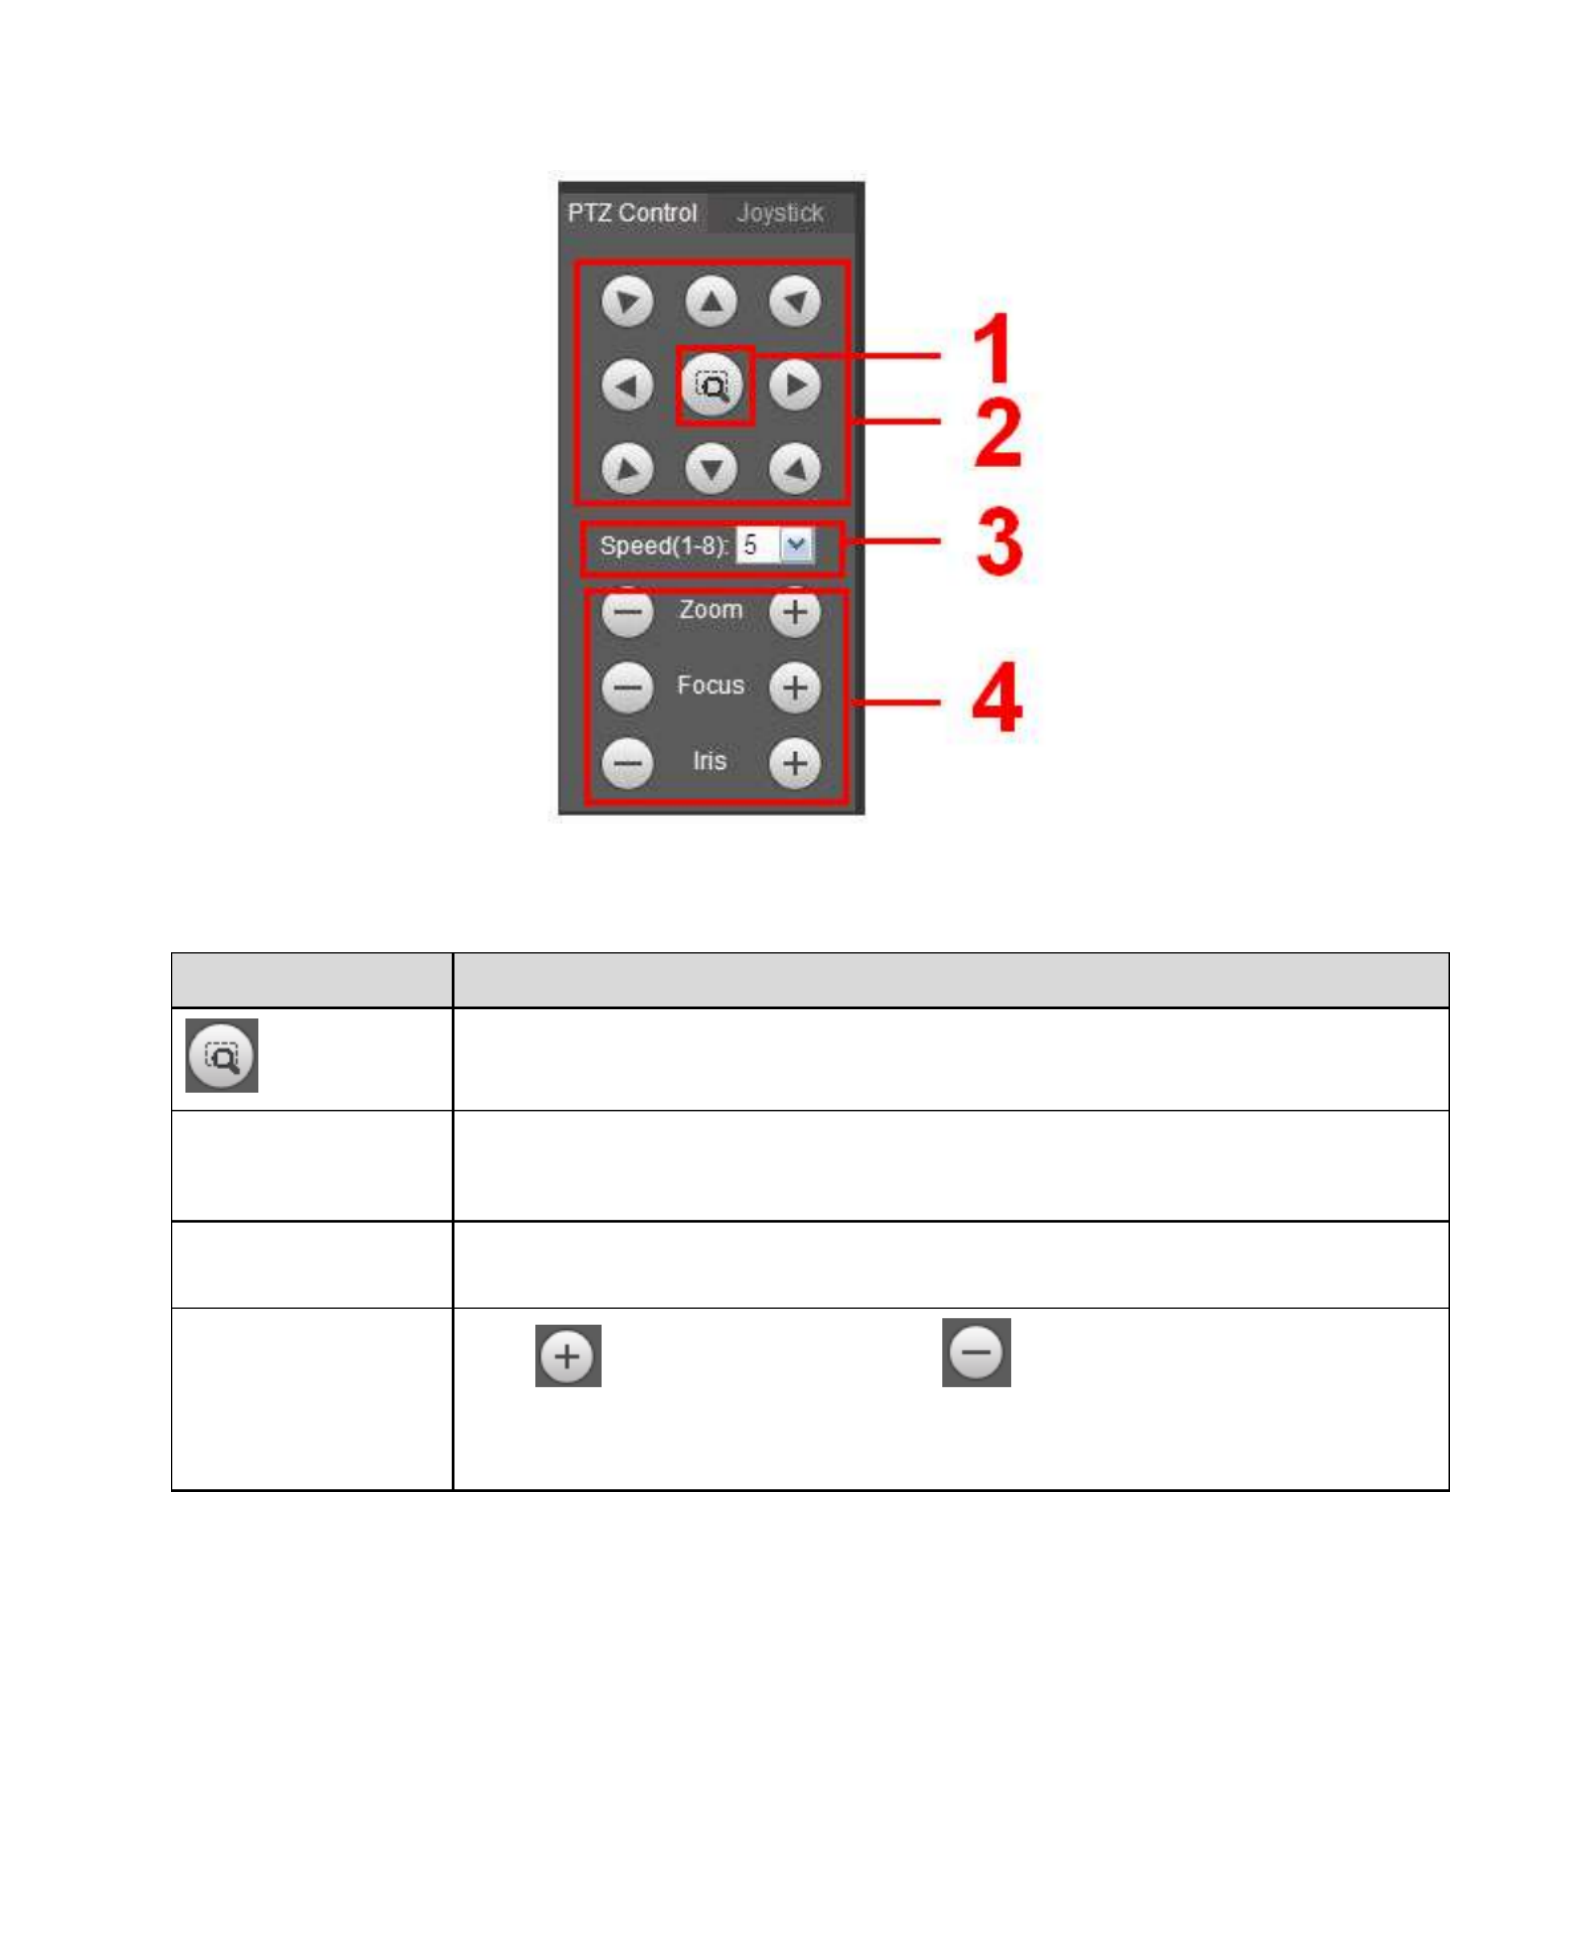
Figure 2-10
Parameter
Note
Quick Position
Use mouse to draw a box in monitoring video, PTZ will rotate focus and ,
quickly position the scene.
PTZ direction
PTZ supports eight directions: left/right/up/down/upper left/upper right/bottom
left/bottom right.
Speed
It controls rotation speed. The longer the step length, the higher the speed.
Step length control PTZ, zoom, focus and iris.
Zoom/focus/iris
Click to increase value and click to decrease value.
Note:
Some cameras don t support iris, please refer to the actual devices for details. ’
Table 2-6
Virtual Joystick
The virtual joystick interface is shown as below. See Figure 2- . 11
This function allows you to control the button in then center to simulate the joystick operation. You can
use it to control device movement.

15
Figure 2- 11
The setting method of speed, zoom, focus and iris is the same as that of the PTZ control.
PTZ Setting
Note
Please refer to 4.3 PTZ Setting for more details. “ ”
The PTZ can support various functions. Click to start some certain PTZ function, and at this
moment the “ ”Start/Stop button becomes , click the button to stop the PTZ function. The
config interface is shown in Figure 2- ; please refer to Table 2-7 for more details about each function. 12
Figure 2- 12
Please refer to the following sheet for PTZ setup information.

16
Parameter
Function
Scan
Select Scan from the dropdown list, click Start button, you can begin
scan operation. Default SN is 1.
Preset
Input the preset value and then click View button, the camera turns
to the corresponding position of the preset.
Tour
Select Tour from the dropdown list and then click Start button, you
can begin tour.
Pattern
You can select Pattern from the dropdown list and then click Start
button to begin PTZ movement.
Assistant
Reserve extended function, it can support special requirements.
Note
It is recommended to enable the function with the guidance of
professional staff if necessary; otherwise it may cause some
unexpected problems.
Pan
Select Pan from the dropdown list and then click “Start” button and it
can realize horizontal rotation of the PTZ.
Wiper
Select wiper, click Open to enable wiper function; click Close to “ ” “ ”
disable wiper function.
Go to
It is the accurate positioning function. Please input
corresponding horizontal angle, vertical angle and zoom speed
and then click “Go to” button to go to a specified position.
One unit of the horizontal angle or vertical angle stands for 0.1
degree.
Table 2-7
Menu
The menu interface is shown in Figure 2- ; please refer to Table 2-8 for more details about parameters. 13
Figure 2- 13
Parameter
Note
Direction button
Up and down buttons are used to select parameters, left and right buttons
are used to select parameter value.

17
Parameter
Note
OK
Click it to confirm.
Open
Open OSD menu.
Close
Click it to close menu.
Table 2-8
Click to enable menu function, then you can see the OSD menu in the monitoring image, which is Open
shown in Figure 2- . 14
Figure 2-14
Here you can set the following items:
Camera: please refer to “4.1.1 Camera Condition”.
PTZ: please refer to “ PTZ setting”.4.3
System: Please refer to 4.6 “ System”.
Users can modify the location of OSD menu in 4.1.2.3 Video Overlay .“ ”

23
Figure 3-8
Parameter
Function
Search
It means searching all the record files between start time and end time of
selected date.

24
Parameter
Function
Record
Download
Format
There are two formats: dav, mp4.
Download
Record type is “dav”, click Download button to download file to local. “ ”
Record type is “mp4” “ ”, click Download button and download file to path in
Chapter 3.1.2.5.
Note
System does not support download and playback of MP4 file at the same time .
Back
Click Back button to go back to calendar interface, then you can select time “ ”
again to operate.
Table 3-5
3.1.5 Playback Clip
Note
The record file which is being playbacked will pause automatically when using playback clip function,
which means that playback clip and playback be implemented at the same time. can’t
Figure 3-9
Step 1
Click start time to clip on time axis. This time must be within progress bar range.
Step 2
Move mouse above the clip icon , and Select Start Time will show up in the lower right corner. “ ”
Step 3
Click clip icon and complete the setting of start time for playback clip.
Step 4
Click end time of playback clip on time axis, and the time must be within progress bar range.
Step 5
Move mouse above clip icon , Select End Time will show up in the lower right corner. and “ ”
Step 6
Termékspecifikációk
| Márka: | Dahua Technology |
| Kategória: | Térfigyelő kamera |
| Modell: | Lite SD1A203T-GN-W |
Szüksége van segítségre?
Ha segítségre van szüksége Dahua Technology Lite SD1A203T-GN-W, tegyen fel kérdést alább, és más felhasználók válaszolnak Önnek
Útmutatók Térfigyelő kamera Dahua Technology

15 Január 2025
31 December 2025
8 Október 2024
7 Október 2024
4 Október 2024
4 Október 2024
23 Szeptember 2024
22 Szeptember 2024
17 Szeptember 2024
14 Szeptember 2024
Útmutatók Térfigyelő kamera
- Térfigyelő kamera Samsung
- Térfigyelő kamera Sony
- Térfigyelő kamera August
- Térfigyelő kamera Nedis
- Térfigyelő kamera Grundig
- Térfigyelő kamera Philips
- Térfigyelő kamera Pioneer
- Térfigyelő kamera Reolink
- Térfigyelő kamera Garmin
- Térfigyelő kamera Bosch
- Térfigyelő kamera Panasonic
- Térfigyelő kamera Canon
- Térfigyelő kamera JVC
- Térfigyelő kamera Evolveo
- Térfigyelő kamera Toshiba
- Térfigyelő kamera Ubiquiti Networks
- Térfigyelő kamera TP-Link
- Térfigyelő kamera Emos
- Térfigyelő kamera Motorola
- Térfigyelő kamera LogiLink
- Térfigyelő kamera Digitus
- Térfigyelő kamera Zebra
- Térfigyelő kamera Xiaomi
- Térfigyelő kamera TRENDnet
- Térfigyelő kamera EZVIZ
- Térfigyelő kamera Boss
- Térfigyelő kamera Crestron
- Térfigyelő kamera ORNO
- Térfigyelő kamera Strong
- Térfigyelő kamera Gigaset
- Térfigyelő kamera MEE Audio
- Térfigyelő kamera Conceptronic
- Térfigyelő kamera Thomson
- Térfigyelő kamera Technaxx
- Térfigyelő kamera Speco Technologies
- Térfigyelő kamera Ricoh
- Térfigyelő kamera Hikvision
- Térfigyelő kamera Netgear
- Térfigyelő kamera Asus
- Térfigyelő kamera Vtech
- Térfigyelő kamera Rollei
- Térfigyelő kamera Hama
- Térfigyelő kamera Mitsubishi
- Térfigyelő kamera Synology
- Térfigyelő kamera Avidsen
- Térfigyelő kamera Raymarine
- Térfigyelő kamera DSC
- Térfigyelő kamera Kodak
- Térfigyelő kamera Ring
- Térfigyelő kamera V-TAC
- Térfigyelő kamera ZyXEL
- Térfigyelő kamera Logitech
- Térfigyelő kamera Withings
- Térfigyelő kamera Denver
- Térfigyelő kamera First Alert
- Térfigyelő kamera Minox
- Térfigyelő kamera Trevi
- Térfigyelő kamera DiO
- Térfigyelő kamera Planet
- Térfigyelő kamera Burg Wächter
- Térfigyelő kamera Ernitec
- Térfigyelő kamera Tenda
- Térfigyelő kamera Qian
- Térfigyelő kamera Aluratek
- Térfigyelő kamera Extech
- Térfigyelő kamera Gembird
- Térfigyelő kamera Cisco
- Térfigyelő kamera Niceboy
- Térfigyelő kamera SPC
- Térfigyelő kamera Bea-fon
- Térfigyelő kamera Powerfix
- Térfigyelő kamera Edimax
- Térfigyelő kamera Eufy
- Térfigyelő kamera APC
- Térfigyelő kamera Overmax
- Térfigyelő kamera Lorex
- Térfigyelő kamera Foscam
- Térfigyelő kamera Manhattan
- Térfigyelő kamera Kogan
- Térfigyelő kamera Alecto
- Térfigyelő kamera Honeywell
- Térfigyelő kamera EnGenius
- Térfigyelő kamera Imou
- Térfigyelő kamera Marshall
- Térfigyelő kamera Acme
- Térfigyelő kamera Furrion
- Térfigyelő kamera Velleman
- Térfigyelő kamera Western Digital
- Térfigyelő kamera Grandstream
- Térfigyelő kamera D-Link
- Térfigyelő kamera Avanti
- Térfigyelő kamera Milesight
- Térfigyelő kamera Monacor
- Térfigyelő kamera IDIS
- Térfigyelő kamera Epiphan
- Térfigyelő kamera ION
- Térfigyelő kamera Blaupunkt
- Térfigyelő kamera Chacon
- Térfigyelő kamera Elro
- Térfigyelő kamera GVI Security
- Térfigyelő kamera Moxa
- Térfigyelő kamera Olympia
- Térfigyelő kamera Delta Dore
- Térfigyelő kamera ZKTeco
- Térfigyelő kamera Abus
- Térfigyelő kamera Vivotek
- Térfigyelő kamera AG Neovo
- Térfigyelő kamera Arlo
- Térfigyelő kamera Trust
- Térfigyelő kamera Konig
- Térfigyelő kamera Marmitek
- Térfigyelő kamera Stabo
- Térfigyelő kamera Pyle
- Térfigyelő kamera Lumens
- Térfigyelő kamera AVer
- Térfigyelő kamera AVMATRIX
- Térfigyelő kamera Sanyo
- Térfigyelő kamera DataVideo
- Térfigyelő kamera CRUX
- Térfigyelő kamera Atlona
- Térfigyelő kamera Schneider
- Térfigyelő kamera Lindy
- Térfigyelő kamera Uniden
- Térfigyelő kamera Quantum
- Térfigyelő kamera Marshall Electronics
- Térfigyelő kamera Trebs
- Térfigyelő kamera M-e
- Térfigyelő kamera Provision-ISR
- Térfigyelő kamera Somfy
- Térfigyelő kamera AViPAS
- Térfigyelő kamera Axis
- Térfigyelő kamera Brilliant
- Térfigyelő kamera Orion
- Térfigyelő kamera EverFocus
- Térfigyelő kamera SereneLife
- Térfigyelő kamera I3International
- Térfigyelő kamera Equip
- Térfigyelő kamera Genius
- Térfigyelő kamera Valueline
- Térfigyelő kamera Swann
- Térfigyelő kamera Adj
- Térfigyelő kamera Anker
- Térfigyelő kamera Genie
- Térfigyelő kamera Petcube
- Térfigyelő kamera ClearView
- Térfigyelő kamera Sitecom
- Térfigyelő kamera ACTi
- Térfigyelő kamera Schwaiger
- Térfigyelő kamera Elmo
- Térfigyelő kamera Vitek
- Térfigyelő kamera Alfatron
- Térfigyelő kamera Laserliner
- Térfigyelő kamera Smartwares
- Térfigyelő kamera REVO
- Térfigyelő kamera Belkin
- Térfigyelő kamera KJB Security Products
- Térfigyelő kamera Kramer
- Térfigyelő kamera BZBGear
- Térfigyelő kamera BirdDog
- Térfigyelő kamera Allnet
- Térfigyelő kamera Aldi
- Térfigyelő kamera Airlive
- Térfigyelő kamera Aritech
- Térfigyelő kamera Flamingo
- Térfigyelő kamera Yale
- Térfigyelő kamera Caliber
- Térfigyelő kamera Eminent
- Térfigyelő kamera Exibel
- Térfigyelő kamera Fortinet
- Térfigyelő kamera KlikaanKlikuit
- Térfigyelő kamera Maginon
- Térfigyelő kamera Profile
- Térfigyelő kamera Marquant
- Térfigyelő kamera Ednet
- Térfigyelő kamera AVerMedia
- Térfigyelő kamera Steren
- Térfigyelő kamera Perel
- Térfigyelő kamera Flir
- Térfigyelő kamera Netis
- Térfigyelő kamera Buffalo
- Térfigyelő kamera GeoVision
- Térfigyelő kamera Nest
- Térfigyelő kamera LevelOne
- Térfigyelő kamera Siedle
- Térfigyelő kamera Hive
- Térfigyelő kamera Netatmo
- Térfigyelő kamera Switel
- Térfigyelő kamera InFocus
- Térfigyelő kamera Hombli
- Térfigyelő kamera Clas Ohlson
- Térfigyelő kamera Naxa
- Térfigyelő kamera BRK
- Térfigyelő kamera EVE
- Térfigyelő kamera Waeco
- Térfigyelő kamera QSC
- Térfigyelő kamera Xavax
- Térfigyelő kamera Vaddio
- Térfigyelő kamera Gira
- Térfigyelő kamera Jung
- Térfigyelő kamera Interlogix
- Térfigyelő kamera Boyo
- Térfigyelő kamera IC Intracom
- Térfigyelő kamera Adesso
- Térfigyelő kamera Satel
- Térfigyelő kamera POSline
- Térfigyelő kamera Notifier
- Térfigyelő kamera Hawking Technologies
- Térfigyelő kamera Lanberg
- Térfigyelő kamera Friedland
- Térfigyelő kamera Nexxt
- Térfigyelő kamera Monoprice
- Térfigyelő kamera Watec
- Térfigyelő kamera Beafon
- Térfigyelő kamera Chuango
- Térfigyelő kamera ETiger
- Térfigyelő kamera Videcon
- Térfigyelő kamera INSTAR
- Térfigyelő kamera Advantech
- Térfigyelő kamera Digital Watchdog
- Térfigyelő kamera Ferguson
- Térfigyelő kamera Ganz
- Térfigyelő kamera Kwikset
- Térfigyelő kamera Intellinet
- Térfigyelő kamera ClearOne
- Térfigyelő kamera Ebode
- Térfigyelő kamera Oplink
- Térfigyelő kamera Kerbl
- Térfigyelő kamera Dorr
- Térfigyelő kamera Sonic Alert
- Térfigyelő kamera Linear PRO Access
- Térfigyelő kamera Summer Infant
- Térfigyelő kamera SMC
- Térfigyelő kamera Topica
- Térfigyelő kamera Iiquu
- Térfigyelő kamera Verint
- Térfigyelő kamera Brinno
- Térfigyelő kamera Rostra
- Térfigyelő kamera Caddx
- Térfigyelő kamera Spyclops
- Térfigyelő kamera EKO
- Térfigyelő kamera Inovonics
- Térfigyelő kamera Kguard
- Térfigyelő kamera Woonveilig
- Térfigyelő kamera Mobi
- Térfigyelő kamera Surveon
- Térfigyelő kamera Hollyland
- Térfigyelő kamera Epcom
- Térfigyelő kamera Indexa
- Térfigyelő kamera Lutec
- Térfigyelő kamera Whistler
- Térfigyelő kamera Hanwha
- Térfigyelő kamera VideoComm
- Térfigyelő kamera IMILAB
- Térfigyelő kamera 3xLOGIC
- Térfigyelő kamera Pelco
- Térfigyelő kamera Leviton
- Térfigyelő kamera EtiamPro
- Térfigyelő kamera Inkovideo
- Térfigyelő kamera Pentatech
- Térfigyelő kamera Weldex
- Térfigyelő kamera SecurityMan
- Térfigyelő kamera Canyon
- Térfigyelő kamera CNB Technology
- Térfigyelő kamera Tapo
- Térfigyelő kamera Aigis
- Térfigyelő kamera Exacq
- Térfigyelő kamera Brickcom
- Térfigyelő kamera Laxihub
- Térfigyelő kamera Securetech
- Térfigyelő kamera EFB Elektronik
- Térfigyelő kamera NetMedia
- Térfigyelő kamera Videotec
- Térfigyelő kamera Illustra
- Térfigyelő kamera Nivian
- Térfigyelő kamera Arenti
- Térfigyelő kamera E-bench
- Térfigyelő kamera Blow
- Térfigyelő kamera Syscom
- Térfigyelő kamera Tecno
- Térfigyelő kamera Night Owl
- Térfigyelő kamera Guardzilla
- Térfigyelő kamera Astak
- Térfigyelő kamera Blink
- Térfigyelő kamera Milestone Systems
- Térfigyelő kamera Zavio
- Térfigyelő kamera Campark
- Térfigyelő kamera IPX
- Térfigyelő kamera Dedicated Micros
- Térfigyelő kamera Hamlet
- Térfigyelő kamera Annke
- Térfigyelő kamera AVTech
- Térfigyelő kamera Qoltec
- Térfigyelő kamera Approx
- Térfigyelő kamera Digimerge
- Térfigyelő kamera Y-cam
- Térfigyelő kamera Feelworld
- Térfigyelő kamera Wisenet
- Térfigyelő kamera WyreStorm
- Térfigyelő kamera Infortrend
- Térfigyelő kamera HiLook
- Térfigyelő kamera Mach Power
- Térfigyelő kamera Compro
- Térfigyelő kamera Aida
- Térfigyelő kamera Ikegami
- Térfigyelő kamera Accsoon
- Térfigyelő kamera Vimtag
- Térfigyelő kamera Sonoff
- Térfigyelő kamera Gewiss
- Térfigyelő kamera Alula
- Térfigyelő kamera Insteon
- Térfigyelő kamera Costar
- Térfigyelő kamera ALC
- Térfigyelő kamera Security Labs
- Térfigyelő kamera Comtrend
- Térfigyelő kamera Seneca
- Térfigyelő kamera Avigilon
- Térfigyelő kamera American Dynamics
- Térfigyelő kamera Vosker
- Térfigyelő kamera Sentry360
- Térfigyelő kamera Owltron
- Térfigyelő kamera Enabot
- Térfigyelő kamera Luis Energy
- Térfigyelő kamera Sir Gawain
- Térfigyelő kamera VisorTech
- Térfigyelő kamera Atlantis Land
- Térfigyelő kamera B & S Technology
- Térfigyelő kamera Promise Technology
- Térfigyelő kamera Ecobee
- Térfigyelő kamera Turing
- Térfigyelő kamera Wasserstein
- Térfigyelő kamera Qolsys
- Térfigyelő kamera HuddleCamHD
- Térfigyelő kamera Setti+
- Térfigyelő kamera Defender
- Térfigyelő kamera Mobotix
- Térfigyelő kamera IOIO
- Térfigyelő kamera BIRDFY
- Térfigyelő kamera I-PRO
- Térfigyelő kamera DVDO
- Térfigyelő kamera TCP
- Térfigyelő kamera Bolin Technology
- Térfigyelő kamera Nextech
Legújabb útmutatók Térfigyelő kamera

6 Április 2025
5 Április 2025
5 Április 2025

14 Január 2025
13 Január 2025
13 Január 2025
13 Január 2025
13 Január 2025
13 Január 2025
13 Január 2025