Használati útmutató Cybex Solution Z i-Fix
Olvassa el alább 📖 a magyar nyelvű használati útmutatót Cybex Solution Z i-Fix (174 oldal) a autósülés kategóriában. Ezt az útmutatót 2 ember találta hasznosnak és 2 felhasználó értékelte átlagosan 4.5 csillagra
Oldal 1/174

DEENITFRNLPLHUCZSKPT ES
SOLUTION Z i-FIX
User guide
UN R129/03, 100 – 150 cm (ca. 3 – 12 Y)
PT ES

2

3
DEENIT
51 | INHOUD
51 | ZAWARTOŚĆ
92 | TARTALOM
93 | OBSAH
93 | OBSAH
FRNLPLHUCZSK
134 | ÍNDICE
135 | CONTEÚDO
ESPT
6 | INHALT
7 | CONTENT
7 | ARGOMENTI
50 | SOMMAIRE
Kurzanleitung
Short instruction
Sommario
Instructions résumées
Stručný návod
Resumen de instrucciones
Manual reduzido
Korte handleiding
Instrukcja skrócona
Rövid tájékoztató
Zkrácený návod
CLICK!
7 8
3
11
12 13 14 1615
4 5
CLICK!
MAX
1 2
610
1800

4
EN - WARNING! Without the approval of the certication oce, the child seat may not be modied or added to in any way. Repairs may only be
performed by person authorised to this eect. Only original parts and accessories may be used for repairs. Failure to comply with the above will result
in the protective function of the child seat no longer being guaranteed.
WARNING! The child seat only oers optimum protection for your child if you follow the usage instructions precisely.
DE - WARNUNG! Ohne Genehmigung der Zulassungsstelle dürfen keine Veränderungen am Kindersitz vorgenommen und keine Ergänzungen
hinzugefügt werden. Reparaturen dürfen ausschließlich durch Personen vorgenommen werden, die hierfür autorisiert sind. Dabei dürfen stets nur
original Bau- und Zubehörteile verwendet werden. Die Schutzfunktion des Kindersitzes ist sonst nicht mehr gewährleistet.
WARNUNG! Der Kindersitz bietet nur dann den bestmöglichen Schutz für Ihr Kind, wenn Sie die Gebrauchsanweisung genau befolgen.
FR - ATTENTION ! Ce siège auto ne saurait être modié sans l’autorisation préalable de l’organisme de certication compétent. Toute réparation ne
peut être eectuée que par une personne habilitée. Seuls des pièces détachées et des accessoires d’origine peuvent être utilisés. Toute entorse aux
règles précitées compromettra la fonction de protection du siège auto.
ATTENTION ! Le siège auto n’ore une protection optimale que si vous suivez précisément les instructions d’utilisation.
NL - BELANGRIJK! Zonder de goedkeuring van het certiceringsinstelling mag het autostoeltje niet worden aangepast en mag er niets aan worden
toegevoegd. Reparaties mogen alleen worden uitgevoerd door personen die daartoe bevoegd zijn. Er mogen uitsluitend originele onderdelen en
accessoires worden gebruikt voor reparaties. Niet-naleving van het bovenstaande heeft tot gevolg dat de beschermende functie van het autostoeltje
niet langer gegarandeerd is.
BELANGRIJK! Het autostoeltje biedt uw kind alleen optimale bescherming als u de handleiding precies volgt.
PL - OSTRZEŻENIE! Bez zgody instytucji certykującej produkt, fotelik nie może być w żaden sposób modykowany lub zmieniany. Naprawy
dokonuje tylko specjalnie upoważniona do tego osoba. Tylko oryginalne części i akcesoria mogą być użyte do naprawy. Niezastosowanie się do tych
zasad może spowodować utratę funkcji ochronnej fotelika oraz utratę gwarancji.
OSTRZEŻENIE! Fotelik zapewnia optymalną ochronę tylko w przypadku postępowania zodnie z instrukcją.
IT - ATTENZIONE! Senza l’approvazione dell’ucio di certicazione il seggiolino non può subire modiche o aggiunte di alcun genere. Eventuali
riparazioni dovranno essere eettuate solo da persone autorizzate, utilizzando soltanto componenti ed accessori originali. Il mancato rispetto di
quanto sopra avrà come conseguenza il termine della garanzia della funzione protettiva del seggiolino.
ATTENZIONE! Il seggiolino ore la protezione ottimale per il bambino solo qualora vengano seguite precisamente le istruzioni per l’uso.
HU - FIGYELMEZTETÉS! A hitelesítő intézet jóváhagyása nélkül a terméken semmilyen módosítás nem végezhető. Javítást csak az erre
felhatalmazott személy végezhet. Kizárólag eredeti alkatrészek és tartozékok használhatók javításhoz. A fentiek be nem tartásával már nem
garantálható a gyermekülés védelmi funkciója.
FIGYELMEZTETÉS! A gyermekülés akkor nyújt megfelelő védelmet gyermekének, ha pontosan követi a használati utasításokat.

5
CZ - VAROVÁNÍ! Bez povolení certikačního úřadu nesmí být autosedačka jakkoliv upravována. Opravy mohou provádět pouze autorizované osoby.
K opravám lze používat pouze originální náhradní díly a příslušenství. Při nedodržení výše uvedených podmínek nelze zaručit ochrannou funkci
dětské autosedačky.
VAROVÁNÍ! Dětská autosedačka poskytuje Vašemu dítěti optimální ochranu pouze při důkladném dodržení pokynů k použití.
SK - VAROVANIE! Bez povolenia certikačného úradu nesmie byť autosedačka akokoľvek upravovaná. Opravy môžu vykonávať len autorizované
osoby. K opravám možné používať len originálne náhradné diely a príslušenstvo. Pri nedodržaní vyššie uvedených podmienok nemožno zaručiť
ochrannú funkciu detskej autosedačky.
VAROVANIE! Detská autosedačka poskytuje Vášmu dieťaťu optimálnu ochranu len pri dôkladnom dodržaní pokynov na použitie.
ES - ¡ATENCIÓN! La silla de auto no puede ser modicada ni se le pueden añadir componentes sin la aprobación de la ocina de certicación. Las
reparaciones las realizará únicamente una persona autorizada para ello. Sólo se utilizarán recambios y accesorios originales en las reparaciones. El
incumplimiento de lo expuesto anteriormente resultará en la pérdida de cobertura por garantía sobre la silla.
¡ATENCIÓN! La silla de coche solo ofrece una protección óptima para su hijo si sigue las instrucciones de uso de forma precisa.
PT - ATENÇÃO! Sem expressa autorização, a cadeira infantil não poderá ser modicada de nenhuma maneira. As reparações só podem ser feitas
por pessoas autorizadas para este efeito. Apenas partes e acessórios originais devem ser utilizados nas reparações. Não ir de encontro ao descrito
anteriormente irá fazer com que a proteção da criança não possa ser assegurada.
ATENÇÃO! A cadeira auto só oferece proteção ótima para a criança quando segue todas as instruções corretamente.

6
ZULASSUNG
CYBEX Solution Z i-Fix
UN R129/03
Größe: 100 – 150 cm
Alter: ca. 3 – 12 Jahre
Nur geeignet für Fahrzeugsitze
mit Dreipunkt-Automatik-Gurt,
die nach UN Regelung Nr. R16
oder gleichwertigem Standard
zugelassen sind.
HOMOLOGATION
CYBEX Solution Z i-Fix
UN R129/03
Size range: 100 – 150 cm
Age: approx. 3 – 12 years
Only suitable for vehicle seats
with automatic three-point belts,
approved in accordance with
UN regulation no. R16 or a
comparable standard.
OMOLOGAZIONE
CYBEX Solution Z i-Fix
UN R129/03
Gamma di altezza: 100 – 150 cm
Età: dai 3 ai 12 anni circa
Adatto soltanto per veicoli con
sedili dotati di cinture di sicurezza
automatiche a 3 punti omologate
ECE R16 o standard equivalente
SEHR GEEHRTE KUNDIN, SEHR GEEHRTER KUNDE!
Solution i-Fix Z
Vielen Dank, dass Sie sich bei der Wahl eines Kindersitzes
für den Solution Z i-Fix entschieden haben. Bei der
Entwicklung des Kindersitzes standen Sicherheit, Komfort
und Bedienfreundlichkeit im Vordergrund. Das Produkt wird
unter besonderer Qualitätsüberwachung hergestellt und erfüllt
strengste Sicherheitsanforderungen.
HINWEIS! Bewahren Sie die Anleitung immer gribereit in
dem dafür vorgesehenen Fach am Kindersitz auf.
HINWEIS! Durch länderspezische Anforderungen
(z.B. Farbkennzeichnungen am Kindersitz) können
Produktmerkmale in ihrer äußeren Erscheinung variieren. Die
korrekte Funktionsweise des Produktes wird davon jedoch
nicht beeinusst.
HINWEIS! Der Dreipunktgurt darf nur durch die dafür
vorgesehenen Führungen verlaufen. Die Gurtführung wird
in diesem Handbuch genau beschrieben und ist zudem am
Kindersitz grün markiert.
HINWEIS! Es ist möglich, den Kindersitz ohne „Linear Side-
Impact Protection“-System (L.S.P.) zu verwenden. Dieses
kann abgenommen werden, um mehr Platz im Fahrzeug zu
schaen. Zum Abnehmen des „Linear Side-Impact Protection“-
Systems (L.S.P.) siehe Kapitel: „DER RICHTIGE PLATZ IM
FAHRZEUG“.
!WARNUNG! Damit Ihr Kind richtig geschützt werden
kann, ist es unbedingt notwendig, den Kindersitz so zu
verwenden, wie es in dieser Anleitung beschrieben wird.
SOLUTION Z I-FIX
Specific Vehicle
Booster Seat
100-150 cm
030036
UN Regulation
No. 129/03
Cybex GmbH
Riedingerstr. 18 , 95448 B ayreu th
German y

7
DEENIT
Thank you for buying the Solution Z i-Fix. We can assure
you that safety, comfort and ease of use were our highest
priorities when developing the car seat. This product is
manufactured under exceptional quality control and meets the
strictest safety requirements.
Grazie per avere scelto Solution Z i-Fix. Le assicuriamo che
nel progettare il seggiolino auto i nostri principali obiettivi sono
stati la sicurezza, il comfort e la facilità di utilizzo. Il prodotto
è stato elaborato sotto uno stretto controllo qualitativo e
risponde ai più severi standard di sicurezza.
NOTE! Always keep this Instruction Manual at hand in the
compartment that has been provided for that purpose on the
car seat.
NOTA BENE! Raccomandiamo di tenere il manuale sempre
a portata di mano e di conservarlo nell’apposito alloggiamento
del seggiolino.
NOTE! Due to country-specic requirements (e.g. colour
labelling on the car seat), the product features may vary in
their external appearance. This, however, does not aect the
correct functioning of the product.
NOTA BENE! In base alle diverse normative nazionali
l’aspetto di alcune caratteristiche del prodotto potrebbe
dierire (es. colori delle etichette sul seggiolino). Ciò tuttavia
non inuisce sul corretto funzionamento del prodotto.
NOTE! The three-point belt must only be passed through the
designated routings. The belt routings are described in detail
in this manual and are marked in green on the car seat.
NOTE! You can use the car seat without the “Linear Side-
Impact Protection” System (L.S.P.). It can be detached to
gather more space in the vehicle. For detaching the “Linear
Side-Impact Protection” System (L.S.P.) see chapter:
“CORRECT POSITION IN THE VEHICLE”.
NOTA BENE! La cintura automatica a tre punti deve
passare attraverso le guide designate. Le guide per la cintura
sono descritte in dettaglio nel presente manuale e sono
contrassegnate in verde sul seggiolino.
NOTA BENE! Il seggiolino può essere utilizzato senza
sistema di protezione lineare negli impatti laterali (Linear
Side-Impact Protection, L.S.P.), il quale può essere smontato
per ottenere più spazio nel veicolo. Per la rimozione del
sistema L.S.P., vedere il capitolo: “POSIZIONE CORRETTA
NEL VEICOLO”.
DEAR CUSTOMER! GENTILE CLIENTE,
!WARNING! In order to keep your child properly
protected it is absolutely essential that you use the car
seat as described in this manual.
!ATTENZIONE! Per la massima sicurezza del bambino
è essenziale usare il seggiolino secondo quanto
descritto in questo manuale.

8
INHALTDE
KURZANLEITUNG ......................................................................................................3
ZULASSUNG ................................................................................................................6
ERSTMONTAGE .......................................................................................................10
ZUM SCHUTZ DES FAHRZEUGS .........................................................................12
DER RICHTIGE PLATZ IM FAHRZEUG................................................................14
SICHERHEIT IM FAHRZEUG .................................................................................20
EINBAU DES KINDERSITZES INS FAHRZEUG.................................................22
EINBAU DES KINDERSITZES MIT ISOFIX .........................................................24
AUSBAU DES KINDERSITZES AUS DEM FAHRZEUG ....................................26
ANPASSEN AN DIE KÖRPERGRÖSSE ...............................................................28
EINSTELLEN DER NEIGUNGSVERSTELLBAREN KOPFSTÜTZE ...............30
ANSCHNALLEN MITTELS FAHRZEUGGURT ....................................................32
IST IHR KIND RICHTIG GESICHERT? .................................................................34
ENTFERNEN DES SITZBEZUGS ..........................................................................36
REINIGUNG................................................................................................................38
PFLEGE.......................................................................................................................40
VERHALTEN NACH EINEM UNFALL ....................................................................40
PRODUKTINFORMATION.......................................................................................42
PRODUKTLEBENSDAUER ....................................................................................42
ENTSORGUNG .........................................................................................................44
GARANTIEBESTIMMUNGEN .................................................................................46

9
DEENIT
CONTENTEN
SHORT INSTRUCTION ..............................................................................................3
HOMOLOGATION .......................................................................................................6
FIRST INSTALLATION..............................................................................................11
PROTECTING THE VEHICLE ................................................................................13
CORRECT POSITION IN THE VEHICLE..............................................................15
SAFETY IN THE VEHICLE ......................................................................................21
INSTALLING THE CAR SEAT IN THE VEHICLE .................................................23
INSTALLING THE CAR SEAT WITH ISOFIX SYSTEM ......................................25
REMOVING THE CAR SEAT FROM THE VEHICLE ..........................................27
ADJUSTING TO THE BODY SIZE .........................................................................29
ADJUSTING THE RECLINING HEADREST ........................................................31
STRAPPING WITH VEHICLE SEAT BELT ...........................................................33
IS YOUR CHILD CORRECTLY SECURED? ........................................................35
REMOVING THE SEAT COVER .............................................................................37
CLEANING ..................................................................................................................39
PRODUCT CARE ......................................................................................................41
WHAT TO DO AFTER AN ACCIDENT ...................................................................41
PRODUCT INFORMATION .....................................................................................43
PRODUCT LIFESPAN ..............................................................................................43
DISPOSAL ..................................................................................................................45
WARRANTY................................................................................................................47
IT
SOMMARIO ..................................................................................................................3
OMOLOGAZIONE .......................................................................................................6
PRIMA INSTALLAZIONE..........................................................................................11
PER LA SAVAGUARDIA DELL’AUTO ....................................................................13
LA POSIZIONE CORRETTA NELL’AUTO .............................................................15
SICUREZZA NELL’AUTO .........................................................................................21
INSTALLAZIONE DEL SEGGIOLINO ....................................................................23
INSTALLAZIONE CON IL SISTEMA ISOFIX ........................................................25
RIMOZIONE DEL SEGGIOLINO DALL’AUTO .....................................................27
REGOLAZIONE IN BASE ALLA CORPORATURA .............................................29
REGOLARE LA RECLINAZIONE DEL POGGIATESTA ...............................31
ALLACCIARE IL BAMBINO CON LA CINTURA ...................................................33
IL BAMBINO È POSIZIONATO CORRETTAMENTE? ........................................35
RIMOZIONE DEL RIVESTIMENTO .......................................................................37
PULIZIA .......................................................................................................................39
CURA DEL PRODOTTO...........................................................................................41
COSA FARE A SEGUITO DI UN INCIDENTE ......................................................41
INFORMAZIONI SUL PRODOTTO ........................................................................43
DURATA DEL PRODOTTO ......................................................................................43
SMALTIMENTO ..........................................................................................................45
GARANZIA ..................................................................................................................47
ARGOMENTI

10
ERSTMONTAGE
Der Kindersitz besteht aus einem Sitzkissen und (1)
einer Rückenlehne . Die Rückenlehne verfügt über (2)
eine höhenverstellbare Kopfstütze mit integrierter
Schulterbreitenverstellung. Nur die Kombination von
Sitzkissen und Rückenlehne bietet Ihrem Kind den
bestmöglichen Schutz und Komfort.
HINWEIS! Bitte bewahren Sie die Gebrauchsanweisung
immer in der dafür vorgesehenen Tasche auf der (3)
Vorderseite des Sitzes auf.
! WARNUNG! Stellen Sie sicher, dass Sie diese
Gebrauchsanweisung sorgfältig lesen, verstehen und
befolgen.
! WARNUNG! Die Bestandteile des CYBEX Solution
Z i-Fix dürfen weder einzeln noch in Verbindung mit
Sitzkissen, Rückenlehnen oder Kopfstützen anderer
Hersteller oder anderer Baureihen verwendet werden.
Die Zulassung würde in solch einem Fall sofort
erlöschen. Eine Fehlanwendung kann zu ernsthaften
bis hin zu tödlichen Verletzungen des Kindes führen.
Bitte bewahren Sie diese Gebrauchsanweisung zur
zukünftigen Verwendung auf.
! WARNUNG! Achten Sie immer darauf, dass die
Einzelteile des Kindersitzes niemals gestaucht
oder eingeklemmt werden (z.B. beim Schließen der
Fahrzeugtür oder beim Verstellen der Rückbank).
Die Rückenlehne wird mit der Führungsnase auf der (2) (4)
Achse des Sitzkissens eingehakt.(5) (1)
3
2
1
2
4
5

11
DEENIT
FIRST INSTALLATION PRIMA INSTALLAZIONE
The car seat consists of a booster seat and a backrest . (1) (2)
The backrest integrates a combined height-adjustment of the
headrest and width-adjustment of the shoulder parts. Only
the combination of booster seat and backrest provides best
protection and comfort to your child.
Il seggiolino auto comprende una seduta , e uno (1)
schienale . Lo schienale è dotato di un sistema integrato (2)
di regolazione dell’altezza del poggiatesta e di regolazione
dell’ampiezza della zona spalle. Solo la combinazione di
rialzo e schienale ore la migliore protezione e il miglior
comfort per il bambino.
Connect the backrest to the booster by hooking the (2) (1)
guide lug on the axis of the booster .(4) (5) (1)
Collegare lo schienale alla seduta agganciando la (2) (1)
guida all’asse della seduta .(4) (5) (1)
NOTE! Please keep the instruction manual close by for future
reference by storing it in the pocket in the front of the seat.(3)
NOTA BENE! Tenere sempre a portata di mano queste
istruzioni e conservarle nell’apposita tasca davanti al (3)
seggiolino.
!WARNING! Make sure to read, understand and follow
the instruction manual.
!WARNING! The parts of the CYBEX Solution Z i-Fix
must not be used alone or in combination with boosters,
backrests or headrests from other manufacturers or
from different product series. In such instances, the
certification expires immediately. Misapplication can
lead to serious injury or death of your child. Please keep
these instructions for future reference.
!ATTENZIONE! Assicuratevi di leggere, capire e seguire
scrupolosamente le istruzioni contenute in questo
manuale.
!ATTENZIONE! Le parti del seggiolino CYBEX Solution
Z i-FIX non devono essere modificate, usate da sole o
in combinazione con sedute, schienali o poggiatesta
di altri produttori o di altri modelli . In tali circostanze,
l’omologazione perde automaticamente validità. Un uso
scorretto del prodotto può portare a gravi lesioni, anche
fatali, per il bambino. Tenere le istruzioni a portata di
mano per riferimento futuro.
!WARNING! Always ensure that the individual
components of the child seat are never compressed
or jammed (e.g. by jamming in the car door or when
adjusting the back seat).
!ATTENZIONE! Verificare sempre che le singole parti
del seggiolino non siano mai bloccatie o compresse (ad
esempio tra la portiera dell’auto o durante la regolazione
del sedile).

12
ZUM SCHUTZ DES FAHRZEUGS
An einigen Autositzen aus empndlichem Material
(z.B. Velours, Leder, etc.) können durch die Benutzung
von Kindersitzen mögliche Gebrauchsspuren und/oder
Abfärbungen auftreten. Um das zu vermeiden, können Sie
z.B. eine Decke oder ein Handtuch unterlegen. Ferner weisen
wir in diesem Zusammenhang auf unsere Reinigungshinweise
hin, die vor der ersten Verwendung des Kindersitzes
unbedingt beachtet werden sollten.

13
DEENIT
Traces of use and/or discoloration can appear on some
vehicle seats made from delicate materials (e.g. velour,
leather, etc.) if car seats are used. You can avoid this by
putting, e.g. a blanket or a towel underneath the car seat. In
this context also see our cleaning directions. It is essential
that these are followed before the rst use of the car seat.
L’uso del seggiolino in auto con sedili realizzati in materiali
delicati (come velluto, pelle, ecc.) può lasciare tracce e/o
causare scoloriture. Questo è evitabile utilizzando ad esempio
un telo o un asciugamano sotto al seggiolino. A riguardo,
vedere anche le istruzioni per la pulizia: è essenziale seguire
quanto in esse indicato prima dell’uso del seggiolino.
PROTECTING THE VEHICLE PER LA SAVAGUARDIA DELL’AUTO

14
DER RICHTIGE PLATZ IM FAHRZEUG
!
WARNUNG! Der Sitz ist nicht für die Verwendung mit
einem 2-Punkt- oder Beckengurt geeignet. Wird der Sitz
mit einem 2-Punkt-Gurt gesichert, kann es bei einem
Unfall zu schweren oder gar tödlichen Verletzungen des
Kindes kommen.
Der Kindersitz ist auf Fahrzeugplätzen verwendbar, die
mit einem Dreipunkt-Automatikgurt ausgestattet sind.
Zugelassene Fahrzeuge und Sitzpositionen entnehmen Sie
bitte der beigelegten Fahrzeugtypenliste. Die aktuelle Version
erhalten Sie auf www.cybex-online.com.
Auch ohne „Linear Side-Impact Protection“-System (L.S.P.) ist
der Seitenaufprallschutz gewährleistet.
Für optimalen Schutz, empfehlen wir jedoch das „Linear Side-
Impact Protection“-System (L.S.P.) möglichst immer zu nutzen.
HINWEIS! Ab einer Körpergröße von 135 cm kann die
Kompatibilität des SOLUTION Z i-FIX mit ihrem Fahrzeug
eventuell eingeschränkt sein. Bitte vergewissern Sie
sich anhand der Fahrzeugtypenliste, ob der Sitz in allen
Kopfstützenpositionen uneingeschränkt verwendbar ist.
Falls Ihr Fahrzeug nicht genug Platz bietet, kann das „Linear
Side-Impact Protection“-System (L.S.P.) abmontiert werden,
in dem Sie dieses nach oben schieben und somit aus seiner
Verankerung lösen.
Falls Ihr Fahrzeug nicht über ISOFIX Anbindungspunkte
verfügt, besteht jederzeit die Möglichkeit den SOLUTION Z
i-FIX mit eingeklappten ISOFIX Rastarmen zu verwenden.
L
.
S
.
P
.
S
Y
S
T
E
M

15
DEENIT
CORRECT POSITION IN THE VEHICLE LA POSIZIONE CORRETTA NELL’AUTO
!
WARNING! The car seat is not suitable for use with a
two-point or lap belt. If the seat is secured using a two-
point belt, an accident may result in severe or even fatal
injuries to the child.
!
ATTENZIONE! Il seggiolino non può essere installato
con cinture a due punti o soltanto con quella ventrale.
Gli incidenti possono causare lesioni gravi o mortali al
bambino in caso installazione con una cintura a due
punti.
The child seat can be used on vehicle seats which are
equipped with an automatic three point belt. Please refer
to the enclosed vehicle type list for approved vehicles.
You can obtain the latest version from www.cybex-online.com.
Il seggiolino per bambini può essere utilizzato sui sedili
del veicolo dotati di cintura automatica a tre punti. Fare
riferimento all‘elenco delle tipologie di veicoli allegato per
conoscere i veicoli approvati. La versione più aggiornata della
lista è disponibile nel nostro sito al link: www.cybex-online.com.
In case your car does not oer enough space, you can detach
the “Linear Side-Impact Protection”- System (L.S.P.) by
pushing it upwards to release it from its anchorage points.
Nel caso in cui l‘auto non ora spazio suciente, è possibile
smontare il sistema di protezione lineare negli impatti laterali
(Linear Side-Impact Protection, L.S.P.) spingendolo verso
l‘alto per rilasciarlo dai punti di ancoraggio.
NOTE! Above a child‘s stature of 135 cm, the compatibility
between the SOLUTION Z i-FIX and your vehicle might be
reduced. Please review the vehicle type list to check
whether the child seat can be used in all headrest
positions without restrictions.
NOTA BENE! Per bambini di altezza superiore ai 135 cm, la
compatibilità tra la SOLUZIONE Z i-FIX e il veicolo potrebbe
essere ridotta. Controllare l‘elenco dei tipi di veicolo per
vericare se il seggiolino per bambini può essere utilizzato in
tutte le posizioni del poggiatesta senza restrizioni.
However, for optimized safety, we strongly recommend to
keep the “Linear Side-Impact Protection“ System (L.S.P.) on
the seat whenever possible.
Tuttavia, per una sicurezza ottimizzata, consigliamo
vivamente di mantenere il sistema L.S.P. sul seggiolino
quando possibile.
Even without the “Linear Side-Impact Protection” System
(L.S.P.), a side impact protection is ensured.
Anche senza il sistema L.S.P., la protezione contro gli impatti
laterali è garantita.
In case your car is not equipped with ion points, there is
always the possibility to use the SOLUTION Z i-FIX with
retracted ISOFIX locking arms.
Nel caso in cui l‘auto non sia dotata di punti di connessione
ISOFIX, è sempre possibile utilizzare la SOLUZIONE Z i-FIX
con i bracci di bloccaggio ISOFIX ritratti.

16
In Ausnahmefällen kann der Kindersitz auch vorne am
Beifahrersitz verwendet werden. Beachten Sie dabei die
folgenden Punkte:
• Bei Fahrzeugen mit Airbag sollten Sie den Beifahrersitz
so weit wie möglich nach hinten schieben. Beachten Sie
jedoch, dass der obere Gurtpunkt des Fahrzeuggurtes
hinter der Gurtführung des Kindersitzes bleibt.
• Die Empfehlungen des Fahrzeugherstellers sind unbedingt
zu befolgen.

17
DEENIT
In exceptional cases, the car seat may also be used on the
front passenger seat. Please note the following in this case:
• In cars with airbags, you should push the passenger seat
back as far as possible. When doing so, however, ensure
that the upper belt point of the safety belt is behind the belt
feed point of the car seat.
• Always comply with the recommendations of the vehicle
manufacturer.
In casi eccezionali, il seggiolino può essere utilizzato anche
sul sedile del passeggero anteriore. In questo caso tenere
conto di quanto segue:
• Nelle auto dotate di airbag il sedile del passeggero va spinto
il più indietro possibile. Nel fare ciò accertarsi però che il
punto di snodo superiore della cintura di sicurezza si trovi
dietro alla guida della cintura del seggiolino.
• Rispettare sempre le raccomandazioni del costruttore del
veicolo.

18
!
WARNUNG! Der Diagonalgurt muss schräg nach
hinten verlaufen und darf nie nach vorn zum oberen
Gurtpunkt in Ihrem Fahrzeug führen. Sollte dies nicht
einzustellen sein, z.B. durch Vorschieben des Autositzes
oder Verwendung auf einem anderen Sitzplatz, so ist
der Kindersitz für dieses Fahrzeug nicht geeignet. Im
Zweifelsfall wenden Sie sich an den Kindersitzhersteller.
!WARNUNG! Gepäckstücke oder andere Gegenstände
im Fahrzeug, welche bei einem Unfall Verletzungen
verursachen können, müssen immer gut befestigt
werden. Sie können zu tödlichen Geschossen im
Fahrzeug werden.
!WARNUNG! Auf Fahrzeugplätzen, die quer zur
Fahrtrichtung angeordnet sind, ist die Verwendung
des Sitzes nicht zulässig. Auf rückwärtsgerichteten
Fahrzeugsitzen, wie z.B. in einem Van oder Minibus, ist
die Verwendung zulässig, sofern der Fahrzeugsitz für
die Beförderung eines Erwachsenen zugelassen ist. Zu
beachten ist, dass die Kopfstütze des Fahrzeugs bei
Nutzung auf rückwärtsgerichteten Fahrzeugsitzen nicht
entfernt werden darf!
!WARNUNG! Bitte lassen Sie Ihr Kind nie
unbeaufsichtigt im Fahrzeug zurück. Die Teile des
Kindersitzes heizen sich in der Sonne auf. Ihr Kind
kann sich daran verbrennen. Schützen Sie Ihr Kind und
den Kindersitz vor intensiver Sonneneinstrahlung (z.B.
indem Sie ein helles Tuch über den Sitz legen).

19
DEENIT
!
WARNING! The diagonal belt must run back at a
recline and must never run forward to the upper belt
point in your vehicle. If it is not possible to adjust the
seat in this way, e.g. by pushing the car seat forward
or using it on another seat, this car seat is not suitable
for your vehicle. Contact the car seat manufacturer if
in doubt.
!WARNING! Luggage or other objects present in the
vehicle that may cause injury in the event of an accident
must always be firmly secured. Otherwise, they may be
thrown, causing fatal injuries.
!
ATTENZIONE! La cintura diagonale deve scorrere
all’indietro e mai in avanti rispetto al punto di aggancio
superiore del veicolo. Nel caso non sia possibile
regolare il sedile in questo modo, ad esempio spingendo
avanti il sedile o usando un altro sedile, il seggiolino non
sarà adatto all’uso in questo veicolo. In caso di dubbio
consultare il produttore del seggiolino.
!ATTENZIONE! Bagagli o altri oggetti presenti nel
veicolo che possono causare lesioni in caso di incidente
devono essere fissati saldamente. In caso contrario
potrebbero essere scagliati e causare lesioni mortali.
!WARNING! The car seat may not be used on vehicle
seats facing to the side of the direction of travel. Use of
the car seat is permitted on rearfacing seats, e.g. in a
van or minibus, provided that the seat is permitted for
transporting an adult. It is essential to ensure that the
vehicle headrest is not removed when the child seat is
installed in a rearward facing vehicle seat.
!ATTENZIONE! Il seggiolino non è utilizzabile sui sedili
rivolti lateralmente rispetto alla direzione di marcia.
L’uso del seggiolino è ammesso sui sedili rivolti contro
il senso di marcia, ad esempio nei minibus, a patto che
il sedile sia abilitato al trasporto di adulti. E’ importante
che il poggiatesta del sedile non venga rimosso quando
il seggiolino è installato su sedili rivolti contro il senso
di marcia.
!WARNING! Never leave your child unattended in the
car. The parts in the child restraint system heat up in
sun and the child may sustain burns. Protect your child
and the car seat from direct sun exposure (e.g. by
covering it with a light colored cloth).
!ATTENZIONE! Non lasciare mai il bambino incustodito
nell’auto. Le parti del seggiolino tendono a riscaldarsi
se esposte al sole diretto con pericolo di scottature per
il bambino. Proteggere il bambino ed il seggiolino da
un’eccessiva esposizione al sole diretto (per esempio
stendendo un telo chiaro sopra il seggiolino).

20
SICHERHEIT IM FAHRZEUG
Achten Sie zum Schutz aller Fahrzeuginsassen stets darauf,
dass …
• die umklappbaren Rückenlehnen der Fahrzeugsitze
eingerastet sind und sich in einer aufrechten Position
benden.
• bei Einbau des Kindersitzes auf dem Beifahrersitz dieser in
der hintersten Position steht.
• im Fahrzeug alle beweglichen Gegenstände gesichert sind.
• alle Personen im Fahrzeug angeschnallt sind.
!
WARNUNG! Der Kindersitz muss, auch dann
wenn er nicht benutzt wird, immer korrekt mit dem
Fahrzeuggurt im Fahrzeug befestigt sein. Bereits
bei einer Notbremsung oder einem geringen Aufprall
können unbefestigte Teile andere Mitfahrer und Sie
selbst verletzen.

21
DEENIT
SAFETY IN THE VEHICLE SICUREZZA NELL’AUTO
In order to guarantee the best possible safety for all
passengers make sure that …
Per garantire la massima sicurezza di tutti i passeggeri
nell’auto è indispensabile vericare che …
• foldable backrests in the vehicle are locked in their upright
position.
• when installing the car seat on the front passenger seat,
adjust the vehicle seat in rearmost position.
• you properly secure all objects likely to cause injury in the
case of an accident.
• all passengers in the vehicle are buckled up.
• gli schienali reclinabili siano ben ssati e nella posizione
eretta
• nel caso il seggiolino sia installato sul sedile passeggero
anteriore, vericare che questo si trovi nella posizione più
arretrata possibile.
• tutti gli oggetti che potrebbero costituire pericolo in caso di
incidente siano ssati in modo adeguato
• tutti i passeggeri abbiano le cinture allacciate.
!
WARNING! The car seat must always be secured
correctly with the vehicle belt in the vehicle even when
not in use. In case of an emergency brake or accident,
an unsecured car seat may injure other passengers or
yourself.
!
ATTENZIONE! Il seggiolino deve sempre essere
allacciato con la cintura di sicurezza dell’auto, anche
quando non utilizzato. In caso di brusche frenate o
di incidente, un seggiolino non fissato può ferire i
passeggeri o il guidatore.

23
DEENIT
INSTALLING THE CAR SEAT IN THE VEHICLE INSTALLAZIONE DEL SEGGIOLINO
Place the car seat on the appropriate seat in the vehicle. Collocare il seggiolino sul sedile dell’auto appropriato.
• Always ensure that the entire surface of the backrest of the
car seat is placed fully against the backrest of the vehicle
seat.
• If the headrest of the vehicle is in the way, pull it out all the
way or remove it completely (it is essential to ensure that
the vehicle headrest is not removed when the child seat is
installed in a rearward facing vehicle seat). The backrest will
perfectly adapt to practically any recline of the vehicle seat.
• Accertare sempre che l’intera supercie dello schienale del
seggiolino appoggi completamente contro lo schienale del
sedile dell’auto.
• Se il poggiatesta del veicolo è d’intralcio, estrarlo completa-
mente, allontanarlo o rimuoverlo del tutto (è essenziale
assicurarsi che il poggiatesta del veicolo non venga rimosso
quando il seggiolino per bambini è installato in un sedile
del veicolo rivolto all‘indietro). Lo schienale si adatterà
perfettamente a praticamente qualsiasi inclinazione del
sedile veicolare.
!WARNING! The full surface of the backrest of the car
seat must be against the backrest of the vehicle. To
ensure maximum protection for your child, the car seat
must be in a normal upright position!
!ATTENZIONE! L’intera superficie dello schienale
del seggiolino deve poggiare contro lo schienale del
veicolo. Per assicurare la massima protezione per il
bambino il sedile deve trovarsi nella normale posizione
eretta!
!WARNING! Do not use any load bearing contact points
other than those described in the instructions and
marked in the child restraint. !ATTENZIONE! Non utilizzare punti di contatto portanti
diversi da quelli descritti nelle istruzioni e contrassegnati
sul sistema di ritenuta.

24
EINBAU DES KINDERSITZES MIT ISOFIX
• Betätigen Sie den Verstellgri unter dem Sitzkissen (7) (1)
des Kindersitzes.
• Ziehen Sie die beiden ISOFIX Rastarme bis zum (8)
Endanschlag aus.
• Drehen Sie nun die ISOFIX Rastarme um 180°, damit (8)
diese in Richtung der ISOFIX Befestigungspunkte zeigen.
Mit dem ISOFIX System können Sie den Kindersitz mit dem
Fahrzeug verbinden und so die Sicherheit Ihres Kindes
erhöhen. Ihr Kind muss weiterhin mit dem 3-Punkt-Gurt Ihres
Fahrzeuges angeschnallt werden.
HINWEIS! Die ISOFIX Befestigungspunkte sind zwei (6)
Metalllaschen pro Sitzplatz und benden sich zwischen
Rückenlehne und Sitzäche des Fahrzeugsitzes. Im
Zweifelsfall nehmen Sie die Bedienungsanleitung Ihres
Fahrzeuges zu Hilfe.
HINWEIS! Überprüfen Sie vor dem Verbinden der ISOFIX
Rastarme mit den ISOFIX Befestigungspunkten (8)
(6) (9) deren Entriegelungstasten . Sind die grünen
Sicherheitsindikatoren zu sehen, müssen Sie vor dem (10)
Verbinden zunächst die ISOFIX Rastarme entriegeln, indem
Sie die Entriegelungstaste drücken und zurückziehen.(9)
HINWEIS! Sind die ISOFIX Befestigungspunkte in ihrem
Fahrzeug schwer zu erreichen, können Sie die mitgelieferten
ISOFIX Einführhilfen verwenden.
• Hängen Sie die mitgelieferten ISOFIX Einführhilfen (11)
mit der längeren Lasche nach oben in den beiden ISOFIX
Befestigungspunkten ein. In manchen Fahrzeugen (6)
eignet sich eine entgegengesetzte Einbaurichtung der
ISOFIX Einführhilfen besser.(11)
8
6
9
10
1
8
7
11

25
DEENIT
Using the ISOFIX system, you can x the car seat to the
vehicle, thereby increasing your child’s safety. The child still
needs to be secured with the three-point belt of your vehicle.
Con il sistema ISOFIX è possibile ssare il seggiolino al
veicolo, aumentando così la sicurezza del bambino. Il
bambino deve essere allacciato utilizzando la cintura a tre
punti del veicolo.
• of Use the adjustment button under the seat cushion (7) (1)
the car seat.
• Pull the two ISOFIX locking arms as far as they will go.(8)
• Now twist the ISOFIX locking arms 180° so that they are (8)
facing the direction of the ISOFIX anchorage points .(6)
• Usare il pulsante di regolazione situato sotto il cuscino di (7)
seduta del seggiolino.(1)
• Estrarre completamente il carrello con i due braccetti
ISOFIX .(8)
• Ruotare quindi i connettori ISOFIX di 180° verso i punti (8)
di ancoraggio ISOFIX .(6)
NOTE! The ISOFIX anchorage points are two metallic (6)
clips for each seat and are positioned between the backrest
and the seating surface of the vehicle seat. In case of doubt,
please refer to the driver’s manual of your vehicle.
NOTA BENE! I punti di ancoraggio ISOFIX sono due clip (6)
metalliche per ogni sedile, posizionate tra lo schienale e la
seduta del sedile del veicolo. In caso di dubbio consultare il
manuale istruzioni del proprio veicolo.
NOTE! Before clicking the ISOFIX locking arms into the (8)
ISOFIX anchorage points , check the release buttons . If (6) (9)
the green safety indicator is visible, you must rst release (10)
the ISOFIX locking arms before joining by pressing and
pulling back the release button .(9)
NOTA BENE! Prima di agganciare i connettori ISOFIX (8)
ai punti di ancoraggio ISOFIX , controllare i pulsanti di (6)
rilascio . Se l‘indicatore di sicurezza verde è visibile, (9) (10)
è necessario prima rilasciare i bracci di bloccaggio ISOFIX
premendo e tirando all‘indietro il pulsante di rilascio .(9)
INSTALLING THE CAR SEAT WITH ISOFIX SYSTEM INSTALLAZIONE CON IL SISTEMA ISOFIX
NOTE! Are the ISOFIX anchorage points hard to reach in
your vehicle, you can use the supplied ISOFIX guides.
NOTA BENE! Se i punti di ancoraggio ISOFIX sono dicili da
raggiungere nel veicolo, è possibile utilizzare le guide ISOFIX
fornite in dotazione.
• Insert the supplied ISOFIX guides with the longer strap (11)
upwards into the two ISOFIX anchorage points . In some (6)
vehicles, it is better to mount the ISOFIX guides (11) in the
opposite direction. • Inserire le guide ISOFIX in dotazione (11) con la cinghia più
lunga verso l‘alto nei due punti di ancoraggio ISOFIX . In (6)
alcuni veicoli, è meglio montare le guide ISOFIX (11) nella
direzione opposta.

26
AUSBAU DES KINDERSITZES AUS DEM
FAHRZEUG
HINWEIS! Durch das Einklappen der ISOFIX Rastarme
schonen Sie nicht nur den Fahrzeugsitz, sondern schützen
auch die ISOFIX Rastarme des ISOFIX Systems vor
Verunreinigung und Beschädigung.
Führen Sie die Einbauschritte in umgekehrter Reihenfolge
durch.
• Entriegeln Sie die ISOFIX Rastarme beidseitig, indem
Sie die Entriegelungstasten drücken und gleichzeitig
zurückziehen.
• Ziehen Sie den Sitz aus den ISOFIX Befestigungspunkten.
• Drehen Sie die ISOFIX Rastarme um 180°.
• Betätigen Sie den Verstellgri des Kindersitzes und
schieben Sie die ISOFIX Rastarme bis zum Anschlag
hinein.
• Schieben Sie die beiden ISOFIX Rastarme in die ISOFIX (8)
Befestigungspunkte bis diese mit einem hörbaren (6)
„KLICK“ einrasten.
• Vergewissern Sie sich, dass der Sitz gut hält, indem Sie
versuchen ihn herauszuziehen.
• Der grüne Sicherheitsindikator muss nun an den beiden (10)
Entriegelungstasten gut sichtbar sein.(9)
• Betätigen Sie den ISOFIX Verstellgri und schieben Sie (7)
den Kindersitz an den Fahrzeugsitz.
• Achten Sie unbedingt darauf, dass die Rückenlehne
des Kindersitzes vollächig an der Rückenlehne des
Fahrzeugsitzes anliegt.
7
CLICK!
6
8
9 10

27
DEENIT
REMOVING THE CAR SEAT FROM THE VEHICLE RIMOZIONE DEL SEGGIOLINO DALL’AUTO
Perform the installation steps in the reverse order.
• Unlock the ISOFIX locking arms on both sides by pushing
the release buttons and pulling them back simultaneously.
• Pull the car seat out of the ISOFIX anchorage points.
• Rotate the ISOFIX locking arms 180°.
• Operate the adjustment button of the car seat and push the
connectors in as far as they will go.
Seguire il procedimento per l’installazione nell’ordine inverso.
• Sbloccare i connettori ISOFIX su ambo i lati premendo
i pulsanti di rilascio e contemporaneamente tirandoli
all’indietro.
• Estrarre il seggiolino dai punti di ancoraggio ISOFIX.
• Ruotare di 180° i connettori ISOFIX.
• Azionare il pulsante di regolazione del seggiolino e spingere
completamente all’interno i connettori.
NOTE! By folding in the ISOFIX locking arms, you are not just
protecting the vehicle seat but also the ISOFIX locking arms
of the ISOFIX system from dirt and damage.
NOTA BENE! Ripiegando i connettori ISOFIX, proteggerete
da possibili danni non solo il sedile dell’auto, ma anche da
danneggiamento e sporcizia i connettori ISOFIX stessi.
• Spingere i due bracci di bloccaggio ISOFIX nei punti di (8)
ancoraggio ISOFIX no a quando questi si bloccano in (6)
posizione con un “CLIC” udibile.
• Assicurarsi che il seggiolino sia ssato in sicurezza
cercando di estrarlo.
• L’indicatore di sicurezza verde deve essere (10)
chiaramente visibile su entrambi i pulsanti di rilascio .(9)
• Utilizzare la maniglia di regolazione ISOFIX e spingere il (7)
seggiolino contro il sedile del veicolo.
• Assicurarsi sempre che l‘intera supercie dello schienale del
seggiolino sia posizionata il più possibile a contatto con lo
schienale del sedile del veicolo.
• Push the two ISOFIX locking arms into the ISOFIX (8)
anchorage points until these lock into place with an (6)
audible “CLICK.”
• Ensure that the car seat is secure by trying to pull it out.
• The green safety indicator must now be clearly visible (10)
on the two release buttons .(9)
• Use the ISOFIX adjustment handle and push the car (7)
seat against the vehicle seat.
• Always ensure that the entire surface of the backrest of
the car seat is placed fully against the backrest of the
vehicle seat.

28
ANPASSEN AN DIE KÖRPERGRÖSSE
Anpassen der Kopfstütze
HINWEIS! Nur eine in optimaler Höhe eingestellte Kopfstütze
(12) gewährt Ihrem Kind größtmöglichen Schutz und Komfort.
Die Höhenverstellung kann in 12 Positionen erfolgen.
HINWEIS! Die Seitenwangen sind fest mit der Kopfstütze
verbunden und müssen nicht separat eingestellt werden.
• Die Kopfstütze muss so eingestellt werden, dass der
Abstand zwischen den Schultern des Kindes und der
Kopfstütze 3 cm (ca. 2 Finger) nicht überschreitet.
• Betätigen Sie die Einstelltaste an der Rückseite (13)
der Kopfstütze und führen Sie die Kopfstütze in die (12)
gewünschte Position.
13
12
MAX

30
EINSTELLEN DER NEIGUNGSVERSTELLBAREN
KOPFSTÜTZE
Die neigungsverstellbare Kopfstütze hilft, das gefährliche
Nach-Vorne-Kippen des Kopfes im Schlaf zu verhindern.
Bei einem Aufprall folgt die Kopfstütze der Kopfbewegung
Ihres Kindes nach vorne, rastet ein und fängt somit die
anschließende Rückwärtsbewegung des Kopfes ab. Die
Neigung der Kopfstütze lässt sich in drei Positionen einstellen.
Nach vorne lässt sie sich in die zweite bzw. dritte Position
verstellen, indem sie nach vorne geschoben wird, bis sie in
der jeweiligen Position einrastet. Zum Zurückstellen in die
Ausgangsposition muss die Kopfstütze nach oben und hinten
gezogen werden.
HINWEIS! Achten Sie bitte darauf, dass der Kopf des Kindes
immer in Kontakt mit der neigungsverstellbaren Kopfstütze
bleibt, da die Kopfstütze nur so ihre optimierte Seitenaufprall-
Schutzfunktion erfüllen kann.
!WARNUNG! Auf keinen Fall darf die Einrastvorrichtung
(15) mit Gegenständen blockiert werden! Im
Falle eines Unfalls muss die Leichtgängigkeit der
Neigungsverstellung gewährleistet sein, da es sonst
eventuell zu Verletzungen Ihres Kindes kommen kann.
15

31
DEENIT
ADJUSTING THE RECLINING HEADREST REGOLARE LA RECLINAZIONE DEL POGGIATESTA
The reclining headrest helps to prevent the child’s head from
dangerously tipping forward during sleep. In the event of a
collision, the headrest will follow the movement of your child’s
head forwards, lock into place and absorb the subsequent
backwards motion of your child’s head. The recline angle
of the headrest can be set to one of three positions. It can
be moved forward to the second or third position until the
headrest locks in the corresponding position. To return it to
the original position, the headrest ap must be lifted and
pulled back.
Il poggiatesta reclinabile aiuta a prevenire la pericolosa
cadura in avanti della testa del bambino durante il sonno. In
caso di incidente, il poggiatesta segue il movimento in avanti
della testa del bambino e si ssa in posizione assorbendo il
successivo movimento all’indietro della testa del bambino.
L‘angolo di inclinazione del poggiatesta può essere regolato
su una delle tre posizioni. Si può spostare in avanti nella
seconda o terza posizione nché il poggiatesta non si blocca
nella posizione corrispondente. Per riportarlo nella posizione
originale, sollevare il risvolto del poggiatesta e tirare indietro.
NOTE! Ensure that your child’s head is always in contact with
the reclining headrest, as this is the only way that the headrest
can provide optimum protection in case of side collisions.
NOTA BENE! Accertarsi che la testa del bambino sia
sempre a contatto con il poggiatesta reclinabile: solo così il
poggiatesta potrà orire la protezione ottimanle in caso di
collisioni laterali.
!WARNING! Never block the locking mechanism ! (15)
In the event of an accident, the recline adjustment
mechanism must move smoothly, or else your child may
be injured!
!ATTENZIONE! Non bloccare mai il meccanismo ! (15)
In caso di incidente il meccanismo di reclinazione deve
operare scorrevolmente per evitare che il bambino
possa essere ferito!

32
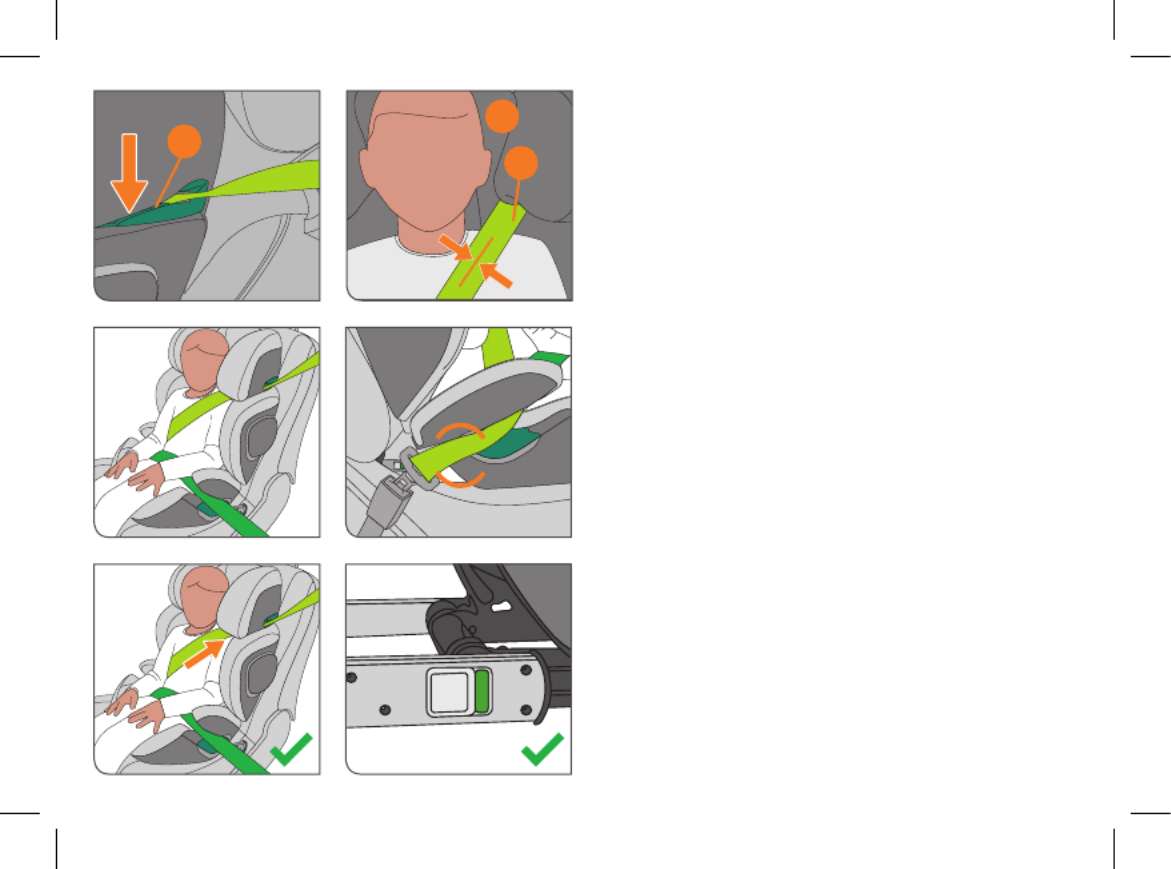
ANSCHNALLEN MITTELS FAHRZEUGGURT
Setzen Sie ihr Kind in den Kindersitz. Ziehen Sie den
Dreipunktgurt weit heraus und führen Sie diesen vor Ihrem
Kind entlang zum Gurtschloss .(16)
Der Beckengurt muss auf beiden Seiten des Sitzkissens (18)
(1) (19) in den unteren Gurtführungen liegen.
Stecken Sie die Gurtzunge in das Gurtschloss . (17) (16)
Dieses muss mit einem hörbaren „KLICK“ einrasten.
Als nächstes legen Sie den Beckengurt in die unteren (18)
grünen Gurtführungen des Kindersitzes ein.(19)
Ziehen Sie nun kräftig am Diagonalgurt , um den (20)
Beckengurt zu straen. Je enger der Gurt anliegt, desto (18)
besser kann er vor Verletzungen schützen. Auf der Seite des
Gurtschlosses müssen der Diagonalgurt und der (16) (20)
Beckengurt zusammen in die untere Gurtführung (18) (19)
eingelegt sein.
HINWEIS! Bringen Sie Ihrem Kind von Anfang an bei, immer
auf eine strae Gurtführung zu achten und bei Bedarf selbst
den Gurt festzuziehen.
!
WARNUNG! Den Gurt auf keinen Fall verdrehen.
!WARNUNG! Der Beckengurt muss auf beiden (18)
Seiten so tief wie möglich über der Leistenbeuge Ihres
Kindes verlaufen, um im Falle eines Unfalls optimal
wirken zu können.
!WARNUNG! Das Fahrzeuggurtschloss darf (16)
keinesfalls über die Armlehne reichen. Ist die
Gurtpeitsche zu lang, ist der Kindersitz für eine
Verwendung auf dieser Position im Fahrzeug nicht
geeignet. Bitte wenden Sie sich im Zweifelsfall an den
Hersteller Ihres Fahrzeugs.
CLICK!
20
1
18
19
17
16

33
DEENIT
STRAPPING WITH VEHICLE SEAT BELT ALLACCIARE IL BAMBINO CON LA CINTURA
Place your child in the car seat. Pull the three-point belt right
out and feed it in front of your child towards the belt buckle .(16)
Posizionare il bambino nel seggiolino. Estrarre
abbondantemente la cintura a tre punti davanti al bambino
e ssarla alla bbia .(16)
The lap belt needs to be fed through the lower belt guides (18)
(19) (1) on both sides of the seat cushion .
La cintura addominale deve passare attraverso le guide (18)
inferiori su entrambi i lati della seduta del seggiolino .(19) (1)
Insert the belt tongue into the belt buckle . It must (17) (16)
lock into place with an audible “CLICK”.
Next, place the lap belt in the lower belt guides (18) (19) of
the car seat.
Now pull the diagonal belt rmly to tighten the lap belt (20)
(18). The tighter the belt sits, the better it provides protection
from injury. On the side of the belt buckle , the diagonal (16)
belt and the lap belt must be inserted together in the (20) (18)
lower belt guide .(19)
Inserire la linguetta della cintura nella bbia della cintura (17)
(16). Si deve ssare con un sonoro “CLICK”.
Collocare successivamente la cintura subaddominale (18)
nelle guide della cintura inferiori del seggiolino.(19)
Ora tirare saldamente la cintura diagonale per tendere la (20)
cintura subaddominale . Più è tesa la cintura, maggiore (18)
è la protezione dalle lesioni. Sul lato della bbia della cintura
(16) (20) (18), la parte diagonale e quella subaddominale
della cintura vanno inserite assieme nella guida della cintura
inferiore .(19)
NOTE! Teach your child from the start to always ensure that
the belt is tight and, if neccessary, how to tighten the belt
themselves. NOTA BENE! Insegnare al bambino n dall’inizio a
controllare sempre che la cintura sia ben tesa e a tenderla
autonomamente se necessario.
!
WARNING! Never twist the belt.
!
ATTENZIONE! Non torcere mai la cintura.
!WARNING! The vehicle belt buckle must never (16)
cross the arm rest. If the belt system is too long, the car
seat is not suitable for use in this position in the vehicle.
In case of doubt, please consult the manufacturer of
your vehicle.
!ATTENZIONE! La fibbia della cintura del veicolo (16)
non deve mai attraversare il bracciolo. Se il sistema di
cinture è troppo lungo il seggiolino non è adatto all’uso
in questa posizione nel veicolo. In caso di dubbio
consultare il costruttore del proprio veicolo.
!WARNING! The lap belt must run as low as (18)
possible on both sides along your child’s groin to have
optimum effect in the event of an accident. !ATTENZIONE! La cintura subaddominale deve (18)
scorrere più bassa possibile su ambo i lati lungo
l’inguine del bambino per la massima efficacia in caso
di incidente.
34
Nun führen Sie den Diagonalgurt durch die obere grüne (20)
Gurtführung in der Kopfstütze bis er sich innerhalb (21) (12)
der Gurtführung bendet. Achten Sie darauf, dass der
Diagonalgurt zwischen Schulteraußenkante und Hals (20)
Ihres Kindes verläuft. Falls erforderlich, passen Sie durch
Verstellen der Kopfstützenhöhe den Gurtverlauf an. Die Höhe
der Kopfstütze kann auch im eingebauten Zustand im (12)
Auto eingestellt werden.
IST IHR KIND RICHTIG GESICHERT?
Um die bestmögliche Sicherheit Ihres Kindes zu
gewährleisten, prüfen Sie bitte vor Beginn der Fahrt, ob …
• die Rückenlehne des Kindersitzes vollächig an der
Rückenlehne des Fahrzeugsitzes anliegt.
• der Beckengurt auf beiden Seiten des Sitzkissens in den
unteren grünen Gurtführungen verläuft.
• der Diagonalgurt auf der Gurtschlossseite auch in der
unteren grünen Gurtführung des Sitzes verläuft.
• der Diagonalgurt durch die grün markierte Gurtführung der
Schulterstütze verläuft.
• der Diagonalgurt schräg nach hinten verläuft.
• der gesamte Gurt stra ist und nicht verdreht am Körper des
Kindes anliegt.
• der Beckengurt möglichst niedrig an der Hüfte anliegt.
• die Position der Kopfstütze ordnungsgemäß eingestellt
wurde.
• bei Verwendung von ISOFIX der Sitz beidseitig mit
den Konnektoren in den ISOFIX Befestigungspunkten
eingerastet ist und die beiden grünen Sicherheitsindikatoren
deutlich zu sehen sind.
21
CLICK!
20
12

36
ENTFERNEN DES SITZBEZUGS
Der Bezug besteht aus fünf Teilen, die entweder mit Klettband,
Druckknöpfen oder elastischen Bändern am Kindersitz
befestigt sind. Sobald Sie alle Befestigungen lösen, können die
Einzelteile abgenommen werden. Zum Abziehen der Einzelteile
des Bezugs führen Sie folgende Schritte durch:
• Nehmen Sie das „Linear Side-Impact Protection“-System
(L.S.P.) ab indem sie es nach oben schieben und somit aus
seiner Verankerung lösen.
• Lösen Sie die Druckknöpfe an der Unterseite des Bezugs
für die verstellbare Kopfstütze. Danach können Sie den
Bezug nach oben hin abziehen.
• Betätigen Sie den Verstellgri für die Kopfstütze und stellen
Sie diese in die höchste Position.
• Önen und lösen Sie auf der Rückseite des Kopfstützen-
bezugs sämtliche Druckknöpfe. Danach ziehen Sie den
Bezug nach vorne ab.
• Ziehen Sie am linken und rechten Seitenteil der Schulter-
stütze den Bezug herab. Dann lösen Sie auf der Innenseite
der Schulterügel die Druckknöpfe, um den Bezug gänzlich
entfernen zu können.
• Bevor Sie den Lehnenbezug vom Sitz nehmen können,
lösen Sie die zugehörigen Befestigungen auf der Rückseite.
• Abschließend fädeln Sie auf der Unterseite der Sitzäche
die elastischen Gummibänder heraus und ziehen den
Sitzkissenbezug nach vorne hin ab.
HINWEIS! Achten Sie vor dem Abziehen aller Einzelteile des
Bezugs darauf, dass dieser bereits oberhalb der silbernen
Dekorteile liegt. Um den Bezug wieder zu befestigen,
verfahren Sie in umgekehrter Reihenfolge. Stellen Sie sicher,
dass die grüne Gurtführung immer sichtbar oberhalb des (21)
Bezugs anliegt.
! WARNUNG! Der Kindersitz darf keinesfalls ohne Bezug
verwendet werden.
21

37
DEENIT
REMOVING THE SEAT COVER RIMOZIONE DEL RIVESTIMENTO
NOTE! Before removing the separate parts of the seat cover,
please ensure that the cover is already positioned above the
decorative silver parts. To put the covers back on the seat,
proceed as above in reverse order. Make sure that the green
belt guide always rests visible above the seat cover.(21)
NOTA BENE! Prima di rimuovere le varie parti del rivestimento
vericare che le estremità siano già state estratte dalle parti
decorative argentate. Per riposizionare il rivestimento sul
seggiolino, ripetere i passaggi precedentemente descritti
nell’ordine inverso. Assicurarsi che la guida verde della cintura
(21) sia sempre visibile sopra il rivestimento del seggiolino.
The seat cover consists of ve parts which are xed to the
seat with velcro, press studs or button holes. One you have
released the fasteners, the cover parts can be removed. To
remove the covers, please follow the instructions below:
• Take o the “Linear Side-Impact Protection” System
(L.S.P.) by pushing it upwards to release it from its
anchorage points.
• Undo the press studs on the lower side of the cover for
the adjustable headrest. Then you can remove the cover
upwards.
• Activate the adjustment handle for the headrest and move
this to its highest position.
• Open and loosen all the press buttons on the rear side of
the headrest. Then pull the cover o forwards.
• Pull down the cover on the left and right side panel of the
shoulder rest. Then undo the press studs on the interior of
the shoulder wings in order to be able to entirely remove
the cover.
• Before you can remove the backrest cover from the seat,
undo the associated fastenings its rear side.
• Then thread the elastic bands out on the underside of the
seat area, and withdraw the seat cushion cover forwards.
Il rivestimento è composto da cinque parti ssate alla scocca
con velcro, bottoni a pressione o asole. Una volta sganciati tutti i
punti di ssaggio è possibile rimuovere ciascuna delle parti per il
lavaggio. Per rimuovere il rivestimento eseguire i seguenti passaggi:
• Per rimuovere il sistema di protezione lineare negli impatti
laterali (Linear Side-Impact Protection, L.S.P.) spingere
verso l‘alto per staccarlo dai punti di ancoraggio.
• Sganciare i perni a pressione sul lato inferiore del
rivestimento del poggiatesta regolabile. Rimuovere il
rivestimento verso l’alto.
• Attivare la maniglia di regolazione del poggiatesta e
spostare quest’ultimo nella posizione più alta.
•
Aprire e allentare tutti i bottoni a pressione nella parte posteriore
del poggiatesta. Quindi togliere il rivestimento tirandolo in avanti.
• Tirare verso il basso il rivestimento su ambo i lati del
pannello destro e sinistro della protezione per le spalle.
Quindi slacciare i bottoni automatici nella parte interna delle
ali di protezione per le spalle in modo da poter rimuovere
completamente il rivestimento.
• Per rimuovere il rivestimento dello schenale dal seggiolino
è necessario slacciare tutti gli agganci associati nella sua
parte posteriore.
• Quindi slare le fascette elastiche sul lato inferiore dell’area
seduta e tirare il rivestimento seduta in avanti.
! WARNING! The infant car seat must under no
circumstances be used without the cover. ! ATTENZIONE! Non usare MAI il seggiolino di sicurezza
senza il rivestimento.

38
REINIGUNG
Es ist darauf zu achten, dass nur ein original Sitzbezug
verwendet wird, da auch der Bezug ein wesentlicher
Bestandteil der Funktion ist. Ersatzbezüge erhalten Sie im
Fachhandel.
!WARNUNG! Bitte auf keinen Fall chemische
Reinigungs- oder Bleichmittel verwenden!
HINWEIS! Bitte den Bezug vor der ersten Verwendung
waschen. Der Bezug darf bei 30 °C im Schonwaschgang
gewaschen werden. Sollten Sie mit mehr als 30 °C waschen,
kann es zu Ausfärbungen kommen. Bitte den Bezug
gesondert von anderer Wäsche waschen und keinesfalls
maschinell trocknen! Den Bezug keinesfalls in der prallen
Sonne trocknen! Die Kunststoteile können mit einem milden
Reinigungsmittel und warmen Wasser gewaschen werden.

41
DEENIT
!WARNING! The cover is an integral component of the
car seat’s safety design. The car seat must therefore
never be used without the cover or with a cover of a
different car seat.
!ATTENZIONE! La fodera è parte integrante e un
componente essenziale per il design di sicurezza del
seggiolino auto. Il seggiolino quindi non deve mai
essere usato senza il rivestimento o con un rivestimento
non originale.
!WARNING! An accident may cause damage to the
car seat that is not visible to the naked eye. Please
exchange the seat without fail after an accident. In case
of doubt contact the retailer or manufacturer.
!ATTENZIONE! Un incidente può causare danni al
seggiolino non identificabili a occhio nudo. Dopo un
incidente il seggiolino dev’essere subito sostituito. Se in
dubbio, contattare il rivenditore o il produttore.
PRODUCT CARE CURA DEL PRODOTTO
WHAT TO DO AFTER AN ACCIDENT COSA FARE A SEGUITO DI UN INCIDENTE
To guarantee that your car seat provides the maximum
protection, it is essential to comply with the following points:
• All major components of the car seat must be regularly
checked for damage. The mechanical parts must work
without problems.
• Make sure that the car seat is not jammed between hard
parts such as the car door, seat rails etc., which can
damage it.
• If e.g. the car seat is dropped, it must be tested by the
manufacturer before being used again.
Perchè il seggiolino continui ad orire la massima protezione
è necessario tenere presente quanto segue:
• Tutte le parti principali del seggiolino devono essere
sottoposte ad un regolare controllo per vericare eventuali
danni. I componenti meccanici devono funzionare
correttamente.
• E’ essenziale che il seggiolino non venga mai schiaccia-
to tra oggetti rigidi, come le portiere dell’auto, i binari del
sedile, ecc. perchè ne sarebbe danneggiato.
• Nel caso il seggiolino dovesse cadere, dovrà essere
controllato dal produttore prima di poter essere riutilizzato.

42
PRODUKTINFORMATION
Bei Fragen wenden Sie sich zuerst an Ihren Händler.
Folgende Angaben sollten Ihnen vorliegen:
• Seriennummer (siehe Aufkleber)
• Marke und Typ des Autos und die Position des Sitzes, auf
dem der Kindersitz benutzt wird
• Gewicht, Alter und Größe des Kindes
Weitere Informationen zu unseren Produkten nden Sie auch
unter www.cybex-online.com.
PRODUKTLEBENSDAUER
Dieser Kindersitz ist so ausgelegt, dass er bei gewöhnlicher
Nutzung für die gesamte Produktlebensdauer von ca.
9 Jahren seine Funktion erfüllt. Durch den langsamen
Verschleiß des Kunststos, beispielsweise durch
Sonneneinstrahlung (UV), können sich die Eigenschaften
des Produkts geringfügig verschlechtern. Da in Fahrzeugen
sehr große Temperaturschwankungen herrschen und andere
unvorhersehbare Belastungen auftreten können, ist es
notwendig, folgende Punkte zu beachten:
• Wenn das Fahrzeug längere Zeit der prallen Sonne
ausgesetzt ist, muss der Kindersitz aus dem Fahrzeug
entfernt oder mit einem hellen Tuch abgedeckt werden.
• Prüfen Sie regelmäßig alle Kunststo- und Metallteile des
Kindersitzes auf Beschädigung oder Veränderung von
Form oder Farbe. Stellen Sie eine Veränderung fest, ist der
Kindersitz zu entsorgen oder muss vom Hersteller geprüft
und gegebenenfalls ausgetauscht werden.
• Veränderungen des Stoes, insbesondere das Ausbleichen,
sind normal und stellen keine Beeinträchtigung dar.

43
DEENIT
PRODUCT INFORMATION INFORMAZIONI SUL PRODOTTO
If you have any questions contact your retailer rst. You
should have the following details ready:
• Serial number (see sticker)
• Make and model of the vehicle and the position of the
vehicle seat on which the car seat is used
• Weight, age and height of the child
Per qualsiasi dubbio o informazione rivolgersi al rivenditore.
Accertandovi di avere a portata di mano questi dati:
• Numero di serie (vedi etichetta adesiva)
• Marca e modello dell’auto e posizione in cui il seggiolino
viene normalmente installato
• Peso, età e altezza del bambino
Further information about our products can be found at
www.cybex-online.com.
Maggiori informazioni sui prodotti nel sito
www.cybex-online.com.
PRODUCT LIFESPAN DURATA DEL PRODOTTO
This child seat has been designed to be able to fulll its
intended functions by ordinary use for a product life span
of approx. 9 years. Gradual wear of the plastic, for example
caused by exposure to sunlight (UV), can cause slight
deterioration of the product’s properties. Since very high
temperature uctuations and other unforeseeable stresses are
common in vehicles, it is necessary to observe the following
points:
• If the vehicle is directly exposed to strong sunlight for long
periods, the child seat must be removed from the vehicle or
covered with a light cloth.
• Check all plastic and metal parts of the seat regularly for
damage or change of shape or colour. If you notice any
change in the child seat, the seat must be disposed or
checked and possibly replaced by the manufacturer.
• Changes to the fabric, especially fading, are normal when
used in a vehicle and do not impair the seat’s function.
Questo seggiolino è progettato per soddisfare le proprie
speciche l’intera vita utile, pari a circa 9 anni. Nel tempo le
parti in plastica tendono ad usurarsi, es. per l’esposizione
al sole (UV) e le caratteristiche del prodotto possono subire
leggere variazioni. Alla luce delle possibili uttuazioni
massicce di temperatura e degli sforzi imprevedili nei veicoli,
devono essere tenuti in considerazione i punti seguenti:
• Se il veicolo viene lasciato al sole per un periodo di tempo
prolungato, il seggiolino deve essere rimosso dall’abitacolo
o coperto con un panno chiaro.
• Controllare regolarmente tutte le parti di plastica e metallo
del seggiolino alla ricerca di eventuali danni, deformazioni
o cambiamenti di colore. Qualora si scopra qualsiasi
cambiamento, il seggiolino dovrà essere smaltito o
controllato e, possibilmente, sostituito dal produttore.
• Modiche del tessuto, in particolare la scoloritura, sono
perfettamente normali in caso di uso in un veicolo e non
intaccano il funzionamento del seggiolino.

44
ENTSORGUNG
Aus Umweltschutzgründen bitten wir den Benutzer zu Beginn
(Verpackung) und am Ende (Produktteile) der Lebensdauer
des Kindersitzes, den anfallenden Abfall zu trennen und
zu entsorgen. Die Abfallentsorgung kann kommunal
unterschiedlich geregelt sein. Um eine vorschriftsmäßige
Entsorgung des Kindersitzes zu gewährleisten, setzen Sie
sich mit Ihrer kommunalen Abfallentsorgung bzw. Verwaltung
lhres Wohnortes in Verbindung. Beachten Sie auf jeden Fall
die Entsorgungsbestimmungen lhres Landes.
!WARNUNG! Bewahren Sie Verpackungsmaterial
aus Kunststoff außer Reichweite Ihres Kindes auf, da
Erstickungsgefahr besteht!

45
DEENIT
!WARNING! Keep plastic packaging material out of your
child’s reach: danger of suffocation! !ATTENZIONE! Tenere tutte le parti in plastica
dell’imballo lontane dalla portata dei bambini: pericolo di
soffocamento!
DISPOSAL SMALTIMENTO
To protect the environment we ask the user to separate and
dispose the waste arising at the start (packaging) and the
end (product parts) of the car seat’s lifespan. Waste removal
is arranged dierently depending on the local authorities. In
order to ensure that the car seat is disposed o in accordance
with regulations, contact your area’s waste removal agency or
local authority. Always observe your country’s waste disposal
regulations.
Per ragioni di natura ambientale chiediamo agli utilizzatori di
provvedere allo smaltimento separato e corretto di ogni parte
dall’inizio (imballo) alla ne (seggiolino ed ogni sua parte) alla
ne della durata di utilizzo del seggiolino. Le norme per lo
smaltimento variano localmente. Per garantire lo smaltimento
corretto secondo le normative vigenti vi preghiamo di
contattare l’ucio di competenza della vostra città. In ogni
caso, seguire sempre le normative vigenti nella zona di
residenza.

46
GARANTIEBESTIMMUNGEN
Die nachfolgenden Garantiebestimmungen gelten nur in dem
Land, in dem dieses Produkt erstmalig über den Einzelhandel
an einen Verbraucher verkauft wurde.
1. Die Garantie deckt sämtliche Herstellungs- und
Materialfehler ab, die im Zeitpunkt des Kaufs bestanden
haben oder die innerhalb von drei (3) Jahren nach dem
Erstverkauf dieses Produkts über den Einzelhandel
an einen Verbraucher in Erscheinung getreten sind
(Herstellergarantie). Bitte überprüfen Sie das Produkt nach
dem Kauf oder wenn es im Versandhandel gekauft wurde
nach Erhalt umgehend auf Vollständigkeit, Herstellungs-
und Materialfehler.
2. Falls Schäden vorhanden sind, darf das Produkt nicht
mehr benutzt werden. Um Leistungen im Rahmen dieser
Garantie in Anspruch nehmen zu können, muss das
Produkt in einem vollständigen und sauberen Zustand
an den Einzelhändler zurückgegeben werden, der es
erstmalig verkauft hat, und ein Nachweis über den Kauf
(Kaufbeleg oder Rechnung) im Original vorgelegt werden.
Bitte bringen oder schicken sie das Produkt nicht direkt
zum Hersteller!
3. Die Garantie deckt keine Schäden ab, die durch
Fehlgebrauch, äußere Einüsse (Wasser, Feuer, Unfälle
o.ä.), normalen Verschleiß oder durch Behandlung
und Benutzung entstanden sind, die im Gegensatz zu
den Instruktionen dieser Gebrauchsanweisung stehen.
Die Garantie wird nur gewährt, wenn Reparaturen
oder Veränderungen ausschließlich durch Personen
vorgenommen wurden, die hierzu befugt waren und stets
nur originale Bau- und Zubehörteile verwendet wurden.
4. Durch diese Garantie werden weder bestehende
Verbraucherrechte noch Rechte gegen den Verkäufer
wegen Vertragswidrigkeit des Produkts beeinusst.

47
DEENIT
WARRANTY GARANZIA
1. The warranty covers all manufacturing and material
defects, existing and appearing, at the date of purchase or
appearing within a term of three (3) years from the date of
purchase from the retailer who initially sold the product to
a consumer (manufacturer’s warranty). Please check the
product with respect to completeness and manufacturing
or material defects immediately at the date of purchase or
immediately after receipt. Please always keep your dated
proof of purchase.
2. In case of a defect, stop using the product immediately. To
obtain the warranty please take or ship the product to the
original retailer, who initially sold this product to you in a
clean and complete condition and submit an original proof
of purchase (sales receipt or invoice). Please do not take
or ship the product to the manufacturer directly.
3. This warranty does not cover any damages which
result from misuse, environmental inuence (water, re,
accidents etc.), normal wear and tear or failure to comply
with the instructions provided in this user manual. The
warranty does not apply if modications and services
were performed by unauthorized persons or if non-original
components and accessories were used.
4. This warranty does not aect any statutory consumer
rights, including claims in tort and claims with respect to a
breach of contract, which the buyer may have against the
seller or the manufacturer of the product.
1. La garanzia copre eventuali difetti di fabbricazione e di
materiali riscontrati all’acquisto o entro un periodo di tre (3)
anni dalla data di acquisto presso il rivenditore (garanzia
del produttore). La garanzia è valida soltanto se il prodotto
è stato sottoposto ad un accurato controllo di completezza,
funzionalità all’acquisto o al ricevimento e se eventuali
manchevolezze di produzione o di materiali sono state
prontamente segnalate. Conservare accuratamente la
prova di acquisto con la data.
2. In caso si riscontri qualsiasi danneggiamento smettere
di utilizzare il prodotto Per avere diritto alla garanzia è
necessario riportare o spedire il prodotto pulito e completo
al rivenditore presso il quale è stato acquistato ed è
indispensabile fornire la prova di acquisto (scontrino
scale, fattura, ecc.) in originale. Preghiamo di non
riportare o spedire il prodotto direttamente al produttore.
3. La garanzia non copre danni provocati da utilizzo improprio
o cause ambientali (acqua, fuoco, incidenti, ecc.), dal
normale deperimento d’uso o dall’innosservanza delle
indicazioni fornite in questo manuale d’utilizzo. La garanzia
decade in caso di modiche o riparazioni eettuate da
personale non autorizzato e se non sono state utilizzate
parti ed accessori originali.
4. Questa garanzia non esclude, limita o comunque
pregiudica eventuali diritti legali dei consumatori, comprese
istanze in caso di torto e in caso di una violazione del
contratto che l’acquirente può avere nei confronti del
rivenditore o del produttore.
The following warranty applies solely in the country where this
product was initially sold by a retailer to a customer.
La garanzia vale unicamente nella nazione in cui il prodotto è
stato inizialmente venduto da un rivenditore al consumatore.

48
HOMOLOGACJA
CYBEX Solution Z i-Fix
UN R129/03
Dopuszczalny wzrost: 100 – 150 cm
Wiek: ok. 3-12 lat
Do użytkowania w pojazdach
z 3-punktowymi pasami
bezpieczeństwa, zgodnymi z
normą UN. R16 odpowiednikiem
standardu.
HOMOLOGATION
CYBEX Solution Z i-Fix
UN R129/03
Plage des tailles : 100 – 150 cm
Age: approx. 3 – 12 years
Ne convient que pour les
véhicules équipés d’une ceinture
automatique trois points norme
UN no. R16 ou équivalent.
GOEDKEURING
CYBEX Solution Z i-Fix
UN R129/03
Lengteklasse: 100 – 150 cm
Leeftijd: ongeveer 3 – 12 jaar
Alleen geschikt voor
autostoelen met automatische
driepuntsgordels die zijn
goedgekeurd conform UN R16 of
een vergelijkbare norm.
Merci d’avoir choisi le Solution Z i-Fix. Lors du développement
du CYBEX Juno M-x, nous nous sommes focalisés sur la
sécurité, le confort et la facilité d’utilisation. Ce produit est
fabriqué selon un contrôle qualité exceptionnel et répond aux
exigences les plus strictes en matière de sécurité.
NOTE ! Toujours garder ce mode d’emploi à portée de main
dans le compartiment prévu à cet eet situé sur le siège auto.
NOTE ! En raison des législations locales (ex. coloris de
l’étiquette sur le siège auto), l’apparence du produit peut
varier. Ceci n’aecte cependant pas le fonctionnement du
produit.
NOTE ! La ceinture de sécurité trois points ne doit passer que
dans les guides dédiés. Les guides de ceinture sont décrits
en détail dans ce manuel et sont de couleur verte sur le siège
auto.
CHER CLIENT !
!ATTENTION ! Pour une protection optimale de votre
enfant, il est essentiel d’installer et d’utiliser ce siège
auto conformément au manuel.
Solution i-Fix Z
SOLUTION Z I-FIX
Specific Vehicle
Booster Seat
100-150 cm
030036
UN Regulation
No. 129/03
Cybex GmbH
Riedingerstr. 18 , 95448 B ayreu th
German y
NOTE! Vous pouvez utiliser le siège auto sans le système de
« Protection linéaire des impacts latéraux » (L.S.P.). Il peut
être détaché pour libérer plus d’espace dans le véhicule. Pour
détacher le système de « Protection linéaire des impacts
latéraux » (L.S.P.) consultez le chapitre : « POSITION
APPROPRIÉE DANS LE VÉHICULE ».

49
FRNLPL
Dziękujemy za zakup fotelika samochodowego Solution
Z i-x. Opracowując ten model fotelika, najwięcej uwagi
poświęciliśmy bezpieczeństwu, komfortowi oraz łatwości
użytkowania. Produkt został stworzony zgodnie z
najwyższymi standardami jakości, które odpowiadają
najbardziej zaostrzonym wymogom bezpieczeństwa.
Hartelijk dank voor uw aanschaf van de Solution Z i-Fix. Wij
verzekeren u dat veiligheid, comfort en gebruiksgemak bij
de ontwikkeling van het autostoeltje de hoogste prioriteit
hebben gekregen. Dit product is aan een uitzonderlijk strenge
kwaliteitscontrole onderworpen en voldoet aan de strengste
veiligheidseisen.
UWAGA! Instrukcję przechowuj zawsze pod ręką w specjalnie
przygotowanym w tym celu kieszonce/schowku fotelika.
LET OP! Bewaar deze handleiding zorgvuldig in het daarvoor
bestemde vakje van het autostoeltje.
UWAGA! Ze względu na wymagania poszczególnych krajów
(np. oznakowanie kolorystyczne na foteliku) cechy produktów
mogą różnić się pod względem wyglądu zewnętrznego. Nie
wpływa to na poprawne funkcjonowanie fotelika.
LET OP! Vanwege nationale regelgeving (bijvoorbeeld
betreende kleurlabels op het autostoeltje) kunnen de
productkenmerken er anders uitzien. Dit is echter niet van
invloed op het correct functioneren van het product.
UWAGA! 3-punktowe pasy bezpieczeństwa muszą
przechodzić przez wyznaczone do tego celu prowadnice.
Prowadnice pasa zostały szczegółowo opisane w niniejszej
instrukcji. Są oznaczone zielonym kolorem na foteliku
samochodowym.
LET OP! De driepuntsgordel mag uitsluitend in de daarvoor
bedoelde geleiders worden geplaatst. De gordelgeleiders
worden in deze handleiding precies beschreven en zijn op het
autostoeltje groen gemarkeerd.
DROGI KLIENCIE!BESTE KLANT!
!OSTRZEŻENIE! W celu zapewnienia dziecku
najwyższego poziomu bezpieczeństwa należy
użytkować fotelik zgodnie z instrukcją obsługi.
!BELANGRIJK! Voor de goede bescherming van uw
kind is het van belang dat u bij het gebruik van het
autostoeltje de instructies in deze handleiding volgt.
LET OP! U kunt het autostoeltje zonder het Linear Side-
Impact Protection-systeem (L.S.P.) gebruiken. Het kan
worden verwijderd voor meer ruimte in het voertuig. Voor het
verwijderen van het Linear Side-Impact Protection-systeem
(L.S.P.) zie hoofdstuk: “JUISTE POSITIE IN HET VOERTUIG”.
UWAGA! Fotelika można używać bez liniowego systemu
ochrony przed zderzeniem bocznym (Linear Side-Impact
Protection, L.S.P.). Można go odczepić, abyzyskać więcej
miejsca w pojeździe. Odłączanie liniowego systemu ochrony
przed zderzeniem bocznym (Linear Side-Impact Protection,
L.S.P.) opisano w rozdziale: „PRAWIDŁOWA POZYCJA W
POJEŹDZIE”.

50
SOMMAIREFR
INSTRUCTIONS RÉSUMÉES .................................................................................. 3
HOMOLOGATION .....................................................................................................48
PREMIERE INSTALLATION .................................................................................... 52
PROTECTION DU VÉHICULE ................................................................................54
POSITION CORRECTE DANS LE VÉHICULE ....................................................56
SÉCURITÉ EN VOITURE ........................................................................................62
INSTALLATION DU SIÈGE AUTO ..........................................................................64
INSTALLATION DU SIÈGE AVEC ISOFIX ............................................................ 66
RETIRER LE SIÈGE AUTO DU VÉHICULE .........................................................68
RÉGLAGE DU SIÈGE ...............................................................................................70
AJUSTER L’INCLINAISON DE L’APPUI-TÊTE ....................................................72
INSTALLATION AVEC LA CEINTURE DE SECURITÉ .......................................74
VOTRE ENFANT EST-IL CORRECTEMENT INSTALLÉ ? ................................76
RETIRER LA HOUSSE DU SIÈGE ........................................................................78
NETTOYAGE ..............................................................................................................80
ENTRETIEN................................................................................................................82
EN CAS D´ACCIDENT ..............................................................................................82
INFORMATIONS PRODUIT ....................................................................................84
DUREE DE VIE DU PRODUIT ................................................................................84
TRAITEMENT DES DÉCHETS ............................................................................... 86
GARANTIE ..................................................................................................................88

51
FRNLPL
ZAWARTOŚĆINHOUDNL
KORTE HANDLEIDING ..............................................................................................3
GOEDKEURING ........................................................................................................48
EERSTE INSTALLATIE ............................................................................................53
HET VOERTUIG BESCHERMEN ...........................................................................55
JUISTE PLAATS IN HET VOERTUIG ....................................................................57
VEILIGHEID IN DE AUTO ........................................................................................63
HET AUTOSTOELTJE IN HET VOERTUIG PLAATSEN ....................................65
HET AUTOSTOELTJE MET HET ISOFIX SYSTEEM PLAATSEN ...................67
HET AUTOSTOELTJE UIT HET VOERTUIG VERWIJDEREN .........................69
AANPASSEN AAN DE LICHAAMSOMVANG .......................................................71
DE KANTELBARE HOOFDSTEUN VERSTELLEN ............................................73
VASTMAKEN MET DE AUTOGORDEL .................................................................75
ZIT UW KIND OP DE JUISTE MANIER VAST? ...................................................77
DE BEKLEDINGSHOES VERWIJDEREN ............................................................79
REINIGING .................................................................................................................81
ONDERHOUD ............................................................................................................83
NA EEN ONGEVAL ....................................................................................................83
PRODUCTINFORMATIE ..........................................................................................85
LEVENSDUUR VAN HET PRODUCT ....................................................................85
VERWIJDERING .......................................................................................................87
GARANTIE ..................................................................................................................89
PL
INSTRUKCJA SKRÓCONA .......................................................................................3
HOMOLOGACJA .......................................................................................................48
PIERWSZY MONTAŻ FOTELIKA ...........................................................................53
OCHRONA TAPICERKI SAMOCHODOWEJ .......................................................55
POPRAWNY MONTAŻ W POJEŹDZIE .................................................................57
BEZPIECZEŃSTWO W SAMOCHODZIE .............................................................63
MONTAŻ FOTELIKA SAMOCHODOWEGO W POJEŹDZIE ............................65
MONTAŻ FOTELIKA ZA POMOCĄ SYSTEMU ISOFIX .....................................67
DEMONTAŻ FOTELIKA Z SAMOCHODU ............................................................69
DOSTOSOWANIE FOTELIKA DO WZROSTU DZIECKA ............................71
REGULACJA ODCHYLANEGO ZAGŁÓWKA ......................................................73
ZAPINANIE FOTELIKA SAMOCHODOWYM PASEM BEZPIECZEŃSTWA .. 75
CZY DZIECKO JEST PRAWIDŁOWO PRZYPIĘTE? .........................................77
ZDEJMOWANIE TAPICERKI...................................................................................79
CZYSZCZENIE ..........................................................................................................81
KONSERWACJA ........................................................................................................83
POSTĘPOWANIE PO KOLIZJI ...............................................................................83
INFORMACJE O PRODUKCIE ...............................................................................85
TRWAŁOŚĆ PRODUKTU ........................................................................................85
UTYLIZACJA ..............................................................................................................87
GWARANCJA .............................................................................................................89

53
FRNLPL
PIERWSZY MONTAŻ FOTELIKAEERSTE INSTALLATIE
Fotelik zbudowany jest z siedziska . Oparcie (1) i oparcia (2)
składa się z regulowanego na wysokość zagłówka oraz
regulowanych na szerokość zabezpieczeń barkowych. Tylko
fotelik w połączeniu z oparciem zapewnia dziecku najlepszą
ochronę i wygodę.
Het autostoeltje bestaat uit een zitverhoging en een (1)
rugleuning . Een in hoogte verstelbare hoofdsteun (2)
met bijpassende aanpassing van de schouderbreedte is
geïntegreerd in de rugleuning. Alleen de combinatie van
stoelverhoger met rugleuning biedt de meeste bescherming
en het beste comfort voor uw kind.
Połącz oparcie z siedziskiem wpinając zaczepy na (2) (1) (4)
uchwyt siedziska .(5) (1)
Verbind de rugleuning met het zitkussen door de (2) (1)
geleidestang vast te haken aan de assen van het (4) (5)
zitkussen .(1)
UWAGA! Instrukcję zawsze przechowuj w pobliżu, w
specjalnie przeznaczonej do tego przegrodzie z przodu (3)
fotelika.
LET OP! Houd de handleiding bij de hand door deze op te
bergen in het vakje aan de voorkant van het stoeltje.(3) !OSTRZEŻENIE! Upewnij się, że zapoznałeś się z
instrukcją fotelika. Postępuj zgodnie ze wskazówkami
opisanymi w instrukcji.
!OSTRZEŻENIE! Części fotelika CYBEX Solution
Z i-Fix nie moga być używane oddzielnie lub w
kombinacji z częściami innych producentów lub
innych serii produktów. W takich przypadkach
certyfikat bezpieczeństwa traci ważność. Niepoprawne
użytkowanie może spowodować poważne obrażenia lub
śmierć dziecka. Zachowaj instrukcję na przyszłość.
!BELANGRIJK! Zorg dat u de handleiding leest,
begrijpt en opvolgt.
!BELANGRIJK! De onderdelen van de Solution Z i-Fix
mogen niet afzonderlijk of in combinatie met een zitting,
rugleuning of hoofdsteun van een andere fabrikant of
van een ander model worden gebruikt. In die gevallen
vervalt de certificering direct. Verkeerd gebruik kan tot
ernstig letsel of de dood van uw kind leiden. Bewaar
deze handleiding voor toekomstig gebruik.
!OSTRZEŻENIE! Zadbaj, aby poszczególne elementy
fotelika samochodowego nie zostały przytrzaśnięte
lub przygniecione (np.: drzwiami samochodowymi lub
podczas regulacji fotela).
!BELANGRIJK! Zorg altijd dat de afzonderlijke
onderdelen van het autostoeltje niet in de knel komen
(bijvoorbeeld tussen een portier of bij het verstellen van
de achterbank).

54
Des traces d’utilisation et/ou de décoloration peuvent
apparaître sur certaines banquettes en matériaux délicats
(velours, cuir, etc) si des sièges auto sont utilisés. An d’éviter
cela, vous pouvez mettre une serviette ou une couverture
entre la banquette et le siège auto. Dans ce contexte, voir
aussi nos instructions de nettoyage. Il est essentiel des les
suivre avant la première utilisation du siège auto.
PROTECTION DU VÉHICULE

55
FRNLPL
Na tapicerkach wykonanych z delikanych materiałów (np.
zamsz, skóra, itp.) mogą pojawić się ślady użytkowania
fotelika lub odbarwienia. Aby tego uniknąć można
zabezpieczyć tapicerkę przez podłożenie koca lub ręcznika
pod fotelik. Zachęcamy do zapoznania się z zaleceniami
dotyczącymi czyszczenia fotelika oraz jego tapicerki.
Należy ich bezwzględnie przestrzegać przed pierwszym
skorzystaniem z fotelika.
Het gebruik van autostoeltjes kan op sommige autozittingen
met een kwetsbare bekleding (zoals velours of leer) sporen
nalaten en/of deze doen verkleuren. U kunt dit voorkomen
door bijvoorbeeld een deken of een handdoek onder het
autostoeltje op de stoel te leggen. Raadpleeg in dit verband
ook onze reinigingsinstructies. Het is van groot belang dat u
die opvolgt voordat u het autostoeltje voor het eerst gebruikt.
OCHRONA TAPICERKI SAMOCHODOWEJHET VOERTUIG BESCHERMEN

56
POSITION CORRECTE DANS LE VÉHICULE
Le siège enfant peut être utilisé sur les sièges de véhicule
équipés d’une ceinture automatique à trois points. Veuillez
vous référer à la liste des types de véhicules pour consulter
les véhicules approuvés. Vous pouvez consulter la dernière
version ici : www.cybex-online.com.
Si vous n’avez pas assez d’espace dans votre véhicule, vous
pouvez détacher le système de « Protection linéaire des
impacts latéraux » (L.S.P.) en le poussant vers le haut pour le
libérer de ses points d’ancrage.
NOTE ! Si l’enfant mesure plus de 135 cm, la compatibilité
entre le siège SOLUTION Z i-FIX et votre véhicule peut être
réduite. Veuillez consulter la liste des types de véhicule pour
vérier si le siège enfant peut être utilisé dans toutes les
positions d’appuie-tête sans restrictions.
Toutefois, pour une sécurité optimale, nous vous
recommandons vivement de conserver le système de «
Protection linéaire des impacts latéraux » (L.S.P.) sur le siège
autant que possible.
Même sans le système de « Protection linéaire des impacts
latéraux » (L.S.P.), votre enfant est protégé contre les impacts
latéraux.
Si votre voiture n’est pas équipée de points de connexion
ISOFIX, il est toujours possible d’utiliser le siège SOLUTION
Z i-FIX avec les bras de verrouillage ISOFIX en position
rétractée.
!ATTENTION ! Ce siège ne doit pas être utilisé avec
une ceinture ventrale deux points. L’utilisation du siège
en conjonction avec une ceinture à deux points risque
de blesser gravement, voire mortellement l’enfant.
L
.
S
.
P
.
S
Y
S
T
E
M

57
FRNLPL
POPRAWNY MONTAŻ W POJEŹDZIEJUISTE PLAATS IN HET VOERTUIG
Het autostoeltje kan worden gebruikt op voertuigzitplaatsen
die zijn uitgerust met een automatische driepuntsgordel.
Raadpleeg de bijgevoegde lijst met voertuigtypen voor
goedgekeurde voertuigen. Het meest actuele overzicht kunt u
downloaden op www.cybex-online.com.
Fotelik dziecięcy może być używany na fotelach
samochodowych wyposażonych w trzypunktowy
automatyczny pas. Należy zapoznać się z dołączoną listą
zatwierdzonych typów pojazdów. Aktualną listę znajdą
Państwo na stronie: www.cybex-online.com.
Als uw auto niet genoeg ruimte biedt, kunt u het Linear
Side-Impact Protection-systeem (L.S.P.) verwijderen
door dit naar boven te duwen om dit los te maken van de
verankeringspunten.
Jeśli w samochodzie nie ma wystarczająco dużo miejsca,
można odłączyć liniowy system ochrony przed zderzeniem
bocznym (Linear Side-Impact Protection, L.S.P.), popychając
go do góry w celu wyjęcia go z punktów mocowania.
LET OP! Wanneer een kind 135 cm of langer is, kan het
zijn dat de compatibiliteit van de SOLUTION Z i-FIX met
uw voertuig minder is geworden. Controleer de lijst met
voertuigtypen om te controleren of het autostoeltje zonder
beperkingen in alle hoofdsteunposities kan worden gebruikt.
UWAGA! Przy wzroście dziecka 135 cm dopasowanie fotelika
SOLUTION Z i-FIX do pojazdu może zostać ograniczone.
Należy zapoznać się z listą typów pojazdów, aby sprawdzić,
czy fotelik dziecięcy może być używany we wszystkich
pozycjach zagłówka bez ograniczeń.
Voor optimale veiligheid raden we echter sterk aan het Linear
Side-Impact Protection-systeem (L.S.P.), indien mogelijk, op
het stoeltje bevestigd te houden. Jednak w celu zapewnienia optymalnego bezpieczeństwa
zdecydowanie zalecamy zachowanie liniowego systemu
ochrony przed zderzeniem bocznym (Linear Side-Impact
Protection, L.S.P.) na fotelu, jeśli tylko jest to możliwe.
Zelfs zonder het Linear Side-Impact Protection-systeem
(L.S.P.) is er een gegarandeerde zijbescherming aanwezig. Ochrona przed uderzeniem z boku jest zapewniona nawet
bez liniowego systemu ochrony przed zderzeniem bocznym
(Linear Side-Impact Protection, L.S.P.).
Als uw auto niet is uitgerust met ISOFIX-bevestigingspunten,
is er altijd de mogelijkheid om de SOLUTION Z i-FIX te
gebruiken met ingeschoven ISOFIX-vergrendelingsarmen.
Jeśli samochód nie jest wyposażony w punkty mocowania
ISOFIX, istnieje możliwość korzystania z fotelika SOLUTION
Z i-FIX ze schowanymi ramionami blokującymi ISOFIX.
!BELANGRIJK! Het stoeltje is niet geschikt voor
gebruik met een tweepuntsgordel of heupgordel. Als
het stoeltje met behulp van een tweepuntsgordel wordt
vastgezet, kan een ongeval resulteren in ernstig of zelfs
fataal letsel van het kind.
!OSTRZEŻENIE! Fotelik samochodowy nie jest
przeznaczony do montażu na siedzeniach z
2-punktowymi pasami bezpieczeństwa lub pasem
biodrowym. Użytkowanie tego typu pasów może
skutkować poważnymi lub śmiertelnymi obrażeniami
dziecka w razie wypadku.

58
Dans des cas exceptionnels, le siège auto peut également
être installé sur le siège passager avant. Dans ce cas, veuillez
tenir compte des remarques suivantes :
• Dans les véhicules équipés d’airbags, vous devez reculer
le siège au maximum. Veuillez cependant vous assurer que
le mécanisme de la ceinture de sécurité se trouve à l’arrière
du point d’attache du siège auto.
• Conformez-vous toujours aux recommandations du
fabricant du véhicule.

59
FRNLPL
In uitzonderlijke gevallen mag het autostoeltje ook op de
passagiersstoel voorin gebruikt worden. Let daarbij dan op
het volgende:
• In auto’s met airbags moet u de passagiersstoel zo ver
mogelijk naar achteren zetten. Zorg er daarbij echter voor
dat het hoogste punt van de veiligheidsgordel achter de
gordelgeleider van het autostoeltje blijft.
• Volg altijd de aanbevelingen van de autofabrikant op.
W pewnych wyjątkach fotelik samochodowy może zostać
zamontowany na przednim fotelu pasażera. Należy wtedy
przestrzegać poniższych wskazówek:
• Jeżeli pojazd posiada poduszkę powietrzną pasażera,
odsuń siedzenie do tyłu najdalej, jak to możliwe. Zwróć
uwagę, by górny zaczep pasa zawsze znajdował się za
fotelikiem.
• Ściśle przestrzegaj zaleceń producenta pojazdu.

60
!
ATTENTION ! La ceinture diagonale doit être à l’arrière
en position inclinée et ne doit jamais être positionnée
en direction du point le plus haut de la ceinture de votre
véhicule. S’il est impossible de positionner le siège de
cette manière, en poussant le siège auto vers l’avant
ou en l’utilisant sur un autre siège, cela signifie que ce
siège auto ne convient pas à votre véhicule. Contactez
le fabricant du siège auto en cas de doute.
!ATTENTION ! Les bagages ou autres objets présents
dans le véhicule peuvent provoquer des blessures en
cas d’accident et doivent toujours être bien attachés.
Sinon, ils risqueraient d’être projetés, provoquant des
blessures mortelles.
!ATTENTION ! Le siège auto ne doit pas être utilisé
sur des sièges de véhicules faisant face au côté de la
route. L’utilisation de ce siège auto est permise sur les
sièges de véhicules orientés dos à la route, notamment
dans un van ou un minibus, à condition que le siège du
véhicule en question soit prévu pour transporter une
personne adulte. Assurez-vous que l’appuie-tête n’est
pas retiré si le siège auto est installé sur une banquette
dos à la route.
!ATTENTION ! Ne laissez jamais votre enfant sans
surveillance dans la voiture. Les pièces du système de
retenue chauffent lorsqu’elles sont exposées au soleil et
l’enfant peut subir des brûlures. Protégez votre enfant
et le siège auto de l’exposition directe au soleil (en
couvrant le siège avec un linge clair par exemple).

61
FRNLPL
!
OSTRZEŻENIE! Pas barkowy musi przebiegać
skośnie od tyłu fotelika. Jeśli nie ma możliwości
zamontowania fotelika pomimo odsunięca do przodu
fotela samochodowego lub montażu na innym
siedzeniu w samochodzie, oznacza to, że fotelik nie
jest kompatybilny z pojazdem. W razie wątpliwości
skontaktuj się z producentem samochodu.
!OSTRZEŻENIE! Bagaże i inne przedmioty znajdujące
się w samochodzie, które mogą zranić pasażerów
w czasie wypadku, powinny zostać dokładnie
zabezpieczone. Pozostawione luzem przedmioty mogą
spowodować obrażenia w czasie wypadku.
!
BELANGRIJK! De borstriem moet schuin naar
achteren lopen en mag nooit voorwaarts naar het
bovenste gordelpunt in uw auto lopen. Als het niet
mogelijk is om het stoeltje op deze manier te plaatsen,
bijvoorbeeld door de autostoel naar voren te schuiven of
door het stoeltje op een andere autostoel te gebruiken,
is dit autostoeltje niet geschikt voor uw auto. Neem bij
twijfel contact op met de fabrikant van het autostoeltje.
!BELANGRIJK! Bagage en andere objecten die in
de auto liggen en letsel kunnen veroorzaken tijdens
een ongeval, moeten altijd goed worden vastgezet.
Rondvliegende voorwerpen kunnen fataal letsel
veroorzaken. !OSTRZEŻENIE! Montowanie fotelika samochodowego
na siedzeniach samochodowych ustawionych bokiem
do kierunku jazdy jest zabronione. Na fotelach
samochodowych umieszczonych tyłem do kierunku
jazdy np. w samochodach typu van czy minibus, można
zamontować niniejszy fotelik, pod warunkiem że fotele
samochodowe przeznaczone są do przewożenia osób
dorosłych. Montując fotelik na siedzeniu skierowanym
tyłem do kierunku jazdy, upewnij się, że zagłowek
siedzenia nie został zdjęty.
!BELANGRIJK! Het autostoeltje mag niet worden
gebruikt op autostoelen die haaks op de rijrichting
staan. Gebruik van het autostoeltje is wel toegestaan
op achterwaarts gerichte stoelen, bijvoorbeeld in een
busje, vooropgesteld dat de stoel bedoeld is voor het
vervoer van een volwassene. Het is essentieel dat de
hoofdsteun van de autostoel zelf niet wordt verwijderd
als het autostoeltje wordt geplaatst op een achterwaarts
gerichte autostoel.
!OSTRZEŻENIE! Nigdy nie zostawiaj dziecka
w samochodzie bez opieki! Części systemu
przytrzymującego dziecko nagrzewają się w słońcu,
w wyniku czego dziecko może doznać poparzeń.
Chroń swoje dziecko oraz fotelik przed bezpośrednią
ekspozycją na słońce (np. poprzez osłonięcie jasną
tkaniną).
!BELANGRIJK! Laat uw kind nooit alleen in de auto
achter. De onderdelen van het kinderbeveiligingssysteem
kunnen warm worden in de zon en het kind brandwonden
bezorgen. Bescherm uw kind en het autostoeltje tegen
directe blootstelling aan de zon (bijvoorbeeld door er
een lichte doek overheen te leggen).

62
SÉCURITÉ EN VOITURE
An de garantir la meilleure sécurité possible pour tous les
passagers, assurez-vous que …
• les dossiers inclinables des banquettes soient relevés dans
leur position initiale droite.
• en installant le siège auto sur le siège passager avant,
celui-ci soit reculé au maximum.
• tous les objets susceptibles de causer des blessures en cas
d’accident soient correctement rangés dans l’habitacle.
• tous les passagers de la voiture attachent leur ceinture.
!
ATTENTION ! Le siège auto doit toujours être attaché
avec la ceinture de sécurité du véhicule, même lorsqu’il
n’est pas utilisé. En cas de freinage d’urgence ou
d’accident, un siège auto non attaché peut causer des
blessures aux autres passagers et à vous même.

63
FRNLPL
BEZPIECZEŃSTWO W SAMOCHODZIEVEILIGHEID IN DE AUTO
By zapewnić najwyższy poziom bezpieczeństwa wszystkim
pasażerom, upewnij się, że …
Om de hoogst mogelijke veiligheid van alle passagiers te
garanderen is het nodig dat …
• składane oparcia w samochodzie są zablokowane w pozycji
pionowej.
• montujac fotelik na przednim siedzeniu pasażera, fotelik
znajduje się w najbardziej odsuniętej do tyłu pozycji.
• wszystkie przedmioty znajdujące się w samochodzie są
odpowiednio zabezpieczone i nie stanowią zagrożenia w
razie wypadku.
• wszyscy pasażerowie mają zapięte pasy.
• neerklapbare rugleuningen in het voertuig rechtop staan en
zijn vergrendeld.
• de passagiersstoel zo ver mogelijk naar achteren staat als u
het autostoeltje op deze stoel installeert.
• u alle voorwerpen die letsel kunnen veroorzaken tijdens een
ongeval goed opbergt.
• alle passagiers in het voertuig hun gordel dragen.
!
OSTRZEŻENIE! Fotelik samochodowy musi zawsze
być przypięty samochodowym pasem bezpieczeństwa,
awet kiedy dziecko nie jest w nim przewożone. W razie
nagłego hamowania lub wypadku niezabezpieczony
fotelik samochodowy może spowodować obrażenia u
pasażerów lub kierowcy.
!
BELANGRIJK! Het autostoeltje moet altijd correct
zijn geïnstalleerd in het voertuig, ook als het niet
wordt gebruikt. Door plotseling remmen of tijdens een
ongeval kan een niet vastgemaakt autostoeltje andere
passagiers of uzelf verwonden.

64
INSTALLATION DU SIÈGE AUTO
Placez le siège auto sur un siège approprié du véhicule.
• Assurez-vous toujours que la surface entière du dossier du
siège auto soit bien en contact avec le dossier du siège du
véhicule.
• Si l’appuie-tête du véhicule gêne, tirez-le ou retirez-le
complètement (il est essentiel de veiller à ce que l’appuie-
tête du véhicule ne soit pas retiré lorsque le siège enfant
est installé sur un siège orienté dos à la route). Le dossier
s’adapte parfaitement à tous types de banquettes.
! ATTENTION ! La surface entière du dossier du siège
auto doit reposer sur le dossier du siège du véhicule. Le
siège doit se trouver en position verticale pour garantir
la sécurité optimale de votre enfant.
! ATTENTION ! Ne pas utiliser de points de contact
autres que ceux décrits dans les instructions.

65
FRNLPL
MONTAŻ FOTELIKA SAMOCHODOWEGO W
POJEŹDZIE
HET AUTOSTOELTJE IN HET VOERTUIG
PLAATSEN
Umieść fotelik samochodowy na przeznaczonym do tego
miejscu w pojeździe.
Plaats het autostoeltje op de juiste stoel in het voertuig.
• Upewnij się, że oparcie fotelika samochodowego w pełni
przylega do oparcia fotela/kanapy w samochodzie.
• Dopasuj ustawienie zagłówka siedzenia samochodowego
lub całkowicie zdemontuj zagłówek (ważne jest, aby nie
demontować zagłówka fotela samochodu, gdy fotelik
dziecięcy jest ustawiony na siedzeniu skierowanym tyłem
do kierunku jazdy). Dzięki odchylanemu oparciu, fotelik
doskonale dopasowuje się do kąta nachylenia oparcia
siedzenia samochodowego.
• Zorg altijd dat de hele rugleuning van het autostoeltje goed
op de rugleuning van de autostoel aansluit.
• Als de hoofdsteun van de auto in de weg zit, trek die dan
helemaal uit of verwijder hem geheel (het is essentieel
dat de hoofdsteun van het voertuig niet wordt verwijderd,
wanneer het autostoeltje op een achterwaarts gerichte
voertuigzitplaats is geïnstalleerd). De rugleuning past zich
volledig aan vrijwel elke hoek van de autostoel aan.
! OSTRZEŻENIE! Powierzchnia oparcia fotelika musi
w pełni przylegać do oparcia fotela samochodowego.
Chcąc zapewnić dziecku maksymalne bezpieczeństwo,
fotelik samochodowy musi znajdować się w normalnej
pozycji pionowej!
! BELANGRIJK! Zorg altijd dat de hele rugleuning
van het autostoeltje goed op de rugleuning van de
autostoel aansluit. Om verzekerd te zijn van maximale
bescherming van uw kind, moet het stoeltje normaal
rechtop staan!
! OSTRZEŻENIE! Nie używaj żadnych punktów
kontaktowych nośnych innych niż opisane w instrukcji i
oznaczone na foteliku.
! BELANGRIJK! Gebruik geen andere dragende
contactpunten dan de in de handleiding beschreven en
op het autostoeltje aangegeven punten.

67
FRNLPL
System ISOFIX umożliwia stabilny montaż oraz zwiększa
poziom ochrony dziecka. Dziecko wciąż musi pozostać
zabezpieczone 3-punktowymi pasami bezpieczeństwa.
De veiligheid van uw kind neemt toe dankzij het ISOFIX
systeem waarmee u het autostoeltje kunt bevestigen in het
voertuig. Uw kind moet nog wel met de driepuntsgordel van
uw voertuig worden vastgemaakt.
• Użyj przycisku regulacji pod siedziskiem fotelika (7) (1)
samochodowego.
• Wyciągniej dwa zaczepy ISOFIX najdalej jak możliwe.(8)
• Teraz obróć zaczepy ISOFIX o 180° tak by skierowane (8)
były przodem do pierścieni ISOFIX .(6)
• Gebruik de instellingsknop (In 8) onder het zitkussen van (1)
het autostoeltje.
• Trek de twee ISOFIX grijparmen zo ver mogelijk uit.(8)
• Draai de ISOFIX grijparmen nu 180°, zodat ze wijzen in (8)
de richting van de ISOFIX-ankerpunten .(6)
UWAGA! Uchwyty ISOFIX to dwa metalowe pierścienie (6)
pomiędzy oparciem a siedziskiem fotela samochodowego. W
razie wątpliwości, należy zajrzeć do instrukcji pojazdu.
LET OP! De ISOFIX-ankerpunten zijn twee metalen (6)
beugels per stoel, die geplaatst zijn tussen de rugleuning
en zitting van de autostoel. Als u twijfelt, kijk dan in de
handleiding van uw voertuig.
UWAGA! Przed wpięciem zaczepów ISOFIX w pierścienie (8)
ISOFIX , sprawdź czy przycoski zaczepów nie są (6)
wciśniete . JJeśli zielony wskaźnik bezpieczeństwa (9) (10)
jest widoczny, przed połączeniem musisz zwolnić rami’ona
blokujące ISOFIX poprzez naciśnięcie i pociągnięcie przycisku
zwalniającego .(9)
LET OP! Voordat u de ISOFIX grijparmen vastklikt (8)
in de ISOFIX-ankerpunten , controleert u de (6)
ontgrendelingsknoppen . Als de groene veiligheidsindicator (9)
(10) zichtbaar is, moet u voor het samenvoegen eerst
de ISOFIX-vergrendelingsarmen losmaken door de
ontgrendelknop in te drukken en terug te trekken.(9)
MONTAŻ FOTELIKA ZA POMOCĄ SYSTEMU
ISOFIX
HET AUTOSTOELTJE MET HET ISOFIX SYSTEEM
PLAATSEN
LET OP! Zijn de ISOFIX-verankeringspunten moeilijk te
bereiken in uw voertuig, dan kunt u de meegeleverde ISOFIX-
geleiders gebruiken.
UWAGA! Jeśli punkty mocujące ISOFIX w Twoim pojeździe
są trudno dostępne, możesz skorzystać z dostarczonych
prowadnic ISOFIX.
• Plaats de meegeleverde ISOFIX-geleiders (11) met de
langere riem naar boven gericht in de twee ISOFIX-
verankeringspunten . Bij sommige voertuigen is het (6)
beter om de ISOFIX-geleiders (11) in de tegenovergestelde
richting te monteren.
• Umieść dostarczone prowadnice ISOFIX (11) w dwóch
punktach mocujących ISOFIX dłuższą częścią (6)
skierowaną do góry. W niektórych pojazdach prowadnice
ISOFIX (11) lepiej zamontować w przeciwnym kierunku.

68
RETIRER LE SIÈGE AUTO DU VÉHICULE
Procédez en inversant les étapes d’installation.
• Déverrouillez les connecteurs ISOFIX des deux côtés en
appuyant sur les boutons déclencheurs et en les retirant
simultanément.
• Retirer le siège des points d’ancrage ISOFIX.
• Faites pivoter les bras ISOFIX à 180°.
• Actionnez la poignée de réglage du siège auto et repoussez
les connecteurs ISOFIX à l’intérieur du siège.
NOTE ! En rétractant les connecteurs ISOFIX, vous ne vous
contentez pas de protéger le siège du véhicule, mais vous
protégez également les connecteurs du système ISOFIX de la
saleté et des dommages.
• Poussez les deux bras de verrouillage ISOFIX dans les (8)
points d’ancrage ISOFIX jusqu’à ce qu’ils s’enclenchent (6)
en émettant un « CLIC » audible.
• Assurez-vous que le siège auto reste bien en place en
essayant de l’extraire.
• Le voyant de sécurité vert doit être clairement visible (10)
sur les deux boutons de déverrouillage ISOFIX .(9)
• Utilisez la poignée de réglage ISOFIX et poussez (7)
ensuite le siège auto contre le siège du véhicule.
• Vériez toujours que la surface du dossier du siège auto
repose entièrement et parfaitement contre le dossier du
siège du véhicule.
7
CLICK!
6
8
9 10

69
FRNLPL
DEMONTAŻ FOTELIKA Z SAMOCHODUHET AUTOSTOELTJE UIT HET VOERTUIG
VERWIJDEREN Wykonal kolejne czynności montażowe w odwrotnej
kolejności.
• Zwolnij przyciski ISOFIX po obu stronach poprzez ich
wciśnięcie i spontaniczne pociągniecie.
• Wyciągnij fotelik z pierścieni ISOFIX.
• Obróć uchwyty ISOFIX o 180°.
• Pociągnij uchwyt regulacji pod siedziskiem fotelika i wciśnij
zaczepy jak najdalej.
Voer de stappen van het plaatsen in omgekeerde volgorde uit.
• Ontgrendel de ISOFIX grijparmen aan beide zijden door op
de ontgrendelingsknoppen te drukken en ze tegelijk terug
te trekken.
• Trek het stoeltje uit de ISOFIX-ankerpunten.
• Draai de ISOFIX grijparmen 180°.
• Gebruik de instellingsknop van het autostoeltje en duw de
grijparmen zo ver mogelijk in. UWAGA! Złozenie zaczepów, chroni tapicerkę samochodu
oraz zaczepy przed zabrudzeniami i uszkodzeniami.
LET OP! Door de ISOFIX grijparmen weg te klappen
beschermt u niet alleen de autostoel, maar ook de grijparmen
van het ISOFIX systeem tegen vuil en beschadiging.
• Duw de twee ISOFIX-vergrendelingsarmen in de (8)
ISOFIX-verankeringspunten totdat deze op zijn (6)
vergrendeld met een hoorbare ‘KLIK’.
• org ervoor dat het autostoeltje stevig vastzit door te
proberen het eruit te trekken.
• De groene veiligheidsindicator moet nu duidelijk (10)
zichtbaar zijn op beide ontgrendelknoppen .(9)
• Gebruik de ISOFIX-instellingshendel en duw de (7)
autostoel tegen de voertuigzitplaats.
• Zorg er altijd voor dat het volledige oppervlak van de
rugleuning van het autostoeltje tegen de rugleuning
van de voertuigzitplaats wordt geplaatst.
• Wciśnij dwa ramiona blokujące ISOFIX do punktów (8)
mocujących ISOFIX , aż zablokują się one na miejscu ze (6)
słyszalnym ‘KLIKNIĘCIEM’.
• Upewnij się, że fotelik samochodowy jest przymocowany,
próbując go wyciągnąć.
• Zielony wskaźnik bezpieczeństwa musi być wyraźnie (10)
widoczny na obu przyciskach zwalniających .(9)
• Użyj uchwytu regulacji ISOFIX i dopchnij fotelik do fotela (7)
pojazdu.
• Należy zawsze pilnować, by cała powierzchnia oparcia
fotelika samochodowego dotykała oparcia siedzenia
pojazdu.

70
RÉGLAGE DU SIÈGE
Ajuster la têtière
NOTE ! La têtière n’ore une protection et une sécurité
optimales à votre enfant que lorsqu‘elle est correctement
réglée. La hauteur de l´appui-tête peut être réglée dans 12
positions diérentes.
NOTE ! Les protections épaules du siège auto sont
indissociables de la têtière et ne doivent pas être ajustées
séparément.
• La têtière doit être réglée de sorte que l’écart entre l’épaule
de l‘enfant et le bas de la têtière soit équivalent à 3 cm
maximum (c’est à dire la largeur de deux doigts environ).
• Activez la poignée de réglage située au dos de (13)
l’appuie-tête et placez-la sur la position souhaitée.(12)
13
12
MAX

71
FRNLPL
DOSTOSOWANIE FOTELIKA DO WZROSTU DZIECKAAANPASSEN AAN DE LICHAAMSOMVANG
Dopasowanie zagłówkaDe hoofdsteun verstellen
UWAGA! Zagłówek (12) zapewnia maksymalną ochroęe dla
dziecka, tylko w przypadku optymalnego dopasowania do
jego wzrostu. Wysokość zagłówka można regulować w 12
różnych pozycjach.
LET OP! De hoofdsteun biedt uw kind alleen optimale (12)
bescherming indien deze in de optimale hoogtestand is gezet.
De hoofdsteun kan in 12 hoogtestanden worden gezet.
UWAGA! Osłony barkowe fotelika są zintegrowane z
zagłówkiem i nie muszą być regulowane indywidualnie.
LET OP! De schoudervleugels van het autostoeltje zijn
verbonden met de hoofdsteun en hoeven niet apart versteld
te worden.
• Poprawnie wyregulowany zagłówek pozostawia max. 3
cm (szerokość ok. dwóch palców) lub mniej przestrzeni
pomiedzy ramionami dziecka i dolną cześcia zagłówka.
• Skorzystaj z uchwytu regulacji w tylnej części zagłówka (13)
(12), aby przesunąć go do wymaganej pozycji.
• De stand van de hoofdsteun moet zodanig zijn dat de
ruimte tussen de schouder van het kind en de hoofdsteun
maximaal 3 cm. (ongeveer twee vingers breed) is.
• Activeer de instellingshendel aan de achterkant van de (13)
hoofdsteun en zet de hendel in de vereiste positie.(12)

72
AJUSTER L’INCLINAISON DE L’APPUI-TÊTE
L’appui-tête ajustable permet d’éviter le basculement de la
tête de l’enfant vers l’avant lorsque celui-ci dort. En cas de
collision, l’appuie-tête suivra le mouvement de la tête de
votre enfant, se verrouillera et absorbera le mouvement vers
l’arrière consécutif au choc de la tête de votre enfant. L’angle
d’inclinaison de l’appuie-tête peut être réglé sur l’une des trois
positions disponibles. Il peut être déplacé vers l’avant vers la
deuxième ou la troisième position, jusqu’à ce que l’appuie-
tête s’enclenche dans la position souhaitée. Pour revenir à la
position de départ, soulevez et tirez vers l’arrière le rabat de
l’appuie-tête.
NOTE ! Assurez-vous que la tête de votre enfant est toujours
en contact avec l’appuie-tête inclinable, puisque c’est la
seule manière de garantir une protection optimale en cas de
collision latérale.
!ATTENTION ! N’utilisez jamais d’objet pour bloquer le
mécanisme de verrouillage ! En cas d’accident, le (15)
mécanisme doit rester souple, sans quoi votre enfant
risque d’être blessé.
15

73
FRNLPL
REGULACJA ODCHYLANEGO ZAGŁÓWKADE KANTELBARE HOOFDSTEUN VERSTELLEN
Odchylany zagłówek zapobiega niebezpiecznemu opadaniu
głowy dziecka do przodu w czasie snu. W przypadku kolizji,
zagłówek porusza się w kierunku ruchu głowy do przodu,
absorbując wsteczne uderzenie głowy dziecka. Kąt opadania
zagłówka można ustawić w jednej z trzech pozycji. Można
go skierować do pozycji drugiej lub trzeciej, aż zagłówek
zostanie zablokowany w odpowiedniej pozycji. Aby powrócić
do pierwotnej pozycji, należy podnieść klapę zagłówka i
pociągnąć ją do tyłu.
De kantelbare hoofdsteun helpt voorkomen dat het hoofd
van uw kind gevaarlijk naar voren valt tijdens het slapen.
Tijdens een botsing volgt de hoofdsteun de beweging van
het hoofd van uw kind naar voren, klikt vast en vangt de
daaropvolgende achterwaartse beweging van het hoofd van
uw kind op. De verstelhoek van de hoofdsteun kan worden
ingesteld op een van de drie standen. Hij kan naar voren
worden bewogen naar de tweede of derde stand totdat
de hoofdsteun in de juiste positie staat. Om hem terug te
brengen naar de oorspronkelijke stand, moet de zijkant van
de hoofdsteun worden opgetild en naar achteren worden
getrokken.
UWAGA! Upewnij się, że głowa dziecka zawsze znajduje się
w stree zagłowka, tylko w ten sposób zagłówek zapewnia
optymalną ochronę w przypadku kolizji bocznej.
LET OP! Zorg dat het hoofd van uw kind altijd contact heeft
met de kantelbare hoofdsteun, omdat de hoofdsteun alleen
dan optimale bescherming kan bieden tijdens een botsing
van opzij.
! OSTRZEŻENIE! Nie należy blokować mechanizmu
zagłówka ! Ruch zagłówka nie może być niczym (15)
ograniczony, w przeciwnym razie dziecko może ulec
obrażeniom w czasie wypadku.
! BELANGRIJK! Voorkom blokkering van het
vergrendelingsmechanisme ! Tijdens een ongeval (15)
moet het kantelmechanisme ongestoord kunnen
werken, anders kan uw kind letsel oplopen!

74
INSTALLATION AVEC LA CEINTURE DE SECURITÉ
Installez votre enfant dans le siège auto. Tirez la ceinture à
trois points et introduisez-la dans la boucle de la ceinture (16)
en la faisant passer devant votre enfant.
La ceinture abdominale doit avoir été introduite dans les (18)
guides de ceinture inférieurs des deux côtés du coussin (19)
du siège .(1)
Insérez la languette de la ceinture de sécurité dans sa (17)
boucle . Elle doit s’enclencher et émettre un « CLIC » (16)
audible.
Ensuite, placez la ceinture sous-abdominale dans les (18)
glissières inférieures du siège auto.(19)
Tirez la ceinture diagonale fermement pour serrer la (20)
ceinture sous-abdominale . Plus la ceinture est serrée, (18)
meilleure est la protection oerte contre les blessures. Sur le
côté de la boucle de ceinture , la ceinture diagonale (16) (20)
et la ceinture ventrale doivent être insérées ensemble (18)
dans la guide inférieur .(19)
NOTE ! Apprenez à votre enfant à s’assurer que la ceinture
est bien serrée et, si nécessaire, à s’attacher seul.
!
ATTENTION ! Ne vrillez jamais la ceinture.
! ATTENTION ! La boucle de la ceinture du véhicule
(16) ne doit jamais croiser l’accoudoir. Si le système de
ceinture est trop long, ce siège auto pour enfant n’est
pas adapté pour cette position dans le véhicule. En cas
de doute, contactez le constructeur de votre véhicule.
! ATTENTION ! La ceinture ventrale doit passer (18)
aussi bas que possible le long de l’aine de votre enfant
pour assurer une protection optimale en cas d’accident.
CLICK!
20
1
18
17
16
19

76
Faites maintenant passer la ceinture diagonale (20) par
le guide de la ceinture supérieur de couleur verte sur (21)
l’appuie-tête jusqu’à ce qu’elle se trouve dans le guide (12)
de la ceinture. Assurez-vous que la ceinture diagonale (20)
passe entre l’extérieur de l’épaule et le cou de votre enfant.
Si nécessaire, ajustez la hauteur de dossier pour modier la
position de la ceinture. La hauteur du dossier peut être (12)
ajustée dans la voiture.
VOTRE ENFANT EST-IL CORRECTEMENT
INSTALLÉ ?
Pour assurer la sécurité optimale de votre enfant, veuillez
toujours procéder aux vérications suivantes avant le départ :
• que toute la surface du dossier du siège auto repose sur le
dossier de la banquette du véhicule.
• La ceinture abdominale doit passer par les guides de la
ceinture inférieurs de couleur verte situés de chaque côté
du coussin du siège.
• La ceinture diagonale du côté de la boucle de ceinture
passe également dans la glissière rouge inférieure du siège.
• La ceinture diagonale passe dans le guide de la ceinture de
couleur verte sur l’appuie-tête.
• La ceinture diagonale est inclinée vers le bas.
• la ceinture est bien ajustée contre le corps de votre enfant
et n’est pas entortillée.
• La ceinture abdominale se positionne bas sur le pelvis.
• L’appui-tête est réglé dans la bonne position.
• Si vous utilisez ISOFIX Connect, le siège est bien verrouillé
de chaque côté avec les connecteurs dans les points
d’ancrage ISOFIX et les deux voyants de sécurité verts sont
bien visibles.
21
CLICK!
20
12

77
FRNLPL
Teraz przeprowadź pas ukośny przez górną zieloną (20)
prowadnicę pasa w zagłówku , tak aby pas znajdował (21) (12)
się wewnątrz prowadnicy. Upewnij się, że pas barkowy (20)
przebiega pomiędzy zewnątrzną częścia ramienia i szyją
dziecka. W razie konieczności dopasuj wysokość zagłówka,
by zmienić pozycję pasa. Wyskokość zagłówka może być (12)
regulowana również gdy fotelik znajduje się w samochodzie.
Voer nu de borstriem door de groene bovenste (20)
gordelgeleider van de hoofdsteun tot hij in de (21) (12)
gordelgeleider zit. Zorg dat de borstriem tussen de (20)
buitenkant van de schouder en de hals van uw kind loopt. Pas
de hoogte van de hoofdsteun indien nodig aan om de positie
van de gordel te veranderen. De hoogte van de hoofdsteun
(12) kan ook in de auto nog steeds worden aangepast.
CZY DZIECKO JEST PRAWIDŁOWO PRZYPIĘTE?ZIT UW KIND OP DE JUISTE MANIER VAST?
W celu zapewnienia najwyższej ochrony swojemu dziecku,
przed każdą podróżą upewnij się, że …
• oparcie fotelika samochodowego dziecka przylega do
oparcia fotela samochodowego.
• pas biodrowy przebiega przez dolne, zielone prowadnice po
obu stronach siedziska.
• pas barkowy również przechodzi przez dolną prowadnicę od
strony klamry zamykającej.
• pas ukośny został poprowadzony przez prowadnicę pasa
oznaczoną na zielono w panelu podparcia ramion.
• pas barkowy przebiega ukośnie do tyłu.
• pas na całej swojej długości jest naprężony i nie jest
skręcony.
• pas barkowy znajduje sią nisko, w okolicy pachwin.
• zagłówek jest dopasowany do odpowiedniej wysokości.
• w przypadku stosowania systemu ISOFIX Connect
fotelik został zablokowany z obu stron z łącznikami w
punktach mocowania ISOFIX, a oba zielone wskaźniki
bezpieczeństwa są dobrze widoczne
Controleer voordat u op weg gaat voor optimale veiligheid van
uw kind of …
• de hele rugleuning van het autostoeltje volledig op de
rugleuning van de autostoel aansluit.
• de buikriem is aan beide zijden van het zitkussen door de
groene onderste gordelgeleiders gevoerd
• de borstriem aan de kant van het gordelslot ook door de
groene onderste gordelgeleider van het autostoeltje is
gevoerd.
• de borstriem is door de groen gemarkeerde gordelgeleider
in de schoudersteun gevoerd.
• de borstriem schuin naar achteren loopt.
• de hele gordel strak tegen het lichaam van uw kind valt en
niet gedraaid is.
• de buikriem laag over het bekken loopt.
• de hoofdsteun op de juiste hoogte is afgesteld.
• bij gebruik van ISOFIX Connect is het stoeltje aan
beide zijden vergrendeld met de connectoren in de
ISOFIX-verankeringspunten en zijn beide groene
veiligheidsindicatoren duidelijk zichtbaar.

80
NETTOYAGE
Il est important d’utiliser uniquement une housse originale,
partie intégrante du siège auto. Vous pouvez obtenir des
housses supplémentaires auprès de votre revendeur.
AVERTISSEMENT! Veuillez laver la housse avant la
première utilisation. Les housses sont lavables en machine
à 30°C maximum, cycle délicat. Si vous lavez à température
plus élevée, le tissu peut être endommagé. Veuillez laver la
housse séparément et ne jamais la passer au sèche-linge !
Ne pas sécher directement au soleil ! Les parties plastiques
peuvent être nettoyées avec un détergent doux et de l’eau
tiède.
! ATTENTION ! N’utilisez jamais de détergents
chimiques ou d’agents blanchissants !

81
FRNLPL
CZYSZCZENIEREINIGING
Tapicerka jest istotną częścią fotelika samochodowego i ma
istotny wpływ na bezpieczeństwo. Dlatego ważne jest, aby
używać wyłącznie oryginalnej tapicerki przeznaczonej do tego
modelu fotelika. Dodatkowy pokrowiec na lato można zakupić
w sklepie, w którym dokonano zakupu fotelika.
Het is van belang alleen een originele zittinghoes te
gebruiken, omdat de hoes essentieel is voor het functioneren.
U kunt losse hoezen bij uw verkooppunt kopen.
OSTRZEŻENIE! Przed pierwszym użyciem fotelika,
należy wyprać tapicerkę. Tapicerkę można prać w max.
30°C w programie dla delikatnych tkanin. Pranie w wyższej
temperaturze, może spowodować utratę koloru. Pokrowiec
należy prać osobno. Nie należy suszyć pokrowca w suszarce
do ubrań. Nie wolno suszyć pokrowca na bezpośrednim
słońcu! Plastikowe elementy można czyścić przy użyciu
delikatnego środka czyszczącego i ciepłej wody.
LET OP! Was de zittinghoes voordat u deze voor de eerste
keer gaat gebruiken. De zittinghoezen zijn wasbaar op
maximaal 30° C met een jnwasprogramma. Als u op een
hogere temperatuur wast, kan de stof van de hoes zijn
kleur verliezen. Was de hoes apart en doe deze nooit in de
droger! Laat de hoes ook niet drogen in de zon! De kunststof
onderdelen kunnen worden schoongemaakt met een zacht
schoonmaakmiddel en warm water.
!OSTRZEŻENIE! Nie stosować chemicznych środków
do czyszczenia ani wybielaczy!
!BELANGRIJK! Gebruik nooit chemische
schoonmaakmiddelen of bleekmiddel!
Termékspecifikációk
| Márka: | Cybex |
| Kategória: | autósülés |
| Modell: | Solution Z i-Fix |
Szüksége van segítségre?
Ha segítségre van szüksége Cybex Solution Z i-Fix, tegyen fel kérdést alább, és más felhasználók válaszolnak Önnek
Útmutatók autósülés Cybex

1 Április 2025
30 December 2025
30 December 2025
30 December 2025
15 December 2024
15 December 2024
9 December 2024
31 Augusztus 2024
31 Augusztus 2024
31 Augusztus 2024
Útmutatók autósülés
- autósülés Dometic
- autósülés Ultimate Speed
- autósülés Storchenmuhle
- autósülés Sena
- autósülés Be Cool
- autósülés Joie
- autósülés Bugaboo
- autósülés Hauck
- autósülés Britax-Römer
- autósülés Peg Perego
- autósülés Nania
- autósülés Kindercraft
- autósülés Chicco
- autósülés Evenflo
- autósülés Lionelo
- autósülés Fisher Price
- autósülés Maxi-Cosi
- autósülés Stokke
- autósülés Jane
- autósülés Lorelli
- autósülés BeSafe
- autósülés Concord
- autósülés Inglesina
- autósülés Bebe Confort
- autósülés Chipolino
- autósülés Joolz
- autósülés Kinderkraft
- autósülés Mountain Buggy
- autósülés Foppapedretti
- autósülés Graco
- autósülés Recaro
- autósülés Brevi
- autósülés InfaSecure
- autósülés Xomax
- autósülés GB
- autósülés ABC Design
- autósülés Britax
- autósülés Nuna
- autósülés Osann
- autósülés Plebani
- autósülés Safety 1st
- autósülés Baninni
- autósülés Clek
- autósülés Hema
- autósülés Silver Cross
- autósülés X-Adventure
- autósülés Phil And Teds
- autósülés Baby Jogger
- autósülés Kiddy
- autósülés Bertoni
- autósülés BabyGO
- autósülés Xadventure
- autósülés Uppababy
- autósülés Giordani
- autósülés Romer
- autósülés Cosatto
- autósülés Heyner
- autósülés Migo
- autósülés Bellelli
- autósülés Burigotto
- autósülés Ellermeyer
- autósülés Disney
- autósülés Axkid
- autósülés Gesslein
- autósülés Takata
- autósülés Renolux
- autósülés Caretero
- autósülés Avova
- autósülés Cangaroo
- autósülés Beemoo
- autósülés Klippan
- autósülés Quax
- autósülés Kikka Boo
- autósülés Hipod
- autósülés Walser
- autósülés Baby Trend
- autósülés Casualplay
- autósülés Kiwy
- autósülés Dreambee
- autósülés Hamron
- autósülés Apramo
- autósülés Mothers Choice
- autósülés Petex
Legújabb útmutatók autósülés
2 Április 2025
2 Április 2025

15 Január 2025
15 Január 2025
15 Január 2025
12 Január 2025
12 Január 2025
12 Január 2025
11 Január 2025
11 Január 2025