Használati útmutató Canon Pixma MG2922
Olvassa el alább 📖 a magyar nyelvű használati útmutatót Canon Pixma MG2922 (4 oldal) a nyomtató kategóriában. Ezt az útmutatót 3 ember találta hasznosnak és 2 felhasználó értékelte átlagosan 4.5 csillagra
Oldal 1/4
1
2
3
XXXXXXXX © CANON INC. 2015
2
1
3
4
(A)
42
1
3
1 2
(B)
1
2
1
3
2
4
1
ES
ES
ES
ES
EN
EN
EN
EN
ES
EN
EN
ES
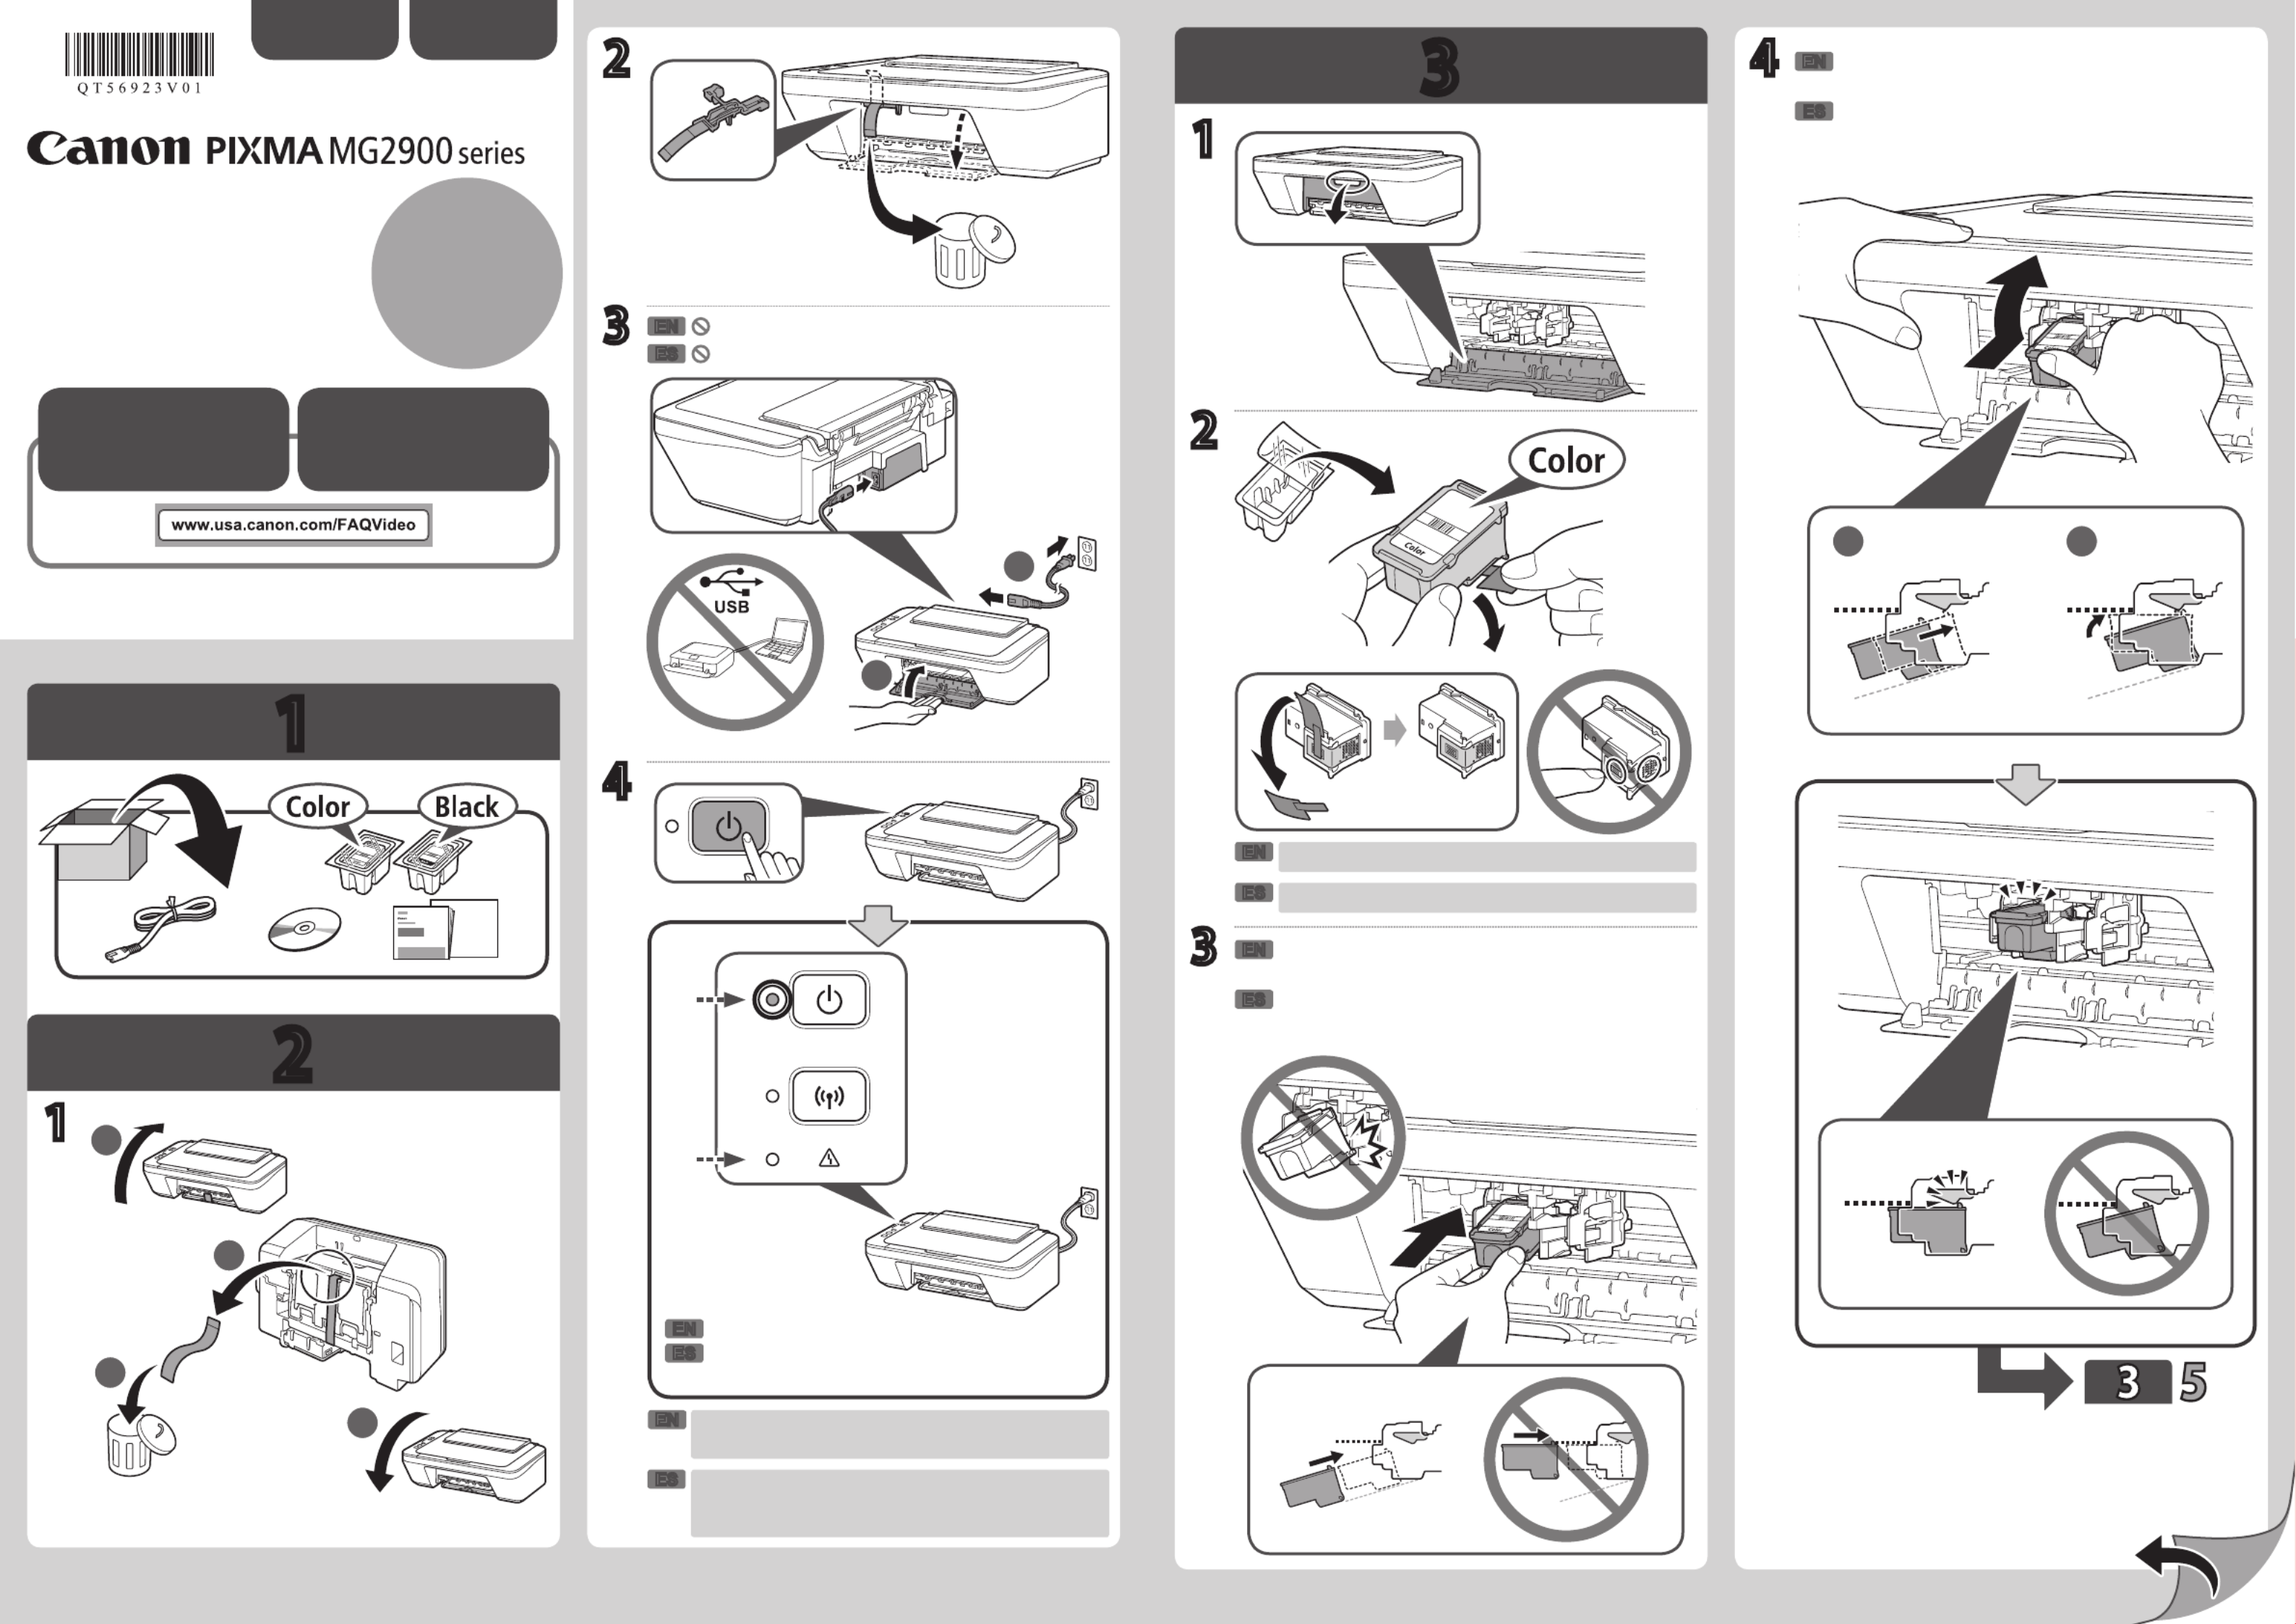
Compruebe que la luz de ACTIVADO (ON) (A)
se ilumina en verde.
Empuje el cartucho FINE (FINE Cartridge)
rmemente hacia dentro y hacia arriba hasta
que encaje en su sitio.
Tenga cuidado con la tinta de la cinta protectora.
Inserte el cartucho FINE (FINE Cartridge) en la
ranura formando un ángulo ligeramente hacia arriba.
ESPAÑOL
Guía de inicio 1
Se dispone de
tutoriales en
vídeo
No conecte aún el cable USB.
Si la lámpara (B) está Alarma (Alarm)
parpadeando, consulte "Si la lámpara Alarma
(Alarm) está parpadeando:".
Check that the lamp (A) lights green.ON
Push the FINE Cartridge in and up rmly until it
snaps into place.
Be careful of ink on the protective tape.
Insert the FINE Cartridge into the slot at a slight
upward angle.
ENGLISH
Getting Started 1
Video Tutorials
Available
Do not connect the USB cable yet.
If the Alarm Alarm lamp (B) is ashing, see "If the
lamp is ashing:".
PRINTED IN XXXXXXXXQT5-6923-V01
RMC: K10405

4 5
5
1
2
2
3
4
5
6
7
1
1 1
2
USB
Windows PC
(C)
(B)
Repita de a para instalar el otro cartucho
FINE (FINE Cartridge).
Cargue papel con
.
Espere hasta que la lámpara
deje de parpadear.
Compruebe que la lámpara esté apagada.
Consulte o dependiendo de cómo vaya a utilizar la máquina.
Siga los pasos de la para realizar
las conexiones e instalar el software, y después
continúe congurando la máquina.
Pulse el botón
.
Compruebe que la
lámpara esté
iluminada.
La máquina está congurada y lista para utilizarse.
El está accesible desde el sitio Web.
Solución de
problemas
Parpadeando
Iluminada
Apagada
Si la lámpara está parpadeando:
9 veces
4 veces
Los materiales de protección no están quitados. Pulse el botón para apagar la máquina, y después
vuelva a realizar el procedimiento desde - .
Compruebe que los cartuchos FINE (FINE Cartridge) estén correctamente instalados. Consulte .
Para otro número de parpadeos, consulte el .
Método de conexión
LAN inalámbrica
Iluminada
• La lámpara (C) está iluminada o
parpadeando.
• Si la lámpara (B) está
parpadeando, consulte "Si la lámpara
está parpadeando:".
Repeat to to install the other FINE
Cartridge.
Load paper with .
Wait until the lamp stops ashing.
Check that the lamp is off.
Refer to either or depending on how you will use the machine.
Follow the steps in the to make
connections and install software, then continue the
machine setup.
Press the button.
Check that the
lamp is lit.
The machine is set up and ready for use.
The is accessible from the website.
Troubleshooting
Flashing
Lit
Off
If the lamp is ashing:
9 times
4 times
The protective materials are not removed. Press the button to turn OFF the machine, then redo from - .
Check that the FINE Cartridges are installed correctly. Refer to .
For other number of ashes, refer to the .
Connection method
Wireless LAN
Lit
• The lamp (C) is lit or flashing.
• If the lamp (B) is flashing, see "If the
lamp is flashing:".

XXXXXXXX © CANON INC. 2015
1. Downloadsetuple. 2. Select connection method.
Select a printer connection method and click .Next
Follow the on-screen instructions to proceed the
setting.
3. Install software.
When the screen below appears, select the
software you want to install and click .Next
Follow the on-screen instructions to proceed the
setting.
Now your computer is connected to
printer.
a Access the following URL in your web browser. Windows PC users: you can also
open the le from the setup CD-
ROM.
The screen in will appear when h
you open the le from the CD-
ROM. Perform the remaining steps
in the same way as on the website.
Wireless LAN Connection
Connect the printer to your computer without
any cables.
USB Connection
Connect the printer to your computer with a
USB cable. This is the easiest way. You only
can connect one printer.
b Click Set Up.
c Select the region where you purchased the product.
d Select your product.
e Click Connecting to Computer, Smartphone or Tablet.
f Select your operating system.
g Click Download to download the setup le.
* If a download security warning appears, allow your web
browser to continue downloading.
h Open the downloaded le and click Next.
N
Proceed to connect printer to • Using wireless router
• Not using/having wireless router
(Connecting printer to device directly)
* If you connect your device to the printer directly, you may be unable to access the Internet
with your device or may be charged for an Internet connection.
Proceed to right side.
Smartphone or
Tablet
PC
screen.
The exte
survey s
appears
rst star
If does not appear on the list, see NOTE Canon_ij_XXXX
to setup the printer and wait until appears.Canon_ij_XXXX
XXXX varies depending on your printer.
The license
agreement screen
appears on the
rst startup.
If the screen in does b
not appear, see NOTE
to setup the printer and
wait until the screen
appears.
If none of these screens appears, see "
screen appears".
j Tap Settings
the home scr
h
Tap OK. Check the SSID and password i
and tap .Copy Password
o Wait for a while until the
printer is detected.
k
Ta
p When the printer is detected, tap
your printer's model name.
q Enter the
needed a
Inkjet
Do th
a Tap PRINT
you have
installed.
b Tap Yes.
Make sure the SSID
of the desired wireless
router appears and tap
Yes.
Enter the
the wireles
tap .OK
Tap . Tap .Yes OK
c Follow the on-screen instruction.
PC ( Mac OSWindows/ )
a Ho
the
the
Do the following to use Google Cloud Print.
a Press the Stop button on the printer.
b Connect the printer to your network.
c Register the printer to Google Cloud Print.
Using Google Cloud Print
Online Manual
QT6-1022-V03 PRINTED IN XXXXXXXX
Termékspecifikációk
| Márka: | Canon |
| Kategória: | nyomtató |
| Modell: | Pixma MG2922 |
Szüksége van segítségre?
Ha segítségre van szüksége Canon Pixma MG2922, tegyen fel kérdést alább, és más felhasználók válaszolnak Önnek
Útmutatók nyomtató Canon

9 Április 2025
3 Április 2025
16 Január 2025
15 Január 2025
14 Január 2025
14 Január 2025
14 Január 2025
14 Január 2025
13 Január 2025
10 Január 2025
Útmutatók nyomtató
- nyomtató Samsung
- nyomtató Sony
- nyomtató Fujitsu
- nyomtató LG
- nyomtató Olympus
- nyomtató Panasonic
- nyomtató StarTech.com
- nyomtató Sharp
- nyomtató Lenovo
- nyomtató Toshiba
- nyomtató HP
- nyomtató Roland
- nyomtató Digitus
- nyomtató Zebra
- nyomtató AVM
- nyomtató Fujifilm
- nyomtató Dell
- nyomtató Xerox
- nyomtató Primera
- nyomtató Thomson
- nyomtató Polaroid
- nyomtató Kyocera
- nyomtató Ricoh
- nyomtató Epson
- nyomtató Huawei
- nyomtató Renkforce
- nyomtató Mitsubishi
- nyomtató Godex
- nyomtató Brother
- nyomtató Citizen
- nyomtató Microboards
- nyomtató Kodak
- nyomtató MSI
- nyomtató Dymo
- nyomtató Testo
- nyomtató Konica Minolta
- nyomtató Datamax O'Neil
- nyomtató Kogan
- nyomtató Honeywell
- nyomtató Velleman
- nyomtató D-Link
- nyomtató Fargo
- nyomtató TSC
- nyomtató Sagem
- nyomtató Olympia
- nyomtató Tomy
- nyomtató Posiflex
- nyomtató ZKTeco
- nyomtató NEC
- nyomtató CUSTOM
- nyomtató Panduit
- nyomtató OKI
- nyomtató Equip
- nyomtató Pantum
- nyomtató Brady
- nyomtató Bixolon
- nyomtató CSL
- nyomtató Nilox
- nyomtató Seiko
- nyomtató Argox
- nyomtató Royal Sovereign
- nyomtató Lexmark
- nyomtató Olivetti
- nyomtató Intermec
- nyomtató Minolta
- nyomtató DNP
- nyomtató Triumph-Adler
- nyomtató Oce
- nyomtató Paxar
- nyomtató Metapace
- nyomtató Ultimaker
- nyomtató Ibm
- nyomtató Toshiba TEC
- nyomtató Frama
- nyomtató Builder
- nyomtató Star Micronics
- nyomtató Dascom
- nyomtató HiTi
- nyomtató GG Image
- nyomtató Vupoint Solutions
- nyomtató Elite Screens
- nyomtató DTRONIC
- nyomtató Phoenix Contact
- nyomtató Videology
- nyomtató Star
- nyomtató EC Line
- nyomtató Colop
- nyomtató Approx
- nyomtató Fichero
- nyomtató Raspberry Pi
- nyomtató Middle Atlantic
- nyomtató IDP
- nyomtató Evolis
- nyomtató Nisca
- nyomtató Epson 7620
- nyomtató Sawgrass
Legújabb útmutatók nyomtató

10 Április 2025
10 Április 2025

10 Április 2025
10 Április 2025
10 Április 2025

10 Április 2025

9 Április 2025

9 Április 2025
3 Április 2025
3 Április 2025