Használati útmutató Canon IXUS 950 IS
Olvassa el alább 📖 a magyar nyelvű használati útmutatót Canon IXUS 950 IS (227 oldal) a kamera kategóriában. Ezt az útmutatót 3 ember találta hasznosnak és 2 felhasználó értékelte átlagosan 4.5 csillagra
Oldal 1/227

CDI-E353-010 XXXXXXX © CANON INC. 2008 PRINTED IN JAPAN
Camera User Guide
Camera User Guide
Camera User Guide
Camera User GuideCamera User Guide
Camera User Guide
ENGLISH
DIGITAL CAMERA
Ensure that you read the Safety Precautions (pp. 194–201).
Getting Started p. 7
COPY
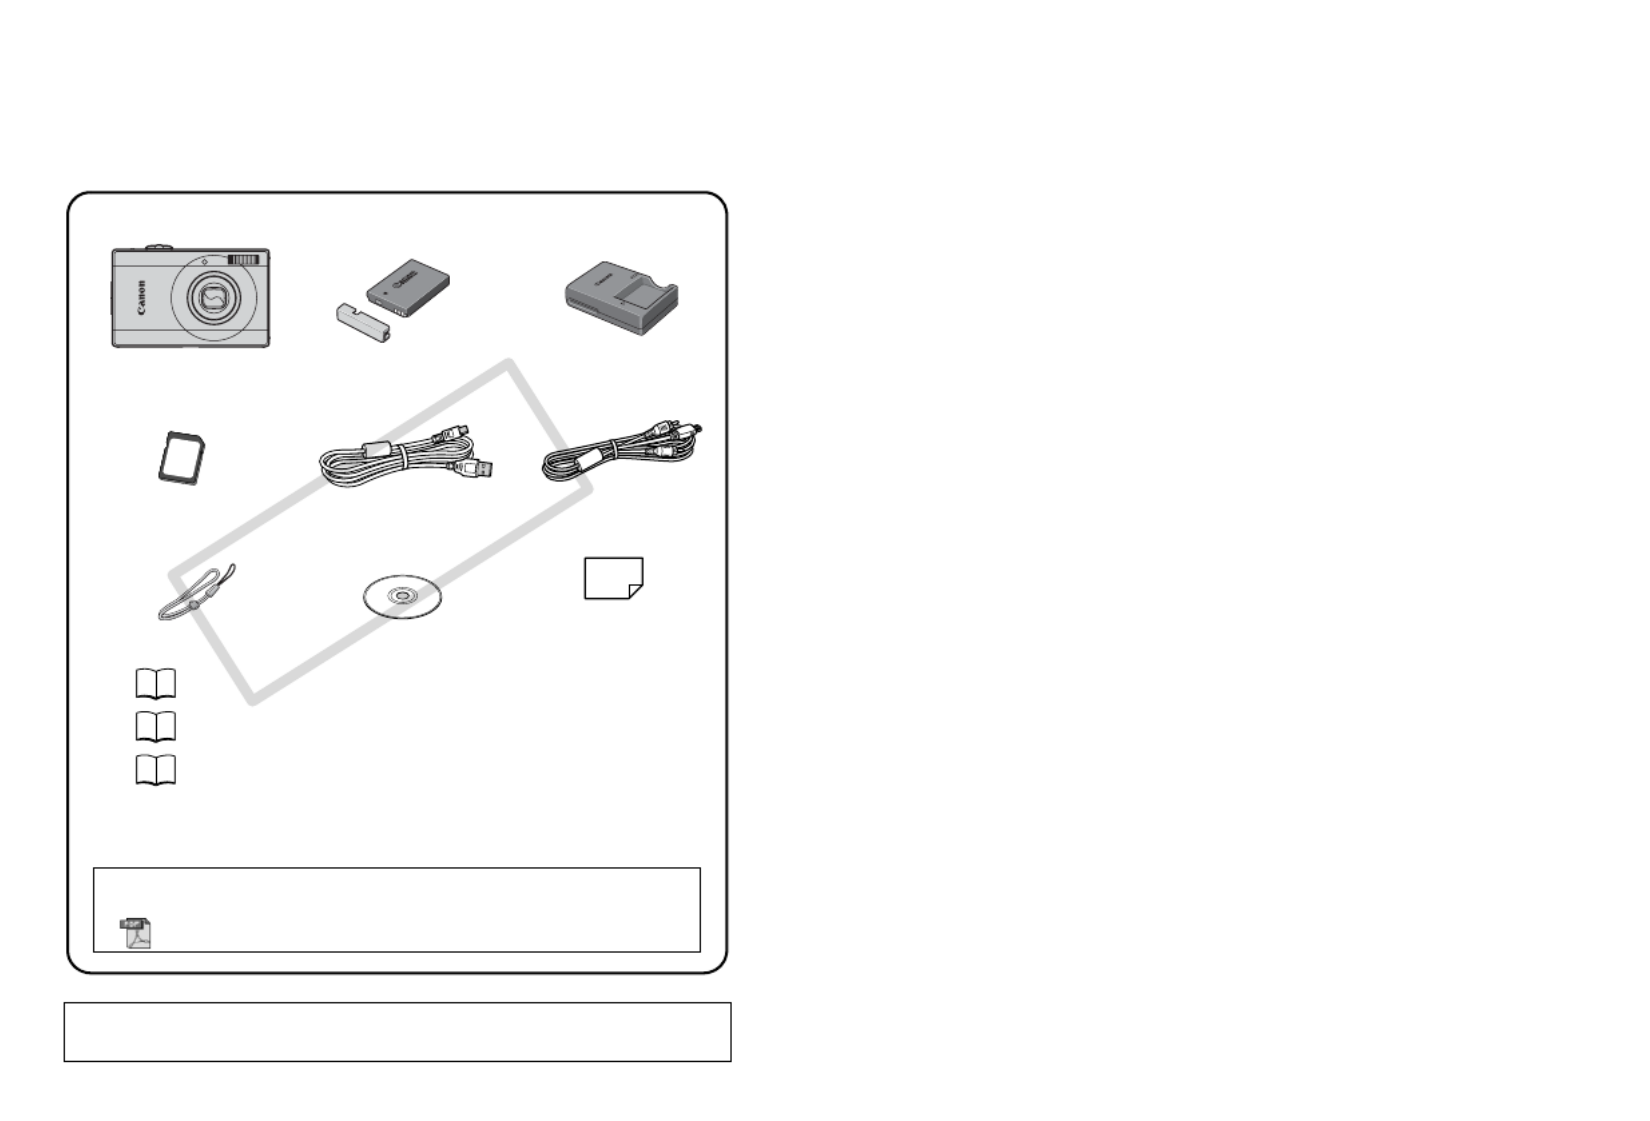
Confirming the Package Contents
The following items are included in the package. If something is
missing, please contact the retail outlet at which you purchased the
product.
You may not be able to achieve the full performance of this camera
with the included memory card.
Battery Charger
CB-2LX/CB-2LXE
Battery Pack NB-5L
(with Terminal Cover)
a b c
d f
g
Camera
Memory Card
(32MB)
Interface Cable
IFC-400PCU
AV Cable
AVC-DC400
Wrist Strap WS-DC2
• Camera User Guide
•Direct Print User Guide
(Connecting the camera to a printer)
•Software Starter Guide
(Connecting the camera to a computer)
• “Canon Customer Support” Leaflet
• “Use of Genuine Canon Accessories Recommended” Leaflet
User Guides
j
e
Canon Digital Camera
Solution Disk
iWarranty Card
h
See the PDF manuals available on the Canon website.
http://web.canon.jp/Imaging/information-e.html
• ZoomBrowser EX/ImageBrowser Software User Guide
COPY
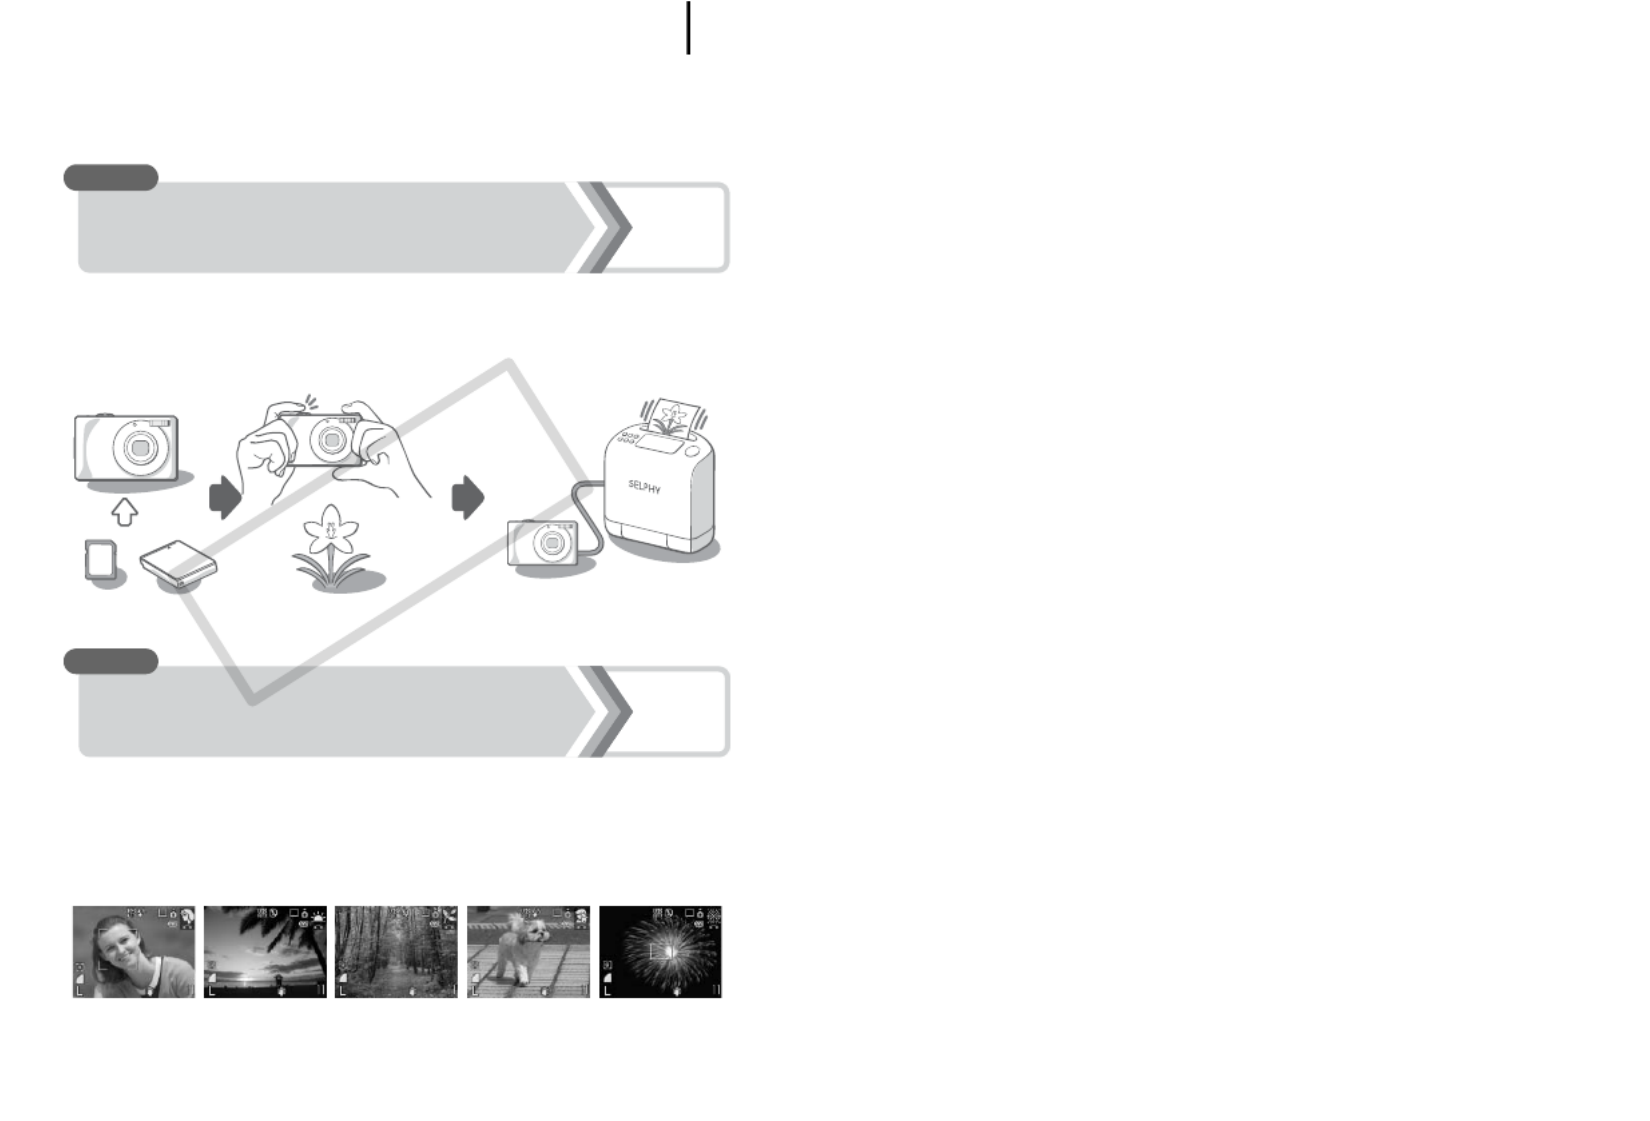
Let’s Get Started! 1
Let’s Get Started!
This guide is divided into the following two sections.
This section explains how to prepare the camera for use and the
basics of shooting, viewing and printing images. Start out by
familiarizing yourself with the camera and mastering the basics.
First...
Next...
Getting Started p. 7
Learning More p. 37
Once you have mastered the basics, use the camera’s many
features to shoot more challenging photos. Details on using each
function are described in this section, including how to connect the
camera to a TV to view images, and how to make My Camera
settings.
COPY

Table of Contents
2
Table of Contents
Items marked with a are lists or charts that summarize camera
functions or procedures.
Please Read . . . . . . . . . . . . . . . . . . . . . . . . . . . . . . . . . . . . . . . . . . . 6
Components Guide 38
Control Dial . . . . . . . . . . . . . . . . . . . . . . . . . . . . . . . . . . . . . . 41
Using the Button . . . . . . . . . . . . . . . . . . . . . . . . . . . . . . . .42
How to Use the Mode Switch . . . . . . . . . . . . . . . . . . . . . . . . 43
Indicator . . . . . . . . . . . . . . . . . . . . . . . . . . . . . . . . . . . . . . . . 44
Basic Operations 46
Menus and Settings . . . . . . . . . . . . . . . . . . . . . . . . . . . . . . . 46
Information Displayed on the LCD Monitor and Menus . . . . 48
Using the LCD Monitor . . . . . . . . . . . . . . . . . . . . . . . . . . . . . 58
Commonly Used Shooting Functions 60
Shooting with the Optical Zoom . . . . . . . . . . . . . . . . 60
Using the Digital Zoom/Digital Tele-Converter . . . . . . . . . . . 60
Magnified Close-Up Shooting (Digital Macro) . . . . . . . . . . . . 63
Using the Flash . . . . . . . . . . . . . . . . . . . . . . . . . . . . . . . . 64
Shooting Close-Ups/Infinity Shot. . . . . . . . . . . . . . . . 64
Using the Self-Timer . . . . . . . . . . . . . . . . . . . . . . . . . . . . 66
Changing the Recording Pixels (Still Images). . . . . . . . . . . . 68
Learning More . . . . . . . . . . . . . . . . . . . . . . . . . . . . 37
Preparations . . . . . . . . . . . . . . . . . . . . . . . . . . . . . . . . . . . . . . . 8
Shooting Still Images ( Auto Mode) . . . . . . . . . . . . . . . . . . . 14
Viewing Still Images . . . . . . . . . . . . . . . . . . . . . . . . . . . . . . . . 16
Erasing . . . . . . . . . . . . . . . . . . . . . . . . . . . . . . . . . . . . . . . . . . 17
Printing . . . . . . . . . . . . . . . . . . . . . . . . . . . . . . . . . . . . . . . . . . 18
Embedding the Date in the Image Data . . . . . . . . . . . . . . . . . 20
Shooting Movies ( Standard Mode) . . . . . . . . . . . . . . . . . . . 22
Viewing Movies. . . . . . . . . . . . . . . . . . . . . . . . . . . . . . . . . . . . 24
Downloading Images to a Computer . . . . . . . . . . . . . . . . . . . 25
System Map . . . . . . . . . . . . . . . . . . . . . . . . . . . . . . . . . . . . . . 32
Getting Started . . . . . . . . . . . . . . . . . . . . . . . . . . . 7
COPY

Table of Contents 3
Changing the Compression (Still Images). . . . . . . . . . . . . . . 69
Setting the Image Stabilizer Function . . . . . . . . . . . . . . . . . . 70
Adjusting the ISO Speed . . . . . . . . . . . . . . . . . . . . . . . . 71
Various Shooting Methods 73
Shooting in Modes for Special Conditions . . . . . . . . . . . . . . 73
Shooting in Manual Mode . . . . . . . . . . . . . . . . . . . . . . . . . . . 76
Continuous Shooting . . . . . . . . . . . . . . . . . . . . . . . . . . . . 76
Setting the Flash . . . . . . . . . . . . . . . . . . . . . . . . . . . . . . . . . . 77
Movie Shooting . . . . . . . . . . . . . . . . . . . . . . . . . . . . . . . . 79
Shooting Panoramic Images (Stitch Assist) . . . . . . . . . . . . . 84
Checking the Focus and Peoples’ Expressions
(Focus Check). . . . . . . . . . . . . . . . . . . . . . . . . . . . . . . . . . . . .86
Switching between Focusing Modes. . . . . . . . . . . . . . . . . . . 89
Selecting the Face to Focus On (Face Select and Track) . . 92
Shooting Hard-to-Focus Subjects (Focus Lock, AF Lock) . . 94
Locking the Exposure Setting (AE Lock). . . . . . . . . . . . . . . . 95
Locking the Flash Exposure Setting (FE Lock) . . . . . . . . . . . 96
Adjusting the Exposure Compensation . . . . . . . . . . . . . . . . . 97
Switching between Metering Modes . . . . . . . . . . . . . . . . . . . 98
Setting the Shutter Speed (Long Shutter Mode). . . . . . . . . . 99
Adjusting the Tone (White Balance) . . . . . . . . . . . . . . . . . . 100
Shooting in a My Colors Mode . . . . . . . . . . . . . . . . . . . . . . 103
Changing Colors . . . . . . . . . . . . . . . . . . . . . . . . . . . . . . . . . 105
Setting the Display Overlays . . . . . . . . . . . . . . . . . . . . . . . . 110
Categorizing Images Automatically (Auto Category) . . . . . 111
Registering Settings to the Print/Share Button. . . . . . 112
Playback/Erasing 114
Viewing Magnified Images . . . . . . . . . . . . . . . . . . . . . . 114
Viewing Images in Sets of Nine (Index Playback). . . . . 115
Checking the Focus and Peoples’ Expressions
(Focus Check Display) . . . . . . . . . . . . . . . . . . . . . . . . . . . . 116
Jumping to Images . . . . . . . . . . . . . . . . . . . . . . . . . . . . 118
Organizing Images by Category (My Category) . . . . . . . . . 120
Trimming a Portion of an Image . . . . . . . . . . . . . . . . . . . . . 123
Viewing Movies . . . . . . . . . . . . . . . . . . . . . . . . . . . . . . . . . . 125
Editing Movies. . . . . . . . . . . . . . . . . . . . . . . . . . . . . . . . . . . 127
Rotating Images in the Display . . . . . . . . . . . . . . . . . . . . . . 129
Playback with Transition Effects . . . . . . . . . . . . . . . . . . . . . 130
COPY

Table of Contents
4
Automated Playback (Slide Shows) . . . . . . . . . . . . . . . . . . 131
Red-Eye Correction Function . . . . . . . . . . . . . . . . . . . . . . . 136
Adding Effects with the My Colors Function . . . . . . . . . . . . 140
Resizing Images . . . . . . . . . . . . . . . . . . . . . . . . . . . . . . . . . 142
Attaching Sound Memos to Images . . . . . . . . . . . . . . . . . . 144
Sound-Only Recording (Sound Recorder) . . . . . . . . . . . . . 146
Protecting Images . . . . . . . . . . . . . . . . . . . . . . . . . . . . . . . . 147
Erasing All Images . . . . . . . . . . . . . . . . . . . . . . . . . . . . . . . 151
Registering Functions to the Button . . . . . . . . . . . . . . . .155
Print Settings/Transfer Settings 157
Setting the DPOF Print Settings . . . . . . . . . . . . . . . . . . . . . 157
Setting the DPOF Transfer Settings . . . . . . . . . . . . . . . . . . 163
Configuring the Camera 165
Setting the Power Saving Function . . . . . . . . . . . . . . . . . . . 165
Setting the World Clock. . . . . . . . . . . . . . . . . . . . . . . . . . . . 166
Formatting Memory Cards . . . . . . . . . . . . . . . . . . . . . . . . . 168
Resetting the File Number . . . . . . . . . . . . . . . . . . . . . . . . . 170
Creating an Image Destination (Folder) . . . . . . . . . . . . . . . 172
Setting the Auto Rotate Function . . . . . . . . . . . . . . . . . . . . 174
Resetting Settings to Their Default Values . . . . . . . . . . . . . 175
Connecting to a TV 176
Shooting/Playback Using a TV . . . . . . . . . . . . . . . . . . . . . . 176
Customizing the Camera (My Camera Settings) 177
Changing My Camera Settings . . . . . . . . . . . . . . . . . . . . . . 177
Registering My Camera Settings . . . . . . . . . . . . . . . . . . . . 178
Troubleshooting 180
List of Messages 190
Appendix 194
Safety Precautions . . . . . . . . . . . . . . . . . . . . . . . . . . . . . . . 194
Handling Precautions . . . . . . . . . . . . . . . . . . . . . . . . . . . . . 198
Using an AC Adapter Kit (Sold Separately) . . . . . . . . . . . . 202
Using an Externally Mounted Flash (Sold Separately) . . . . 203
Camera Care and Maintenance . . . . . . . . . . . . . . . . . . . . . 205
Specifications . . . . . . . . . . . . . . . . . . . . . . . . . . . . . . . . . . . 206
COPY
Getting Started
Preparations
8
Preparations
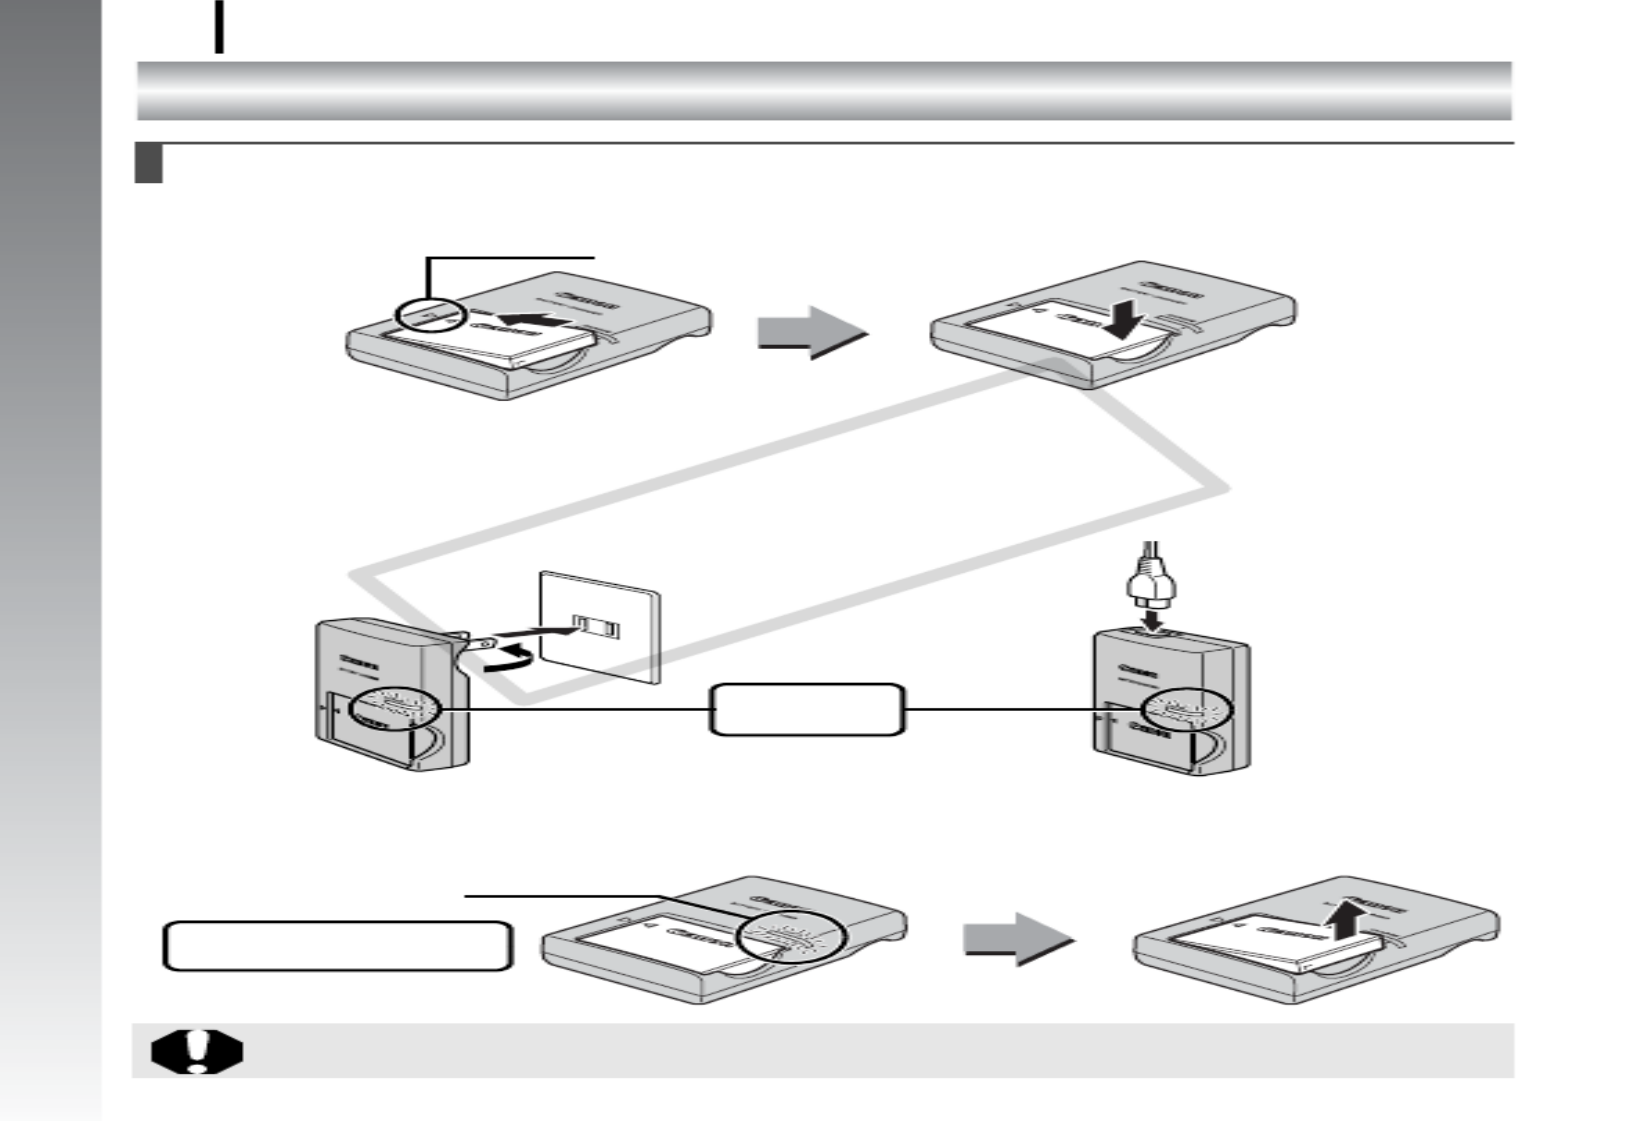
1. Insert the battery into the battery charger.
2. Plug the battery charger (CB-2LX) into a power outlet,
or attach the power cord to the battery charger (CB-
2LXE) and plug it into a power outlet.
• Battery charger model names and types vary by region.
3. Remove the battery after charging is complete.
• Charging takes approximately 2 hours 5 minutes.
Charging the Battery
To protect the battery and prolong its life, do not charge it for
longer than 24 hours continuously.
Align these symbols
Charge Indicator
Charging:
Lights red
For CB-2LX For CB-2LXE
Charge Indicator
Charging complete:
Lights green
COPY

Preparations
10
Getting Started
4. Close the cover (a
a
a
aa, b
b
b
bb).
To Remove the Battery
Press the battery lock in the direction of
the arrow (a
a
a
aa) and pull the battery out
(b
b
b
bb).
To Remove the Memory Card
Use a finger or the toggle on the wrist strap to push the memory card in
until you hear a click, then release it.
COPY
Preparations 11
Getting Started
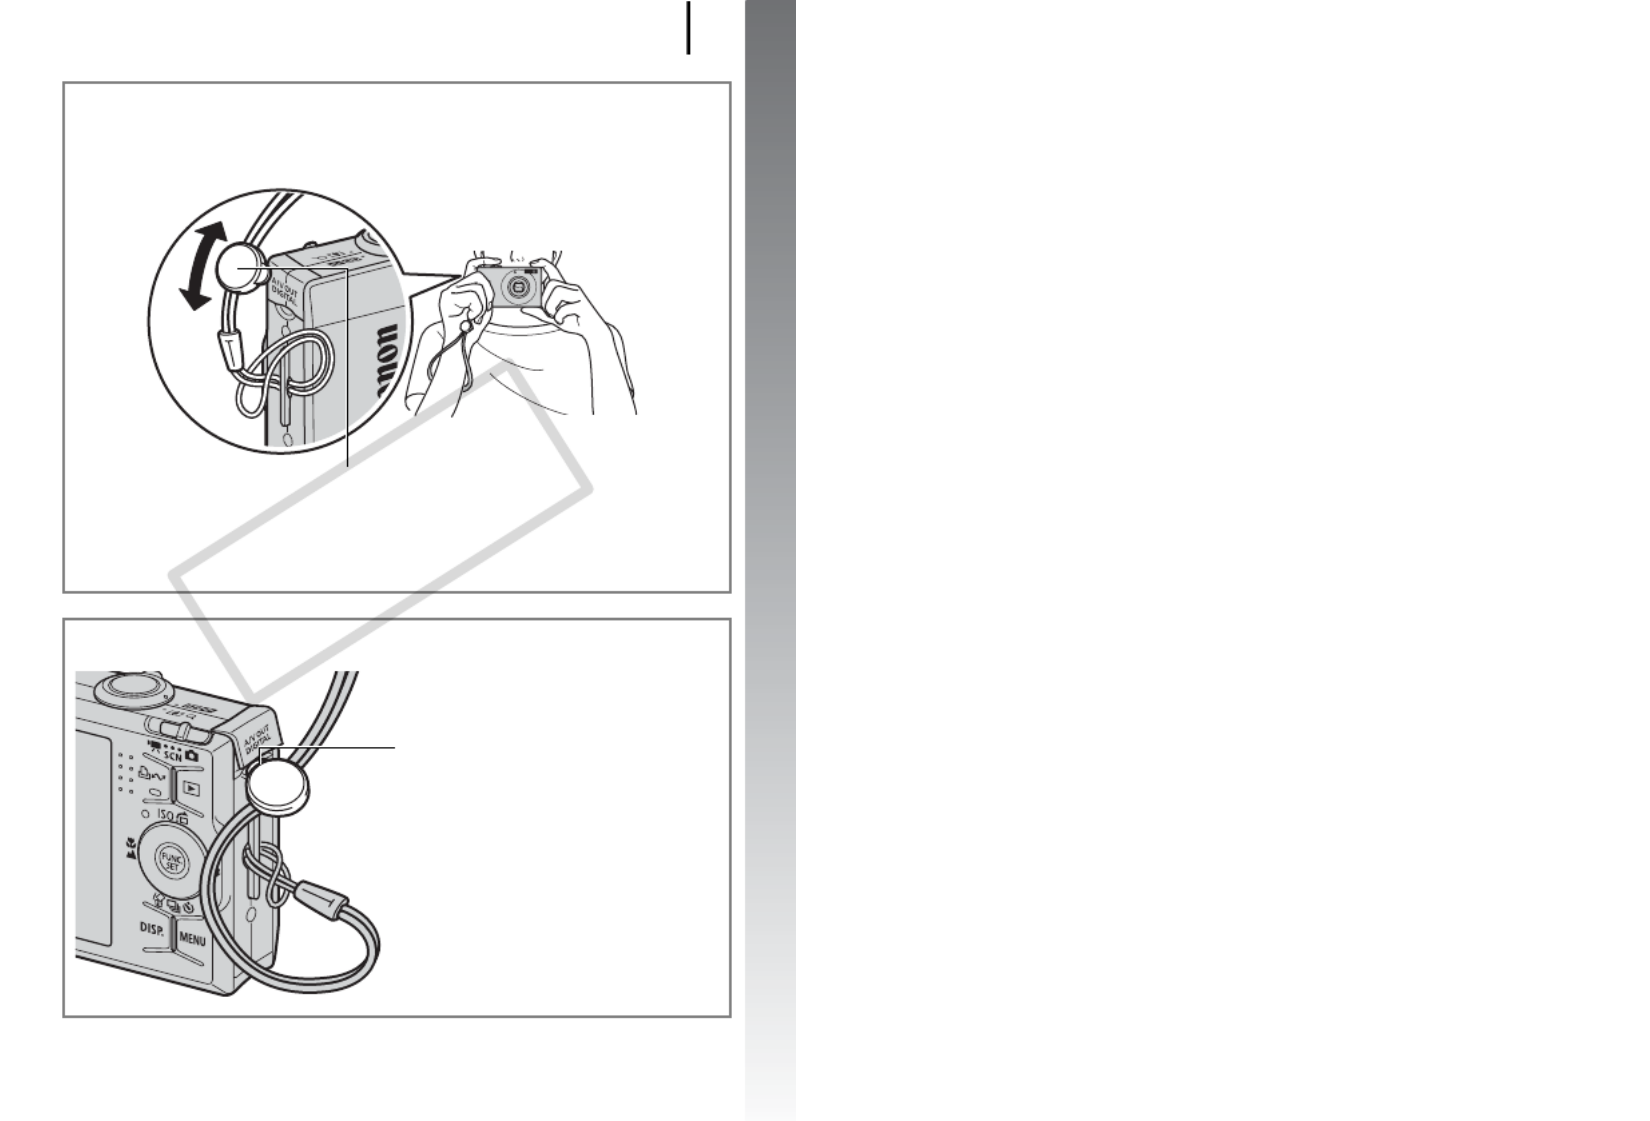
Attaching the Wrist Strap
Use the wrist strap when using the camera to prevent yourself from
accidentally dropping the camera.
Use the Wrist Strap to Open the Terminal Cover
Toggle
You can change its position on the strap. The
toggle can be used to open the A/V OUT and
DIGITAL terminal cover and when inserting or
removing memory cards.
Hook your fingernail or the wrist
strap toggle under the bottom edge
of the A/V OUT and DIGITAL
terminal cover to open it.
COPY

Preparations
12
Getting Started
The Date/Time settings menu will appear the first time the power is
turned on.
1. Press the power button.
2. Select the month, day, year and
time, and the display order.
1. Use the or button to select a
category.
2. Use the or button to set the
value.
3. Press the button.
To Change a Previously Set Date/Time
Use the following procedures to display the Date/Time settings
window, and then perform Steps 2 and 3 above.
1. Press the button.
2. Use the or button to select
the (Set up) menu.
3. Use the or button to select
[Date/Time].
4. Press the button.
Setting the Date and Time
Button
Buttons
Power Button
Button
COPY

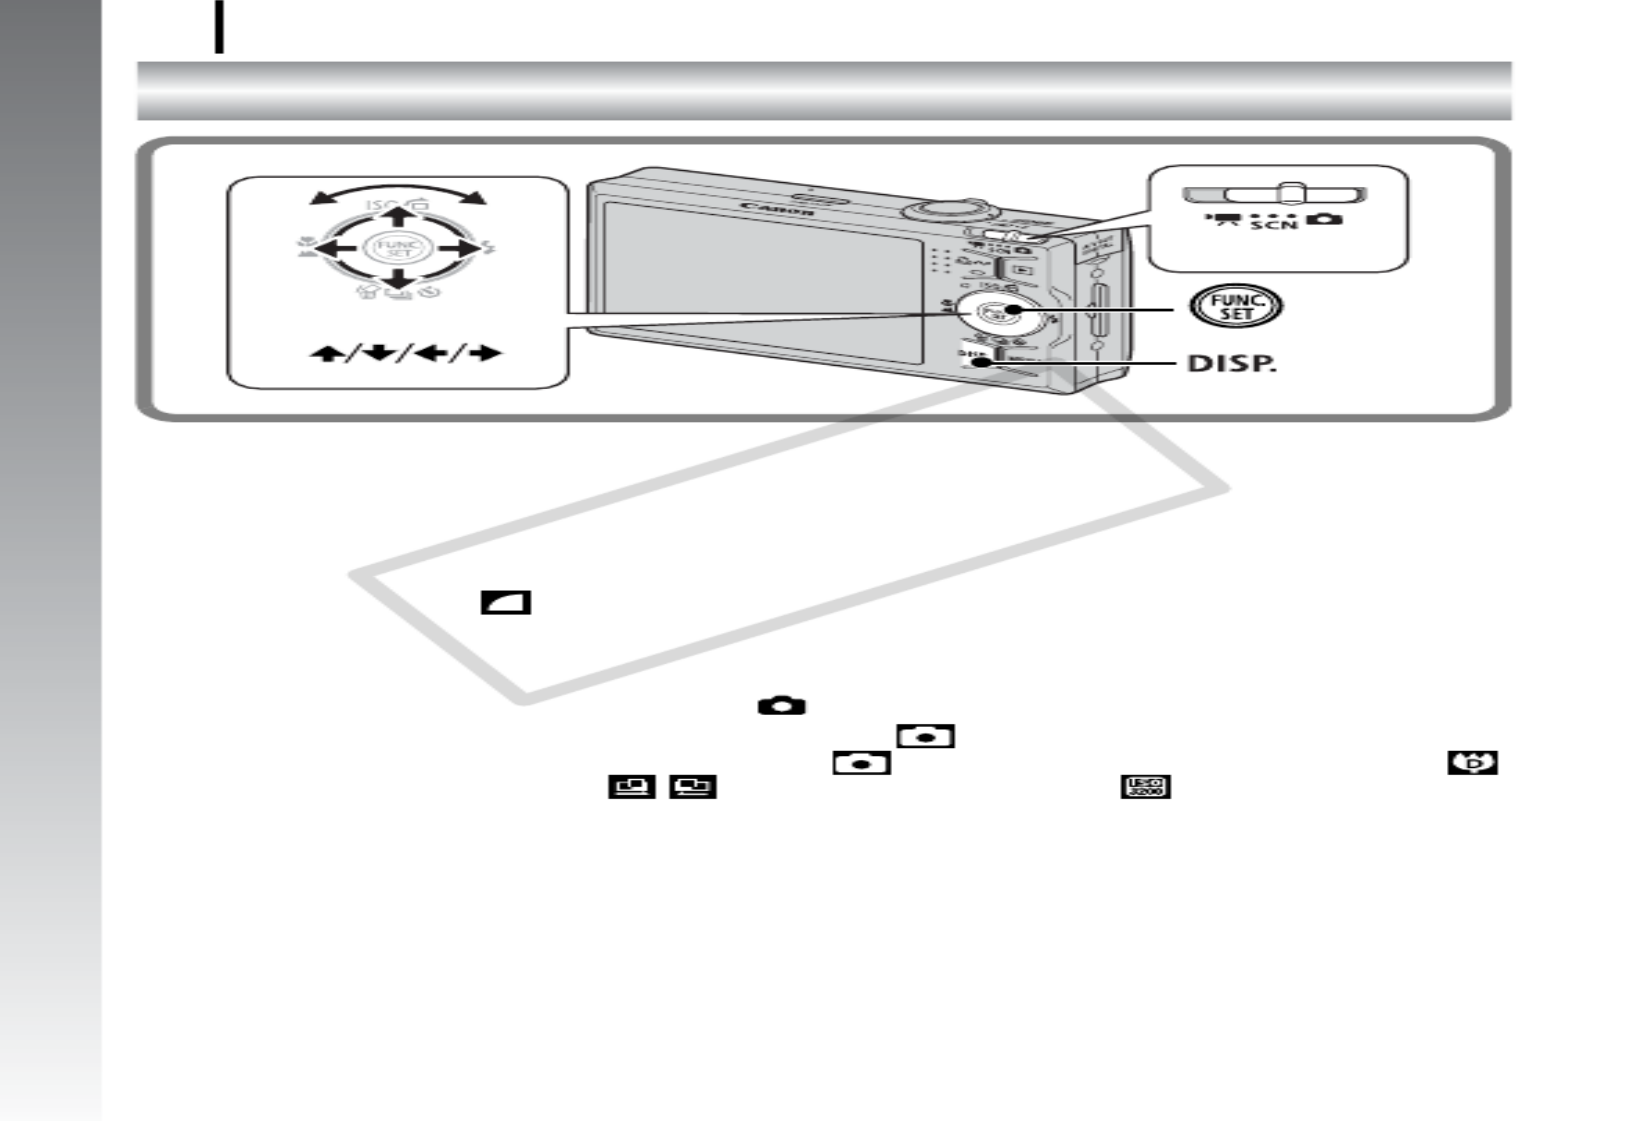
Getting Started
Shooting Still Images
14
Shooting Still Images
1. Press the power button.
• The start-up sound will play and the start-up image will display in
the LCD monitor.
• Pressing the power button again turns the power off.
2. Select a shooting mode.
1. Set the mode switch to
(Shooting).
2. Turn the control dial to select
(Auto).
3. Aim the camera at the subject.
4. Press the shutter button lightly (press halfway) to set
the focus.
• When the camera focuses, it beeps twice and the indicator lights
green (orange when the flash fires).
Avoiding Camera Shake
Keep your arms tight against your body while
holding the camera firmly by the sides. Using
a tripod is also effective.
( Auto Mode)
Indicator
Shutter ButtonPower Button
Mode Switch
Control Dial
Wrist Strap
Use the wrist strap to avoid dropping
the camera during use.
COPY

Shooting Still Images 15
Getting Started
5. Without changing anything else, press the shutter
button all the way (press fully) to shoot.
• The shutter sound will play once and the image will record.
• Recorded images are displayed on the LCD monitor for
approximately 2 seconds immediately after shooting (Rec.
review). Shooting is possible while the image is displayed.
• Holding down the shutter button after taking a shot will continue
displaying the image.
• The indicator will blink green and the file will record to the
memory card.
To Shoot Images in Focus
The camera automatically sets the focus when you press the shutter
button halfway*.
* The shutter button has a two-stage action. Pressing it down to the first stage is
referred as “pressing halfway”.
Mute Setting
Pressing the DISP. button while turning on the camera power will
silence all camera sounds except for warning sounds. Setting can be
changed from the (Set up) Menu [Mute].
Just
pressing
fully
Press fully
Press
halfway to
focus
Beeps
twice
AF frames will display in
green on the LCD monitor
at the points of focus.
Shooting preparations
complete: Lights green
(orange when the flash fires)
Incorrect
Correct
Recording:
Blinks green
Recording:
Blinks green
COPY

Getting Started
Viewing Still Images
16
Viewing Still Images
1. Press the (Playback) button.
2. Use the or button to display
the image you wish to view.
• Use the button to move to the
previous image and the button to
move to the next image.
• The images advance more quickly if
you keep the button pressed
continuously, but they will appear
coarse.
• Use the control dial to select images. Turn the dial
counterclockwise to view a previous image and clockwise to view
the next image.
zSetting [Resume] to either [Last seen]* or [Last shot] in the
(Play) menu allows you to specify the image to display in
playback mode (* Default setting). If you select [Last seen],
the last image viewed will display (Resume Playback).
zFollowing the procedure below will display the last image,
regardless of the [Resume] setting.
- Shooting an image
- Changing the memory card
- Editing an image on the memory card using a computer
Button
( / Buttons)
Control Dial
COPY
Getting Started
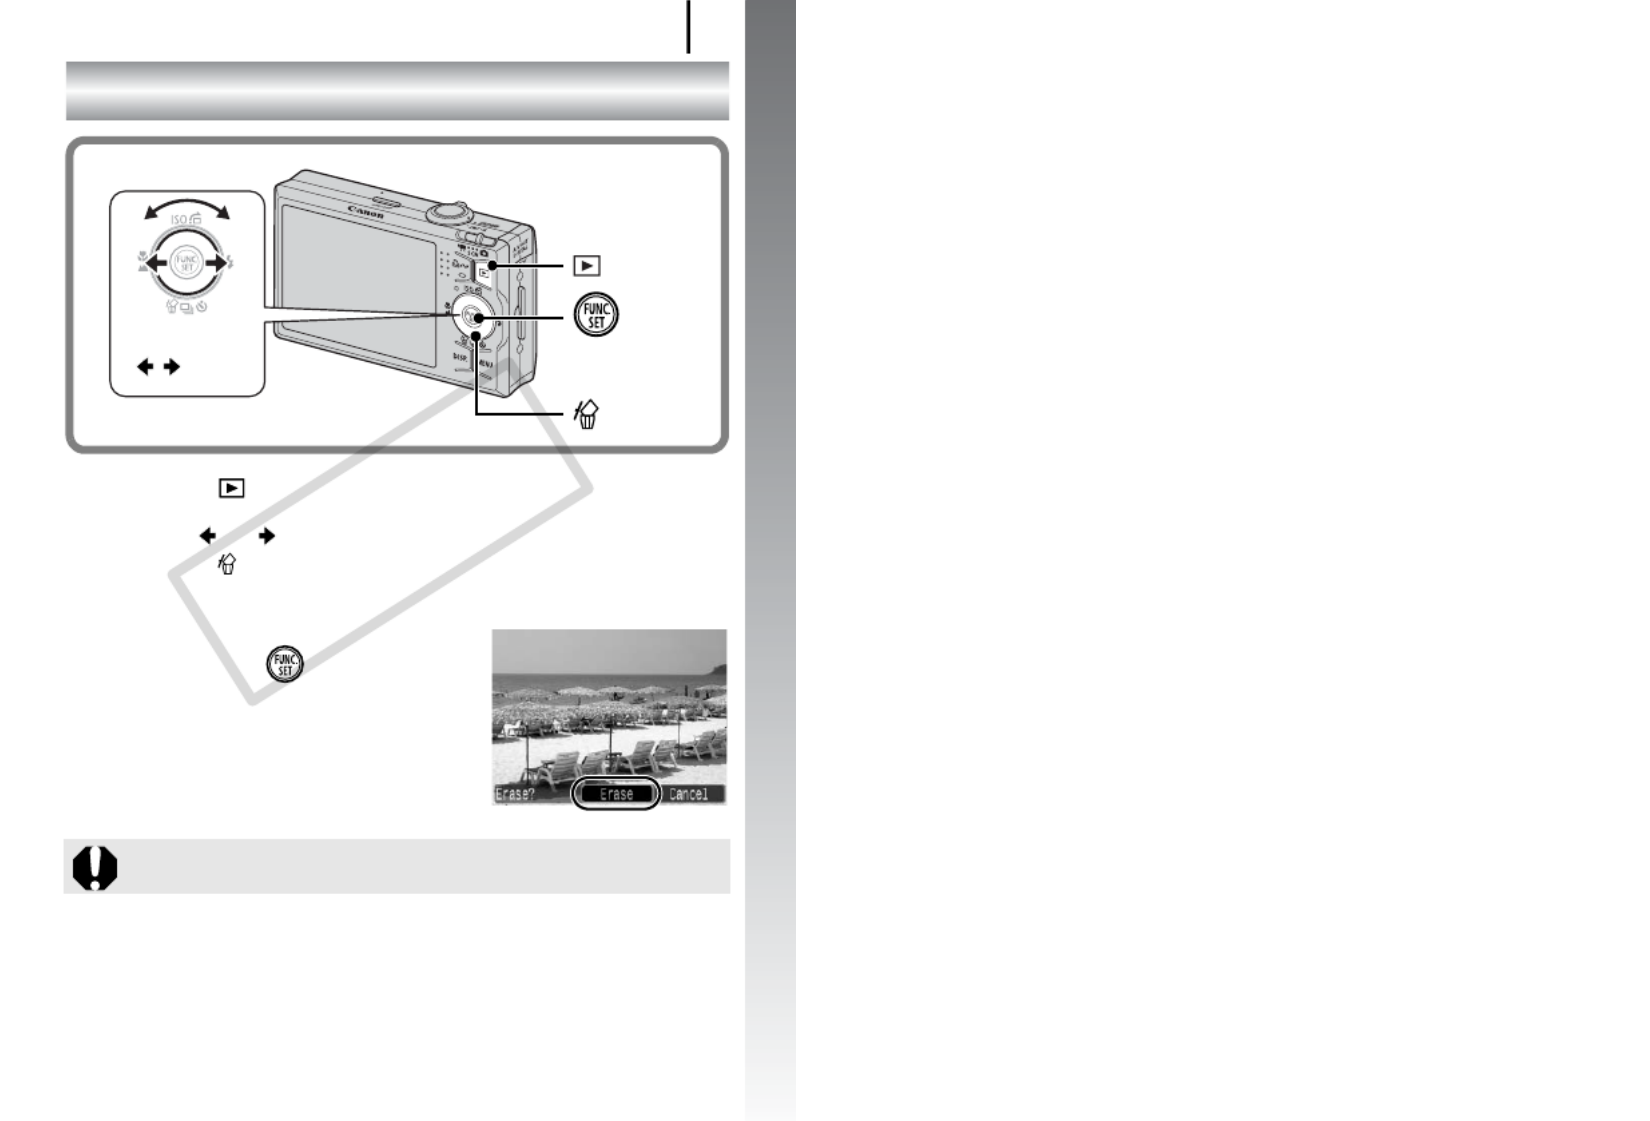
Erasing 17
Erasing
1. Press the (Playback) button.
2. Use the or button to select an image to erase and
press the button.
• You can select images by turning the control dial.
3. Confirm that [Erase] is selected
and press the button.
• To exit instead of erasing, select
[Cancel].
Please note that erased images cannot be recovered. Exercise
adequate caution before erasing an image.
Button
/ Buttons
Button
Button
( / Buttons)
Control Dial
COPY

Getting Started
Printing
18
Printing
1. Connect the camera to a direct print compatible printer.
• Hook your fingernail or the wrist strap toggle under the bottom
edge of the camera’s terminal cover to open it, then insert the
interface cable all the way into the connector.
• See the printer’s user guide for connection instructions.
• Printing is also possible using a non-Canon-brand printer
provided the printer is PictBridge compliant. Refer to the Direct
Print User Guide for details.
2. Turn on the printer.
3. Press the camera’s (Playback) button to turn on the
power.
• The button will light blue.
4. Use the or button to select an image to print and
press the button.
• You can select images by turning the control dial.
• The button will blink blue and printing will start.
• After you finish printing, turn off the camera and the printer and
disconnect the interface cable.
Button
Button
Interface
Cable
A/V OUT and DIGITAL Terminal
( / Buttons)
Control Dial
COPY

Printing 19
Getting Started
Printing From a Print List
You can add images directly to a print list by merely pressing the
button immediately after shooting or while playing back images.
You can then print the images from the print list, when connecting the
camera to a printer.
Adding to a Print List
1. Press the button (still images only).
2. Add to the print list.
1. Use the or button to set
the number of copies to print.
2. Use the or button to select
[Add].
3. Press the button.
• To remove an image from the print
list, press the button again,
select [Cancel] using the or button, then press the
FUNC./SET button.
Printing Images in a Print List
This explanation is based on the use of a Canon SELPHY ES series
or SELPHY CP series printer.
1. Connect the camera to your printer.
2. Print images.
1. Use the or button to select
[Print now].
• Use the or button to confirm
the images added to the print list.
2. Press the button.
• Printing will begin.
• If printing is halted and resumed,
printing will start from the next
image in the queue.
Number of copies to print
COPY
Getting Started
Embedding the Date in the Image Data
20
Embedding the Date in the Image Data
This section explains how to embed date information on images as
they are recorded (Date Stamp).
• The date stamp cannot be deleted from the image data once it has
been embedded. Ensure that the camera’s date/time is set correctly
beforehand (p. 12).
• The image size is fixed to 2M (1600 x 1200) setting and the
compression to (Fine) (appropriate for printing L-size or postcard-
size prints).
1. Select a shooting mode.
1. Set the mode switch to (Shooting).
2. Turn the control dial to select (Auto).
• Shooting modes other than can be selected (except for
(Digital Macro), (Stitch Assist), and ).
Button
Button
(
Buttons)
Mode Switch
Control Dial
COPY

Embedding the Date in the Image Data 21
Getting Started
2. Select [Date Stamp].
1. Press the button.
2. Use the or button to select
.
3. Use the or button to select
.
• The area which will not be printed
will appear gray.
• Press the DISP. button, then use the
or button to select [Date/
Time].
You can use the following methods to imprint the
date on images lacking imprinted date stamps.
• Set with the camera’s Digital Print Order Format (DPOF)
function.
Set the [Date] option to [On] in [Print Settings] in the (Print)
menu.
• Connect the camera to a printer and imprint the date.
See the Direct Print User Guide.
• Insert a memory card into the printer and imprint the date.
See your printer user guide.
• Use the supplied software.
See the Software Starter Guide.
COPY
Getting Started
Shooting Movies
22
Shooting Movies
1. Press the power button.
2. Select a shooting mode.
1. Set the mode switch to
(
Movie
)
.
2. Turn the control dial to select
(Standard).
3. Aim the camera at the subject.
z Do not touch the microphone while recording.
z Do not press any buttons other than the shutter button. The
sound that buttons make will be recorded in the movie.
( Standard Mode)
Shutter Button
Power Button
Microphone
Indicator
Mode Switch
Control Dial
COPY

Shooting Movies 23
Getting Started
4. Press the shutter button lightly
(press halfway) to set the focus.
• An electronic beep will sound twice
and the indicator will light green when
the camera focuses.
• The exposure, focus and white
balance are automatically set when
you press the button halfway.
5. Without changing anything else,
press the shutter button all the
way (press fully) to shoot.
• Recording starts.
• During the recording, the elapsed
recording time and [ zRec.] will display
in the LCD monitor.
6. Press the shutter button again
(press fully) to stop recording.
• The indicator will blink green and the
data will be recorded onto the memory
card.
• Recording will stop automatically when
the maximum recording time elapses,
or the built-in memory or memory card
become full.
Shooting preparations
complete: Lights green
Elapsed Time
Recording: Blinks green
COPY

Getting Started
Viewing Movies
24
Viewing Movies
1. Press the (Playback) button.
2. Use the or button to display a movie and press the
button.
• Images with a icon are movies.
• You can switch between images by
turning the control dial.
3. Use the or button to select (Playback) and
press the button.
• The movie will start playing.
• If you press the FUNC./SET button
during playback, you can pause and
restart the movie.
• You can adjust the playback volume
with the or button.
Button
Button
(
Buttons)
Control Dial
COPY

Getting Started
Downloading Images to a Computer 25
Downloading Images to a Computer
You are recommended to use the supplied software to download
images to your computer.
Items to Prepare
• Camera and computer
• Canon Digital Camera Solution Disk supplied with the camera
• Interface cable supplied with the camera
Please install the software on a computer meeting the following
minimum requirements.
Windows
Macintosh
System Requirements
OS Windows Vista
Windows XP Service Pack 2
Windows 2000 Service Pack 4
Computer Model The above OS should be pre-installed on computers with built-in
USB ports.
CPU Windows Vista Pentium 1.3 GHz or higher
Windows XP/Windows 2000 Pentium 500 MHz or higher
RAM Windows Vista 512 MB or more
Windows XP/Windows 2000 256 MB or more
Interface USB
Free Hard Disk
Space
• Canon Utilities
- ZoomBrowser EX 200 MB or more
- PhotoStitch 40 MB or more
•
Canon Camera TWAIN Driver
25 MB or more
Display 1,024 x 768 pixels/High Color (16 bit) or better
OS Mac OS X (v10.3 – v10.4)
Computer Model The above OS should be pre-installed on computers with built-in
USB ports.
CPU PowerPC G3/G4/G5 or Intel Processor
RAM 256 MB or more
Interface USB
Free Hard Disk
Space
• Canon Utilities
- ImageBrowser 300 MB or more
- PhotoStitch 50 MB or more
Display 1,024 x 768 pixels/32,000 Colors or better
COPY

Downloading Images to a Computer
26
Getting Started
1. Installing the software.
Windows
1. Place the Canon Digital Camera Solution Disk in the
computer’s CD-ROM drive.
2. Click [Easy Installation].
• Follow the onscreen messages to
proceed with the installation.
3. Click [Restart] or [Finish] once the
installation is complete.
• When the installation is finished,
[Restart] or [Finish] will display. Click
the button that appears.
4. Remove the CD-ROM from the
drive when your normal desktop
screen appears.
Macintosh
Double-click the icon in the CD-
ROM window. When the installer panel
appears, click [Install]. Follow the
onscreen instructions to proceed.
Preparing to Download Images
When using Windows 2000, make sure to install the software first
before connecting the camera to the computer.
COPY

Downloading Images to a Computer 27
Getting Started
2. Connecting the camera to a computer.
1. Connect the supplied interface cable to the computer’s USB
port and to the camera’s A/V OUT and DIGITAL terminal.
• Hook your fingernail or the wrist strap toggle under the bottom
edge of the camera’s terminal cover to open it, then insert the
interface cable all the way into the connector.
3. Preparing to download images to the computer.
1. Press the camera’s (Playback)
button to turn on the power.
If the Digital Signature Not Found window appears, click [Yes].
The USB driver will automatically finish installing onto the
computer when you attach the camera and open a connection.
Interface Cable
USB Port A/V OUT and DIGITAL
Terminal
COPY

Downloading Images to a Computer
28
Getting Started
4. Displaying CameraWindow.
Windows
1. Select [Canon CameraWindow] and
click [OK].
CameraWindow will display.
Macintosh
CameraWindow will appear when you establish a connection
between the camera and computer. If it fails to appear, click the
[CameraWindow] icon on the Dock (the bar which appears at the
bottom of the desktop).
Preparations for downloading images are now finished. Please
proceed to the Downloading Images Using the Camera (Direct
Transfer) section (p. 29) (except Windows 2000).
If this event dialog does not appear, click the [Start] menu and
select [All Programs] or [Programs], followed by [Canon
Utilities], [CameraWindow], [CameraWindow] and
[CameraWindow].
z Please refer to the regarding how to Software Starter Guide
download images using the computer.
z With Windows 2000, you can download images using the
computer.
COPY

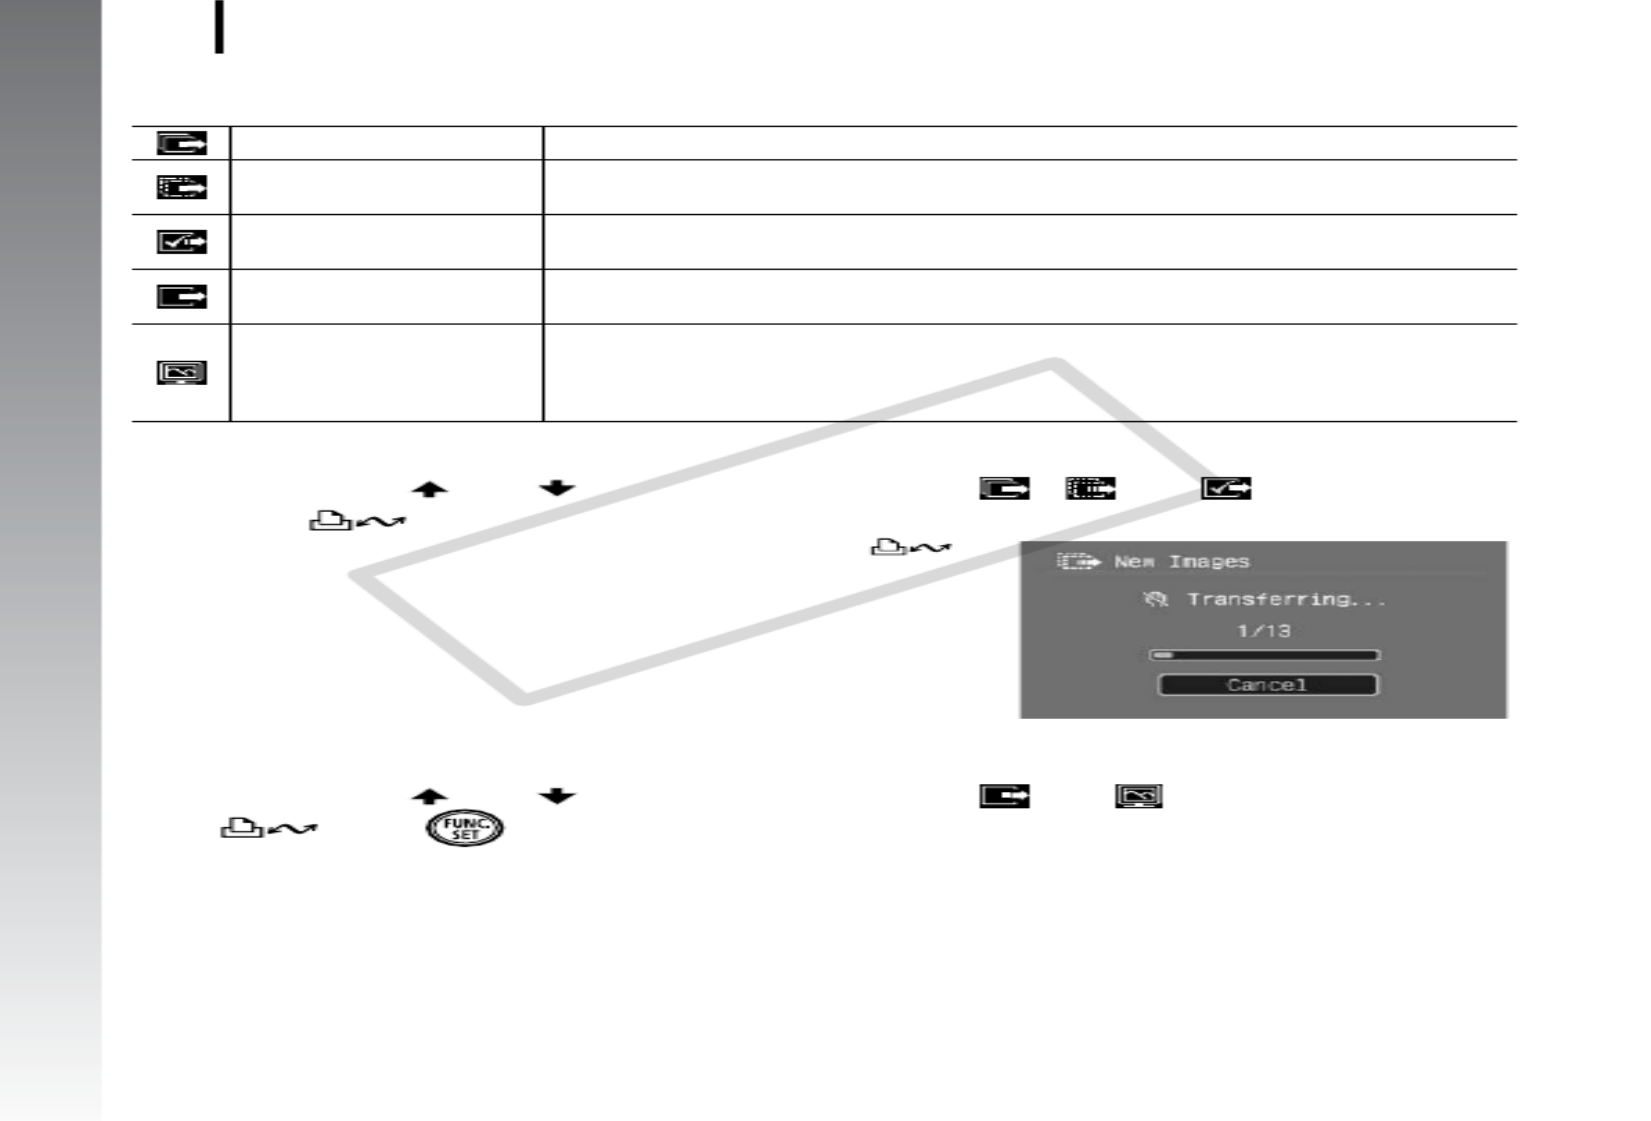
Downloading Images to a Computer 29
Getting Started
Use this method to download images using camera operations (except
Windows 2000).
1. Confirm that the Direct Transfer menu is displayed on
the camera’s LCD monitor.
• The button will light blue.
• Press the MENU button if the Direct
Transfer menu fails to appear.
2. Press the button.
• All images that have not already been transferred to the
computer are transferred and saved to the computer.
Downloading Images Using the Camera
(Direct Transfer)
Install the software before downloading images via the Direct
Transfer method for the first time (p. 26).
Button
Button
Button
Buttons
Direct Transfer Menu
COPY
Downloading Images to a Computer
30
Getting Started
You can also use the following options in the Direct Transfer
menu to set the method for downloading images.
All Images/New Images/DPOF Trans. Images
1. Use the or button to select , or and press
the button.
• The images will download. The
button will blink blue while
downloading is in progress.
• The display will return to the Direct
Transfer menu when the download is
complete.
• To cancel the download, press the
FUNC./SET button.
Select & Transfer/Wallpaper
1. Use the or button to select or and press the
(or ) button.
All Images Transfers and saves all images to the computer.
New Images Transfers and saves to the computer only the
images that have not been previously transferred.
DPOF Trans.
Images
Transfers and saves to the computer only the
images with DPOF Transfer Order settings.
Select &
Transfer
Transfers and saves single images to the computer
as you view and select them.
Wallpaper
Transfers and saves single images to the computer
as you view and select them. The transferred
images display as the background on the computer
desktop.
COPY

Downloading Images to a Computer 31
Getting Started
2. Use the or button to select images to download
and press the button.
• The images will download. The
button will blink blue while
downloading is in progress.
3. Press the button after
downloading finishes.
• You will return to the Direct Transfer
menu.
Click at the bottom right of the window to close the CameraWindow
and the downloaded images will display on the computer.
By default, images are saved on the computer in folders according to
the shooting date.
Only JPEG images can be downloaded as wallpaper for a
computer.
The option selected with the button is retained even when
the camera’s power is turned off. The previous setting will be in
effect the next time the Direct Transfer menu is displayed. The
image selection screen will appear directly when the [Select &
Transfer] or the [Wallpaper] option was last selected.
Windows Macintosh
ZoomBrowser EX ImageBrowser
COPY

Getting Started
System Map
32
System Map
Wrist Strap
WS-DC2
Battery Pack NB-5L*
1
(with Terminal Cover)
Compact Power Adapter
CA-DC10
AC Adapter Kit ACK-DC30
Supplied with Camera Interface Cable IFC-400PCU*
1
Memory Card (32MB)
Canon Digital Camera
Solution Disk
AV Cable
AVC-DC400*
1
Waterproof Case
WP-DC24
Power Cord
DC Coupler
DR-30
Battery Charger
CB-2LX/CB-2LXE*
1
High-Power Flash
HF-DC1
COPY

System Map 33
Getting Started
USB Port
PC Card Slot
Direct Interface Cable
USB Card
Reader
PCMCIA
Adapter
SD Memory Card*
5
• SDC-128M
• SDC-512MSH
Compact Photo Printers*
2
*
3
(SELPHY Series)
Direct Print Compatible
Bubble Jet Printers*
4
(PIXMA series)
Video IN Terminal
Audio IN Terminal
*1 Also available for purchase separately.
*2 See the user guide supplied with the printer for more information on the printer.
*3 This camera can also be connected to the CP-10/CP-100/CP-200/CP-300.
*4 See the user guide supplied with the Bubble Jet printer for more information on
the printer and interface cables.
*5 Not sold in some regions.
TV/Video
Canon Direct Print
Compatible Printers
COPY

System Map
34
Getting Started
The following camera accessories are sold separately.
Some accessories are not sold in some regions, or may no longer
be available.
Flash
• High-Power Flash HF-DC1
This attachable supplementary flash can be used to capture
photographic subjects that are too distant for the built-in flash to
illuminate.
Power Supplies
• AC Adapter Kit ACK-DC30
Kit for using power from a household electrical outlet.
Recommended to power a camera for an extended period of time or
when connecting to a computer (cannot be used to charge the
camera).
• Battery Charger CB-2LX/CB-2LXE
An adapter for charging Battery Pack NB-5L.
• Battery Pack NB-5L
Rechargeable lithium-ion battery.
Other Accessories
• SD Memory Card
SD memory cards are used to store images recorded by the camera.
Canon brand memory cards are available in 128 MB and 512 MB
capacities.
• Interface Cable IFC-400PCU
Use this cable to connect the camera to a computer, Compact Photo
Printer (SELPHY series), or to a Bubble Jet printer*.
* Refer to the user guide included with your printer.
• AV Cable AVC-DC400
Use this cable to connect the camera to a TV set.
• Waterproof Case WP-DC24
When you attach this waterproof case to the camera, you can use it
to take underwater shots at depths of up to 40 meters (130 feet), and
of course it is ideal for taking worry-free pictures in the rain, at the
beach, or on the ski slopes.
Optional Accessories
COPY

System Map 35
Getting Started
Canon offers the following separately sold printers for use with the
camera. You can produce photo quality prints quickly and easily by
connecting them to the camera with a single cable and operating the
camera’s controls.
• Compact Photo Printers (SELPHY series)
• Bubble Jet Printers (PIXMA series)
For more information, visit your nearest Canon retailer.
Direct Print Compatible Printers
Use of genuine Canon accessories is recommended.
This product is designed to achieve excellent performance when
used with genuine Canon accessories. Canon shall not be liable for
any damage to this product and/or accidents such as fire, etc.,
caused by the malfunction of non-genuine Canon accessories (e.g.,
a leakage and/or explosion of a battery pack). Please note that this
warranty does not apply to repairs arising out of the malfunction of
non-genuine Canon accessories, although you may request such
repairs on a chargeable basis.
COPY

36
COPY
38
Components Guide
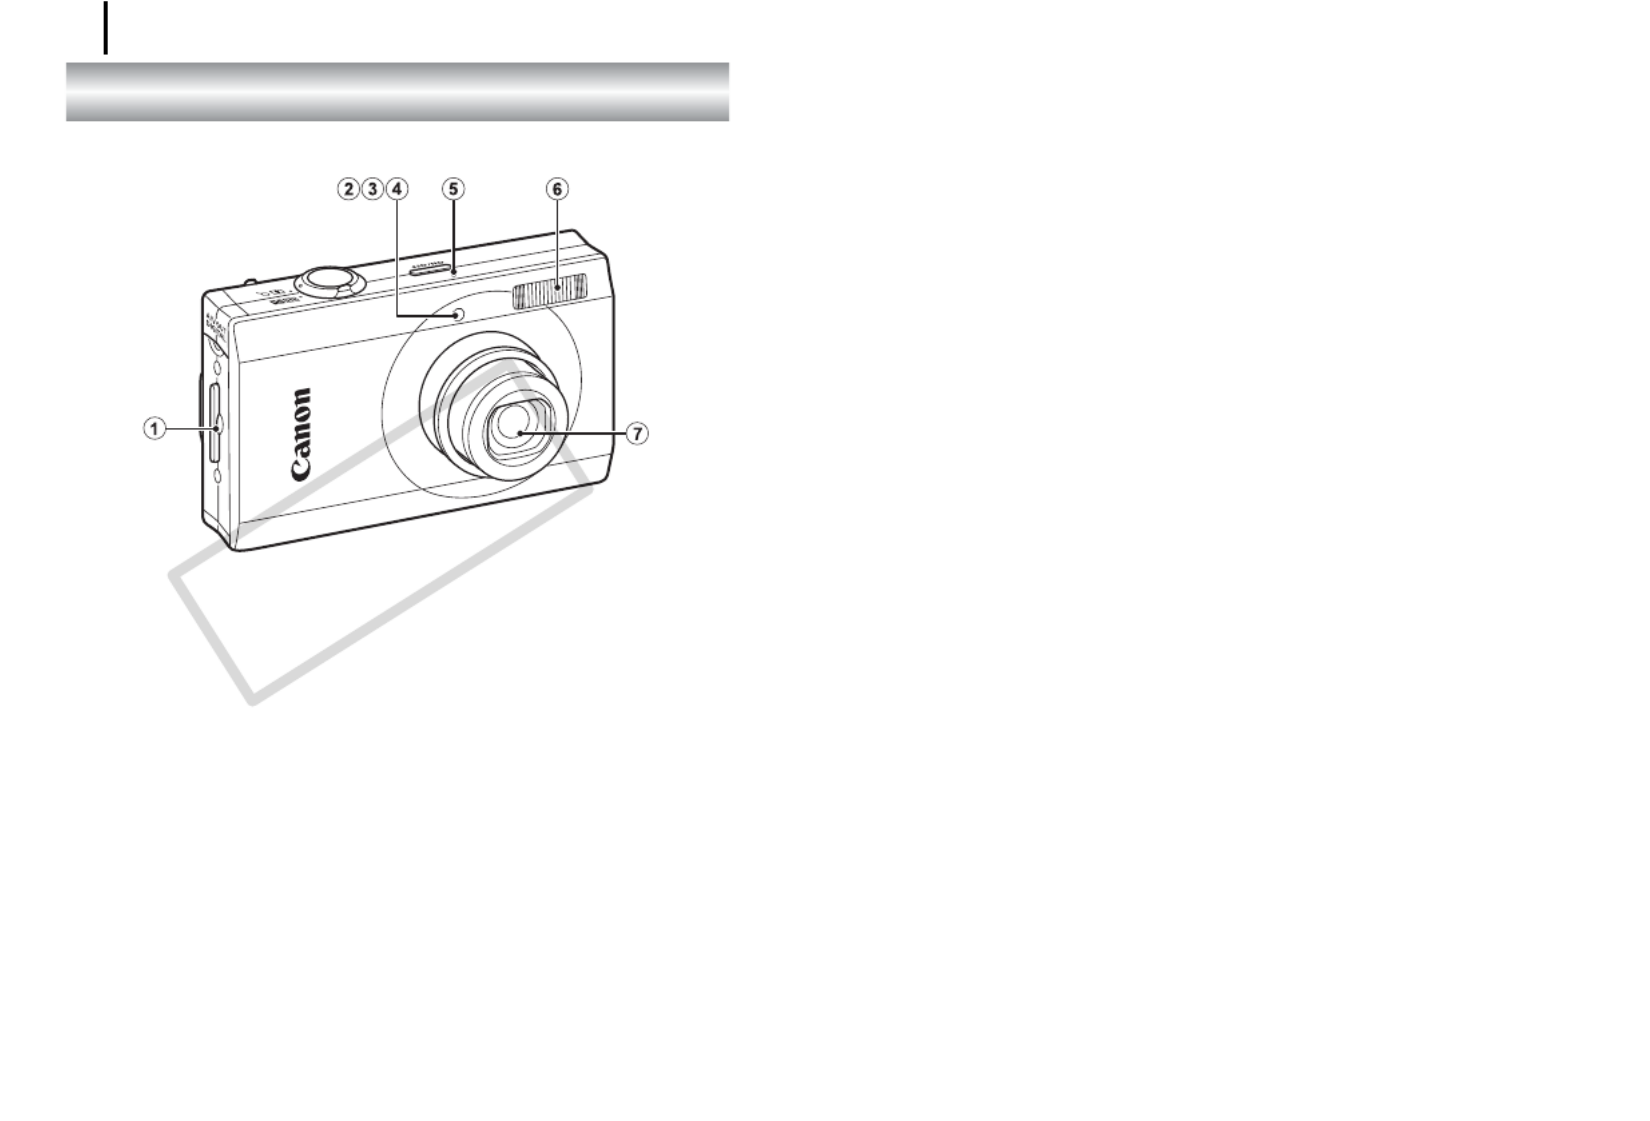
Front View
aWrist Strap Mount (p. 11)
bAF-assist Beam (p. 53)
cRed-Eye Reduction Lamp (p. 77)
dSelf-Timer Lamp (p. 66)
eMicrophone (p. 22)
fFlash (p. 64)
gLens
COPY
39
Components Guide
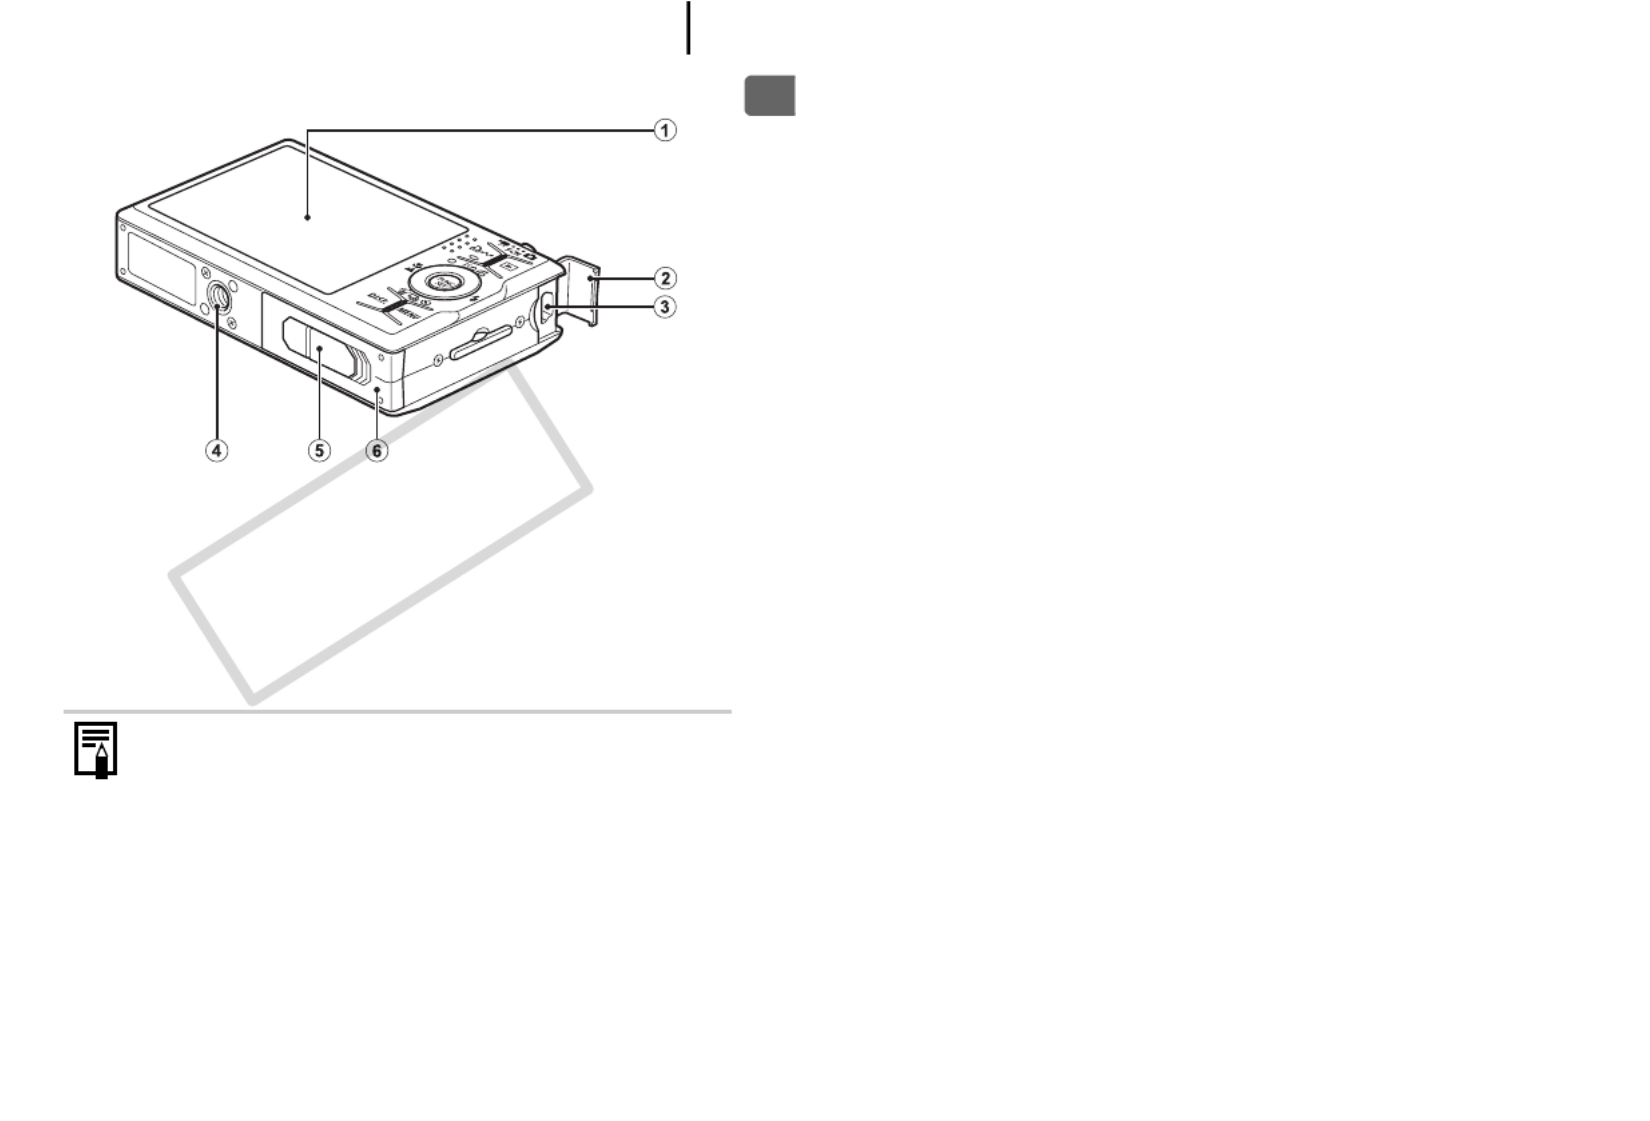
Back View
aLCD Monitor (pp. 48, 58)
bTerminal Cover (p. 11)
cA/V OUT (Audio/Video output) and DIGITAL Terminal (p. 176)
dTripod Socket
eDC Coupler Terminal Cover (p. 202)
fMemory Card Slot/Battery Cover (p. 9)
The LCD monitor may be covered with a thin plastic film for
protection against scratches during shipment. If so, remove the
film before using the camera.
COPY

40
Controls
aPower Button (p. 12)
bShutter Button (p. 14)
cZoom Lever (pp. 60, 114)
Shooting: (Wide Angle)/ (Telephoto)
Playback: (Index)/ (Magnify)
d (Print/Share) Button (p. 112)
eMode Switch (pp. 14, 43)
f (Playback) Button (p. 42)
gIndicator (p. 44)
hFUNC./SET Button (p. 46)
iMENU Button (p. 47)
jDISP. Button (p. 58)
k (Macro)/ (Infinity)/ Button (p. 64)
l (ISO Speed)/ (Jump)/ Button (pp. 71, 118)
m (Single Image Erase)/ (Continuous)/ (Self-timer)/
Button (pp. 17, 66, 76)
n (Flash)/ Button (p. 64)
Control Dial
COPY

42
The button can turn the camera on/off and switch between the
Shooting and Playback modes. In addition, you can register slideshow
or sound recorder functions to the button (p. 155).
* The time period for the automatic retraction of the lens can be changed in the [Lens
Retract] option in the menu (p. 56).
Using the Button
Button
• May operate differently than above when functions are registered to the button
(p. 155).
Turning the
Camera Off
Press the
button
Press the power
button
Press the shutter
button halfway
Press the
power button
Lens retracted* Lens open
Shutter ButtonPower Button
Shooting Mode
Press the
button
Playback Mode
COPY
43
Components Guide
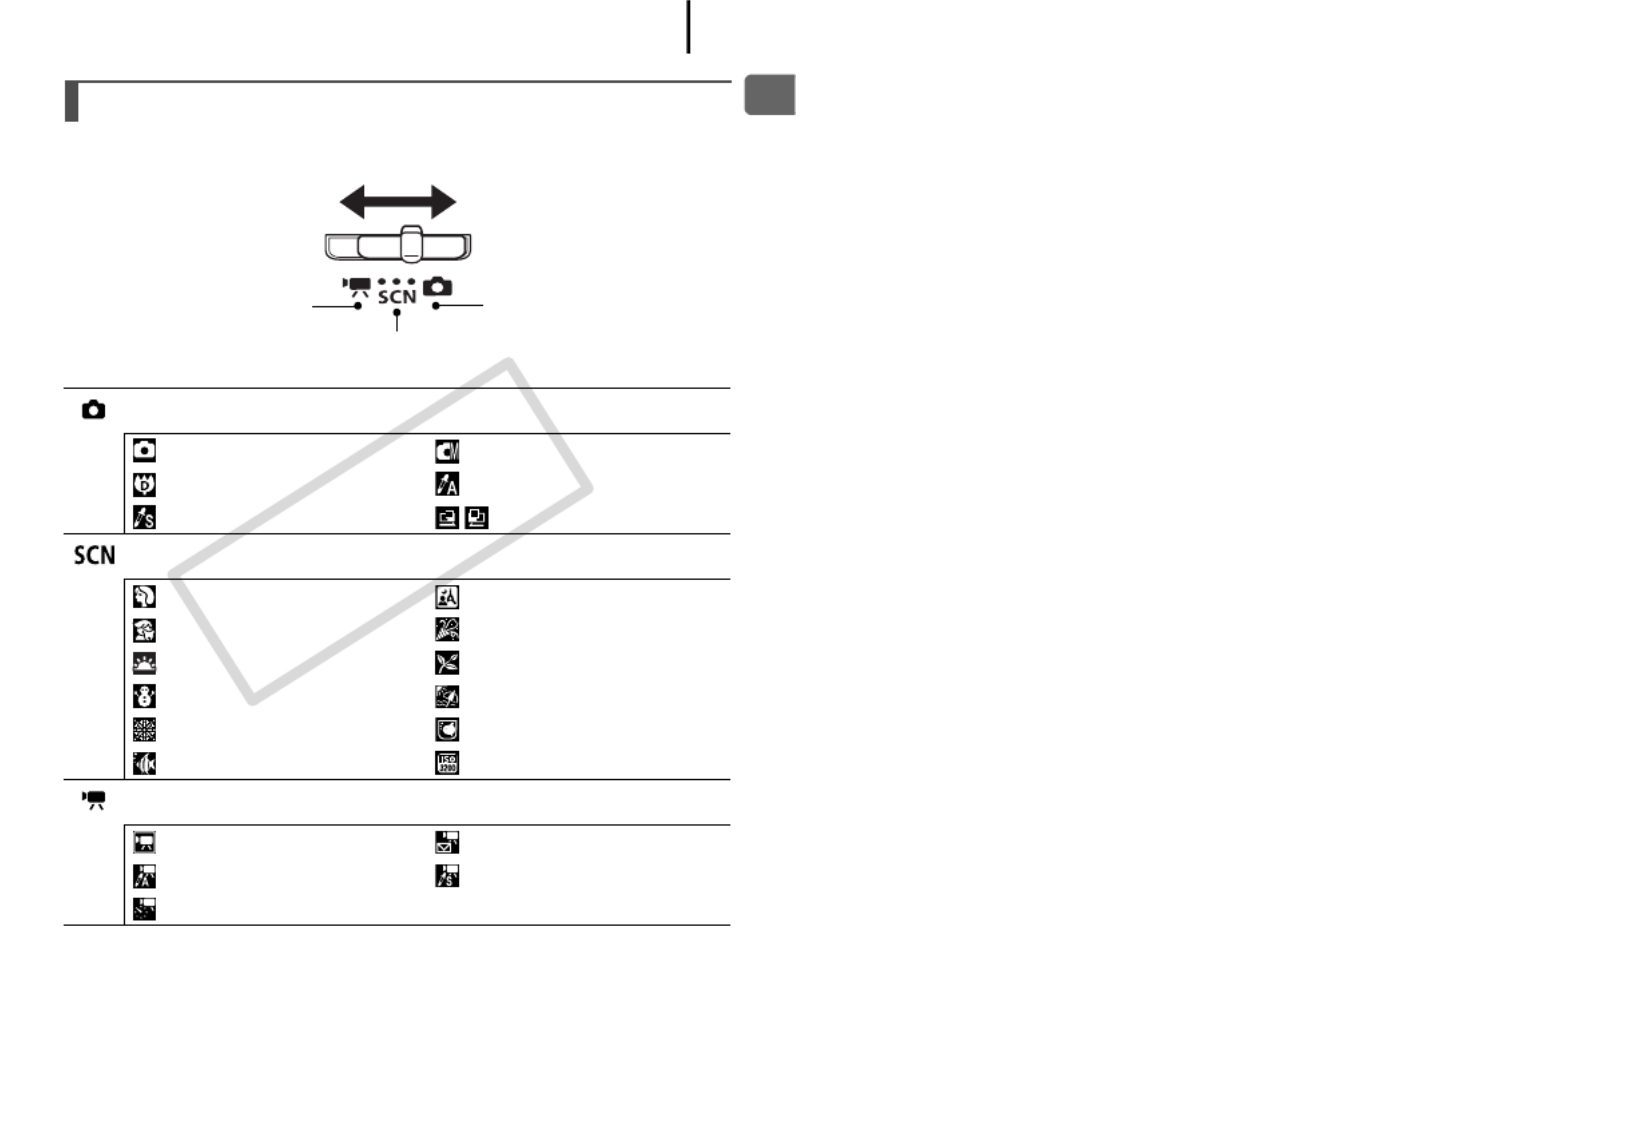
Slide the switch to the mode you wish to use.
How to Use the Mode Switch
Shooting Mode
: Auto (p. 14) : Manual Mode (p. 76)
: Digital Macro (p. 63) : Color Accent (p. 105)
: Color Swap (p. 107) : Stitch Assist (p. 84)
Special Scene Mode (p. 73)
: Portrait : Night Snapshot
: Kids&Pets : Indoor
: Sunset : Foliage
: Snow : Beach
: Fireworks : Aquarium
: Underwater : ISO 3200
Movie Mode (p. 79)
: Standard : Compact
: Color Accent : Color Swap
: Time Lapse
Movie Mode Shooting Mode
Special Scene Mode
COPY

44
The indicator on the back of the camera lights or blinks under the
following conditions.
* When the camera is having difficulty focusing, the camera beeps once.
Indicator
Green: Ready to shoot (camera beeps twice)*/Display off
Blinking Green: Camera starting up/Time Lapse (movie) recording/
Image recording/reading/erasing/transferring (when
connected to a computer/printer)
Orange: Ready to shoot (flash on)
Blinking Orange: Ready to shoot (camera shake warning)
Never do the following while the indicator blinks green. These
actions may corrupt image data.
- Shake or jolt the camera
- Turn off the camera, or open the memory card slot/battery
cover
COPY
45
Components Guide
Displaying the Clock
You can display the current date and time
for a 5-second* interval using the
following two methods.
* Default setting
Method 1
Hold the FUNC./SET button down while
turning on the power.
Method 2
In a shooting or playback mode, press the FUNC./SET button for
more than one second.
If you hold the camera horizontally, it displays the time. If you hold it
vertically, the time and date display.
However, if you hold the camera vertically and use method 1 to
display the date and time, the time will be initially displayed in the
same way as when the camera is held horizontally.
• You can change the display color of the clock by pressing the or
button or by turning the control dial while the clock is displayed.
• The clock display will disappear when the display interval is over or
when a button is operated for a subsequent operation.
• The clock’s display interval can be changed in the menu
(p. 56).
• The clock cannot be displayed when images are magnified or in the
Index Playback mode.
COPY

46
Basic Operations
Settings for the shooting or playback modes or such camera settings
as the print settings, date/time and sounds are set using the FUNC.
menu or the Rec., Play, Print, Set up or My Camera menu.
FUNC. Menu ( Button)
This menu sets many of the common shooting functions.
Menus and Settings
1
Set the mode switch to , or .
2
Press the button.
3
Use the or button to select a menu item.
• Some items may not be selectable in some shooting modes.
4
Use the or button to select an option for
the menu item.
• Items showing the icon can be changed with the DISP.
button.
• After selecting an option, you can press the shutter button to
shoot immediately. After shooting, this menu will appear again,
allowing you to adjust the settings easily.
• You can also select an option by turning the control dial.
5
Press the button.
• This example shows the FUNC.
menu in (Auto) mode.
1 2 5
3 4
COPY

47
Basic Operations
Rec., Play, Print, Set up and My Camera Menus
( Button)
Convenient settings for shooting, playback or printing can be set with
these menus.
1
Press the button.
2
Use the or button to switch between
menus.
• You can also use the zoom lever to switch between menus.
• The following menus are displayed.
Shooting: Rec./ Set up/ My Camera
Playback: Play/ Print/ Set up/ My Camera
3
Use the or button to select a menu item.
• Some items may not be selectable in some shooting modes.
• You can also use the control dial to select a menu item.
4
Use
the or button
to select an option.
• Menu items followed by an ellipsis (...) can only be set after
pressing the FUNC./SET button to display the next menu.
Press the FUNC./SET button again to confirm the setting, then
press the MENU button to return to the menu screen.
You can switch between
menus with the
or
button.
1
2
5
3 4
Shooting Mode (Auto)
Playback Mode
• This example shows the Rec.
menu in (Auto) mode.
COPY

48
Shooting Mode
5
Press the button.
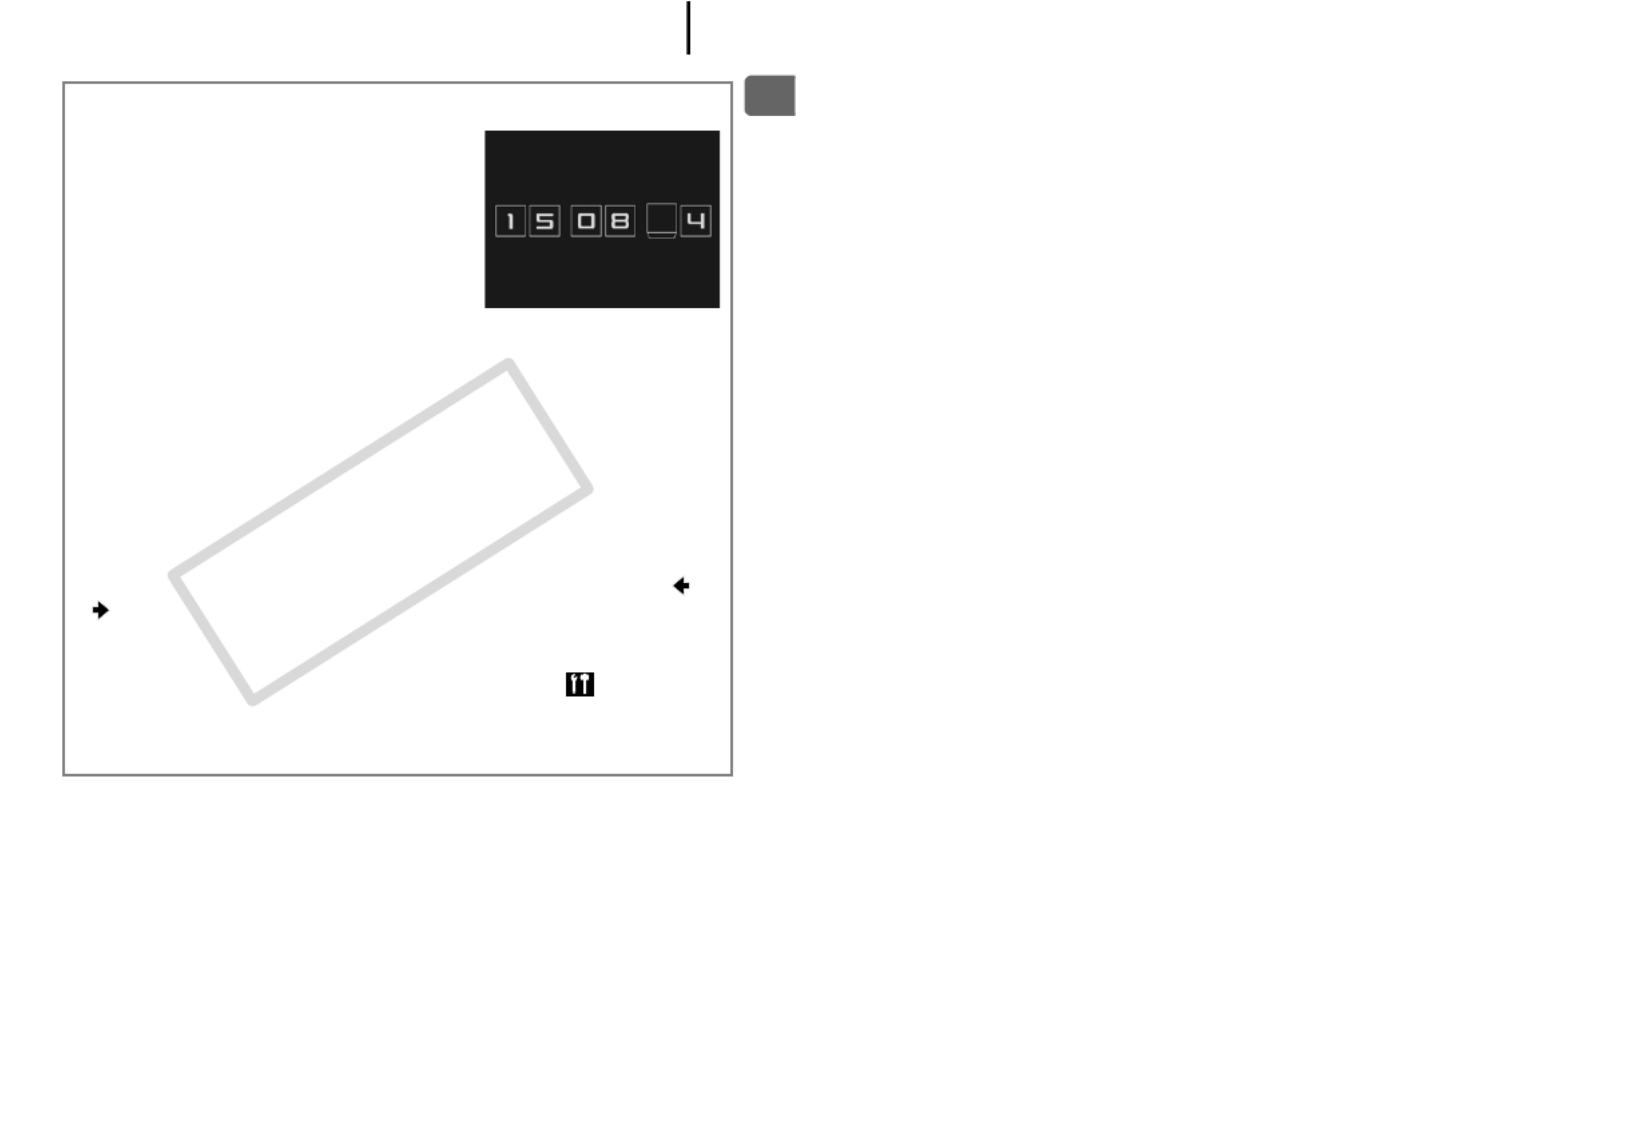
Information Displayed on the LCD Monitor
and Menus
Available Shooting Modes p. 222
Display Content Setting Method
a Time Zone (Home/World ) MENU Button (Set up Menu)
b Exposure Compensation ( ••• ) and
Recording Pixels, etc.
FUNC./SET Button
(FUNC. Menu)
c Disp. Overlay MENU Button (Rec. Menu)
d Digital Zoom Magnification/Digital Tele-
Converter ( 1.4x/2.3x)
MENU Button (Rec. Menu)
e Macro ( )/Infinity ( ) / Button
f ISO Speed
( )
Button
( is a Mode)
g Flash ( ) Button
Spot AE Point Frame/
AF Frame
Remaining battery
charge will display.
b
Recordable Shots (Stills)
Remaining Time/Elapsed
Time (Movies)
Shutter Speed and Aperture Value, p
j
m
n
o
c
ak
Camera Shake Warning
(p. 182)
e f g h i
l
d
COPY

49
Basic Operations
hRed-Eye Correction Function ( ) MENU Button (Rec. Menu
[Flash Settings])
iDrive Mode ( ) / Button
jAuto Rotate ( ) MENU Button (Set up Menu)
kShooting Mode Mode Switch/Control Dial
lAE Lock ( )/FE Lock ( ) Button
mAF Lock ( ) / Button
nCreate Folder ( ) MENU Button (Set up Menu)
oImage Stabilizer ( ) MENU Button (Rec. Menu)
pExposure Shift Bar (Movie) Button
About the Battery Charge Displays
The following icons and messages will display.
If the indicator blinks orange and the camera shake warning
icon ( ) displays, this indicates that a slow shutter speed may
have been selected due to insufficient illumination.
Use the following methods to shoot:
- Set the IS mode to any setting other than [Off] (p. 70)
- Raise the ISO speed (p. 71)
- Select a setting other than (Flash off) (p. 64)
- Attach the camera to a tripod or other device
Display Message
Sufficient battery charge.
Recharge the battery soon for extended use.
(Blinking red) Low battery charge. Recharge the battery.
Change the battery
pack.
Battery is depleted and the camera can no longer
operate. Charge the battery immediately.
COPY

50
Playback Mode (Detailed)
The following information may also be displayed with some images.
Display Content Setting Method
qPrint List or MENU Button
(Print Menu)
rAuto Category/My Category
( )
MENU Button
(Shooting/Playback Menu)
sCompression (Still Images), Recording
Pixels (Still Images), Movie ( )
FUNC./SET Button
(FUNC. Menu)
t
Red-Eye Correction/Trimming/My
Colors/Resize ( ) MENU Button
(Playback Menu)Images with sound memo ( )
Protection Status ( )
A sound file in a format other than WAVE is attached.
JPEG image not conforming to Design rule for Camera File
System Standards (p. 207).
RAW image
Unrecognized data type
Histogram
tShooting Date/Time
Remaining battery charge display Displayed image number/
Total number of images
Folder Number-File
Number
Shooting information is
displayed
r
s
File size
Recording Pixels (Still
Images)
Movie Length (Movies)
q
COPY
51
Basic Operations
zInformation for images shot on other cameras may not
display correctly.
zOverexposure Warning
In the following cases, overexposed portions of the image
blink.
- When reviewing an image right after shooting in the LCD
monitor (Detailed Display)
- When using the Detailed Display mode of the Playback
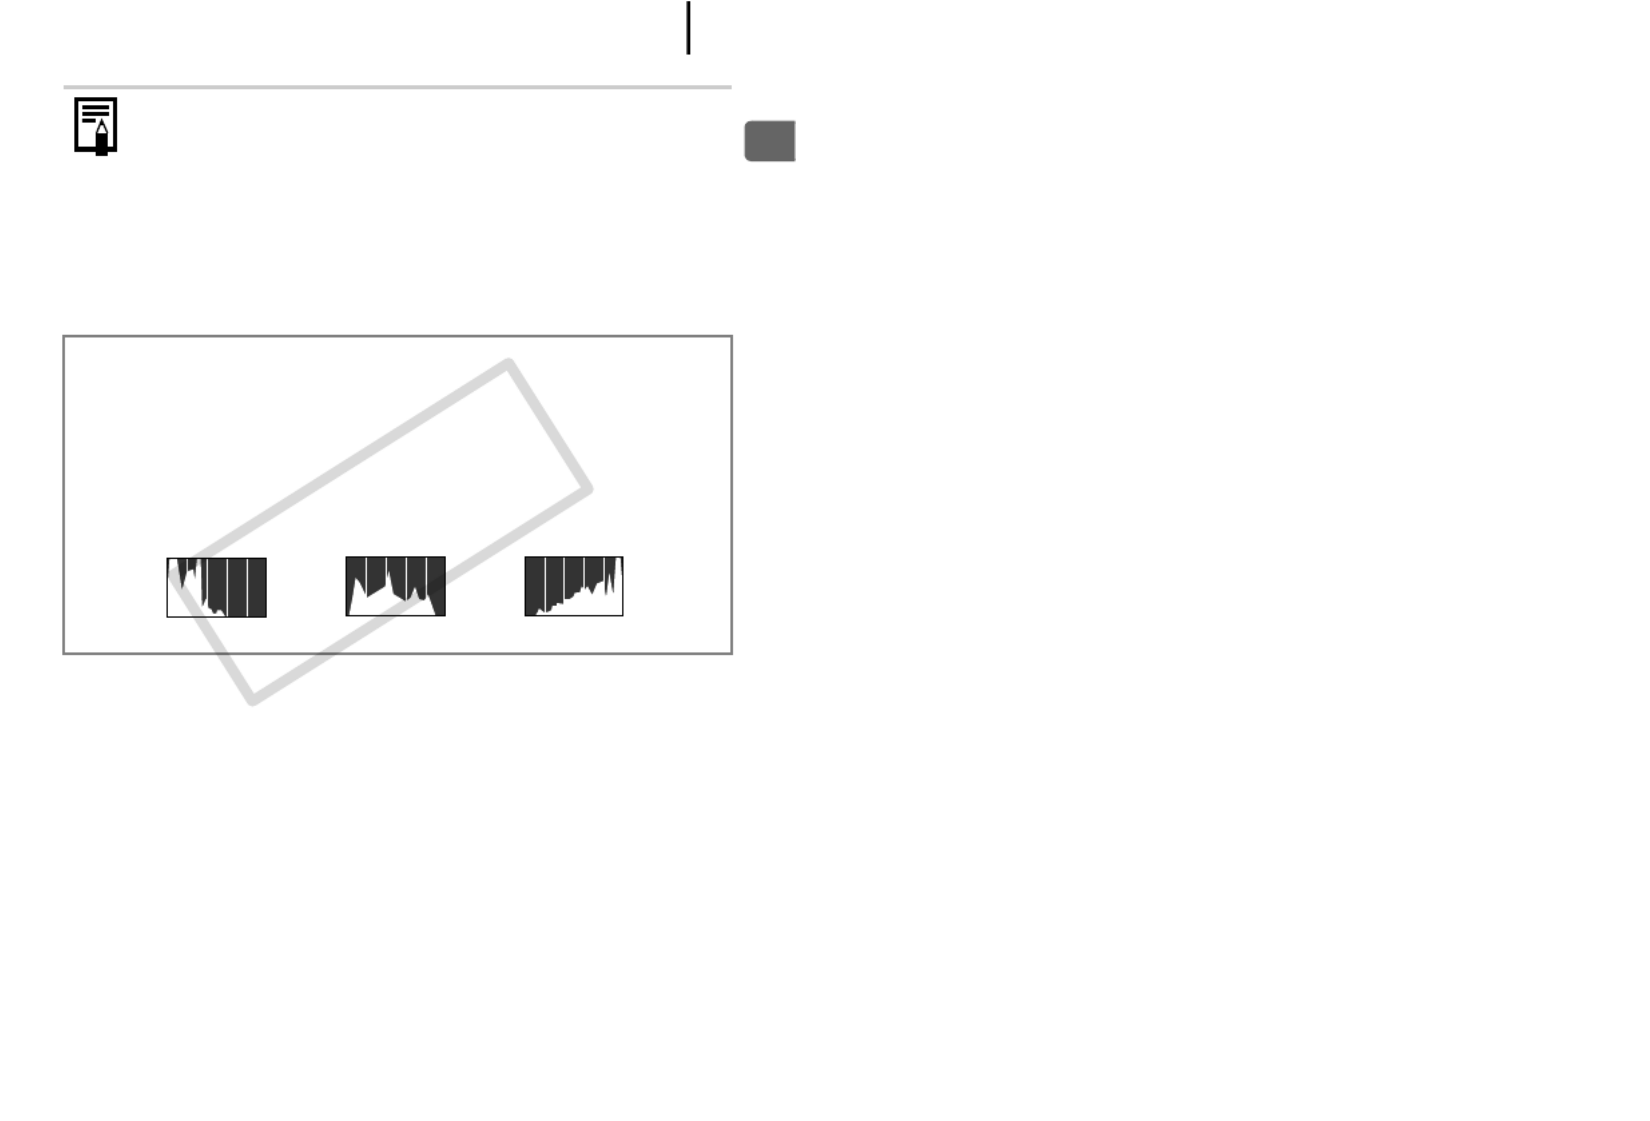
mode
Histogram Function
The histogram is a graph that allows you to check the brightness of
the image. The greater the bias toward the left in the graph, the
darker the image. The greater the bias toward the right, the brighter
the image.
Use the exposure compensation function to adjust the brightness of
the image while shooting (p. 97).
Sample Histograms
Balanced ImageDark Image Bright Image
COPY

52
Shooting Mode
FUNC. Menu
Menu Item Options Page
Still Image
pp. 14,
22, 43
Special Scene
Movie
Menu Item Options Page
Exposure
Compensation ••• p. 97
Long Shutter Mode ••• p. 99
White Balance p. 100
My Colors p. 103
Metering Mode p. 98
Compression p. 69
Shooting Interval
(Movie) ( selected) p. 83
Recording Pixels
(Still Image) ( when the date has not been set) p. 68
Recording Pixels
(Movie) p. 82
COPY
53
Basic Operations
Rec. Menu
Menu Item Options Page
AF Frame Face Detect*/AiAF/Center p. 89
AF Frame Size Normal*/Small p. 91
AF-Point Zoom On/Off* p. 86
Digital Zoom
p. 60
(Still image) Standard*/Off/1.4x/2.3x
(Movie) Standard*/Off
(In Standard Movie mode only)
Flash Settings p. 77
Slow Synchro On/Off*
Red-Eye Corr. On/Off*
Red-Eye Lamp On*/Off
Self-timer Delay: 0–10*, 15, 20, 30 sec.
Shots: 1–10 (Default setting is 3 shots)
p. 66
AF-assist Beam On*/Off p. 184
Review Off/2*–10 seconds/Hold p. 15
Review Info Off*/Detailed/Focus Check p. 87
Save Original On/Off* p. 109
Auto Category On*/Off p. 111
Disp. Overlay p. 110
(Still image) Off*/Grid Lines/3:2 Guide/Both
(Movie) Off*/Grid Lines
IS Mode p. 70
(Still image) Continuous*/Shoot Only/Panning/Off
(Movie) Continuous*/Off
Set button */ / / / / / / / /
/
p. 112
* Default setting
COPY

54
Play Menu
Print Menu
Menu Item Page Menu Item Page
Slide Show p. 131 Sound Memo p. 144
My Category p. 120 Sound Recorder p. 146
Erase p. 151 Rotate p. 129
Protect p. 147 Transfer Order p. 163
Red-Eye Correction p. 136 Set Play button p. 155
Trimming p. 123 Resume p. 16
Resize p. 142 Transition p. 130
My Colors p. 140
Menu Item Content Page
Print Displays the printing screen.
p. 157
Select Images & Qty. Configures print settings for single
images as you view them.
Select Range For picking a first and last image and
printing all the images in the range.
Select by Date Configures print settings for images
corresponding to the selected date.
Select by Category Configures print settings for images in
the selected category.
Select by Folder Configures print settings for images in
the selected folder.
Select All Images Configures print settings for all images.
Clear All Selections Removes all print settings from images.
Print Setting Sets the printing style.
COPY

55
Basic Operations
Set up Menu
Menu Item Options Page/Topic
Mute On/Off* Set to [On] to silence all sounds*.
* Except for when the memory card
slot/battery cover is opened during
recording.
Volume Off/1/2*/3/4/5 Adjusts the volume of the start-
up sound, operation sound, self-
timer sound, shutter sound and
playback sound. The volume
cannot be adjusted if [Mute] is
set to [On].
Start-up Vol. Adjusts the volume of the start-
up sound when the camera is
turned on.
Operation Vol. Adjusts the volume of the
operation sound that beeps
when any button other than the
shutter button is pressed.
Selftimer Vol. Adjusts the volume of the self-
timer sound played 2 sec. before
the shutter is released.
Shutter Volume Adjusts the volume of the sound
played when the shutter
releases. The shutter sound
does not play when a movie is
recording.
Playback Vol. Adjusts the movie playback
volume, sound memo or sound
recorder volume.
LCD Brightness -7 to 0* to +7 Use the or button to adjust
the brightness of the LCD
monitor. You can check the
brightness of an image while
adjusting the setting.
* Default setting
COPY

56
Power Saving
p. 165
Auto Power
Down
On*/Off
Display Off 10 sec./20 sec./
30 sec./1 min.*/
2 min./3 min.
Time Zone Home*/World p. 166
Date/Time p. 12
Clock Display 0–5*–10 sec./
20 sec./30 sec./
1 min./2 min./
3 min.
p. 45
Format You can also select a low level
format (p. 168).
File Numbering Continuous*/Auto
Reset
p. 170
Create Folder
p. 172
Create New
Folder
Check mark (On)/
No check mark
(Off)
Auto Create Off*/Daily/
Monday–Sunday/
Monthly
(Time can also be
set)
Auto Rotate On*/Off p. 174
Lens Retract 1 minute*/
0 seconds
Sets the lens retraction timing
when switching from Shooting
mode to Playback mode.
Language p. 13
Video System NTSC/PAL p. 176
Print Method Auto*/ p. 57
Reset All p. 175
Menu Item Options Page/Topic
COPY

57
Basic Operations
Print Method
You can change the printer connection method. There is usually no
need to change the settings, but select when you print an image
recorded in the (Widescreen) mode at the full page setting for wide
paper using a Canon SELPHY CP750/CP740/CP730/CP720/CP710/
CP510 Compact Photo Printer. Since this setting is saved even when
the power is turned off, ensure that you return the setting to [Auto] to
print other image sizes. (However, it cannot be changed while the
printer is connected.)
My Camera Menu
Menu Item Content Page
Theme Selects a common theme for each My
Camera settings item.
p. 177
Start-up Image Sets the image displayed when the
camera power is turned on.
Start-up Sound Sets the sound played when the camera
power is turned on.
Operation Sound Sets the sound played when any button
other than the shutter button is pressed.
Selftimer Sound Sets the sound played 2 seconds before
the shutter releases in Self-timer mode.
Shutter Sound Sets the sound played when the shutter
button is pressed. There is no shutter
sound for movies.
My Camera Menu
Contents (Off)/ */ /
* Default setting
COPY
58
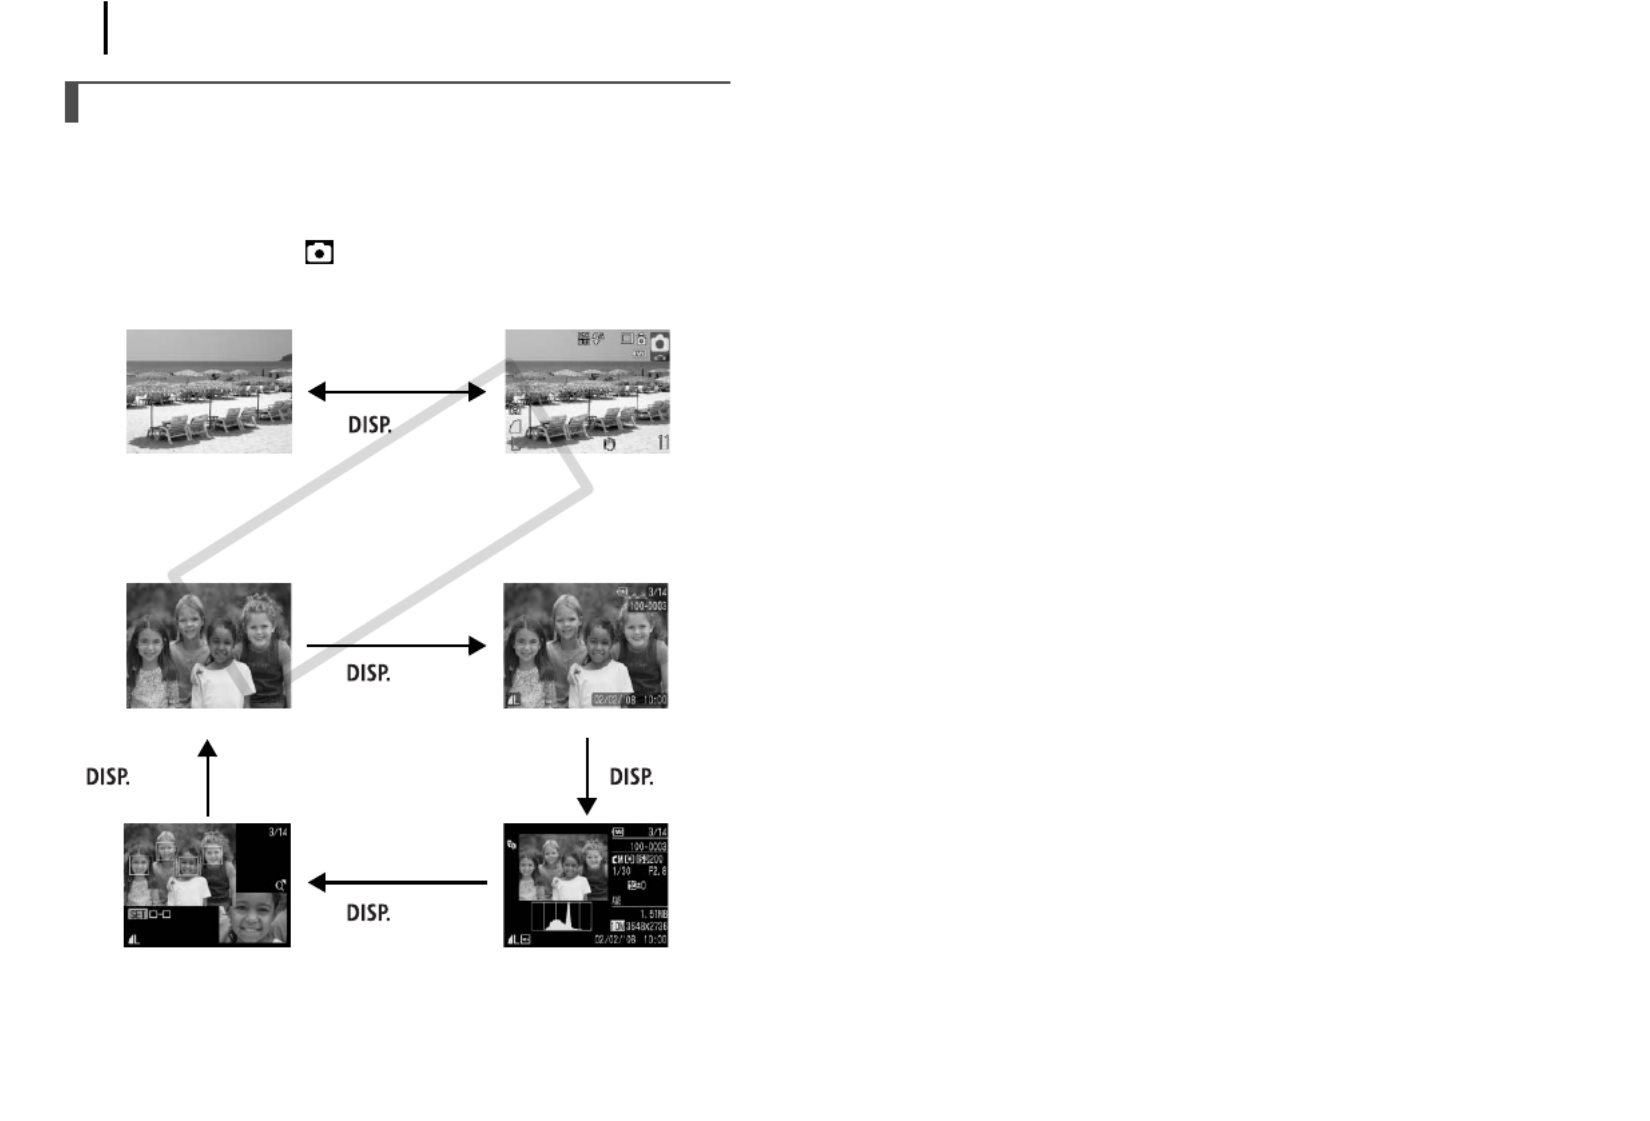
Switching the Information Displays
You can switch the LCD monitor information display each time you
press the DISP. button. See Information Displayed on the LCD Monitor
and Menus for details (p. 48). (The following are the screens that
display when shooting in mode.)
Shooting Mode
Playback Mode, Rec. Review (Immediately after
Shooting)
Using the LCD Monitor
*1 Playback Mode only
*2 Still images only
No Information Information View
Button
No Information Standard*
1
Focus Check Display*
2
Detailed
Button
Button
Button Button
COPY

98
Switching between Metering Modes
Available Shooting Modes p. 222
Evaluative
Appropriate for standard shooting conditions,
including backlit scenes. The camera divides
images into several zones for metering. It
evaluates complex lighting conditions, such as
the position of the subject, the brightness, the
direct light, and the backlighting, and adjusts the
settings to the correct exposure for the main
subject.
Center Weighted
Avg.
Averages the light metered from the entire
frame, but gives greater weight to the subject
matter at the center.
Spot
Adjusts the exposure according to the subject in
the center of the frame (meters the area within
the spot AE point at the center of the LCD
monitor). Use this mode when there is a large
divergence in brightness between the subject
and surroundings.
1
Change the metering
method.
1. Press the button.
2. Use the or button to select
and the or button to change
the option.
3. Press the button.
The metering method is fixed to [Evaluative] in the Long
Shutter mode.
COPY
100
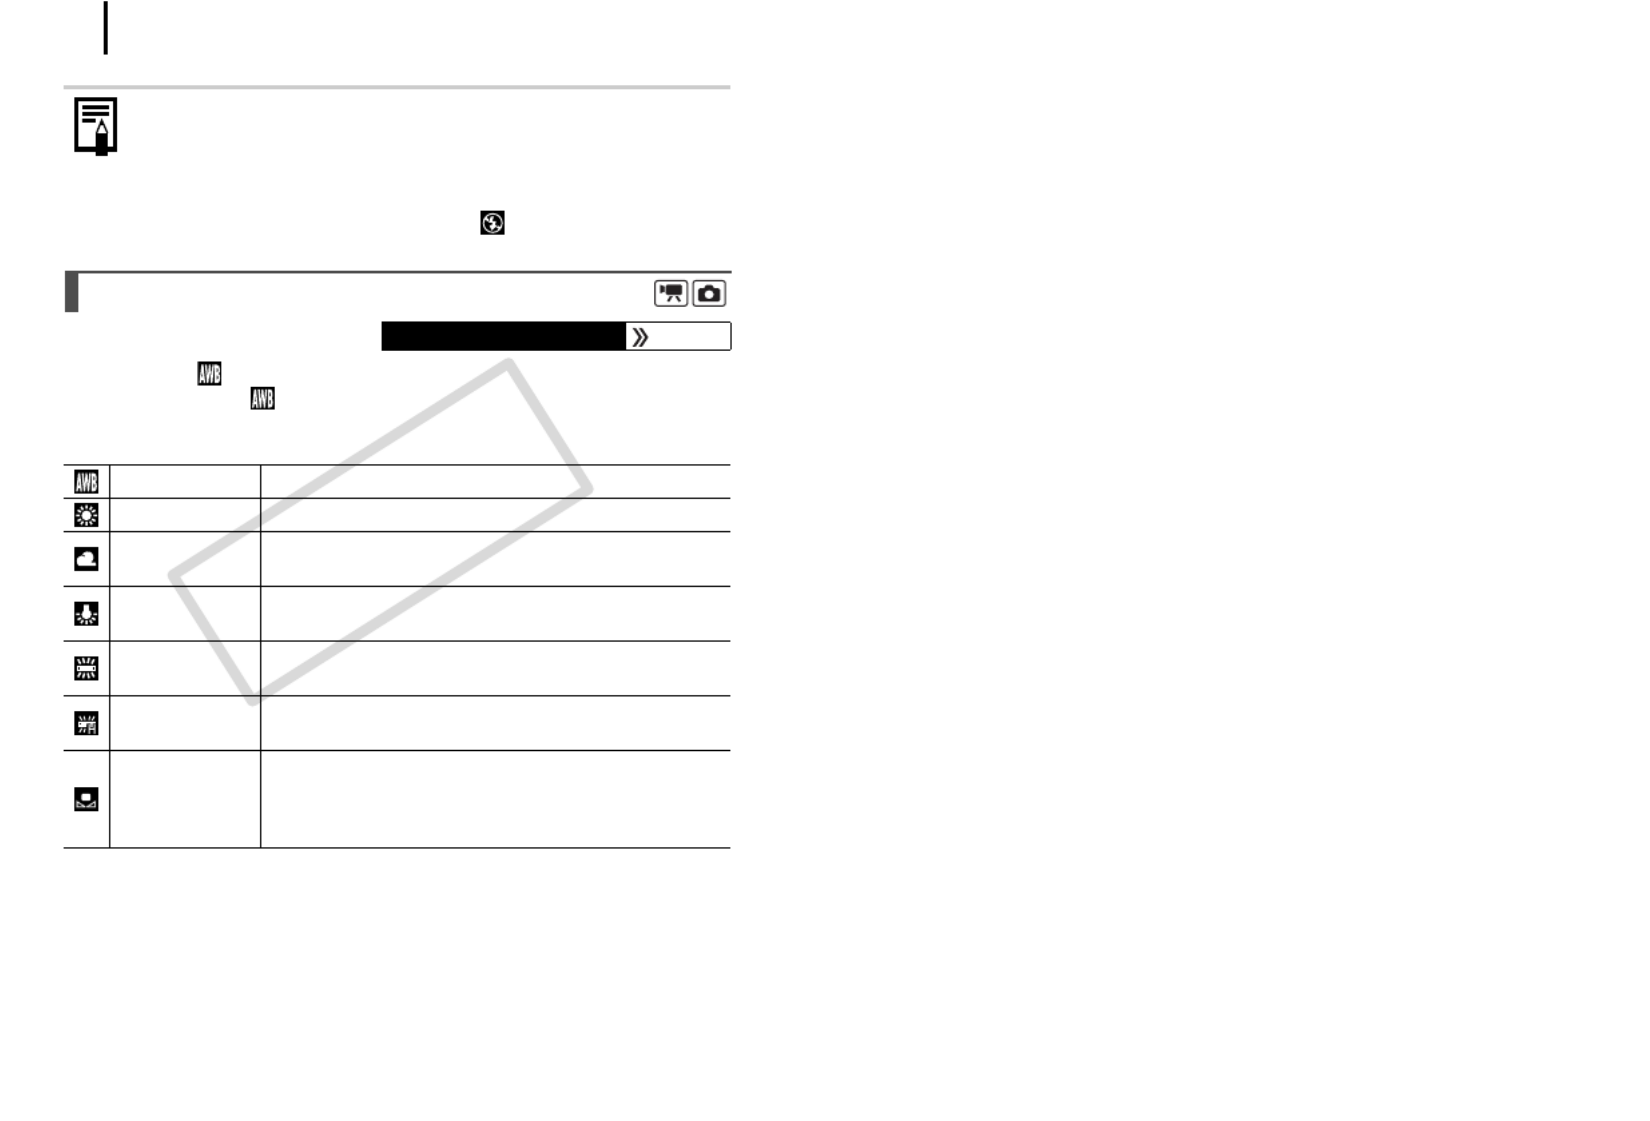
Normally, the (Auto) white balance setting selects an optimal white
balance. When the setting cannot produce natural looking colors,
change the white balance using a setting appropriate for the light
source.
zUse the LCD monitor to confirm that the image was recorded
at the desired brightness.
zPlease note that camera shake becomes a factor at low
shutter speeds. Shoot with the camera attached to a tripod.
zUse of the flash may result in an over-exposed image. If this
occurs, shoot with the flash set to .
Adjusting the Tone (White Balance)
Available Shooting Modes p. 222
Auto Settings are automatically set by the camera.
Day Light For recording outdoors on a bright day.
Cloudy For recording under overcast, shady or twilight
skies.
Tungsten For recording under tungsten and bulb-type 3-
wavelength fluorescent lighting.
Fluorescent For recording under warm-white, cool-white or
warm-white (3-wavelength) fluorescent lighting.
Fluorescent H For recording under daylight fluorescent, or daylight
fluorescent-type 3-wavelength fluorescent lighting.
Custom
Adjusts the optimal white balance for the shooting
conditions using the white balance data retained in
the camera from a white-colored object, such as a
white paper or cloth.
COPY
Termékspecifikációk
| Márka: | Canon |
| Kategória: | kamera |
| Modell: | IXUS 950 IS |
Szüksége van segítségre?
Ha segítségre van szüksége Canon IXUS 950 IS, tegyen fel kérdést alább, és más felhasználók válaszolnak Önnek
Útmutatók kamera Canon

14 Január 2025
15 December 2024
3 Október 2024
1 Szeptember 2024
1 Szeptember 2024
31 Augusztus 2024
31 Augusztus 2024
26 Augusztus 2024
25 Augusztus 2024
25 Augusztus 2024
Útmutatók kamera
- kamera Samsung
- kamera Sony
- kamera Braun
- kamera National Geographic
- kamera Acer
- kamera Nedis
- kamera Philips
- kamera Reolink
- kamera Olympus
- kamera Oregon Scientific
- kamera SilverCrest
- kamera Panasonic
- kamera JVC
- kamera Lenovo
- kamera Casio
- kamera Toshiba
- kamera Ozito
- kamera HP
- kamera BenQ
- kamera TP-Link
- kamera Medion
- kamera Vimar
- kamera Xiaomi
- kamera Fujifilm
- kamera EZVIZ
- kamera Prixton
- kamera Polaroid
- kamera Kyocera
- kamera Technaxx
- kamera GoPro
- kamera Speco Technologies
- kamera Ricoh
- kamera Hikvision
- kamera Epson
- kamera Netgear
- kamera Vtech
- kamera Rollei
- kamera Agfa
- kamera Lamax
- kamera Hitachi
- kamera Kodak
- kamera Ring
- kamera Nikon
- kamera Alpine
- kamera Logitech
- kamera Bresser
- kamera Dahua Technology
- kamera Viewsonic
- kamera Cobra
- kamera Scosche
- kamera Denver
- kamera Minox
- kamera Trevi
- kamera Joy-It
- kamera Daewoo
- kamera Gembird
- kamera GE
- kamera SPC
- kamera Powerfix
- kamera Eufy
- kamera Avaya
- kamera Levenhuk
- kamera Konica Minolta
- kamera Mamiya
- kamera Lorex
- kamera Foscam
- kamera Kogan
- kamera SJCAM
- kamera Imou
- kamera AgfaPhoto
- kamera Sigma
- kamera Pentax
- kamera Velleman
- kamera D-Link
- kamera Blaupunkt
- kamera InfiRay
- kamera Fluke
- kamera Arlo
- kamera Trust
- kamera Konig
- kamera ARRI
- kamera Pyle
- kamera Emerson
- kamera MuxLab
- kamera Lumens
- kamera Sanyo
- kamera DataVideo
- kamera Lenco
- kamera Leica
- kamera Azden
- kamera Burris
- kamera Marshall Electronics
- kamera Getac
- kamera AViPAS
- kamera Creative
- kamera EverFocus
- kamera SereneLife
- kamera Swann
- kamera Anker
- kamera Microtek
- kamera Linksys
- kamera Elmo
- kamera UniView
- kamera Laserliner
- kamera IGET
- kamera Vivitar
- kamera PTZ Optics
- kamera BZBGear
- kamera Argus
- kamera Lexibook
- kamera Bushnell
- kamera Easypix
- kamera Maginon
- kamera AVerMedia
- kamera Celestron
- kamera Yashica
- kamera Flir
- kamera Daitsu
- kamera Nest
- kamera Ansco
- kamera Sygonix
- kamera Intel
- kamera Zenit
- kamera EVE
- kamera Fuji
- kamera Minolta
- kamera Zorki
- kamera RunCam
- kamera SeaLife
- kamera FIMI
- kamera Liiv360
- kamera Watec
- kamera Meade
- kamera Contax
- kamera Sinji
- kamera Traveler
- kamera Exakta
- kamera Digital Watchdog
- kamera ZeissIkon
- kamera Silvergear
- kamera Dorr
- kamera Spypoint
- kamera HOLGA
- kamera Praktica
- kamera Hasselblad
- kamera Moto Mods (Motorola)
- kamera Fantasea Line
- kamera Brinno
- kamera Z CAM
- kamera General
- kamera Ergoguys
- kamera Strex
- kamera General Electric
- kamera Berger & Schröter
- kamera Leitz Focomat IIc
- kamera Syrp
- kamera Cosina
- kamera Hanwha
- kamera Videology
- kamera Pelco
- kamera Videotec
- kamera Cambo
- kamera Kobian
- kamera Kyocera Yashica
- kamera Red Digital Cinema
- kamera Bauhn
- kamera Konica
- kamera Akaso
- kamera Seek Thermal
- kamera Aida
- kamera Ikegami
- kamera Ikelite
- kamera Adeunis
- kamera Hoppstar
- kamera IOptron
- kamera Moultrie
- kamera PatrolEyes
- kamera Camouflage
- kamera HuddleCamHD
- kamera Aplic
- kamera Linhof
- kamera GoXtreme
- kamera KanDao
- kamera Aquapix
Legújabb útmutatók kamera

1 Április 2025
29 Március 2025
29 Március 2025
28 Március 2025
27 Március 2025
27 Március 2025

20 Március 2025

14 Január 2025
12 Január 2025
12 Január 2025