Használati útmutató Brother MFC-8840DN
Olvassa el alább 📖 a magyar nyelvű használati útmutatót Brother MFC-8840DN (226 oldal) a nyomtató kategóriában. Ezt az útmutatót 11 ember találta hasznosnak és 2 felhasználó értékelte átlagosan 4.5 csillagra
Oldal 1/226

MFC-8440
MFC-8840D
USER’S GUIDE
Version C

i
THIS EQUIPMENT IS DESIGNED TO WORK WITH A TWO WIRE
ANALOGUE PSTN LINE FITTED WITH THE APPROPRIATE
CONNECTOR.
APPROVAL INFORMATION
Brother advises that this product may not function correctly in a
country other than where it was originally purchased, and does not
offer any warranty in the event that this product is used on public
telecommunication lines in another country.
Compilation and Publication Notice
Under the supervision of Brother Industries Ltd., this manual has
been compiled and published, covering the latest product
descriptions and specifications.
The contents of this manual and the specifications of this product are
subject to change without notice.
Brother reserves the right to make changes without notice in the
specifications and materials contained herein and shall not be
responsible for any damages (including consequential) caused by
reliance on the materials presented, including but not limited to
typographical and other errors relating to the publication.

ii

iii
Safety precautions
To use the MFC safely
Save these instructions for later reference.
WAR NI NG
There are high voltage
electrodes inside the machine.
Before you clean the MFC or
clear a paper jam, make sure
you have unplugged the power
cord from the power outlet.
Do not handle the plug with wet
hands. Doing this might cause
an electrical shock.
After you use the MFC, some internal parts are extremely HOT!
To prevent injuries, be careful not to put your fingers in the area shown in
the illustration.
To prevent injuries, be careful
not to put your hands on the
edge of the MFC under the
document cover.
To prevent injuries, be careful
not to put your fingers in the
area shown in the illustration.

iv
■When you move the MFC, grasp the side handholds that are
under the scanner. Do NOT carry the MFC by holding it at the
bottom.
■Use caution when installing or modifying telephone lines. Never
touch telephone wires or terminals that are not insulated unless
the telephone line has been disconnected at the wall socket.
Never install telephone wiring during a lightning storm. Never
install a telephone socket in a wet location.
■Install equipment with a power cord near a socket/outlet that is
easily accessible.
■Do not use a telephone in the vicinity of gas leak to report leak.
■Do not use this product near appliances that use water, in a wet
basement or near a swimming pool.
Caution
■Lightning and power surges can damage this product! There may
be a remote risk of electric shock from lightning. We recommend
that you use a quality surge protection device on the AC power
line and on the telephone line, or unplug the lines during a
lightning storm.
To prevent injuries, be careful not to put
your fingers in the area shown in the
illustration.

v
Choosing a location
Place your MFC on a flat, stable surface that is free of vibration and
shocks, such as a desk. Put the MFC near a telephone socket and a
standard, grounded power outlet. Choose a location where the
temperature remains between 10° and 32.5°C.
Caution
■Avoid placing your MFC in a high-traffic area.
■Do not place near heaters, air conditioners, water, chemicals, or
refrigerators.
■Do not expose the MFC to direct sunlight, excessive heat,
moisture, or dust.
■Do not connect your MFC to electrical outlets controlled by wall
switches or automatic timers.
■Disruption of power can wipe out information in the MFC’s
memory.
■Do not connect your MFC to electrical outlets on the same circuit
as large appliances or other Equipment that might disrupt the
power supply.
■Avoid interference sources, such as speakers or the base units
of cordless phones.

vi
Quick Reference Guide
Sending faxes
Automatic Transmission
1
If it is not illuminated in
green, press (Fax).
2
Place the document face up
in the ADF, or face down on
the scanner glass.
3
Enter the fax number using
One-Touch, Speed-Dial,
Search or the dial pad.
4
Press Start.
5
If you are using the scanner
glass, press 2 or Start.
Real Time Transmission
You can send faxes in real time.
1
If it is not illuminated in
green, press (Fax).
2
Place the document face up
in the ADF, or face down on
the scanner glass.
3
Press Menu, 2, 2, 5.
4
Press or to select
On, and then press Set.
—OR—
For the next transmission
only, press or to
select Next Fax Only,
and then press Set.
5
For the next fax only, press
or to select
Next Fax:On, and then
press Set.
6
Press 1 if you want to
choose more settings and
the LCD will return to the
Setup send menu.
— —OR
Press 2 to fax.
7
Enter the fax number.
8
Press Start.
Receiving faxes
Select Receive Mode
1
Press Menu, 0,1.
2
Press or to select
Fax Only, Manual,
Fax/Tel and
External TAD and then
press Set.
Storing numbers
Storing One-Touch Dial
numbers
1
Press Menu, 2, 3, 1.
2
Press the One-Touch key
where you want to store the
number.
3
Enter a number (up to 20
digits), and then press Set.
4
Enter a name (up to 15
characters or leave it blank),
and then press Set.
5
Press Stop/Exit.

ix
3
On-screen programming .....................................................3-1
User-friendly programming ............................................... 3-1
Menu table ..................................................................3-1
Memory Storage .........................................................3-1
Navigation keys ................................................................3-2
4
Getting started .....................................................................4-1
Initial Setup.......................................................................4-1
Setting the Date and Time..........................................4-1
Setting the Station ID..................................................4-2
Entering text ...........................................................4-3
Inserting spaces .....................................................4-3
Making corrections .................................................4-4
Repeating letters ....................................................4-4
Special characters and symbols ............................4-4
PABX and TRANSFER...............................................4-5
Setting PABX..........................................................4-5
General Setup................................................................... 4-6
Setting the Mode Timer ..............................................4-6
Setting the Paper Type...............................................4-7
Setting the Paper Size................................................ 4-8
Setting the Ring Volume .............................................4-9
Setting the Beeper Volume.........................................4-9
Setting the Speaker Volume.....................................4-10
Turning on Automatic Daylight Savings Time...........4-10
Toner Save ...............................................................4-10
Sleep Time................................................................4-11
Turning off the Scanner Lamp ..................................4-11
Power Save ..............................................................4-12
Setting the Tray Use for Copy mode ........................4-13
Setting the Tray Use for Fax mode...........................4-14
Setting the LCD Contrast..........................................4-14
Initial Setup depending on Your Country ........................4-15
Setting Tone or Pulse dialling mode
(Except for the Nordic Countries) .........................4-15
5
Setup Receive ......................................................................5-1
Basic receiving operations................................................5-1
Choosing the Receive Mode.......................................5-1
To select or change your Receive Mode ................ 5-2
Setting the Ring Delay ...............................................5-2
Setting the F/T Ring Time (Fax/Tel mode only).......... 5-3
Fax Detect ..................................................................5-4
Printing a reduced incoming fax (Auto Reduction) ......5-5

xi
Advanced sending operations ........................................ 6-14
Composing the electronic Cover Page ..................... 6-14
Composing your own comments ..........................6-15
Cover page for the next fax only...........................6-15
Send a cover page for all faxes ............................6-16
Using a printed cover page.......................................6-17
Broadcasting.............................................................6-17
Overseas Mode ........................................................6-19
Delayed Fax..............................................................6-20
Delayed Batch Transmission....................................6-21
Setup for Polled Transmit (Standard) .......................6-21
Setup for Polled Transmit with Secure Code............6-22
Memory Security.......................................................6-23
Setting up the password .......................................6-24
Turning Memory Security on ................................6-24
Turning Memory Security off.....................................6-24
7
Auto Dial numbers and dialling options ............................ 7-1
Storing numbers for easy dialling .....................................7-1
Storing One-Touch Dial numbers ...............................7-1
Storing Speed-Dial numbers.......................................7-3
Changing One-Touch and Speed-Dial numbers.........7-4
Setting up Groups for Broadcasting............................7-5
Dialling options .................................................................7-7
Search ........................................................................7-7
One-Touch Dialling .....................................................7-7
Speed-Dialling ............................................................ 7-8
Manual dialling............................................................ 7-8
Using an external telephone .......................................7-8
Access codes and credit card numbers......................7-9
Pause .......................................................................7-10
Tone or Pulse ...........................................................7-10
8
Remote Fax Options ............................................................ 8-1
Fax Forwarding.................................................................8-1
Programming a Fax Forwarding number ....................8-1
Setting Fax Storage..........................................................8-2
Setting your Remote Access Code...................................8-3
Remote retrieval ............................................................... 8-4
Using your Remote Access Code...............................8-4
Remote commands.....................................................8-5
Retrieving fax messages ............................................8-6
Changing your Fax Forwarding number .....................8-6

xii
9
Printing reports .................................................................... 9-1
MFC settings and activity ................................................. 9-1
Customizing the Transmission Verification Report ...... 9-1
Setting the Journal Period .......................................... 9-2
Printing reports ...........................................................9-3
To print a report...................................................... 9-3
10
Making copies .................................................................... 10-1
Using the MFC as a copier .............................................10-1
Enter Copy mode...................................................... 10-1
Temporary copy settings ...................................... 10-2
Making a single copy from the ADF..........................10-3
Making multiple copies from the ADF.......................10-3
Single or multiple copies using the scanner glass...... 10-4
Out of Memory message ..........................................10-5
Using the Copy keys (Temporary settings) .................... 10-6
Enlarge/Reduce........................................................ 10-7
Quality (type of document) ....................................... 10-9
Sorting copies using the ADF ................................... 10-9
Contrast ..................................................................10-10
Tray Select .............................................................10-11
Duplex/N in 1 ..........................................................10-12
Duplex/N in 1 copy ................................................. 10-14
N in 1 copy .........................................................10-14
Poster ................................................................. 10-15
Duplex (1 in 1) (For MFC-8840D)....................... 10-16
Duplex (2 in 1) and Duplex (4 in 1)
(For MFC-8840D) ........................................... 10-18
Changing the default copy settings .............................. 10-19
Quality .................................................................... 10-19
Contrast ..................................................................10-19
11
Important information ....................................................... 11-1
IEC 60825 Specification ........................................... 11-1
Laser Diode ..........................................................11-1
Caution ................................................................. 11-1
For your safety..........................................................11-2
Disconnect device ....................................................11-2
IT power system (For Norway only) ..................... 11-2
LAN connection ....................................................11-2
International ENERGY STAR® Compliance
Statement ............................................................. 11-2
Important safety instructions........................................... 11-3
Trademarks .................................................................... 11-5

xiv
S
Specifications ......................................................................S-1
Product description...........................................................S-1
General.............................................................................S-1
Print media .......................................................................S-2
Copy .................................................................................S-2
General (continued)..........................................................S-2
Fax....................................................................................S-3
Scanner ............................................................................S-4
Printer ...............................................................................S-5
Interfaces..........................................................................S-5
Computer requirements....................................................S-6
Consumable items............................................................S-7
Network (LAN) board (NC-9100h) ....................................S-8
Optional External Wireless Print/Scan Server
(NC-2200w) ...................................................................S-9
I
Index ...................................................................................... I-1
R
Remote Retrieval Access card .......................................... R-1

INTRODUCTION 1 - 1
1
Using this Guide
Thank you for buying a Brother Multi-Function Center (MFC). Your
MFC-8440, MFC-8840D is simple to use, with LCD screen
instructions to guide you through programming it. You can make the
most of your MFC by taking a few minutes to read this Guide.
Finding information
All the chapter headings and subheadings are listed in the Table of
Contents. You will be able to find information about a specific feature
or operation by checking the Index at the back of this Guide.
Symbols used in this Guide
Throughout this Guide you’ll see special symbols alerting you to
important warnings, notes and actions. To make things clearer and
to help you press the correct keys, we used special fonts and added
some of the messages that will appear in the LCD.
Introduction
Bold Bold typeface identifies specific keys on the MFC control
panel.
Italics Italicized typeface emphasizes an important point or
refers you to a related topic.
Courier New Courier New typeface identifies the messages on the
LCD of the MFC.
Warnings inform you what to do to avoid possible personal injury or
damage to the MFC.
Cautions specify procedures you must follow or avoid to prevent
possible damage to the machine.
Notes tell you how you should respond to a situation that may arise or
give tips about how the current operation works with other features.
Improper Setup alerts you to devices and operations that are not
compatible with the MFC.

1 - 2 INTRODUCTION
MFC part names and operations
■Front view
No.
Name Description
1(MFC-8440) Manual Feed Tray
(MFC-8840D) Multi-purpose Tray
(MP Tray)
Load paper here.
2Front Cover Release Button Press it to open the front cover.
3Face-down Output Tray Support Flap
with Extension (Support Flap)
Unfold it to prevent the printed paper
from sliding off the MFC.
4Control Panel Use the keys and display to control
the MFC.
5Automatic Document Feeder (ADF) Use the ADF unit for multiple page
documents.
6ADF Document Support Extension Place the document here to use the
ADF unit.
7ADF Document Output Support Flap Unfold to prevent the scanned pages
from sliding off the MFC.
8Document Cover Open to place the document on the
scanner glass.
9Power Switch Switch it on or off.
10 Front Cover Open to install a toner cartridge or
drum unit.
11 Paper Tray (Tray #1) Load paper here.
7 ADF Document
Output Support
Flap
8 Document Cover
6 ADF Document Support
Extension
5 Automatic Document Feeder (ADF)
11 Paper Tray (Tray #1)
4 Control Panel
3 Face-down Output Tray
Support Flap with Extension
1
(MFC-8440) Manual Feed Tray
(MFC-8840D) Multi-purpose
Tray (MP Tray)
9 Power Switch
10 Front Cover
2 Front Cover Release Button

INTRODUCTION 1 - 3
■Back view
No.
Name Description
12 Paper Adjustment Lever for
Duplex Printing
(MFC-8840D)
Use to match your paper size for duplex
printing.
13 Duplex Tray
(MFC-8840D)
Slide out to remove paper jammed inside the
MFC.
14 AC Power Connector Connect the AC Power Cable here.
15 Face-up Output Tray
(Back Output Tray)
Open it when thicker paper is placed in the
MP tray or Manual feed tray.
16 ADF Cover Open to remove paper jammed inside the
ADF unit.
17 Telephone Line Jack/Socket Plug the line cord supplied with the machine
here.
18 USB Interface Connector Connect the USB Cable here.
19 Parallel Interface Connector Connect the Parallel Cable here.
20 External Telephone Line
Jack/Socket (Not for the UK)
Plug in the modular plug on the external
telephone line here.
15 Face-up Output Tray
(Back Output Tray)
14 AC Power Connector
13 Duplex Tray
(MFC-8840D)
16 ADF Cover
17 Telephone Line
Jack/Socket
12 Paper Adjustment Lever
for Duplex Printing
(MFC-8840D)
18 USB Interface
Connector
19 Parallel Interface
Connector
20 External Telephone
Line Jack/Socket
1 - 4 INTRODUCTION
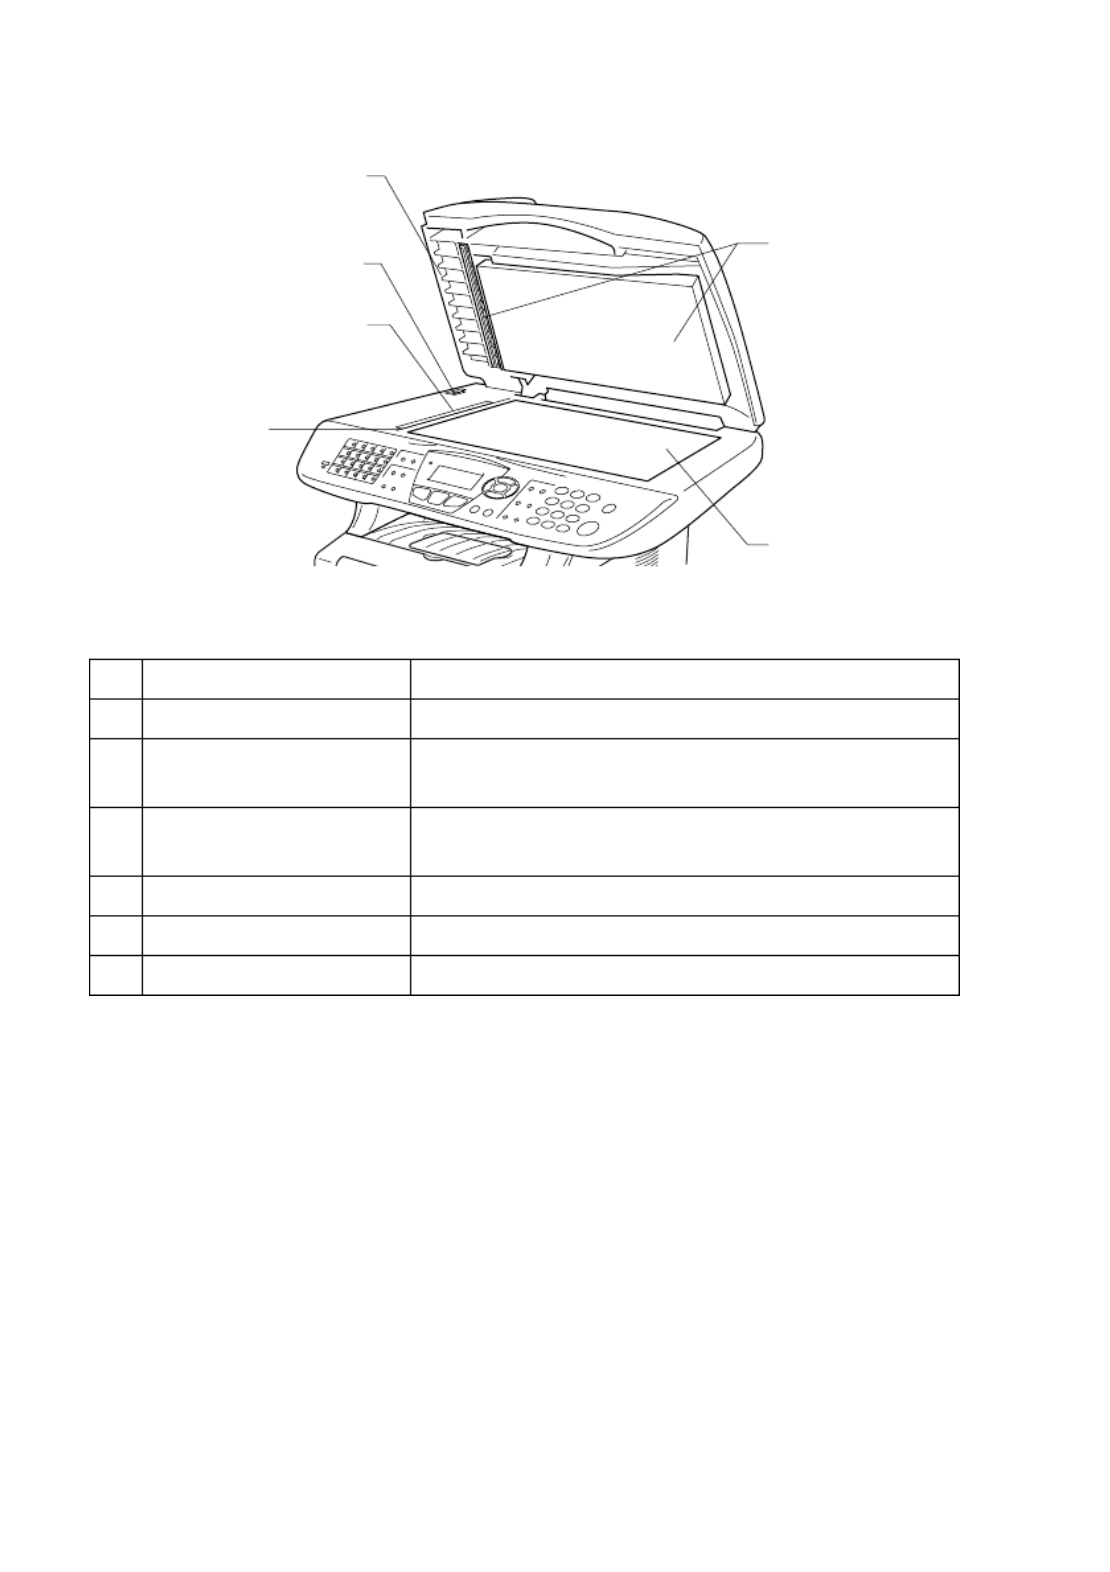
■Inside view (Document cover open)
No.
Name Description
21 Document Guidelines Use to center the document on the scanner glass.
22 Glass Strip This is used to scan documents when using the
ADF.
23 Scanner Lock Lever Use to lock/unlock the scanner when relocating the
MFC.
24 Document Cover Open to place the document on the scanner glass.
25 White Film Clean it for good quality copying and scanning.
26 Scanner Glass Place the document to be scanned here.
25 White Film
24 Document Cover
21 Document
Guidelines
22 Glass Strip
26 Scanner Glass
23 Scanner Lock Lever

INTRODUCTION 1 - 5
Control panel overview
MFC-8440 and MFC-8840D have similar control panel keys.
6
12
7
421 3 95 8
10 11

INTRODUCTION 1 - 7
7 Fax and telephone keys:
Tel/R
This key is used to have a telephone
conversation having picked up the
external handset in F/T
pseudo-ringing etc. Also, use this
key to gain access to an outside line
and/or to recall the operator or
transfer a call to another extension
when it is connected to a PABX.
Resolution
Sets the resolution when you send a
fax.
Search/Speed Dial
Lets you look up numbers that are
stored in the dialling memory. It also
lets you dial stored numbers by
pressing # and a three-digit number.
Redial/Pause
Redials the last number you called.
It also inserts a pause in auto dial
numbers.

1 - 8 INTRODUCTION
6
12
95 8
10 11
8 Navigation keys:
Menu
Lets you access the Menu to
program.
Set
Lets you store your settings in the
MFC.
Clear/Back
Deletes entered data or lets you exit
the menu by pressing repeatedly.
or
Press to scroll forward or backward
to a menu selection.
When using the speaker or ring, you
can press these keys to adjust the
volume in fax mode.
or
Press to scroll through the menus
and options.
Also, you can use these keys to do
a numeral search for the names of
stored numbers in fax mode.
9 Copy keys
(Temporary settings):
Enlarge/Reduce
Lets you reduce or enlarge copies
depending upon the ratio you
select.
Contrast
Lets you make a copy that is lighter
or darker than the document.
Quality
Lets you select the copy quality for
your type of document.
Tray Select
You can select which tray you would
like to use for the next copy.
Sort
Lets you sort multiple copies using
the ADF.
N in 1 (For MFC-8440)
N in 1 lets you copy 2 or 4 pages
onto one page.
Duplex/N in 1 (For MFC-8840D)
You can choose Duplex to copy on
both sides of the paper or N in 1 to
copy 2 or 4 pages onto one page.

1 - 10 INTRODUCTION
Status LED indications
The Status LED (Light Emitting Diode) will flash and change color
depending on the MFC status.
The LED indications shown in the table below are used in the
illustrations in this chapter.
LED LED status
LED is off.
Green Yellow Red
LED is on.
Green Yellow Red
LED is blinking.
LED MFC status Description
Sleep Mode The power switch is off or the MFC is in Sleep
mode or Power save mode.
Green
Warming Up The MFC is warming up for printing.
Green
Ready The MFC is ready to print.
Yellow
Receiving Data The MFC is either receiving data from the
computer, processing data in memory or
printing data.
Yellow
Data Remaining in
Memory
Print data remains in the MFC memory.

INTRODUCTION 1 - 11
Red
Service error Follow the steps below.
1. Turn off the power switch.
2. Wait a few seconds, and then turn it back on
and try to print again.
If you cannot clear the error and see the same
service call indication after turning the MFC
back on, call your dealer or Brother authorized
service center.
Red
Cover open The cover is open. Close the cover. (See Error
messages on page 12-1.)
Toner empty Replace the toner cartridge with a new one.
(See Replacing the toner cartridge on page
12-27.)
Paper error Put paper in the tray or clear the paper jam.
Check the LCD message. (See Troubleshooting
and routine maintenance on page 12-1.)
Scan lock Check that the scanner lock lever is released.
(See Scanner Lock Lever on page 1-4.)
Others Check the LCD message. (See Troubleshooting
and routine maintenance on page 12-1.)
Out of memory Memory is full. (See Error messages on page
12-1.)
When the power switch is off or the MFC is in Sleep mode, the
LED is off.
LED MFC status Description

1 - 12 INTRODUCTION
About fax machines
Fax tones and handshake
When someone is sending a fax, the MFC sends fax calling tones
(CNG tones). These are quiet, intermittent beeps every 4-seconds.
You’ll hear them after you dial and press Start and they will continue
for about 60 seconds after dialling. During that time, the sending
machine must begin the “handshake”, or connection, with the
receiving machine.
Each time you use automatic procedures to send a fax, you are
sending CNG tones over the phone line. You’ll soon learn to listen for
these quiet beeps each time you answer a phone on your fax line, so
you will know if you are receiving a fax message.
The receiving fax responds with fax receiving tones, which are loud,
chirping sounds. A receiving fax chirps for about 40 seconds over the
phone line, and the LCD shows Receiving .
If your MFC is set to the Fax Only mode, it will answer every call
automatically with fax receiving tones. If the other person hangs up,
your MFC will continue to send the “chirps” for about 40 seconds,
and the LCD continues to show Receiving . To cancel receiving,
press Stop/Exit .
The fax ‘handshake’ is the time in which the sending machine’s CNG
tones and the receiving machines “chirps” overlap. This must be for
at least 2 to 4 seconds, so both machines can understand how each
is sending and receiving the fax. The handshake cannot begin until
the call is answered, and the CNG tones only last for about 60
seconds after the number is dialled. So it is important for the
receiving machine to answer the call in as few rings as possible.
When you have an external Telephone Answering Device (TAD)
on your fax line, your TAD will decide the number of rings before
the call is answered.
Pay special attention to the directions for connecting a TAD in
this chapter. (See Connecting an external telephone answering
device (TAD) on page 1-15.)

INTRODUCTION 1 - 13
ECM (Error Correction Mode)
The Error Correction Mode (ECM) is a way for the MFC to check a
fax transmission while it is in progress. If the MFC detects errors
during fax transmission, it resends the pages of the fax that had an
error. ECM transmissions are only possible between fax machines
that both have this feature. If they do, you may send and receive fax
messages that are continuously being checked by the MFC.
Your MFC must have enough memory for this feature to work.

1 - 14 INTRODUCTION
Connecting the MFC
Connecting an external telephone
Although your MFC does not have a handset, you can connect a
separate telephone (or telephone answering device) directly to your
MFC as shown in the diagram below.
Whenever this phone (or TAD) is in use, the LCD shows
Telephone .
Extension
Telephone
External
Telephone
(Example
for the U.K.)

INTRODUCTION 1 - 15
Connecting an external telephone answering
device (TAD)
Sequence
You may choose to connect an answering device. However, when
you have an external TAD on the same telephone line as the MFC,
the TAD answers all calls and the MFC “listens” for fax calling (CNG)
tones. If it hears them, the MFC takes over the call and receives the
fax. If it doesn’t hear CNG tones, the MFC lets the TAD continue
playing your outgoing message so your caller can leave you a voice
message.
The TAD must answer within four rings (the recommended setting is
two rings). The MFC cannot hear CNG tones until the TAD has
answered the call, and with four rings there are only 8 to 10 seconds
of CNG tones left for the fax “handshake”. Make sure you carefully
follow the instructions in this guide for recording your outgoing
message. We do not recommend using the toll saver feature on your
external answering machine if it exceeds five rings.
If you do not receive all your faxes, reduce the Ring Delay
setting on your external TAD.

1 - 16 INTRODUCTION
Connections
1
Plug the telephone line cord from the wall socket into the back
of the MFC, in the socket labelled LINE.
2
Plug the telephone line cord from your external TAD into the
correct socket on the machine. (Make sure this cord is
connected to the TAD at the TAD’s telephone line socket, and
not its telephone socket.)
3
Set your external TAD to one or two rings. (The MFC’s Ring
Delay setting does not apply.)
4
Record the outgoing message on your external TAD.
5
Set the TAD to answer calls.
6
Set the Receive Mode to External TAD .
(See Choosing the Receive Mode on page 5-1.)
Do not connect a TAD elsewhere on the same phone line.
TAD
TAD
(Example
for the U.K.)

INTRODUCTION 1 - 17
Recording outgoing message (OGM) on an external TAD
Timing is important in recording this message. The message sets up
the ways to handle both manual and automatic fax reception.
1
Record 5 seconds of silence at the beginning of your message.
(This allows your MFC time to listen for the fax CNG tones of
automatic transmissions before they stop.)
2
Limit your speaking to 20 seconds.
3
End your 20-second message by giving your Remote Activation
Code for people sending manual faxes. For example:
“After the beep, leave a message or send a fax by pressing
51 and Start.”
We recommend beginning your OGM with an initial 5-second
silence because the MFC cannot hear fax tones over a resonant
or loud voice. You may try omitting this pause, but if your MFC
has trouble receiving, then you must re-record the OGM to
include it.

1 - 18 INTRODUCTION
Using extension telephones (For U.K. only)
It may be that your premises are already wired with parallel extension
telephones, or you intend to add extension telephones to your line,
in addition to your machine. While the simplest arrangement is
straightforward parallel connection, there are some reasons as to
why this arrangement will cause unsatisfactory service, the most
obvious of which is inadvertent interruption of a facsimile
transmission by someone picking up an extension telephone in order
to make an outgoing call. Additionally, remote activation may not
operate reliably in such a simple configuration.
This machine may also be set to make a delayed transmission (i.e. a
transmission at a pre-set time). This pre-set job may coincide with
someone picking up an extension handset.
Such problems can easily be eliminated however, if you arrange
modification of your extension wiring circuit, such that extension
devices are connected “downstream” of your machine, in a
master/slave configuration. In such a configuration, this machine can
always detect whether a telephone is in use, thus it will not attempt
to seize the line during that time. This is known as “telephone
off-hook detection.”
The inadvisable configuration is shown in figure 1 below, and the
recommended master/slave configuration is shown in figure 2.
This new connection configuration can be arranged by contacting
BT, Kingston upon Hull Telecommunications, your PABX maintainer
or a qualified telephone installation company as appropriate. Simply
explained, the extension telephone circuit should be terminated on a
normal modular plug (BT 431A style), which in turn should be
inserted into the modular socket of the white “T”-shaped connector
provided as part of the line cord assembly.

INTRODUCTION 1 - 19
FAX
EXTENSION
SOCKET EXTENSION
SOCKET MASTER
SOCKET INCOMING
LINE
INADVISABLE CONNECTION OF EXTENSION SOCKETS
Fig. 1.
EXTENSION
SOCKET EXTENSION
SOCKET MASTER
SOCKET INCOMING
LINE
RECOMMENDED CONNECTION OF EXTENSION SOCKETS
Fig. 2.
FAX
FAX MACHINE MUST BE PLUGGED
INTO MASTER SOCKET
DISCONNECT

1 - 20 INTRODUCTION
Multi-line connections (PBX)
Most offices use a central telephone system. While it is often
relatively simple to connect the MFC to a key system or a PBX
(Private Branch Exchange), we suggest that you contact the
company that installed your telephone system and ask them to
connect the MFC for you. It is advisable to have a separate line for
the MFC. You can then leave the Receive Mode set to Fax Only to
receive faxes any time of the day or night.
If the MFC is to be connected to a multi-line system, ask your installer
to connect the unit to the last line on the system. This prevents the
unit from being activated each time a telephone call is received.
If you are installing the MFC to work with a PBX
1
It is not guaranteed that the unit will operate correctly under all
circumstances with a PBX. Any cases of difficulty should be
reported first to the company that handles your PBX.
2
If all incoming calls will be answered by a switchboard operator,
it is recommended that the Receive Mode be set to Manual . All
incoming calls should initially be regarded as telephone calls.
Custom features on your phone line
If you have Voice Mail, Call Waiting, RingMaster, an answering
service, an alarm system or other custom feature on one phone line
it may create a problem with the operation of your MFC.
(See Custom features on a single line. on page 12-13.)

2 - 2 PAPER
Caution
Do not use ink jet paper. It may cause a paper jam and damage your
MFC.
Choosing acceptable paper
We recommend that you test paper (especially special sizes and
types of paper) on the MFC before purchasing large quantities.
■Avoid feeding label sheets that are partly used or your MFC will
be damaged.
■Avoid using coated paper, such as vinyl coated paper.
■Avoid using preprinted or highly textured paper, or paper with an
embossed letterhead.
For optimum printing, use a recommended type of paper, especially
for plain paper and transparencies. For more information on paper
specifications, call your nearest authorized sales representative or
the place where you purchased your MFC.
■Use label or transparencies that are designed for use in laser
printers.
■For the best print quality, we recommend using long-grained
paper.
■If you are using special paper and the paper has problems
feeding from the paper tray, try again using the manual feed tray
or Multi-purpose tray.
■You can use recycled paper in this MFC.
The output quality depends on the paper type and paper brand.
Visit us at http://solutions.brother.com and check the latest
recommendations for paper that can be used with the
MFC-8440 and MFC-8840D.

PAPER 2 - 3
Paper capacity of the paper trays
Paper size Number of sheets
Multi-purpose tray
(MP tray)
(MFC-8840D)
Width: 69.8 to 220 mm
Height: 116 to 406.4 mm
50 sheets
(80 g/m 2)
Manual feed tray
(MFC-8440)
Width: 69.8 to 220 mm
Height: 116 to 406.4 mm
Single sheet
Paper tray (Tray #1) A4, Letter, Legal, B5 (ISO),
B5 (JIS), Executive, A5, A6,
B6 (ISO)
250 sheets
(80 g/m 2)
Optional lower tray
(Tray #2)
A4, Letter, Legal, B5 (ISO),
B5 (JIS), Executive, A5, B6 (ISO)
250 sheets
(80 g/m 2)
Duplex printing A4, Letter, Legal —
PAPER 2 - 5
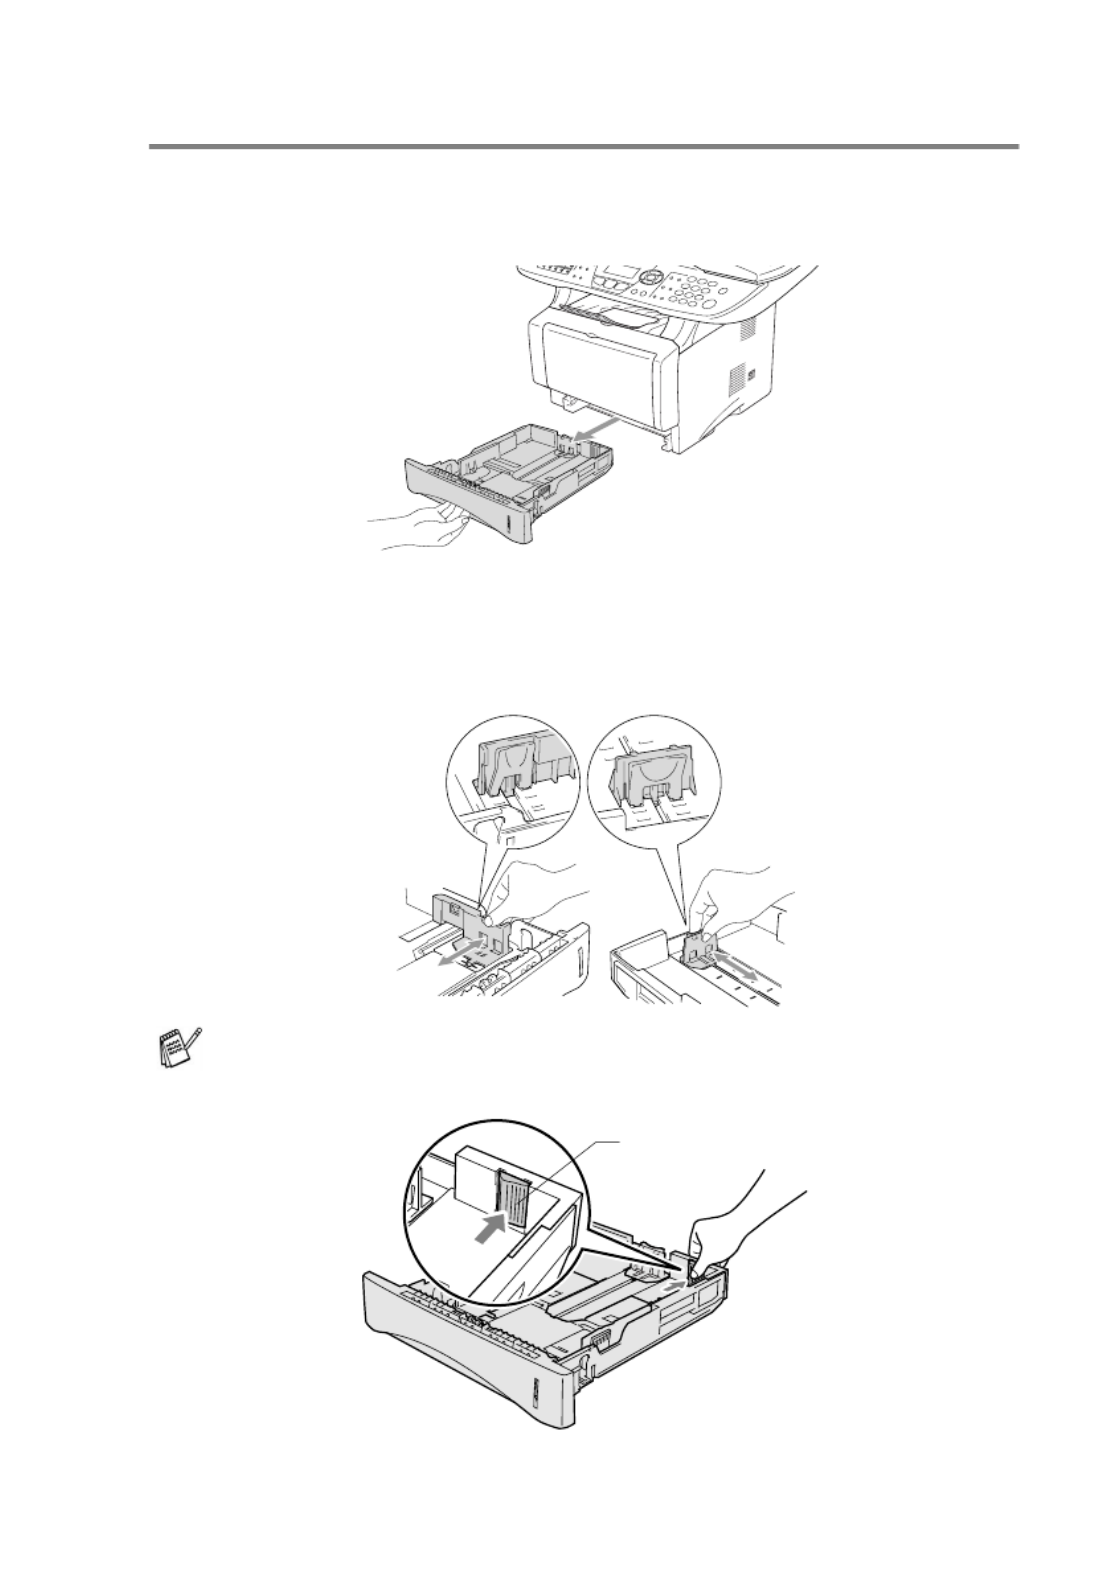
How to load paper
To load paper or other media in the paper tray
1
Pull the paper tray completely out of the MFC.
2
While pressing the paper guide release lever, slide the adjusters
to fit the paper size.
Check that the guides are firmly in the slots.
For Legal size paper, press the universal guide release button
and pull out the back of the paper tray.
Universal Guide Release
Button

2 - 6 PAPER
3
Fan the stack of paper well to avoid paper jams and misfeeds.
4
Put paper in the paper tray.
Check that the paper is flat in the tray, below the maximum
paper mark, and that the paper guide is flush against the paper
stack.
5
Put the paper tray firmly back in the MFC and unfold the support
flap before you use the MFC.
When you put paper in the paper tray, please remember the
following:
■The side to be printed on must be face down.
■Put the leading edge (top of the paper) in first and push it
gently into the tray.
■To copy or receive faxes on Legal size paper, unfold the
support flap extension, too.
Up to here.
Support Flap with Extension

2 - 8 PAPER
When you put paper in the manual feed, please remember the
following:
■The side to be printed on must be face up.
■Put the leading edge (top of the paper) in first and push it
gently into the tray.
■Make sure that the paper is straight and in the proper
position on the manual feed tray. If it is not, the paper may
not be fed properly, resulting in a skewed printout or a paper
jam.
■Do not put more than one sheet of paper or envelope in the
manual feed tray at any one time, or it may cause a jam.

PAPER 2 - 9
To load paper or other media in the multi-purpose tray
(MP tray) (For MFC-8840D)
1
Open the MP tray and lower it gently.
2
Pull out and unfold the MP tray support flap.
When printing envelopes and labels you should only use the
multi-purpose tray.
MP tray support flap

2 - 10 PAPER
3
When loading paper in the MP tray, make sure it touches the
back of the tray.
4
While pressing the paper-guide release lever, slide the paper
guide to fit the paper size.
■Make sure that the paper is straight and in the proper
position on the MP tray. If it is not, the paper may not be fed
properly, resulting in a skewed printout or a paper jam.
■You can place up to 3 envelopes or up to 50 sheets of
80 g/m 2 paper in the MP tray.
When you put paper in the MP tray, please remember the
following:
■The side to be printed on must be face up.
■During printing, the inside tray rises to feed paper into the
MFC.
■Put the leading edge (top of the paper) in first and push it
gently into the tray.

PAPER 2 - 11
To use Automatic Duplexing for fax, copy and
print operations (For MFC-8840D)
If you want to print on both sides of the paper using the Duplex
feature for fax, copy or print, you will need to set the Paper
Adjustment Lever to the size of paper you are using.
This feature is available for A4, Letter or Legal size paper.
(See Setting Duplex printing for Fax mode (For MFC-8840D) on
page 5-13, Duplex/N in 1 on page 10-12 and Two-sided printing
(Duplex Printing) in Software User’s Guide on the CD-ROM.)
1
Load paper in the Paper Tray or Multi-purpose Tray.
2
Set the Paper Adjustment Lever for Duplex Printing, in the back
of the MFC, to match your paper size.
3
Your MFC is now ready to print two-sided pages.
LTR/LGL
A4

3 - 1 ON-SCREEN PROGRAMMING
3
User-friendly programming
Your MFC is designed to be easy to use with LCD on-screen
programming using the navigation keys. User-friendly programming
helps you take full advantage of all the menu selections your MFC
has to offer.
Since your programming is done on the LCD, we have created
step-by-step on-screen instructions to help you program your MFC.
All you need to do is follow the instructions as they guide you through
the menu selections and programming options.
Menu table
You can probably program your MFC without the User’s Guide. But
to help you understand the menu selections and options that are
found in the MFC programs, use the Menu table on page 3-4.
Memory Storage
If there is a power failure, you will not lose your menu settings
because they are stored permanently. Temporary settings (such as
Contrast, Overseas Mode, and so on) will be lost. You may also have
to reset the date and time.
On-screen programming
You can program your MFC by pressing Menu followed by the
menu numbers.
For example to set Fax Resolution to Fine :
Press Menu , 2, 2, 2 and or to select Fine .
Press Set .

ON-SCREEN PROGRAMMING 3 - 2
Navigation keys
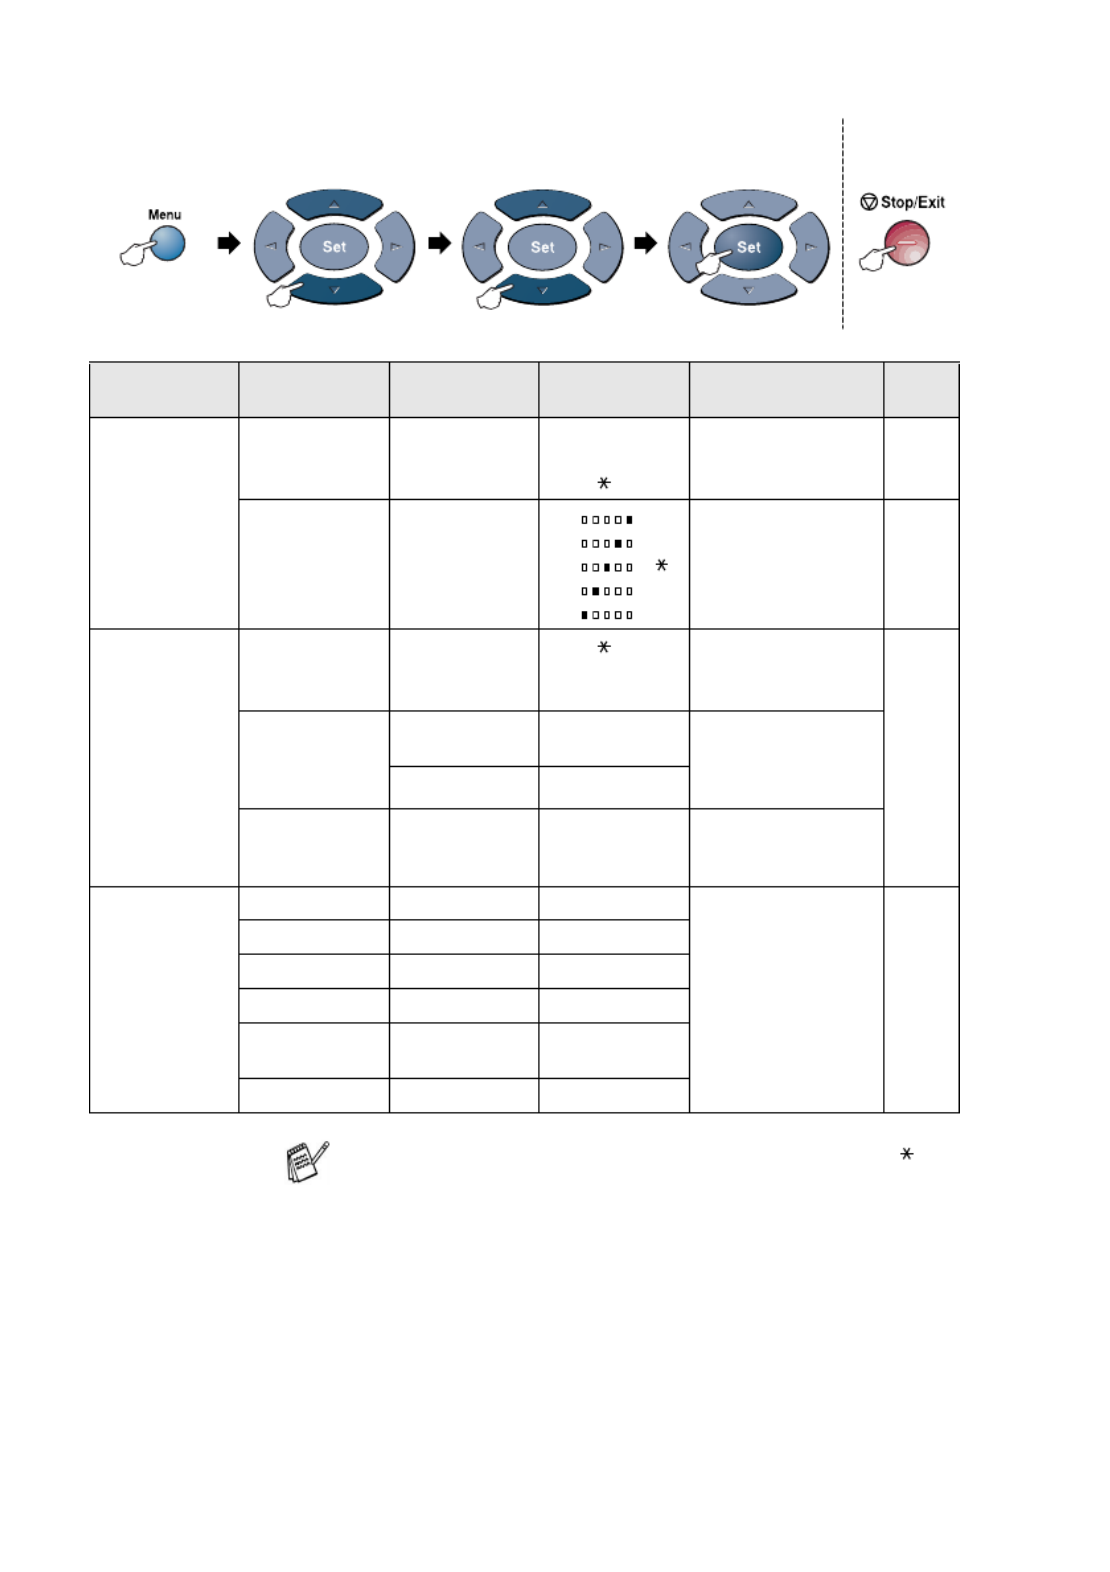
You can access the menu mode by pressing Menu .
When you enter the menu, the LCD scrolls.
Press 1 for General Setup menu
— —OR
Press 2 for Fax menu
— —OR
Press 3 for Copy menu
— —OR
Press 4 for Printer menu
— —OR
Press 5 for Print Reports menu
— —OR
Press 6 for LAN menu
(Only if the optional LAN board (NC-9100h) is installed.)
— —OR
Press 0 for Initial Setup menu
— —OR
You can scroll more quickly through each menu level by pressing the
arrow for the direction you want: or .
Then set an option by pressing Set when that option appears on the
LCD.
*Access the menu
*Go to the next menu level
*Accept an option
*Exit the menu by pressing
repeatedly
*Go back to the previous
menu level
*Scroll through the current
menu level
*Go back to the previous
menu level
*Go forward to the next
menu level
*Exit the menu
1.General Setup
2.Fax
3.Copy
4.Printer
Select ▲▼
& Set
4.Printer
5.Print Reports
6.LAN
0.Initial Setup
Select ▲▼
& Set

3 - 3 ON-SCREEN PROGRAMMING
The LCD will then show the next menu level.
Press or to scroll to your next menu selection.
Press Set.
When you finish setting an option, the LCD shows Accepted.
Use to scroll backward if you passed your choices or want
to save keystrokes.
The current setting is always the option with “ ”.

3 - 5 ON-SCREEN PROGRAMMING
Main Menu Submenu Menu
Selections
Options Descriptions Page
1.
General
Setup
(Continued)
3.Paper Size
(Continued)
2.Tray #2
(option)
A4
Letter
Legal
Executive
A5
B5
B6
Sets the size of paper
in paper tray #2.
4-8
4.Volume 1.Ring High
Med
Low
Off
Adjusts the ring
volume.
4-9
2.Beeper High
Med
Low
Off
Adjusts the volume
level of the beeper.
4-9
3.Speaker High
Med
Low
Off
Adjusts the speaker
volume.
4-10
5.Auto
Daylight
—On
Off
Change for Daylight
Savings Time
automatically.
4-10
6.Ecology 1.Toner Save On
Off
Increases life of toner
cartridge.
4-10
2.Sleep Time (00-99)
05Min
Conserves power 4-11
3.Power Save On
Off
Power Save Mode 4-12
The factory settings are shown in Bold with .
to accept
to
exit
Press the Menu numbers.
(ex. Press 1 1, for Mode Timer)
—OR—
to select to select

ON-SCREEN PROGRAMMING 3 - 6
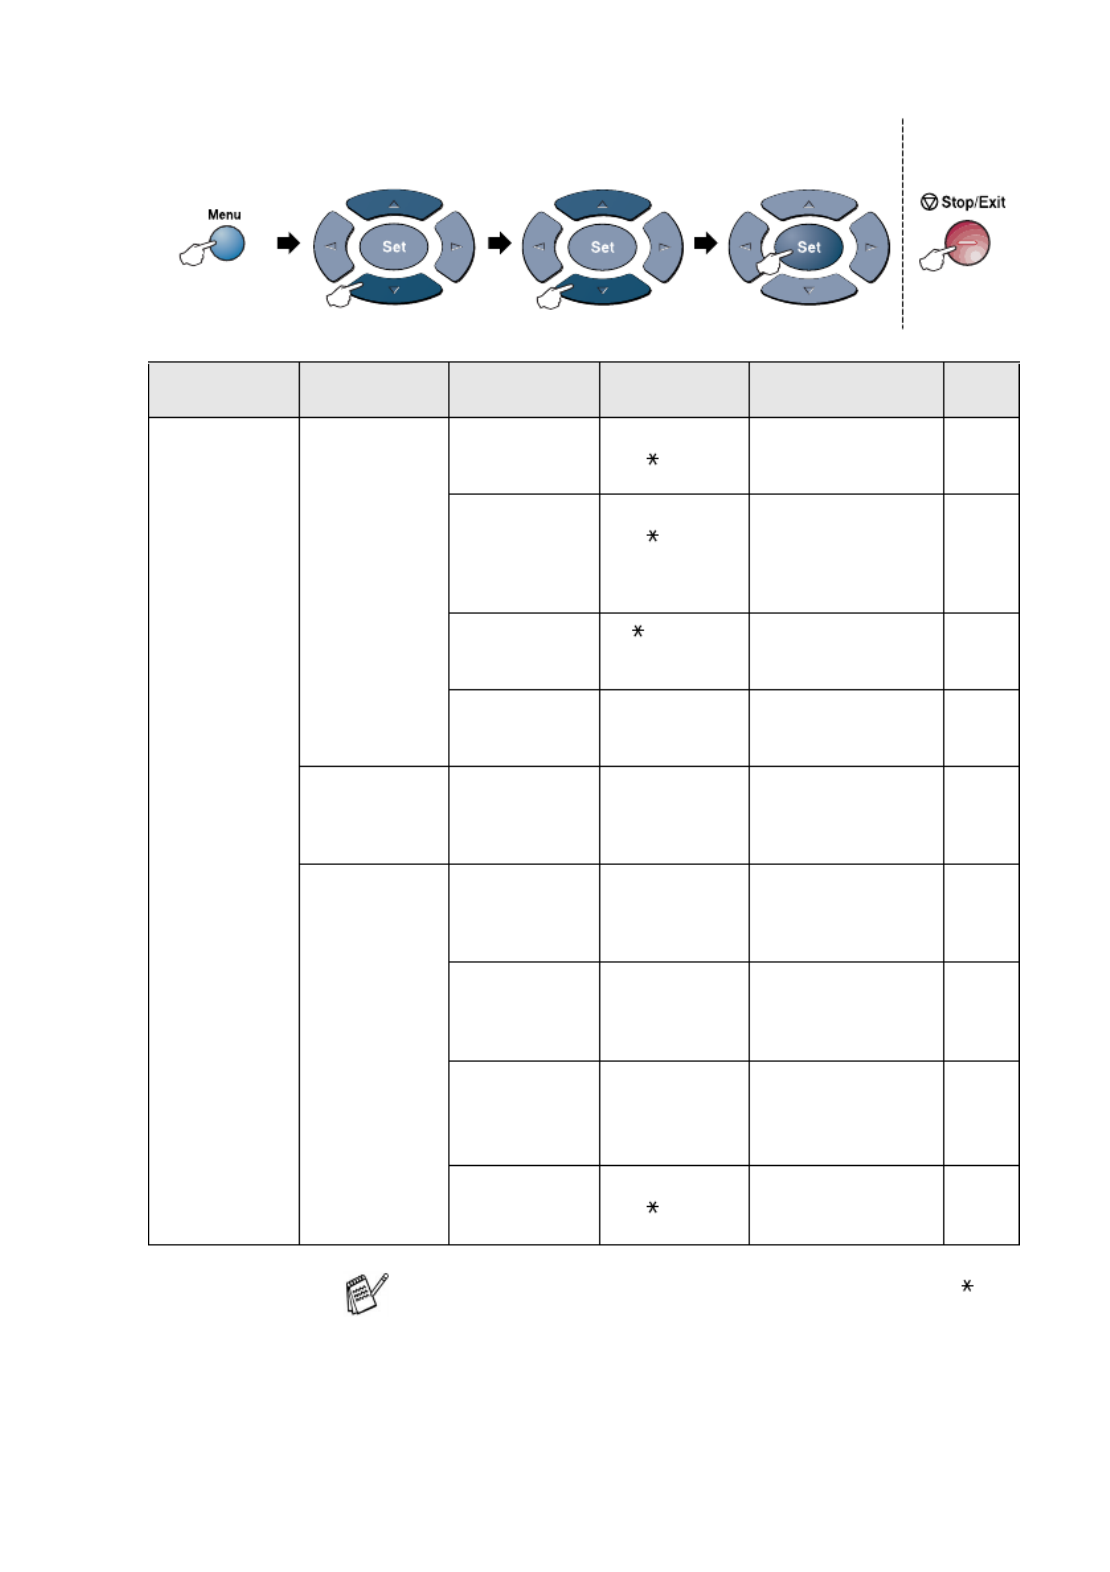
Main Menu Submenu Menu
Selections
Options Descriptions Page
1.
General
Setup
(Continued)
7.Tray Use:
Copy
(For
MFC-8440, this
menu doesn't
appear.)
(If you have
optional tray
#2, see page
3-17.)
—Tray#1 Only
MP Only
Auto
Selects the tray that
will be used for copy.
4-13
8.Tray Use:
Fax
(This setting
only appears if
you have the
optional tray
#2, see page
3-17.)
— Selects the tray that
will be used for fax.
4-14
7.LCD
Contrast
(MFC-8440)
8.LCD
Contrast
(MFC-8840D)
9.LCD
Contrast
(With optional
tray #2)
— - +
- +
- +
- +
- +
Adjusts the contrast
of LCD.
4-14
2.Fax 1 Setup .
Receive
(In Fax mode
only)
1.Ring Delay 00 - 04 (02 )
(UK only)
00 - 05 (02 )
(Nordic
countries only)
Sets the number of
rings before the MFC
answers in FAX or
FAX/TEL mode.
5-2
2.F/T Ring
Time
70
40
30
20
Sets the
pseudo/double-ring
time in FAX/TEL
mode.
5-3
The factory settings are shown in Bold with .
to accept
to
exit
Press the Menu numbers.
(ex. Press 1 1, for Mode Timer)
—OR—
to select to select

3 - 7 ON-SCREEN PROGRAMMING
Main Menu Submenu Menu
Selections
Options Descriptions Page
2.Fax
(Continued)
1.Setup
Receive
(In Fax mode
only)
(Continued)
3.Fax Detect On
Off
Receives fax
messages without
pressing the Start
key.
5-4
4.Remote
Code
On
( 51, #51)
Off
You can answer all
calls at an extension
or external phone
and use codes to turn
the MFC on or off.
You can personalize
these codes.
5-9
5.Auto
Reduction
On
Off
Reduces the size of
incoming faxes.
5-5
6.Memory
Receive
On
Off
Automatically stores
any incoming faxes
in its memory if it runs
out of paper.
5-6
7.Print
Density
- +
- +
- +
- +
- +
Makes printouts
darker or lighter.
5-7
8.Polling RX Standard
Secure
Timer
Sets up your MFC to
poll another fax
machine.
5-10
9.Duplex
(MFC-8840D)
On
Off
Receives faxes
printed on both sides
of the paper.
5-13
The factory settings are shown in Bold with .
to accept
to
exit
Press the Menu numbers.
(ex. Press 1 1, for Mode Timer)
—OR —
to select to select
ON-SCREEN PROGRAMMING 3 - 8
Main Menu Submenu Menu
Selections
Options Descriptions Page
2.Fax
(Continued)
2.Setup Send
(In Fax mode
only)
1.Contrast Auto
Light
Dark
Changes the
lightness or darkness
of faxes you send.
6-8
2.Fax
Resolution
Standard
Fine
S.Fine
Photo
Sets the default
resolution for
outgoing faxes.
6-9
3.Delayed
Fax
— Set the time of day in
24 hour format that
the delayed faxes will
be sent.
6-20
4.Batch TX On
Off
Combines delayed
faxes to the same fax
number at the same
time of day into one
transmission.
6-21
5.Real Time
TX
Off
On
Next Fax Only
You can send a fax
without using the
memory.
6-11
6.Polled TX Standard
Secure
Sets up the
document on your
MFC to be retrieved
by another fax
machine.
6-21
7.Coverpg
Setup
Next Fax Only
On
Off
Print Sample
Automatically send a
Cover Page you
have programmed.
6-14
The factory settings are shown in Bold with .
to accept
to
exit
Press the Menu numbers.
(ex. Press 1 1, for Mode Timer)
—OR—
to select to select
ON-SCREEN PROGRAMMING 3 - 10
Main Menu Submenu Menu
Selections
Options Descriptions Page
2.Fax
(Continued)
5.Remote Fax
Opt
1.Fax
Forward
On
Off
Sets the MFC to
forward fax
messages.
8-1
2.Fax
Storage
On
Off
Stores incoming
faxes in the memory
so you can retrieve
them while you are
away from your MFC.
8-2
3.Remote
Access
--- You must set your
own code for Remote
Retrieval.
8-3
4.Print
Document
— Prints incoming faxes
stored in the
memory.
5-7
6.Remaining
Jobs
— — Checks which jobs
are in the memory or
cancels a delayed
fax or polling job.
6-12
0.
Miscellaneous
1
.
Mem
Security
— Prohibits most
functions except
receiving faxes into
memory.
6-23
2.Drum Life — You can check the
percentage of drum
life that remains
available.
12-35
3.Page
Counter
Total
Copy
Print
List/Fax
Lets you check
number of total
pages the MFC has
printed so far.
12-35
4
.
BT Call
Sign
(U.K. Only)
On
Off
Use with BT Call
Sign.
5-14
The factory settings are shown in Bold with .
to accept
to
exit
Press the Menu numbers.
(ex. Press 1, 1 for Mode Timer)
—OR—
to select to select
3 - 11 ON-SCREEN PROGRAMMING
Main Menu Submenu Menu
Selections
Options Descriptions Page
3.Copy 1.Quality Text
Photo
Auto
Selects the Copy
resolution for your
type of document.
10-19
2.Contrast — - +
- +
- +
- +
- +
Adjusts the contrast
for copies.
10-19
4.Printer 1.Emulation — Auto
HP LaserJet
BR-Script 3
Selects the
Emulation mode.
See
Software
User’s
Guide
on the
CD-ROM
2.Print
Options
1.Internal
Font
— Prints a list of the
MFC’s internal fonts
or current printer
settings.
2.
Configuration
—
3.Reset
Printer
— — Returns the MFC to
the original factory
default settings.
5.Print
Reports
1.Help List — — You can print these
lists and reports.
9-3
2.Quick-Dial — —
3.Journal — —
4
.
XMIT Verify
— —
5.System
Setup
— —
6.
Order Form
— —
The factory settings are shown in Bold with .
to accept
to
exit
Press the Menu numbers.
(ex. Press 1 1, for Mode Timer)
—OR —
to select to select

ON-SCREEN PROGRAMMING 3 - 12
Main Menu Submenu Menu
Selections
Options Descriptions Page
0.Initial
Setup
1.Receive
Mode
— Fax Only
Fax/Tel
External TAD
Manual
You can choose the
receive mode that
best suits your
needs.
5-2
2.Date/Time — — Puts the date and
time on the LCD and
in headings of faxes
you send.
4-1
3.Station ID — Fax
Tel
Name
Program your name,
fax and telephone
number to appear on
each page you fax.
4-2
4.Tone/Pulse Tone—
Pulse
Selects the dialling
mode.
4-15
5.PBX — On
Off
Turn on this function
if the machine is
connected to PABX
(private automatic
Branch Exchange.)
4-5
6.Local
Language
(For Czech and
Hungarian)
— Czech
Hungarian
English
Allows you to change
the LCD Language
for your country.
See
Quick
Setup
Guide
6.Local
Language
(For
Norwegian,
Swedish,
Danish and
Finnish)
— Norwegian
Swedish
Danish
Finnish
English
Allows you to change
the LCD Language
for your country.
See
Quick
Setup
Guide
■The factory settings are shown in Bold with .
■6.Local Language menu is not available on
UK machine.
to accept
to
exit
Press the Menu numbers.
(ex. Press 1, 1 for Mode Timer)
—OR—
to select to select

3 - 13 ON-SCREEN PROGRAMMING
If you installed optional LAN board (NC-9100h), the LCD shows
the following LAN menu.
Main Menu Submenu Menu
Selections
Options Descriptions Page
6.LAN
(option)
1.Setup
TCP/IP
1
.
BOOT Method
Auto
Static
RARP
BOOTP
DHCP
You can choose the
BOOT method that
best suits you needs.
See
Network
User’s
Guide
on the
CD-ROM
2.IP Address [000-255].
[000-255].
[000-255].
[000-255]
Enter the IP address.
3
.
Subnet Mask
[000-255].
[000-255].
[000-255].
[000-255]
Enter the Subnet
mask.
4.Gateway [000-255].
[000-255].
[000-255].
[000-255]
Enter the Gateway
address.
5.Host Name BRN_XXXXXX Enter the Host name.
6
.
WINS Config
Auto
Static
You can choose the
WINS configuration
mode.
7.WINS
Server
Primary
Secondary
Specifies the IP
address of the
primary or secondary
server.
The factory settings are shown in Bold with .
to accept
to
exit
Press the Menu numbers.
(ex. Press 1 1, for Mode Timer)
—OR —
to select to select

ON-SCREEN PROGRAMMING 3 - 14
Main Menu Submenu Menu
Selections
Options Descriptions Page
6.LAN
(option)
(Continued)
1.Setup
TCP/IP
(Continued)
8.DNS Server Primary
Secondary
Specifies the IP
address of the
primary or secondary
server.
See
Network
User’s
Guide
on the
CD-ROM
9.APIPA On
Off
Automatically
allocates the IP
address from the
link-local address
range.
2.Setup
Internet
1.Mail
Address
(60 characters) Enter the mail
address.
2
.
SMTP Server
[000-255].[000-
255].[000-255].
[000-255]
Enter the SMTP
server address.
3
.
POP3 Server
[000-255].[000-
255].[000-255].
[000-255]
Enter the POP3
server address.
4.Mailbox
Name
(up to 20
characters)
Enter the mail box
name.
5
.
Mailbox Pwd
Password:
******
Enter the password
to login to the POP3
server.
3.Setup Mail
RX
1.Auto
Polling
On
Off
Automatically checks
the POP3 server for
new messages.
2.Poll
Frequency
10Min Sets the interval for
checking for new
messages on the
POP3 server.
The factory settings are shown in Bold with .
to accept
to
exit
Press the Menu numbers.
(ex. Press 1, 1 for Mode Timer)
—OR—
to select to select

3 - 15 ON-SCREEN PROGRAMMING
Main Menu Submenu Menu
Selections
Options Descriptions Page
6.LAN
(option)
(Continued)
3.Setup Mail
RX
(Continued)
3.Header All
Subject+From+To
None
Selects the contents
of the mail header to
be printed.
See
Network
User’s
Guide
on the
CD-ROM
4.Del Error
Mail
On
Off
Deletes error mails
automatically.
5.
Notification
On
MDN
Off
Sends notification
messages.
4.Setup Mail
TX
1.Sender
Subject
— Displays the subject
that is attached to the
Internet Fax data.
2.Size Limit On
Off
Limits the size of
E-mail documents.
3.
Notification
On
Off
Sends notification
messages.
5
.
Setup Relay
1.Rly
Broadcast
On
Off
Relays a document
to another fax
machine.
2.Relay
Domain
RelayXX: Registers the
Domain name.
3.Relay
Report
On
Off
Prints the Relay
Broadcast Report.
The factory settings are shown in Bold with .
to accept
to
exit
Press the Menu numbers.
(ex. Press 1 1, for Mode Timer)
—OR —
to select to select

ON-SCREEN PROGRAMMING 3 - 16
Main Menu Submenu Menu
Selections
Options Descriptions Page
6.LAN
(option)
(Continued)
6
.
Setup Misc.
1.Netware On
Off
Select On to use the
MFC on a Netware
network.
See
Network
User’s
Guide
on the
CD-ROM
2.Net Frame Auto
8023
ENET
8022
SNAP
Lets you specify the
frame type.
3.AppleTalk On
Off
Select On to use the
MFC on a Macintosh
network.
4.DLC/LLC On
Off
Select On to use the
MFC on a DLC/LLC
network.
5.Net
BIOS/IP
On
Off
Select On to use the
MFC on a Net
BIOS/IP network.
6.Ethernet Auto
100B-FD
100B-HD
10B-FD
10B-HD
Selects Ethernet link
mode.
7.Time Zone GMT-XX:XX Sets the time zone
for your country.
7
.
Scan to
E-Mail
1.Color PDF
JPEG
Selects the file type.
2.B/W PDF
TIFF
The factory settings are shown in Bold with .
to accept
to
exit
Press the Menu numbers.
(ex. Press 1, 1 for Mode Timer)
—OR—
to select to select

3 - 17 ON-SCREEN PROGRAMMING
(For MFC-8440 with the optional paper tray #2)
(For MFC-8840D with the optional paper tray #2)
If you have the optional paper tray, the LCD displays these
options. ( Menu , 1, 7/Menu , 1, 8)
Main Menu Submenu Menu
Selections
Options Descriptions Page
1.General
Setup
7.Tray Use:
Copy
— Tray#1 Only
Tray#2 Only
Auto
Select the tray that
will be used for
copying.
4-13
8.Tray Use:
Fax
— Tray#1 Only
Tray#2 Only
Auto
Select the tray that
will be used for
faxing.
4-14
Main Menu Submenu Menu
Selections
Options Descriptions Page
1.General
Setup
7.Tray Use:
Copy
— Tray#1 Only
Tray#2 Only
MP Only
Auto
Select the tray that
will be used for
copying.
4-13
8.Tray Use:
Fax
— Tray#1 Only
Tray#2 Only
Auto
Select the tray that
will be used for
faxing.
4-14
The factory settings are shown in Bold with .

4 - 2 GETTING STARTED
Setting the Station ID
You should store your name or company name and fax number and
telephone number to be printed on all fax pages that you send.
It is important that you enter the fax and telephone numbers in the
internationally standardised format, i.e. in accordance with the
following strict sequence:
■The “+” (plus) character (by pressing key)
■Your Country Code (e.g. “44” for the United Kingdom, “41” for
Switzerland)
■Your local area code minus any leading “0” (“9” in Spain)
■A space
■Your number on the local exchange, using spaces to aid
readability as appropriate.
As an example, if the machine is installed in the United Kingdom and
the same line is to be used for both fax and voice calls, and your
national telephone number is 0161-444 5555, then you must set the
fax and telephone number parts of your station ID as: +44 161-444
5555.
1
Press Menu , 0, 3.
2
Enter your fax number (up to 20
digits).
Press Set .
3
Enter your telephone number (up to 20 digits).
Press Set .
(If your telephone number and fax number are the same, enter
the same number again).
■The telephone number you enter is only used for Cover
Page features. (See Composing the electronic Cover Page
on page 6-14.)
■You cannot enter a hyphen.
03.Station ID
Fax:
Enter & Set Key

4 - 4 GETTING STARTED
Making corrections
If you entered a letter incorrectly and want to change it, press to
move the cursor under the incorrect character. Then press
Clear/Back . The letter above the cursor will be deleted. Re-enter
the correct character.
Repeating letters
If you need to enter a character that is on the same key as the
previous character, press to move the cursor to the right before
you press the key again.
Special characters and symbols
Press , # or 0, and then press or to move the cursor under
the special character or symbol you want. Then press Set to select it.
Press for (space) ! " # $ % & ’ ( ) + , - . /
Press #for : ; < = > ? @ [ ] ^ _
Press 0for Ä Ë Ö Ü À Ç È É 0

GETTING STARTED 4 - 5
PABX and TRANSFER
The machine is initially set to be connected with PSTN (Public
Switched Telephone Network) lines. However, many offices use a
central telephone system or Private Automatic Branch Exchange
(PABX). Your fax can be connected to most types of PABX. The
recall facility on the machine supports timed break recall only (TBR),
PBXS normally can work with this for gaining access to an outside
line, or for transferring a call to another extension: The feature works
when the Tel/R key is pressed.
Setting PABX
If the machine is connected to a PABX system, set PBX to On. If not,
set it to Off .
1
Press Menu , 0, 5.
2
Press or to select On (or
Off ).
Press Set .
3
Press Stop/Exit .
You can program a Tel/R keypress as part of a number stored
in a One-Touch or Speed-Dial location. When programming the
One-Touch or Speed-Dial number (Function menu 2-3-1 or
2-3-2) press Tel/R first (the screen displays "!"), then enter the
telephone number. If you do this, you do not need to press
Tel/R each time before you dial using a One-Touch or
Speed-Dial location. (See Storing numbers for easy dialling on
page 7-1.)
However, if PBX is set to Off , you cannot use the One-Touch
or Speed-Dial number that a Tel/R key press is programmed
into.
05.PBX
▲On
▼Off
Select ▲▼
& Set

4 - 6 GETTING STARTED
General Setup
Setting the Mode Timer
The MFC has three temporary mode keys on the control panel: Fax,
Copy and Scan. You can change the number of seconds or minutes
the MFC takes after the last Copy or Scan operation before it returns
to Fax mode. If you select Off , the MFC stays in the mode you used
last.
1
Press Menu , 1, 1.
2
Press or to select
0 Sec , 30 Secs , 1 Min , 2 Mins ,
5 Mins or Off .
3
Press Set .
11.Mode Timer
▲0 Sec
30 Secs
▼1 Min
Select ▲▼
& Set

GETTING STARTED 4 - 7
Setting the Paper Type
To get the best print quality, set the MFC for the type of paper you
are using.
For MFC-8440
1
Press Menu , 1, 2.
—OR—
If you have the optional paper tray,
press Menu , 1, 2, 1 to set the
paper type for Tray #1 or Menu ,
1, 2, 2 to set the paper type for
Tray #2 .
2
Press or to select Thin ,
Plain , Thick , Thicker or
Transparency .
3
Press Set .
4
Press Stop/Exit .
For MFC-8840D
1
Press Menu , 1, 2, 1 to set the
paper type for MP Tray .
—OR—
Press Menu , 1, 2, 2 to set the
paper type for Tray #1 .
—OR—
If you have the optional paper tray, press Menu , 1, 2, 3 to set
the paper type for Tray #2 .
2
Press or to select Thin ,
Plain , Thick , Thicker or
Transparency .
3
Press Set .
4
Press Stop/Exit .
You can select Transparency for Tray #1 and Tray #2 only
when A4, Letter or Legal is selected in Menu , 1, 3.
12.Paper Type
▲Plain
Thick
▼Thicker
Select ▲▼
& Set
12.Paper Type
1.Tray #1
2.Tray #2
Select ▲▼
& Set
12.Paper Type
1.MP Tray
2.Tray #1
3.Tray #2
Select ▲▼
& Set
12.Paper Type
1.MP Tray
▲Plain
▼Thick
Select ▲▼
& Set

4 - 8 GETTING STARTED
Setting the Paper Size
You can use eight sizes of paper for printing copies: A4, letter, legal,
executive, A5, A6, B5 and B6 and three sizes of paper for printing
faxes: A4, letter and legal. When you change the size of paper in the
MFC, you will need to change the setting for Paper Size at the same
time so your MFC can fit an incoming fax or reduced copy on the
page.
1
Press Menu , 1, 3.
2
Press or to select A4,
Letter , Legal , Executive , A5,
A6, B5 or B6.
Press Set .
3
Press Stop/Exit .
With optional paper tray
1
Press Menu , 1, 3, 1 to set the
paper size for Tray #1 .
— —OR
Press Menu , 1, 3, 2 to set the
paper size for Tray #2 .
2
Press or to select A4, Letter , Legal , Executive ,
A5, A6, B5 and B6.
Press Set .
3
Press Stop/Exit .
■If you are using the optional paper tray, paper size A6 is not
available.
■If you select Transparency in Menu , 1, 2, you can only
select A4, Letter or Legal .
13.Paper Size
▲A4
Letter
▼Legal
Select ▲▼
& Set
13.Paper Size
1.Tray #1
2.Tray #2
Select ▲▼
& Set

GETTING STARTED 4 - 9
Setting the Ring Volume
You can adjust the ring volume when your MFC is idle (not being
used). You can turn the ring Off or you can select the ring volume
level.
1
Press Menu , 1, 4, 1.
2
Press or to select
(Low, Med, High or Off ).
Press Set .
3
Press Stop/Exit .
— —OR
In Fax mode, press or to adjust the volume level. Every time
you press these keys, the MFC will ring so you can hear the active
setting as the LCD shows it. The volume changes with each key
press. The new setting will stay until you change it again.
Setting the Beeper Volume
You can change the beeper volume. The default (factory) setting is
Med. When the beeper is on, the MFC beeps every time you press a
key or make a mistake and after a fax is sent or received.
1
Press Menu , 1, 4, 2.
2
Press or to select your
option.
(Low, Med, High or Off )
Press Set .
3
Press Stop/Exit .
14.Volume
1.Ring
▲Med
▼High
Select ▲▼
& Set
14.Volume
2.Beeper
▲Med
▼High
Select ▲▼
& Set

4 - 10 GETTING STARTED
Setting the Speaker Volume
You can adjust the MFC’s one-way speaker volume.
1
Press Menu , 1, 4, 3.
2
Press or to select
(Low, Med, High or Off ).
Press Set .
3
Press Stop/Exit .
Turning on Automatic Daylight Savings Time
You can set the MFC to change automatically for Daylight Savings
Time. It will reset itself forward one hour in the Spring and backward
one hour in the Autumn. Make sure you have set the correct day and
time in the Date/Time setting. The default setting is On.
1
Press Menu , 1, 5.
2
Press or to select On (or
Off ).
Press Set .
3
Press Stop/Exit .
Toner Save
You can conserve toner using this feature. When you set Toner Save
to On, print appears somewhat lighter. The default setting is Off .
1
Press Menu , 1, 6, 1.
2
Press or to select On (or
Off ).
3
Press Set .
4
Press Stop/Exit .
14.Volume
3.Speaker
▲Med
▼High
Select ▲▼
& Set
15.Auto Daylight
▲On
▼Off
Select ▲▼
& Set
16.Ecology
1.Toner Save
▲On
▼Off
Select ▲▼
& Set

GETTING STARTED 4 - 11
Sleep Time
Setting the Sleep Time reduces power consumption by turning off
the fuser inside the MFC, while it is idle. You can choose how long
the MFC is idle (from 00 to 99 minutes) before it goes into sleep
mode. The timer is automatically reset when the MFC receives a Fax
or PC data, or makes a copy. The factory setting is 05 minutes. While
the MFC is in sleep mode, you will see Sleep on the LCD. If you try
to print or copy in sleep mode, there will be a short delay while the
fuser warms up to working temperature.
1
Press Menu , 1, 6, 2.
2
Use the dial pad to enter the length of time the MFC is idle
before it goes into sleep mode (00 to 99).
3
Press Set .
4
Press Stop/Exit .
Turning off the Scanner Lamp
The scanner lamp stays on for 16 hours before automatically
switching off to preserve the life of the lamp. You can turn off the
scanner lamp manually if you wish by pressing the and keys
simultaneously. The scanner lamp will remain turned off until the next
time you use the scanning feature.
Turning off the scanner lamp will also reduce the power
consumption.
■If you want to turn sleep mode off, press Secure and Job
Cancel simultaneously in Step 2.
■If the MFC is in Sleep Mode when you change the Sleep
Time, the new setting will take effect the next time the MFC
copies or prints is restarted.
Please note that turning the lamp off regularly will reduce the
lamp
’
s life. Some people prefer to turn the lamp off as they leave
the office, or late at night at home. This is not necessary for
normal day to day use.

4 - 12 GETTING STARTED
Power Save
Setting Power Save mode reduces power consumption. If Power
Save Mode is switched On, when the MFC is idle and the scanner
lamp is turned off, it drops into power save mode in approx. 10
minutes automatically. In the Power Save Mode, you cannot use the
fax detect function or remote activation.
The MFC will not display the date and time in this condition.
1
Press Menu , 1, 6, 3.
2
Press or to select On (or
Off ).
3
Press Set when the screen
displays your selection.
4
Press Stop/Exit .
16.Ecology
3.Power Save
▲On
▼Off
Select ▲▼
& Set

GETTING STARTED 4 - 13
Setting the Tray Use for Copy mode
MFC-8440
The default setting of Auto allows *1your MFC to choose the optional
Tray #2 when paper is out in Tray #1 or * 2when the size of the
document will fit best on the paper in Tray #2.
1
Press Menu , 1, 7.
2
Press or to select
Tray#1 Only, Tray#2 Only, or
Auto.
3
Press Set .
4
Press Stop/Exit .
MFC-8840D
The default setting of Auto allows *1your MFC to choose the optional
Tray #2 or the MP tray when paper is out in Tray #1 or and * 2when
the size of the document will fit best on the paper in Tray #2.
1
Press Menu , 1, 7.
2
Press or to select
Tray#1 Only, MP Only, or
Auto.
—OR—
If you have the optional paper tray.
Press or to select
Tray#1 Only, Tray#2 Only,
MP Only, or Auto.
3
Press Set .
4
Press Stop/Exit .
If your MFC is a MFC-8440 without the optional tray #2, you can
skip this setting.
*1 Copies will automatically be printed from Tray #2 only if the
Paper Size setting for Tray #2 is the same as Tray #1.
*2 When using the ADF, copies will automatically be printed
from Tray #2 if the Paper Size setting for Tray #2 is different than
Tray #1 and this paper size is more suitable for the scanned
original.
17.Tray Use: Copy
▲Tray#1 Only
Tray#2 Only
▼Auto
Select ▲▼ & Set
17.Tray Use: Copy
▲Tray#1 Only
MP Only
▼Auto
Select ▲▼ & Set
17.Tray Use: Copy
▲Tray#1 Only
Tray#2 Only
▼MP Only
Select ▲▼ & Set

6 - 15 SETUP SEND
Composing your own comments
You can set up two comments of your own.
1
If it is not illuminated in green, press ( Fax ).
2
Press Menu , 2, 2, 8.
3
Press or to choose 5 or
6 for your own comment.
Press Set .
4
Use the dial pad to enter your
customized comment.
Press Set .
(See Entering text on page 4-3.)
5
Press 1 if you want to choose more settings and the LCD will
return to the Setup Send menu.
—OR—
Press 2 to exit.
Cover page for the next fax only
This feature does not work without the Station ID. So make sure it
has been set. (See Setting the Station ID on page 4-2.) If you only
want to send a Cover Page with a particular fax, this Cover Page will
include the number of pages in your document.
1
If it is not illuminated in green, press ( Fax ). Place the
document face up in the ADF, or face down on the scanner
glass.
2
Press Menu , 2, 2, 7.
3
When LCD shows
Next Fax Only .
Press Set .
4
Press or to select Next Fax:On
(or Next Fax:Off ).
Press Set .
5
Press or to select one of the standard or your own
comments.
Press Set .
22.Setup Send
8.Coverpage Note
▲5.
▼6.
Select ▲▼
& Set
22.Setup Send
7.Coverpg Setup
▲Next Fax Only
▼On
Select ▲▼
& Set

7 - 7 AUTO DIAL NUMBERS AND DIALLING OPTIONS
Dialling options
Search
You can search for names you have stored in the One-Touch and
Speed-Dial memory.
(See Storing One-Touch Dial numbers on page 7-1 and Storing
Speed-Dial numbers on page 7-3.)
1
If it is not illuminated in green, press (Fax). Place the
document face up in the ADF, or face down on the scanner
glass.
2
Press Search/Speed Dial.
3
Press or .
To search alphabetically through the names that are stored,
enter the first letter of the name you’re looking for and press
or .
—OR—
Press or .
To search for numbers numerically, press or .
4
When the LCD shows the name you want to call,
Press Start.
One-Touch Dialling
1
If it is not illuminated in green, press (Fax). Place the
document face up in the ADF, or face down on the scanner
glass.
2
Press the One-Touch key of the location you want to call.
3
Press Start.
When you dial using an auto dial number, the LCD shows the
name and fax number you’ve stored.

8 - 5 REMOTE FAX OPTIONS
Remote commands
Follow the commands below to access features when you are away
from the MFC. When you call the MFC and enter your Remote
Access Code (3 digits followed by ), the system will give two short
beeps and you must enter a remote command.
Remote commands Operation details
95 Change the Fax
Forwarding settings
1 OFF If you hear one long beep, the change has
been accepted. If you hear three short beeps,
you cannot change it because the conditions
have not been met. You can register your Fax
Forwarding number by entering 4.
(See Changing your Fax Forwarding number
on page 8-6). Once you have registered the
number, Fax Forwarding will be set to On.
2 Fax Forwarding
4 Fax Forwarding number
6 Fax Storage ON You can turn Fax Storage to On (or Off
after you have retrieved or erased all your
messages).
7 Fax Storage OFF
96 Retrieve a fax
2 Retrieve all faxes Enter the number of a remote fax machine to
receive stored fax messages. (See Retrieving
fax messages on page 8-6.)
3 Erase faxes from the
memory
If you hear one long beep, you can erase fax
messages from the memory.
97 Check the receiving status
1 Fax You can check whether your MFC has
received any faxes. If it has, you will hear one
long beep. If it hasn’t, you will hear three short
beeps.
98 Change the Receive Mode
1 External TAD If you hear one long beep, you can change
the Receive Mode.
2 Fax/Tel
3 Fax Only
90 Exit After a long beep, you can exit Remote
Retrieval.
Termékspecifikációk
| Márka: | Brother |
| Kategória: | nyomtató |
| Modell: | MFC-8840DN |
Szüksége van segítségre?
Ha segítségre van szüksége Brother MFC-8840DN, tegyen fel kérdést alább, és más felhasználók válaszolnak Önnek
Útmutatók nyomtató Brother

22 Március 2025
14 Január 2025
11 Január 2025
6 Január 2025
3 Január 2025
3 Január 2025
30 December 2025
15 December 2024
15 December 2024
15 December 2024
Útmutatók nyomtató
- nyomtató Samsung
- nyomtató Sony
- nyomtató Fujitsu
- nyomtató LG
- nyomtató Olympus
- nyomtató Panasonic
- nyomtató Canon
- nyomtató StarTech.com
- nyomtató Sharp
- nyomtató Lenovo
- nyomtató Toshiba
- nyomtató HP
- nyomtató Roland
- nyomtató Digitus
- nyomtató Zebra
- nyomtató AVM
- nyomtató Fujifilm
- nyomtató Dell
- nyomtató Xerox
- nyomtató Primera
- nyomtató Polaroid
- nyomtató Kyocera
- nyomtató Ricoh
- nyomtató Epson
- nyomtató Huawei
- nyomtató Renkforce
- nyomtató Mitsubishi
- nyomtató Godex
- nyomtató Citizen
- nyomtató Microboards
- nyomtató Kodak
- nyomtató MSI
- nyomtató Dymo
- nyomtató Testo
- nyomtató Konica Minolta
- nyomtató Datamax O'Neil
- nyomtató Kogan
- nyomtató Honeywell
- nyomtató Velleman
- nyomtató D-Link
- nyomtató Fargo
- nyomtató TSC
- nyomtató Sagem
- nyomtató Olympia
- nyomtató Tomy
- nyomtató Posiflex
- nyomtató ZKTeco
- nyomtató NEC
- nyomtató CUSTOM
- nyomtató Panduit
- nyomtató OKI
- nyomtató Equip
- nyomtató Pantum
- nyomtató Brady
- nyomtató Bixolon
- nyomtató CSL
- nyomtató Nilox
- nyomtató Seiko
- nyomtató Argox
- nyomtató Royal Sovereign
- nyomtató Lexmark
- nyomtató Olivetti
- nyomtató Intermec
- nyomtató Minolta
- nyomtató DNP
- nyomtató Triumph-Adler
- nyomtató Oce
- nyomtató Paxar
- nyomtató Metapace
- nyomtató Ultimaker
- nyomtató Ibm
- nyomtató Toshiba TEC
- nyomtató Frama
- nyomtató Builder
- nyomtató Star Micronics
- nyomtató Dascom
- nyomtató HiTi
- nyomtató GG Image
- nyomtató Vupoint Solutions
- nyomtató Elite Screens
- nyomtató DTRONIC
- nyomtató Phoenix Contact
- nyomtató Videology
- nyomtató Star
- nyomtató EC Line
- nyomtató Colop
- nyomtató Approx
- nyomtató Fichero
- nyomtató Raspberry Pi
- nyomtató Middle Atlantic
- nyomtató IDP
- nyomtató Evolis
- nyomtató Nisca
- nyomtató Epson 7620
- nyomtató Sawgrass
Legújabb útmutatók nyomtató

10 Április 2025
10 Április 2025

10 Április 2025
10 Április 2025
10 Április 2025

10 Április 2025

9 Április 2025

9 Április 2025

9 Április 2025
3 Április 2025