Használati útmutató Bose 3-2-1 GSX Series III
Bose
Házimozi készlet
3-2-1 GSX Series III
Olvassa el alább 📖 a magyar nyelvű használati útmutatót Bose 3-2-1 GSX Series III (108 oldal) a Házimozi készlet kategóriában. Ezt az útmutatót 2 ember találta hasznosnak és 2 felhasználó értékelte átlagosan 4.5 csillagra
Oldal 1/108
Owner’s Guide
Guía de usario
Notice d’utilisation
DVD HOME ENTERTAINMENT SYSTEM
©2008 Bose Corporation, The Mountain,
Framingham, MA 01701-9168 USA
AM312518 Rev.00
3•2•1® GSX SERIES III DVD HOME ENTERTAINMENT SYSTEM
3•2•1® GSX SERIES III

ii
EnglishItalianoSvenska DeutschNederlands Français Español
SAFETY INFORMATION
Please read this owner’s guide
Please take the time to follow this owner’s guide carefully. It will help you set up
and operate your system properly and enjoy all of its advanced features. Save
this owner’s guide for future reference.
WARNING: To reduce the risk of fire or electric shock, do not expose the system
to rain or moisture.
WARNING: Do not expose this apparatus to dripping or splashing, and do not
place objects filled with liquids, such as vases, on or near the apparatus. As with
any electronic product, use care not to spill liquids in any part of the system.
Liquids can cause a failure and/or a fire hazard.
The CAUTION marks shown here are located on the bottom of your 3•2•1
®
home
entertainment system media center and the rear panel of the
Acoustimass
®
module:
The lightning flash with arrowhead symbol within an equilateral triangle
alerts the user to the presence of uninsulated, dangerous voltage within
the system enclosure that may be of sufficient magnitude to constitute a
risk of electric shock.
The exclamation point within an equilateral triangle alerts the user to the
presence of important operating and maintenance instructions in this
owner’s guide.
CAUTION: To prevent electric shock, match wide blade of plug to wide slot,
insert fully.
CAUTION: Do not place any naked flame sources, such as lighted candles, on or
near the apparatus.
Class 1 laser product
This CD player is classified as a CLASS 1 LASER PRODUCT according to
EN 60825-1:1994+A1+A2, IEC60825-1:1993+A1+A2.
CAUTION: Use of controls or adjustments or performance of procedures other
than those specified herein may result in hazardous radiation exposure. The DVD
player should not be adjusted or repaired by anyone except properly qualified
service personnel.
Class B emissions limits
This Class B digital apparatus meets all requirements of the Canadian
Interference-Causing Equipment Regulations.
Batteries
Please dispose of used batteries properly, following any local regulations. Do not
incinerate.
This product conforms to the EMC Directive 2004/108/EC and to the Low Voltage
Directive 2006/95/EC. The complete Declaration of Conformity can be found at:
www.Bose.com/static/compliance/index.html.
Additional safety information
See the additional instructions on the
Important Safety Information
sheet
enclosed in the shipping carton.
CLASS 1 LASER PRODUCT
KLASSE 1 LASER PRODUKT
LUOKAN 1 LASER LAITE
KLASS 1 LASER APPARAT

English Italiano SvenskaDeutsch NederlandsFrançaisEspañol
iii
CONTENTS
INTRODUCTION 2
Before you begin . . . . . . . . . . . . . . . . . . . . . . . . . 2
For your records . . . . . . . . . . . . . . . . . . . . . . . . 3
Unpacking . . . . . . . . . . . . . . . . . . . . . . . . . . . . . . 4
SETUP 6
1Placing the system components 6
2Connecting the speakers to the module 8
3Connecting the module to the media center 10
4Connecting the system video to your TV 12
5Connecting a cable box or other component 17
To connect another component . . . . . . . . . . . . . 19
To get digital audio from the component . . . . . 20
To use video pass through . . . . . . . . . . . . . . . . 21
6Connecting audio from your TV as an option . . . 22
7Installing the FM and AM radio antennas . . . . . . 25
8Connecting the module to power outlet . . . . . . . 28
9Setting the remote to control your TV
and components . . . . . . . . . . . . . . . . . . . . . . . . . 30
Inserting the remote batteries . . . . . . . . . . . . . . 30
Setting the remote for your TV . . . . . . . . . . . . . 31
Controlling another component . . . . . . . . . . . . 32
FIRST TIME USE 33
Trying out the DVD . . . . . . . . . . . . . . . . . . . . . . . . 33
CONTROLS AND INDICATORS 34
The remote control . . . . . . . . . . . . . . . . . . . . . . . . 34
Power and source buttons . . . . . . . . . . . . . . . . 35
Menu and movement buttons . . . . . . . . . . . . . . 36
Play and numeric buttons . . . . . . . . . . . . . . . . . 37
Record and A,B,C buttons
(not in Europe) . . . . . . . . . . . . . . . . . . . . . . . . . . 38
Colored buttons
(in Europe only) . . . . . . . . . . . . . . . . . . . . . . . . . 38
uMusic® buttons . . . . . . . . . . . . . . . . . . . . . . . . 38
The media center . . . . . . . . . . . . . . . . . . . . . . . . . 39
Display . . . . . . . . . . . . . . . . . . . . . . . . . . . . . . . . 39
Disc tray . . . . . . . . . . . . . . . . . . . . . . . . . . . . . . . 39
OPERATION 40
Playing a video disc or CD . . . . . . . . . . . . . . . . . . 40
Selecting a play option . . . . . . . . . . . . . . . . . . . 40
Keeping your discs clean . . . . . . . . . . . . . . . . . 41
Checking for disc compatibility . . . . . . . . . . . . . 42
For DVDs: Setting Parental Control . . . . . . . . . . 42
Choosing a password . . . . . . . . . . . . . . . . . . . . . 42
Setting a restriction level . . . . . . . . . . . . . . . . . . 43
Ratings supplied by the MPAA . . . . . . . . . . . . . . 43

iv
EnglishItalianoSvenska DeutschNederlands Français Español
Playing a cable box or other component . . . . . . . 44
Adjusting for audio delay . . . . . . . . . . . . . . . . . 44
Getting digital audio from a source . . . . . . . . . 45
Choosing other options . . . . . . . . . . . . . . . . . . 45
Listening to the radio . . . . . . . . . . . . . . . . . . . . . . 46
Creating a preset . . . . . . . . . . . . . . . . . . . . . . . 46
Removing a station from a preset . . . . . . . . . . . 46
ADJUSTMENTS TO THE PERFORMANCE 47
Changing system features . . . . . . . . . . . . . . . . . . 47
To get to the System menu . . . . . . . . . . . . . . . . 47
Selecting a new option . . . . . . . . . . . . . . . . . . . 48
Audio options . . . . . . . . . . . . . . . . . . . . . . . . . . 49
Video options . . . . . . . . . . . . . . . . . . . . . . . . . . 50
Media center options . . . . . . . . . . . . . . . . . . . . 52
Stored CDs options . . . . . . . . . . . . . . . . . . . . . 54
Choosing new settings . . . . . . . . . . . . . . . . . . . . 56
To get to the Settings menu . . . . . . . . . . . . . . . 56
Settings options . . . . . . . . . . . . . . . . . . . . . . . 57
REFERENCE 60
Replacing remote batteries . . . . . . . . . . . . . . . . . . 60
Protecting the system . . . . . . . . . . . . . . . . . . . . . . 60
Cleaning the media center . . . . . . . . . . . . . . . . . 60
Cleaning the speakers . . . . . . . . . . . . . . . . . . . . 60
Troubleshooting . . . . . . . . . . . . . . . . . . . . . . . . . . 61
For Customer Service . . . . . . . . . . . . . . . . . . . . . . 65
Limited warranty . . . . . . . . . . . . . . . . . . . . . . . . . . 65
Technical Information . . . . . . . . . . . . . . . . . . . . . . 65
END USER LICENSE AGREEMENT 70
COPYRIGHT AND LICENSE PROTECTIONS 71
DEVICE CODES A-1

ItalianoSvenska DeutschNederlands EnglishFrançais Español
2
INTRODUCTION
Before you begin
Thank you for purchasing the 3•2•1® DVD home
entertainment system. Using Bose® proprietary signal
processing technology, the 3•2•1 system provides
improved spaciousness from stereo recordings and
bold movie effects for surround-sound sources.
System features include:
• Small, easy-to-place shelf speakers
• Easy-to-hide Acoustimass® module
• Integrated DVD/CD player and AM/FM tuner
• Remote and media center controls
• HDMI video connection to your TV
• Audio In connectors for three components
• Your choice of language for text displays
• New ways to enjoy your favorite CD tracks
with the uMusic® intelligent playback system
What is a uMusic system?
This system features breakthrough Bose technology
that enables you to:
• Store your favorite music in a library with capacity for
approximately 200 hours of music (about 200 CDs).
• Teach the system which tracks you like or dislike, so it
automatically plays the music you want to hear most.

3
INTRODUCTION
Italiano SvenskaDeutsch NederlandsEnglish FrançaisEspañol
For your records
As you unpack the system, look for the serial numbers
on the rear of the Acoustimass® module and the bottom
of the media center.
This is a good time to record the serial numbers on the
lines below and on your product registration card. You
may need them if you ever contact Bose® Customer
Service.
Acoustimass module serial number:
________________________________________________
Media center serial number:
_______________________________________________
Dealer name:
________________________________________________
Dealer phone:
________________________________________________
Purchase date:
________________________________________________
We suggest you keep your sales receipt and the
warranty information (on the product registration card)
together with this owner’s guide.
Acoustimass module serial number
Media Center serial number

4
INTRODUCTION
EnglishItalianoSvenska DeutschNederlands Français Español
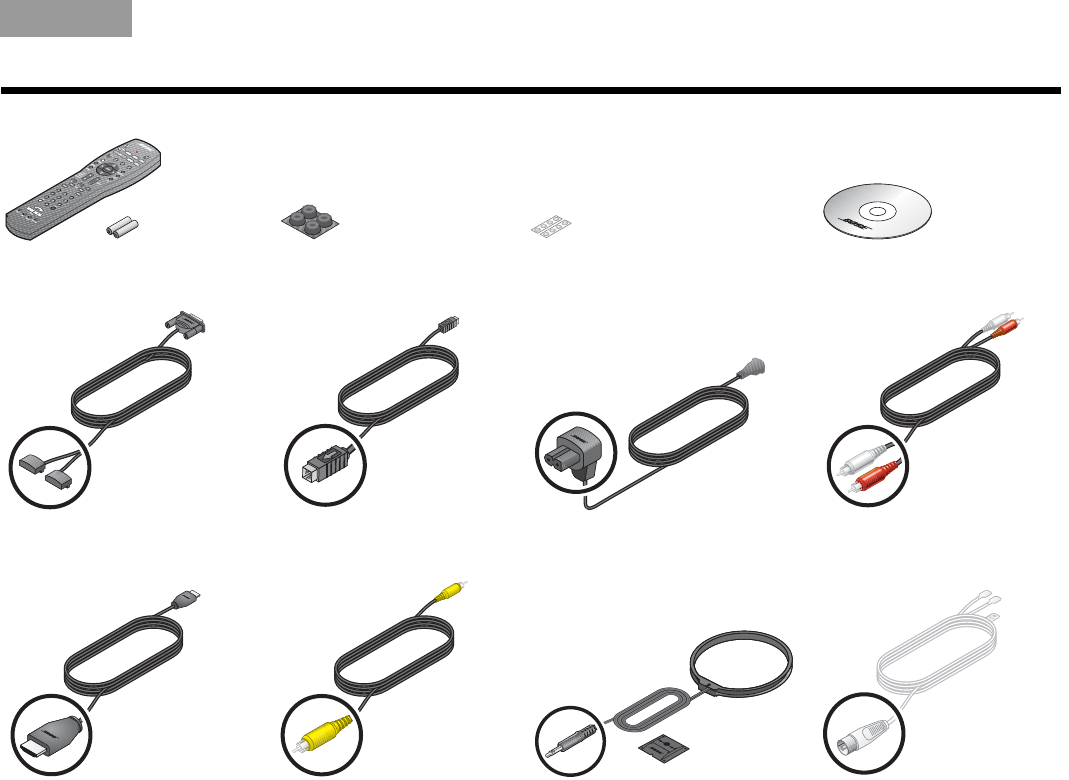
Unpacking
Carefully unpack your system. Save all packing
materials, which provide the safest way to transport your
system. Make sure your system includes the
parts shown.
WARNING: To avoid danger of suffocation, keep the
plastic bags out of the reach of children.
As you identify them, you may want to place a check
mark in the box next to the name of each part.
If any part of the system appears damaged, do not try to
use it. Notify Bose or your authorized Bose® dealer right
away. For contact information, refer to the address sheet
included in the carton.
❏Media center ❏Speakers ❏Acoustimass® module
5
INTRODUCTION
Italiano SvenskaDeutsch NederlandsEnglish FrançaisEspañol
❏Remote control and batteries ❏Rubber feet for
Acoustimass® module
❏Rubber feet for speakers ❏Setup disc
❏Speaker cable ❏Acoustimass module
cable
❏Acoustimass module
power cord
❏Stereo audio cable
❏HDMI video cable ❏Composite video cable ❏AM antenna and stand ❏FM antenna

ItalianoSvenska DeutschNederlands EnglishFrançais Español
6
SETUP
The image below shows one of the many ways you can
position your new 3•2•1® system.
See Steps 1-6 for details.
1
Placing
the system
components
What you need to use:
Media center
Speakers
Acoustimass® module
3' (1 m) or more
3' (1 m)
or more
3' (1 m)
or less
Left
speaker
Right
speaker

7
SETUP
Italiano SvenskaDeutsch NederlandsEnglish FrançaisEspañol
1. On the bottom of each speaker, attach one set of
small rubber feet.
2. Place the left and right speakers:
• at least 3 feet (1 meter) apart
• within 3 feet (1 meter) of the TV screen
• near the front edge of any shelf
• aimed straight ahead (not angled) to face the
listening area
3. On the legs of the Acoustimass® module, attach the
large rubber feet.
4. Place the Acoustimass module:
• at the same end of the room as the speakers and
your TV
• at least 3 feet (1 meter) from the TV to prevent
interference with the screen
• several feet (.8 meters) from audio or video tapes
to prevent magnetic damage to them
• standing upright, not lying on a side, the front, or
the back
• with the front port aimed out from or along a wall
for balanced performance
• hidden under a table, behind a sofa or chair, or
behind drapes as preferred
• NOT in an enclosure, on a bed, on a sofa, or on a
surface that can block the ventilation openings.
CAUTION: Do not block ventilation openings on the
bottom and rear of the module.
5. Place the media center:
• where nothing obstructs
the front panel
• near any components you
will connect
6. Continue with on the
next page.
2

8
SETUP
ItalianoSvenska DeutschNederlands EnglishFrançais Español
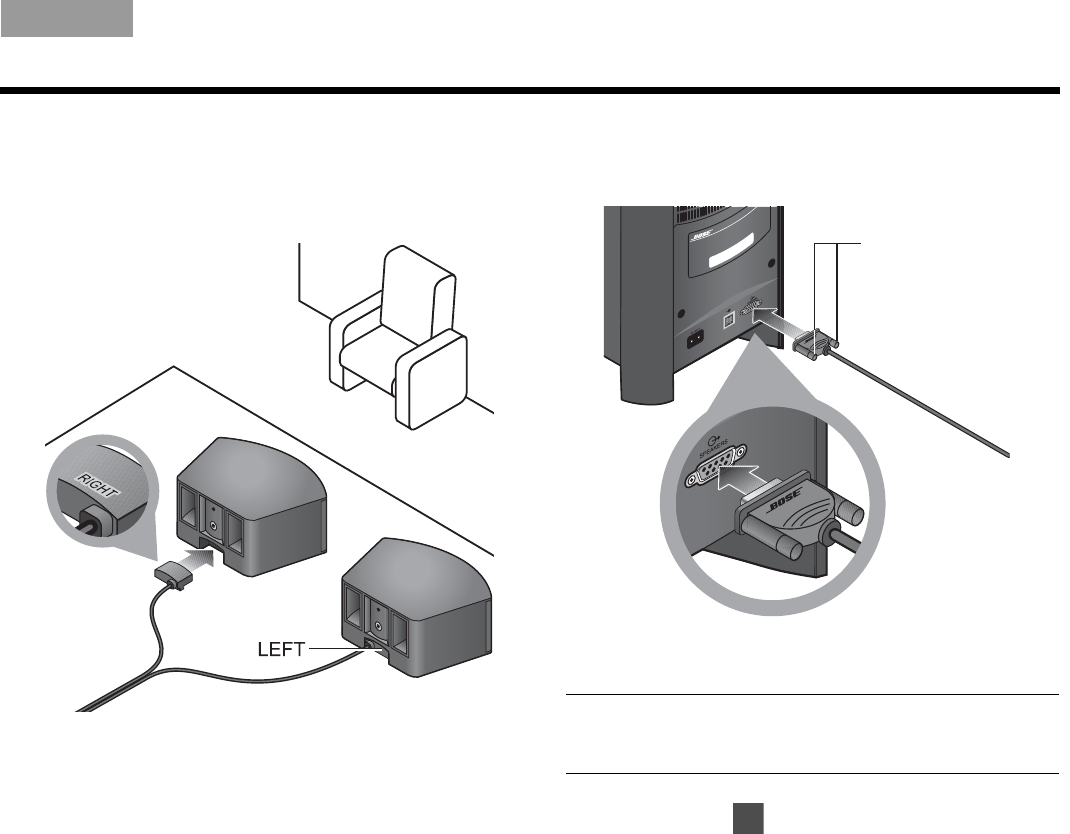
1. Notice the two plugs at one end of the speaker
cable.
2. Separate the two plugs so each one reaches a
speaker.
(Refer to for placement guidelines.)
2
Connecting
the speakers
to the module
What you need to use:
Speakers
Acoustimass® module
Speaker cable
1
9
SETUP
Italiano SvenskaDeutsch NederlandsEnglish FrançaisEspañol
3. Insert each plug into the connector on the proper
speaker.
The plug marked RIGHT goes into the speaker
placed to the right of your TV.
4. Insert the remaining single plug into the connector
labeled SPEAKERS on the back of the Acousti-
mass® module.
5. Tighten each fastener screw by hand to secure
the plug.
CAUTION: Do not plug the Acoustimass module into an
AC power (mains) outlet until all other components are
connected.
6. Continue with on the next page.
Fastener screws
3

10
SETUP
ItalianoSvenska DeutschNederlands EnglishFrançais Español
1. Notice the arrow on the top of the multi-pin plug at
each end of the Acoustimass module cable.
2. Make sure you can see the arrow on top before you
insert either end of the cable.
3
Connecting
the module to
the media center
What you need to use:
Acoustimass® module cable
Media center
Acoustimass module
Arrow

11
SETUP
Italiano SvenskaDeutsch NederlandsEnglish FrançaisEspañol
3. Insert this plug into the connector labeled on
the back of the Acoustimass® module.
Make sure the arrow on the plug faces up as you
insert it.
4. On the other end of the cable, make sure you can
see the arrow on top of the plug.
5. Insert this plug into the connector labeled
Acoustimass Module on the back of the
media center.
6. Continue with on the next page.
4

12
SETUP
ItalianoSvenska DeutschNederlands EnglishFrançais Español
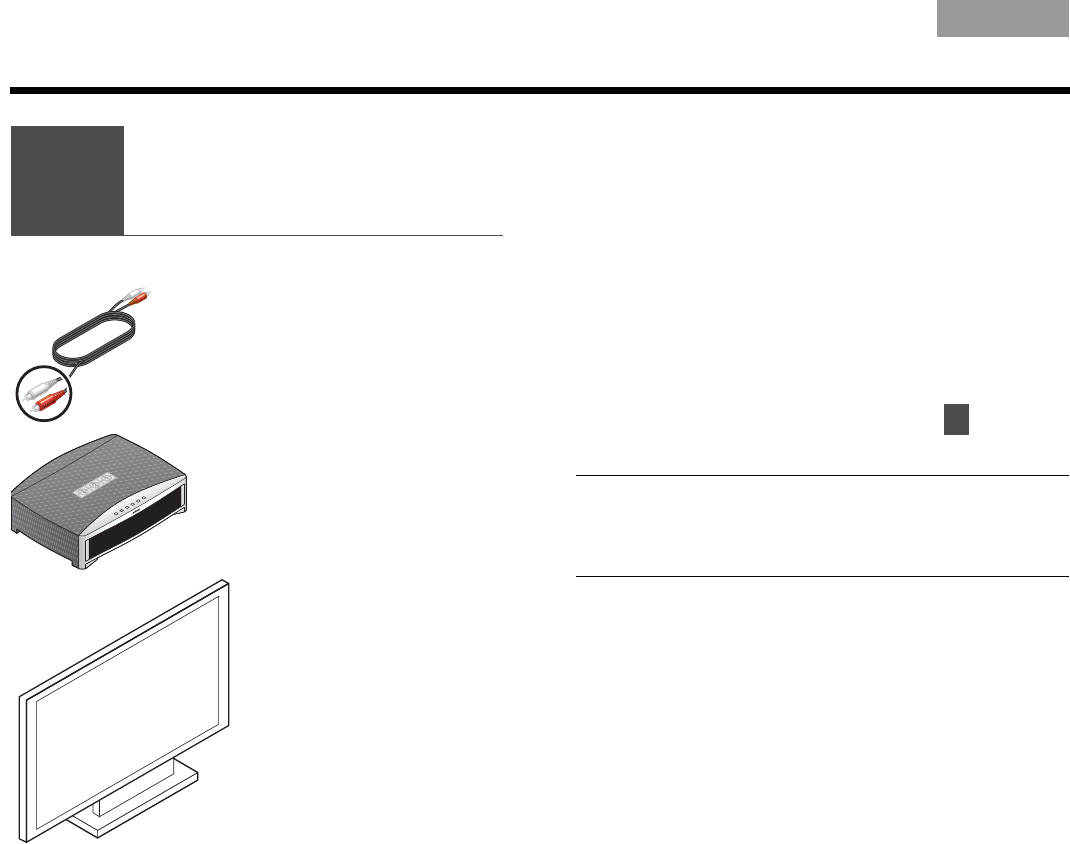
This connection allows you to see DVDs and other
video from the 3•2•1® system on your TV.
1. Select the HDMI video cable.
4
Connecting the
system video
to your TV
What you may need to use:
HDMI OR
video cable Composite
video cable
Media center
Your TV

13
SETUP
Italiano SvenskaDeutsch NederlandsEnglish FrançaisEspañol
2. Check to see if your TV has an unused HDMI
connector for VIDEO IN.
This may be located on the side or rear connector
panel of the TV.
3. Follow the directions that are appropriate
for your TV:
or
TV with HDMI
TV without HDMI
on page 14
on page 15

14
SETUP
ItalianoSvenska DeutschNederlands EnglishFrançais Español
1. Insert one end of the HDMI cable into the HDMI
connector on your TV.
Match the wide side of the plug to the wide side
of the connector.
2. Insert the other end of this cable into the HDMI
connector on the media center.
Make sure the Bose® logo shows as you insert the
plug.
3. Continue with on page 17.
TV with HDMI
Bose
logo
5
Note: If you make this HDMI connection, you do not
need the supplied yellow Composite video cable to make
any connections.
DO NOT use either of the two ONLY PASS-THROUGH
connectors on the back of the media center for video from
a component.Neither S-Video nor Composite signals can
pass through the HDMI cable to the TV.

15
SETUP
Italiano SvenskaDeutsch NederlandsEnglish FrançaisEspañol
1. Notice the yellow plug at each end of the
Composite video cable.
Note: There may be other kinds of video connectors on
your TV that offer higher resolution than Composite.
To use either S-Video or Component connectors, you
need the appropriate cables. These cables are available
at most electronics stores.
2. Plug the Composite video cable into the yellow
VIDEO IN connector on your TV.
Note: If there is just one Composite Video In connector
on your TV, it may be in use already for another video
component. You can disconnect that component from
the TV, and see “To use video pass through” on page 21.
TV without HDMI
Yellow
Yellow

16
SETUP
ItalianoSvenska DeutschNederlands EnglishFrançais Español
3. Insert the other end into the yellow Composite
VIDEO OUT connector on the back of the
media center.
a.
Note: If you make this Composite connection, you can
use the ONLY PASS-THROUGH connector on the media
center for video from another component. See “To use
video pass through” on page 21 for further information.
4. Continue with on the next page.
5
17
SETUP
Italiano SvenskaDeutsch NederlandsEnglish FrançaisEspañol
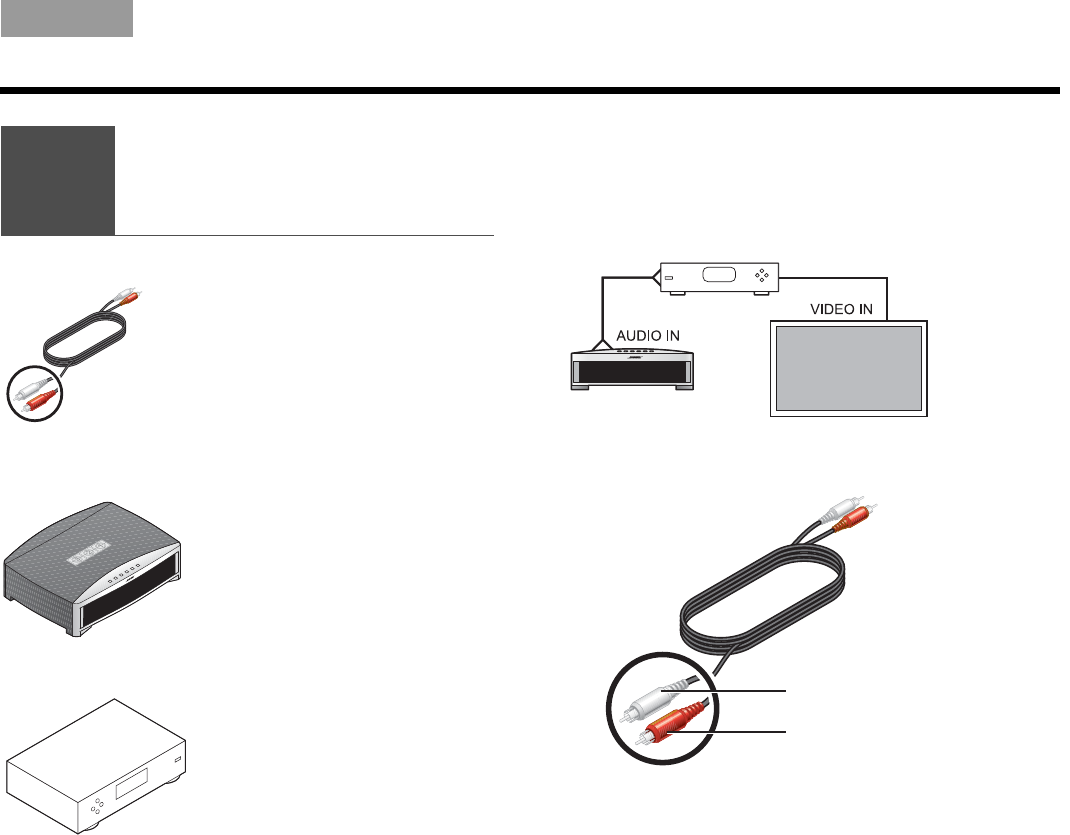
You can listen to another sound source — like a cable
or satellite box — through the 3•2•1® speakers instead
of your TV.
This requires an audio connection only. Leave the video
from your component connected to your TV.
5. Select the audio cable that has red and white plugs
at each end.
5
Connecting
a cable box or
othercomponent
What you need to use:
Stereo audio cable
Media center
Your cable box, satellite box,
or other component
White plug
Red plug

18
SETUP
ItalianoSvenska DeutschNederlands EnglishFrançais Español
6. Check to see if your cable or satellite box has red
and white AUDIO OUT connectors.
A red and white audio cable may (a) or may not (b)
already be attached to these connectors.
c. If there are no AUDIO OUT connectors at all,
continue with on page 22.
3. To use the AUDIO OUT connectors, follow a or b as
appropriate.
a. If an audio cable is already attached
Disconnect the cable from the TV only.
b. If an audio cable is not yet attached
Connect the cable to your cable or satellite box.
Be sure to connect red to red and white to white.
OR
a.
b.
6

19
SETUP
Italiano SvenskaDeutsch NederlandsEnglish FrançaisEspañol
4. Insert the plugs at the other end of the audio cable
into the CBL•SAT AUDIO IN connectors on the
media center.
To connect another component
In addition to your cable or satellite box, you can
connect a second component, like a VCR. For this you
need another audio cable with red and white plugs,
available at most electronics stores.
1. Use this additional cable to connect to the AUDIO
OUT on your component. Follow the method used
in steps 1-3 on the previous pages.
2. Connect the other end of this cable to the AUDIO
IN AUX on the 3•2•1® system media center.
White plug
Red plug
White plug
Red plug

20
SETUP
ItalianoSvenska DeutschNederlands EnglishFrançais Español
To get digital audio from the component
For a component that is already connected to the
media center, you can make a digital audio connection
too.
For this higher quality audio, you need a digital audio
cable that works with your component. Such cables are
available at most electronics stores.
1. Identify the digital connector on your component
as either an Optical or Coaxial connector.
2. Be sure to use the right cable for this connector.
Note: If your component has an Optical and a Coaxial
connector, use either one but not both.
3. Connect one end of your digital cable to the digital
AUDIO OUT connector on your component.
Be sure to keep the red and white audio cable
connected. This allows you to hear the audio if the
program audio is not digital or the digital signal is
interrupted.
4. Locate the appropriate digital AUDIO IN connector,
labeled D, on the system media center.
You can make:
• up to 3 coaxial connections
• up to 2 coaxial and one optical connection
Note: The media center Optical connector is factory
set to work with a cable or satellite box. If your Optical
component is neither of those, you need to select your
component in an on-screen System menu. See
“Getting digital audio from a source” on page 45.
Coaxial
Optical
Optical OR Coaxial

21
SETUP
Italiano SvenskaDeutsch NederlandsEnglish FrançaisEspañol
5. Plug the other end of your digital cable into
the appropriate AUDIO IN connector on the
media center.
The example here shows an Optical digital
connection only.
To use video pass through
This calls for another composite cable or two S-Video
cables, which are available at most electronics stores.
You can make a pass through connection if:
• You have a Composite or S-Video connection
between the TV and the media center (not HDMI or
Component).
AND:
• You want to connect another video component
through the media center to the TV.
Be sure to use one matched pair as shown here:
DO NOT use either of the two ONLY PASS-THROUGH
connectors (on the left) if you have made an HDMI or
Component connection VIDEO OUT TO TV.
Continue with on the next page.
Video in from
your component Video out
to your TV
6
22
SETUP
ItalianoSvenska DeutschNederlands EnglishFrançais Español
For some setups, in order to hear your TV sound
from your 3•2•1® speakers, you need to make this
connection.
If:
• Your cable box does not provide red and white
AUDIO OUT connectors.
• You watch TV programs without using a cable or
satellite box.
• You connect a video camera or game console
to your TV.
If none of the above apply, continue with on
page 25.
Note: If you have already connected the audio
cable provided with the system, you need another cable
for this connection. These cables are available at most
electronics stores.
6
Connecting audio
from your TV as
an option
What you need to use:
Audio cable
Media center
Your TV
7

23
SETUP
Italiano SvenskaDeutsch NederlandsEnglish FrançaisEspañol
1. Insert the red and white plugs at one end of the
cable into the AUDIO OUT connectors on the TV.
Be sure to match red to red and white to white.
Note: In addition to this connection, you can make a
digital AUDIO OUT connection from the TV to the media
center. For more information, review “To get digital audio
from the component” on page 20.
Note: If your TV does not provide AUDIO OUT connec-
tors, you cannot connect the TV audio to the 3•2•1®
system. Continue to use your TV speakers for TV
program audio.
The audio from other components that are connected
to the 3•2•1 media center will play through the 3•2•1
speakers.
White plug
Red plug

24
SETUP
ItalianoSvenska DeutschNederlands EnglishFrançais Español
2. Insert the red and white plugs at the other end of
this cable into the AUDIO IN TV connectors on the
media center.
Be sure to match red to red and white to white.
3. Use your TV remote control to turn the TV speakers
down to minimum volume.
This prevents the echo effect of audio playing
through both the TV speakers and your 3•2•1®
system speakers.
White plug
Red plug
25
SETUP
Italiano SvenskaDeutsch NederlandsEnglish FrançaisEspañol
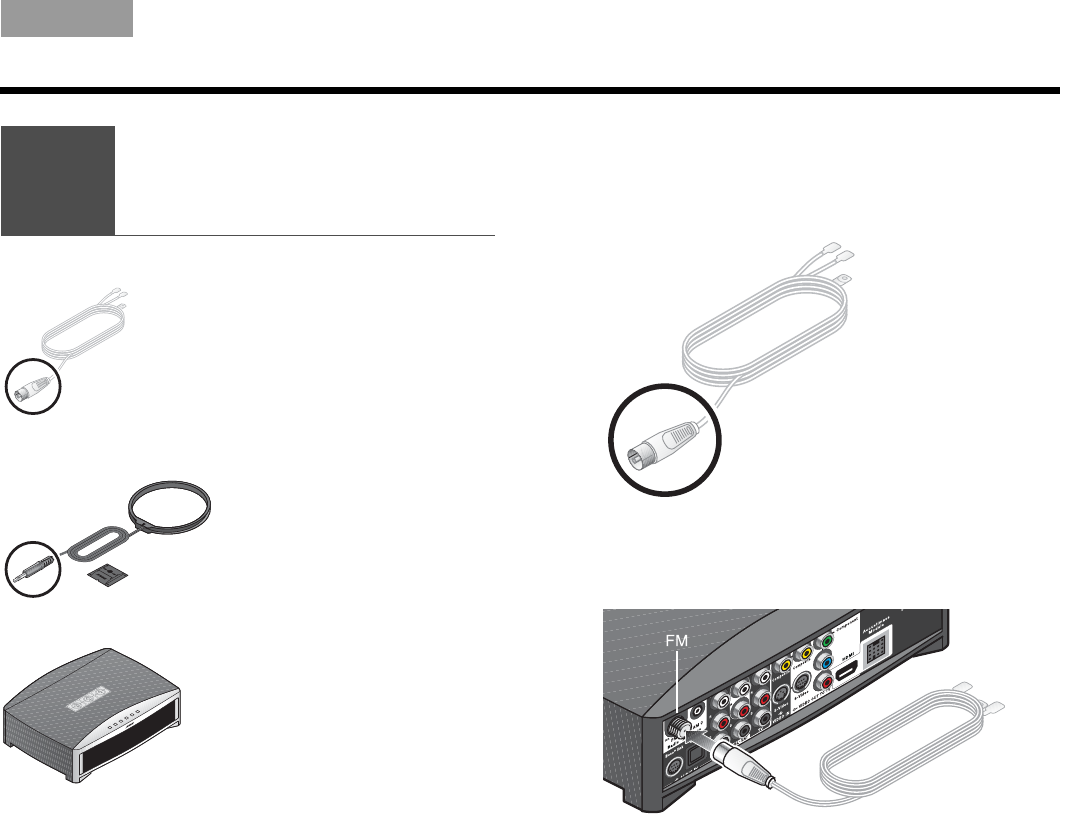
For radio reception of broadcast radio programs,
you need to use the supplied antennas.
For FM:
1. Select the FM antenna.
2. Insert the antenna plug into the FM antenna
connector.
7
Installing
the FM and AM
radio antennas
What you need to use:
AM antenna
and stand
FM antenna
Media center

26
SETUP
ItalianoSvenska DeutschNederlands EnglishFrançais Español
3. Straighten the antenna cable and spread the two
ends far apart.
You may need to raise the ends and adjust the
position to get clear reception.
For AM:
1. Select the AM antenna and stand.

27
SETUP
Italiano SvenskaDeutsch NederlandsEnglish FrançaisEspañol
2. Insert the antenna plug into the AM antenna
connector. 3. Press firmly to attach the antenna loop to the
provided stand.
Small tabs on the antenna ring fit into notches on
the stand.
4. Place the antenna in an upright position and at
lease 20 inches (50 centimeters) from both the
media center and the Acoustimass® module.
5. Continue with on the next page.
8
28
SETUP
ItalianoSvenska DeutschNederlands EnglishFrançais Español
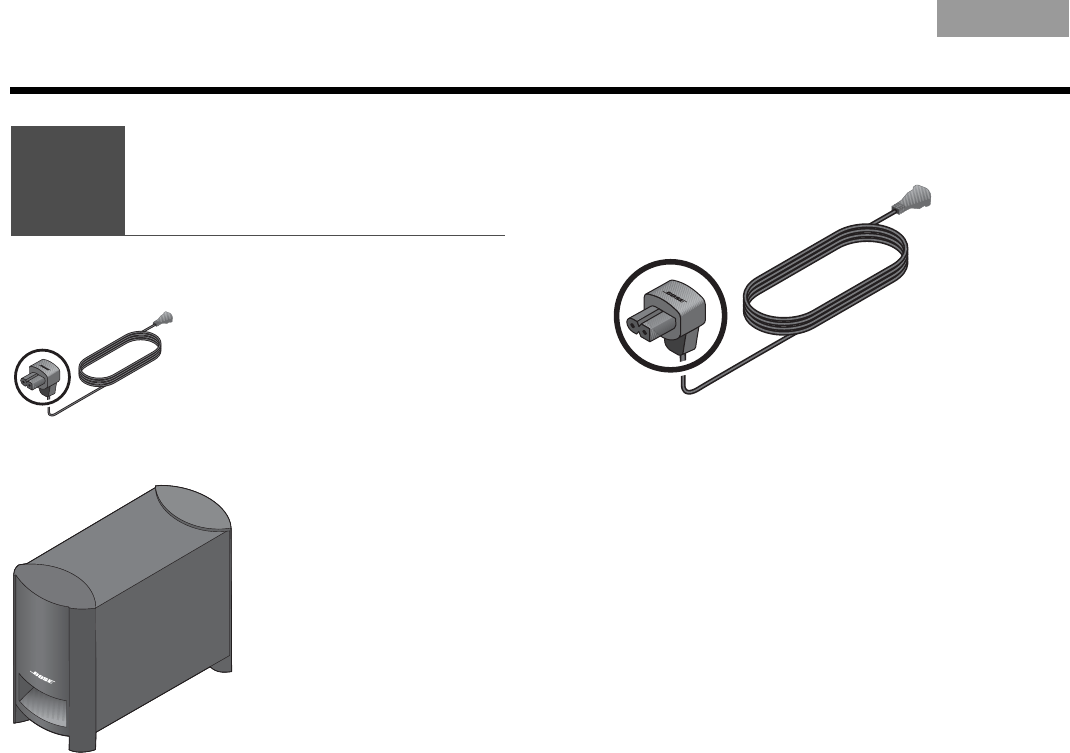
1. Notice the large plug at one end of the
Acoustimass module power cable.
8
Connecting
the module to
a power outlet
What you need to use:
Acoustimass® module power cable
Acoustimass module

29
SETUP
Italiano SvenskaDeutsch NederlandsEnglish FrançaisEspañol
2. Insert this plug into the power connector that is
marked on the Acoustimass® module.
Note: On some systems, the Acoustimass
module includes one of two controls.
On 220-240V models only, turn the
POWER switch to on ( l ).
On dual-voltage systems only, set
the voltage switch for the power
that is appropriate to the region
where you use the system.
3. Plug the other cable end into the AC (mains) power.
CAUTION: Bose recommends using a safety agency-
approved surge protector on all electronic equipment.
Voltage variations and spikes can damage electronic
components in any system.
Note: Surge protectors are available at most
electronics stores.
4. Continue with on the next page.
9
~

30
SETUP
ItalianoSvenska DeutschNederlands EnglishFrançais Español
When the batteries are installed, you can set the 3•2•1®
remote to control your TV and other components
connected to the media center.
Inserting the remote batteries
The two supplied AA batteries go into the compartment
on the back of the remote control.
1. Slide the battery compartment cover off.
Symbols inside the compartment show how to
match the – and + symbols on the batteries.
2. Insert the two batteries, making sure to match the
markings.
3. Slide the cover back until it clicks into place.
9
Setting the remote
to control your TV
and components
What you need to use:
Remote control
and batteries
Your component
Your TV
–
+

31
SETUP
Italiano SvenskaDeutsch NederlandsEnglish FrançaisEspañol
Setting the remote for your TV
To use the 3•2•1® remote with your TV, you must set
the remote for the proper TV device code.
1. Refer to the list of “Device codes” on page A-1.
2. In the list for TVs, find the brand of your TV.
3. Write down several codes for your brand so you
can try more than one, if needed.
Note: If one code works to turn your TV on and off but
does not change channels, you can try other codes to
find one that provides more complete TV control.
4. Turn on the TV and your 3•2•1 system.
5. On the 3•2•1 remote, press and
hold the TV button for several
seconds.
Wait until the red light at the top of the remote
turns on.
6. Use the number buttons on this
remote to enter the device code
for your TV.
The light turns off briefly as you
press each key.
7. Make sure the light turns off completely after all
digits are entered.
If the light blinks now, the code is invalid. Return to
step 5 and try a different code for your TV.
8. Point the 3•2•1 remote at your TV
and press the TV On/Off button.
Use the 3•2•1 remote to turn the TV
on again and change channels, using the
number buttons or by pressing Channel up
or down.
If it performs both operations, this code is correct.
Write the code numbers below:
If this code does not work, repeat steps 5-8
using a different code for your TV.
Note: For a CD changer or combination CD/DVD player
and changer, your brand may not be listed in the CD/DVD
device codes on page A-21. In some cases, the same
brand of DVD or VCR device codes can work with
a changer.

32
SETUP
ItalianoSvenska DeutschNederlands EnglishFrançais Español
Controlling another component
With your CBL•SAT, VCR, or other component turned
on, follow these steps.
1. In the Device Codes list, find the codes for the type
and brand of your component.
2. On the 3•2•1® remote, press and hold the
button for this component for several
seconds.
Wait until the red light at the top of the
remote turns on.
3. Enter the device code for your component.
The light turns off briefly as you press each key.
4. Make sure the light turns off completely after all
digits are entered.
If the light blinks instead of turning off, the code is
invalid. Return to step 2 and try a different code for
your component.
5. Point the 3•2•1 remote at your
component and press the On/
Off button for this source.
Use the 3•2•1 remote to turn
the component on again and to skip
forward by pressing channel up or down.
If it performs both operations, this code is
correct. Write the code numbers below:
If this code does not work, repeat steps 2-5
using a different code for your component.
AUXAUX
or
AUXAUX

Italiano SvenskaDeutsch NederlandsEnglish FrançaisEspañol
33
FIRST-TIME USE
Trying out the DVD
When you first turn on the system, you can play the
provided DVD to get a step-by-step review of your
setup.
1. Before you continue, make sure that:
• All of the cables needed for your setup are
connected.
• Batteries are installed in the 3•2•1® system
remote control.
• The system power cord is plugged in at both
ends.
2. Turn on your TV.
• Use the TV On/Off button on the
3•2•1 remote if you have it set up
to control your TV.
• Or use the remote control that
came with the TV.
3. Play the provided DVD.
a. Point the 3•2•1 remote control at the
media center and press CD/DVD.
b. On the media center
controls, press Eject.
c. Insert the disc into the
disc tray.
d. Press Eject again to
close the tray and
begin automatic play.
e. If the DVD does not begin playing, press
the play button on the remote.
Playing the DVD helps verify that your system setup is
correct.
Note: If you do not see the DVD video on
your TV screen, change the Video Input on
the TV.
Use the TV Input button on the 3•2•1
remote if you have it set up to control your
TV.
Or use the button for Video Input on your
TV remote control. For more information, refer to the
owner’s manual that came with your TV.
If you STILL do not see the DVD image on your screen,
see the problem identified as “Sound, but no picture”
under Troubleshooting on page 65.
ItalianoSvenska DeutschNederlands EnglishFrançais Español
34
CONTROLS AND INDICATORS
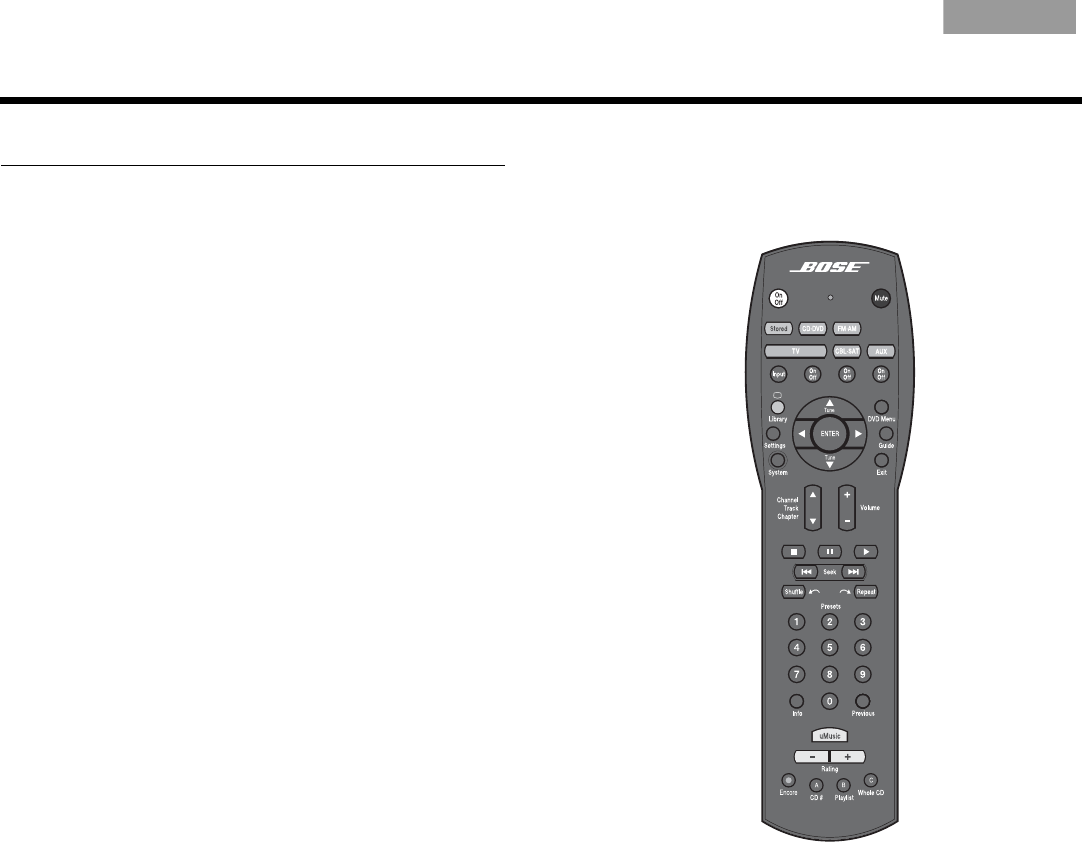
The remote control
Aim the 3•2•1® remote control at the media center or at
the component you are controlling with the remote.
1. Press the white On/Off button near the top of the
remote control.
The system turns on to the last used source*, which
may be:
• Stored music
• CD•DVD
•FM•AM
•TV
•CBL•SAT
•AUX
If your media center does not respond to the
remote:
• Make sure there is nothing blocking the front dis-
play where signals are received.
• Aim more directly at the media center.
• Move closer to the system.
The control range of the remote is roughly 20 feet
(6.2 meters).
*If your 3•2•1 system is connected by Bose® link cable to a
Lifestyle®system in another room, the Lifestyle® system can be
the selected source.
2. Get to know how the remote works:
• See the brief descriptions on pages 35-38.
• Try out the various buttons to see how they work.

35
CONTROLS AND INDICATORS
Italiano SvenskaDeutsch NederlandsEnglish FrançaisEspañol
Power and source buttons
Turns the 3•2•1® system on and off.
Play begins with the source last used.
Silences or restores the sound.
Selects stored CDs as the music source and
turns on the system.
Play begins in the play mode last used.
Selects the built-in CD/DVD player as source
and turns on the system.
Selects the built-in FM/AM radio as source
and turns on the system to the station last
used.
Switches between FM and AM when the
radio is playing.
Selects audio from the TV source and turns
your 3•2•1 system on if it was off.
If the remote is set up control your TV:
• Input selects a TV Video Input.
• On/Off turns the TV on and off.
Your remote also provides one of the two
buttons shown here:
• For adjusting the on-screen aspect
ratio of video from cable, satellite,
or TV (but not DVD).
• For displaying teletext information
that is provided with broadcast
programs (in Europe only).
Selects the audio from the device connected
to CBL•SAT on the media center rear panel.
Turns your 3•2•1 system on if it was off.
If the remote is set up to control this source,
On/Off turns the cable or satellite box on
and off.
Selects the audio from the device connected
to AUX on the media center rear panel.
Turns your 3•2•1 system on if it was off.
If the remote is set up to control this source,
On/Off turns the AUX device on and off.
AUXAUX

36
CONTROLS AND INDICATORS
ItalianoSvenska DeutschNederlands EnglishFrançais Español
Menu and movement buttons
Enters the library of stored CD tracks.
Enters the Settings menu for the source that is
playing.
Enters the System main menu.
Displays the DVD menu for the current disc on
your TV screen.
Displays an on-screen program guide for any
connected video devices that provide a guide.
Exits the 3•2•1® Settings or System menu.
Exits the on-screen menus or information
screens of other connected video sources.
Confirms the selection of a menu item.
Moves up, down, left, or right in a menu or
screen.
Tunes the FM/AM radio up or down to the next
frequency.
Selects the next or previous item in a menu list.
Raises or lowers the volume.
• Pressing + raises the volume and unmutes the
system (if muted).
• Pressing – lowers the volume.
Skips backward or forward to the next:
• TV, cable, or satellite channel
•CD track
• DVD chapter

37
CONTROLS AND INDICATORS
Italiano SvenskaDeutsch NederlandsEnglish FrançaisEspañol
Play and numeric buttons
Halts play of recorded music or video.
Pauses or resumes paused play of recorded
music or video.
Starts or resumes play of recorded music or
video.
For CD or MP3: Moves to the previous or
next track.
• Press and hold scans through a track.
For DVD and DVR: Moves backward or
forward in video.
• More presses increase the speed.
For FM/AM: Moves to the previous or next
strong radio station.
For CD: Randomly plays the music.
• Pressing again ends random play.
For DVR: Moves backwards a few
seconds with each press.
For Stored: In CD#, Playlist, and Whole
CD play modes only, plays the music in
random order.
• Pressing again ends random play.
For CD or MP3: Repeats the current track.
• Pressing again repeats the disc.
• Pressing three times ends the repeat.
For DVR: Moves forward a few seconds
with each press.
For Stored: In CD#, Playlist, and Whole CD
play modes only, repeats the track playing.
• Pressing twice replays the entire disc or
playlist.
For CD: Selects a track.
For DVD: Selects a chapter.
For TV, cable, or satellite: Selects the
channel of the numbers pressed.
For FM/AM: Selects a preset radio station.
For Stored: Selects a uMusic® preset.
For CBL•SAT: Displays or dismisses an
on-screen information window (if one is
available).
For MP3: Holding down the button displays
or dismisses artist and title information on
the media center display panel.
For Stored: Displays detailed track
information.
For TV, cable, or satellite: Returns to the
channel last selected.

38
CONTROLS AND INDICATORS
ItalianoSvenska DeutschNederlands EnglishFrançais Español
Record and A, B, C buttons
(not in Europe)
Colored buttons
(in Europe only)
uMusic® buttons
These buttons can be used with a DVR, VCR, a cable box,
or satellite box. This requires that the 3•2•1® remote is set
to control the component.
Starts DVR or VCR recording of the cable, satellite,
or TV program that is playing.
Makes a selection from a cable on-screen List A.
Makes a selection from a cable on-screen List B.
Makes a selection from a cable on-screen List C.
These buttons can be used with Teletext, a cable box, or a
satellite box.
Red – Selects the screen content labeled red.
Green – Selects the screen content labeled green.
Yellow – Selects the screen content labeled yellow.
Blue – Selects the screen content labeled blue.
Selects the uMusic intelligent playback
system for stored music play.
Ends other stored music play modes.
Applies a negative (–) or positive (+) rating
to stored music.
Ratings can be applied to the track that is
playing or to music that is selected in the
stored music library.
–
ratings end play of the current track
and begin a new selection.
+
ratings continue playing the current
track.
Selects and plays stored music that
matches features of the current track.
Plays tracks of a CD chosen by number in
the uMusic system.
Plays all tracks in the playlist
(if one is set up).
Other play modes, such as Encore, may be
applied while the playlist is selected.
Skips the currently playing track to begin
play of the CD that included this track.
Plays all tracks on the CD in order.

39
CONTROLS AND INDICATORS
Italiano SvenskaDeutsch NederlandsEnglish FrançaisEspañol
The media center
The front of the media center features:
Control buttons
Note: When you use the Source button on the media
center to select a connected component for play, your
3•2•1® remote will not control that component.
Press the CBL•SAT or AUX button on the remote to
control that source.
Display
When the system is turned on, the display shows:
• selected source (CD/DVD, for example)
• source status (stopped, for example)
• source data (elapsed DVD time, for example)
• system status (like disc tray OPEN, shown below)
Disc tray
Use the Eject button to open and close this tray.
Do NOT push the tray to close it.
On•Off Turns the system power on or off.
Source Displays and sets the choice of play options.
– Volume + Lowers or raises the volume level.
Store Copies audio CD tracks into the library.
Eject Opens or closes the disc tray.
Termékspecifikációk
| Márka: | Bose |
| Kategória: | Házimozi készlet |
| Modell: | 3-2-1 GSX Series III |
Szüksége van segítségre?
Ha segítségre van szüksége Bose 3-2-1 GSX Series III, tegyen fel kérdést alább, és más felhasználók válaszolnak Önnek
Útmutatók Házimozi készlet Bose

27 Szeptember 2024
3 Szeptember 2024
20 Augusztus 2024
20 Augusztus 2024
19 Augusztus 2024
18 Augusztus 2024
17 Augusztus 2024
16 Augusztus 2024
16 Augusztus 2024
7 Augusztus 2024
Útmutatók Házimozi készlet
- Házimozi készlet Samsung
- Házimozi készlet Sony
- Házimozi készlet Yamaha
- Házimozi készlet LG
- Házimozi készlet Marantz
- Házimozi készlet Philips
- Házimozi készlet Pioneer
- Házimozi készlet Adler
- Házimozi készlet Panasonic
- Házimozi készlet JVC
- Házimozi készlet AEG
- Házimozi készlet Sharp
- Házimozi készlet Harman Kardon
- Házimozi készlet Hyundai
- Házimozi készlet Medion
- Házimozi készlet Onkyo
- Házimozi készlet Technics
- Házimozi készlet JBL
- Házimozi készlet Dell
- Házimozi készlet Thomson
- Házimozi készlet Klipsch
- Házimozi készlet Aiwa
- Házimozi készlet Kenwood
- Házimozi készlet Nevir
- Házimozi készlet SVS
- Házimozi készlet Dynaudio
- Házimozi készlet Daewoo
- Házimozi készlet Funai
- Házimozi készlet Dali
- Házimozi készlet Denon
- Házimozi készlet Edifier
- Házimozi készlet Anthem
- Házimozi készlet Jamo
- Házimozi készlet Blaupunkt
- Házimozi készlet NAD
- Házimozi készlet Magnat
- Házimozi készlet AKAI
- Házimozi készlet Konig
- Házimozi készlet Fenton
- Házimozi készlet Pyle
- Házimozi készlet Sanyo
- Házimozi készlet Lenco
- Házimozi készlet Schneider
- Házimozi készlet Rotel
- Házimozi készlet Bowers & Wilkins
- Házimozi készlet KEF
- Házimozi készlet Wharfedale
- Házimozi készlet Canton
- Házimozi készlet RCA
- Házimozi készlet Creative
- Házimozi készlet Definitive Technology
- Házimozi készlet Focal
- Házimozi készlet ILive
- Házimozi készlet Majestic
- Házimozi készlet Teufel
- Házimozi készlet Sylvania
- Házimozi készlet Polk
- Házimozi készlet Coby
- Házimozi készlet Sherwood
- Házimozi készlet Boston Acoustics
- Házimozi készlet Pure Acoustics
- Házimozi készlet Integra
- Házimozi készlet Wolfgang
- Házimozi készlet Iluv
- Házimozi készlet Eltax
- Házimozi készlet Mitsai
- Házimozi készlet Magnavox
- Házimozi készlet Fluance
- Házimozi készlet Amphion
- Házimozi készlet BBK
- Házimozi készlet Meridian
- Házimozi készlet SLS
Legújabb útmutatók Házimozi készlet

28 Március 2025

20 Március 2025

16 Január 2025

14 Január 2025

13 Január 2025
12 Január 2025
10 Január 2025

8 Január 2025
5 Január 2025
29 December 2024