Használati útmutató BlackVue DR650S-1CH
Olvassa el alább 📖 a magyar nyelvű használati útmutatót BlackVue DR650S-1CH (198 oldal) a Dashcam kategóriában. Ezt az útmutatót 6 ember találta hasznosnak és 2 felhasználó értékelte átlagosan 4.5 csillagra
Oldal 1/198


2BLACKVUE
Table of Contents
Introduction 5 .................................................................
Important safety information ....................................6
Overview ......................................................................9
In the box 9 .....................................................................................................................
At a glance .................................................................................................................10
Front camera 10 ...................................................................................................................................
Removing and inserting the front camera ................................................................................12
Rear camera.....................................................................................................................................12
Removing and inserting the rear camera ..................................................................................13
Installation 14 .................................................................
Installing the BlackVue dashcam ..........................................................................14
Playing and Managing Videos 18 ..................................
Playing and managing video les using your smartphone
(Android/iOS) 18 ..........................................................................
Opening video les 18 ..................................................................................................
BLACKVUE WI-FI screen composition ...................................................................20
Playing video ............................................................................................................21
Playing back videos 21 .......................................................................................................................
Identify video les by recording type ........................................................................................21
Checking the displayed time & GPS data ..................................................................................23
Real-time streaming video (Live View) 24 ................................................................
Managing videos .....................................................................................................25
Managing videos in BLACKVUE WI-FI 25 ........................................................................................
Copy to Internal Memory 25 .............................................................................................................................................
Managing videos in INTERNAL MEMORY 26 ..................................................................................
Deleting videos .............................................................................................................................................................. 27
Creating a new folder ................................................................................................................................................... 27
Copying and pasting videos ....................................................................................................................................... 27
Moving videos ............................................................................................................................................................... 28
Renaming a video ......................................................................................................................................................... 28
Uploading, sharing or emailing a video ................................................................................................................... 28
Playing and managing video les using your computer
(Windows/Mac) 29 .......................................................................
Removing the microSD card 29 ..................................................................................
Opening video les in BlackVue Viewer ..............................................................30
For Windows users ......................................................................................................................... 30
For Mac users ..................................................................................................................................31
Viewer screen composition 32 ....................................................................................
Windows Viewer .............................................................................................................................32
Mac Viewer ...................................................................................................................................... 33
Playing video ............................................................................................................34
Playing back videos 34 .......................................................................................................................
Identify video les by recording type ........................................................................................34
Checking the displayed time ....................................................................................................... 35
Using BlackVue Viewer .................................................................................................................. 35
Exploring the timeline .................................................................................................................. 35
Zoom options .................................................................................................................................36
Viewing the G-Sensor graph ........................................................................................................ 36
Checking the GPS data .................................................................................................................. 37
GPS tracking .................................................................................................................................... 37
GPS tracking – Advanced mode .................................................................................................. 38
Managing videos......................................................................................................39
Capturing or printing a still image from video 39 .........................................................................
Deleting videos ..............................................................................................................................40
For Windows users ......................................................................................................................................................... 40
For Mac users .................................................................................................................................................................. 40
Exporting videos 41 ............................................................................................................................
For Windows users ......................................................................................................................................................... 41
For Mac users .................................................................................................................................................................. 42
Verifying videos 43 ..............................................................................................................................

DR650S-2CH 3
Tips for optimal performance 44 ..................................
Formatting the microSD card 44 ................................................
Format using the dashcam’s self-format function 44 .............................................
Format using Windows Viewer ..............................................................................45
Format using Mac Viewer .......................................................................................46
Upgrading the rmware 48 .........................................................
Upgrading the rmware using an iOS or Android device
(Firmware Over The Air) ..........................................................................................48
Upgrading the rmware using a computer (Windows or Mac) .......................51
Changing settings 53 .....................................................
Changing settings using your smartphone (Android/iOS) .... 53
Basic settings 54 ............................................................................................................
Time zone ........................................................................................................................................ 55
Video settings ................................................................................................................................. 56
Resolution 56 .......................................................................................................................................................................
Image quality .................................................................................................................................................................. 56
Brightness ........................................................................................................................................................................ 56
Recording settings 57 .........................................................................................................................
Normal recording 57 ..........................................................................................................................................................
Voice recording .............................................................................................................................................................. 57
Date and time display .................................................................................................................................................. 57
Speed unit ...................................................................................................................................................................... 58
Normal recording duration .......................................................................................................................................... 58
Event/Parking mode recording duration .................................................................................................................. 58
Auto switching to parking mode ............................................................................................................................... 58
Rear camera power ....................................................................................................................................................... 58
Rear camera recording ................................................................................................................................................. 58
Rear camera 180° rotation ........................................................................................................................................... 58
Sensitivity settings ..................................................................................................59
G-sensor (Normal mode and parking mode) 60 ............................................................................
Motion detection (Parking mode) .............................................................................................. 61
Speed alert ...................................................................................................................................... 62
Other settings 63 ..........................................................................................................
Recording status LED 63 ....................................................................................................................
Security LED (Front camera)......................................................................................................... 63
Security LED (Rear camera) .......................................................................................................... 63
Voice guidance ..............................................................................................................................64
Volume ............................................................................................................................................. 64
User text overlay ............................................................................................................................65
Wi-Fi settings ............................................................................................................66
Wi-Fi auto turn on & o 66 .................................................................................................................
Login credentials ............................................................................................................................67
Cloud settings 68 ..........................................................................................................
Enable Cloud service 68 .....................................................................................................................
Cloud service hotspot settings ...................................................................................................69
Push notication settings ............................................................................................................70
Changing settings using your computer (Windows/Mac) 71 ...
BlackVue Viewer language setting 71 .......................................................................
BlackVue settings .....................................................................................................71
Basic settings 72 ..................................................................................................................................
Firmware 72 ..........................................................................................................................................................................
Setting your time zone.................................................................................................................................................. 73
Video settings ................................................................................................................................................................. 73
Recording settings ......................................................................................................................................................... 74
Sensitivity settings 75 ........................................................................................................................
Sensitivity in normal and parking mode 75 ...................................................................................................................
Sensitivity of the motion detection (parking mode) .............................................................................................. 76
Advanced sensitivity settings for normal and parking mode ............................................................................... 76
Speed alert ...................................................................................................................................................................... 77
Wi-Fi & Other settings 78 ...................................................................................................................
Wi-Fi settings 79 ..................................................................................................................................................................
Other settings ................................................................................................................................................................ 79
Cloud settings 81 .................................................................................................................................
Cloud settings 82 .................................................................................................................................................................
Push notication settings ............................................................................................................................................. 82
Applying the settings 82 ....................................................................................................................

4BLACKVUE
About the Cloud Service 83 ...........................................
Connect to BLACKVUE CLOUD (Optional) 83 ............................
Optional accessories 89 .................................................
Parking mode hardwiring kit (Optional) 89 ..............................
Parking mode battery pack (Optional) ................................. 90
Troubleshooting 91 ........................................................
Resetting the direct Wi-Fi login password 91 ............................
Change the Wi-Fi password over the internet: ...................................................91
Change the Wi-Fi password using BlackVue Viewer (Windows or Mac) ........93
Reset the Wi-Fi password by upgrading the rmware using a computer
(Windows or Mac) ....................................................................................................93
Product specications 94 ...............................................
Recording time ..........................................................96
Disposal and recycling information .........................97

DR650S-2CH 5
Introduction
Thank you for purchasing this BlackVue dashcam made by Pittasoft Co., Ltd.
This instruction manual contains information on how to operate your dashcam.
Before using your dashcam, we recommend that you read through this manual to ensure correct usage.
To improve the performance of the product, the contents of this manual are subject to change without prior notice.
Note
yA formatted microSD card is provided in the BlackVue dashcam when you purchase the product. After turning on the power of
the dashcam, the microSD card will be initialized and programs such as BlackVue Viewer will be installed.

6BLACKVUE
Important safety information
For user safety and to avoid property damage, read through this manual and follow these safety instructions to use the product correctly.
Failure to observe the following directions could result in death or property damage:
DANGER
yDo not disassemble, repair, or modify the product yourself.
Doing so may cause re, electric shock, or malfunction. For internal inspection and repair, contact the service center.
yIf any foreign matter gets inside the product, detach the power cord immediately.
Contact the service center for repair.
yDo not adjust the product while driving.
Doing so may cause an accident. Stop or park your car in a safe place before installing and setting up the product.
yDo not install the product in a location where the product can interfere with the driver's eld of vision.
Doing so may cause an accident.
yDo not use a damaged or modied power cord. Only use the cords provided by the manufacturer.
Damaged or modied power cords may cause an explosion, re, or malfunction.
yDo not operate the product with wet hands.
Doing so may cause electric shock.
yDo not install the product in an environment with high humidity, or combustible gases or liquids.
Doing so may cause an explosion and/or re.

DR650S-2CH 7
Failure to observe the following directions could result in death or serious injury:
WARNING
yDo not leave the product near infants, children, or pets.
There is a risk of them swallowing small components, and/or their saliva may get into the product, causing an explosion due to a short
circuit.
yDo not spray water or wax directly onto the product while cleaning the inside of the car.
Doing so may cause re, electric shock, or malfunction.
yIf smoke or an unusual smell is emitted from the power cord, detach the power cord immediately.
Contact the service center or your distributor.
yKeep the terminals of the power cord clean.
Failure to do so may cause excessive heat and re.
yUse the correct input voltage.
Failure to do so may cause explosion, re, or malfunction.
yPlug in the power cord rmly so that it cannot easily be disconnected.
Failure to do so may cause re.
yDo not cover the product with any material.
Doing so may cause external deformation of the product or re. Use the product and peripherals in a well-ventilated location.

8BLACKVUE
Failure to observe the following directions could result in injury or property damage:
CAUTION
yDo not spray cleaning products directly onto the product.
Doing so may cause discoloration, cracks, or malfunction.
yIf the product is used outside the optimal temperature range (-20°C – 60°C / -4°F – 140°F), performance can decline or
malfunctions may occur.
yMake sure that the product is installed properly.
If installed incorrectly, vibrations may cause the product to fall, and may cause physical injury.
yWhen entering or exiting a tunnel, when directly facing into bright sunlight, or when recording at night without lighting the
quality of recorded video may deteriorate.
yIf the product is damaged or the power supply is cut due to an accident, video may not be recorded.
yExcessively tinted windshield glass can distort the recorded video or cause recorded video to be indistinct.
yProlonged use of the product can increase the interior temperature and cause burns.
ymicroSD cards are consumables, so replace microSD cards after prolonged use.
microSD cards may not record video correctly after extended use, so check the microSD card's recording capability periodically and
replace as necessary.
yClean the lens regularly.
Foreign material attached to the lens can aect the recording quality.
yDo not remove the microSD card while the microSD card is saving or reading data.
The data can be damaged or malfunctions may occur.
yIt is recommended that you install the software and rmware from the BlackVue download page. You can access the BlackVue
download page on the BlackVue website (www.blackvue.com).
yIt is recommended that you remove the power cord if the product (BlackVue dashcam/Parking Mode Hardwiring Kit) is not used
for an extended period of time.

DR650S-2CH 9
Overview
In the box
Check the box for each of the following items before installing the BlackVue dashcam.
Front camera Quick start guide
Power cord Cable clips (8 EA)
Double-sided tape for the
Mounting Brackets microSD card
microSD card reader Rear camera
Rear camera connection cable Pry tool
Note
yThe illustrations in this manual may dier from the product.
yTo improve the performance of the product, the contents of this manual are subject to change without prior notice.
yFor more information about the package components and accessories, visit the BlackVue website (www.blackvue.com).
yYou can nd the microSD card in the BlackVue dashcam.

10 BLACKVUE
At a glance
The following diagrams explain each part of the BlackVue dashcam.
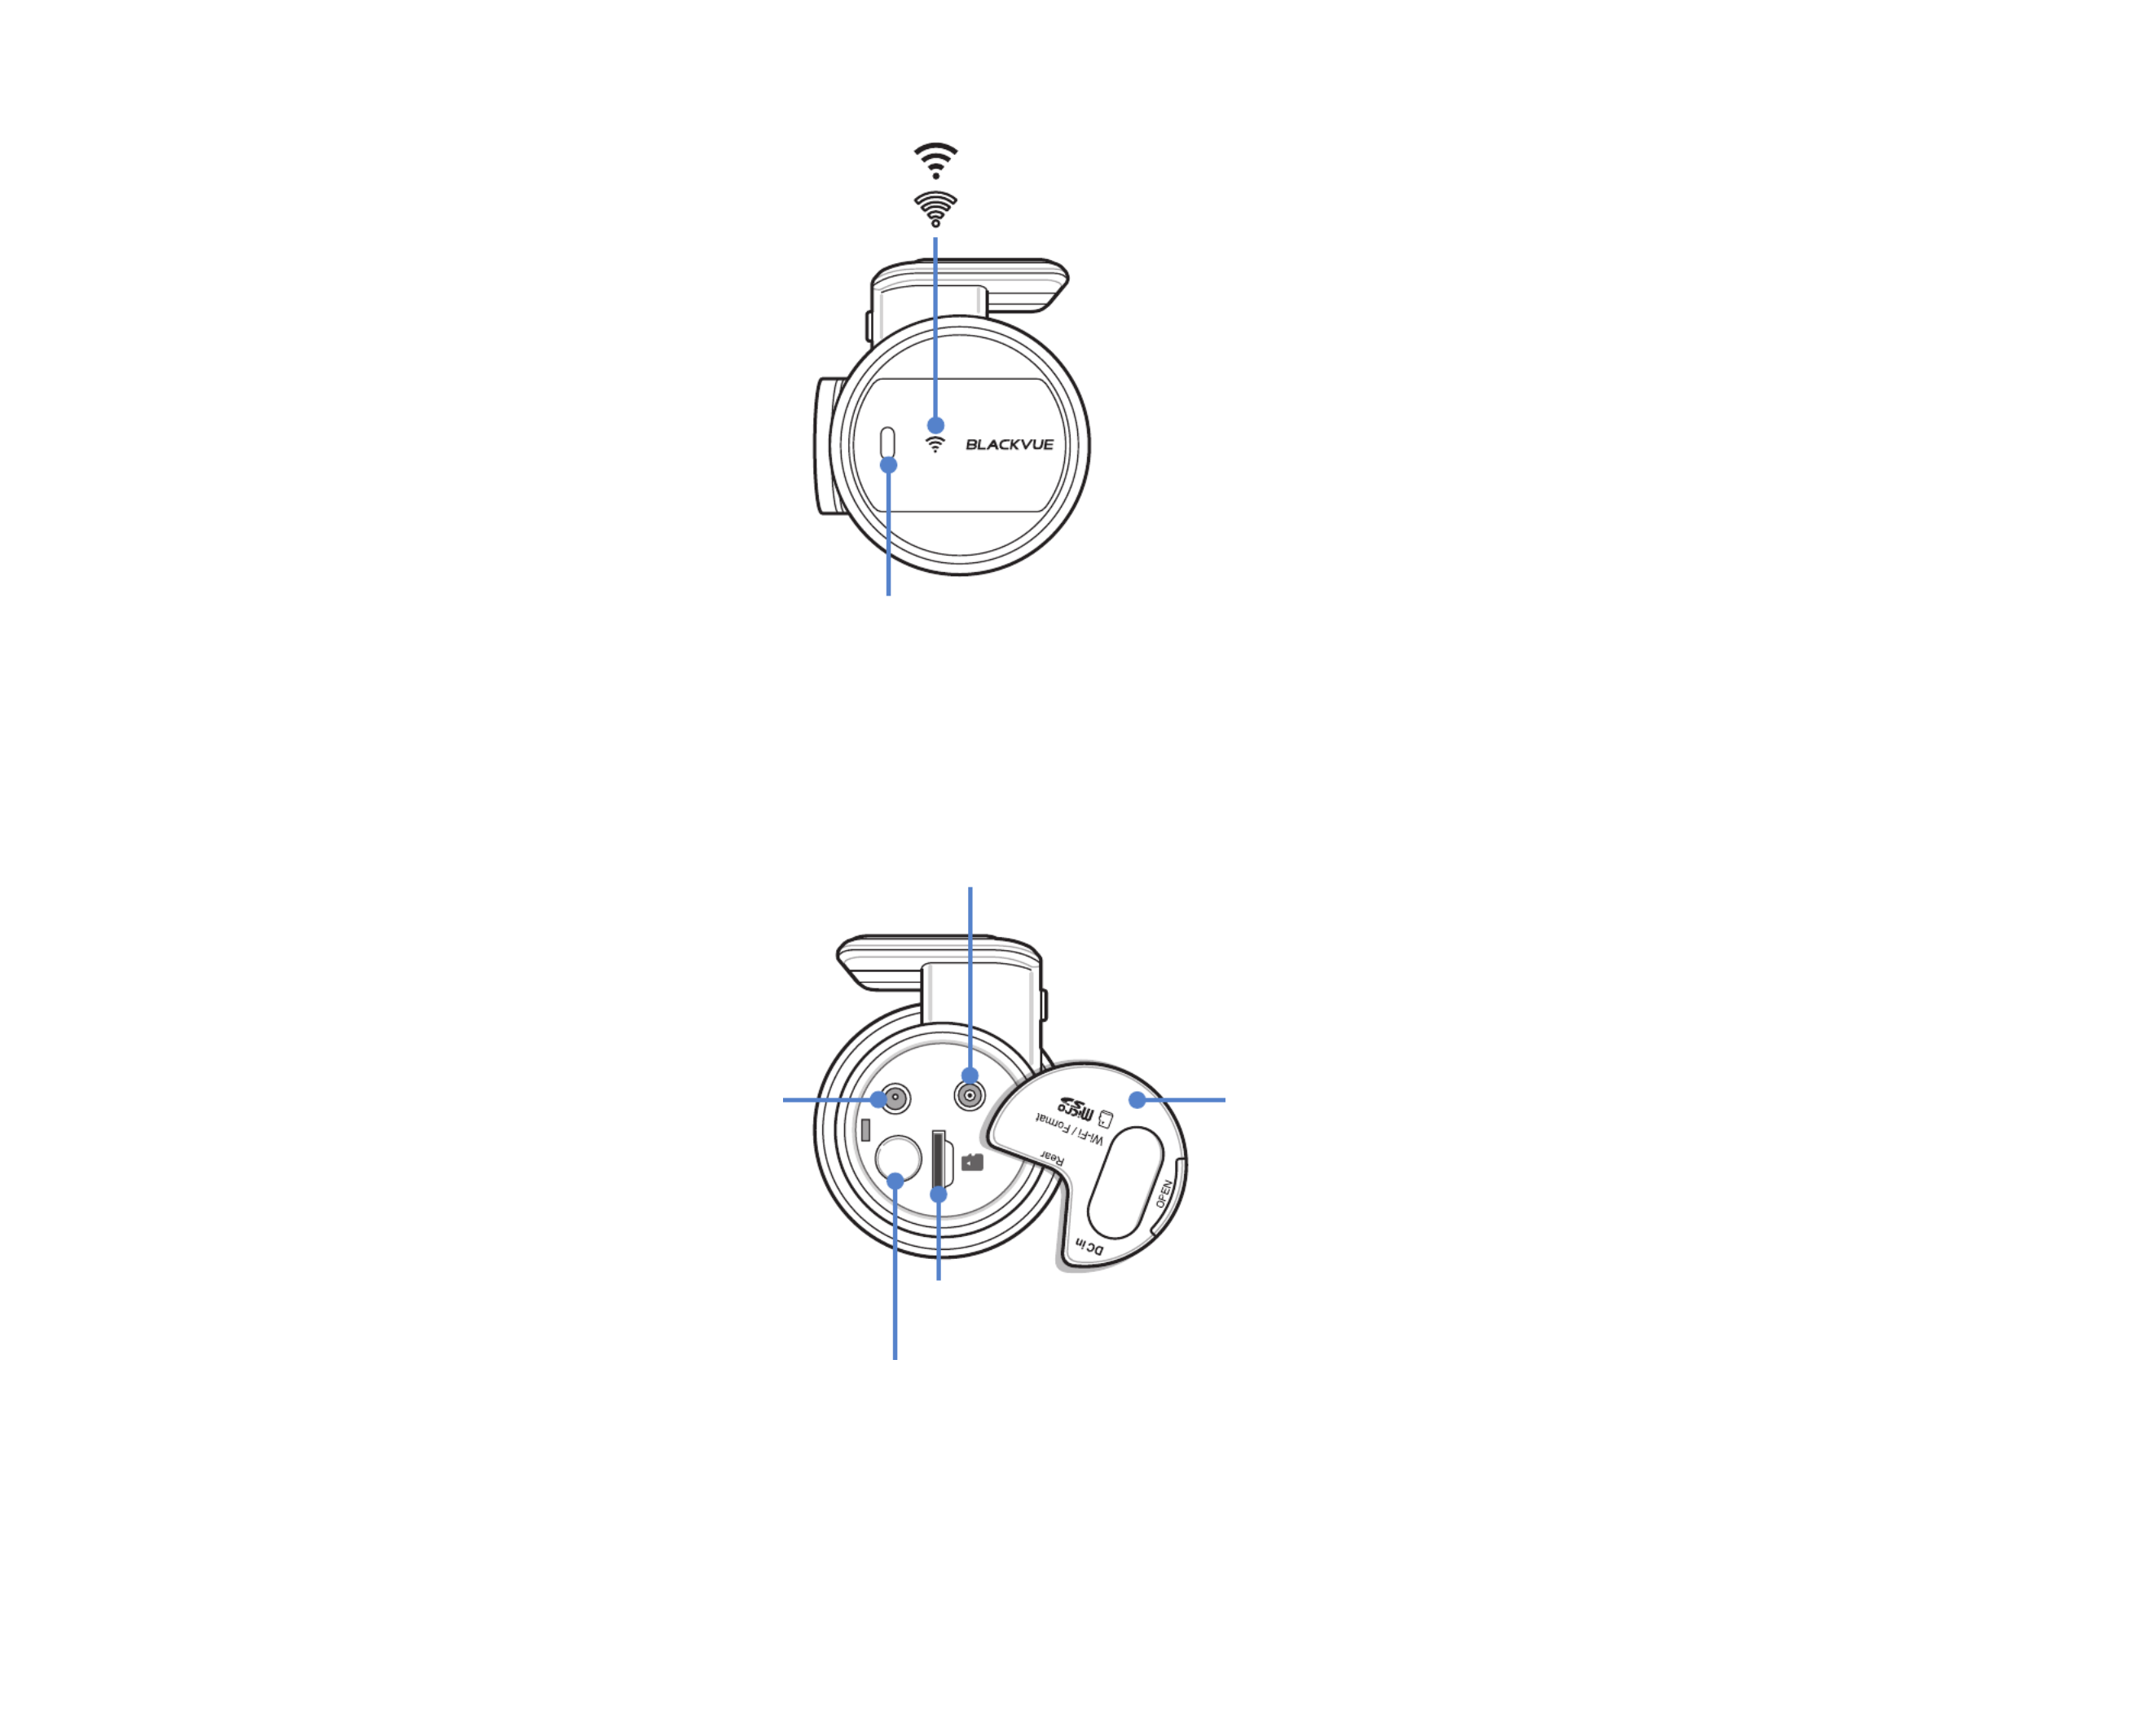
Front camera
Recording LED
: Blinks orange in normal mode.
: Blinks red when an event is being recorded (impact detected).
: Blinks green when motion is detected in parking mode.
Cloud code
QR Code:
Used to register your camera for
the Cloud Service
(leave attached for easy access).
GPS LED
: GPS is on.
Speaker
Lock button
Mounting bracket
Front security LED
: Blinks slowly in normal and parking
: Blinks quickly when
(i) an event is being recorded (impact detected),
(ii) motion is detect ed in parking mode.
Camera lens
118.5 mm
55 mm
36 mm
DR650S-2CH 11
Voice recording proximity sensor:
Touch or wave a nger within 20mm of the sensor to turn
the voice recording function on or o.
Wi-Fi/Internet LED
: Direct Wi-Fi is on.
: Blinks when connected to the internet (Cloud connected).
Wi-Fi / Format button
* Self-format function: To format the microSD card press
the button for 10 seconds until the dashcam beeps.
microSD card slot
Cover DC in
(power connector)
Rear camera connection port

12 BLACKVUE
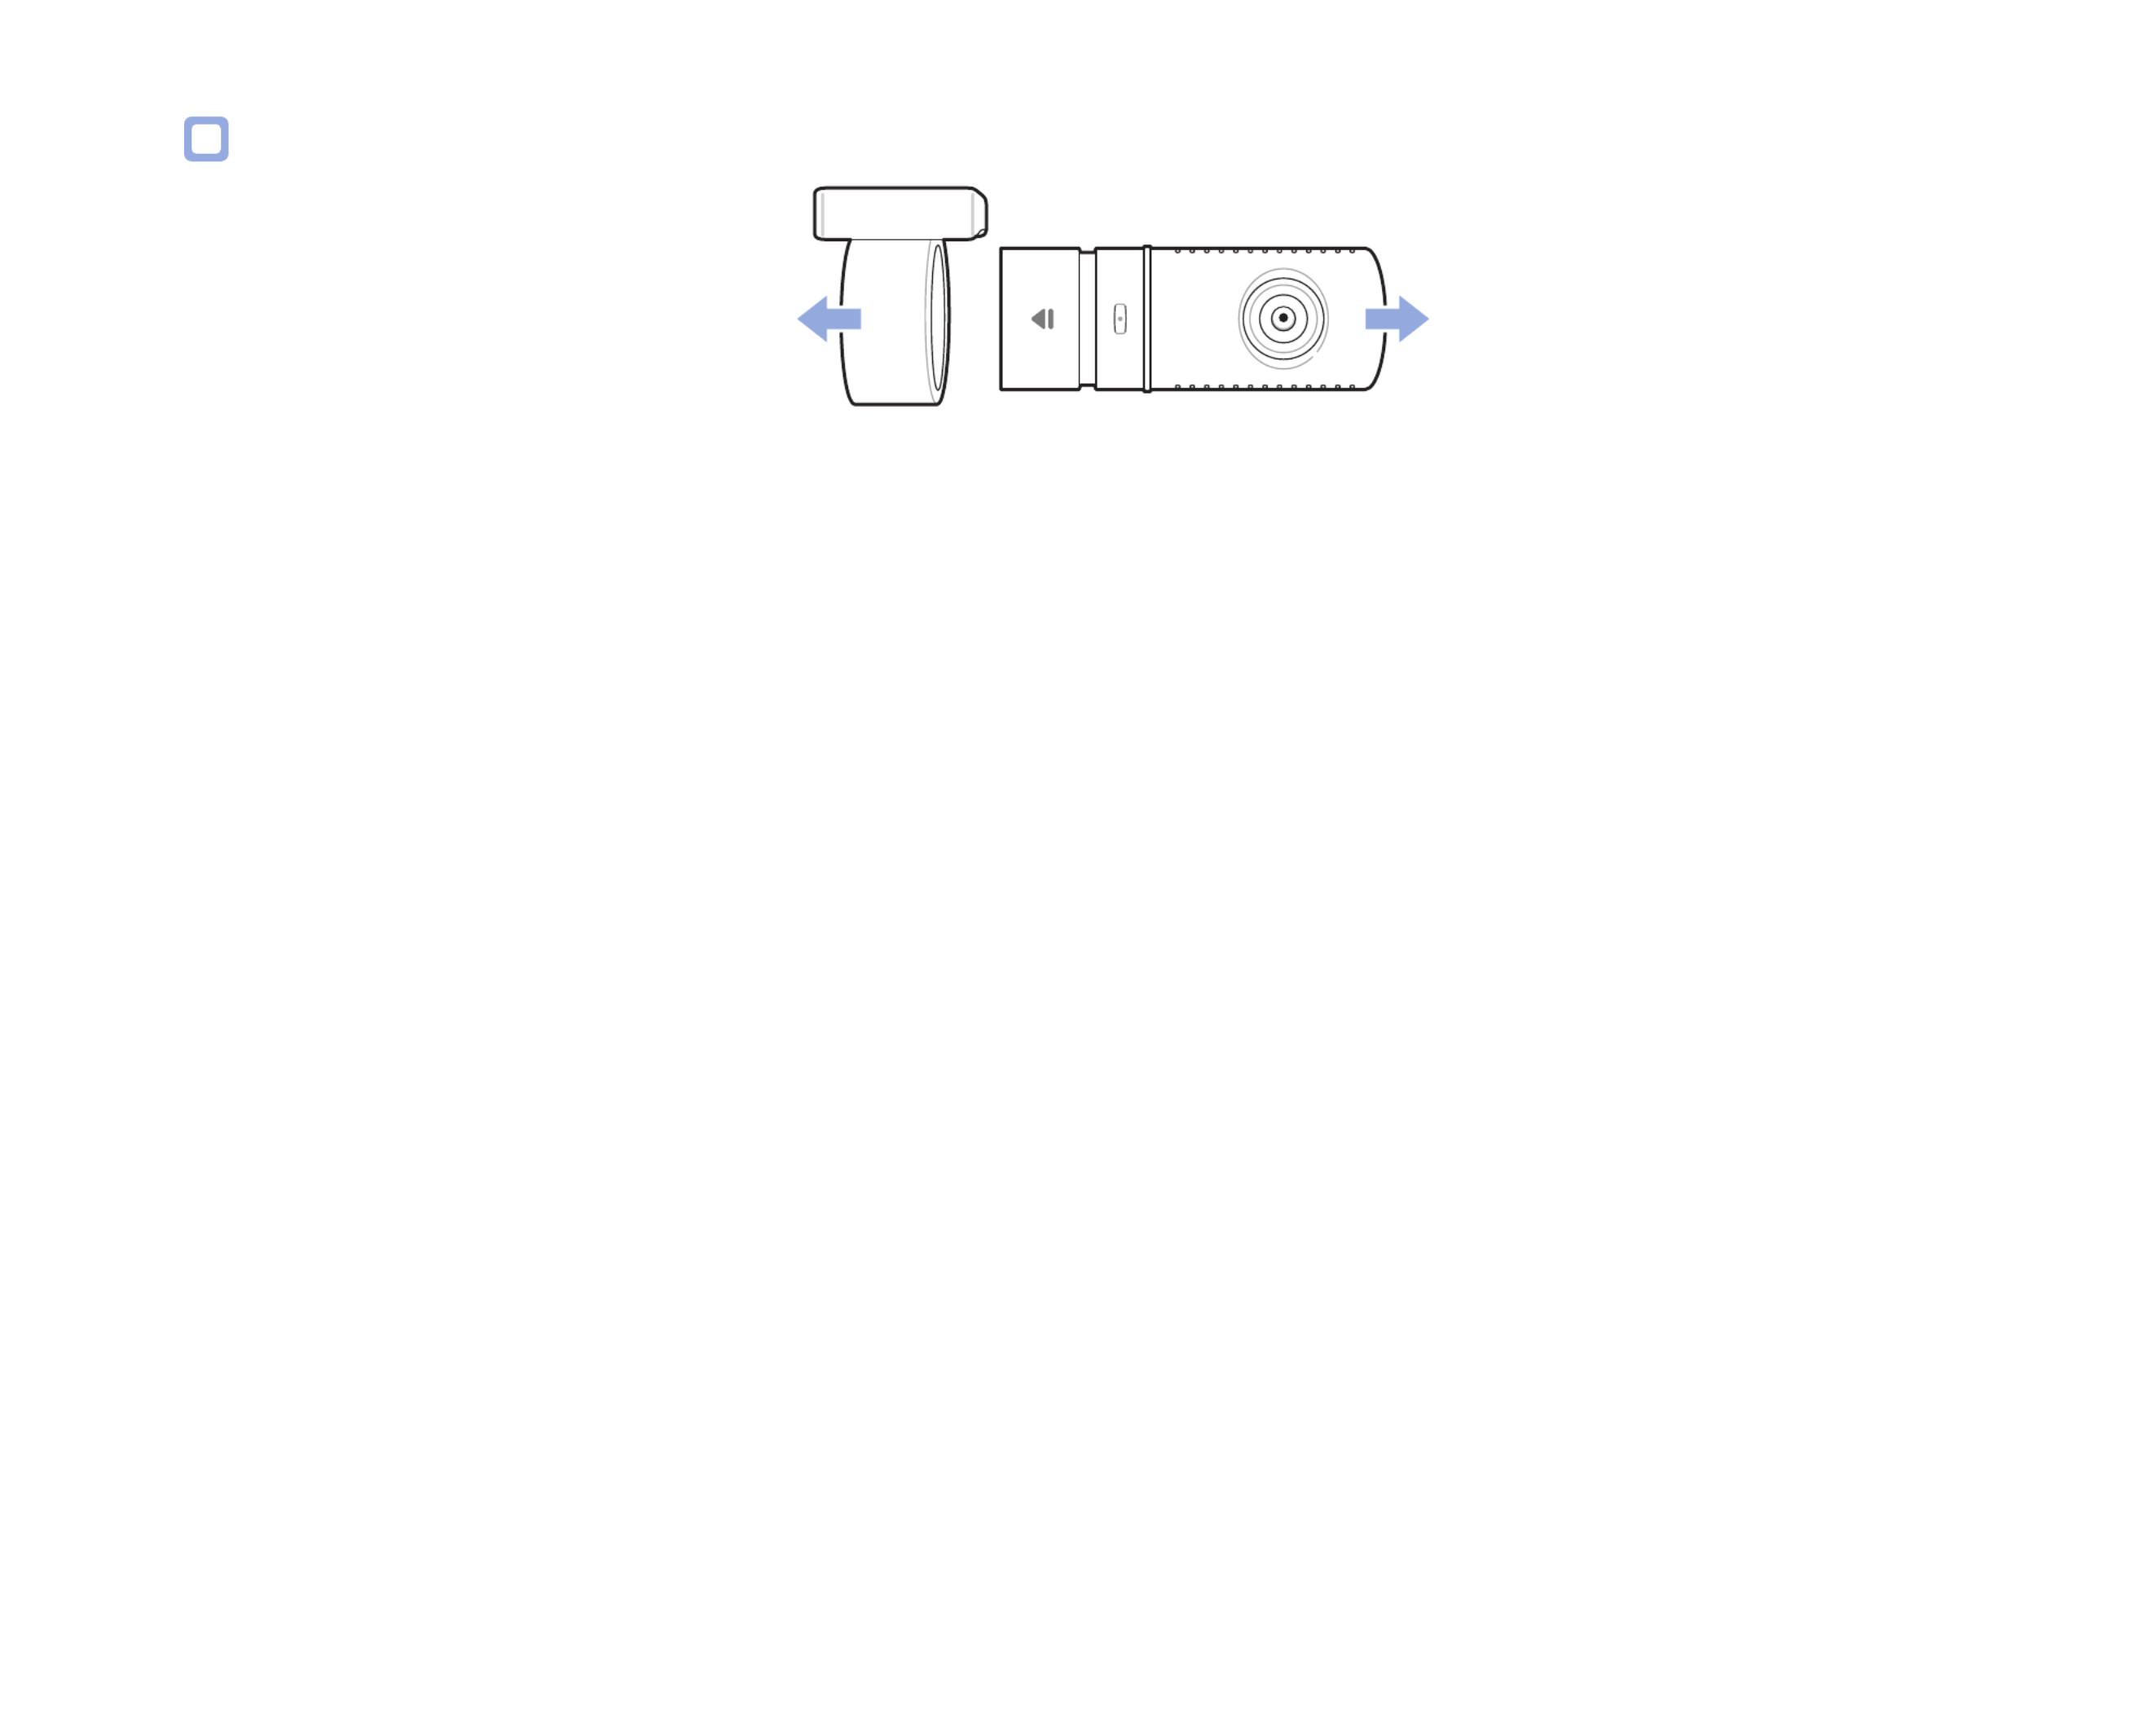
Removing and inserting the front camera
yTo remove the dashcam from its bracket, press the LOCK button and pull the dashcam out of the mounting bracket.
yTo insert the dashcam into its bracket, push the dashcam into the mounting bracket until it "clicks" in.
Rear camera
Rear security LED
: Rear camera is on
(on in all recording modes).
V out
(Front camera
connection port)
Mounting bracket Camera lens
31 mm
67.4 mm
25 mm
DR650S-2CH 13
Removing and inserting the rear camera
yTo remove the rear camera from its bracket, hold the mounting bracket and pull the rear camera out.
yTo insert the rear camera into its bracket, push the rear camera into the mounting bracket until it "clicks" in.

14 BLACKVUE
Installation
Installing the BlackVue dashcam
Install the BlackVue dashcam behind the rear view mirror. Remove any foreign matter and clean and dry the windshield before installation.
Warning
yDo not install the product in a location where it can obstruct the driver's eld of vision.
1
Turn o the engine.
2Peel o the protective lm from the double-sided tape and attach the dashcam to the windshield behind the rear-view mirror.
DR650S-2CH 15
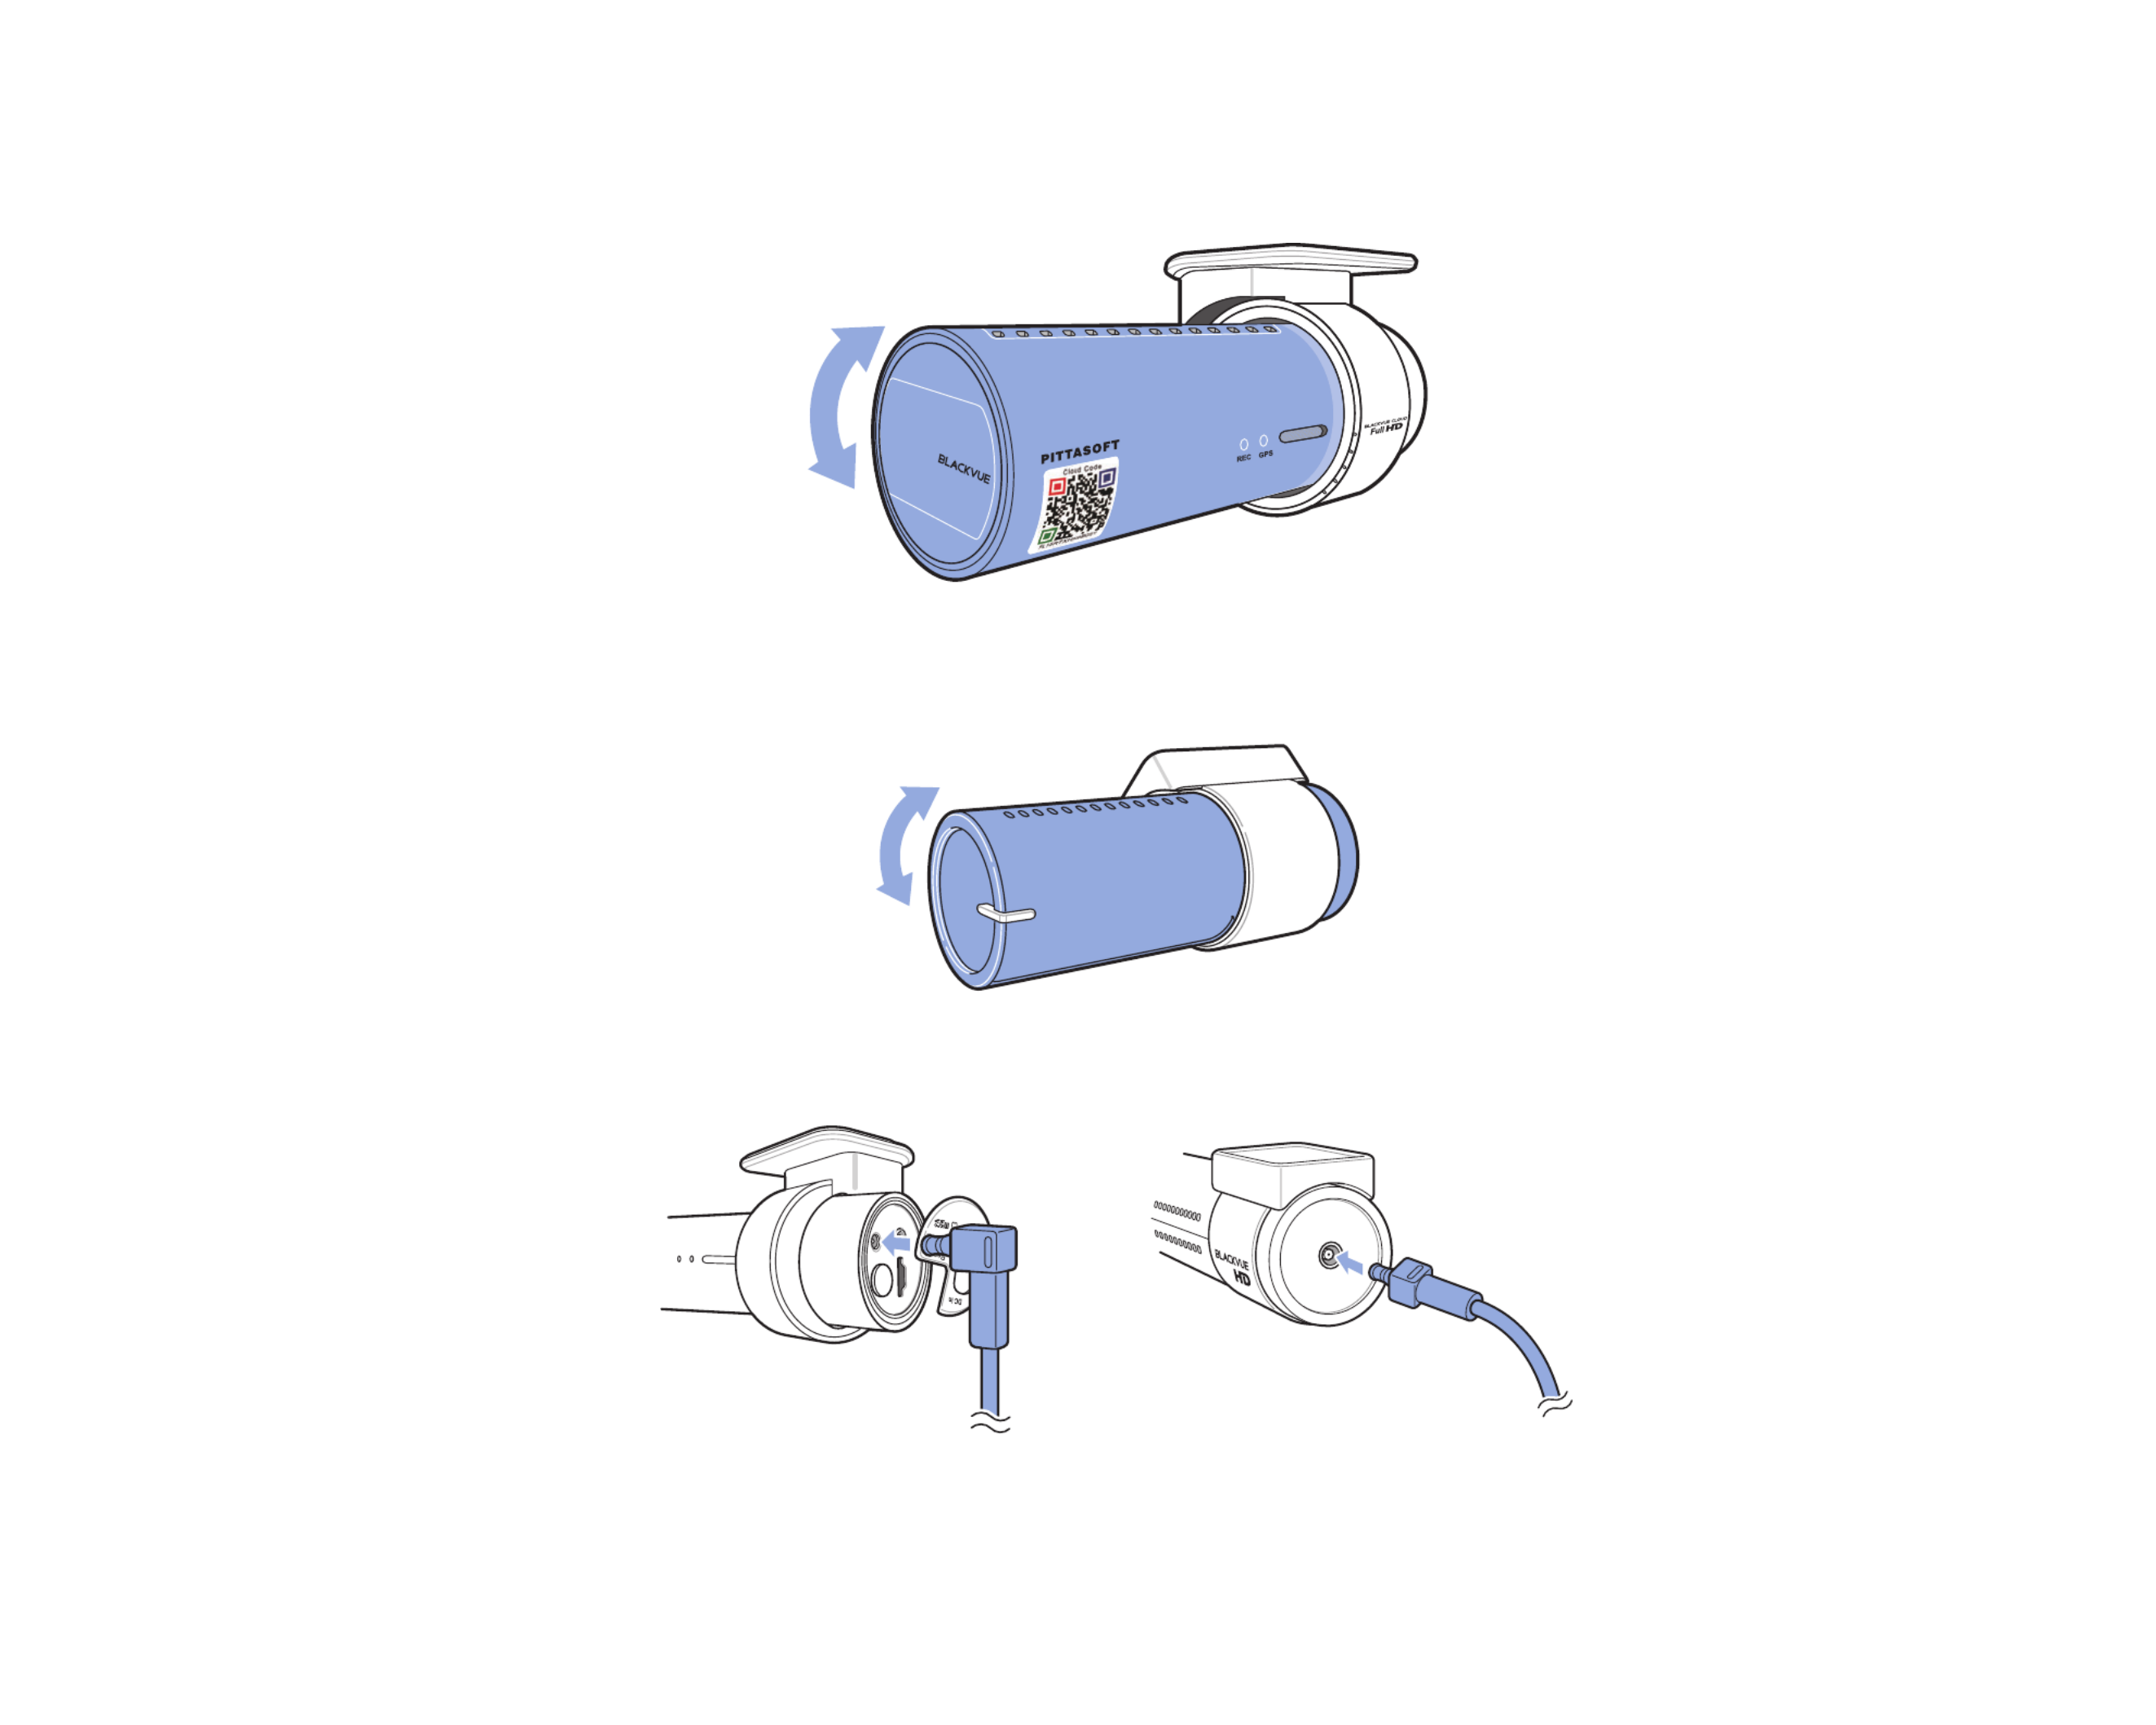
3Adjust the angle of the lens by rotating the body of the dashcam. We recommend pointing the lens slightly downwards (≈10° below
horizontal), so as to record video with a 6:4 road to background ratio.
4Peel o the protective lm from the double-sided tape and attach the rear camera to the rear windshield. Adjust the angle of the
lens by rotating the body of the rear camera.
5Connect the front camera ('Rear' port) and the rear camera ('V out') using the rear camera connection cable.

16 BLACKVUE
6Use the pry tool to lift the edges of the rubber window sealing and molding and tuck in the rear camera connection cable.
Rear camera connection cable
7Plug the power cord into the cigarette lighter socket and the front camera.
8Use the pry tool to lift the edges of the windshield trim/molding and tuck in the power cord.
Power cordRear camera connection cable
9Turn on the engine. The BlackVue dashcam will power up and start recording. Video les are stored on the microSD card. When the
microSD card lls up, the newest video les will start to replace the oldest video les (called loop recording) – so you will always
have the most recent video les.

DR650S-2CH 17
Note
yThe recording LED blinks while recording (default setting) and the GPS LED is on when a GPS signal is received. There are 3
recording modes: Normal, Event and Parking. The dashcam starts recording in normal mode, switches to event mode when an
impact is detected, and switches to parking mode if the vehicle is stationary for 5 minutes.
yWhen you run the dashcam for the rst time the rmware is automatically loaded onto the microSD card. After the rmware has
been loaded onto the microSD card you can customize settings using BlackVue Viewer on a computer.
10 Turn o the engine. The dashcam will automatically stop recording and power down. To record in parking mode while the engine is
o please install a Power Magic Battery Pack (sold separately) or a Power Magic Pro (sold separately). A Power Magic Pro powers
your dashcam when the engine is o by hardwiring it to the automotive battery. A low voltage power cut-o function and a parking
mode timer protect the automotive battery from discharge.

18 BLACKVUE
Playing and Managing Videos
Playing and managing video les using your smartphone (Android/iOS)
Opening video les
1
Search for the BlackVue C app in the Google Play Store or Apple App Store and install it on your smartphone.
2Pair” your smartphone with the BlackVue dashcam via direct Wi-Fi:
a. Go to your smartphone's then select Settings Wi-Fi, and make sure Wi-Fi is turned on.

DR650S-2CH 19
b. Choose your BlackVue dashcam from the network list. The dashcam's default SSID begins with its model number
(e.g. DR650S-******).
c. Enter the default password and tap .'blackvue' Join
d. Open the BlackVue C app and select BLACKVUE WI-FI.
Note
yDirect Wi-Fi will turn on automatically when the dashcam turn on.
yDirect Wi-Fi lets you directly connect your smartphone to your dashcam via Wi-Fi within a range of 10m.
yThe BlackVue C app is available for devices running Android 4.4.2 and up, or iOS 8.0 or later.

20 BLACKVUE
BLACKVUE WI-FI screen composition
Firmware settings
Video le menu
Live View
Blackvue SSID
File type button
Refresh video list
Copy to Internal Memory
Recorded File list

DR650S-2CH 21
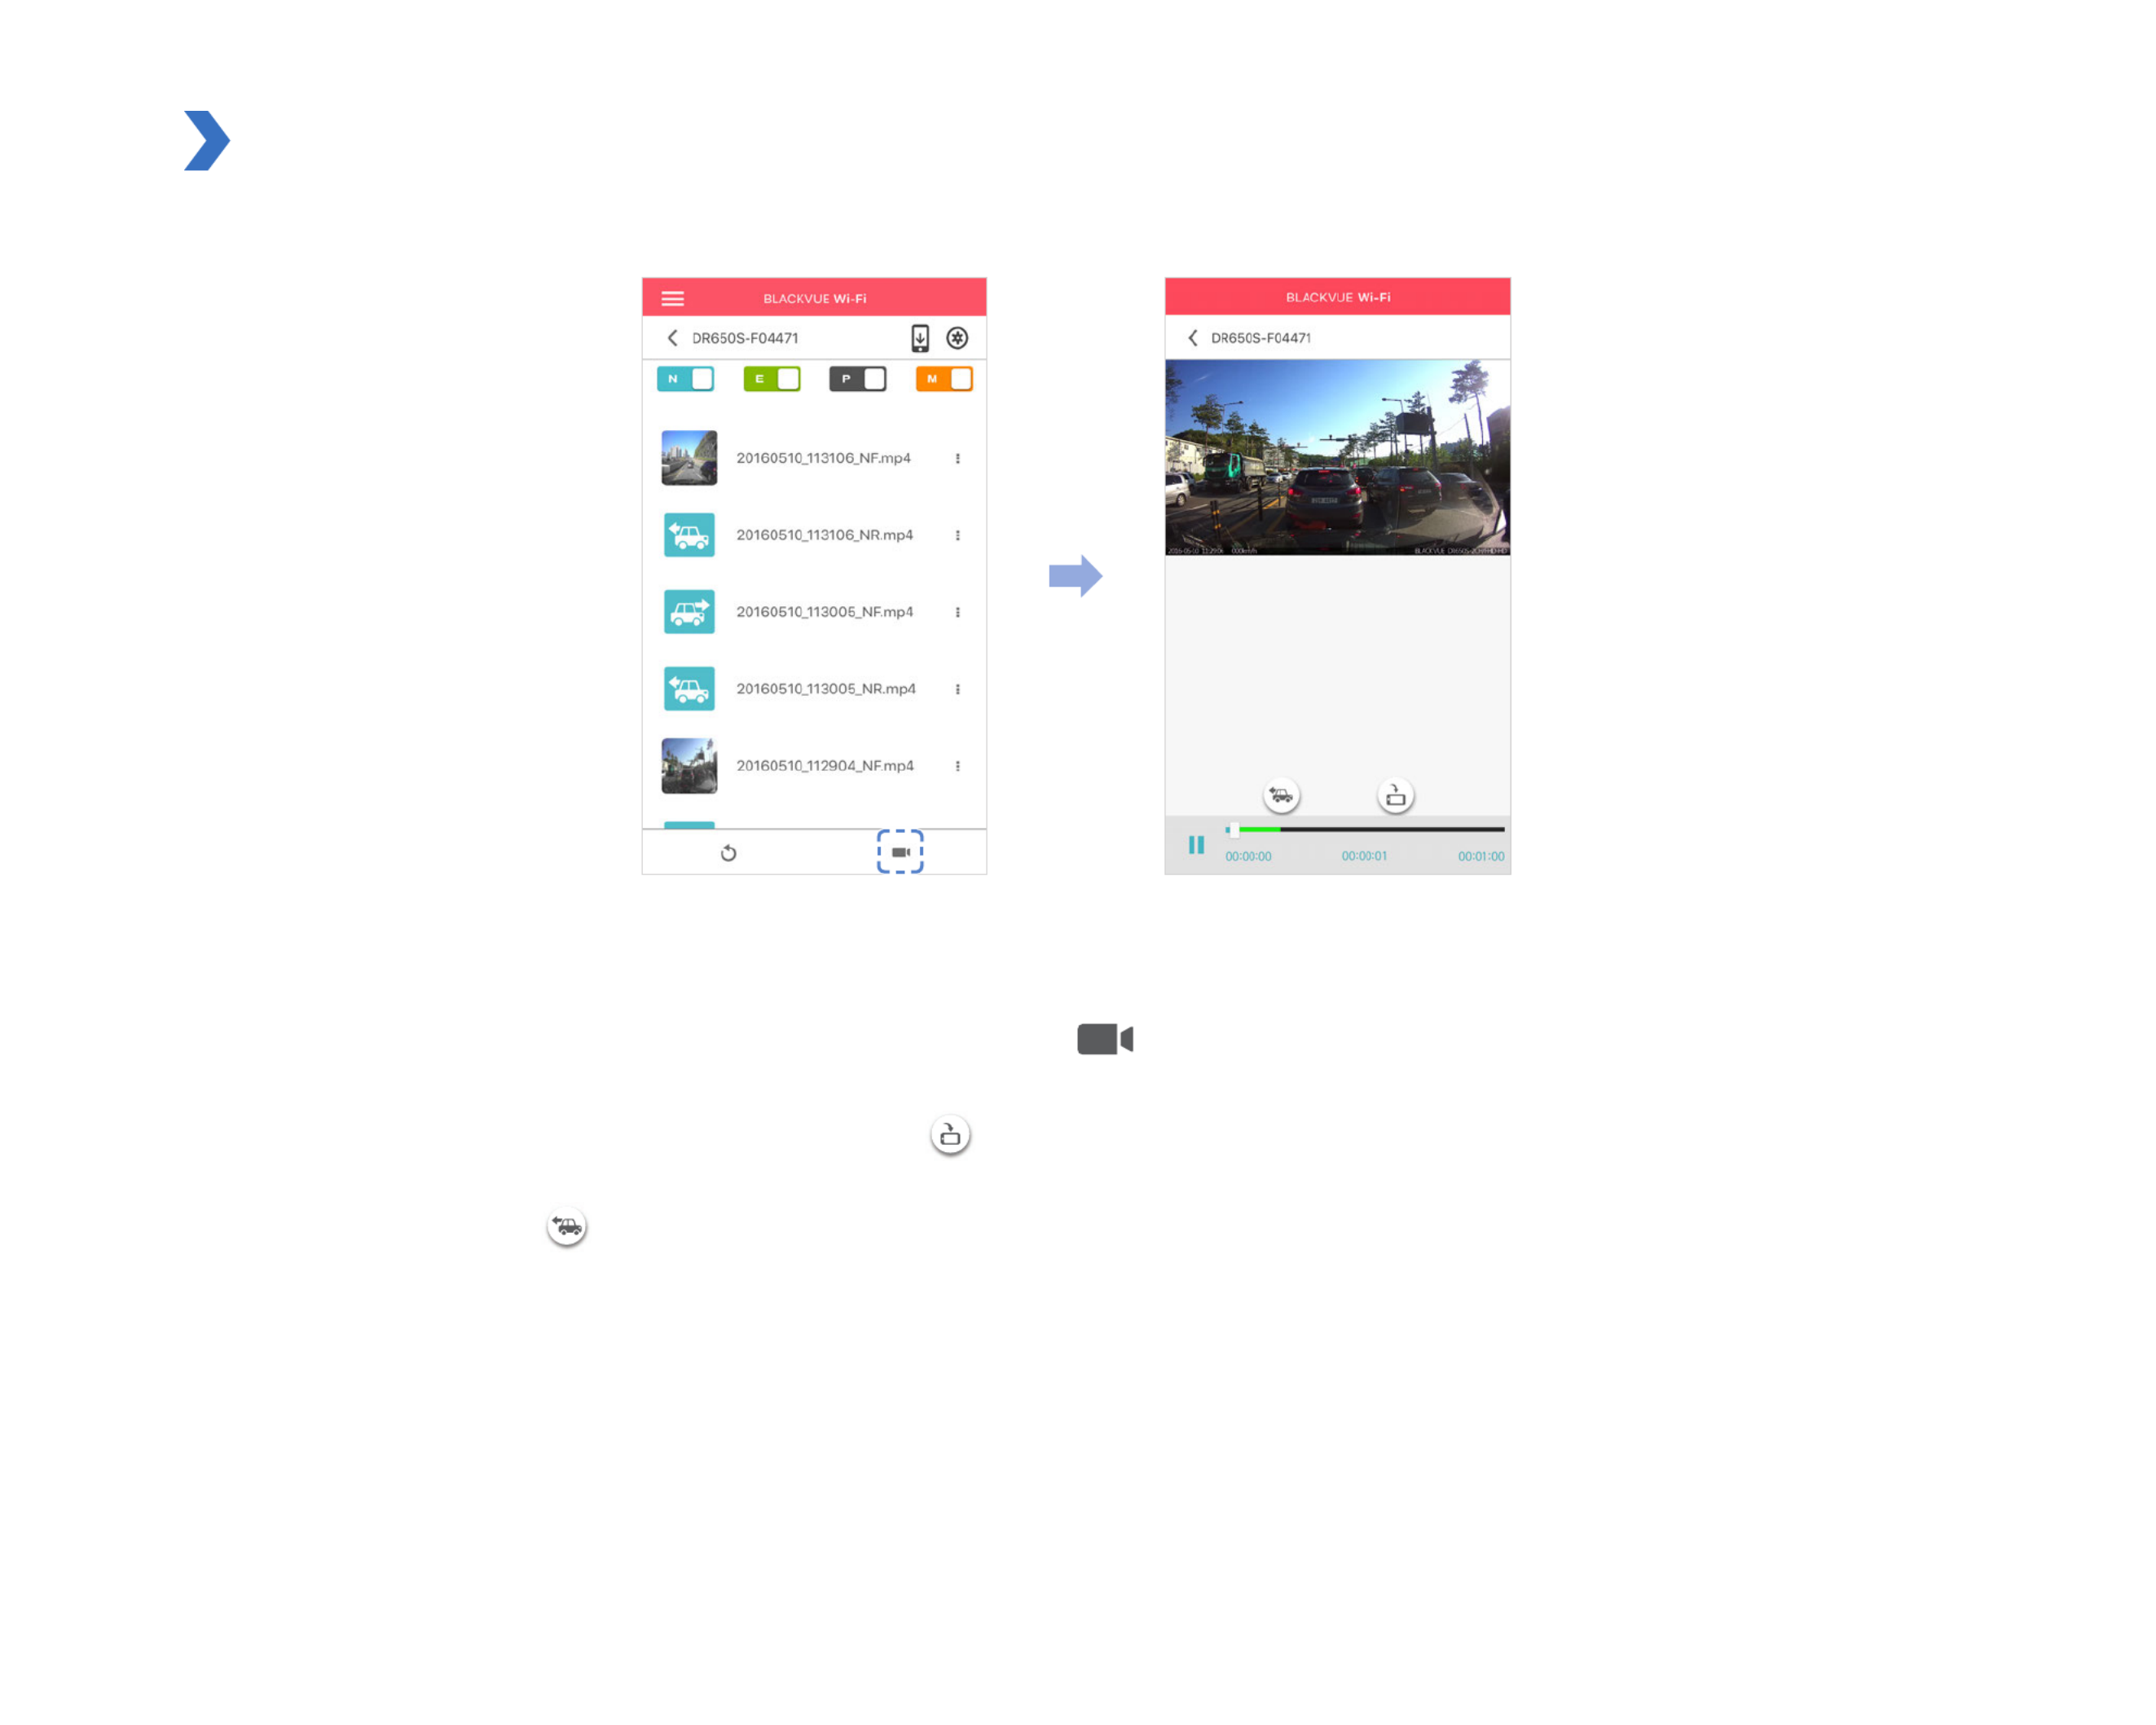
Playing video
Playing back videos
Select the video le you want to play from the video list.
Press the refresh button to refresh the video list.
Identify video les by recording type
Normal The dashcam records in normal mode by default.
Event When the dashcam detects an impact while in normal or parking mode, it switches to event mode and
saves an event recording beginning 5 seconds before the event trigger.
Parking In parking mode the dashcam continuously buers video. When motion is detected in the dashcam's
eld of view, it saves a parking recording beginning 5 seconds before the motion detection.
Thumbnails are automatically shown for event recording les. For normal and parking mode recordings, tap the car icon to load a
thumbnail.
The car icon with an arrow pointing to the right indicates a front dashcam recording.
The car icon with an arrow pointing to the left indicates a rear dashcam recording.

22 BLACKVUE
Recording le names include the date, time, recording mode and camera direction.
yExample le name : 20160510_113207_NF.mp4
yDate & time : 10th May 2016, 11:32:07 am
yRecording mode : N: Normal E: Event P: Parking
yCamera direction : F: Front dashcam R: Rear dashcam
Note
yThe dashcam requires a constant power source to record in parking mode. See "Optional accessories" on page 89 for more
information.
yUse the , , buttons to lter the video list by recording type (Normal, Event and Parking).

DR650S-2CH 23
Checking the displayed time & GPS data
The camera's time zone is initially set to 'Pacic/Midway_Midway Islands' (GMT-11). The time the video was recorded is displayed in the
lower left corner of the video in the playback screen. If the displayed time in the recorded videos is incorrect please see "Time zone" on
page 55.
Copy to Internal Memory
Portrait and
landscape display
Video le
Date, Time & Speed
Rear camera
Model name
The vehicle's speed is displayed in the lower-left corner of the video while it is playing back.
Rotate your smartphone or press the rotate button to switch between portrait and landscape display modes.
Press the rear button to switch to the rear dashcam view.
24 BLACKVUE
Real-time streaming video (Live View)
You can view in real-time the video currently being recorded by connecting your smartphone to the dashcam via direct Wi-Fi.
1
Go to your smartphone's > Settings Wi-Fi and connect to your dashcam.
2Open the BlackVue C app. Select and tap the button.BLACKVUE WI-FI
3Rotate your smartphone or press the rotate button to switch between portrait and landscape display modes.
4Press the rear button to switch to the rear dashcam view.

DR650S-2CH 25
Managing videos
Managing videos in BLACKVUE WI-FI
You can manage the recorded videos using the BlackVue C app.
Note
yWhen the microSD card lls up, the newest video les will start to replace the oldest video les (called loop recording) – so you
will always have the most recent video les.
Copy to Internal Memory
To copy individual les to your smartphone, tap next to the video you want to copy. Select Copy to Internal Memory.
To copy multiple les to your smartphone in one go tap . Select which les to copy, or tap to select all les. Tap to begin copying.

26 BLACKVUE
Managing videos in INTERNAL MEMORY
Open the BlackVue C app and select INTERNAL MEMORY.
Tap to see le options. You can delete, copy or move les, change the name of les and share les.

DR650S-2CH 27
Deleting videos
To delete multiple les from your smartphone in one go, tap at the top of the screen and select . Select which les to delete, Delete
or tap to select all les. Tap to delete the selected les.
To delete individual les, tap next to the video you want to delete. Select .Delete
Creating a new folder
To create a new folder tap at the top of the screen and select . Enter a new folder name and press OK.New folder
Copying and pasting videos
To copy multiple les in one go, tap at the top of the screen and select . Select which les to copy, or tap to select all les. Copy
Tap to copy the selected les. Go to another folder and tap to paste the selected les there.
To copy individual les, tap next to the video you want to copy. Select . Go to another folder and tap to paste the le there.Copy

28 BLACKVUE
Moving videos
To move multiple les in one go, tap at the top of the screen and select . Select which les to move, or tap to select all les. Move
Tap and go to another folder and tap to move the selected les there.
To move individual les, tap next to the video you want to move. Select . Go to another folder and tap to move the le there.Move
Renaming a video
To rename a video, tap next to the video you want to rename. Select . Enter a new name and tap . Change name OK
Uploading, sharing or emailing a video
Tap next to the video you want to share. Select . Choose the app you want to share with. The available options will depend on Share le
what apps you have installed on your smartphone.

DR650S-2CH 29
Playing and managing video les using your computer (Windows/Mac)
Removing the microSD card
1
Unplug the power cord to turn o the dashcam.
2Open the side cover of the dashcam.
3To remove the microSD card, gently press on the card to release the lock then carefully pull the card out.
To insert the microSD card, gently push the card into the slot until it locks into place and close the side cover.
Open side cover To remove To insert

30 BLACKVUE
Opening video les in BlackVue Viewer
1
Remove the microSD card from the dashcam.
2Insert the card into the microSD card reader and connect it to a computer.
3Find and run the BlackVue Viewer program.
For Windows users
Open Windows Explorer and click on the microSD card (Removable Disk (F:), or the name of your card location). Go to F:\BlackVue\
Application\Viewer for Windows\ and run BlackVue.exe.
DR650S-2CH 31
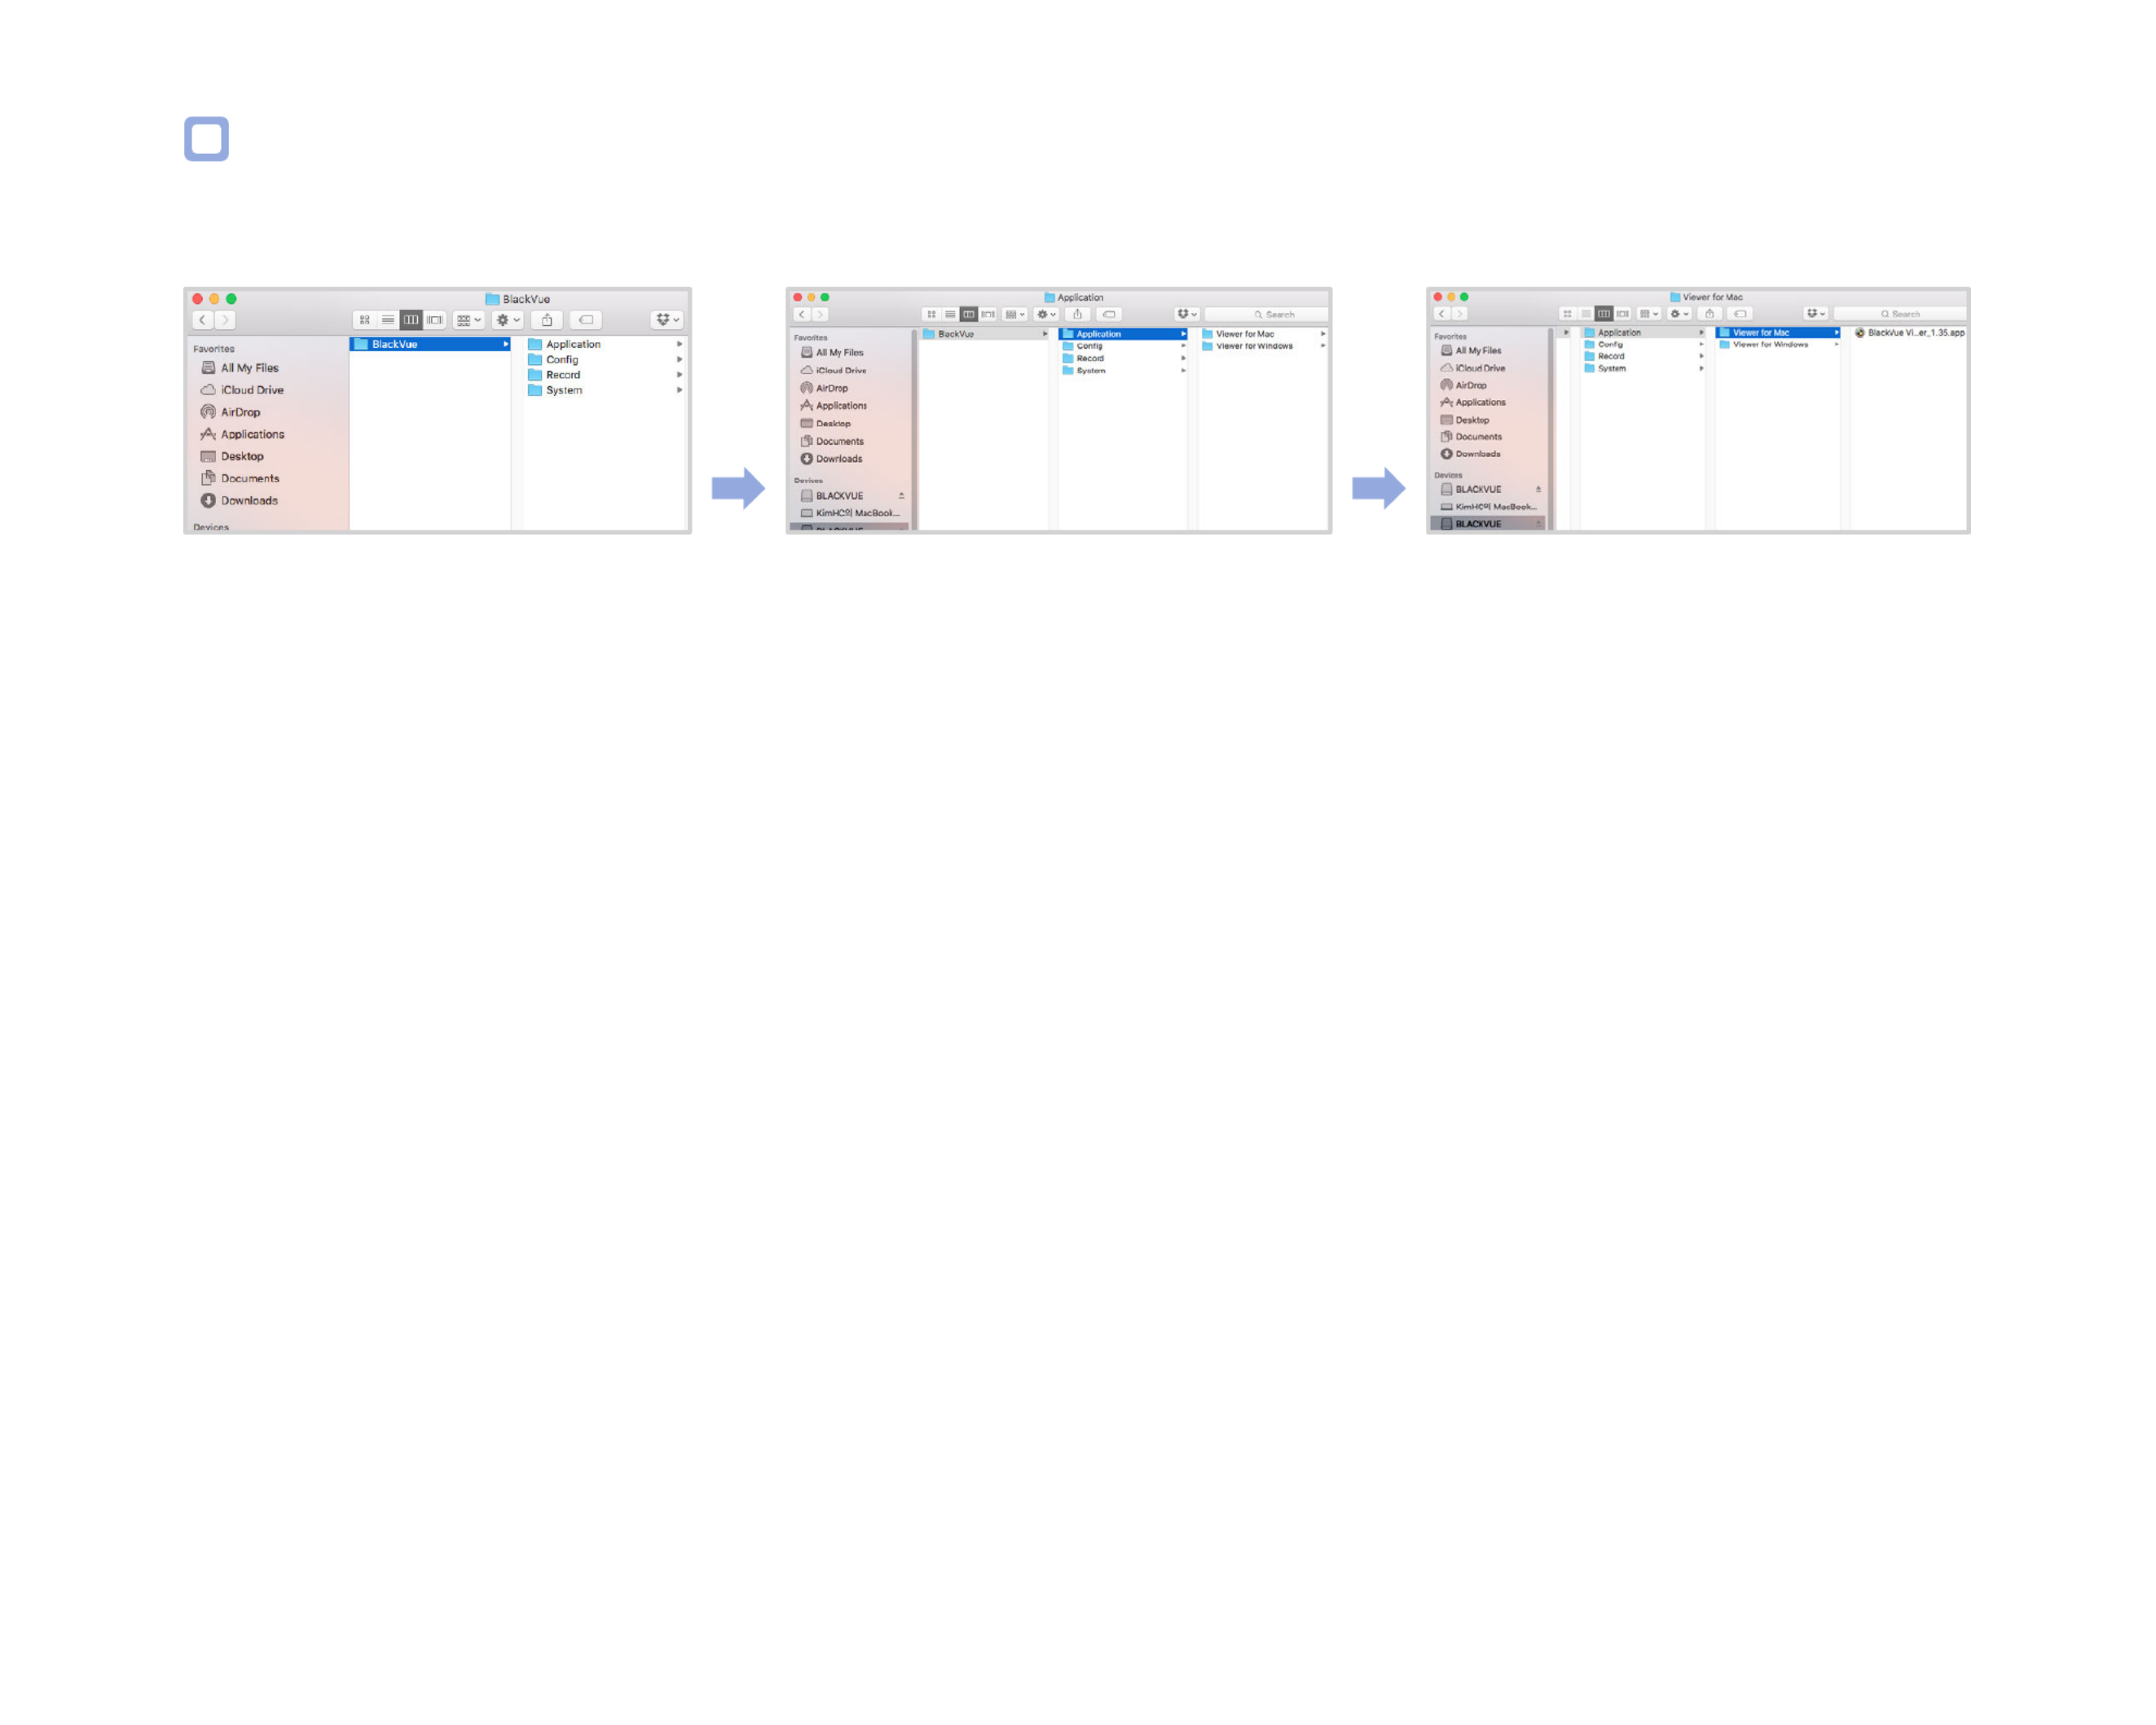
For Mac users
Open Finder and select the microSD card reader from the list in the left frame. Go to \BlackVue\Application\Viewer for Mac\ and run
BlackVue Viewer.

32 BLACKVUE
Viewer screen composition
Windows Viewer
G-Sensor Information
GPS Data
Recorded File list
Timeline for sec selection
Settings
Print
Capture
Program info.
Playback Screen
(rear camera)
Playback Screen
(front camera)
Full Screen view
Playback/Pause Playback speed control
Stop Volume control
Next frame Timeline for min selection
Play next le
View upside-down
Flip horizontally
Front/Rear screen mode
Front/Rear reverse view
Play previous le
Previous frame
Format
MyWay Viewer

DR650S-2CH 33
Mac Viewer
G-Sensor Information
Settings
Print
GPS Data
Recorded File List
Timeline for sec selection
Capture
Playback Screen
(rear camera)
Playback Screen
(front camera)
Full Screen view
Previous frame
Timeline for min selection
Playback speed control
Playback/Pause Volume control
Next frame
Playback time
Play next le
View upside-down
Flip horizontally
Front/Rear screen mode
Front/Rear reverse view
Normal screen size
Play previous le
Format
MyWay Viewer

34 BLACKVUE
Playing video
Playing back videos
In BlackVue Viewer select a video and click or double click the selected video to play.
BlackVue Viewer shows by default the les in the microSD card. To see les in another folder click (Windows) or (Mac) and set the
folder path.
Identify video les by recording type
Front camera
Rear camera
: The dashcam starts normal recording by default.
: The dashcam starts event recording with a 5-second prerecording when it detects an impact during normal mode or parking mode.
: The dashcam starts parking recording with a 5-second prerecording when it detects motion in the camera during parking mode.
Parking mode recording starts when the vehicle does not move for 5 minutes or longer.
Note
yThe dashcam requires a constant power source to record in parking mode. See "Parking mode hardwiring kit (Optional)" or
"Parking mode battery pack (Optional)" on page 89 for more information.
yTo install the BlackVue Viewer program on your computer, go to the BlackVue website (www.blackvue.com) and download the
installable version of the BlackVue Viewer.
yUsing the File type buttons ( , , , , ) you can lter the le list by Front camera, Rear camera, Normal recording,
Event recording, and Parking mode recording.

DR650S-2CH 35
Checking the displayed time
The time the video was recorded is displayed in the lower left corner of the video in the playback screen. If the displayed time in the
recorded videos is incorrect please see "Setting your time zone" on page 73.
Using BlackVue Viewer
You can customize the playback options of the recorded videos, such as the screen size, playback speed, and volume using the playback
option buttons.
View upside-down
Front/Rear reverse view
Front/Rear screen mode
Flip horizontally
Playback/
Pause
Stop
Full screen view
Volume control
Playback time
Play previous le
Play next le
Playback speed control
Previous frame
Next frame
Exploring the timeline
You can explore the timeline for the playback of the recorded videos by date, hour, minute, and second using the timeline option buttons.
Year selection
Timeline for min
selection
Month selection Timeline for sec
selection

36 BLACKVUE
Zoom options
yFull-screen view: Double click on the video image to enter full-screen view. Double click again or tap ESC to return to the default view.
yZoom to 100%: Right-click on the video image to view at 100% zoom. Click and drag to move the video image around.
Windows Mac
Viewing the G-Sensor graph
You can check the impact sensitivity (G-Sensor) information in the main window.

DR650S-2CH 37
Checking the GPS data
You can check the GPS data of the recorded video in the BlackVue Viewer while video is playing back.
MyWay Viewer
Map Type Selection
Car Location
Switch Speed Unit
Map Zoom-in/out
GPS tracking
You can check the vehicle's speed and the location of the recorded video in BlackVue Viewer while a video is playing back (GPS tracking).
1
Double click a le in the le list to play.
2Click the tab.Map

38 BLACKVUE
GPS tracking – Advanced mode
Combine 4 consecutive videos and GPS data to build a driving route and see your car's speed and location as well as any event recorded,
while watching the video footage at any point of the route.
1
Double click a le in the le list to play.
2Click the button.
Switch Speed Unit
Car Location
Map Type Selection
Red line indicates event recording
Driving Route
Latitude & Longitude
Red icon indicates the
starting point of the
playing back le
Car Location

DR650S-2CH 39
Managing videos
You can manage the recorded videos through the BlackVue Viewer program. You can also format the microSD card and upgrade the
rmware.
Note
yIf the microSD card is full, by default the dashcam will record over the oldest videos rst.
Capturing or printing a still image from video
1
Double click a le in the le list to play.
2Click the button to pause the video.
3Select the
G
button to capture the image or the button to print directly.

40 BLACKVUE
Deleting videos
For Windows users
1
Select the video from the recorded video list.
2Right-click the video.
3Click Delete.
For Mac users
1
Go to \BlackVue\Record\.
2Select the video from the recorded video list.
3Click Move to Trash.

DR650S-2CH 41
Exporting videos
For Windows users
1
Select the video from the recorded video list.
2Right-click the video.
3
Click Export.
4Enter a le name and the start and end points (min:sec) of the segment you want to export. To export without audio select “Sound
O ”.
5Click the button.OK
6Select the folder in which to save the le and enter the le name.
7Click the button.Save

42 BLACKVUE
For Mac users
1
Go to \BlackVue\Record\.
2Select the video from the recorded video list.
3Click Copy "le name".

DR650S-2CH 43
Verifying videos
The following function is only available in BlackVue Viewer for Windows.
1
Select the video from the recorded video list.
2Right-click the video.
3
Click Verication.
4Click the button.OK

44 BLACKVUE
Tips for optimal performance
Formatting the microSD card
Format the microSD card once a month, or when the BlackVue dashcam tells you the card needs maintenance.
Format the microSD card using the dashcam's self-format function or BlackVue Viewer (Windows or Mac).
Format using the dashcam’s self-format function
To format the microSD card press the Wi-Fi/Format button on the side of the dashcam for 10 seconds until the dashcam beeps.

DR650S-2CH 45
Format using Windows Viewer
1
Download BlackVue Viewer from www.blackvue.com > Support > Downloads and install the program on your computer.
2Insert the microSD card into the microSD card reader.
3Connect the microSD card reader to your computer.
4Launch the copy of BlackVue Viewer that is installed on your computer.
5Click the Format button.
6Select the microSD card drive and click .OK

46 BLACKVUE
Format using Mac Viewer
1
Download BlackVue Viewer from www.blackvue.com > Support > Downloads and install the program on your computer.
2Insert the microSD card into the microSD card reader.
3Connect the microSD card reader to a Mac.
4Launch the copy of BlackVue Viewer that is installed on your computer.
5Click the Format button.
6Select the microSD card from the list of drives in the left frame.

DR650S-2CH 47
7After selecting your microSD card select the Erase tab in the main window.
8Select “MS-DOS (FAT)” from the Volume Format dropdown menu and click Erase.
Caution
yIf you format the microSD card, all the video les stored in the microSD card will be deleted.
yBack up important video les such as event recording les before formatting the microSD card. PittaSoft Co., Ltd. will not be
responsible for the loss of video les that were not backed up.
yFormatting the microSD card once a month is recommended.
yFormat the microSD card if the recorded video quality appears to be poor.
yOnly use ocial BlackVue microSD cards. Other cards may have compatibility issues.
yPittaSoft Co., Ltd. will not be held responsible for any problems caused by using another manufacturer's microSD card.

48 BLACKVUE
Upgrading the rmware
Firmware upgrades may add new features or improve performance. Keep your BlackVue dashcam updated by upgrading the rmware
to the latest version. Visit the BlackVue website (www.blackvue.com) to check for any new rmware releases for your BlackVue dashcam
model.
Upgrading the rmware using an iOS or Android device (Firmware Over The Air)
Click here for a step-by-step video tutorial, or go to the main menu and select > Help Video tutorials.
Makes sure your smartphone has a stable internet connection.
1
Open the BlackVue C app
2Tap and select Firmware download.
3Select your dashcam model and the rmware language and tap .OK
4Check the rmware version and release notes and tap to start downloading.OK
5After the download completes tap to be taken back to the home screen.OK
Make sure your BlackVue dashcam is on and nearby.

DR650S-2CH 49
6Go to your smartphone's then select Settings Wi-Fi, and make sure Wi-Fi is turned on.
7Choose your BlackVue dashcam from the network list. The dashcam's default SSID begins with its model number (e.g. DR650S-******).
8Enter the default password and tap .'blackvue' Join

50 BLACKVUE
9Open the BlackVue C app. Select BLACKVUE WI-FI > > Firmware upgrade.
10 Tap to apply the rmware upgrade.OK
11 The dashcam's rmware will be upgraded – this may take a few minutes. The dashcam needs to reboot to complete the rmware
upgrade.

DR650S-2CH 51
Upgrading the rmware using a computer (Windows or Mac)
Keep your BlackVue dashcam updated by upgrading the rmware to the latest version. Visit the BlackVue website (www.blackvue.com) to
check for any new rmware releases for your BlackVue dashcam model.
1
Insert the microSD card into the microSD card reader.
2Connect the microSD card reader to a PC.
3Launch BlackVue Viewer and click on the About button.
yFor Mac users, click and select About BlackVue from the menu.
4Check the current rmware version of your BlackVue dashcam and proceed only if your version is not the latest one.
MacWindows
5Format the microSD card. See "Formatting the microSD card" on page 44.
52 BLACKVUE
6Go to the BlackVue website (www.blackvue.com > Support > Download) and download the latest rmware for your BlackVue
dashcam model in zip format.
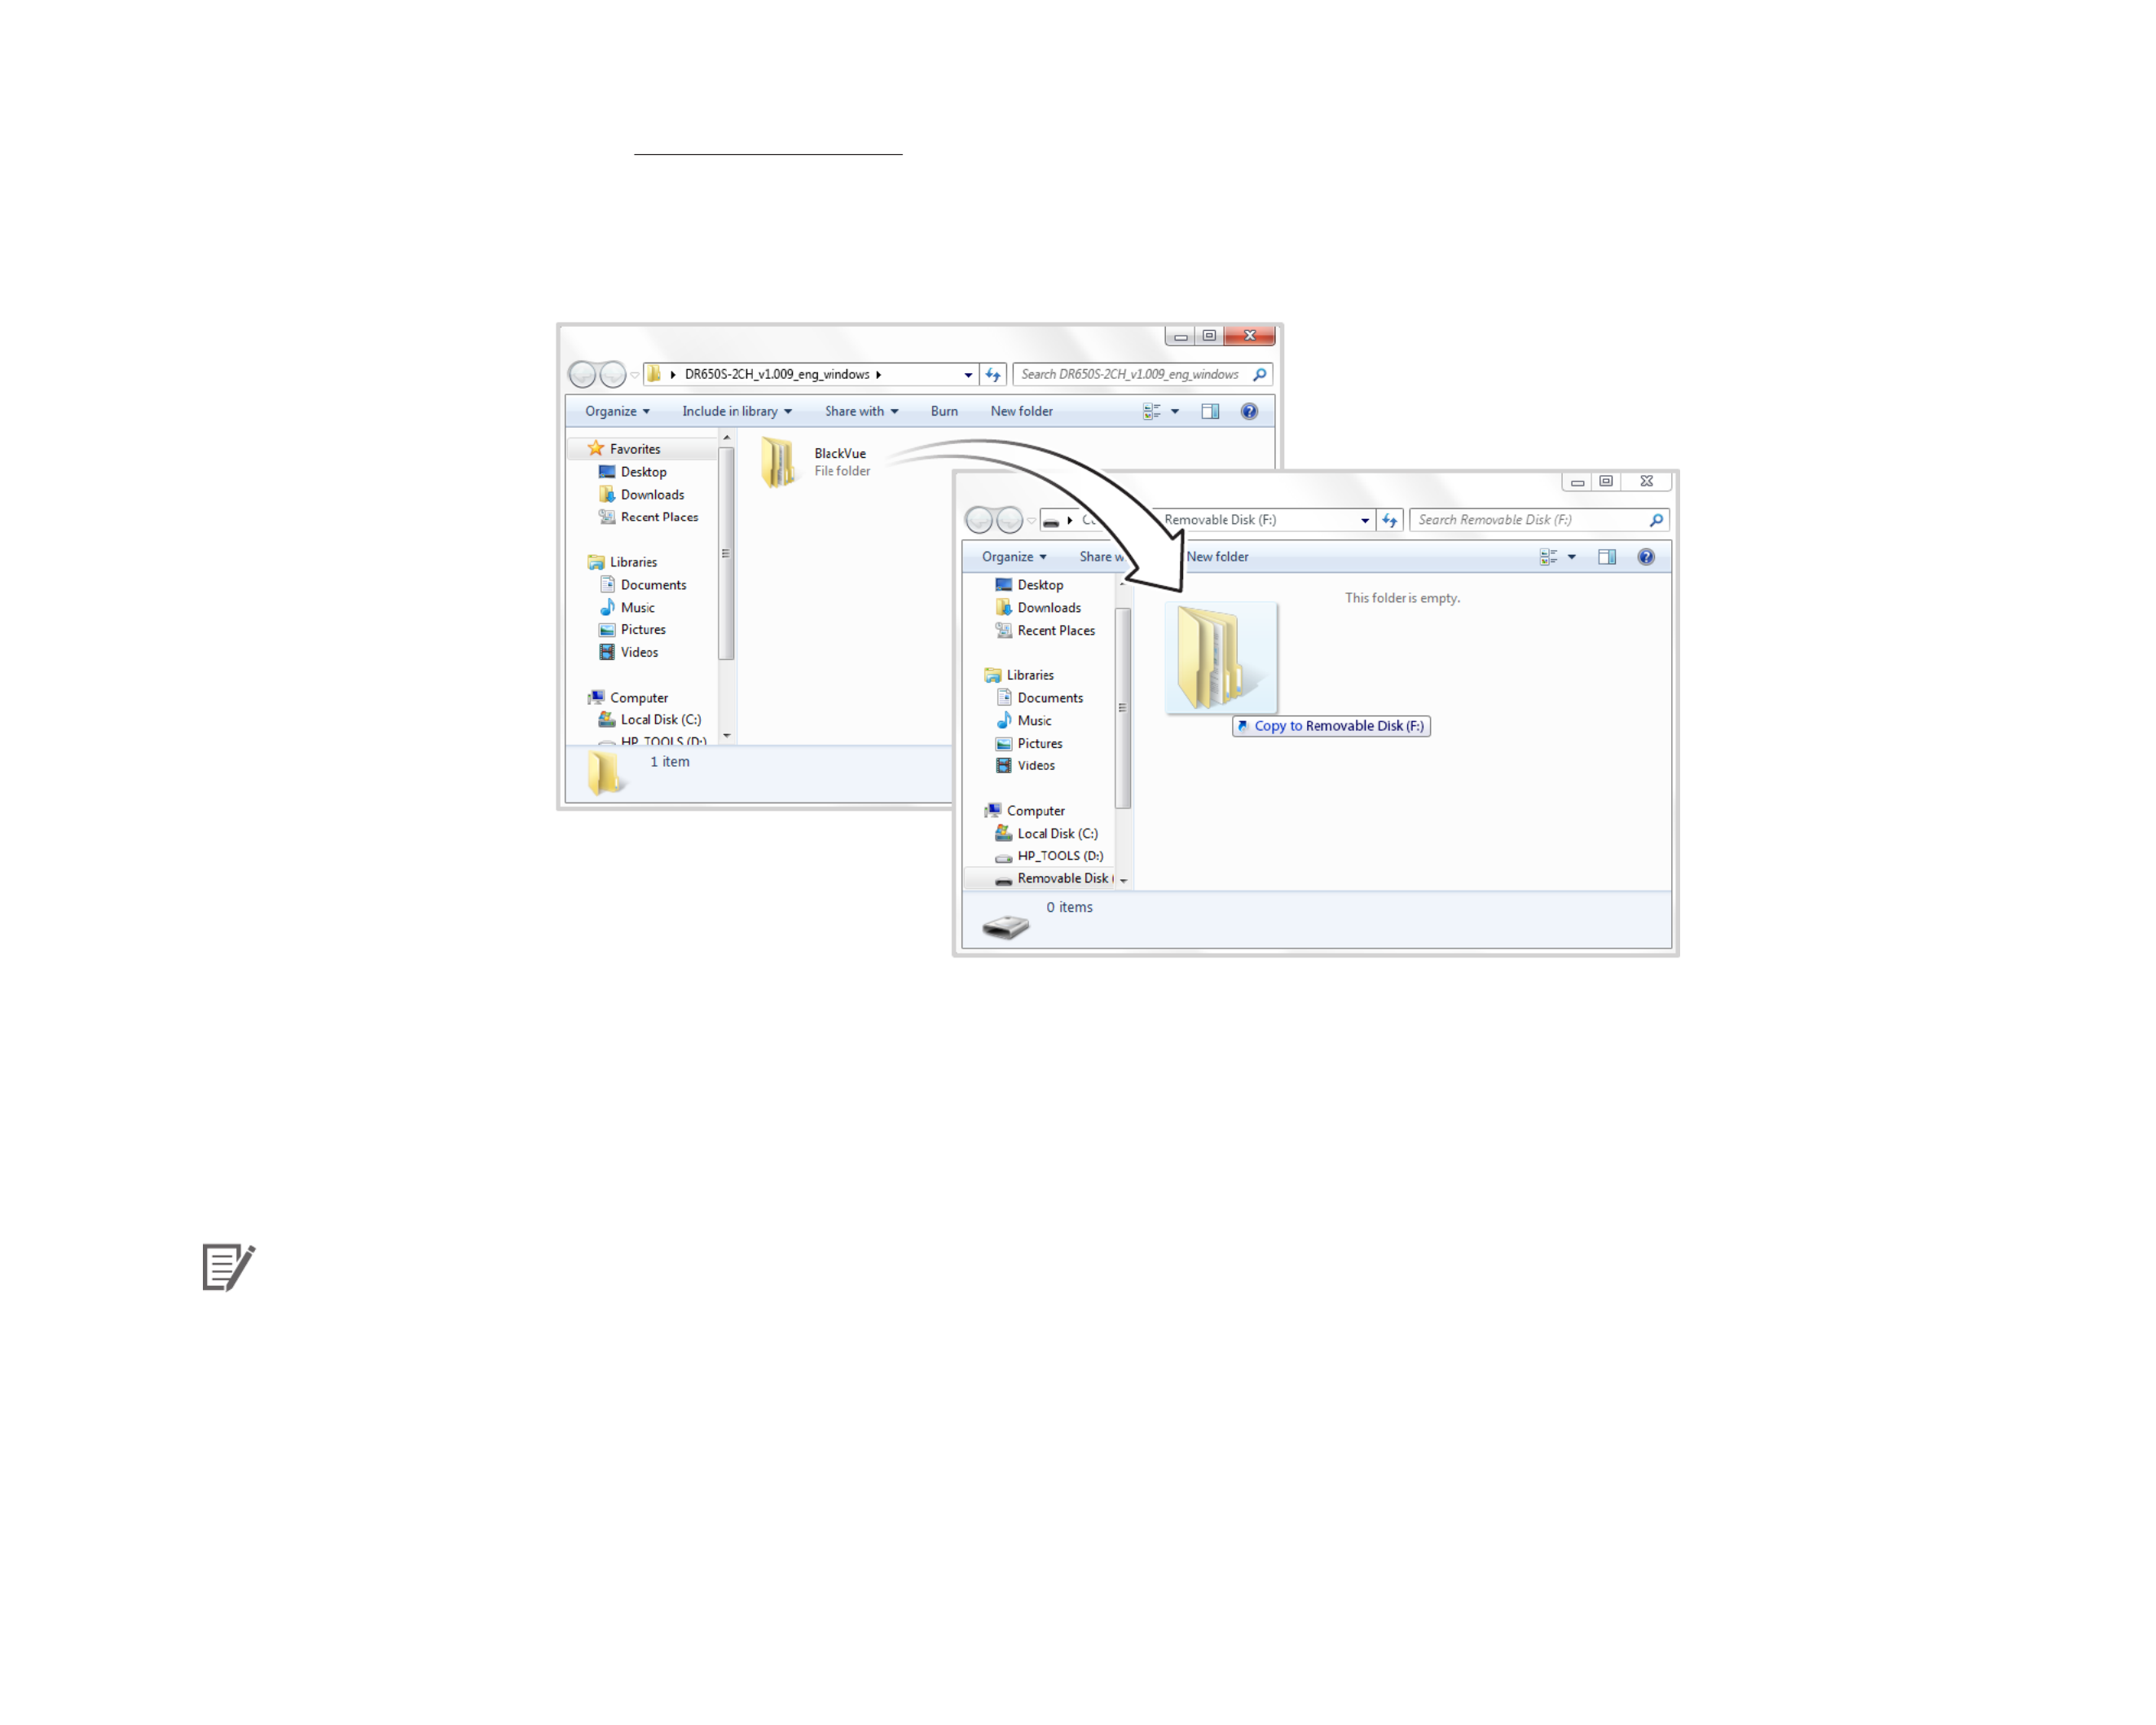
7Unzip the downloaded le and copy the BlackVue folder to the microSD card.
8Insert the microSD card into the dashcam and connect the power to initiate the rmware upgrade. Make sure the power remains
on until the upgrade is completed. Any power interruption may prevent the rmware upgrade from completing, resulting in
malfunction.
Note
yDo not insert or remove the microSD card when the dashcam is turned on. Doing so may damage the data and cause a
malfunction of the microSD card.
yAfter a rmware upgrade all settings are reset to the defaults to ensure stable operation. Please recongure your personal settings
(such as time zone, etc.).

DR650S-2CH 53
Changing settings
Changing settings using your smartphone (Android/iOS)
“Pair” your smartphone with the BlackVue dashcam via direct Wi-Fi (for details see "Opening video les" on page 18).
1
Go to your smartphone's > Settings Wi-Fi and connect to your dashcam.
2Open the BlackVue C app. Select > to access the Firmware settings menu.BLACKVUE WI-FI

54 BLACKVUE
Basic settings

DR650S-2CH 55
Time zone
Click here for a step-by-step video tutorial, or go to the main menu and select > Help Video tutorials.
The initial time zone is set to 'Pacic/Midway_Midway Islands' (GMT-11). Select your time zone in the dropdown list. If your city is not in the
list, select any other city within the same time zone.
When you change the time zone and save the setting, the dashcam it will format the microSD card and restart automatically. Please backup
any important videos that are in the microSD card before changing the time zone.

56 BLACKVUE
Video settings
Resolution
Select the resolution and frame rate. For example, "FHD@30 + HD@30" means the front camera records Full HD video at 30 frames per
second, and the rear camera records HD video at 30 frames per second.
Image quality
You can adjust the recording image quality (bit rate). Choose between:
yHighest (Front: 10 Mbit/s, Rear: 5 Mbit/s)
yHigh (Front: 8 Mbit/s, Rear: 4 Mbit/s)
yNormal (Front: 6 Mbit/s, Rear: 3 Mbit/s)
These are the maximum bit rates when the resolution is set to "FHD@30 + HD@30". If you lower the resolution and frame rate setting, the
actual bit rates will be lower.
Increasing the image quality will increase the size of the video les. Loading and copying time will increase accordingly.
Brightness
You can adjust the recording brightness level.
DR650S-2CH 57
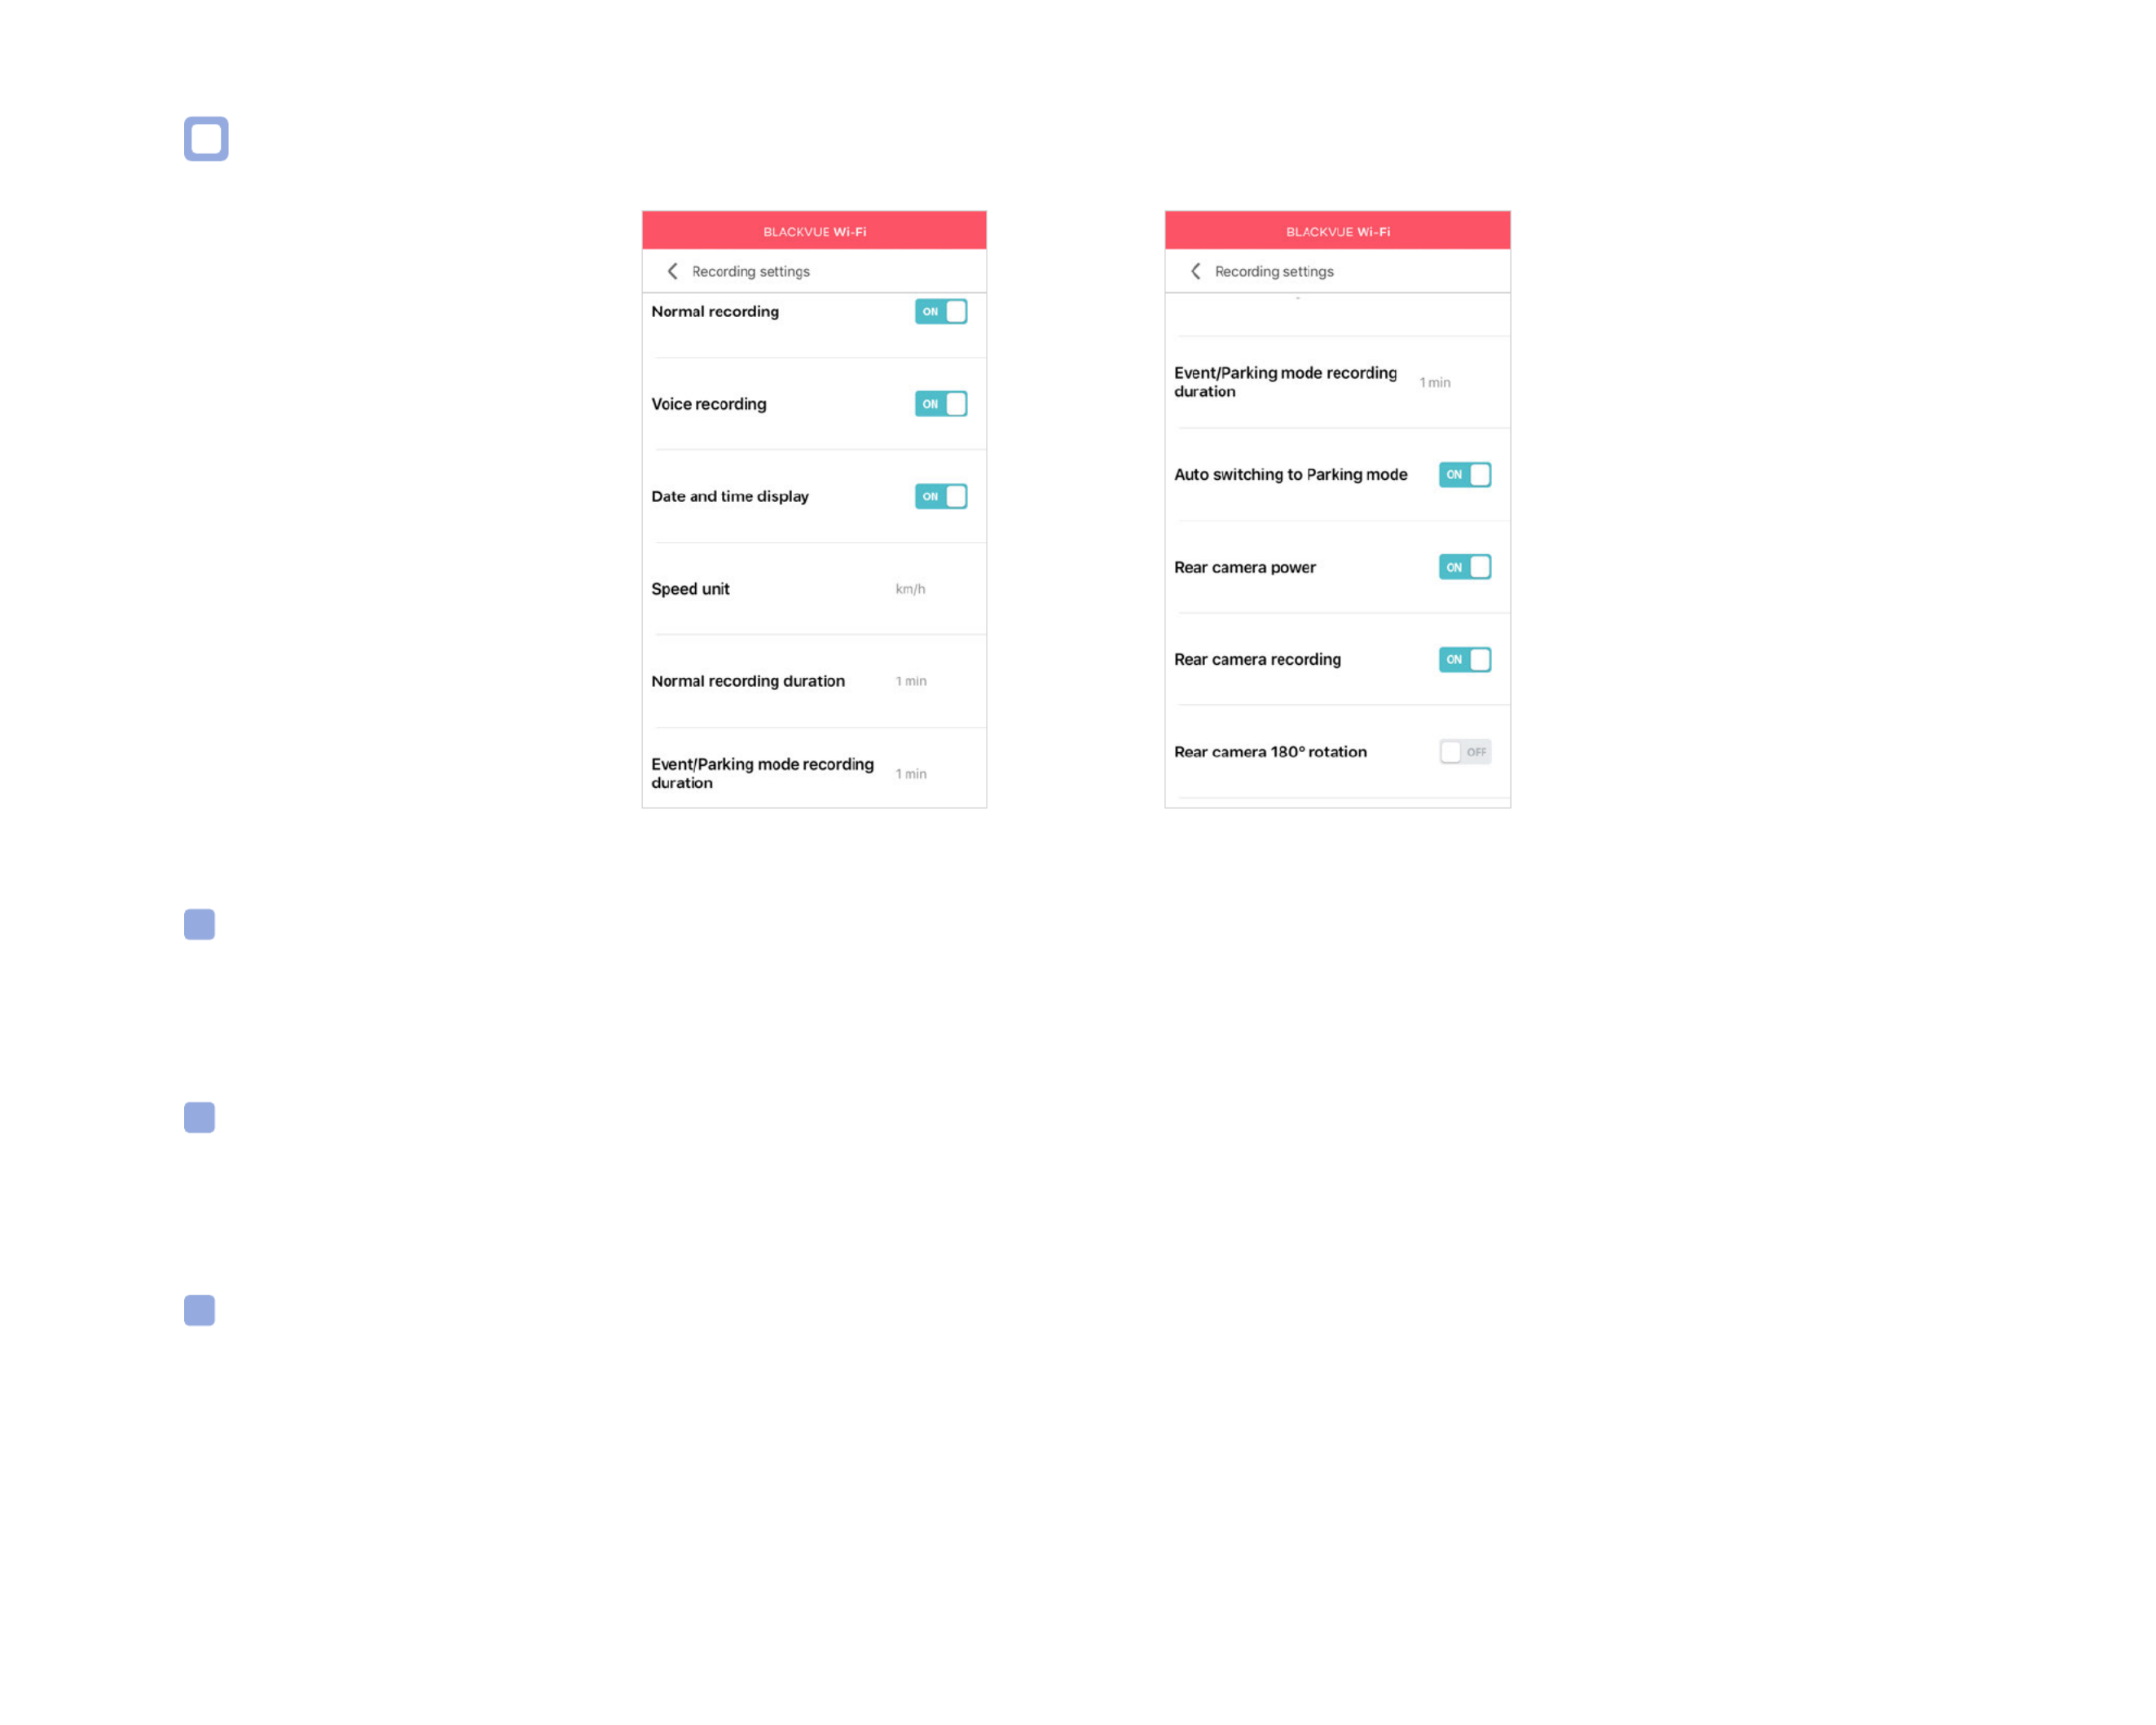
Recording settings
Normal recording
When turned o the dashcam does not record in normal mode.
Voice recording
When turned o the dashcam does not record audio.
Date and time display
Turn on/o the date and time display on videos.

58 BLACKVUE
Speed unit
Select km/h, MPH, or turn o.
Normal recording duration
Choose between 1,2 or 3 minute video les.
Event/Parking mode recording duration
Choose between 1,2 or 3 minute video les.
Auto switching to parking mode
If enabled, the dashcam switches from normal mode to parking mode when the vehicle is stationary for 5 minutes.
Rear camera power
You can turn o power to the rear camera.
Rear camera recording
You can enable or disable rear camera recording.
Rear camera 180° rotation
If you installed the rear camera in a ipped position, use this setting to rotate the rear camera image.

DR650S-2CH 59
Sensitivity settings
Termékspecifikációk
| Márka: | BlackVue |
| Kategória: | Dashcam |
| Modell: | DR650S-1CH |
Szüksége van segítségre?
Ha segítségre van szüksége BlackVue DR650S-1CH, tegyen fel kérdést alább, és más felhasználók válaszolnak Önnek
Útmutatók Dashcam BlackVue

3 Szeptember 2024
23 Augusztus 2024
23 Augusztus 2024
23 Augusztus 2024
23 Augusztus 2024
16 Augusztus 2024
15 Augusztus 2024
14 Augusztus 2024
14 Augusztus 2024
13 Augusztus 2024
Útmutatók Dashcam
- Dashcam Dometic
- Dashcam Nedis
- Dashcam Philips
- Dashcam Pioneer
- Dashcam Garmin
- Dashcam JVC
- Dashcam AEG
- Dashcam Toyota
- Dashcam Evolveo
- Dashcam HP
- Dashcam Motorola
- Dashcam Boss
- Dashcam Technaxx
- Dashcam Hikvision
- Dashcam Kenwood
- Dashcam Asus
- Dashcam Rollei
- Dashcam Hama
- Dashcam Midland
- Dashcam Lamax
- Dashcam Navitel
- Dashcam Sencor
- Dashcam TrueCam
- Dashcam Xblitz
- Dashcam Ring
- Dashcam Alpine
- Dashcam Cobra
- Dashcam Nextbase
- Dashcam Scosche
- Dashcam Denver
- Dashcam Trevi
- Dashcam EchoMaster
- Dashcam Gembird
- Dashcam Niceboy
- Dashcam Osram
- Dashcam ModeCom
- Dashcam ADATA
- Dashcam Overmax
- Dashcam Mini
- Dashcam Kogan
- Dashcam Prestigio
- Dashcam Clarion
- Dashcam Media-Tech
- Dashcam AZDome
- Dashcam Metra
- Dashcam ION
- Dashcam Blaupunkt
- Dashcam Mio
- Dashcam DOD
- Dashcam Pro-User
- Dashcam Konig
- Dashcam Jensen
- Dashcam Pyle
- Dashcam Salora
- Dashcam CRUX
- Dashcam Uniden
- Dashcam Hertz
- Dashcam Thinkware
- Dashcam IRoad
- Dashcam Trebs
- Dashcam Genius
- Dashcam Valueline
- Dashcam Swann
- Dashcam Caliber
- Dashcam Brigmton
- Dashcam Maginon
- Dashcam Ednet
- Dashcam Steren
- Dashcam Audiovox
- Dashcam Transcend
- Dashcam Laser
- Dashcam Naxa
- Dashcam Waeco
- Dashcam Nikkei
- Dashcam Tracer
- Dashcam Minolta
- Dashcam Navman
- Dashcam Veho
- Dashcam Boyo
- Dashcam Dymond
- Dashcam Jobo
- Dashcam NAV-TV
- Dashcam Cowon
- Dashcam Guardo
- Dashcam Eufab
- Dashcam Roadeyes
- Dashcam Kaiser Baas
- Dashcam Ferguson
- Dashcam Braun Phototechnik
- Dashcam Escort
- Dashcam Nordval
- Dashcam Innovv
- Dashcam Carmera
- Dashcam Skytronic
- Dashcam Lidl
- Dashcam VIOFO
- Dashcam CamOne
- Dashcam Mobileye
- Dashcam Blow
- Dashcam Kapture
- Dashcam ProUser
- Dashcam Nanocam+
- Dashcam Vicovation
- Dashcam Dashmate
- Dashcam Andatech
- Dashcam Rexing
- Dashcam RIPOON
Legújabb útmutatók Dashcam
14 Január 2025
14 Január 2025
14 Január 2025

13 Január 2025
11 Január 2025
11 Január 2025

11 Január 2025
11 Január 2025
7 Január 2025
7 Január 2025