Használati útmutató BeamZ Pangolin Quickshow
BeamZ
Megkönnyebbülés
Pangolin Quickshow
Olvassa el alább 📖 a magyar nyelvű használati útmutatót BeamZ Pangolin Quickshow (110 oldal) a Megkönnyebbülés kategóriában. Ezt az útmutatót 3 ember találta hasznosnak és 2 felhasználó értékelte átlagosan 4.5 csillagra
Oldal 1/110

Lasershow
Designer
QuickShow
And
FB3-QS
User Manual

Intellectual Property notice and credits
QuickShow is copyright © 2008-2010, Pangolin Laser Systems, Inc. All rights reserved.
QuickShow User Interface Patent Pending.
QuickShow was written by Alexey Sinitsyn, Valery Furmanov and William R. Benner, Jr.,
with development assistance and testing by Derek Garbos.
Due to our policy of continuous product improvement,
information in this manual is subject to change without notice.

Contents
Introduction 5
In this package 5
DVD-ROM contents 5
Functions 6
Software and Hardware Installation 7
Installing the QuickShow software 7
USB driver installation 7
QuickShow 9
Introduction 9
System Recommendations 9
Quick Setup 10
Settings menu 14
Projector Settings 16
QuickTargets Beam Settings 20
Projection Zones 21
DMX Settings 30
User-interface Access Mode 34
Main Control Window 36
Toolbar 36
Cue triggering mode 37
Transition between cues 37
Playing only one cue at a time, or multiple cues 38
Beat synchronization system 38
Virtual Laser Jockey button 38
Blackout and Pause 38
Enabling laser output 39
Cue Grid 39
Keyboard access 40
Page tabs 40
Categories 41
Types of cues 41
Creating new content or editing existing content within a cue 42
Previewing contents of each Cue 42
Laser Preview Window 42
Controlling cues during playback 44
Live Performance tools 44
Cue editing tools 45
Virtual Laser Jockey 46
Live Control tab overview 49
Live Control tab -- Size controls 51

Live Control tab - Position and Rotation controls 52
Keyboard Equivalent for Invert Rotation Speed 52
Live Control tab - Color controls 53
Live Control tab -- Playback controls 53
QuickTools overview 54
QuickText 56
QuickShape 58
QuickTrace 60
QuickTargets (Beam Sequencing) 62
QuickDMX 64
QuickTimeline 67
QuickCapture 68
QuickFX 69
Advanced Tools overview 70
Cue properties 71
Laser Frame/Animation editor 74
Advanced Text editor 87
Advanced Shape (abstract) editor 88
Advanced Clock editor 89
Effect Editor 90
Music and Beats overview 94
Controlling multiple lasers 95
Pointing to a cue location 98
Keyboard Equivalents 99
Files and File Extensions 100
Virtual MIDI Keyboard 102
MIDI Settings 103
ILDA output assignment 107
LED light codes 109
RoHS Certificate of Compliance 110

Introduction
The Flashback 3 product line, often abbreviated FB3, is the smallest, easiest and most economical way
to add high-quality graphics and beams to a stand-alone laser projector. In fact, the Flashback 3 is so
impressive, that it won the ILDA Hardware Product Of The Year Award in 2006.
This credit-card sized wonder can play laser graphics, beams and even complete Pangolin-quality
shows. The tiny Flashback 3 has everything you need to control your laser projector.
In this package
Included in this package you will find a DVD-ROM, the FB3-QS, USB cable, and a quick start guide
DVD-ROM contents
The DVD-ROM included with this package includes:
Lasershow Designer QuickShow program
Workspace file
USB drivers for FB3-QS
Tutorial videos
5

Functions
Lasershow Designer QuickShow – a PC application for full control of FB3-QS, allows:
Trigger cues by clicking on buttons with the mouse
Create and edit the frames and animations on line (real time editing)
Live control of many effects parameters during cue playback
Live total control of the FB3-QS
The FB3-QS hardware contains the following basic functions:
USB power supply
12-bit X and Y outputs with differential voltage level of +/-5V
8-bit Red, Green, Blue and Intensity outputs with single-ended voltage level of 0 to +5V
TTL-level Shutter signal
High speed connection between FB3-QS and PC (480 Mb/s)
6

Software and Hardware
Installation
To use the FB3-QS, you will need to install QuickShow software first, and then, while the DVD ROM is
still inside the drive, connect the supplied USB cable to one USB port available on your computer.
QuickShow requires Windows XP, Vista or 7.
You will also need to connect the DB25 to a projector. The DB25 connector is configured as a QM2000/
ILDA-compatible connector, complete with differential outputs for X and Y.
Installing the QuickShow software
The QuickShow software installation should begin installation when the DVD is inserted. To manually
install the QuickShow software application, simply copy the QS folder from the DVD ROM to your
computer or run the setup.exe application.
USB driver installation
When you connect the FB3-QS to USB port of your computer, the ‘New Hardware’ wizard should
appear. You should use automatic install procedure. Instead, you should point the wizard to the USB not
driver directory on the DVD-ROM. On Windows 7 you may need to go to the Device Manager, select
the Flashback3 and Update Driver by pointing it to the DVD.

8

QuickShow
Introduction
QuickShow was designed to be an easy-to-use program for anyone wanting to control lasers -- including
beginners who have never used a laser before, as well as to the most experienced laser operators.
Although ease-of-use was the guiding principal behind QuickShow, it is still quite powerful since it is
based on Pangolin's new BEYOND calculation engine and it has many advanced features not found in
any other product.
Designed by laserists for laserists
During the development of QuickShow, we consulted with laserists of all kinds, including everyone
from hobbyists playing shows in their garages, all the way up to top-level Laser DJs, including Glenn
Turner of Oracle Projects and Derek Garbos of Garbos Consulting. Derek contributed hundreds of
suggestions and he also created the demonstration workspace that comes with QuickShow.
More help available on the Laserchat forum
Although we intended QuickShow to be a program friendly enough for beginners to use, QuickShow is
also a very deep program. It is not likely that you will ever exhaust the power and capabilities of
QuickShow, no matter what your application. As such, we encourage users to check out the Pangolin
Laserchat forum, which has many topics intended to help people gain a greater understanding of
QuickShow as well as other Pangolin-related products. The Laserchat forum can be found on the
Pangolin web site at www.pangolin.com.
System Recommendations
Dual-core processor is recommended
Unlike most of Pangolin's past developments, QuickShow uses the PC to do all of the laser calculations
and processing, while output boards such as the FB3 are used only for color conversion and final laser
output. Because of this, we recommend you use a dual-core processor (Intel Centrino Duo or Core 2
Duo or equivalent AMD) for best results.
Monitor resolution of 1024 by 768 or higher is recommended
QuickShow was designed to work with a single monitor with a resolution of 1024 by 768 or higher.
QuickShow will work with a lower resolution, but some of the features on the lower portion of the
screen will be unavailable.
9

Quick Setup
The very first time you run QuickShow, the Quick Setup wizard will greet you.
(Quick Setup can also be accessed at any time in the Help menu.)
The purpose of the QuickSetup wizard is to help you to configure the most important parts of
QuickShow to your needs and the needs of your projector.
Step 1: Specify a user level
The first step in the process is to familiarize QuickShow with the type of user you are. When choosing a
user level, you should be as honest as possible, since QuickShow will tailor the features you see based
on your user level. If you are a beginner and you tell QuickShow that you are an advanced user, you
might get confused by the advanced tools seen at the Advanced level.
10

Step 2: Indicate the type of scanners you have
The second step in the process is to familiarize QuickShow with the type of scanners you have.
THIS IS VERY IMPORTANT! If you have low performance scanners and you tell QuickShow that
you really have high performance scanners, QuickShow may drive the scanners too hard, which may
cause excessive wear or heat. So when indicating the type of scanners you have, be as careful as
possible. The high performance setting is only for American-made scanners, as well as the most
expensive German and Chinese scanners.
Step 3: Indicate the number of lasers in your projector
The third step in the process is to familiarize QuickShow with the number of lasers in your projector.
This is important because if you only have a single-color laser and you tell QuickShow that you really
have an RGB laser, then certain colors will not be seen in the projected imagery. Note that QuickShow is
asking how many LASERS you have, not how many colors your projector can make (for example, a
two-laser projector can make at least three colors).
11

Step 4: Indicate the type of color system used by your projector
The fourth and final step in the process is to familiarize QuickShow with the type of color system used
by your projector. The lasers within a projector may have either TTL-modulated lasers, or Analog-
modulated lasers. Generally less expensive and lower power laser projectors have TTL lasers, while
more expensive and higher-power projectors use Analog-modulated lasers. You should review the
specifications on your laser projector and make the right choice below, because if you make the wrong
choice, QuickShow won't be able to project the maximum number of colors that your projector is
capable of producing.
12
Setup the projector settings and targeted beam positions next
Although QuickShow can make the most important adjustments to the user interface and projector setup
based on the selections that you made above, it is important to use the Projector Settings window to
fine-tune QuickShow's output to your projector. Once that part is finished, it is important to setup the
targeted beam positions after that.
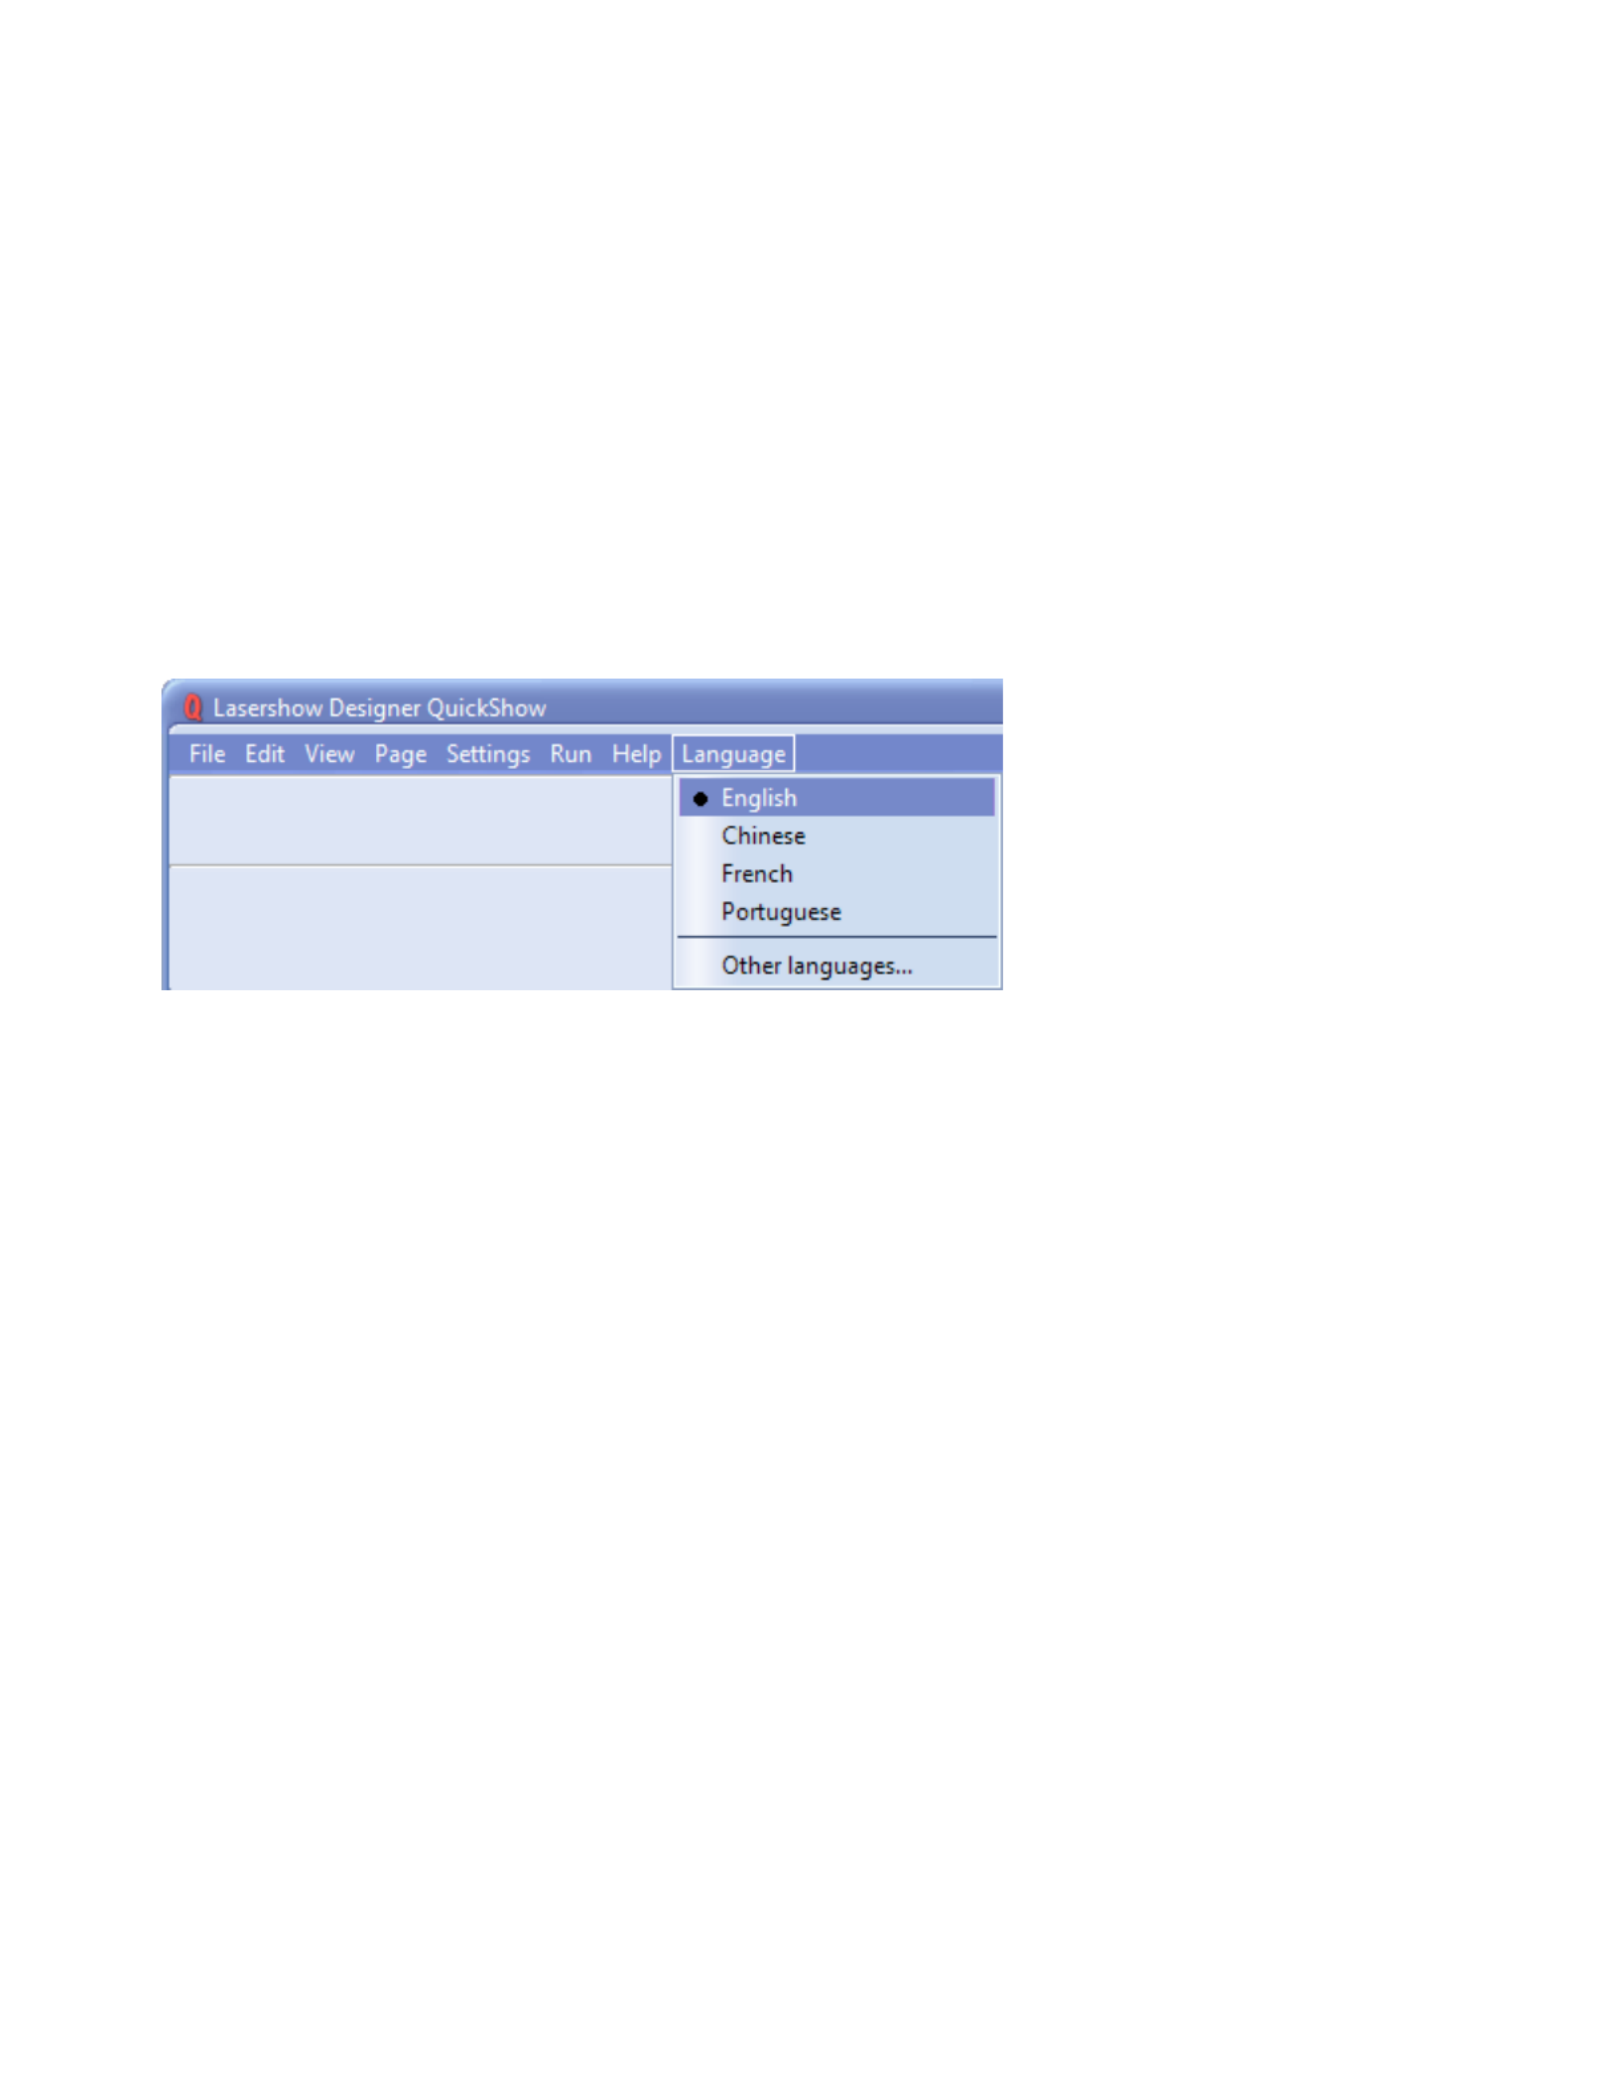
Selecting your language
QuickShow currently supports the ability to show the user interface in English, Chinese, French, Dutch,
German and Portuguese languages. This is selected with the Language menu, located on the far right
side of the menu strip, as shown below.
QuickShow can also easily support other languages as well. If you are interested in using QuickShow in
a language that is not shown above, please contact Pangolin to discuss how this can be accomplished.
13

Settings menu
The Settings menu provides access to windows that help to configure QuickShow to suit your projector
and to setup targeted beam positions. Other settings menus allow access to more advanced features and
options. You can see the menu below, along with text highlighting the most important two menu items.
Quick Setup
Choosing this menu will display the dialog box, which allows you to quickly specify the Quick Setup
type of user interface you want, and also allows you to specify some of the most basic projector
parameters.
Projector Settings
The most important item in this menu is Projector Settings. This accesses the Projector Settings
window, which will help to configure QuickShow for your type of projector. Available settings include
size, position, scan rate, color shift, number of colors and color levels.
Targeted Beam Settings
If you will be targeting mirrors, mirror balls or diffraction gratings, another important item in this
menu is QuickTargets Beam Settings. This accesses a window that allows you to setup the target beam
positions from your scanners. For example, you can make it so that your scanners will target mirrors,
mirror balls or diffraction grating effects.
If you wont be targeting mirrors, mirror balls or diffraction gratings, or if your primary interest is
in doing graphics, you can safely ignore this part of the program.
14

Projection Zones
Another important item in this menu is Projection Zones. This allows you to perform Geometric
Correction for off-axis projection as well as setup multiple projection areas from a single projector or
multiple projectors. is generally an advanced menu and we would not recommend that Projection Zones
beginners or intermediate-level users make adjustments to Projection Zones without learning more about
lasers first.
DMX Settings
The menu allows you to setup DMX-512 for input or output. Use this if you want to DMX Settings
control QuickShow using an external DMX lighting console, or if you want to control external lighting
devices or fog machines using DMX-512.
User interface Access Mode
The User-interface Access Mode allows you to control which menus, buttons, and other features will be
available if the program is placed in User mode.
Other menus
There are also other, more advanced menu items which are not currently described in this help file.
Advanced users who are familiar with laser software will certainly recognize these menus and how they
work. If you need additional information or help using these menus, please contact Pangolin.
15

Projector Settings
The Projector Settings window allows you to configure QuickShow for your of projector. Available
settings include size, position, scan rate, color shift, number of colors and color levels. The first page of
the Projector Settings window is shown and described in the picture below.
Setting the Master size and position, and extra options
Within the Master size and position tab shown above, the most important thing to do is to show a test
pattern, and then adjust the size and position tool to fit the projected output to your projection screen (or
area), and also the , Invert X Invert Y Swap XY and check boxes. We have noticed that some projector
manufacturers require one or more of these check boxes to be checked in order for the "TOP" to look
properly.
16

Setting the Scan rate
Another important part of the Projector Settings window is the tab, as shown below. Scan rate
Setting up the colors
The Color Settings tab is shown below. Be sure to indicate the number and type of lasers in your
projector, and the color modulation scheme (color system type) to use for your projector.
17

Using the ILDA Test Pattern to set the Default Scan rate
The ILDA tuning standard dictates that your scanners can show the ILDA Test Pattern in a specific way
(circle touching the sides of the square), when the ILDA Test Pattern is displayed at the correct scan
speed (points per second):
Scanning too slow:
Circle outside of square
Scanning correctly:
Circle touches midpoint of
square
Scanning too fast:
Circle can't touch square
As you are projecting the ILDA test Pattern, look very carefully at the central section of the test pattern.
18

Adjust the slider in the Default Scan rate Projector Settings window so that the circle is just touching
the sides of the square. Note that sometimes the circle may touch only the sides but may be over on the
top and bottom, or vice versa. Just adjust the slider for the best overall appearance of circle touching the
square.
Using the ILDA Test Pattern to set the Color/Blanking shift
Just below the purple Y in the ILDA Test Pattern, there is a set of long horizontal lines around short
vertical lines. The ILDA tuning standard dictates that the horizontal lines should be approximately
centered around the vertical lines.
Color shift too low:
Horizontal lines
shifted too far left
Color shift correct:
Horizontal lines
approximately centered
Color shift too high:
Horizontal lines
shifted too far right
As you are projecting the ILDA test Pattern, look very carefully at the horizontal lines below the letter Y.
Adjust the slider in the Color/Blanking shift Projector Settings window so that the horizontal lines are
approximately centered around the vertical lines. Since the is a somewhat coarse Color/Blanking shift
adjustment, it may not be possible to get the horizontal lines perfectly centered around the vertical lines.
It is acceptable that the top set of horizontal lines be shifted slightly to the right -- lining up under the
letter Y.
Better scanners provide better results
Although QuickShow will work with any scanners and scan speed, QuickShow provides the best results
with 30K or faster scanners that are tuned perfectly. Please make sure that the low frequency damping
and high frequency damping are adjusted properly for "critical damping."
19

QuickTargets Beam Settings
(recommended only for users who target mirrors, mirror balls and diffraction gratings)
The QuickTargets Beam Settings window allows you to output single beams of light from your scanners.
Normally this feature is used to target mirrors, mirror balls or diffraction grating effects. The main
features of the QuickTargets Bean Settings window are shown and described in the picture below.
QuickTargets features will not be available until you confirm that you understand how to use
them
The first time you open the QuickTargets Beam Settings window, you will see a message which
explains what QuickTargets is for, and asks that you confirm that you understand the purpose of this tool
and the associated risks. Neither the window shown above, nor the Beam Settings QuickTargets Beam
Sequencing tab will be available until you have made that confirmation.
You must also activate each beam and adjust the relative power individually
As another safety measure, each beam position will start out deactivated. To activate a beam, click on
the toolbar button at the top of the window.Activate target beam
In addition, each beam starts out at only 10% power. If you want higher power in that particular beam
position, you will need to increase the setting for that beam.Relative Power
20

Projection Zones
(only recommended for Advanced users)
QuickShow includes Pangolin's exclusive ILDA-Award-winning technology, which Projection Zones
allows QuickShow to access up to 30 separate projection areas (zones) either from a single laser
projector, or up to six laser projectors.
Projection Zones combine a scanner selection with for that particular zone, Geometric Correction
along with the Preview Window Appearance Beam Attenuation Map for that zone and a that can
control the brightness in that particular zone.
The window is shown below.Projection Zones
There are 30 projection zones which can be selected on the left side of the window. When you click on a
zone in the left side, the tabs on the right allow you to view and adjust the parameters for each projection
zone. To view and adjust the parameters, click on the , Geometric Correction Preview Window
Appearance Beam Attenuation Map Other, or tab.
21

-Projection zone name
The area toward the top of the General tab allows you to specify a Projection Zone Name. Since there
are 30 zones, you should give a descriptive name to each zone such as "Main Graphics" or "Scanner 2
Beam zone".
-Scanner (projector) Output section
The next section, labeled allows you to indicate the scanner (projector) that will be Output this zone to
used for that zone, and also to adjust the parameters for that scanner. This is how you indicate which
scanner will be used for each zone. Pressing the "Adjust scanner settings" button will display the
Projector Settings window.
-Test pattern control section
The bottom section allows you to display a test pattern if desired, and it is possible to project a test
pattern on multiple zones simultaneously in this mode. This allows you to adjust geometric correction
settings on overlapping scanners.
There are two different test patterns available for selection: a Simple test pattern and a Grid test pattern.
The simple test pattern has roughly 500 points, and the grid test pattern has roughly 1000 points. Using
the simple test pattern when you are projecting multiple test patterns from the same set of scanners will
help to reduce flicker.
In addition to the lines that make up the actual test pattern, each test pattern also has an identifying
number to help distinguish which test pattern is being projected from which zone.
-Geometric Correction section
The next section shows the Geometric Correction parameters for the selected zone, and allows you to
adjust it. The Geometric Correction settings allow you to adjust the geometric correction for each
scanner. Moreover, each scanner can actually have multiple geometric correction settings if desired
simply by directing more than one zone to the same scanner.
To adjust the geometric correction, click, on the different Correction Types and then move the sliders
that appear on the sides and top of the window, or you can click and drag the mouse in the window area.
22

-Preview Window Appearance section
The next section shows the Preview Window Appearance for the selected zone, and allows you to
adjust it. Note that it is possible to specify a Preview Window Appearance for each projection zone,
and this preview window appearance is independent of the laser output so master size, position and
geometric correction do not affect the preview window.
For each zone, the can be adjusted. Moreover, you can specify Preview image size and position
whether the preview for that zone should be normal laser graphics, or audience scanning beam effects.
If you specify that the preview should be , you get a few more options. You Audience Scanning Beams
can control the vanishing point created by the actual projector position. You an also chose whether or not
to mirror the output and the position in the preview window.
You would mirror the output and position when you are sending the output of a single FB3 to multiple
scanners at either side of a stage. When this is selected, the preview window automatically duplicates
and mirrors the output even though there is only one signal source for both scanners.
23

Note that with all of this flexibility, you can adjust the preview window for each zone to truly simulate
what the show will look like in the final venue.
-Beam Attenuation Map section
The next section shows the Beam Attenuation Map section for the selected zone, and allows you to
adjust it. The Beam Attenuation Map allows you to control the brightness of the beam over the entire
projection zone and allows non-uniform brightness maps.
24

The Beam Attenuation Map is a 64 by 64 "pixel" brightness control map. Each pixel can be set to any
brightness level from 0 to 100%. Rudimentary tools are provided to sample a brightness level in the
map, fill the entire map with the selected brightness level, fill a rectangular area with the selected
brightness level and freehand-draw brightness levels into the map.
The Beam Attenuation Map can be used for graphics, atmospheric and beam effects.
Example Beam Attenuation Map use with laser graphics
One common graphics use would be to prevent scanning above or below a certain point. For example,
lets say that you were projecting laser graphics over a standard television screen with a 4:3 aspect ratio.
Since the laser typically has a 1:1 aspect ratio, this would mean that the graphics could possibly scan
above the top or below the bottom of the screen. You can use the Beam Attenuation Map to make sure
that the brightness at the top and bottom of the screen is zero.
25

Example Beam Attenuation Map use with audience scanning
Another common use would be to reduce the brightness below the horizon to a level that would be more
pleasing for audience scanning viewers. This can easily be done by selecting a reduced brightness level,
and filling the rectangular area below the horizon.
26

Example Beam Attenuation Map use with targeted beam effects
Another common use would be to protect certain areas from hazardous laser exposure or to reduce the
brightness in certain areas. When doing beam shows outdoors, it is often necessary to ensure certain
areas (such as the windows in certain buildings) won’t be exposed. Using the rudimentary drawing tools,
it is possible to "carve out" areas from the projected area.
-Other Scanning Parameters section
The next section shows the for the selected zone, and allows you to adjust Other Scanning Parameters
them. These are advanced scanning parameters which are particularly well suited for zones used for
targeted beam effects.
When the Prevent master size and master position check box is checked, it will make it so that the
Master Size and Master Position Projector Settings controls in the window do not affect the output of
this zone.
When the check box is checked, it will make is so that the Prevent 3D settings and Showtime effects
output of this zone is not affected at all by any effect that would cause beam frames to no longer hit their
intended targets. For example, if you painstakingly adjusted the position of a beam to precisely hit a
mirror, you would not want the position of this beam to be affected in any way. The two options above
ensure that even if you mistakenly use affects that would change the position, or accidentally change the
Master Size settings, these beams will continue to hit their intended targets.
The setting in the Minimum number of points Projector Settings window can be adjusted to relieve
the scanners from trying to scan high duty-cycle images that might cause power limiting. Setting the
Minimum number of points to 200 or higher can actually increase the life of your scanners. However,
doing so will mean that if you project less than 200 points, the additional points will be blanked. For
beam frames, it is often undesirable to have any unintended blanking at all because such blanking would
tend to reduce the power of the display. When the Prevent minimum number of points check box is
27
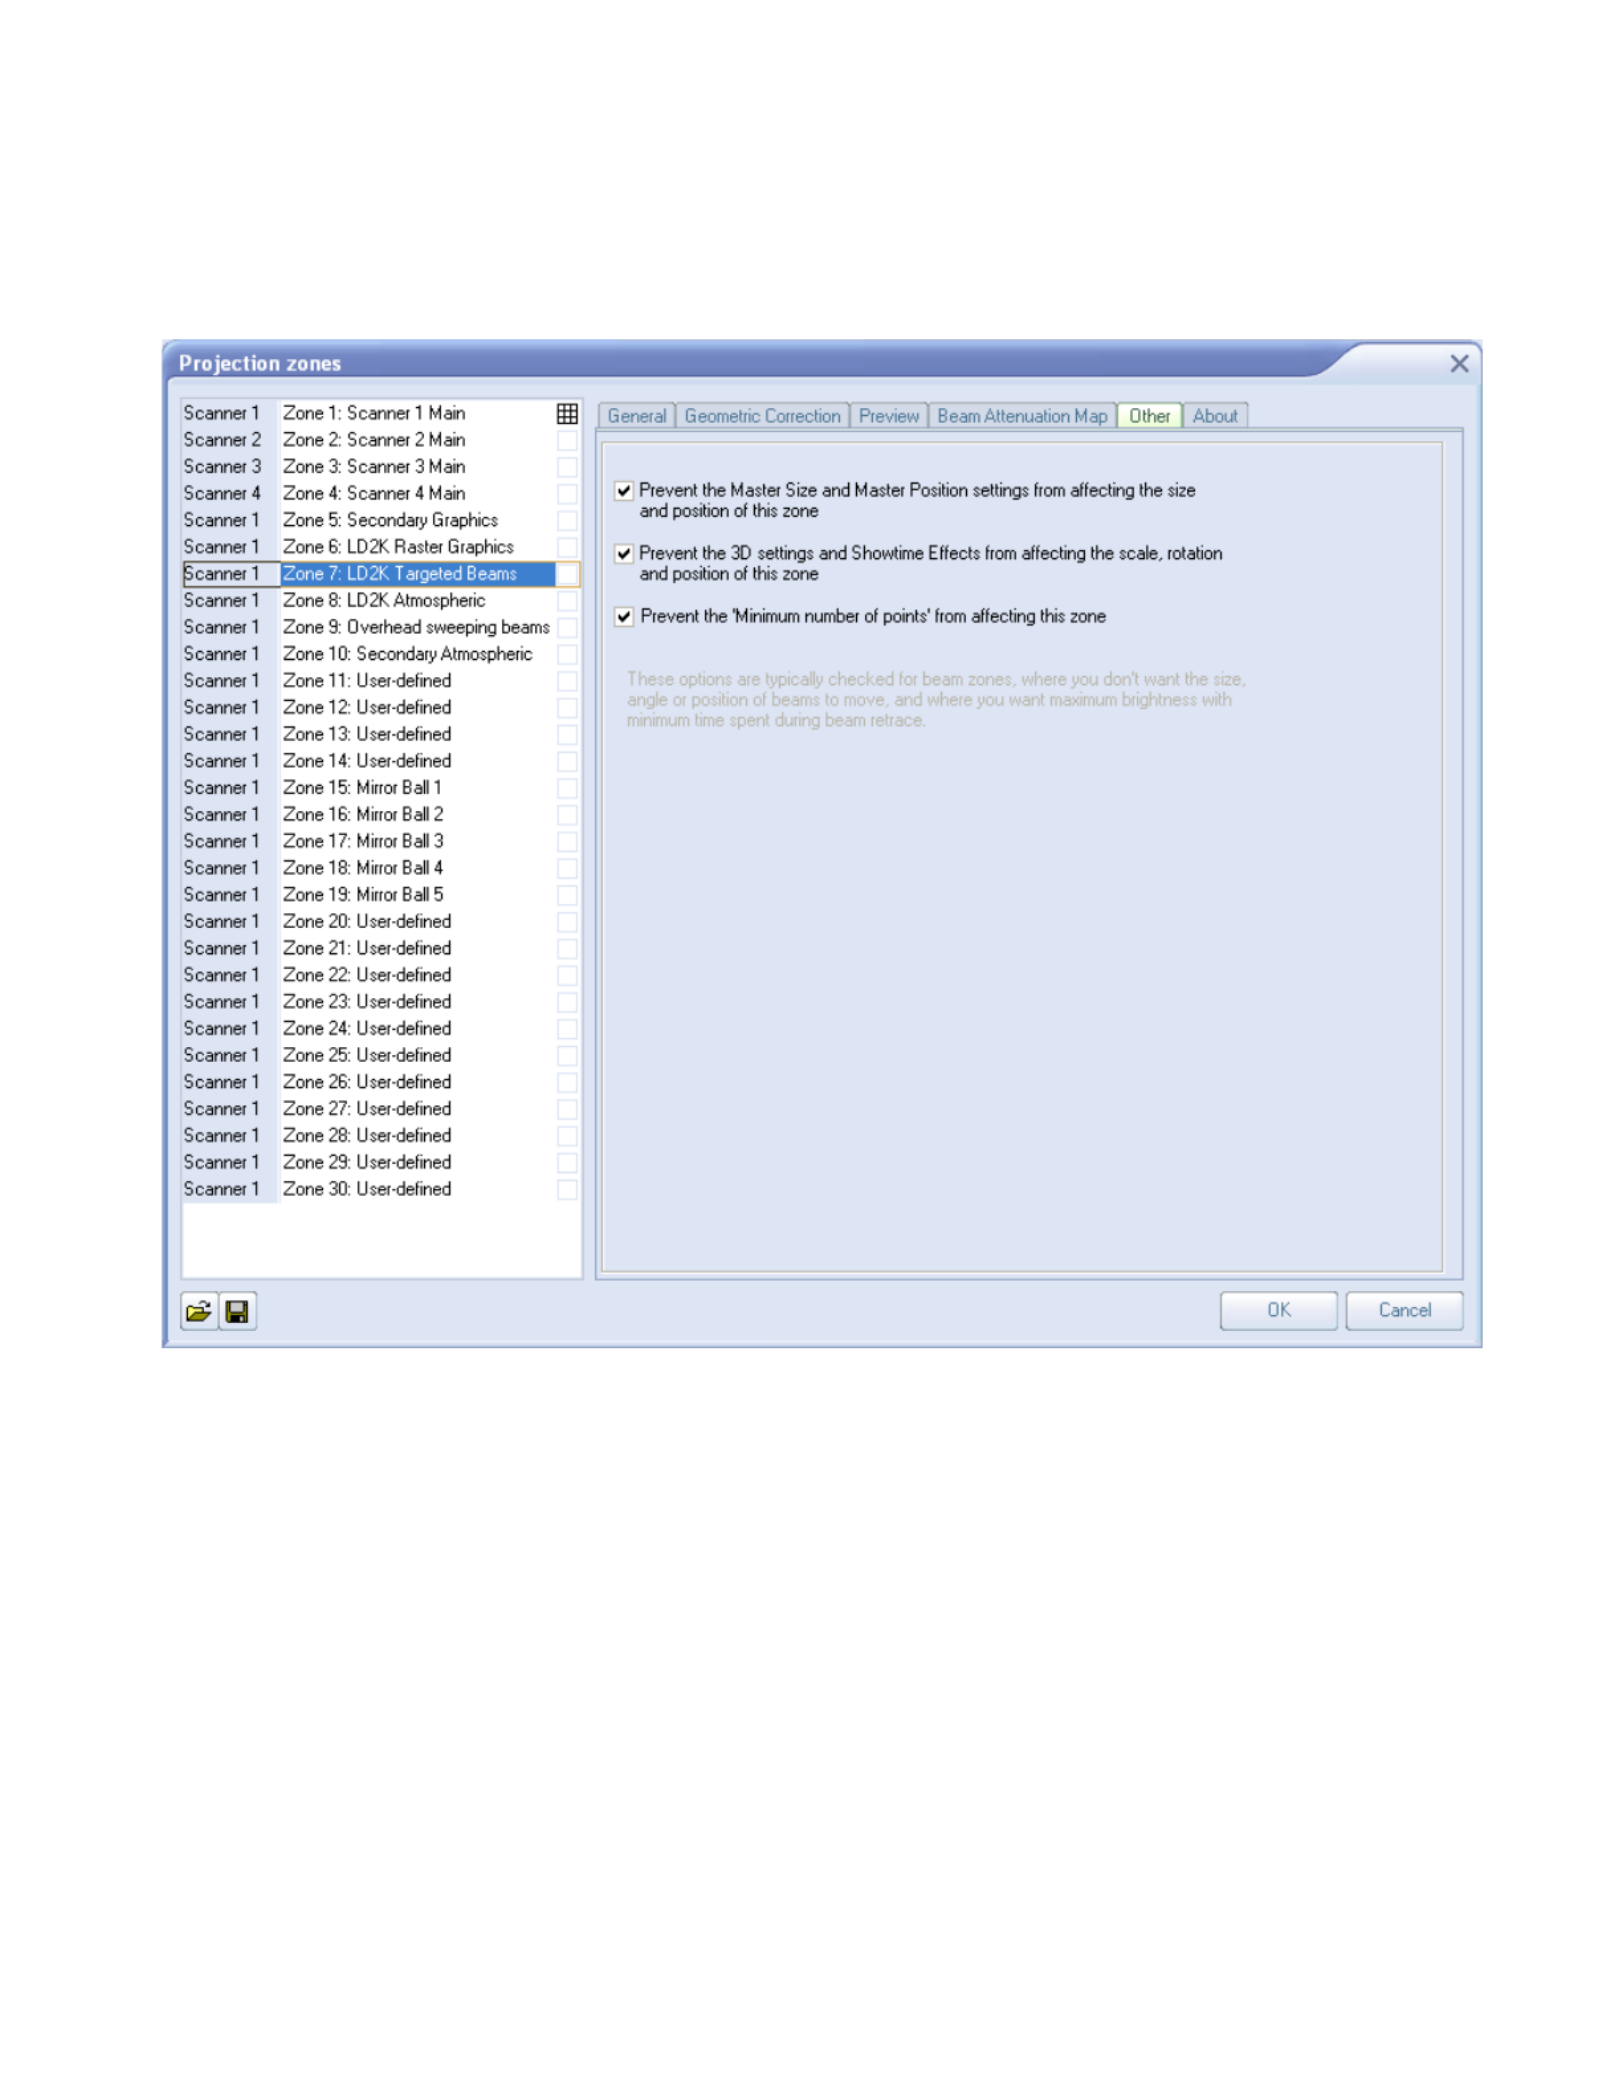
checked, all scanner output will be dedicated strictly to producing laser output and the Minimum number
of points setting is ignored.
28

Recommended use of the first eight zones
Although we do not restrict the use of zones in any way, for maximum compatibility Pangolin
recommends that the first 8 projection zones be used as follows:
Zone Scanner Name Comment
Zone 1 Scanner 1 Scanner 1 Main Used for most common output
Zone 2 Scanner 2 Scanner 2 Main Used for anything directed to scanner 2
Zone 3 Scanner 3 Scanner 3 Main Used for anything directed to scanner 3
Zone 4 Scanner 4 Scanner 4 Main Used for anything directed to scanner 4
Zone 5 Any scanner Secondary Graphics Used for a second graphics screen
Zone 6 Any scanner Raster Graphics Reduced in size used for raster graphics (retained for compatibility with
LD2000 zones)
Zone 7 Any scanner Hot Beams Used for high-intensity beams which may or may not be directed
within the audience area
Zone 8 Any scanner Atmospheric Effects Used for atmospherics and audience scanning (retained for
compatibility with LD2000 zones)
Zone 30 Any scanner
Sending cues to specific Projection zones
Projection Zones can be specified within QuickShow cues, so that when you trigger a cue, it will
automatically be sent to one or more specific zones. See the help topic about Cue Properties for more
information.
-Projection Zones are not available in Beginner mode
The Projection Zones menu and window are only visible when you have the User Level set to
Intermediate Advanced Beginner or mode. They do not appear if you are in mode.
29

DMX Settings
QuickShow may be setup to be controlled by an incoming DMX signal (DMX input), or to control
external DMX devices such as lights and fog machines (DMX output). Both of these are specified using
the DMX Settings dialog box, which is shown below.
First specify whether you want to use DMX Input or Output using the "Connection" portion of the
dialog box. After that, specify the COM port where the DMX-to-USB controller is connected.
QuickShow gives you the ability to test the connection of the USB device by pressing the Test
Connection button. If you have the proper COM port selected and the device is connected and working
properly, it should give you a message box which will show the serial number and firmware version
installed in the device as shown above.
30

DMX Input
If you want an external lighting console to be able to trigger QuickShow cues and control them live,
choose the option. You will also need to specify the Starting DMX Channel Enable DMX Input
(address) where you want QuickShow to appear within the DMX stream.
As shown above, the DMX Channel Assignment for QuickShow is exactly the same as that of the FB3-
SE DMX daughter board. This allows external controllers that are already familiar with the FB3 to
easily control QuickShow in the same way and providing the same results.
31

DMX Output
If you want to control external devices such as beam tables, LEDs, lights or fog machines, choose the
Enable DMX Output option. You will also need to specify the Number of channels that QuickShow
should transmit. The default is 24, but you can enable QuickShow to send up to 512 channels.
The DMX Output settings also has advanced controls that allow you to control the timing of the DMX
signal. Generally the default values should work well, and you would only need to make adjustments to
these settings if you suspect data corruption or incorrect DMX signal receipt.
32

DMX to USB device needed
Note that in order to use DMX for either input or output, you must first acquire a DMX to USB
converter device. Currently QuickShow supports only the DMX USB PRO controller from the company
ENTTEC. This is a very popular device which is freely available from many vendors on the internet.
Pangolin also normally carries a limited stock of these devices as well.
DMX daughter board on FB3-SE can not be used
Also note that if you have a FB3-SE with a DMX daughter board installed, this can not be used for
DMX input or output with QuickShow. The DMX daughter board on the FB3 is only used by the FB3
for direct FB3 control and playback.
33

User-interface Access Mode
There may be times when you want to restrict access to certain parts of QuickShow. One case would be
in a disco with a "light jockey" operator. He or she may not need to access all of the creation or cue
editing features of QuickShow and instead would only need to trigger the already-setup cues and
perhaps access a few Live Control features. For that reason, QuickShow provides a facility that allows
you to indicate which features you want available in the "User mode".
Setting up the User-mode restrictions
To setup the User-mode restrictions, go to the Settings menu, and choose Setup User Interface as shown
below.
A dialog box will appear which allows you to control all aspects of the user interface, and also specify a
password which must be used in order to go from User mode back into Administrator mode.
34

35
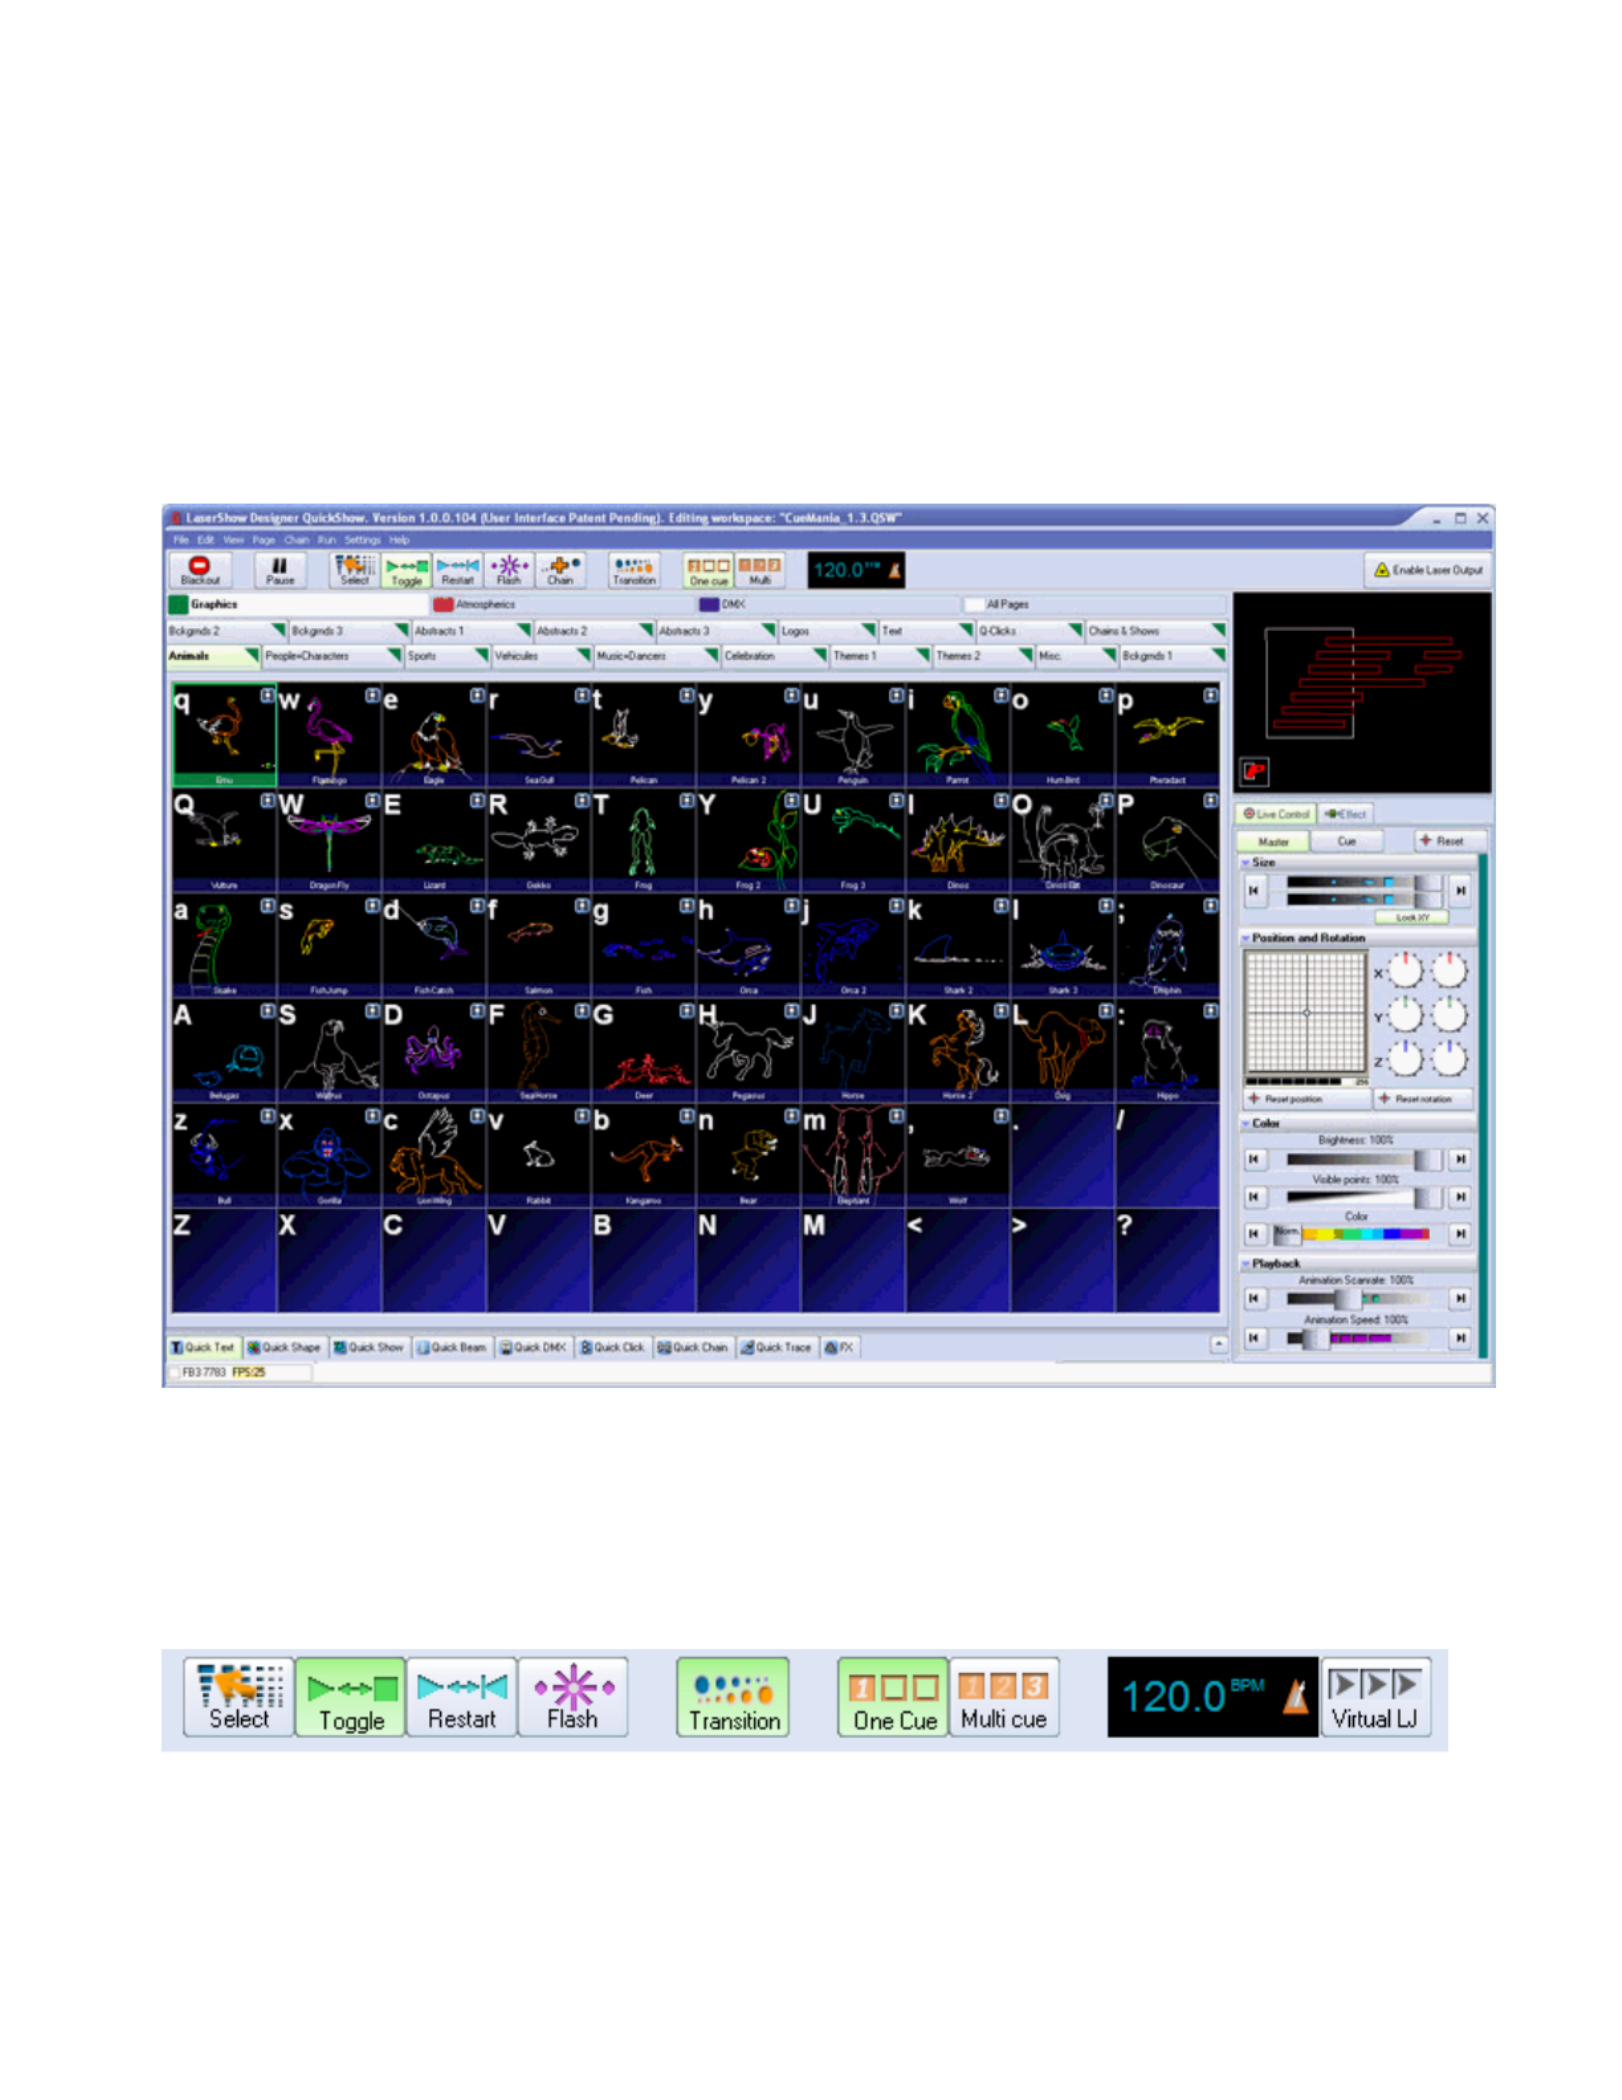
Main Control Window
Below you will see a picture of the QuickShow Control Window. The Control Window is divided into
sections. The largest section contains the . This is where you select and trigger cues. The lower Cue Grid
section contains the QuickTools where new content creation takes place. The right section contains the
Live control tab and Effect Editor tab.
Toolbar
The main functions within QuickShow are controlled by the Toolbar which is located at the top of the
Main Control Window. The toolbar is shown below.
36

Cue triggering mode
The Cue triggering mode controls what happens when you click on a cue with the mouse (or touch
screen).
If the mode is chosen, cues are not activated when you click on them. Cues are only selected. Select
This is handy when you want to drag and drop cues to a QuickTimeline, or when you want to change the
Properties of a cue, without activating the cue.
If the Toggle mode is chosen (as indicated above with the green highlight), cues will "toggle" their
activation mode each time you click on the cue. For example, if you click on a cue once, it will start
playing. If you click on the cue again, it will stop playing. Toggle is the default cue triggering mode.
If the mode is chosen, cues will be restarted each time you click on them. For example, if you Restart
have an animation which counts down to zero, the count-down will restart each time you click on the
cue, if mode is chosen.Restart
If the mode is chosen, cues will only remain active for the period of time you are clicking on them Flash
(or holding your finger pressed on the touch screen). For example, when you click the left mouse button
on the cue, the cue will begin playing and will remain playing until you release the left mouse button.
Transition between cues
The Transition button controls what happens when you trigger a new cue and there is already a cue
playing.
When Transition is activated, morphing will be performed between the currently-displayed output and
the next cue you press.
You can change the type of transition that is performed by right-clicking on the Transition button. You
can also control the transition by showing the Dynamics tab in the View menu
37

Playing only one cue at a time, or multiple cues
QuickShow allows you to play either one cue at a time, or multiple cues simultaneously, depending on
whether the One cue or Multi cue button is pressed.
You can choose the behavior of both the One Cue button, and the Multi cue button, by right-clicking on
each button. These can also controlled by showing the Dynamics tab in the View menu.
Beat synchronization system
QuickShow is a beat-oriented program. The beat counter is always running and you can see the beats per
minute, and also a metronome icon to indicate the beat of the music.
You can set the beat by repeatedly clicking on the "BPM" label, or by repeatedly tapping the SPACE
BAR on the computer keyboard. You must click the BPM label or press the SPACE BAR repeatedly to
the beat of the music. When you do this, the average BPM of the clicks or key presses will be calculated
and this will be used to synchronize the timer beat system.
Note that you can press the BACKSPACE key on the computer keyboard to "re-synchronize" the timer
beat system to the beat of the music, in case the music timing becomes slightly ahead or behind the
timer.
You can also enter a specific BPM, and control other aspects of beats by right-clicking on the Beat icon.
Virtual Laser Jockey button
QuickShow includes a new and ground breaking feature called Virtual Laser Jockey, which can be used
to make a completely automated laser show synchronized to the BPM or incoming audio.
Blackout and Pause
The Blackout and Pause buttons control the overall playback of QuickShow
The button causes all output to immediately stop. This will also reset certain program Blackout
38
functions, including the cue triggering mode. can also be activated by pressing the key Blackout ESC
on the computer keyboard.
The button will pause all currently-playing cues. can also be activated by pressing the Pause Pause
Pause key on the computer keyboard.
Keyboard equivalents
Blackout ESC can be activated by pressing the key on the computer keyboard. This is normally the top-
left key on a computer keyboard.
Pause mode can be activated by pressing the PAUSE key on the computer keyboard. This is normally
the top-right key on a computer keyboard
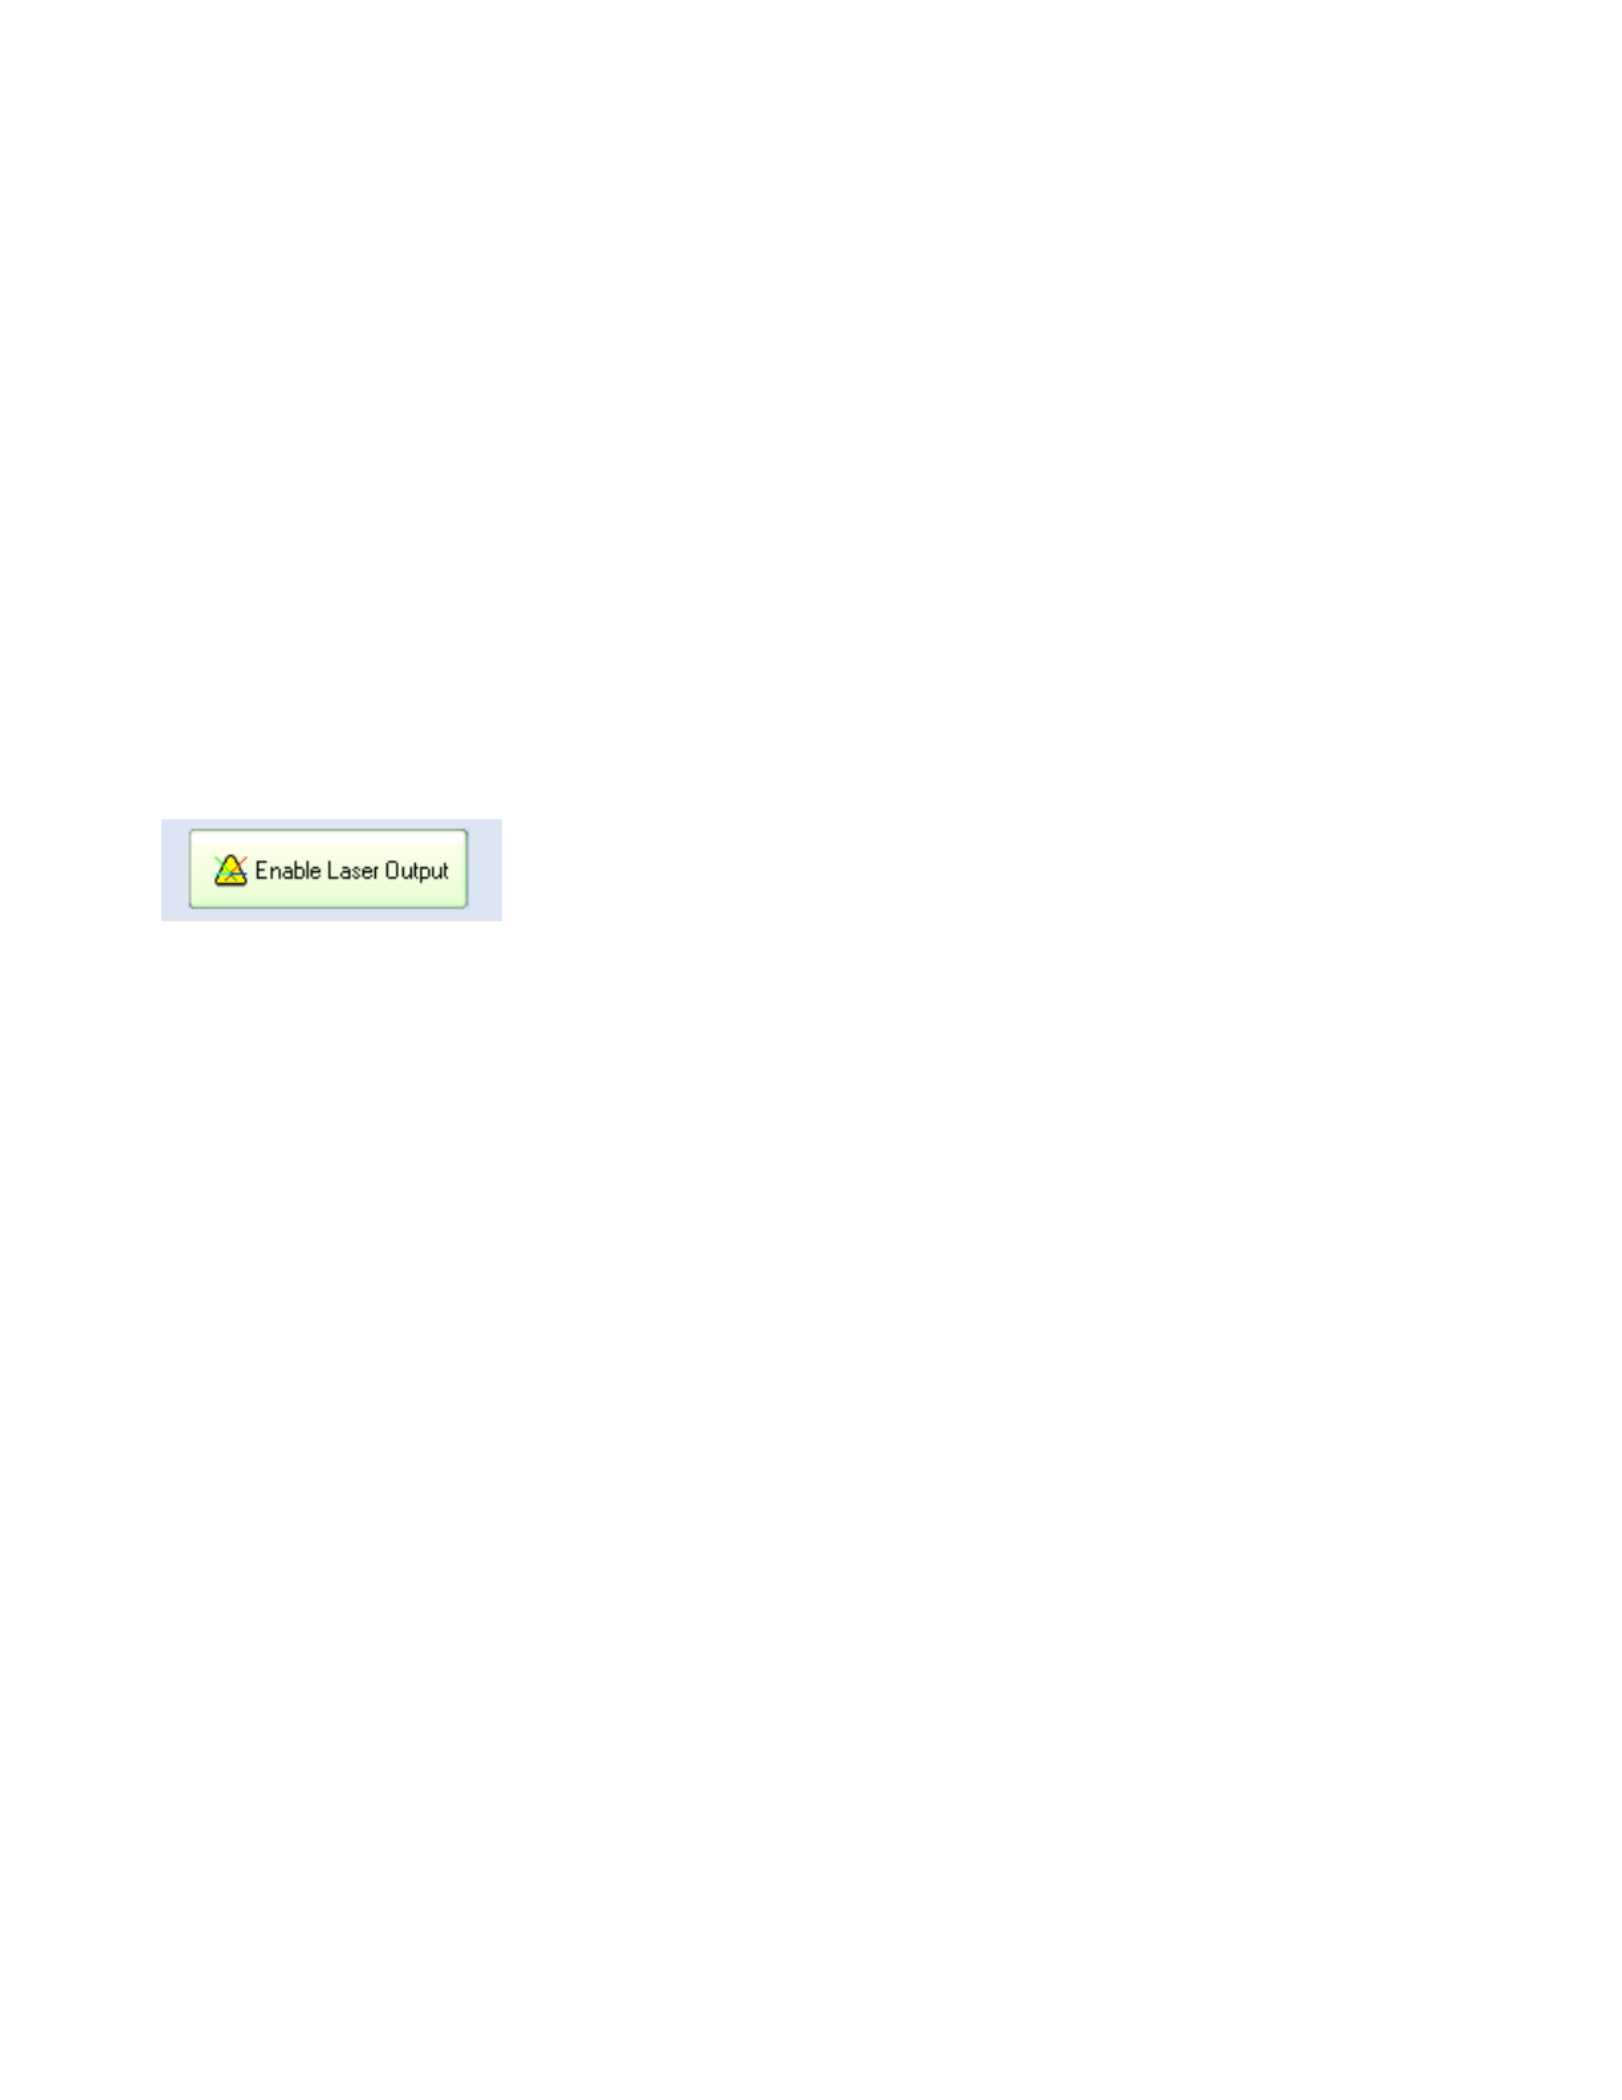
Enabling laser output
The button is found at the far right of the toolbar.Enable Laser Output
In order to enable output from the FB3 laser controller, the button must be Enable Laser Output
pressed.
Laser output is always disabled by default
Since there is a possibility that an untrained operator might activate the laser during a time that is not
appropriate (for example, when workers are in a room preparing for an event), laser output is always
disabled by default, and it is always required for the laser operator to consciously activate laser output.
All editors and setup windows also have their own Enable Laser Output (Show it now) button
The button on the QuickShow toolbar is not the only Enable Laser Output button. Enable Laser Output
In fact, each editor window, and setup window within QuickShow also has a button named Show it now
which will enable the output from that specific window. Again, the laser operator must consciously
enable laser output in order to get any output from QuickShow.
Cue Grid
QuickShow includes an extensive cue grid. There are 10 columns by 6 rows for a total of 60 cues visible
on the screen at one time.
In addition to the 60 cues, QuickShow allows for you to organize up to 32 pages of cues. In all, nearly
2000 cues can be loaded into the QuickShow workspace!
39

Keyboard access
You can access cues by clicking on them with a mouse (or touch screen), or by using the alphabetic keys
on the computer keyboard. The printed letter in the upper left hand corner of each cue cell indicates
which computer key will trigger that cue.
Note that since there are six rows, it means that some of the cues are accessed using unshifted keys (a, s,
d, f, A, S, D, F, etc.) and others are accessed using shifted keys ( etc.).
Page tabs
On the top of the cue grid, you will see tabs. These tabs allow you to access the Pages in QuickShow.
To change pages in QuickShow, just click on the page tab with the mouse.
You can assign F-Keys on the computer keyboard to pages, so that pages can be quickly accessed by
pressing F-keys on the computer keyboard. You can also change the name of each page. Both F-key
assignments and naming of the pages can be done using the Page menu, or by right-clicking on a Page
tab.
40

Categories
On the top of the cue grid, just above the Page tabs, you will see a number of Category buttons.
Categories help to organize the work space and only show the most relevant tabs. For example, if you
are only looking for Graphic-related imagery, you can click on the category, and only those Graphics
Pages and Cues related to graphics will be shown. To add, change or rename categories, just right-click
in the Categories section.
Types of cues
Each cue can contain a Frame (or animation), Text, Shape (abstract), Timeline-based show, Beam
sequence, Clock, DMX sequence, Synthesized image, a Sequence of other cues, or a Capture (many
other cues triggered simultaneously). In the lower left corner of each cue, you will see an icon. The icon
indicates what the cue contains. Below you will see a list of icons and the corresponding type of image.
41

Creating new content or editing existing content
within a cue
You can create new content, or edit the existing content in any cue by right-clicking on the cue and
selecting either "Create" or "Edit".
Right-clicking on the cue also allows you to copy the content of a cue onto the Windows clipboard,
where they can then be pasted into other pages.
Previewing contents of each Cue
You can preview the contents of each cue by simply hovering the mouse pointer over a cue. This will
give you an accurate representation of what the cue does.
Laser Preview Window
The Laser Preview Window in QuickShow is always active, and is found in the upper right corner of
the Main Control Window.
In addition to simply showing the current laser output, the Laser Preview Window also provides
additional controls, as shown and explained in the picture below.
42

Capturing the laser preview into a cue
You can also capture the currently playing laser, DMX, and beam sequencing cues into another single
cue by clicking the right mouse button in the preview window, and selecting the Capture to clipboard
menu. After that, you can select an empty cue within the workspace and select Edit/Paste from the main
menu
Or as a short-cut, you can simply click the left mouse button in the preview window and drag the
preview window contents directly into a cue.
Using the preview window to select alternative lasers and zones
The Laser Preview window can be "split" into nine separate zones which can then be selected by
clicking with the mouse or by pressing keys on the numeric keypad. This is an advanced way to control
multiple lasers and zones. For more information about this, see Controlling multiple lasers.
43

Controlling cues during playback
QuickShow has the power to display more than one cue at a time. When displaying more than one cue, it
can be handy to adjust the size, position, and orientation of each cue individually, so that the visuals do
not overlap. QuickShow provides two separate ways of accomplishing this.
Live Performance tools
When a cue is playing, Live Performance tools can be seen on the bottom of the cue. These tools provide
a way to quickly and easily start and stop the cue, as well as control size, position and rotation.
For size, position and rotation, just click the mouse button on one of the icons, and drag the mouse
upward and downward.
Note that you can reset the size, position, and rotation by right-clicking on one of the tools.
44

Cue editing tools
The Live Performance tools within a cue are really just a shortcut to the cue controls. As you make
adjustments to the Live Performance tools, you will notice that what really happens, is that the cue
controls themselves are changing. Therefore, an alternative way of controlling the size, position, rotation
angle, and other geometric properties of a cue is by clicking on the button within the Live Controls Cue
panel, and making adjustments there.
Visibility of Live Performance and Cue editing tools depends on your user level
Note that the Live Performance cue editing tools, and Cue editing tools discussed above are not
available if the is set to User Level Beginner. Intermediate If the User Level is set to , then the Live
Performance tools are available, but Cue editing tools are not.
45

Virtual Laser Jockey
QuickShow includes a new and ground breaking way to help you to make laser shows called the Virtual
Laser Jockey. The Virtual Laser Jockey can automatically trigger cues (and Effects as discussed below)
to the beat set by the BPM system, or to the beat of externally-detected audio input. The Virtual Laser
Jockey can trigger cues sequentially (linear) within the page, or randomize cues. And you can specify
the number of beats to wait before triggering a new cue.
The Virtual Laser Jockey button is positioned just to the right of the BPM system, helping to indicate
that it works in relation to the BPM. If you click on the Virtual LJ button with the left mouse button, that
will activate the Virtual Laser Jockey. If it is active and you click again, it will deactivate the Virtual
Laser Jockey.
If you click the right-mouse button on the Virtual LJ button, you will see a menu which allows you to
configure the way in which the Virtual Laser Jockey works.
Using externally-input audio with the Virtual Laser Jockey
Note that you can indicate that the Virtual Laser Jockey should trigger cues based on Audio Input. When
you choose that option, a new Audio Input window will appear just to the right of the BPM gauge. This
new window allows you to specify the audio device as well as see the waveform generated by the
incoming audio.
If you click the left or right mouse button in the Audio Input window, you can specify the audio device
to use. All audio input devices available to your computer will also be available to the Audio Input
window. For a laptop, normally the choices are "Microphone" or "Wave Out Mix". When you choose
"Wave Out Mix" it will give you a mixture of everything that is coming out of the computer. For
example, you can use Windows Media Player to play a song from the computer, and use that as an input
to the Virtual Laser Jockey. You can then use the Windows Volume Mixer (as shown below) to try to
optimize the levels for best detection by the Virtual Laser Jockey.
46

Audio input results not guaranteed (normal BPM system is believed to be better)
Almost every member of the Pangolin staff is a musician of some kind. And nobody on the Pangolin
staff really believes that a computer will ever be able to detect the beats within audio as well as a human
can. Often times music may have "double beats" or "tricky beats" which would fool computer
algorithms. So generally we do not believe in this computer-based technique.
As we have tried this audio input system and sent it to other customers to try, sometimes we see good
results and other times we see not-so-good results. In any event, we are including this feature in the
software as a kind of experiment. Users may use it or not.
As a final note, all of us on the Pangolin staff believe that tapping the space bar to the beat of the music
-- although not sounding very sexy or sophisticated -- is certainly an absolutely reliable method to pick
up the beat of the music. Simply tap the space bar 10 times and it will pick up the beat of the music and
hold the beat for minutes at a time. When the music changes, just tap some more and you will be able to
easily and reliably synchronize to the beat of the music.
Virtual Laser Jockey use within the QuickFX
The QuickFX portion of QuickShow also includes the same Virtual Laser Jockey features, which may be
used along with cue triggering explained above, or separately.
47

Play along with the Virtual Laser Jockey
Just because the Virtual Laser Jockey is triggering cues doesn't mean that you can't. Indeed, QuickShow
allows you to play cues and trigger effects even while the Virtual Laser Jockey is running. This can be
like having two laserists operating the computer at once!
48

Live Control tab overview
The tab is on the right side of the QuickShow window and it is the main tab that is used Live Control
during Live performances.
49
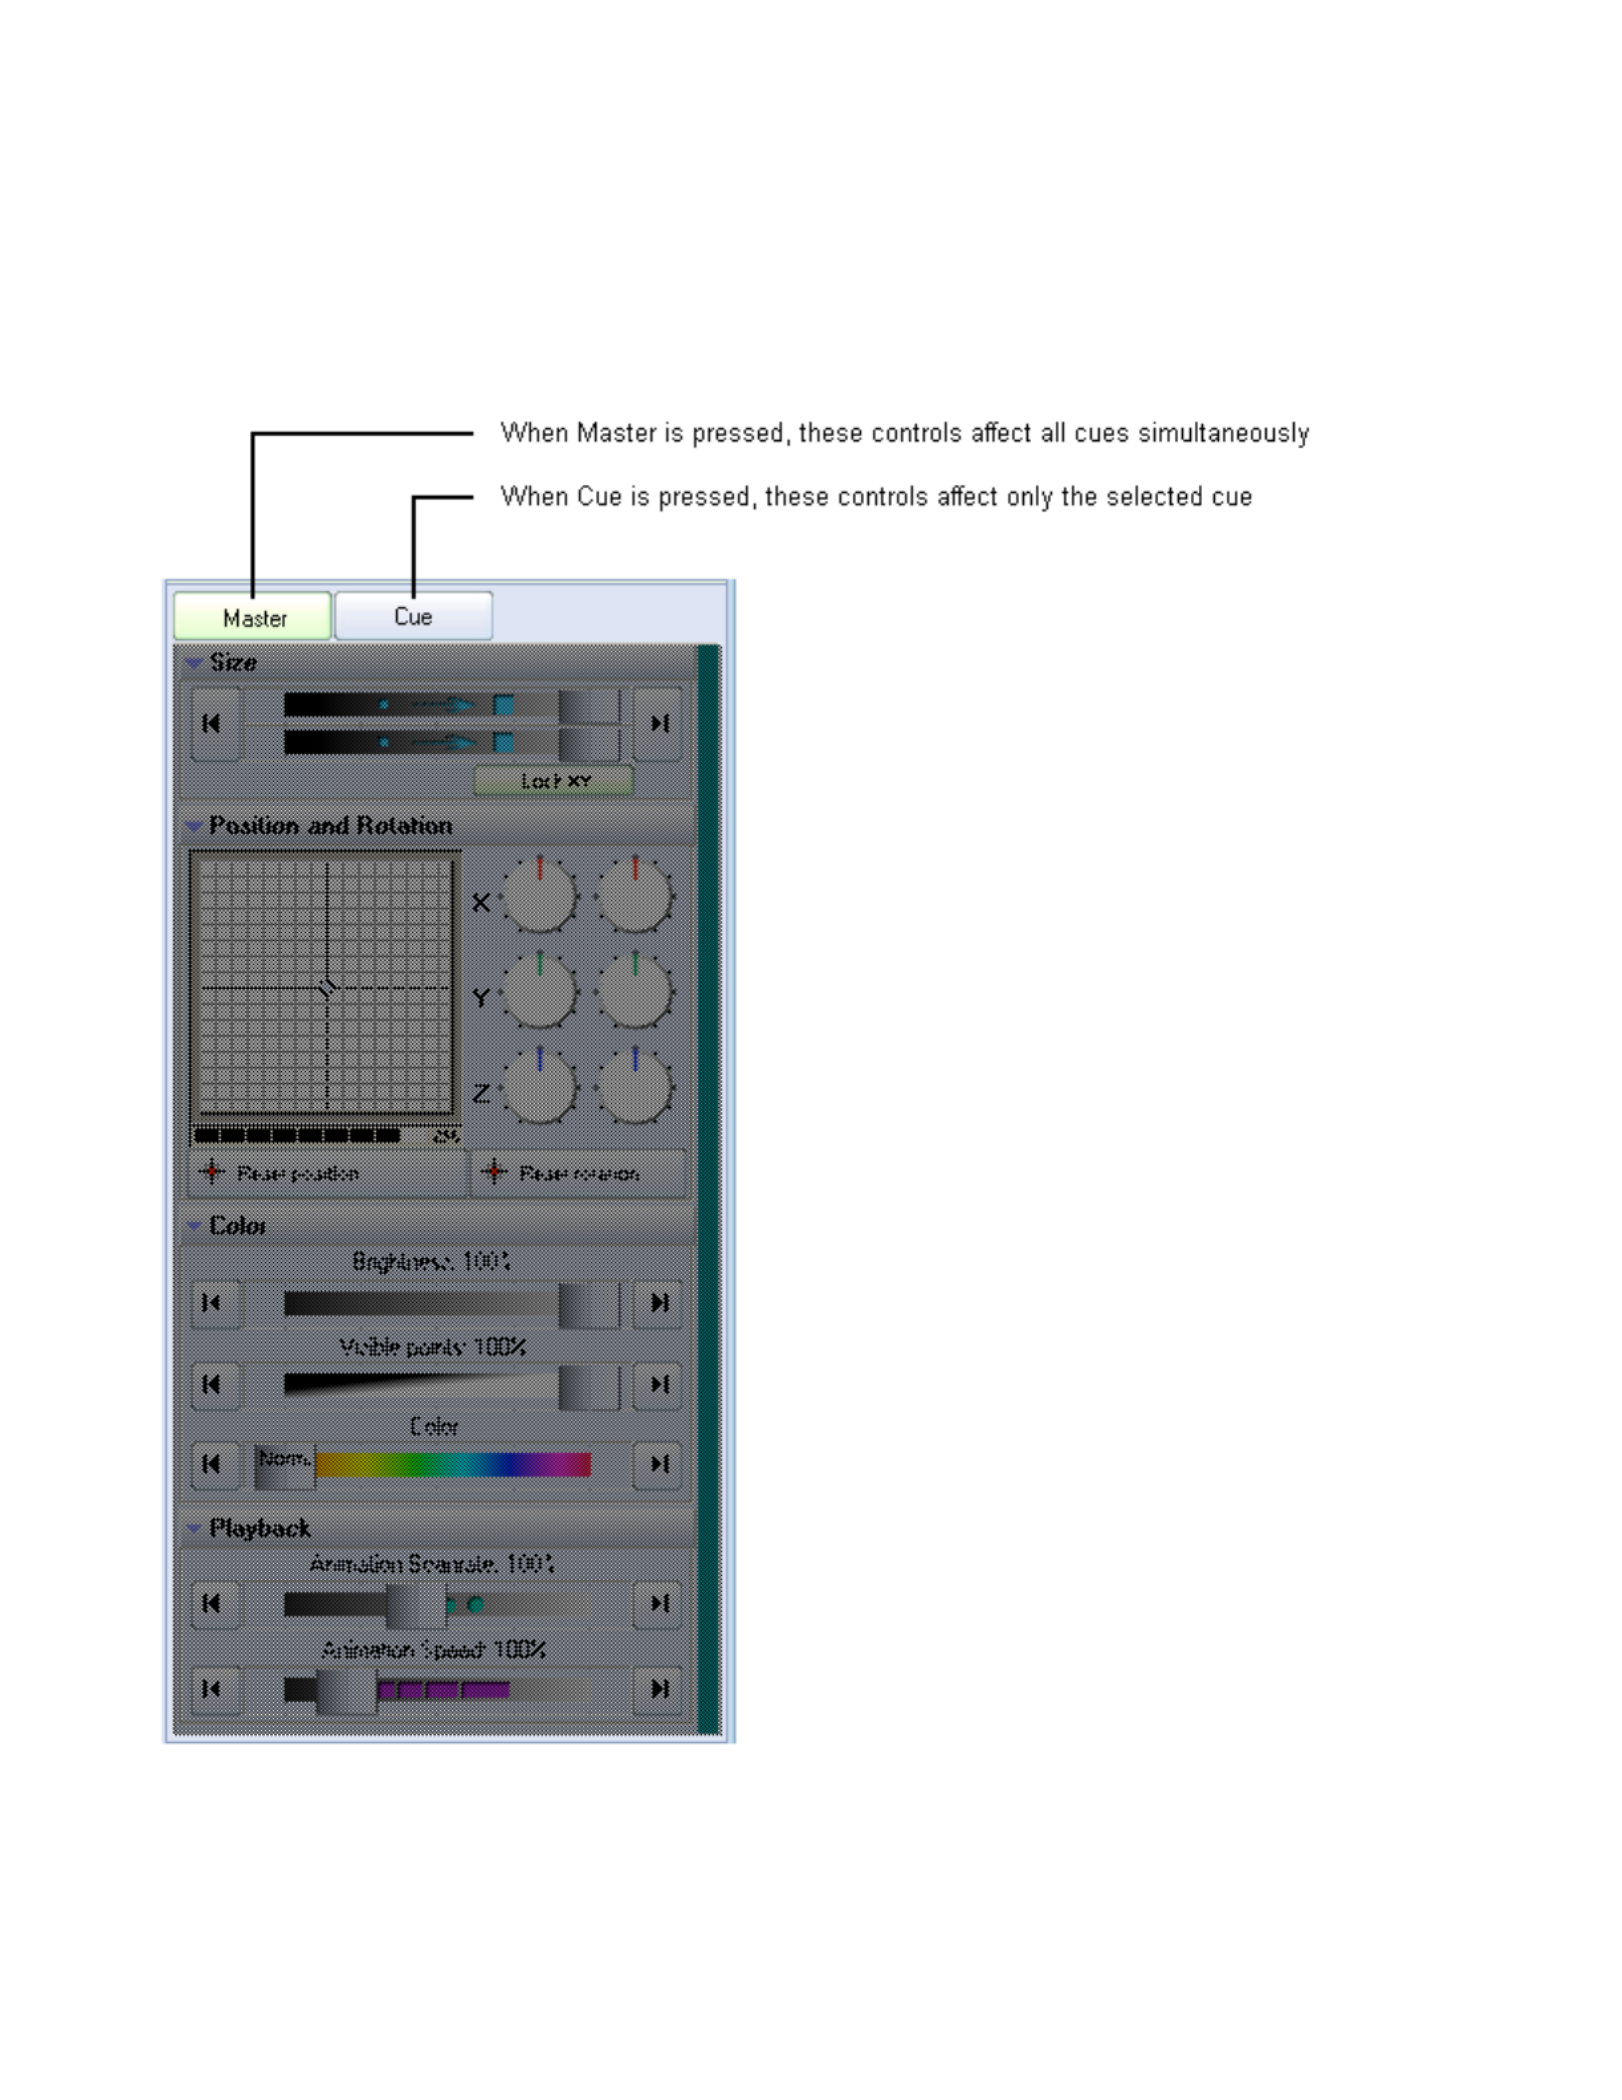
Live Control tab - Master and Cue controls
The Live Control tab can be used to control the geometric properties of all cues simultaneously, or only
the geometric properties for the selected cue. This depends on whether the or button is Master Cue
pressed as explained below.
Live Controls only affect the cues, not QuickTools
Note that the Live Controls will only affect the size, position, rotation, color, brightness, etc. of the cues.
The Live Controls do not affect the QuickTools at all.
50
Master and Cue buttons are only visible in Advanced mode
Note that the and buttons are only visible when you have the user interface set to Master Cue
Advanced Intermediate Beginner mode. These buttons do not appear if you are in or mode. (However,
most of the cue-related controls can be accessed by using tools within each cue.)Live Performance
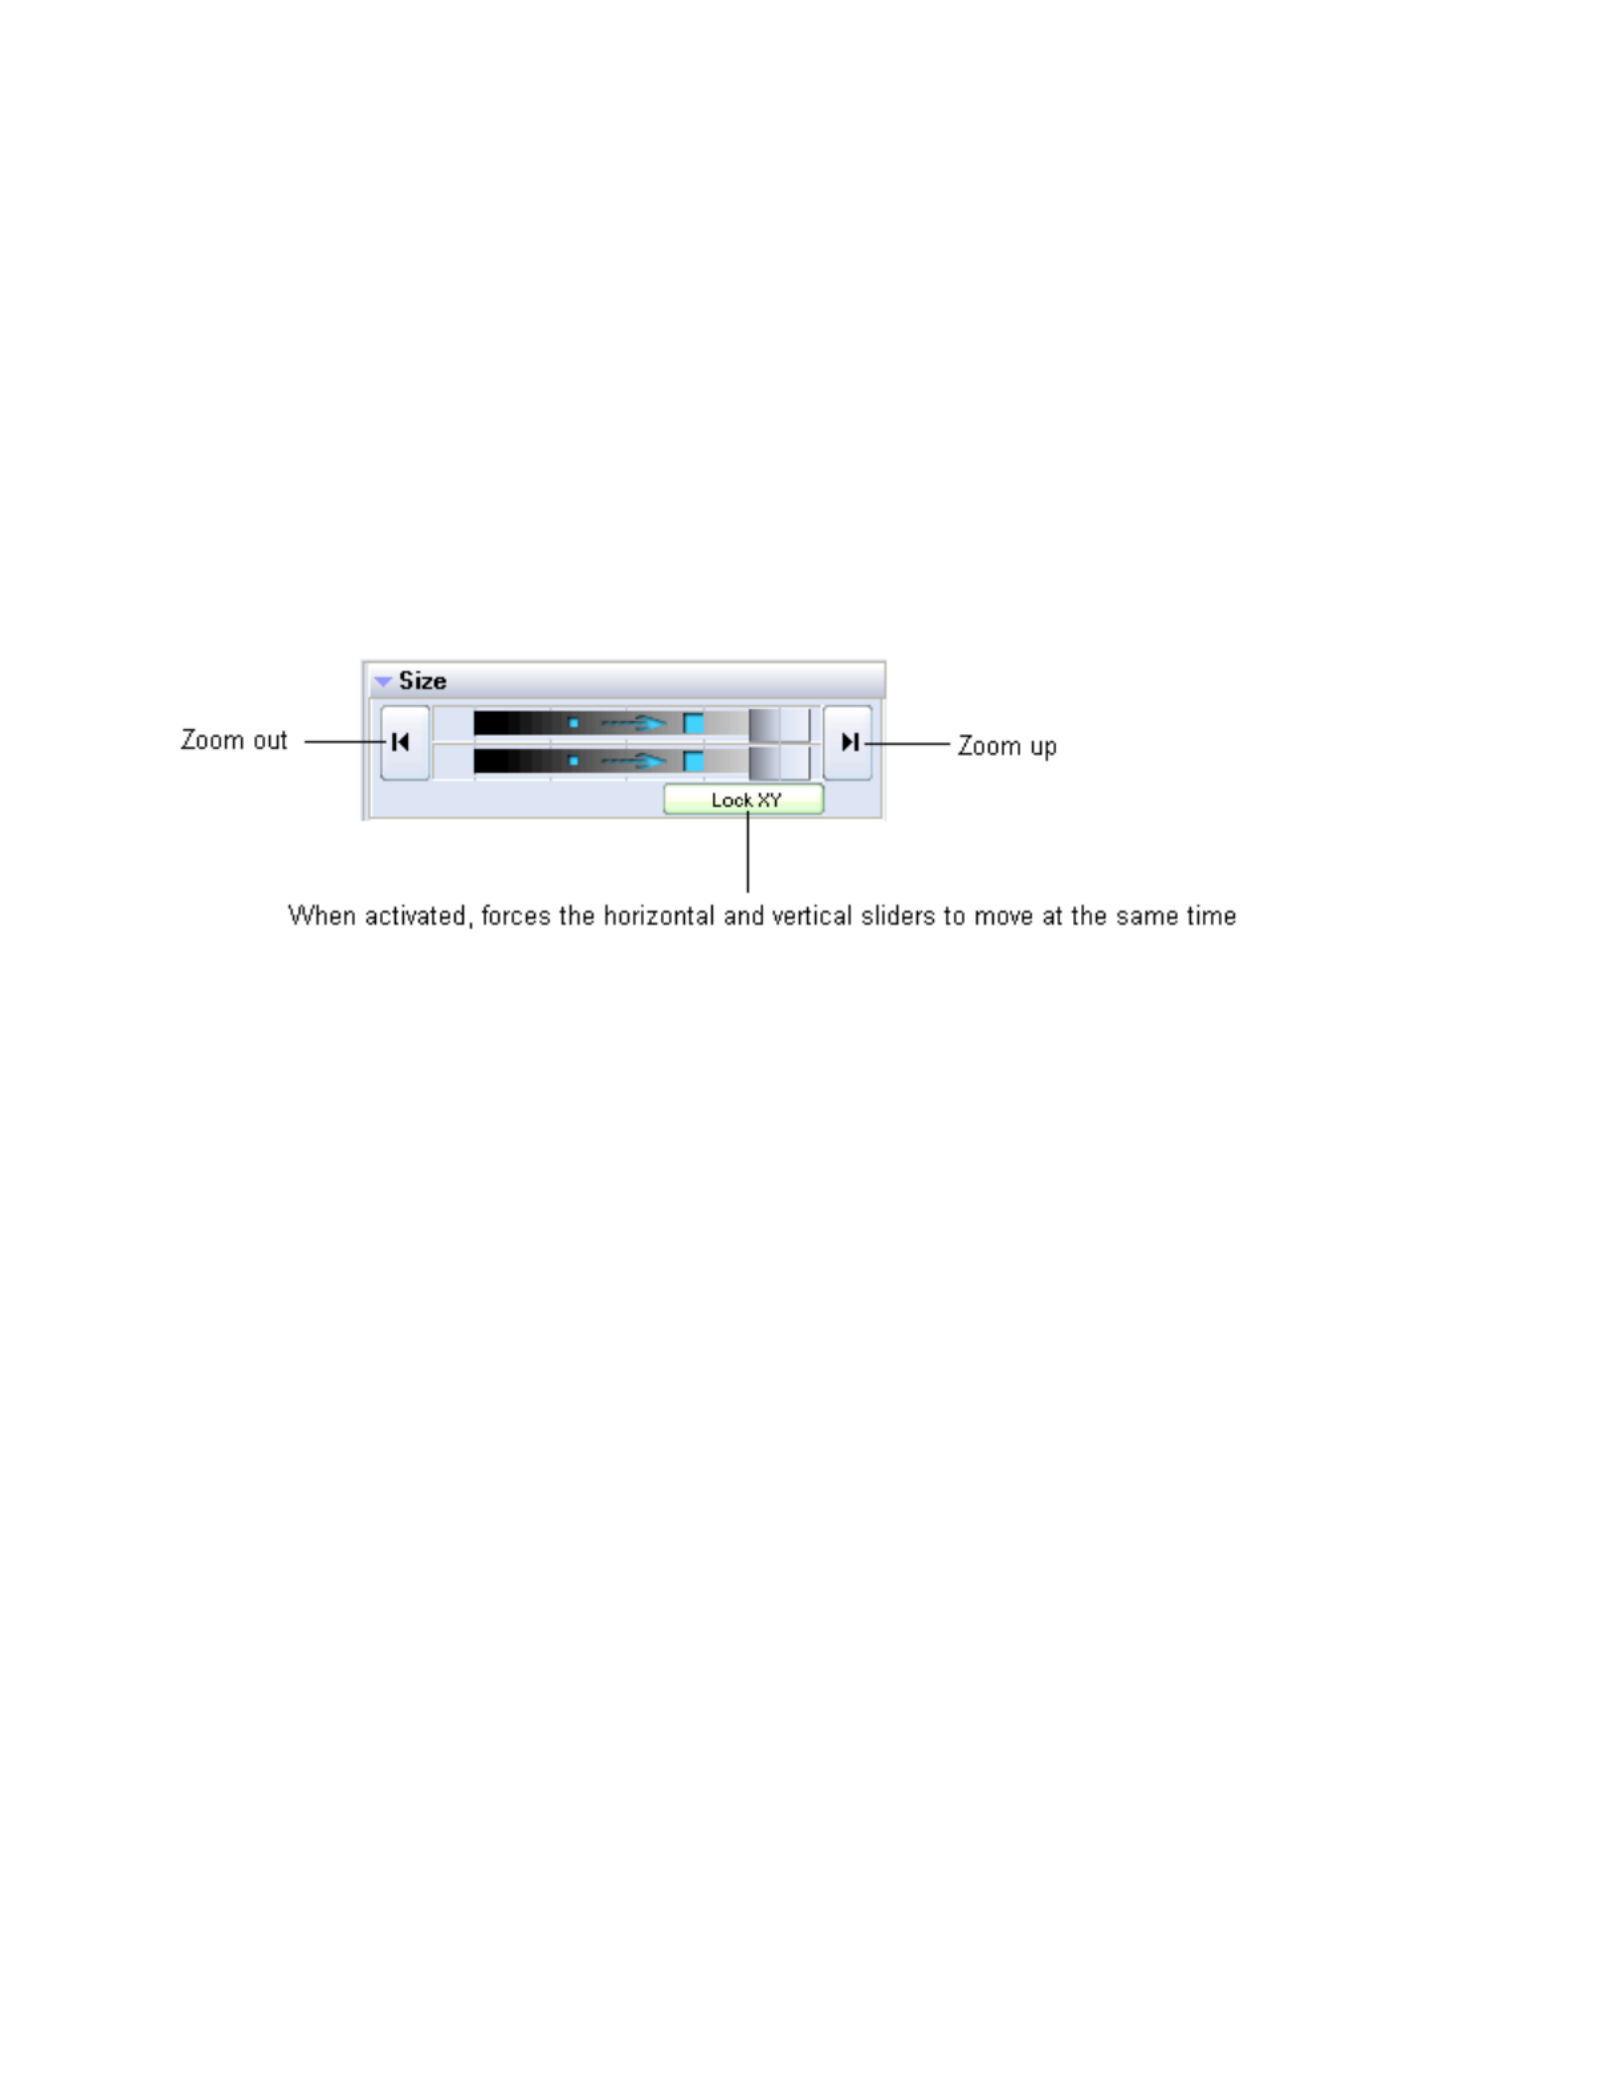
Live Control tab -- Size controls
Using the Live Control tab, you can affect the of everything together (when in mode), or Size Master
the size of individual cues (when in mode). The picture below explains the various options.Cue
Automatic Zoom out and Zoom up
You can automatically zoom the image out by pressing the button on the left.
You can automatically zoom the image up by pressing the button on the right.
Right click
Note that if you click the right mouse button on a slider, its value will be reset to 100%.Size
51

Live Control tab - Position and Rotation controls
Using the Live Control tab, you can affect the position, rotation angle and rotation speed of everything
together (when in mode), or of individual cues (when in mode). The picture below explains Master Cue
the various options.
Keyboard Equivalent for Invert Rotation Speed
You can invert the rotation speed by pressing "~" (shifted or unshifted tilde key -- right below the ESC
key). This can be a handy tool to use while a show is playing. For example, you can set the Z Rotation
Speed to 45, and then tap the "~" key to the beat of the music to invert the direction of the rotation each
beat.
Right click
Note that if you click the right mouse button on the control or any of the dials, its Position Rotation
value will be reset to 0.
52

Live Control tab - Color controls
Using the Live Control tab, you can affect the and Brightness, Color Visible Points of everything
together (when in mode), or of individual cues (when in mode). The picture below explains Master Cue
the various options.
Right click
Note that if you click the right mouse button on the or Brightness Visible Points slider, its value will be
reset to 100%. If you click the right mouse button on the slider, the color will be reset to Color
"Normal".
Live Control tab -- Playback controls
Using the Live Control tab, you can affect the Scanrate and Animation Speed of everything together
(when in mode), or that of individual cues (when in mode).Master Cue
Right click
Note that if you click the right mouse button on the or slider, its Animation Scanrate Animation Speed
value will be reset to 100%.
53

QuickTools overview
The QuickTools section of QuickShow is one of the most unique aspects of the program. QuickTools
allow you to quickly and easily create new content without disturbing the currently-playing laser show.
The QuickTools are found at the bottom of the Main Control Window, and are shown below.
All of the QuickTools work in a similar manor. You click on the tab that corresponds to the type of
content you want to create, enter some basic parameters, and then either or drag and drop Show it now
the content to a cue for later playback.
Brief explanation
Below, each QuickTool is discussed separately.
54

Common Features
All image-generating QuickTools share some common features. These are shown and discussed below.
To edit content originally created with a QuickTool, simply drag from the Cue grid back down to the
most relevant QuickTool tab.
Visibility of certain QuickTools depends on your user level
Note that some of the QuickTools discussed above are not available if the is set to User Level Beginner
or . Intermediate
55
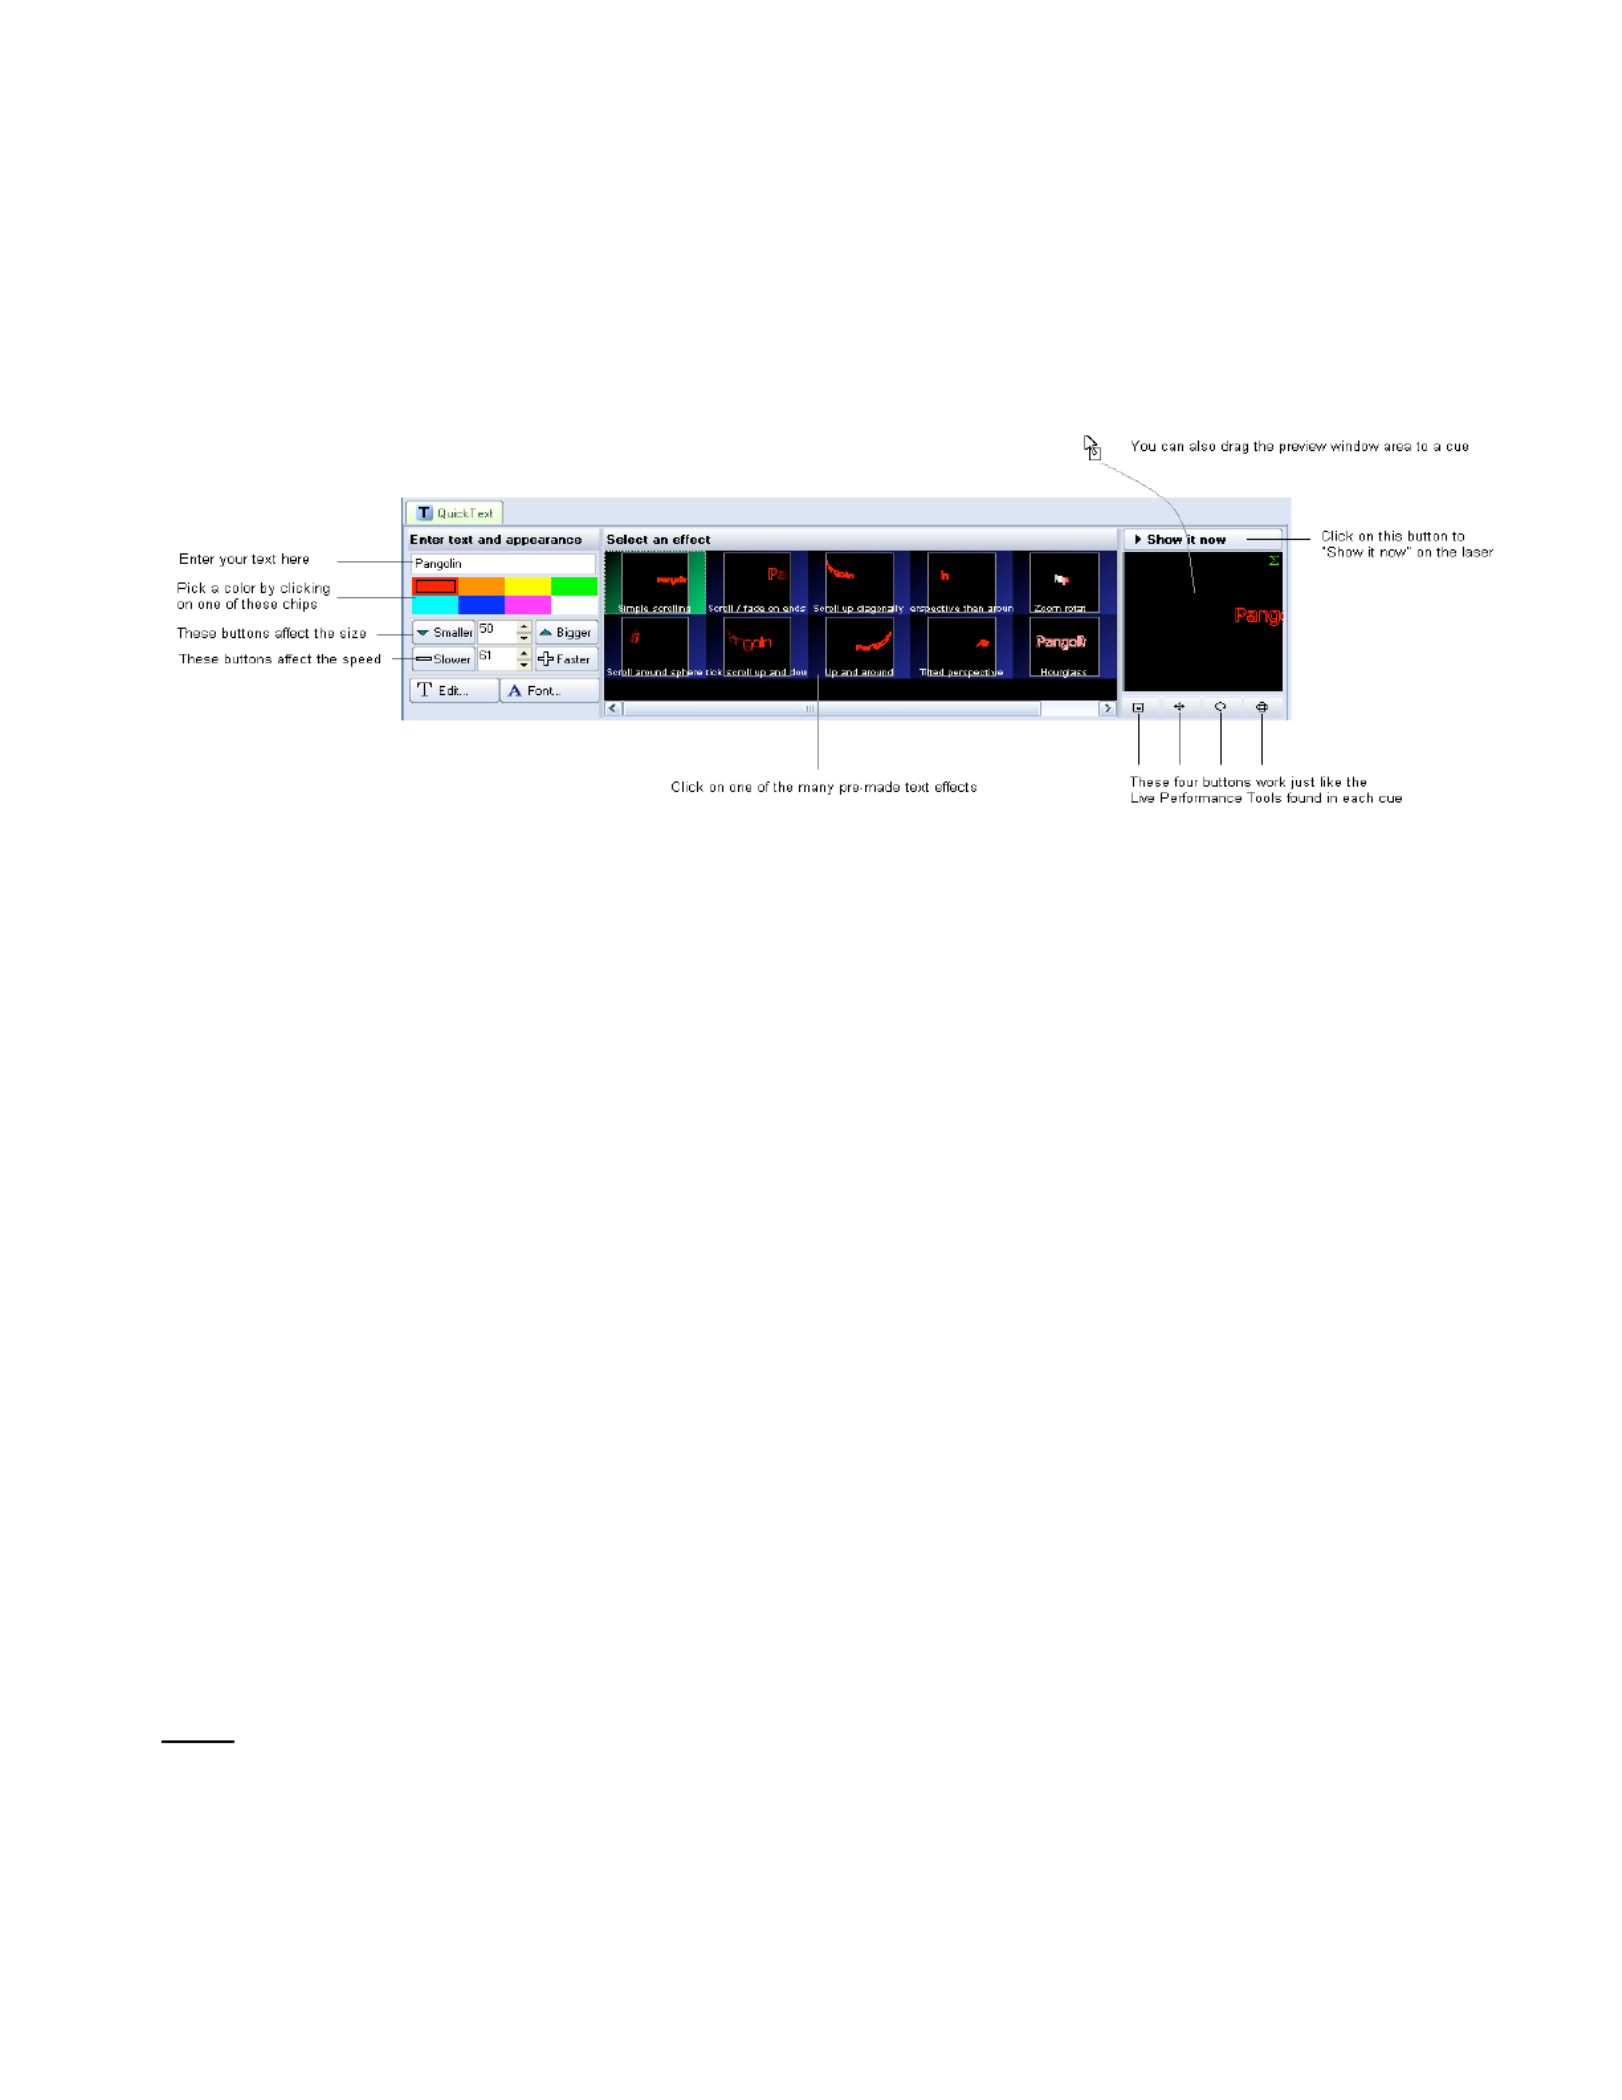
QuickText
The QuickText tool allows you to quickly create non-moving text, as well as scrolling, animated and
waving text effects. Simply click on the QuickText tab at the bottom of the QuickShow window and
you will see the QuickText tool. The main features of the QuickText tool are shown and described in
the picture below.
As shown, you simply enter some text, pick a color and an effect and then either , or drag Show it now
and drop the text to a cue for playback later.
Text entry
The text can be any characters, and the function even works with Chinese character sets.
Increasing or decreasing the size of the projected text
To decrease the size, repeatedly click on the button labeled Smaller. To increase the size, repeatedly
click on the button labeled Bigger.
Increasing or decreasing the speed of the effect
To decrease the speed, repeatedly click on the button labeled Slower. To increase the speed, repeatedly
click on the button labeled Faster.
Selecting an effect
The large, central area within the QuickText tab allows you to select an effect that will be applied to the
text. There are many effects, such as simple scrolling text, effects that will impress the text onto a
rotating cone or sphere, effects that simulate flag waving, etc. Simply click on the desired effect and you
will see the result in the preview window.
Modifying the text effect further
After entering text and choosing an effect, you can modify the text even further, by changing the font or
going into the Advanced Text editor window.
If you click on the T Edit... button, this will open the Advanced Text Editor window which will give you
full access to change the text or create a new text effect.
If you click on the A Font... TrueTyp Laser font button, this will allow you to choose a new e font, or a .
The are single-trace fonts which generally allow for faster scanning. However, the Laser Laser fonts
56

fonts only have the most common (Latin) characters.
Note that clicking on the or T Edit... A Font... buttons must be done last. If you click on a different
effect, it will reset the font and text setting.
Modifying the overall size, position and rotation angle
The four buttons under the text preview window allow you to control the size, position, and rotation
angle of the text effect. These work in exactly the same way as the Live Performance Tools within a
cue. Simply click down the mouse over one of the controls, and then drag the mouse either upward or
downward to affect the image.
Displaying text momentarily
To display the text that you have created, simply click on the button.Show it now
Saving the QuickText to a cue
You can save the QuickText to a cue for more permanent storage or for use later. Simply drag and drop
the text preview window (or the QuickText QuickText tab itself) to a cue. Everything about the will be
saved into the cue, including the size, position, rotation, speed, color and font as seen in the text preview
window.
Supports only a single line of text
The QuickText function was only meant to create a single line of text. Applications requiring more than
one line of text will need to use the Text Frame/Animation editor. tool within the
57

QuickShape
The tool allows you to quickly create basic shapes, such as circles, squares, lines, etc. as QuickShape
well as more complex shapes such as waves, loops, and spirograph figures. These figures can be made
up of a solid and continuous line, or made of dots. Dots are particularly handy for beam shows.
The main features of the tool are shown and described in the picture below. QuickShape
As shown, you simply pick a base shape, choose whether the shape should be made up of dots or a
continuous line, adjust the size and number of points in the image, pick a color and an effect and then
either , or drag and drop the image to a cue for playback later.Show it now
Base shape
The seven buttons in a row allow you to choose a base shape. The base shape can be a circle, vertical
line, horizontal line, triangle, square, pentagon or hexagon.
Choosing a continuous line or shape made of points (beams)
The shape can be made of a continuous line, or made of points. When the shape is made of points, this is
particularly handy for Beam shows.
Increasing or decreasing the size of the projected image
The Size slider allows you to control the overall size of the base shape.
Increasing or decreasing the number of points in a shape
The number of points is controlled by the Points slider. For simple and unmodified base shapes, the
number of points won't have much of a visual effect. But for more complex modified shapes, or when
using points (beams) mode, the Points slider controls the number of points (beams) in the projected
image.
Beam Speed slider (only available when you are in Points mode)
When you select the Points (beams) mode, the Speed slider will allow you the points to scroll within the
projected image. This can make a very dramatic effect.
58

Selecting an effect
Effects modify the base shape. An effect can add waves, loops, rolls, colors, or a variety of other
modifications. Simply click on the desired effect and you will see the result in the preview window.
Modifying the overall size, position and rotation angle
The four buttons under the shape preview window allow you to control the size, position, and rotation
angle of the shape. These work in exactly the same way as the Live Performance Tools within a cue.
Simply click down the mouse over one of the controls, and then drag the mouse either upward or
downward to affect the image.
Displaying the shape momentarily
To display the shape that you have created, simply click on the button.Show it now
Saving the QuickShape to a cue
You can save the to a cue for more permanent storage or for use later. Simply drag and QuickShape
drop the preview window (or the tab itself) to a cue. Everything about the QuickShape QuickShape
will be saved into the cue, including the size, position, rotation, speed, color and font as seen in the
preview window.
59

QuickTrace
The QuickTrace tool allows you to quickly trace graphic images such as bitmaps stored in BMP, JPEG
or GIF format.
The main features of the QuickTrace tool are shown and described in the picture below.
As shown, you simply select a image file, choose a trace mode, make a few adjustments, and then either
Show it now, or drag and drop the image to a cue for playback later.
Selecting the image file
To select an image file, click on the button. This will display a standard Windows file Open image
dialog box, where you can navigate to and select the image to trace.
Choosing a tracing mode
The QuickTrace tool offers three separate tracing modes:
Color separation mode (best for high-quality company logos and business card graphics)
mode (best for lower-quality images and continuous-tone photographs)Highlight separation
mode (best for line-art such as hand drawn images)Centerline
Applying Noise Reduction
The QuickTrace Noise reduction tool has a check box that will apply a filtering. This may be handy for
images that have small specks or severe JPEG compression artifacts. Just try checking and un-checking
the box to see which way provides the best looking output image.
Choosing a number of colors
When the tracing mode is set to , you can choose the number of colors that Color separation
QuickTrace will try to find in the image. The default is four. This is another control where you simply
can increase and decrease the number of colors until you get the best looking output image.
Adjusting the Separation level
60

When the tracing mode is set to or , the slider will Highlight separation Centerline Separation Level
be available for adjustment. Simply click and drag your mouse in the slider area, and move the slider
back and forth until you get the best looking output image.
Modifying the overall size, position and rotation angle
The four buttons under the preview window allow you to control the size, position, and rotation angle of
the shape. These work in exactly the same way as the Live Performance Tools within a cue. Simply
click down the mouse over one of the controls, and then drag the mouse either upward or downward to
affect the image.
Displaying the traced image momentarily
To display the traced image that you have created, simply click on the button.Show it now
Saving the QuickTrace to a cue
You can save the QuickTrace to a cue for more permanent storage or for use later. Simply drag and drop
the preview window (or the QuickTrace QuickTrace tab itself) to a cue. Everything about the will be
saved into the cue, including the size, position, rotation, speed, color and font as seen in the preview
window.
Editing the image after it has been traced
Once you drag and drop the traced image to a cue, you can use the to edit the Frame/Animation editor
traced image. For example, you could recolor all or part of the traced image, you could select and then
delete certain parts, etc.
61

QuickTargets (Beam Sequencing)
The QuickTargets tool allows you to quickly create targeted beams and beam sequences. Simply click
on the QuickTargets QuickTargets tab at the bottom of the screen and you will see the tool. (Note that
you will not see the QuickTargets QuickTargets Beam Settings feature until you have setup the .)
The main features of the QuickTargets tool are shown and described in the picture below.
As shown, you simply add as many steps as you want in the sequence, choose the colors and beams you
want for each step, indicate the step duration, and then either , or drag and drop the Show it now
sequence to a cue for playback later.
Adding steps to create a sequence
Although the QuickTargets tool can be used to trigger a single beam or several beams to output
continually (thus requiring only a single Step), typically the QuickTargets tool is used to make beam
sequences. To create a sequence, you must first add as many steps as you want in the sequence. For
example, if you want to have a four-step sequence, simply click on the button until you see four steps.+
Turning on beams at each step
To turn on beam number 1 at step number 1, simply click the mouse in the column number "Beam 1"
and in the row to the right of Step 1.
Beam numbers increase in columns to the right. Step numbers increase in row numbers downward.
Note that you can make a beam any of the brightest and most popular colors. Simply click on the color
you want before clicking on the beam. If you want to turn the beam off, simply click it again.
62

Also note that you can trigger more than one beam during each step, as shown above.
Controlling the speed of the sequence
The speed of the sequence is controlled by the control and by the and Step duration Beats Time
buttons to the right of the control. Typically beam sequences are performed to the beat of Step duration
the music and typically with each beam position remaining on only for a single beat. If this is desired,
see the picture above (which is also the default configuration). If you want each step to last two beats,
you can increase the control to 2.0. If you want each step to last for 4 seconds, increase Step duration
the control to 4 and click on the button (indicated by a Clock icon -- this indicates Step duration Time
time instead of beats).
Stepping through the sequence manually
You can review the output of each step by simply clicking the left mouse button on the desired Step. For
example, if you want to see what the output looks like at Step 3, simply click on the word .Step 3
Displaying the static or sequenced beams momentarily
To send the output of the QuickTargets tool to the laser, simply click on the button. If the Show it now
Play button is pressed in the QuickTargets window, the beam sequence will be output to the laser. If the
Stop button is pressed, only the selected step will be output to the laser.
Saving the QuickTargets to a cue
You can save the QuickTargets beam sequence to a cue for permanent storage or for use later. Simply
drag and drop the preview window (or the QuickTargets tab itself) to a cue.
63

QuickDMX
The QuickDMX tool allows you to quickly create DMX scenes or complete DMX sequences. Simply
click on the tab at the bottom of the screen and you will see the tool. (Note QuickDMX QuickDMX
that you will not see the feature until you have DMX Output enabled using the QuickDMX DMX
Settings dialog box.)
The main features of the QuickTargets tool are shown and described in the picture below.
As shown, you simply add as many steps as you want in the sequence, moving the sliders at each step,
indicate the step duration, and then either , or drag and drop the sequence to a cue for Show it now
playback later.
Adding steps to create a sequence
Although the tool can be used to output a single channel or channels continually (thus QuickDMX
forming a DMX "scene" and requiring only a single Step), typically the tool is used to QuickDMX
make sequences. To create a sequence, you must first add as many steps as you want in the sequence.
For example, if you want to have a four-step sequence, simply click on the button until you see four +
steps.
Controlling the speed of the sequence
The speed of the sequence is controlled by the control and by the and Step duration Beats Time
buttons to the right of the control. Typically beam sequences are performed to the beat of Step duration
the music and typically with each step within the sequence remaining on only for a single beat. If this is
desired, see the picture above (which is also the default configuration). If you want each step to last two
beats, you can increase the control to 2.0. If you want each step to last for 4 seconds, Step duration
increase the control to 4 and click on the button (indicated by a Clock icon -- this Step duration Time
indicates time instead of beats).
Stepping through the sequence manually
You can review the output of each step by simply clicking the left mouse button on the desired Step. For
example, if you want to see what the output looks like at Step 2, simply click on the word . The Step 2
step number is made bold in the list.
64

Displaying the static or sequenced DMX momentarily
To send the output of the QuickDMX tool to the DMX output device, simply click on the Show it now
button. If the button is pressed in the QuickDMX window, the DMX sequence will be output to the Play
device. If the button is pressed, only the selected step will be output.Stop
Saving the QuickDMX to a cue
You can save the sequence to a cue for permanent storage or for use later. Simply drag and QuickDMX
drop the preview window (or the tab itself) to a cue. QuickDMX
Changing the name of DMX channels
You can give each channel a different name by clicking the right mouse button on the label below the
slider, and entering a name.
Changing the color and control type
You can change the color of each slider by right-clicking on the slider itself, and then choosing a color in
the menu. If you have a DMX fixture that uses six channels, you can make the six sliders that control
that fixture all the same color, thus helping you to identify which sliders correspond to the fixture.
You can also designate a channel as requiring stepped change or smooth change. For example, certain
lighting fixtures have control channels which require absolute values to be presented, while other
channels that control the pan, tilt, and brightness would desire a smooth change. This too can be
specified.
65

Changing how channels are viewed
You can view the DMX either as sliders (as shown above), or as a spreadsheet format, or as a waveform,
showing how the channel values will change at each step.
66

QuickTimeline
The tool allows you to quickly create simple laser shows. A few noteworthy features of QuickTimeline
the tool are shown and described in the picture below. QuickTimeline
Drag and drop cues onto the timeline
To create a show, simply drag and drop cues from the Cue Grid onto the timeline. Four tracks are
initially visible, but you can add as many as you want by using the button in the upper left corner. Menu
Play and stop the show, or drag the time slider
QuickTimeline features Play and Stop buttons so that you can watch the show as you are creating it. You
can also drag the time slider by clicking and dragging the mouse in the timeline area.
Displaying the show momentarily
To display the show that you have created, simply click on the button. If the button is Show it now Play
not active, you could scroll around on the timeline and output only the imagery found at that particular
time slider position. If the button is active, the show will play to the laser. Play
Saving the show to a cue
You can save the show to a cue for more permanent storage or for use later. Simply drag QuickTimeline
and drop the preview window (or the tab itself) to a cue. . You can also save the show as QuickTimeline
a file on disk, by clicking on the button, and then selecting . Menu Save Show
67

QuickCapture
The tool allows you to capture anything that is currently playing in the preview window, QuickCapture
into a single cue, which can then be dragged and dropped into the workspace for use later. Simply click
on the tab at the bottom of the screen and you will see the tool. QuickCapture QuickCapture
For example, if you are in mode, and you have three cues playing, you can capture that into a Multi-cue
single cue, so that next time you want to trigger the same three cues, you can do it by merely clicking on
a single cue.
The main features of the tool are shown and described in the picture below. QuickCapture
Displaying the capture momentarily
To send the output of the QuickCapture tool to the laser, simply click on the button. Show it now
Saving the QuickCapture to a cue
You can save the to a cue for permanent storage or for use later. Simply drag and drop QuickCapture
the preview window (or the tab itself) to a cue. QuickCapture
68

QuickFX
The tool is different from all of the other QuickTools. The QuickFX is intended to apply an QuickFX
effect to already-running cues.
The main features of the tool are shown and described in the picture below. QuickFX
As shown, you simply clock on a desired effect, and it will be applied on top of all playing cues (if the
Master button is pressed) or it will be applied to only the selected cue (if the Cue button is pressed).
Up to four FX can be active at a time
There are multiple Layers of FX available. This allows you to pick an effect from Layer 1, and a
separate effect from Layer 2, and have both effects active simultaneously. Since there are four layers of
effects, this allows up to four effects to be active at the same time.
69

Advanced Tools overview
In addition to the QuickTools, which allow you to create content extremely quickly but with limited
parameters, QuickShow also includes a full featured Laser Frame/Animation editor, Advanced Text
editor, Advanced Shape (abstract) generator, and an Advanced Clock editor.
These advanced tools can be accessed by right-clicking in a cue within the cue grid, or by using the Edit
menu.
70
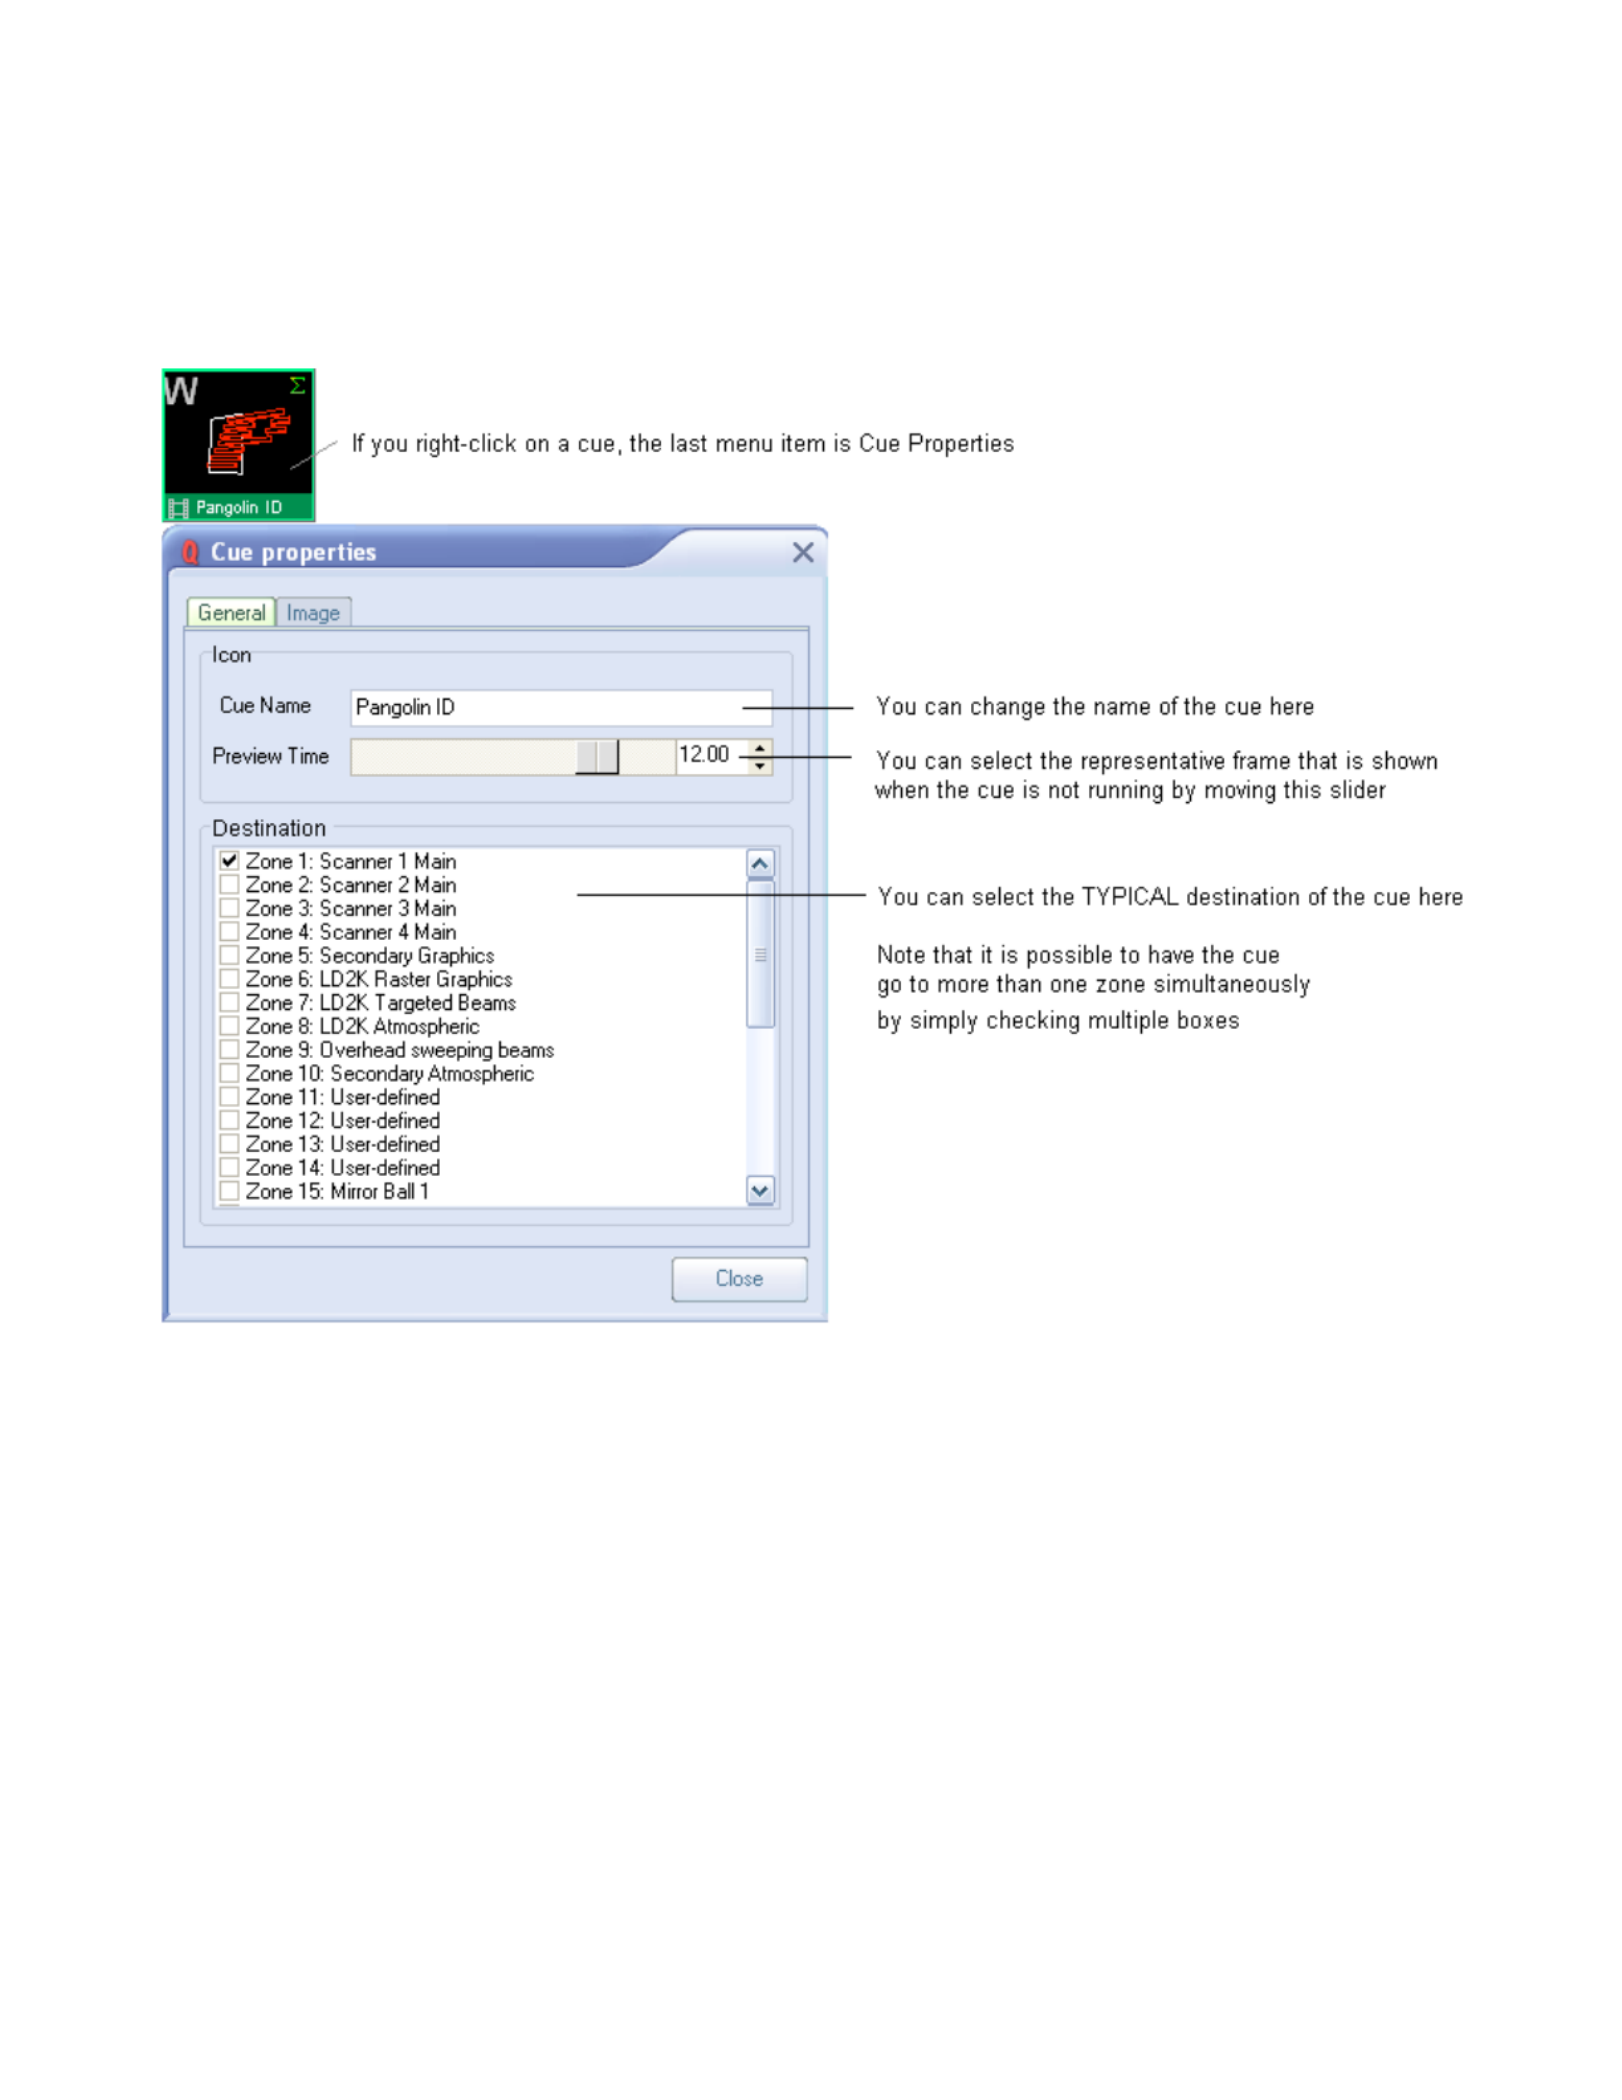
Cue properties
The Properties of each cue can be accessed by right-clicking on the cue and choosing Cue Properties.
The first page of the window is shown and described in the picture below. Cue Properties
Icon section
The section of the window controls the visual representation in the Cue Grid. The Icon Cue Properties
Cue Name is the name that shows up in the Cue Grid. The Preview Time is the time within the
animation that will be used to extract a single frame for the purpose of previewing in the Cue Grid.
Destination section
The section controls the destination of the cue (i.e. where the cue will be routed once it is Destination
triggered). Most users will have only a single FB3 and a single projection area, and therefore most users
can simply leave this set for the default selection (Zone 1: Scanner 1 Main).
Note that the section will not be visible unless you have already setup projection zones or if Destination
you have more than one FB3. Otherwise this section is hidden to prevent confusing beginner-level users.
Image-related properties
71

In the Second page of the window, you will find image-related properties. The second Cue Properties
page of the window is shown and described in the picture below. Cue Properties
Animation type
If the cue contains an animation (i.e. a frame file with more than one frame), there are three ways in
which QuickShow can animate that frame file.
Refresh-based animation (provides the smoothest animation for long frame files, but is often
too fast for simple animations with only a few frames)
(the most common type of animation -- used with most cues)Time-based animation
(allows you to control the animation based on the Beat system. This is Beat-based animation
very handy for visuals that go to the beat of the music.)
Scan rate and optimization settings
The lower portion of the window allows you to control the scan rate of the cue, as well Cue Properties
as accessing more advanced optimization settings. Most users can simply leave this set to 100% of the
base scan rate as shown above.
Preventing cues from being rerouted
It is possible to use the Laser Preview window as a means of directing cues to projection zones other
than those already specified by the cue itself. However, individual cues may prevent rerouting by
checking a box on the General tab.
72

When rerouting is prevented in this way, the cue will have a special icon indicating that it can't be
rerouted by the preview window.
73

Laser Frame/Animation editor
QuickShow includes an easy-to-use, yet full-featured Frame and Animation editor.
Powerful, yet easy to use
The editor works just like a simple Paint program and yet it takes all of the headaches out of creating
laser frames because points are placed automatically.
Just click on a drawing tool found in the upper left side of the window, choose a color, and start drawing.
You can even load existing animations in Pangolin or ILDA format and edit them as well.
Right click on any cue and select Edit to display the Edit window.
Following is a brief description of each menu options and shortcut icons:
74
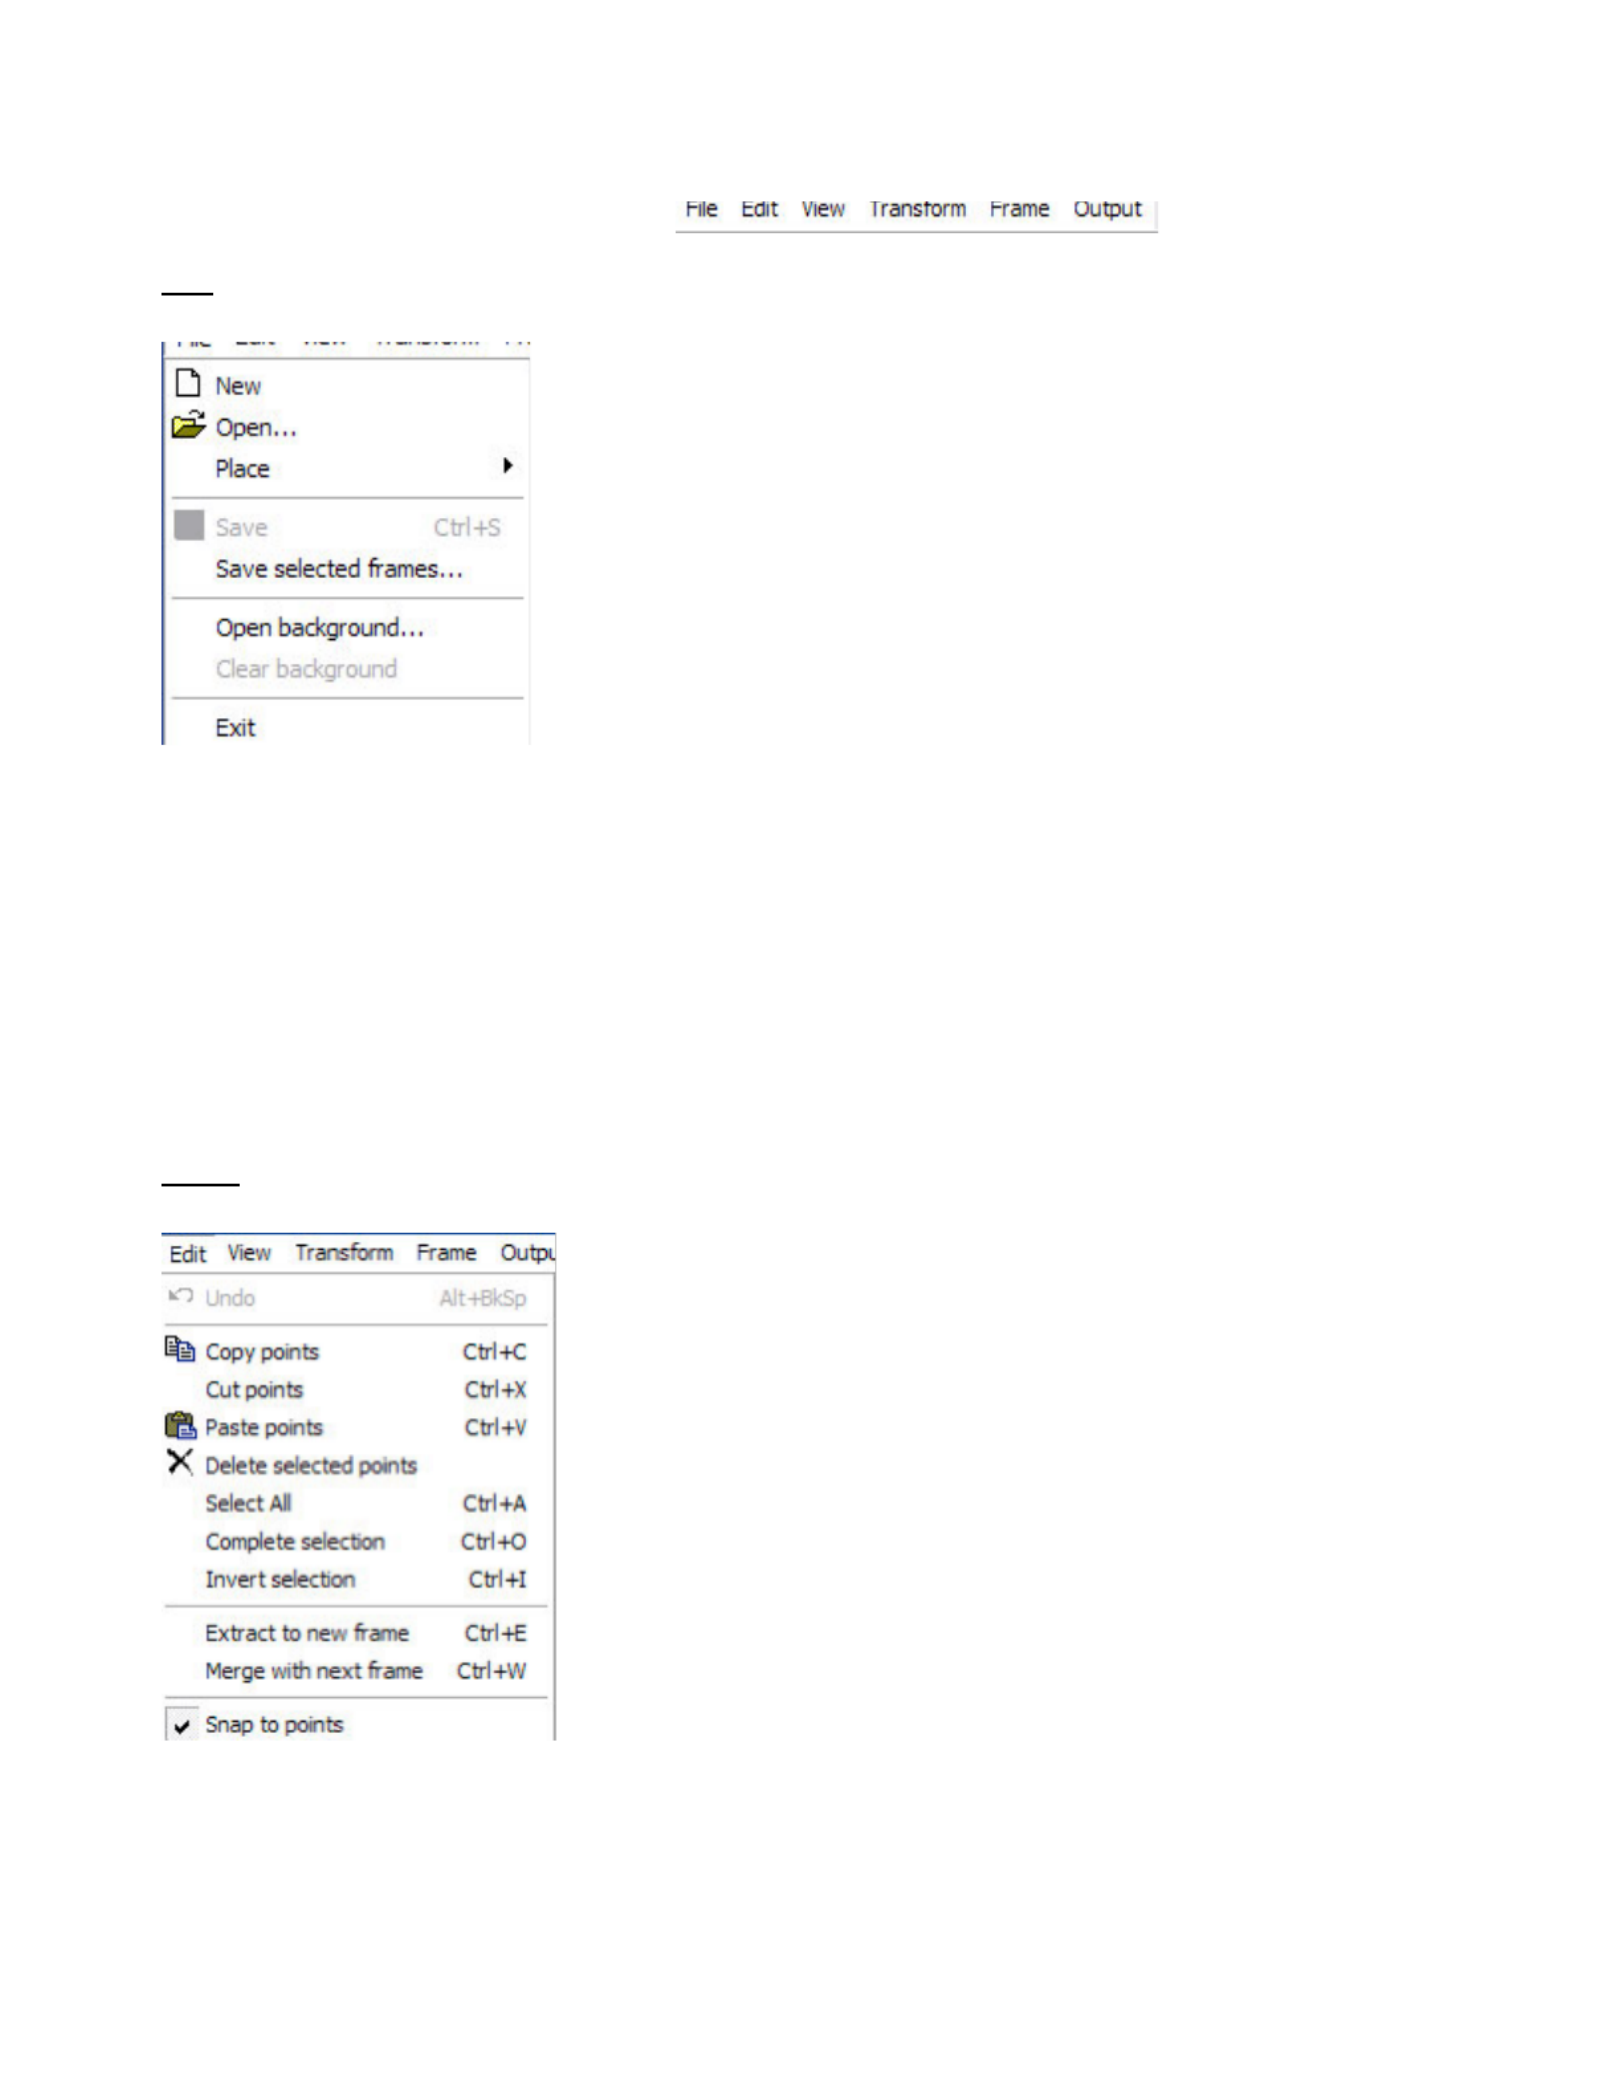
Drop Down Menus
File
New: Clears all frames in cue
Open: Opens Browser to Browse Frame Files to open
Place: Place a file into a location within the current frame list (cue)
Save: Save cue
Save selected frames: Click groups of frames (Click first frame then hold SHIFT and Click last frame
to highlight selected group of frames to use this function).
Open Background: Open a Bitmap image for tracing
Clear Background: Removes Bitmap image after tracing is complete.
EDIT
Undo: Undo what you just did
Copy Points: Copies selected points
Cut points: Cuts points from frame to clipboard
Paste points: Pastes copied or cut points
Delete selected points: Deletes selected points from frame
75

Select All: Selects all available data within frame
Complete Selection: Deselects selected points or points currently being edited
Invert Selection: Inverts state of point selection. If points are not selected this function inverts to
selected.
Extract to new frame: Extracts (Pulls out) selected points and creates a new frame next to the current
frame containing the extracted points
Merge with next frame: Merges current frame or selected points with the next frame in the frame list.
Transform
Quick Center: Quick Centers Image in Frame Edit Window
Quick Rotate: Gives you options of quick degrees of rotation of frame content such as 90 Clockwise
etc.
Quick Resize: Quick Resize gives you options such as double or half size to enable quick animations
between two sizes. (See Creating Animations for example)
Flip X: Flips the frame content on the X axis
Flip Y: Flips the frame content on the Y axis
Frame
Add: Adds a new frame to the end of the frame list
Insert: Inserts a duplicate frame next to the selected frame
Duplicate: Adds a duplicate frame of the selected frame to the end of the frame file list
Delete: Deletes the frame
Clear: Clears the content from the frame
Select All: Selects all frames in the frame file list
Copy: Copies selected frame
76

Paste: Pastes copied frame
Output
Stop Laser Output: Stops the laser output (Same as ESC key) use this ESC Key as a safety interlock to
stop output if a hazardous condition presents itself.
Enable Laser Output: Enables Laser Output to begin
Play Animation: Starts to play selected cue
Shortcuts
1 2 3 4 5 6 7 8 9 10 11 12 13 14 15 16
1. New Frame
2. Open Frame Folder to find frame files
3. Save
4. Undo
5. Copy
6. Paste
7. Delete
8. Show Points
9. Show Blanking Path
10. Zoom in
11. Zoom out
12. Effects
Effects are easy auto creation tools for quick animations of single frames and text.
Choose Effect such as write zoom in and enter a value of the total number of frames
to auto create.
See the section in this manual about creating animations or watch the training video
for more information
77

13. Animate
Opens path based animation dialogue box and tools. See section on animation further on in this manual
14. Frame Repeats: Save memory card space by using frame repeats to speed up or slow down
animations. Remember animation is a visual perception based on 24-30 frames per second. Instead of
drawing more frames use frame repeats to adjust the animation speed. Uses less memory space!
15. Density: Adjusts the point density or number of points per frame which relates to scan speed and
playback speed and visual perception. Increase or decrease point density to optimize the image based on
your scan speed capabilities and number of ppf (Points per frame).
16. Frame Properties: Set frame attributes and fine tune frame files for playback, projection zone, and
scan speed, color etc. See Frame Properties Section for more information.
78

Color
Quick Color selector interface (Click and Pick)
Double Click in the White Square to open RGB color picker dialogue box
Note: Using the RGB picker on a TTL only system may have some adverse effects. If your system
is TTL only choose primary colors as you will only have 7 colors to choose from.
Frame File List
Shows all frames in current frame file and enables (right Click) options for animation and additional
animation functions.
79

Frame Data
Shows information such as number of points in the selected frame and color data and position
information.
OK: Click ok and the cue will automatically be available in the Cue list you selected to edit on the main
page. You must upload changes to the memory and also save your workspace file in order not to lose
these changes.
Cancel: Cancels all changes and leaves original cue intact untouched.
Creating Content
In this section we will show brief examples of content creation.
1. Edit Existing Cues
Some cues already are animated. Others are single frames for use as a DMX workspace to use DMX to
control movement and other attributes that make single frames nice in DMX mode.
a. Select Existing single frame Cue by clicking on the cue.
b. From the Edit Menu or Right Click on Cue and select Edit
c. Right Click Here
d. Select Duplicate Frame (Now you have two identical frames)
e. Click the first frame then
f. Use the Select Object do select all the points in the frame or CTL + A to Select All.
g. Use the Move Tool to move the selected points in frame 1 to the top of the window and repeat
the process for frame two but move the selected points to the bottom of the frame. This should then look
like this:
80

Two frames
One with the selected points
on the top of the edit window
and the other on the bottom
h. Right click frame 1 and click the menu selection Create Animation Between Frames
i. Enter number of frames in the animation you desire. Remember to few frames the animation is fast,
1-100 (1 Fast – 100 Slow) Enter 50 for now click OK.
j. Presto! Instant 50 frame animation which you should see in the Frame File List.
k. Click OK and then the edit window will close and the cue will be in the workspace ready to be
uploaded to the memory in the device. Remember to save your workspace s you don’t mismatch the
workspace with the memory card.
81
Termékspecifikációk
| Márka: | BeamZ |
| Kategória: | Megkönnyebbülés |
| Modell: | Pangolin Quickshow |
Szüksége van segítségre?
Ha segítségre van szüksége BeamZ Pangolin Quickshow, tegyen fel kérdést alább, és más felhasználók válaszolnak Önnek
Útmutatók Megkönnyebbülés BeamZ

16 Március 2025
11 Január 2025
8 Január 2025
8 Január 2025
8 Január 2025
8 Január 2025
8 Január 2025
6 Január 2025
5 Január 2025
4 Január 2025
Útmutatók Megkönnyebbülés
- Megkönnyebbülés Ikea
- Megkönnyebbülés Dometic
- Megkönnyebbülés Nedis
- Megkönnyebbülés Milwaukee
- Megkönnyebbülés LG
- Megkönnyebbülés Philips
- Megkönnyebbülés Bosch
- Megkönnyebbülés Theben
- Megkönnyebbülés Livarno Lux
- Megkönnyebbülés Florabest
- Megkönnyebbülés Ozito
- Megkönnyebbülés Makita
- Megkönnyebbülés Auriol
- Megkönnyebbülés HQ
- Megkönnyebbülés Siemens
- Megkönnyebbülés TP-Link
- Megkönnyebbülés Emos
- Megkönnyebbülés Geemarc
- Megkönnyebbülés Vimar
- Megkönnyebbülés Roland
- Megkönnyebbülés JBL
- Megkönnyebbülés Viessmann
- Megkönnyebbülés Xiaomi
- Megkönnyebbülés GoGen
- Megkönnyebbülés Crivit
- Megkönnyebbülés CAT
- Megkönnyebbülés Crestron
- Megkönnyebbülés ORNO
- Megkönnyebbülés Mazda
- Megkönnyebbülés Medisana
- Megkönnyebbülés Be Cool
- Megkönnyebbülés Conceptronic
- Megkönnyebbülés Ardes
- Megkönnyebbülés Eurolite
- Megkönnyebbülés Cateye
- Megkönnyebbülés Intellytech
- Megkönnyebbülés Vivanco
- Megkönnyebbülés Duronic
- Megkönnyebbülés Rollei
- Megkönnyebbülés Hama
- Megkönnyebbülés Dyson
- Megkönnyebbülés Knog
- Megkönnyebbülés Westinghouse
- Megkönnyebbülés Telefunken
- Megkönnyebbülés Ring
- Megkönnyebbülés V-TAC
- Megkönnyebbülés Monster
- Megkönnyebbülés COLBOR
- Megkönnyebbülés Omnitronic
- Megkönnyebbülés Toolcraft
- Megkönnyebbülés Bresser
- Megkönnyebbülés Klein Tools
- Megkönnyebbülés American DJ
- Megkönnyebbülés Denver
- Megkönnyebbülés Black & Decker
- Megkönnyebbülés Workzone
- Megkönnyebbülés Gardena
- Megkönnyebbülés DiO
- Megkönnyebbülés Planet
- Megkönnyebbülés NGS
- Megkönnyebbülés Lenoxx
- Megkönnyebbülés Godox
- Megkönnyebbülés Gembird
- Megkönnyebbülés PowerPlus
- Megkönnyebbülés OK
- Megkönnyebbülés Metabo
- Megkönnyebbülés Osram
- Megkönnyebbülés Ledlenser
- Megkönnyebbülés Behringer
- Megkönnyebbülés Powerfix
- Megkönnyebbülés Biltema
- Megkönnyebbülés Rocktrail
- Megkönnyebbülés Novy
- Megkönnyebbülés Chamberlain
- Megkönnyebbülés Showtec
- Megkönnyebbülés RYOBI
- Megkönnyebbülés Futurelight
- Megkönnyebbülés Chauvet
- Megkönnyebbülés HiKOKI
- Megkönnyebbülés MaxCom
- Megkönnyebbülés Kogan
- Megkönnyebbülés Honeywell
- Megkönnyebbülés EnGenius
- Megkönnyebbülés Yato
- Megkönnyebbülés Sigma
- Megkönnyebbülés Velleman
- Megkönnyebbülés Media-Tech
- Megkönnyebbülés TFA
- Megkönnyebbülés Monacor
- Megkönnyebbülés Hayward
- Megkönnyebbülés Tesy
- Megkönnyebbülés Trotec
- Megkönnyebbülés ION
- Megkönnyebbülés Blaupunkt
- Megkönnyebbülés NZXT
- Megkönnyebbülés Gre
- Megkönnyebbülés Mio
- Megkönnyebbülés Chacon
- Megkönnyebbülés Elro
- Megkönnyebbülés Razer
- Megkönnyebbülés Busch-Jaeger
- Megkönnyebbülés Logik
- Megkönnyebbülés NEO Tools
- Megkönnyebbülés Fiap
- Megkönnyebbülés Delta Dore
- Megkönnyebbülés Infinity
- Megkönnyebbülés Trust
- Megkönnyebbülés GAO
- Megkönnyebbülés Porter-Cable
- Megkönnyebbülés Konig
- Megkönnyebbülés ARRI
- Megkönnyebbülés GlobalTronics
- Megkönnyebbülés DeWalt
- Megkönnyebbülés Steinel
- Megkönnyebbülés IFM
- Megkönnyebbülés Eheim
- Megkönnyebbülés JMAZ Lighting
- Megkönnyebbülés Corsair
- Megkönnyebbülés Schneider
- Megkönnyebbülés Brandson
- Megkönnyebbülés Stanley
- Megkönnyebbülés Busch + Müller
- Megkönnyebbülés Impact
- Megkönnyebbülés Nitecore
- Megkönnyebbülés DMT
- Megkönnyebbülés Cameo
- Megkönnyebbülés Cotech
- Megkönnyebbülés Martin
- Megkönnyebbülés Siig
- Megkönnyebbülés Artecta
- Megkönnyebbülés Kathrein
- Megkönnyebbülés HQ Power
- Megkönnyebbülés Elation
- Megkönnyebbülés Beper
- Megkönnyebbülés Brilliant
- Megkönnyebbülés Melinera
- Megkönnyebbülés Blizzard
- Megkönnyebbülés Varta
- Megkönnyebbülés SereneLife
- Megkönnyebbülés Pontec
- Megkönnyebbülés Vintec
- Megkönnyebbülés Olight
- Megkönnyebbülés Kino Flo
- Megkönnyebbülés Adj
- Megkönnyebbülés OneConcept
- Megkönnyebbülés ILive
- Megkönnyebbülés Nordlux
- Megkönnyebbülés Schwaiger
- Megkönnyebbülés Neewer
- Megkönnyebbülés EasyMaxx
- Megkönnyebbülés Heitronic
- Megkönnyebbülés Lexon
- Megkönnyebbülés Astro
- Megkönnyebbülés Cocraft
- Megkönnyebbülés XQ-lite
- Megkönnyebbülés Craftsman
- Megkönnyebbülés Blackburn
- Megkönnyebbülés Kern
- Megkönnyebbülés Smartwares
- Megkönnyebbülés Aqara
- Megkönnyebbülés Fluval
- Megkönnyebbülés Hazet
- Megkönnyebbülés CSL
- Megkönnyebbülés Perfect Christmans
- Megkönnyebbülés Vivitar
- Megkönnyebbülés Lume Cube
- Megkönnyebbülés Fiilex
- Megkönnyebbülés Fenix
- Megkönnyebbülés Digipower
- Megkönnyebbülés Profoto
- Megkönnyebbülés Generac
- Megkönnyebbülés Manfrotto
- Megkönnyebbülés Rosco
- Megkönnyebbülés Ansmann
- Megkönnyebbülés All Solar Lights
- Megkönnyebbülés Reflecta
- Megkönnyebbülés Qazqa
- Megkönnyebbülés ADB
- Megkönnyebbülés Tel Sell
- Megkönnyebbülés Brennenstuhl
- Megkönnyebbülés KonstSmide
- Megkönnyebbülés LivarnoLux
- Megkönnyebbülés Tiger
- Megkönnyebbülés Miomare
- Megkönnyebbülés Eglo
- Megkönnyebbülés Lucide
- Megkönnyebbülés Caliber
- Megkönnyebbülés SilverStone
- Megkönnyebbülés Kichler
- Megkönnyebbülés Anslut
- Megkönnyebbülés Sun Joe
- Megkönnyebbülés Halo
- Megkönnyebbülés Aukey
- Megkönnyebbülés KlikaanKlikuit
- Megkönnyebbülés Gemini
- Megkönnyebbülés GLP
- Megkönnyebbülés Maginon
- Megkönnyebbülés Megaman
- Megkönnyebbülés Steren
- Megkönnyebbülés Perel
- Megkönnyebbülés Audiosonic
- Megkönnyebbülés Lumie
- Megkönnyebbülés Livarno
- Megkönnyebbülés Watshome
- Megkönnyebbülés Envivo
- Megkönnyebbülés Black Diamond
- Megkönnyebbülés ESYLUX
- Megkönnyebbülés In Lite
- Megkönnyebbülés Maul
- Megkönnyebbülés Näve
- Megkönnyebbülés Hive
- Megkönnyebbülés Goobay
- Megkönnyebbülés Bigben
- Megkönnyebbülés Massive
- Megkönnyebbülés IDance
- Megkönnyebbülés Yongnuo
- Megkönnyebbülés Gamma
- Megkönnyebbülés Laser
- Megkönnyebbülés Clas Ohlson
- Megkönnyebbülés Steinhauer
- Megkönnyebbülés QTX
- Megkönnyebbülés Zuiver
- Megkönnyebbülés Reer
- Megkönnyebbülés Belux
- Megkönnyebbülés Kress
- Megkönnyebbülés EVE
- Megkönnyebbülés Ikan
- Megkönnyebbülés Blumfeldt
- Megkönnyebbülés GVM
- Megkönnyebbülés Gira
- Megkönnyebbülés Jung
- Megkönnyebbülés Harvia
- Megkönnyebbülés Genaray
- Megkönnyebbülés Max
- Megkönnyebbülés Nanlite
- Megkönnyebbülés Ecomed
- Megkönnyebbülés Trio Lighting
- Megkönnyebbülés Ranex
- Megkönnyebbülés Qnect
- Megkönnyebbülés Bazooka
- Megkönnyebbülés Wentronic
- Megkönnyebbülés Peerless
- Megkönnyebbülés Paul Neuhaus
- Megkönnyebbülés Dymond
- Megkönnyebbülés Friedland
- Megkönnyebbülés Nexxt
- Megkönnyebbülés Bora
- Megkönnyebbülés Ibiza Sound
- Megkönnyebbülés Stairville
- Megkönnyebbülés Adastra
- Megkönnyebbülés Litecraft
- Megkönnyebbülés Garden Lights
- Megkönnyebbülés Shada
- Megkönnyebbülés Swisstone
- Megkönnyebbülés Handson
- Megkönnyebbülés Aputure
- Megkönnyebbülés ColorKey
- Megkönnyebbülés KS
- Megkönnyebbülés Dydell
- Megkönnyebbülés Trump Electronics
- Megkönnyebbülés Verbatim
- Megkönnyebbülés Normann
- Megkönnyebbülés Panzeri
- Megkönnyebbülés Moen
- Megkönnyebbülés Merlin Gerin
- Megkönnyebbülés Sencys
- Megkönnyebbülés Botex
- Megkönnyebbülés Levita
- Megkönnyebbülés Unitec
- Megkönnyebbülés Dorr
- Megkönnyebbülés Ludeco
- Megkönnyebbülés Hortensus
- Megkönnyebbülés Paulmann
- Megkönnyebbülés Heirt
- Megkönnyebbülés Kanlux
- Megkönnyebbülés Woodland Scenics
- Megkönnyebbülés LYYT
- Megkönnyebbülés Wetelux
- Megkönnyebbülés SLV
- Megkönnyebbülés Sagitter
- Megkönnyebbülés Handy Century
- Megkönnyebbülés Solaris
- Megkönnyebbülés Aqua Signal
- Megkönnyebbülés Century
- Megkönnyebbülés Esotec
- Megkönnyebbülés Fuzzix
- Megkönnyebbülés Mtx Audio
- Megkönnyebbülés Berger & Schröter
- Megkönnyebbülés Lideka
- Megkönnyebbülés Lutec
- Megkönnyebbülés Maxxworld
- Megkönnyebbülés SolarlampKoning
- Megkönnyebbülés Ibiza Light
- Megkönnyebbülés IXL
- Megkönnyebbülés Fun Generation
- Megkönnyebbülés Karma
- Megkönnyebbülés Meipos
- Megkönnyebbülés Mr. Beams
- Megkönnyebbülés Pegasi
- Megkönnyebbülés Mellert SLT
- Megkönnyebbülés 4K5
- Megkönnyebbülés Lightway
- Megkönnyebbülés IMG Stage Line
- Megkönnyebbülés Wireless Solution
- Megkönnyebbülés Eutrac
- Megkönnyebbülés EtiamPro
- Megkönnyebbülés Olymp
- Megkönnyebbülés NUVO
- Megkönnyebbülés LightZone
- Megkönnyebbülés Varytec
- Megkönnyebbülés Tractel
- Megkönnyebbülés Enerdan
- Megkönnyebbülés Luxform Lighting
- Megkönnyebbülés Canarm
- Megkönnyebbülés Angler
- Megkönnyebbülés GP
- Megkönnyebbülés Luxform
- Megkönnyebbülés Karwei
- Megkönnyebbülés DistriCover
- Megkönnyebbülés Blumill
- Megkönnyebbülés Aquatica
- Megkönnyebbülés Ledar
- Megkönnyebbülés Delock Lighting
- Megkönnyebbülés LightPro
- Megkönnyebbülés FlinQ
- Megkönnyebbülés Adviti
- Megkönnyebbülés 9.solutions
- Megkönnyebbülés Pauleen
- Megkönnyebbülés Obsidian
- Megkönnyebbülés FeinTech
- Megkönnyebbülés Gumax
- Megkönnyebbülés Doughty
- Megkönnyebbülés Sharper Image
- Megkönnyebbülés CIVILIGHT
- Megkönnyebbülés ActiveJet
- Megkönnyebbülés Enlite
- Megkönnyebbülés Gingko
- Megkönnyebbülés Outspot
- Megkönnyebbülés Innr
- Megkönnyebbülés Fristom
- Megkönnyebbülés Dracast
- Megkönnyebbülés Raya
- Megkönnyebbülés DTS
- Megkönnyebbülés Expolite
- Megkönnyebbülés LSC Smart Connect
- Megkönnyebbülés Mr Safe
- Megkönnyebbülés Swisson
- Megkönnyebbülés Tellur
- Megkönnyebbülés SSV Works
- Megkönnyebbülés Chrome-Q
- Megkönnyebbülés ETC
- Megkönnyebbülés Meteor
- Megkönnyebbülés Maxim
- Megkönnyebbülés Megatron
- Megkönnyebbülés MeLiTec
- Megkönnyebbülés Integral LED
- Megkönnyebbülés Time 2
- Megkönnyebbülés Wachsmuth - Krogmann
- Megkönnyebbülés Amaran
- Megkönnyebbülés Dynamax
- Megkönnyebbülés DreamLED
- Megkönnyebbülés Ideen Welt
- Megkönnyebbülés Casalux
- Megkönnyebbülés Briloner
- Megkönnyebbülés Retlux
- Megkönnyebbülés Adam Hall
- Megkönnyebbülés Hoftronic
- Megkönnyebbülés Underwater Kinetics
- Megkönnyebbülés Musicmate
- Megkönnyebbülés Light4Me
- Megkönnyebbülés Lowel
- Megkönnyebbülés Illuminex
- Megkönnyebbülés Sonoff
- Megkönnyebbülés Lirio By Philips
- Megkönnyebbülés Raytec
- Megkönnyebbülés Gewiss
- Megkönnyebbülés Hella Marine
- Megkönnyebbülés Bright Spark
- Megkönnyebbülés Sengled
- Megkönnyebbülés Enttec
- Megkönnyebbülés Ledino
- Megkönnyebbülés Ikelite
- Megkönnyebbülés Audibax
- Megkönnyebbülés Middle Atlantic
- Megkönnyebbülés Sonlux
- Megkönnyebbülés Atmospheres
- Megkönnyebbülés Dainolite
- Megkönnyebbülés DOTLUX
- Megkönnyebbülés Ape Labs
- Megkönnyebbülés Insatech
- Megkönnyebbülés GEV
- Megkönnyebbülés Kinotehnik
- Megkönnyebbülés Litegear
- Megkönnyebbülés DCW
- Megkönnyebbülés LumenRadio
- Megkönnyebbülés HERA
- Megkönnyebbülés BB&S
- Megkönnyebbülés Astera
- Megkönnyebbülés Temde
- Megkönnyebbülés Excello
- Megkönnyebbülés Varaluz
- Megkönnyebbülés Aveo Engineering
- Megkönnyebbülés Prolycht
- Megkönnyebbülés Magmatic
- Megkönnyebbülés DeSisti
- Megkönnyebbülés Cineo
- Megkönnyebbülés Zylight
- Megkönnyebbülés Smith-Victor
- Megkönnyebbülés Light & Motion
- Megkönnyebbülés LUPO
- Megkönnyebbülés Altman
- Megkönnyebbülés EXO
- Megkönnyebbülés Setti+
- Megkönnyebbülés Portman
- Megkönnyebbülés Fotodiox
- Megkönnyebbülés Claypaky
- Megkönnyebbülés Bearware
- Megkönnyebbülés Litepanels
- Megkönnyebbülés Aplic
- Megkönnyebbülés Rayzr 7
- Megkönnyebbülés Beghelli
- Megkönnyebbülés ET2
- Megkönnyebbülés Quoizel
- Megkönnyebbülés WAC Lighting
- Megkönnyebbülés Golden Lighting
- Megkönnyebbülés Weeylite
- Megkönnyebbülés Crystorama
- Megkönnyebbülés Valerie Objects
- Megkönnyebbülés OttLite
- Megkönnyebbülés Sonneman
- Megkönnyebbülés Zero 88
- Megkönnyebbülés AFX
- Megkönnyebbülés Stamos
- Megkönnyebbülés Currey & Company
- Megkönnyebbülés Wiesenfield
- Megkönnyebbülés Luxli
- Megkönnyebbülés Elan
- Megkönnyebbülés Livex Lighting
- Megkönnyebbülés Hinkley Lighting
- Megkönnyebbülés Sea&Sea
- Megkönnyebbülés Triton Blue
- Megkönnyebbülés Singercon
- Megkönnyebbülés Hudson Valley
- Megkönnyebbülés Forte Lighting
- Megkönnyebbülés Kuzco
- Megkönnyebbülés Schonbek
Legújabb útmutatók Megkönnyebbülés
9 Április 2025
9 Április 2025
9 Április 2025

8 Április 2025
8 Április 2025
8 Április 2025
7 Április 2025
5 Április 2025
5 Április 2025
5 Április 2025