Használati útmutató Auna Connect Soundchef
Olvassa el alább 📖 a magyar nyelvű használati útmutatót Auna Connect Soundchef (224 oldal) a rádió kategóriában. Ezt az útmutatót 5 ember találta hasznosnak és 2 felhasználó értékelte átlagosan 4.5 csillagra
Oldal 1/224

www.auna-multimedia.com
Connect Soundchef
Unterbauradio
Under-cabinet radio
Radio debajo del gabinete
Radio sous le meuble
Radio sottopensile
10032166 10032167 10032168


3
DE
English 47
Français 91
Italiano 135
Español 179
Sehr geehrter Kunde,
wir gratulieren Ihnen zum Erwerb Ihres Gerätes. Lesen Sie
die folgenden Hinweise sorgfältig durch und befolgen
Sie diese, um möglichen Schäden vorzubeugen. Für
Schäden, die durch Missachtung der Hinweise und
unsachgemäßen Gebrauch entstehen, übernehmen wir
keine Haftung.Scannen Sie den QR-Code, um Zugri
auf die aktuellste Bedienungsanleitung und weitere
Informationen rund um das Produkt zu erhalten.
INHALTSVERZEICHNIS
Technische Daten 4
Geräteübersicht 8
Inbetriebnahme 10
Funktionen und Einstellungen 13
Internet Radio 22
Spotify ConnecT 24
Musik-Player 25
DAB 31
FM-Radio 33
BT-Verbindung 35
AUX-IN 36
Weitere Funktionen 36
NetRemote (UNDOK-App) 38
Reinigung und Pege 42
Fehlersuche und Fehlerbehebung 42
Hinweise zur Entsorgung 45
Konformitätserklärung 45
4
DE
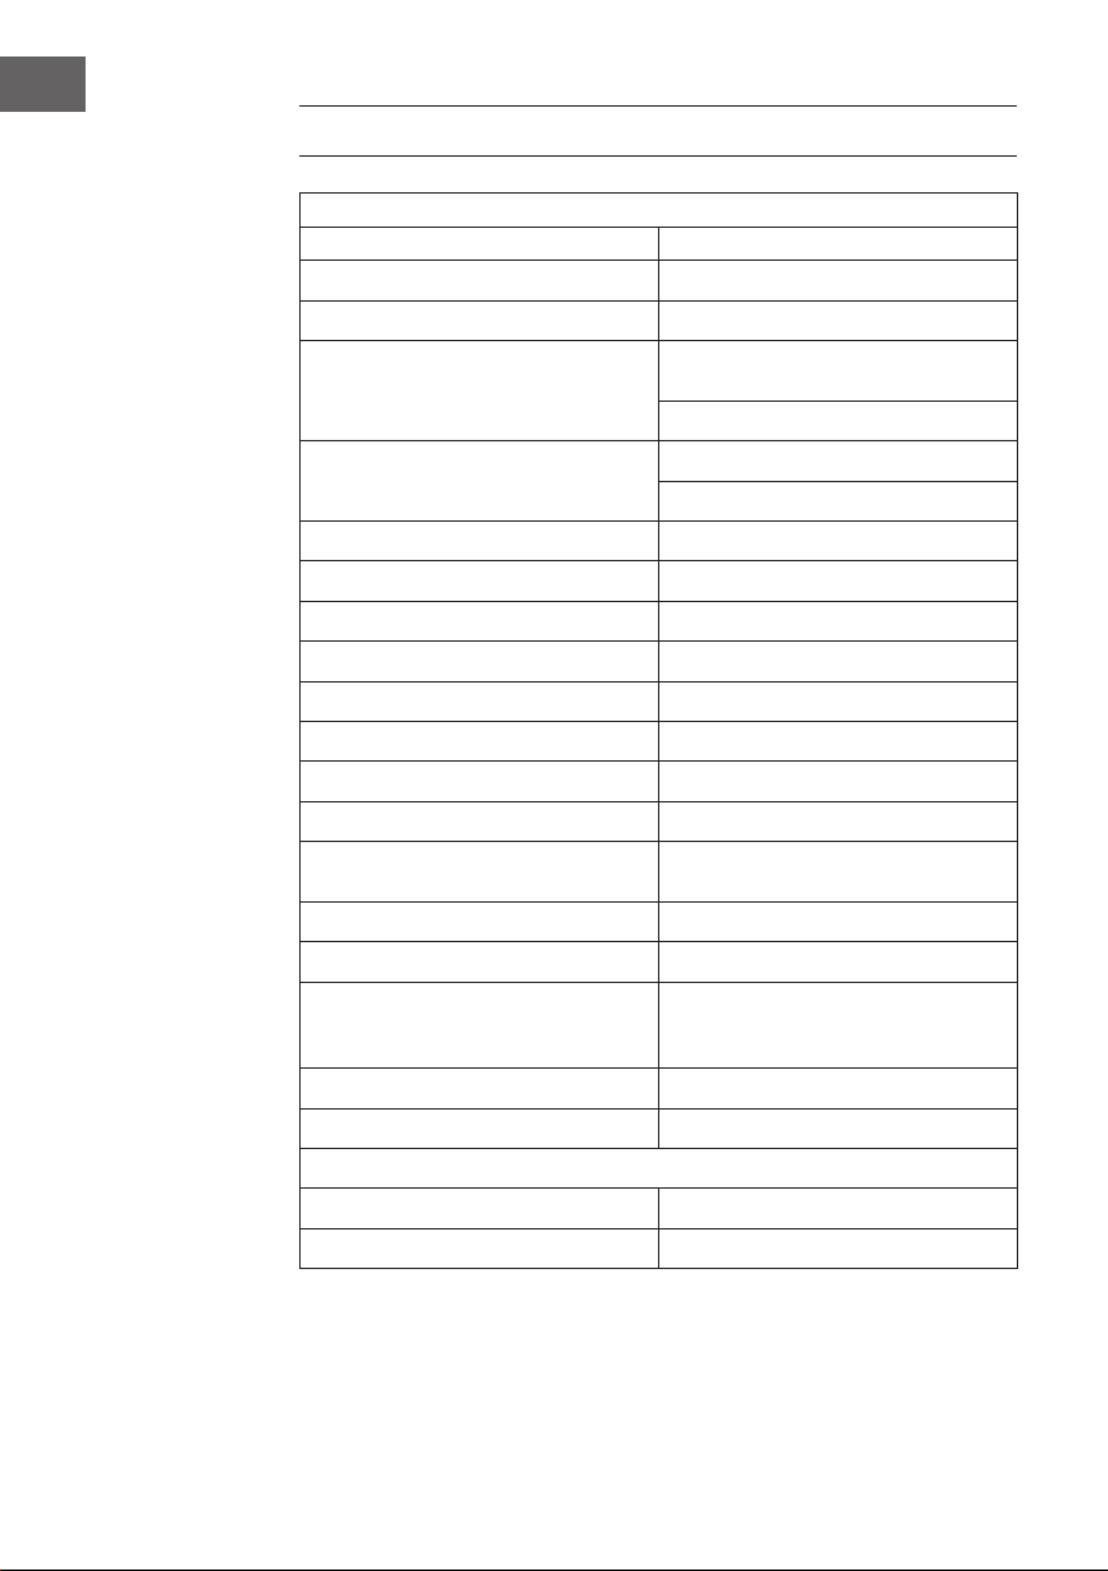
TECHNISCHE DATEN
Gerät
Artikelnummer 10032166, 10032167, 10032168
Bildschirm 2,4“, 320x240, TFT Farbbildschirm
Unterstütztes Netzwerk IEEE 802.11a/b/g/n drahtlos (WiFi)
Frequenzbereich
WiFi: 2.400-2.4836 GHz
Bluetooth: 2,4GHz-2,48GHz
Maximal übertragene
Radiofrequenzstärke
WiFi: 17.432dBm
Bluetooth: <20dBm
Verschlüsselungen WEP, WPA,WPA2 (PSK), WPS
Streaming UPnP, DLNA
Unterstützte Wiedergabeformate MP3, WMA, WAV, FLAC
DAB/DAB+ Band III (170-240MHz)
FM 87.0-180.0 MHz, mit RDS
Netzteil 12V 2000mA
Batterien für die Fernbedienung 2 x 1,5V Typ AAA Batterien
Stromverbrauch im Standby-Modus <1,0W
Stromverbrauch um Standby-Modus mit
Netzwerkverbindung <6,0W
Betriebstemperatur 0°C-35°C
Ausgangsleistung der Lautsprecher 2x7W=14W
Anschlüsse
3,5mm AUX-IN Anschluss, Stereo
3,5mm Kopfhöreranschluss, Stereo
DC IN Stromanschluss
Maße in mm (LxHxT) 256x72x200
Gewicht 1.71 kg
Netzteil
Eingangsleistung 100-240V AC, 50/60 Hz
Ausgangsleistung 12V 2000mA

5
DE
Netzteil
Hersteller Chal-Tec GmbH, Wallstraße 16,
10179 Berlin, Deutschland.
Eingangsspannung AC 100 – 240V
Eingangs-Wechselstromfrequenz 50/60 Hz
Ausgangsspannung DC 12.0 V
Ausgangsstrom 2.0 A
Ausgangsleistung 24.0 W
Durchschnittliche aktive Efzienz 87.54% @ 115 V (AC) / 60 Hz
87.47% @ 230 V (AC) / 50 Hz
Wirkungsgrad bei niedriger Last
(10%)
88.53% @115 V (AC) / 60 Hz
86.19% @230 V (AC) / 50 Hz
Leistungsaufnahme bei Nulllast 0.052W @115 V (AC) / 60 Hz
0.077W @ 230 V (AC) / 50 Hz

6
DE
Netzwerkanforderungen:
• Eine Breitbandverbindung in Kombination mit einem drahtlosen
Zugangspunkt, Router oder ähnlichem Netzwerkgerät.
• Das Netzwerkgerät muss eine drahtlose Netzwerkverbindung
(802.11a/b/g/n) unterstützen.
• PC, Tablet oder Smartphone muss mit Netzwerkverbindung. Das
Netzwerk, mit dem das Radio verbunden ist, muss das Gleiche sein.
SICHERHEITSHINWEISE
Allgemeine Sicherheitshinweise
• Lassen Sie das Radio nicht herunter fallen und achten Sie darauf, dass
es nicht mit Flüssigkeiten, Dampf oder Flüssigkeit in Berührung kommt.
• Wenn Sie das Gerät aus einer kalten Umgebung in eine wärmere
Umgebung bringen, geben Sie dem Gerät einen Moment Zeit, sich an
die neue Temperatur anzupassen, bevor Sie es bedienen. Anderenfalls
könnte sich Kondenswasser bilden, welches zu Fehlfunktionen des
Geräts führen könnte.
• Verwenden Sie das Radio nicht in staubiger Umgebung, da die inneren
elektronischen Komponenten des Geräts dadurch beschädigt werden
könnten, was zu Fehlfunktionen führen könnte.
• Schützen Sie das Radio vor starken Vibrationen und stellen Sie es nur
auf stabile Oberächen.
• Versuchen Sie nicht, das Radio auseinander zu bauen.
• Ziehen Sie den Netzstecker des Radios aus der Steckdose, wenn dieses
für einen längeren Zeitraum nicht verwendet wird. Dadurch wird die
Brandgefahr verringert.
• Blockieren Sie keinesfalls die Belüftungsönungen des Radios mit
Gegenständen wie beispielsweise Zeitungen, Tischdecken, Vorhängen
etc.
• Auf dem Gerät sollten keine oenen Flammen, wie beispielsweise
angezündete Kerzen, abgestellt werden.
• Platzieren Sie das Gerät, um den Anforderungen der RF
Strahlenbelastungsrichtlinien zu entsprechen, in mindestens 20cm (8
Zoll) Abstand zu Personen, die sich in der Nähe benden, es sei denn,
Sie verwenden die Bedienelemente.

7
DE
Netzteil
• Verwenden Sie nur das mit dem Radio gelieferte Netzteil.
• Die verwendete Steckdose sollte sich in der Nähe des Radios benden
und sollte leicht zugänglich sein.
• Fassen Sie den Netzstecker niemals mit nassen Händen an und ziehen
Sie den Netzstecker niemals am Kabel aus der Steckdose.
• Achten Sie darauf, dass die auf dem Typenschild des Radios und
auf dem Netzstecker angegebene elektrische Spannung mit der
elektrischen Spannung der Steckdose übereinstimmt. Die falsche
Spannung kann zur Zerstörung des Geräts führen.
Risiken in Verbindung mit hoher Lautstärke
• Wenn Sie zum Musikhören mit dem Radio Kopfhörer verwenden,
reduzieren Sie vor der Verwendung der Kopfhörer immer die Lautstärke.
Nachdem Sie die Kopfhörer richtig positioniert haben, können Sie die
Lautstärke bis zur gewünschten Höhe anpassen.
• Hören Sie zum Vermeiden von Hörschäden nicht über längere
Zeiträume mit hoher Lautstärke Musik.
Hinweise zum Gebrauch von Batterien
• Versuchen Sie niemals, die Batterien der Fernbedienung aufzuladen
oder zu önen. Explosionsgefahr.
• Beschädigen oder verbiegen Sie die Batterien nicht.
• Werfen Sie Batterien niemals in oenes Feuer und setzen Sie diese
keinen hohen Temperaturen aus.
• Verwenden Sie nur Batterien des gleichen oder eines äquivalenten
Typs. Explosionsgefahr.
• Entfernen Sie die Batterien, sobald diese leer sind, oder wenn Sie die
Fernbedienung für einen längeren Zeitraum nicht verwenden möchten,
aus dem Batteriefach.
• Verwenden Sie die Fernbedienung nicht, wenn das Batteriefach
nicht mehr richtig schließt. Achten Sie auf eine fachgerechte,
umweltschonende Entsorgung der Batterien.
• Ein Missachten dieser Hinweise kann dazu führen, dass Batteriesäure
austritt, was zu Hautirritationen führen kann.
Im Falle eines Hautkontakts mit Batteriesäure:
• Spülen Sie die Batteriesäure mit reichlich klarem Wasser ab.
• Reiben Sie sich nicht die Augen. Spülen Sie Ihre Augen stattdessen für
etwa 10 Minuten mit ausreichend klarem Wasser aus und suchen Sie
sofort einen Arzt auf.

8
DE
GERÄTEÜBERSICHT
1 2,4 TFT Bildschirm Anzeige
2 Tasten und Knöpfe Grundlegende Bedienungselemente
3 Fernbedienungsempfänger Infrarotschnittstelle der
Fernbedienung
4 Kopfhörerausgang 3,5mm-Buchse zur
Lautsprecherverbindung
5 AUX In 3,5mm-AUX In-Buchse
6 Mikrofon Zur Verwendung der
Freisprechfunktion
7 Ein-/Ausschalter Gerät ein-/ausschalten
8 DC IN Stromversorgung
9 FM/DAB Antennenanschluss Verbinden Sie das IEC-
Antennenkabel

9
DE
Fernbedienung
Verwenden Sie Ihren Daumen, um den Deckel
der Batterieabdeckung nach unten zu drücken
und heraus zu ziehen. Legen Sie eine 1,5V 2 AAA
Batterie in das Batteriefach. Achten Sie darauf,
dass Sie die Batterie richtig einlegen.
Es besteht Explosionsgefahr, wenn eine
Batterie des falschen Typs eingelegt wird.
Entsorgen Sie gebrauchte Batterien gemäß den
landesüblichen Bestimmungen.
VORSICHT
Verletzungsgefahr! Verschlucken
Sie die Batterie der
Fernbedienung nicht. Es besteht
die Gefahr einer chemischen
Verbrennung
Halten Sie sowohl neue als auch gebrauchte
Batterien fern von Kindern. Wenn das
Batteriefach sich nicht mehr sicher verschließen
lässt, hören Sie auf, die Fernbedienung zu
verwenden und bewahren Sie diese außerhalb
der Reichweite von Kindern auf. Wenn Sie
glauben, dass Batterien verschluckt worden
sein könnten oder in sonstige Körperö nungen
gesteckt wurden, suchen Sie umgehend einen
Arzt auf.

11
DE
Installation des zusätzlich erhältlichen Tablet-Halters
Im Falle, dass ihr Tablet-Halter nicht fest genug gehalten wird oder
die Halterung sich zu leicht dreht, ziehen Sie bitte die Schrauben an
den Gelenken des Halters an. Die Schrauben benden sich unter den
Schutzkappen an den Gelenken.
Die Netzwerkumgebung vorbereiten
Für drahtloses WiFi
• Vergewissern Sie sich, dass Sie ein drahtloses Netzwerk eingerichtet
haben und das Sie das WEP, WPA oder WPA2 Sicherheitspasswort
kennen, damit Sie eine Verbindung herstellen können.
• Sie können ebenfalls die WPS (WiFi Protected Setup) Funktion, für eine
einfache Verbindungsherstellung zwischen dem Netzwerkgerät und
dem Radio, verwenden.
• Überprüfen Sie, ob sich die Leuchtanzeigen auf dem Netzwerkgerät im
richtigen Status benden.
• Verbinden Sie das Netzteil mit dem Gerät und stecken Sie den
Netzstecker in die Steckdose. Schalten Sie das Radio ein.
• Bei der ersten Inbetriebnahme des Geräts wird das System Sie fragen,
ob Sie den Installationsassistenten starten möchten. Wählen Sie „JA“
aus, um mit der Einrichtung fortzufahren. Installationsassistent. Wenn
Sie „NEIN“ auswählen, wird auf dem Bildschirm die Frage erscheinen,
ob Sie den Installationsassistenten beim nächsten Einschalten des
Radios starten möchten.

12
DE
• Das Radio wird sich, sobald Sie es einschalten, automatisch mit dem
zuvor eingestellten Netzwerk verbinden. Wenn Sie das Netzwerk
ändern möchten, gehen Sie in „Systemeinstellungen“, um die
entsprechende Verbindung herzustellen.
• Drücken und halten Sie die Taste
MODE auf dem Gerät oder drücken Sie
die Taste der Fernbedienung, um
in den Standby-Modus zu gelangen.
Zeit, Datum und alle aktiven Alarme
werden auf dem Bildschirm angezeigt
werden.
• Drücken Sie die Tasten / zur Anpassung der Lautstärke.
Alternativ können Sie am VOLUMEN/INFO Knopf des Radios drehen,
um die Lautstärke anzupassen. Drücken Sie die Taste so lange, bis
die Lautstärke bei 0 ist oder drücken Sie direkt die Taste zum
Stummschalten der Lautstärke.
Freigabe von Musik via PC
Zur Freigabe von Audiodateien des PCs, befolgen Sie auf Ihrem PC die
folgenden Schritte:
1. Verbinden Sie den PC mit dem Netzwerk.
2. Stellen Sie sicher, dass das Radio eingeschaltet und mit dem gleichen
Netzwerk wie der PC verbunden ist.
3. Önen Sie die UPnP-Plattform des Windows Media Players (11
oder aktueller). Alternativ können auch andere Plattformen, wie
beispielsweise Windows Media Connection verwendet werden.

13
DE
4. Erlauben Sie die Freigabe der Medien für das Radio, welches unter dem
Namen KR-1000 zu nden ist.
5. Fügen Sie die Audiodateien und Ordner, die Sie für das Küchenradio
freigeben möchten, der Medienbibliothek hinzu.
FUNKTIONEN UND EINSTELLUNGEN
Hauptmenü
Unter Hauptmenü können Sie die folgenden Modi auswählen: Internetradio,
Spotify Connect, Media Player, DAB, FM, BT, AUX IN, Eieruhr, Schlafmodus
und Alarm.
Installationsassistent
Anzeigeformat
Wählen Sie 12 oder 24 Stunden als Zeitformat aus.

14
DE
Automatisches Aktualisieren
• Die Uhrzeit und das Datum können entweder manuell oder automatisch
über DAB, FM oder Netzwerk eingestellt werden.
• Das automatische Aktualisieren funktioniert über Daten, die via BAD,
FM oder das Internet an das Gerät gesendet werden.
• Die Uhrzeit wird jeweils nur im entsprechenden Modus aktualisiert,
es ist also am besten, einen Modus auszuwählen, den Sie häug
verwenden.
• DAB und FM nutzen Zeitsignale, die über Rundfunkübertragungen
gesendet werden. Das Netzwerk verwendet im Netzwerkmodus vom
Internet Radioportal gesendete Zeitsignale.
Zeitzone, Sommer-/Winterzeit
Stellen Sie Ihre Zeitzone ein. Wenn Ihr Land Sommer-/ und Winterzeit
verwendet, wählen Sie die Sommer-/Winterzeit Speicheroptionen aus.
Manuelles Aktualisieren
• Wenn Sie „kein Aktualisieren“ auswählen, wird der Installationsassistent
Sie dazu auordern, die Uhrzeit und das Datum manuell einzustellen.
Das Datum und die Uhrzeit werden als dd-mm-yyyy und hh:mm
angezeigt.
• Der aktuelle Wert erscheint blinkend. Passen Sie jeden Wert mit
dem Navigationsknopf des Geräts oder den Tasten </> auf der
Fernbedienung aus. Sobald Sie den Wert eingestellt haben, drücken Sie
„OK“, um den nächsten Wert einzustellen.
Netzwerkeinstellungen
WLAN Region
• Wählen Sie die WLAN-Region aus, um eine optimale WLAN-Verbindung
zu erhalten: Großteil von Europa.
Netzwerksuche
• Das Gerät ist kompatibel mit allen gängigen Netzwerkprotokollen
und Verschlüsselungsmethoden. Es sucht nach allen verfügbaren
Netzwerken und listet diese zu Ihrer Auswahl auf.
• Es gibt Hinweise für den Netzwerktyp. Wenn Ihr Netzwerkgerät
die WPF-Funktion unterstützt, wird [WPS] vor der SSID (Name des
Netzwerkgeräts) stehen. Wählen Sie das Netzwerk, mit welchem das
Radio sich verbinden soll, aus.
• Zum Herstellen der drahtlosen Verbindung werden Sie im nächsten
Schritt nach der Eingabe des Netzwerkschlüssels gefragt werden.
15
DE
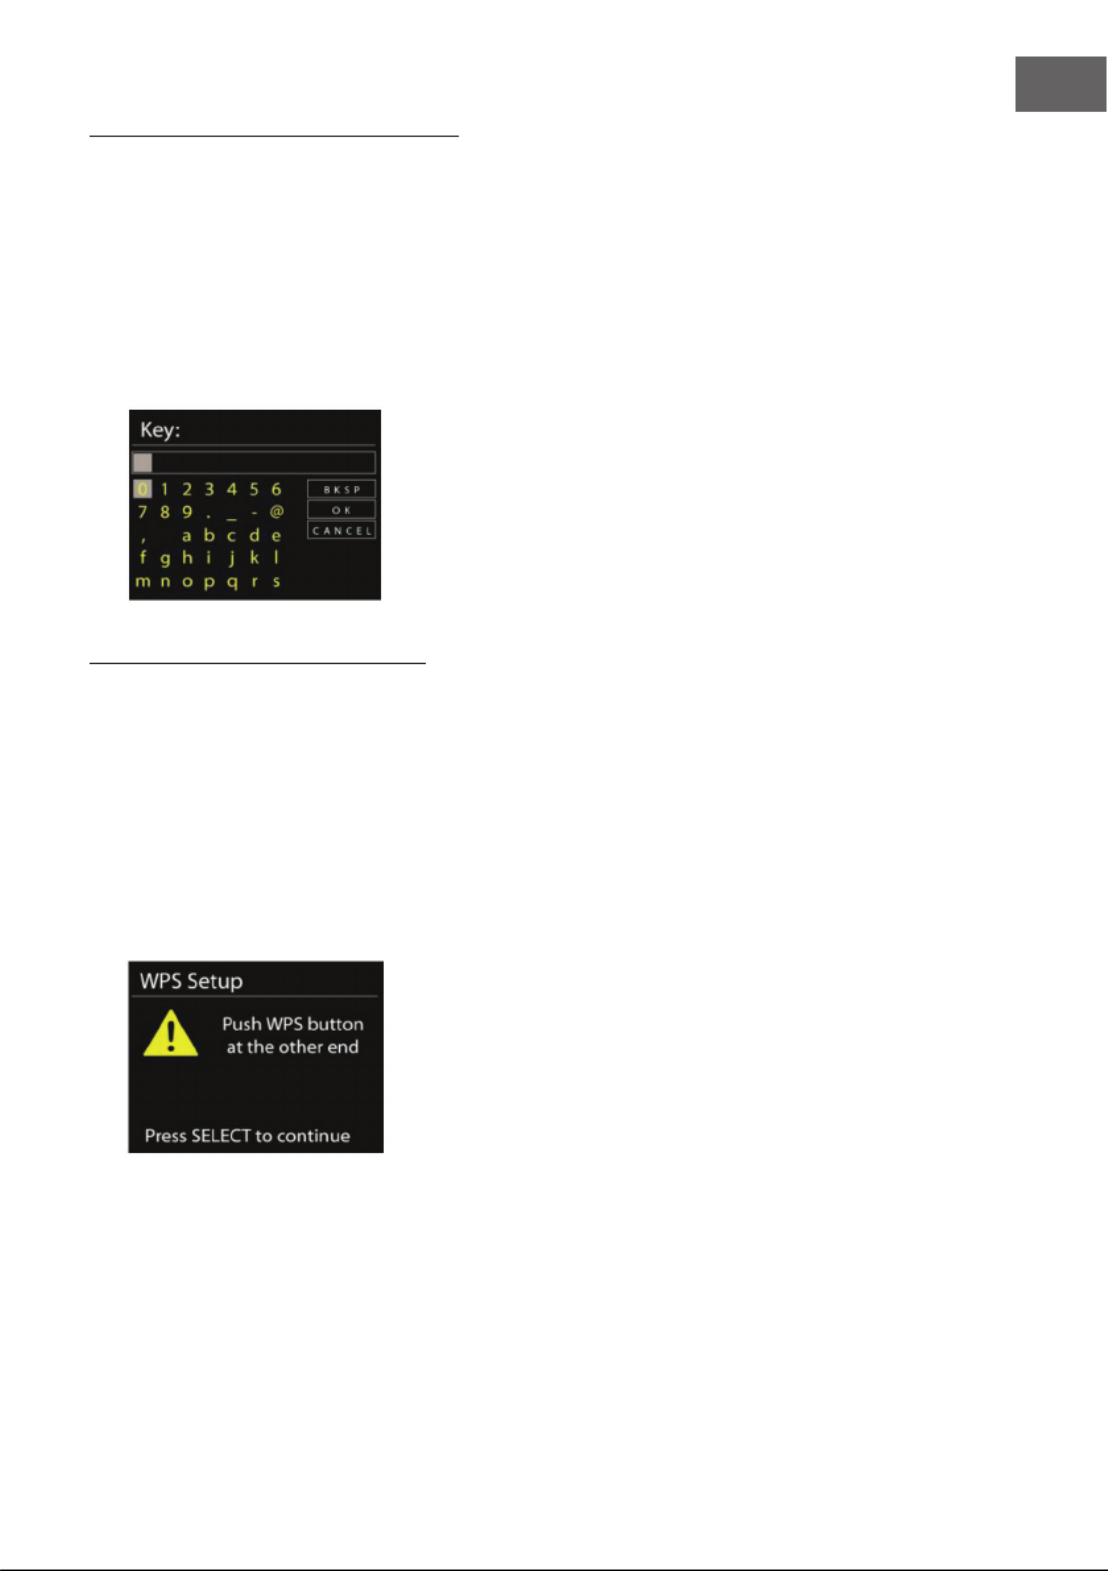
Netzwerk mit Standardverschlüsselung
• Nutzen Sie zur Eingabe des Netzwerkschlüssels den Navigationsknopf
oder die Pfeiltasten auf der Fernbedienung, um den Mauszeiger zu den
Zeichen zu bewegen und drücken Sie zum Bestätigen „OK“.
• Durch Auswahl der einzelnen Zeichen vervollständigen Sie den im
oberen Bildschirmbereich angezeigten Code.
• Der Mauszeiger wird durch Drehen des Navigationsknopfes vor die
ersten Zeichen gesetzt und folgende drei Optionen werden angezeigt:
„Zurück“, „OK“ und „Abbrechen“.
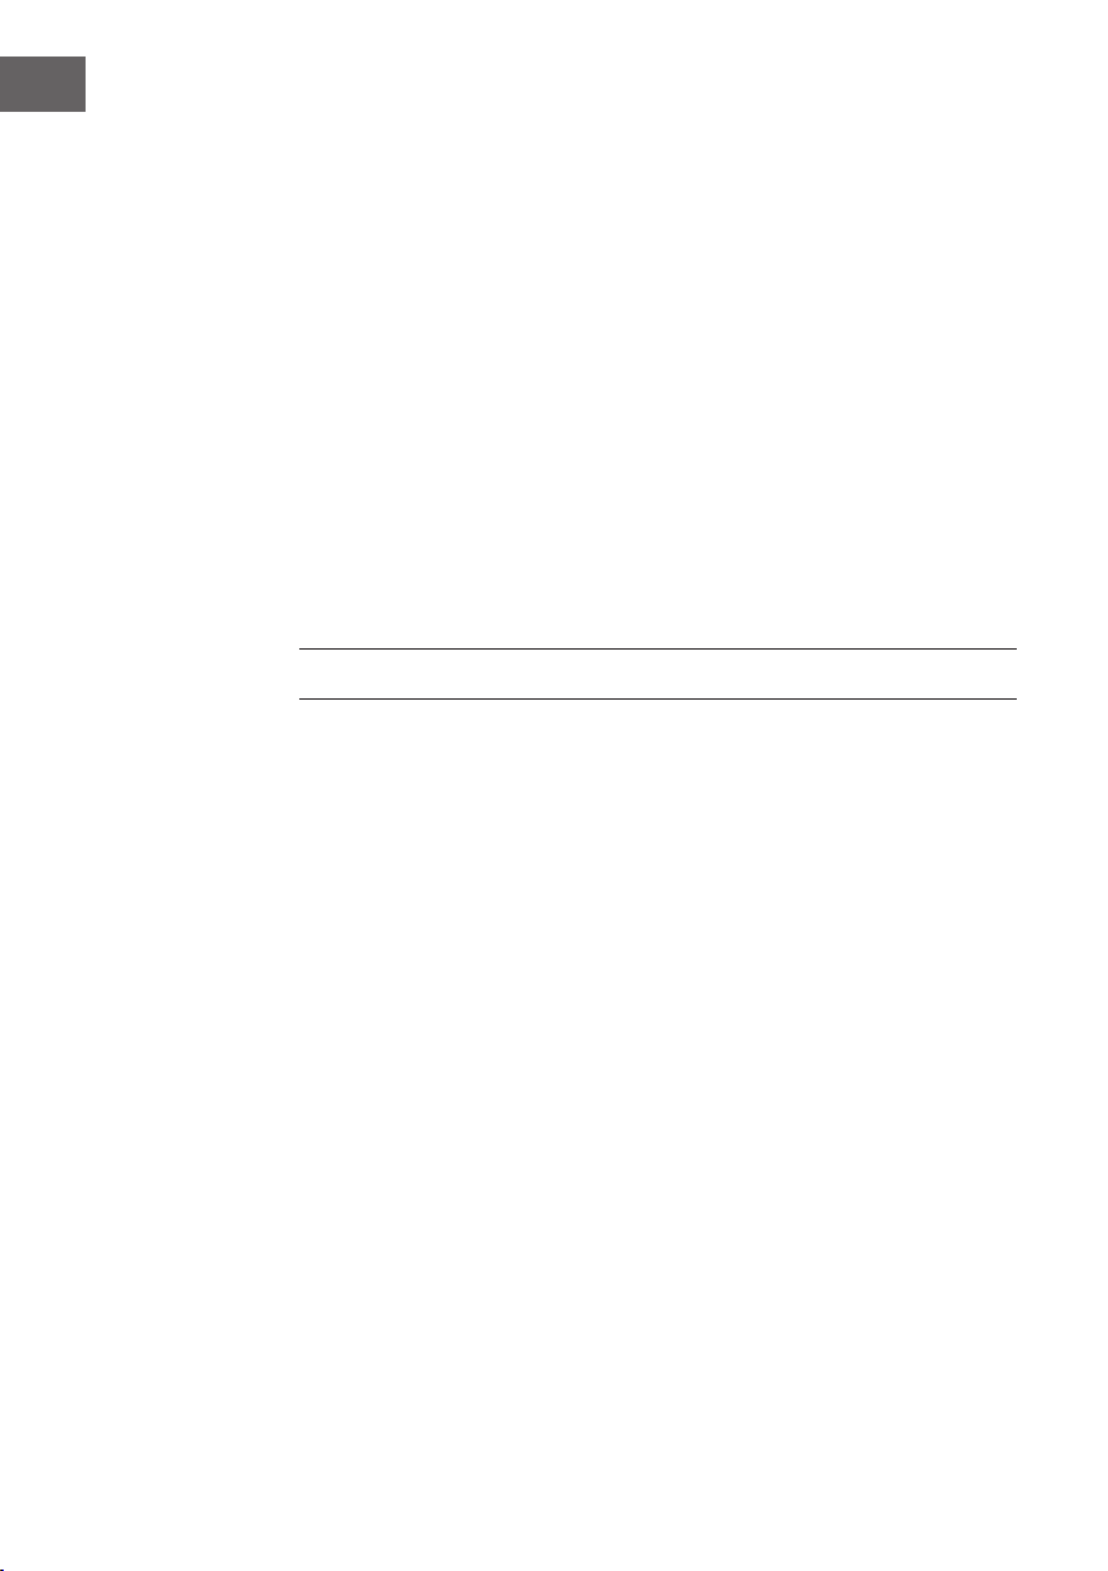
Netzwerk mit WPS-Verschlüsselung
Mit WPS verschlüsselte Netzwerke sind durch die Buchstaben WPS zu
Beginn des Netzwerknamens erkennbar. Verwenden Sie zur Verbindung mit
einem WPS-Netzwerk folgende Verbindungsmethoden:
• Drücken einer Taste
Das Radio fordert Sie dazu auf, den Verbindungsknopf des
Routers zu drücken. Es sucht anschließend nach einen bereiten
Druckknopfverbindungsnetzwerk und verbindet sich.

16
DE
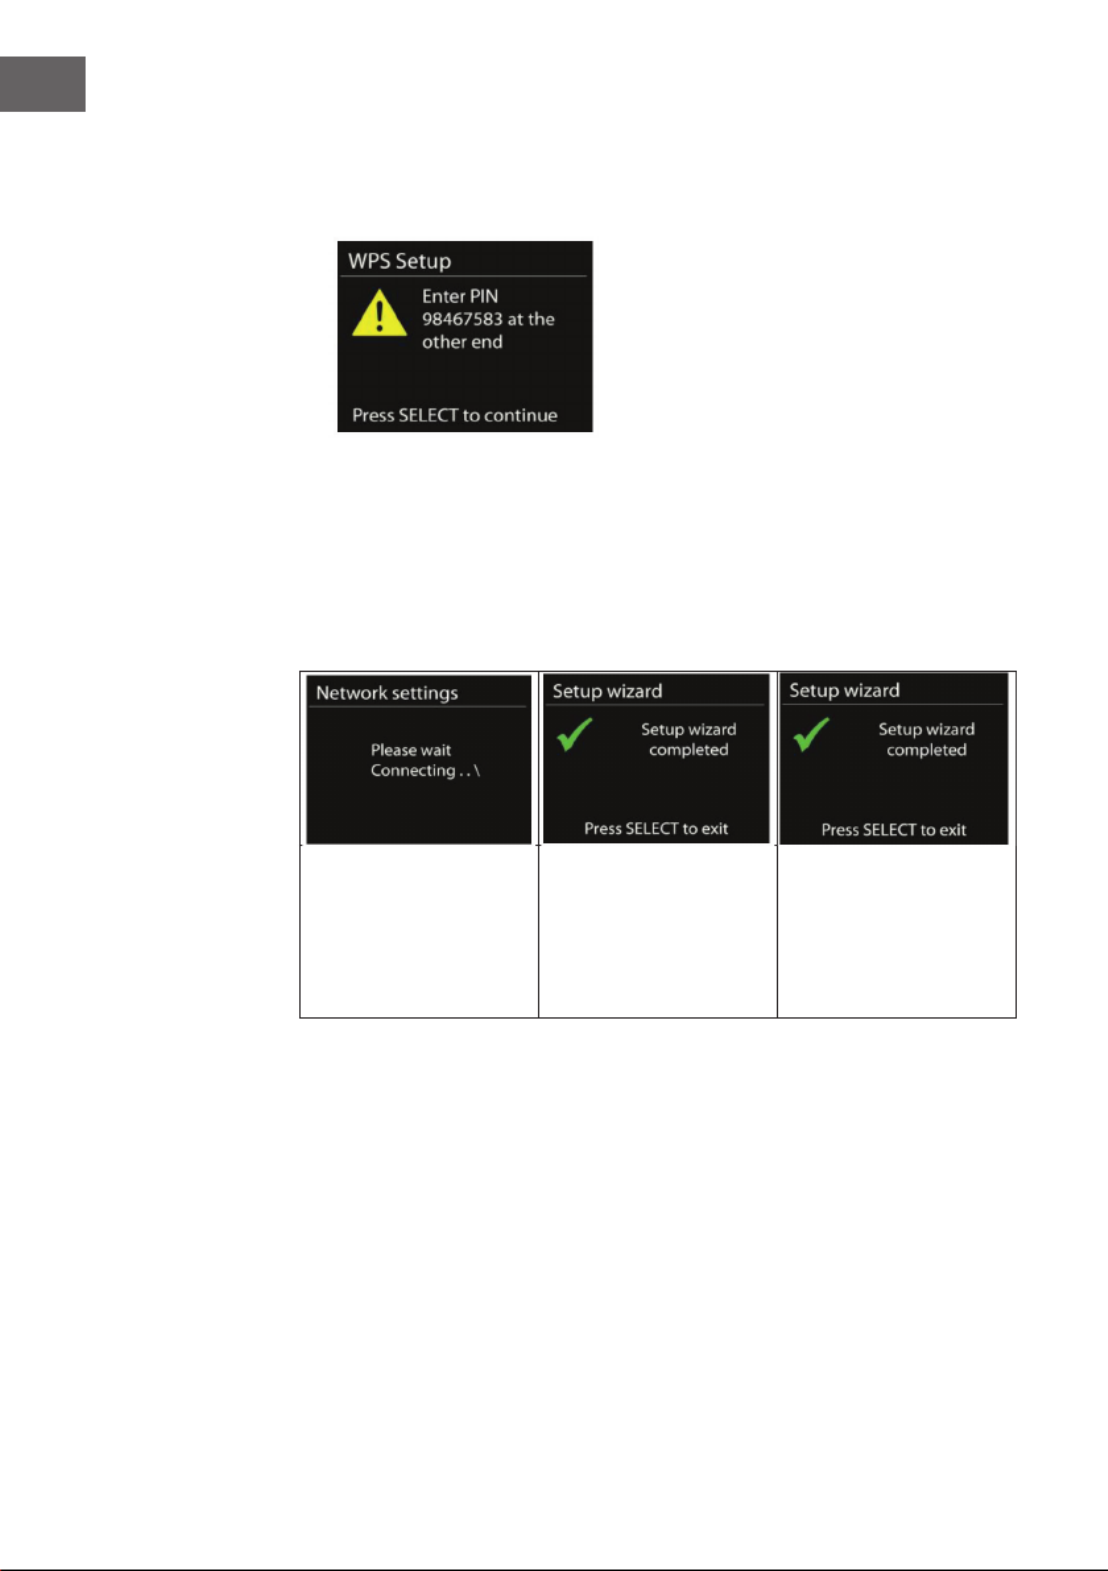
• Pin
Das Radio generiert einen Pin mit 8 Ziern, den Sie am drahtlosen
Router, dem Zugangspunkt oder einem externen Zugangspunkt
eingeben.
• WPS überspringen
Geben Sie wie bei dem Netzwerk mit Standardverschlüsselung den
Schlüsseln ein. Wenn Sie weitere Informationen zum Einrichten eines
mit WPS verschlüsselten Netzwerks benötigen, lesen Sie sich die
Bedienungsanleitung Ihres Routers durch.
Fertigstellung
Das Radio versucht,
sich mit dem von Ihnen
ausgewählten Netzwerk
zu verbinden.
Es wird „verbunden“
anzeigen, wenn die von
Ihnen vorgenommenen
Einstellungen erfolgreich
abgeschlossen wurden.
Wenn die Verbindung
fehlschlägt, wird das
Radio zum vorherigen
Bildschirm zurückkehren,
um erneut zu versuchen,
eine Verbindung
herzustellen.
Drücken Sie „OK“ um den
Installationsassistenten
zu beenden.

17
DE
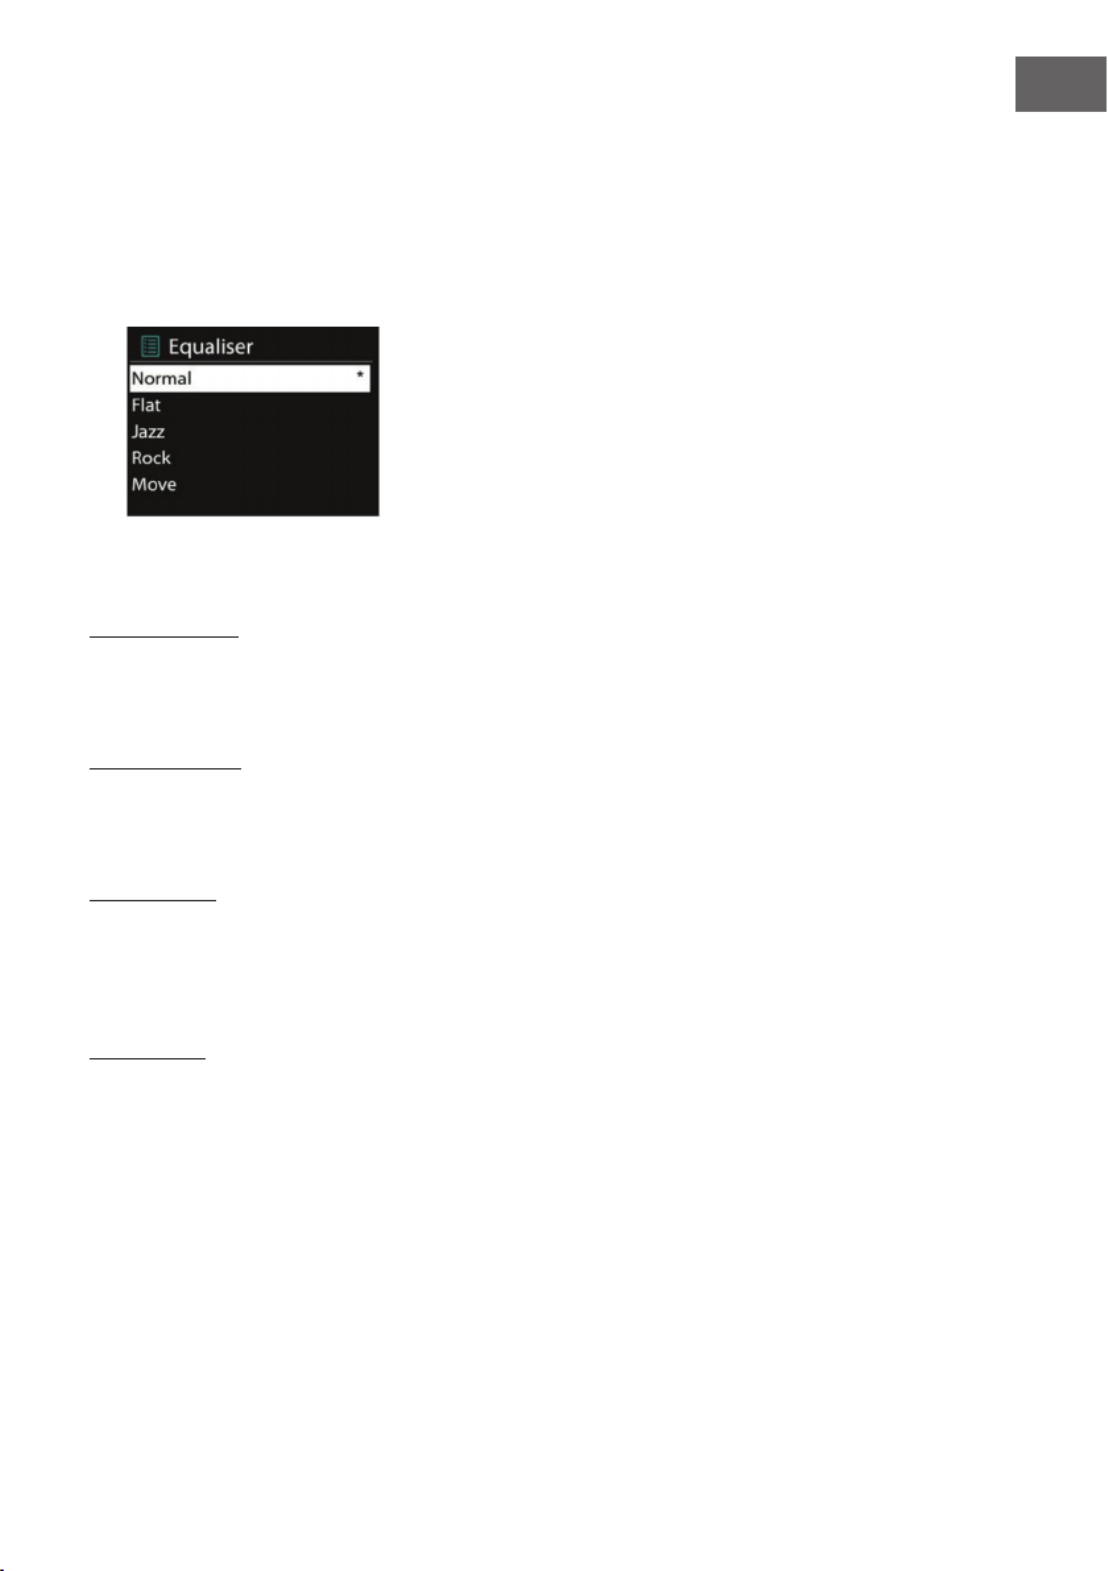
Equalizer
• Es gibt mehrere EQ-Modi zur Auswahl: Normal, Flat, Jazz, Rock, Movie,
Classic, Pop und Nachrichten.
• Benutzerdenierte Einstellungen sind ebenfalls verfügbar. Kreieren Sie
Ihren eigenen EQ mit Bass, Tonhöhe und Lautstärkeeinstellungen.
• Drücken Sie die Taste EQ der Fernbedienung für einen Schnellzugang
zum Equalizermenü.
Netzwerkeinstellungen
Netzwerkassistent
Wählen Sie den Netzwerkassistenten aus, um AP SSID zu suchen und geben
Sie dann den WEP-/WPA-Schlüssel ein oder wählen Sie Druckknopf/Pin/
WPS überspringen aus, um sich mit dem drahtlosen Netzwerk zu verbinden.
PBC WLAN einrichten
Drücken Sie den Einstellungsknopf. Er dient zum Verbinden der WPS
unterstützenden AP.
Darstellung
Sehen Sie die Informationen des aktuell verbundenen Netzwerks ein:
Aktive Verbindung, MAC Adresse, WLAN-Region, DHCP, SSIP, IP-Adresse,
Subnetzmaske, Gateway-Adresse, Primäre DNS und Sekundäre DNS.
WLAN-Region
Wählen Sie die WLAN-Region aus, um optimale WLAN-Verbindung zu
bekommen: Kanada, Spanien, Frankreich, Japan, Singapur, Australien oder
die Koreanische Republik.

18
DE
Manuelle Einstellungen
Wählen Sie „drahtlose Netzwerkverbindung“ aus und aktivieren oder
deaktivieren Sie DHCP (Dynamic Host Conguration Protocol).
Net-Remote Pin
Richten Sie einen Pin ein, über welchen die Remote-Anwendung auf das
Radio zugreifen kann. Der werksseitig eingestellte Pin ist 1234.
Netzwerkprole
• Das Gerät speichert die letzten vier Netzwerke, mit denen es verbunden
war und versucht automatisch sich mit dem Netzwerk davon zu
verbinden, das gerade verfügbar ist.
• Von hier aus können Sie die Liste der registrierten Netzwerke einsehen.
Sie können unerwünschte Netzwerke löschen in den Sie OK drehen und
drücken und dann „JA“ drücken, um das Löschen zu bestätigen.
Netzwerkverbindung aufrechterhalten
Wenn Sie sich dafür entscheiden, das Netzwerk verbunden zu lassen,
wird die WiFi-Verbindung nicht einmal im Standby-Modus unterbrochen.
Ansonsten wäre die WiFi-Verbindung nur verfügbar, wenn das Gerät
eingeschaltet ist. Diese Option ermöglicht es dem gerät, in jedem
Betriebsmodus bereit für DLNA-Streaming zu sein.

20
DE
Info
Die Versionsinformationen der Firmware und die Radiokennung einsehen
Hintergrundbeleuchtung
Es kann vorkommen, dass Sie die Intensität der Hintergrundbeleuchtung
jedes Modus (Gerät eingeschaltet/Standby) auf Hoch, Mittel oder Niedrig
verändern möchten. Sie können außerdem die Dauer einstellen, nach der
das Radio, wenn es nicht verwendet wird, den Bildschirm verdunkelt.
Multi-Room
Sie können das Radio im Internet-Radio-, Spotify Connect-, Lokale Musik-,
Musik-Player-, DAB- oder FM-Modus als Lautsprecher eines Multi-Room-
Audiosystems verwenden. Dieses Menü ermöglicht es Ihnen, den Status
und andere Informationen des Internetradios in Ihrem Multi-Room
Audiosystem abzufragen sowie die aktuellen Geräte im Multi-Room
Audiosystem anzuzeigen und Gruppen zu bearbeiten. Sie benötigen, um das
Radio als Bestanteil eines Multi-Room Audiosystems zu nutzen, die Auna
Kontrollanwendung (UNDOK). Sie können diese App vom Apple App Store
oder vom Google Play Store herunterladen.
Es folgt eine Zusammenfassung der verfügbaren Einstellungen im Multi-
Room-Menü:
Details ansehen
Hier können Sie gegebenenfalls sehen, zu welcher Gruppe des Multi-Room
Audiosystems Ihr Gerät gehört.
Neue Gruppe erstellen
Hier können Sie eine neue Gruppe erstellen. Sie können dann das
Internetradio und andere Geräte zu der von Ihnen erstellten Gruppe
hinzufügen.
• Drehen Sie den Navigationsknopf zum Auswählen eines Zeichens und
drücken Sie zum Bestätigen die Taste OK. Sie können ebenfalls die
numerische Tastatur oder den Navigationsknopf und die Taste OK der
Fernbedienung nutzen.
• Nachdem Sie auf diesem Weg den Gruppennamen eingegeben haben,
drehen Sie am Navigationsknopf, um „OK“ auszuwählen und drücken
Sie zum Bestätigen OK.

22
DE
INTERNET RADIO
Mit diesem Radio können Sie tausende Radiosender und Podcasts über
eine Breitband Internetverbindung abspielen lassen.
Wenn Sie „Internet Radio“ auswählen,
kontaktiert das Radio direkt das Frontier
Silicon Internet Radio Portal (welches
vom v-tuner unterstützt wird), um
eine Senderliste zu bekommen. Das
Portal aktiviert außerdem eine Liste
von Lieblingssendern, die Sie selbst
personalisieren können.
Wenn Sie bereits einen Internetradiosender
hören, können Sie die Taste TIMER/BACK
oder [<] auf der Fernbedienung drücken,
um zum letzten besuchten Abschnitt des
Menübaums zu kommen, anstatt
MENU zu drücken und erst in den
Internetradiomodus wechseln zu müssen.
Zuletzt gehört
Wenn der Internetradiomodus neu gestartet wird, werden die Sender
ausgewählt, die zuletzt gehört wurden. Um einen anderen, erst kürzlich
gehörten Sender auszuwählen, wählen Sie dieses Menü um die gelisteten
Sender anzuzeigen. Aktuelle Sender werden im oberen Teil der Liste
angezeigt.
Senderliste
Dursuchen Sie Radiosendungen die in unterschiedliche Kategorien, „Orte“,
„Genre“, „Bekannte Sender“ und „Neue Sender“ unterteilt sind. Sie können
Sender auch durch die Stichwortsuche nden.
24
DE
Gespeicherte Sender
Auf im Radio gespeicherte Sender kann nicht von anderen Radios aus
zugegrien werden. Drücken und halten Sie so lange PRESET/BT PAIR
bis der Bildschirm „Sender speichern“ anzeigt. Wählen Sie einer der 10
Speicherplätze aus, um den aktuell wiedergegebenen Sender zu speichern.
Wenn ein von Ihnen gespeicherter Sender wiedergegeben wird, zeigt der
Bildschirm am unteren Ende *n (* 1, *2 etc.) an. Die Zahlen 1 bis 10/0 auf der
Fernbedienung dienen dem Einstellen gespeicherter Sender.
Informationen zur aktuellen Wiedergabe
Während der Wiedergabe zeigt der Bildschirm Name und Beschreibung
des Senders an. Zum Einsehen weiterer Informationen drücken Sie die
Tasten VOLUME/INFO oder INFO/TIMER auf der Fernbedienung. Jedes Mal
wenn Sie diese Tasten drücken, werden andere Informationen angezeigt.
Sie können sich Informationen zu „Name/Beschreibung“, „Genre/Ort“,
„Vertrauenswürdigkeit“, „Codec/Samplingrate“, „Wiedergabepuer“ und
zum „aktuellen Datum“.
SPOTIFY CONNECT
Spotify Connect ermöglicht es Ihnen, unter Verwendung der Spotify App als
Fernbedienung, Spotify über Ihre Lautsprecher Zuhause oder den Fernseher
abspielen zu lassen.
Zum Verwenden von Spotify Connect benötigen Sie einen Spotify Premium
Account (Details folgen unten).
1 Fügen Sie Ihre Lautsprecher zu Ihrem Wi-Fi-Netzwerk hinzu.
2 Starten Sie die Spotify App auf Ihrem Smartphone, Tablet oder PC,
unter Verwendung des gleichen Netzwerks, in dem sich auch das Radio
bendet.
3 Geben Sie ein Lied auf Spotify wieder und wählen Sie „Verfügbare
Geräte“ aus.
4 Wählen Sie Ihren Lausprecher aus und die Musik wird über diesen
wiedergeben.
Zu mehr Informationen über die Einrichtung und Verwendung von Spotify
Connect, besuchen Sie bitte die Website www.spotify.com/connect.
Lizenzen
Die Software von Spotify unterliegt dem Copyright Dritter, was Sie hier
einsehen können: http://www.spotify.com/connect/third-party-licenses
25
DE
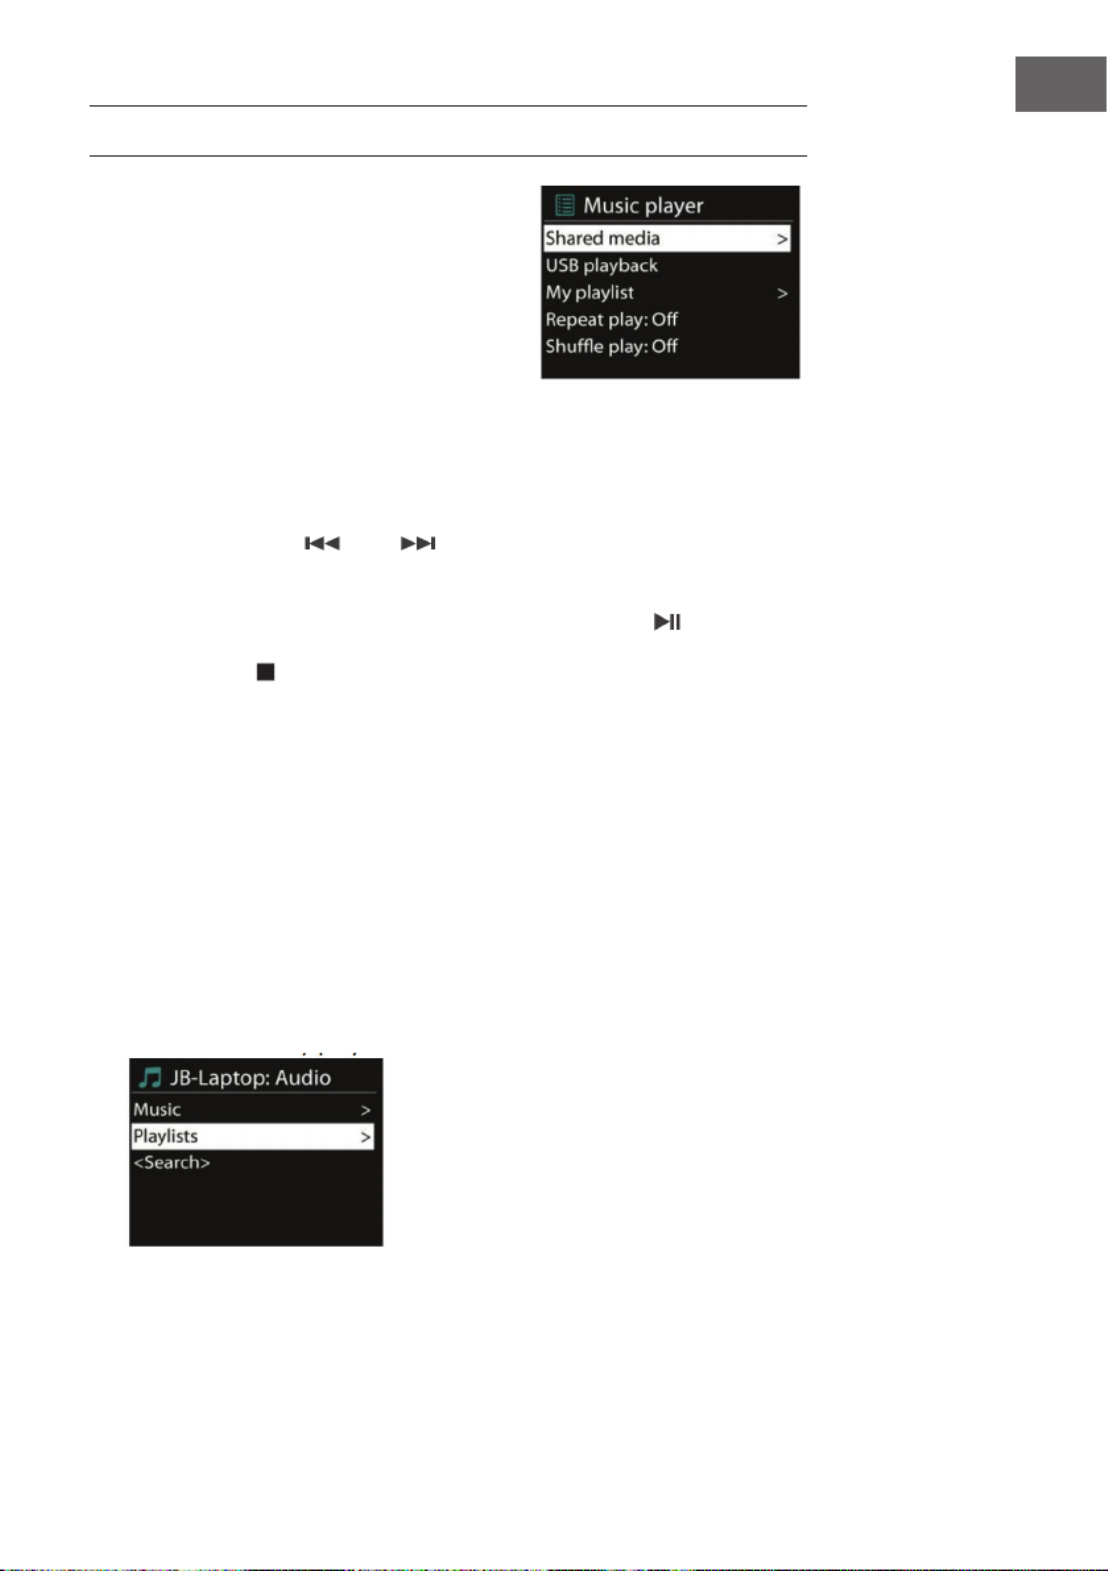
MUSIK-PLAYER
Im Musik-Player Modus können
Audiodateien von einem Computer im
lokalen Netzwerk wiedergegeben werden.
Die Audiodateien können folgende Formate
haben: MP3, WMA, WAV, AAC oder FLAC.
Wenn Sie bereits eine Audiodatei wiedergeben, können Sie die Taste
TIMER/BACK oder [<] auf der Fernbedienung drücken, da dies schneller
geht als die Taste zu drücken, um zum zuletzt besuchten Abschnitt des
Menübaums zu gelangen.
Sie können die Tasten oder verwenden, um den vorherigen oder
nächsten Titel abzuspielen. Drücken und halten Sie die jeweilige Taste,
um schnell vor oder schnell zurück zu spulen. Drücken Sie zum Starten der
Wiedergabe oder zum Pausieren der Wiedergabe die Taste . Drücken
Sie zum Stoppen der Wiedergabe und um zur Wiedergabeliste zurück zu
kehren die Taste .
Freigegebene Medien
• Wenn Sie die geteilten Medien eingerichtet haben, sollten Sie einen
Eintrag sehen, der aus <Computername>:<Name der freigegebenen
Medien> besteht.
• Wenn Sie mehr als einen Computer zur Freigabe von Medien haben,
werden die Alternativen ebenfalls aufgelistet.
• Wählen Sie die freigegebenen Medien, die Sie abspielen möchten, aus.
• Von diesem Punkt an, werden die Menüs vom Server der geteilten
Medien generiert. Das erste Menü zeigt eine Liste von Medientypen
an, zum Beispiel Musik, Video, Bilder und Wiedergabelisten. Ihr
Küchenradio kann nur Musik und Wiedergabelisten wiedergeben.
26
DE
Es gibt ebenfalls eine Suchfunktion, die Lieder in ähnlicher Weise ndet wie
die Internetradiosuche.
Bei der Auswahl der Musik gibt es mehrere Wege, Lieder auszuwählen.
Diese können nach Genre, Künstler, Album, Komponist und Bewertung.
Sobald Sie ein Lied gefunden haben, welches Sie wiedergeben möchten,
drücken Sie OK. Durch ein kurzes Drücken, wird der ausgewählte Titel sofort
abgespielt.
Wiederholung/Zufallswiedergabe
Sie können das Radio so einstellen, dass Titel wiederholt oder in zufälliger
Reihenfolge wiedergegeben werden. Drücken Sie die Taste SHUFFLE/
REPEAT der Fernbedienung, um schneller in das Menü zu gelangen.
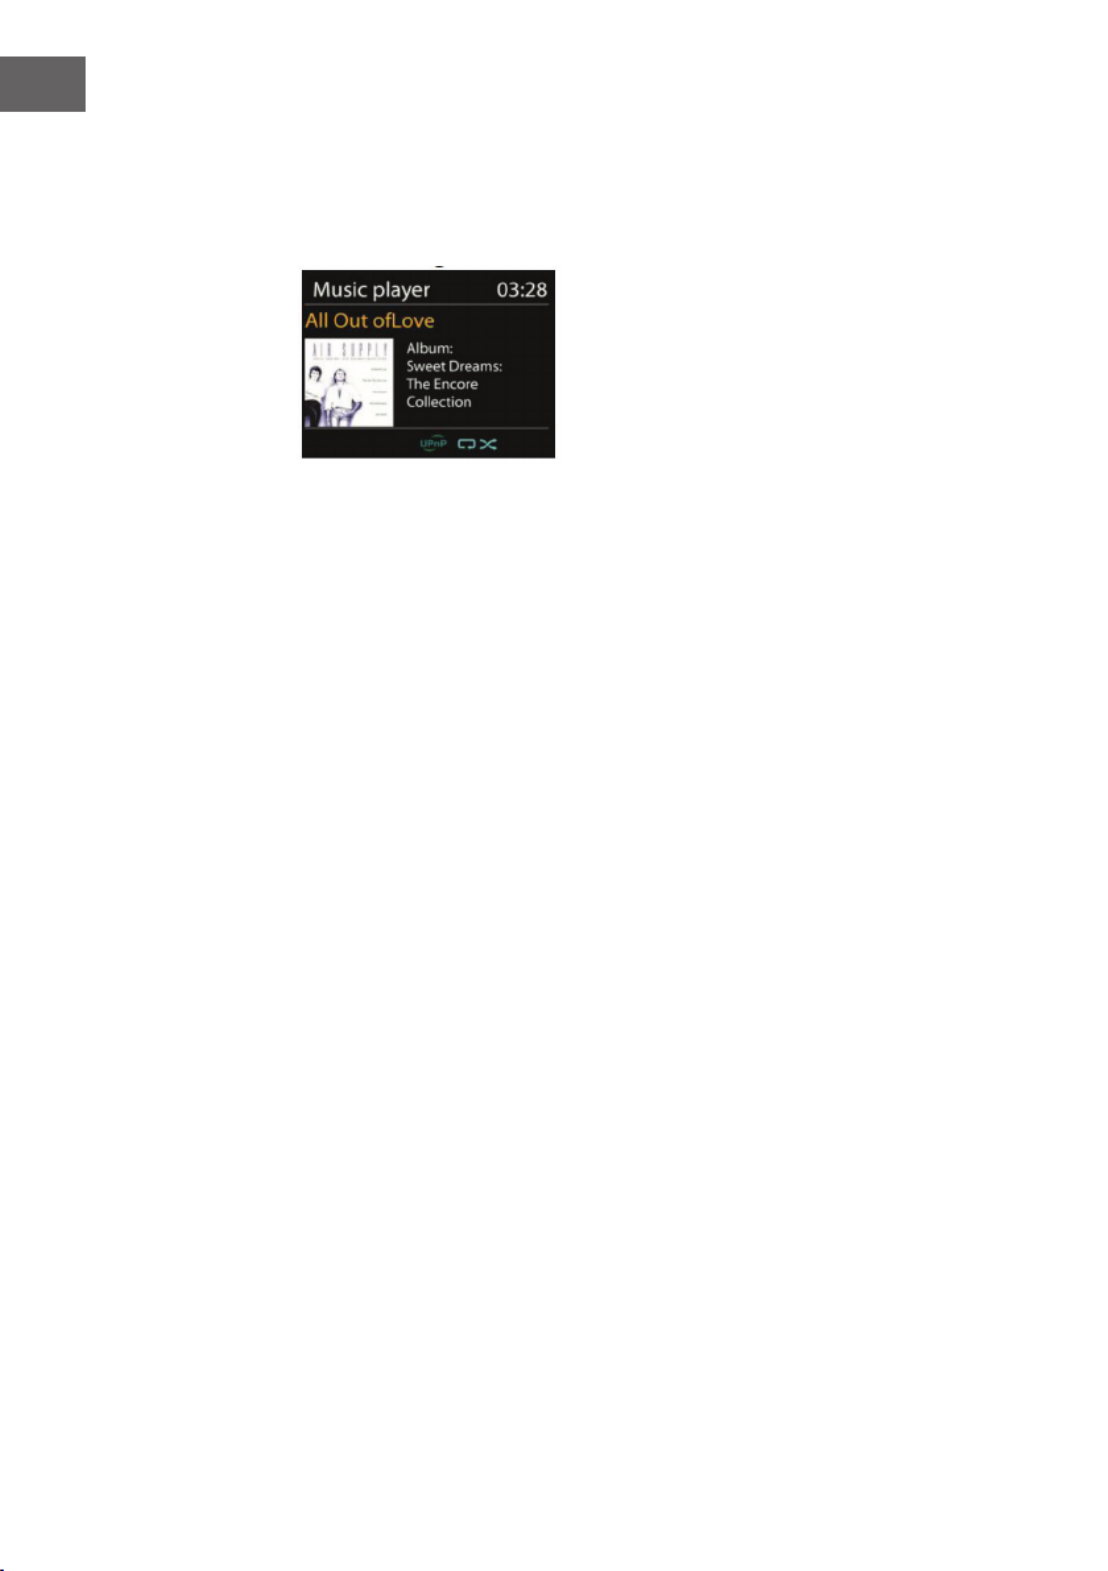
Informationen zur aktuellen Wiedergabe
Während der Wiedergabe eines Titels, zeigt der Bildschirm den Titel und
den Künstler an (UPnP). Es gibt ebenfalls einen Balken, der den Fortschritt
anzeigt, mit Zahlen der bereits vergangenen Zeit und der Gesamtdauer
des wiedergegebenen Titels. Am unteren Ende des Bildschirms, zeigt ein
Symbol, je nach Quelle, UPnP an. Für weitere Informationen drücken Sie die
Tasten VOLUME/INFO oder INFO/TIMER auf der Fernbedienung.
Jedes Mal, wenn Sie eine der beiden Tasten drücken, werden verschiedene
Informationen in folgender Reihenfolge angezeigt:
UPnP: Titel/Künstler/Fortschrittsbalken/Dauer des Titels, Album, Codec/
Samplingrate, Wiedergabepuer und aktuelles Datum.

27
DE
DMR (DLNA-Streaming)
Die Freigabe von Musik ist ein Weg,
Musik zu streamen, bei welchem Sie auf
die Wiedergabeliste schauen und die
Wiedergabe von ihrem Radio aus steuern.
Dieser Abschnitt zeigt Ihnen einen weiteren
Weg zum Musik streamen auf, bei welchem
es nicht notwendig ist, die Wiedergabe von
Ihrem Radio aus zu steuern.
Sie können Audiodateien via PC, Android Smartphone oder Tablet, via
direkter Verwendung Ihres PCs, Android Smartphone, Tablet oder iPhone/
iPad freigeben, um die Wiedergabe auf Ihrem Radio zu steuern. Dieses
Verfahren nennt sich DLNA-Streaming.
Bedienung via PC
Die Anforderungen an PCs zur Verwendung von DLNA sind Windows 7 und
Windows Media Player 12. Einstellungen wie folgt:
Geben Sie zunächst die auf Ihrem PC bendlichen Medien für Ihr
Küchenradio frei: Bedienfeld>Netzwerk und Internet>Netzwerk- und
Freigabecenter> Medien-Streaming-Optionen

29
DE
Bedienung via Smartphone/Tablet
Sie können kostenfreie oder kommerzielle DLNA Apps (mit dem Stichwort
DLNA) aus dem Google Play Store oder Apple Store installieren, je nachdem
ob Sie ein Android Smartphone/Tablet oder iPhone/iPad verwenden.
Es wird empfohlen, die Apps BubbleUPnp oder Twonky Beam auf Android
Smartphones und Tablets und Twonky Beam auf iPhone und iPad zu
verwenden.
Die Vorgehensweise zur Wiedergabe von freigegebener Musik über die App
ist folgende:
1. Wählen Sie KR-1000 als Wiedergabemedium aus.
2. Wählen Sie den Musikserver aus und wählen Sie Musik aus.
BubbleUpnp
Wiedergabemedium auswählen Server auswählen

30
DE
TwonkyBeam
Hinweis: Einige Apps unterstützen das Streamen von Musik von
iPhone/iPod nicht, aber iPhone/iPad können trotzdem zur Bedienung
des Streamens von Musik von anderen Servern verwendet werden.
Einige Apps erlauben die Wiedergabe von Musik auf mehreren
Wiedergabemedien gleichzeitig. Mit einigen Apps können Sie bei der
Auswahl von mehreren Liedern eine Wiedergabeliste erstellen.
Lesen Sie sich die jeweiligen Anweisungen der Software oder den Apps, die
Sie für das DLNA-Streaming nutzen möchten, durch.

31
DE
DAB
Im DAB-Modus empfangen Sie digitales DAB/DAB+ Radio und können
Informationen zu Sender, Stream und Wiedergabetitel einsehen.
Sendersuchlauf
Wenn Sie zum ersten Mal den DAB-Modus auswählen, oder wenn Ihre
Senderliste leer ist, führt das Radio einen automatischen Sendersuchlauf
durch, um die verfügbaren Sender aufzeigen zu können. Es kann ebenfalls
aus den folgenden Gründen notwendig werden, dass Sie einen manuellen
Sendersuchlauf durchführen müssen, um die Senderliste zu aktualisieren:
• Verfügbare Sender ändern sich von Zeit zu Zeit.
• Wenn der Empfang beim automatischen Sendersuchlauf nicht gut war,
kann dies zu einer leeren oder unvollständigen Senderliste führen.
• Wenn Sie bei einigen Sendern schlechten Empfang haben (Rauschen),
kann es vorkommen, dass Sie nur Sender mit gutem Empfang auisten
möchten.
Wählen Sie zum Starten eines manuellen Sendersuchlaufs „vollständige
Suche“ aus. Um nur Sender mit guter Signalstärke zu suchen, wählen Sie
„lokale Sender“ aus.

33
DE
Einstellungen
Dynamikbereich-Komprimierung (DRC)
Wenn Sie in lauter Umgebung Musik mit einem hohen Dynamikbereich
hören, möchten Sie gegebenenfalls den Audio-Dynamikbereich
komprimieren. Dadurch werden leise Töne lauter und laute Töne leiser. Sie
können DRC auf „aus“, „niedrig“ oder „hoch“ einstellen.
Reihenfolge der Sender
Die können die DAB-Sender Ihrer Liste entweder „alphanummerisch“,
„Ensemble“, oder „Valide“ anordnen lassen. „Ensemble“ listet Sender, die
zusammen ausgestrahlt werden, in Gruppen auf. „Valide“ listet gültige
Sender zuerst in alphanummerischer Reihenfolge auf und anschließend
Sender, die aktuell nicht ausstrahlen.
FM-RADIO
Im FM-Modus können Sie analoges Radio auf FM-Frequenz empfangen.
Der Bildschirm zeigt im FM-Modus RDS (Radio Data System) Informationen
über den Sender und wo er ausgestrahlt wird, an.
Drücken Sie, zum Finden eines Senders, die Taste OK/SCAN. Die
Frequenzanzeige beginnt nach oben zu gehen, während das Küchenradio
nach FM-Frequenzen sucht. Alternativ können Sie Sender über die Tasten
TUNE- oder TUNE+ suchen oder durch schnelles drücken dieser Tasten oder
durch Drehen des Navigationsknopfes, Sender manuell suchen.

34
DE
Sender speichern
• Drücken und halten Sie zum Speichern im FM-Modus so lange die Taste
PRESET/BT PAIR, bis das Display „Sender speichern“ anzeigt.
• Wählen Sie einen der 10 Speicherplätze aus, um den Sender zu
speichern.
• Zur Auswahl eines gespeicherten Senders, drücken Sie kurz die Taste
PRESET/BT PAIR und wählen einen der dort gelisteten Sender aus.
Wenn ein in der Liste gespeicherter Sender wiedergegeben wird, zeigt
der Bildschirm am unteren Ende *n (*1, *2 etc.) an. Die Zahlen 1 bis 10/0
auf der Fernbedienung dienen dem Einstellen gespeicherter Sender.
Informationen zur aktuellen Wiedergabe
Während der Wiedergabe des Streams zeigt der Bildschirm dessen
Frequenz an, oder, wenn RDS-Informationen verfügbar sind, Sendername
und weitere RDS-Informationen wie Sendungsname, Wiedergabetitel und
Kontaktinformationen. Wenn keine Informationen verfügbar sind, wird
nur die Frequenz angezeigt. Radiosendungen in Stereo werden durch ein
Symbol an der Oberseite des Bildschirms gekennzeichnet. Für weitere
Informationen über eine Sendung, drücken Sie die Tasten VOLUME/INFO
oder INFO/TIMER auf der Fernbedienung.
Jedes Mal, wenn Sie diese Tasten drücken, werden verschiedene
Informationen in folgender Reihenfolge angezeigt: RDS-Text,
weiterführender RDS-Text (Sender/Programmart), Frequenz und aktuelles
Datum.
Einstellungen
Sucheinstellungen
Im FM-Suchmodus stoppt das Gerät, werksseitig eingestellt, bei
jedem verfügbaren Sender. Dies kann dazu führen, dass bei Sendern
mit schwachem Signal gestoppt wird und diese durch das Signal-
Rausch-Verhältnis bei der Wiedergabe rauschen. Zum Verändern
des Sucheinstellungen dahingehend, dass nur bei Sendern mit guter
Signalstärke gestoppt wird, wählen Sie nach der Auswahl von „Nur Sender
mit guter Signalstärke“ „JA“ aus.
Audioeinstellungen
Alle Stereosender werden in Stereo reproduziert. Bei Sendern mit
schwachem Signal, kann dies zu einem Rauschen bei der Wiedergabe
führen. Um schwache Sender in Mono wiedergeben zu lassen, wählen Sie
im FM-Modus „schwachen Empfang>Nur in Mono Wiedergeben>JA“ aus.

37
DE
Automatisches Ausschalten (Sleep)
Zum Einstellen der Zeit bis zum automatischen Ausschalten, wählen Sie im
Hauptmenü „Sleep“ aus oder drücken Sie die Taste der Fernbedienung.
Sie können zwischen „Sleep aus“, 15 MIN, 30MIN, 45MIN oder 60MIN
auswählen. Nachdem Sie eine Zeit ausgewählt haben, kehrt das Gerät
automatisch zum Hauptmenü zurück. Drücken Sie die Taste MODE, um zur
aktuellen Wiedergabe zurück zu gelangen.
Alarm
Das Gerät verfügt über zwei vielseitige
Alarme mit Schlummerfunktion und
einer Funktion, die das Gerät nach einer
eingestellten Zeit ausschaltet. Jeder
Alarm kann so eingestellt werden, dass
er in einem bestimmten Modus losgeht.
Wählen Sie im Hauptmenü „Alarme“
aus, um den Alarm einzustellen oder zu
verändern.
• Wählen Sie die Nummer des Alarms (1 oder 2) aus und stellen Sie die
folgenden Parameter ein:
- Aktivieren: ein/aus
- Frequenz: Täglich, Einmalig, Wochenende oder Wochentage
- Uhrzeit
- Modus: Alarmton, Internetradio, DAB oder FM
- Speicher: Letzte gehörte Lieder 1-10
- Lautstärke: 0-20
• Scrollen Sie zum Aktivieren der neuen Einstellungen nach unten und
wählen Sie „Speichern“ aus.
• Der Bildschirm zeigt die aktiven Alarme mit einem Symbol an der linken
Unterseite des Bildschirms an.
• Der Alarm wird an der von Ihnen eingestellten Uhrzeit aktiviert. Sie
können dieses zeitweise stummschalten, indem Sie eine beliebige
Taste auf dem Gerät (außer MODE, oder ALARM). Sie können den
Zeitraum des Schlummermodus verändern. Das Radio kehrt dann in den
Standby-Modus zurück und das stummgeschaltete Alarmsymbol blinkt
auf dem Bildschirm.

38
DE
Kopfhörerausgang
Ermöglicht ihnen, Ihr Küchenradio über ein Audiokabel mit Ihren Kopfhörern
zu verbinden, um eine bessere Klangleistung zu haben.
LED-Beleuchtung
Sie können die LED Beleuchtung entweder am Gerät einstellen, indem
Sie die MENU Taste länger gedrückt halten oder indem Sie auf der
Fernbedienung die Licht-Taste betätigen. Es stehen 3 verschiedene
Helligkeitsstufen zur Auswahl.
NETREMOTE (UNDOK-APP)
• Das Gerät ermöglicht Ihnen NetRemote über Smartphone oder
Tablet in iOS oder im Androidsystem zu nutzen. Indem Sie die damit
verbundene App namens UNDOK herunterladen, können Sie alle Modi
wie Internetradio, Spotify Connect, Musik-Player, DAB, FM und AUX-IN
anzeigen lassen.
• Suchen Sie die APP UNDOK im Google Play Store oder im
Apple Store, um diese auf Ihrem Smartphone oder Tablet
zu installieren.
• Vor der Verwendung der App UNDOK, sollten Sie sicherstellen, dass
sich das von Ihnen verwendete Gerät im gleichen Netzwerk wie das
Radio bendet.
• Starten Sie die App. Die App startet und sucht im Netzwerk nach dem
Internetradio. Klicken Sie das Internetradio an, um die Verbindung mit
NetRemote herzustellen.

40
DE
Spotify Connect
Verwenden Sie die Spotify App zum Aussuchen von Musik aus der Spotify
Wiedergabeliste
Klicken Sie das Spotifysymbol der Spotify App an und wählen Sie dann
Ihr bevorzugtes Gerät aus. Es sollte in der Spotify App angezeigt werden.
Sobald Musik ausgewählt wurde, wird diese auf dem Gerät gestreamt.
Lokale Musik
Durchsuchen Sie die Musikdateien Ihres Smartphones/Tablets und wählen
Sie Musik aus der App aus.
Musik-Player
Durchsuchen Sie die Dateien der freigegebenen Medien und wählen Sie
Musik aus der App aus.
DAB
Durchsuchen Sie die DAB+-Sender, wählen Sie einen Sender aus und lassen
Sie dich den Rolltext des Senders von der App anzeigen.

41
DE
FM
Manuelle
Suche oder
durchsuchen Sie
die Sender von
der App aus.
Sie können mit der App ebenfalls über Fernsteuerung
den Standby-Modus/ Gerät einschalten, Equalizer
einstellen, Pin ändern und den Gerätenamen unter
„Einstellungen>Menü“ ändern.
RadioVIS
Radio VIS ist ein Sender, bei dem Rundfunkveranstalter über das Internet
Slideshows liefern. RadioVIS Präsentationen, sind den DAB+ Slideshows
sehr ähnlich und sind eng mit dem Audioübertragungsdienst verknüpft.
RadioVIS ist allerdings nur in einigen Ländern auf der Welt verfügbar.
(besuchen Sie die Website www.radioDNS.org für Details über die
Radiosendungen). Sobald RadioVIS in der App aktiviert wurde und die
Slideshows verfügbar sind, werden diese im DAB- oder FM-Modus in der
aktuellen Wiedergabe der NetRemote App angezeigt.
Hinweis: Achten Sie darauf, dass, wenn ein weiteres Smartphone/Tablet,
auf dem die App installiert ist, sich im gleichen Netzwerk bendet, die
originale Verbindung unterbrochen wird, sobald das andere Gerät sich
mit dem Radio verbindet.
43
DE
Problem Mögliche Ursache und Lösungsansatz
Es wird kein Sender
gefunden.
Überprüfen Sie sowohl das Netzwerk als auch den
Zugangspunkt und die Firewall.
Der Sender könnte aktuell nicht verfügbar sein. Versuchen
Sie es später erneut oder wählen Sie einen anderen Sender
aus.
Die Verbindung hat sich verändert oder der Sender
überträgt nicht mehr- fragen Sie den Anbieter nach
Informationen.
Die Verbindung des manuell eingestellten Senders ist nicht
korrekt. Stellen Sie sicher, dass Sie die richtige Verbindung
eingeben und versuchen Sie es erneut.
Rauschen im FM-
Modus.
Überprüfen/bewegen Sie die FM-Antenne.
Stellen Sie das Radio an einen anderen Platz.
Kein Sender
verfügbar/Störung/
Unterbrechung im
DAB-Modus.
Schalten Sie den Alarm ein.
Lesen Sie sich, auf Grund der Lautstärkeeinstellungen, die
Lösungsvorschläge für „Kein Ton“ durch.
Die eingestellte Alarmquelle war ein Sender, es
besteht aber keine Netzwerkverbindung. Ändern
Sie die Alarmquelle oder stellen Sie erneut eine
Netzwerkverbindung her.
Der Alarm
funktioniert nicht.
Schalten Sie den Alarm ein.
Lesen Sie sich, auf Grund der Lautstärkeeinstellungen, die
Lösungsvorschläge für „Kein Ton“ durch.
Die eingestellte Alarmquelle war ein Sender, es
besteht aber keine Netzwerkverbindung. Ändern
Sie die Alarmquelle oder stellen Sie erneut eine
Netzwerkverbindung her.
Das Gerät kann von
der Spotify-App nicht
ausgewählt werden.
Achten Sie darauf, dass das Gerät mit dem gleichen
Netzwerk verbunden ist wie Ihr Smartphone oder Tablet.
Sie benötigen zum Verwenden von Spotify Connect einen
Spotify Premium Account. Wenn Sie keinen haben können
Sie sich unter www.spotify.com/freetrial anmelden und
Spotify Premium kostenlos testen.

44
DE
Problem Mögliche Ursache und Lösungsansatz
Die Musik wird
nach dem Schließen
der Spotify App
weiterhing auf dem
Gerät gestreamt.
Starten Sie die Spotify App neu.
Alle anderen
unbestimmten Fälle.
Das Gerät könnte nach einer längeren Betriebszeit
eine große Datenmenge verarbeiten, egal in welchem
Modus, was zu einem Einfrieren des Systems oder
einer Fehlfunktion führen könnte. Starten Sie das Gerät
gegebenenfalls neu.
Die normale Funktion des Geräts könnte durch eine
starke Elektromagnetische Störung beeinusst werden.
Sollte dies der Fall sein, setzen Sie das Gerät auf
Werkseinstellungen zurück, um den normalen Betrieb
wieder aufnehmen zu können. Sollte das Gerät dann noch
immer nicht funktionieren, stellen Sie es an einen anderen
Platz.
Das Gerät könnte in Gegenden mit starker
Rundfunkstörung Fehlfunktionen aufweisen. Das Gerät wird
wieder richtig funktionieren, wenn keine Rundfunkstörung
mehr vorhanden ist.


53
EN
Power adapter
• Only use the power adaptor delivered with the Radio.
• The socket outlet should be installed near the Radio and should be
easily accessible.
• Never touch the power plug with wet hands and never pull on the
power cable when pulling the plug out of the power socket.
• Make sure the electrical voltage specied on the Radio and its power
plug is corresponding to the voltage of the power socket. Incorrect
voltage will destroy the device.
Risks associated with high volumes
• While listening the Radio with headphones, always reduce the volume
before put on the headphones. After the headphones are positioned
properly, increase the volume to the desired level.
• To prevent possible hearing damage, do not listen at high volume for
long periods.
Hints on Use of Batteries
• Never attempt to recharge or open the battery. Explosion hazard.
• Never damage or warp the battery.
• Never throw batteries into an open re or expose them to high
temperatures.
• Failure to observe these guidelines may cause uid to escape from the
battery, which can cause skin irritation.
• Only use batteries of the same or an equivalent type. Explosion hazard.
• Remote the batteries from the battery compartment as soon as they
are empty, or if you do not intend to use the device for a long period of
time.
• If the battery compartment does not close securely, stop using the
product and attention should be drawn to the environmental aspects of
battery disposal.
In case of contact:
• Wash o the uid with plenty of clear water
• Do to rub your eyes. Instead, rise eyes with plenty of water for
10minutes and seek immediate medical attention.

54
EN
PRODUCT DESCRIPTION
1 2.4” TFT Screen Display
2 Buttons and Knobs Basic control of operation
3 Remote Receiver Infra-red reception interface for
remote control
4 Earphone out 3.5mm jack for speaker connection
5 AUX In 3.5mm jack for AUX IN
6 Microphone Use for hand free mode
7 On/O Switch Power on/o
8 DC IN Power supply
9 FM/DAB antenna socket Connect IEC-antenna cable

55
EN
Remote Control
Use your thumb to press the lid of the battery
compartment and pull it out. Install 2 AAA type
1.5V battery into the battery compartment,
taking care to insert it with the right position.
Risk of explosion if battery is replaced by
an incorrect type. Dispose of used batteries
according to the instructions.
CAUTION
Risk of injury! Do not ingest the
battery, Chemical Burn Hazard
(The remote control supplied
with).
Keep new and used batteries away from
children. If the battery compartment does not
close securely, stop using the product and keep
it away from children.
If you think batteries might have been
swallowed or placed inside any part of the
body, seek immediate medical attention.

56
EN
GETTING STARTED
Packing Content
• Kitchen radio unit
• Mounting kit
• Power adaptor
• Audio cable with 3.5mm jack at both ends
• User manual
Mounting the set under a cabinet
1. Decide on the installation location and installing the unit based on the
best cabinet/shelf. Attached the metal bracket under the cabinet/shelf
with supplied mounting screws. If the board thickness of cabinet/shelf
is thinner than the screw’s height, you can supply the suitable screw by
yourselves.
2. Slide the unit to metal bracket until it locks securely. Due to its heavy
weight, the unit should be installed with great care. Be sure that the
cabinet is used that is sturdy enough to support the weight of the unit.
To reduce the risk of re, do not place any heating area or without the
spacer.
You can slide out the unit from the metal bracket to be the stand kitchen
radio. Then, you can slide the plastic clapboard in the unit.

57
EN
Installation the additionally available tablet holder
If your tablet is not holding to your satisfaction, or rotating too easily –
please tighten the screws in the joints of the tablet-holder. You can nd the
screws under the protective caps of the joints
Get the network environment ready
For wireless WiFi
• Make sure you have setup the wireless network and you have the WEP,
WPA or WPA2 security password to activate the connection.
• You may also use the WPS (WiFi Protected Setup) function for easy
pairing between the network device and the kitchen radio. Check if the
light indicators on the network device are in appropriate status.
• Connect the power adaptor to the side of the kitchen radio and plug it
into power socket. Switch on the kitchen radio.
• At the rst time operation, system asks if you want to start the Setup
Wizard. Select
• YES to continue the setup. After choosing NO, the next screen asks if
you would like to run the wizard next time the kitchen radio is started.

58
EN
• The kitchen radio will automatically connect to the network that
was set before when power on to Internet Radio again. In case you
desire to change the network, enter System Setting to congure the
corresponding connection.
• Press and hold on the device or on
the remote control to enter standby
mode. The time, date and any active
alarm times display on the screen.
• Press / to adjust the volume. Alternatively, rotate the VOLUME/
INFO knob on the playing screen to adjust the volume. until volume
level becomes 0, or direct press to mute the sound
Music Sharing from PC
To share the music les from PC, the following steps are done on the PC:
1 Connect the PC to the network.
2 Ensure the kitchen radio is powered on and connected to the same
network.
3 Open the UPnP platform Windows Media Player (11 or later).
Alternatively, other platforms or server such as Windows Media
Connection may be used.

59
EN
4. Allow to share your media to KR-1000, which is the device name for
music streaming.
5. Add the audio les and folders you want to share with the kitchen radio
to the media library.
FUNCTIONS AND SETTINGS
Main Menu
Under the main menu, you can select the following modes: Internet Radio,
Spotify Connect, Media Player, DAB, FM, Bluetooth, AUX IN, Egg Timer,
Sleep and Alarm
Setup Wizard
Display format
Select 12 or 24 as the time format.
60
EN
Auto-update
• The time and date can be updated manually or automatically from DAB,
FM or network.
• Auto-update works with data sent over DAB, FM or the Internet. The
clock is only updated when in a corresponding mode, so it is best to
select a mode you use regularly.
• DAB and FM use time signals broadcast with radio transmissions.
• Network uses a time signal sent from the Internet radio portal when in
any network-connected mode.
Time zone, daylight
Set your time zone. If you country uses daylight saving and it is in eect,
turn on the Daylight savings option.
Manual update
• If you set No update, the wizard prompts you to set the time and date
manually. The date and time are displayed as dd-mm-yyyy and hh:mm.
• The active value appears as ashing. Adjust each value with the
NAVIGATE knob or </> on the remote control. Once the value is set,
press OK to continue setting with next value.
Network
Wlan region
Select the Wlan region to obtain the optimal Wlan connectivity: Most of
Europe.
Scanning for the network
• The kitchen radio is compatible with all common network protocols and
encryption methods. It searches for the available networks and list them
out for you choose.
• There will be hints for the type of network – if your network device
supports WPS function, it will be [WPS] before the SSID (the name of
network device). Select the one you want to connect.
• For the wireless connection, you will be asked for input encryption in
the next step.

61
EN
Standard encrypted network
• To enter the network’s key, use the NAVIGATE knob or direction keys on
the remote control to move the cursor through the characters and press
to conrm. As each character is selected, the key is built up near the top
of the display.
• There are three options accessible by tuning the NAVIGATE knob back
before the rst characters – Backspace, OK and Cancel.
WPS encrypted network
WPS encrypted networks are identied by WPS at the start of the network
name when the kitchen radio searches the available AP. Use one of the
following methods of connection:
• Push button
The kitchen radio prompts you to press the connect button on the
router. It then scans for a ready Push Button Connect network and
connects.
62
EN
• Pin
The kitchen radio generates an 8-digit code number which you enter
into the wireless router, access point, or an external registrar.
• Skip WPS
Enter key as for a standard encrypted network. For more information
on setting up a WPS encrypted network, see your WPS router’s
instructions.
Completion
The kitchen radio
attempts to connect to
the selected network.
It will show connected if
the setup is successful.
If connecting fails, the
kitchen radio returns to
a previous screen to try
again.
Press OK to quit the setup
wizard.
63
EN
Equalizer
• Several preset EQ modes are available: Normal, Flat, Jazz, Rock, Movie,
Classic, Pop and News.
• Also a user-dened setting is available; create your own EQ with custom
bass, treble and loudness settings.
• Press EQ on the remote control to quick enter equalizer menu.
Network
Network wizard
Enter to search AP SSID, then input the WEP / WPA key or choose Push
Button/Pin/Skip WPS to connect to the wireless network.
PBC Wlan setup
Push Button Conguration, it is to connect the AP that supports WPS (Wi-Fi
Protected Setup).
View settings
View the information of current connected network: Active connection,
MAC address, Wlan region, DHCP, SSID, IP address, Subnet mask, Gateway
address, Primary DNS and Secondary DNS.
Wlan region
Select the Wlan region to obtain the optimal Wlan connectivity: Canada,
Spain, France, Japan, Singapore, Australia, and Republic of Korea.

64
EN
Manual settings
Choose wireless network connection and enable or disable DHCP (Dynamic
Host Conguration Protocol).
NetRemote PIN setup
Setup the PIN that used to access the kitchen radio through the remote App.
Default PIN is 1234.
Network prole
The kitchen radio remembers the last four wireless networks it has
connected to, and automatically tries to connect to whichever one of them
it can nd.
From here you can see the list of registered networks. You can delete
unwanted networks by turning and pressing OK then choosing YES to
conrm delete.
Keep network connected
If you choose to keep network connected, the WiFi will not disconnect even
you are in standby mode. Otherwise, the connection will only available.
This option allows the kitchen radio to be ready for DLNA streaming in any
operating modes. Details for DLNA streaming.

65
EN
Time/Date
Set the time manually or auto update, time format, time zone and daylight.
Language
The default language is English. Change it as your preference.
Factory reset
A factory reset resets all user settings to default values, so that time and
date, network conguration and presets are lost. However, the kitchen
radio’s current software version is maintained, as is registration with the
Internet radio portal. Internet radio favourites therefore remain unless you
re-register your kitchen radio with another account on the portal website.
Software update
From time to time, software upgrades may be created with bug xes and/or
additional features. You can either check manually or set the kitchen radio
to check periodically automatically (this is the default). If newer available
software is detected, you will be asked if you want to go ahead with an
update. If you agree, the new software is then downloaded and installed.
After a software upgrade, all user settings are maintained.
NOTE: Before starting a software upgrade, ensure that the kitchen radio
is plugged into a stable main power connection. Disconnecting power
during an upgrade may permanently damage the unit.

66
EN
Info
View the rmware version and the radio ID.
Backlight
You may change the backlight of each environment (power on or standby)
to High, Medium or Low. And adjust the timeout duration which the radio
turns to standby backlight level when it has not been controlled.
Multi-room
You can use your Internet Radio as a speaker of a multi-room audio system
when using Internet Radio, Spotify connect, Local Music, Music player, DAB
or FM mode. This menu lets you query the status and other information of
the Internet Radio in your multi-room system as well as show the current
devices in the system and edit groups. To use your Internet Radio as a
component of a multi-room audio system you will need the auna kitchen
radio control application (UNDOK). You can download it from the Apple App
Store and from the Google Play Store. The following is a summary of the
settings available in the Multi-room menu:
View details
Here you can view to what group of your multi-room system the Internet
Radio belongs to, if applicable.
Create new group
• This lets you create a new group. You can then assign your Internet
Radio and other speakers to the group created.
• Rotate the NAVIGATE knob to select a character and press OK to
conrm it. You can also use the numeric keypad or the NAVIGATE
buttons and the OK button of the remote control.
• After you have entered the entire group name in this way, rotate the
NAVIGATE knob to select OK and press OK to conrm.

67
EN
Add to group
This lets you add one or more devices of your multi-room system that are
connected to the same WLAN to a group.
List current clients
This shows the devices that are currently assigned to a group. It is also
possible to delete individual devices from the group.
Leave group
This lets your remove your Internet Radio from a multi-room group.
Dissolve group
This allows you to delete an entire group.
Standby Clock Format
You may change the Standby Clock format to Analog or Digital.

68
EN
INTERNET RADIO
The kitchen radio can play thousands of radio stations and podcasts from
around the world though a broadband Internet connection.
When you select Internet radio, the kitchen
radio directly contacts the Frontier Silicon
Internet radio portal (which is supported by
v-tuner) to get a list of stations. The portal
also enables multiple lists of favourite
stations that you can personalize.
If you are already listening to an Internet
radio station, you can press TIMER/BACK or
[<] on the remote control to quickly return
to the last visited branch of the menu tree,
rather than press and hold MENU to go to
the rst menu of Internet radio mode.
Last listened
When Internet radio mode restarts, the last-listened station is selected. To
select another recently used station, enter here to select the listed station.
Most recent stations appear at the top of the list.
Station list
Browse Internet broadcasts that organized into dierent categories,
Location, Genre, Popular and New. You can also nd the station with Search
by keyword.
69
EN
Favourites
• Favourites are stored with the Internet radio portal, and are available
through all Internet radios registered on the same account. Before
favourites can be used, the radio has to be registered with the Internet
radio portal.
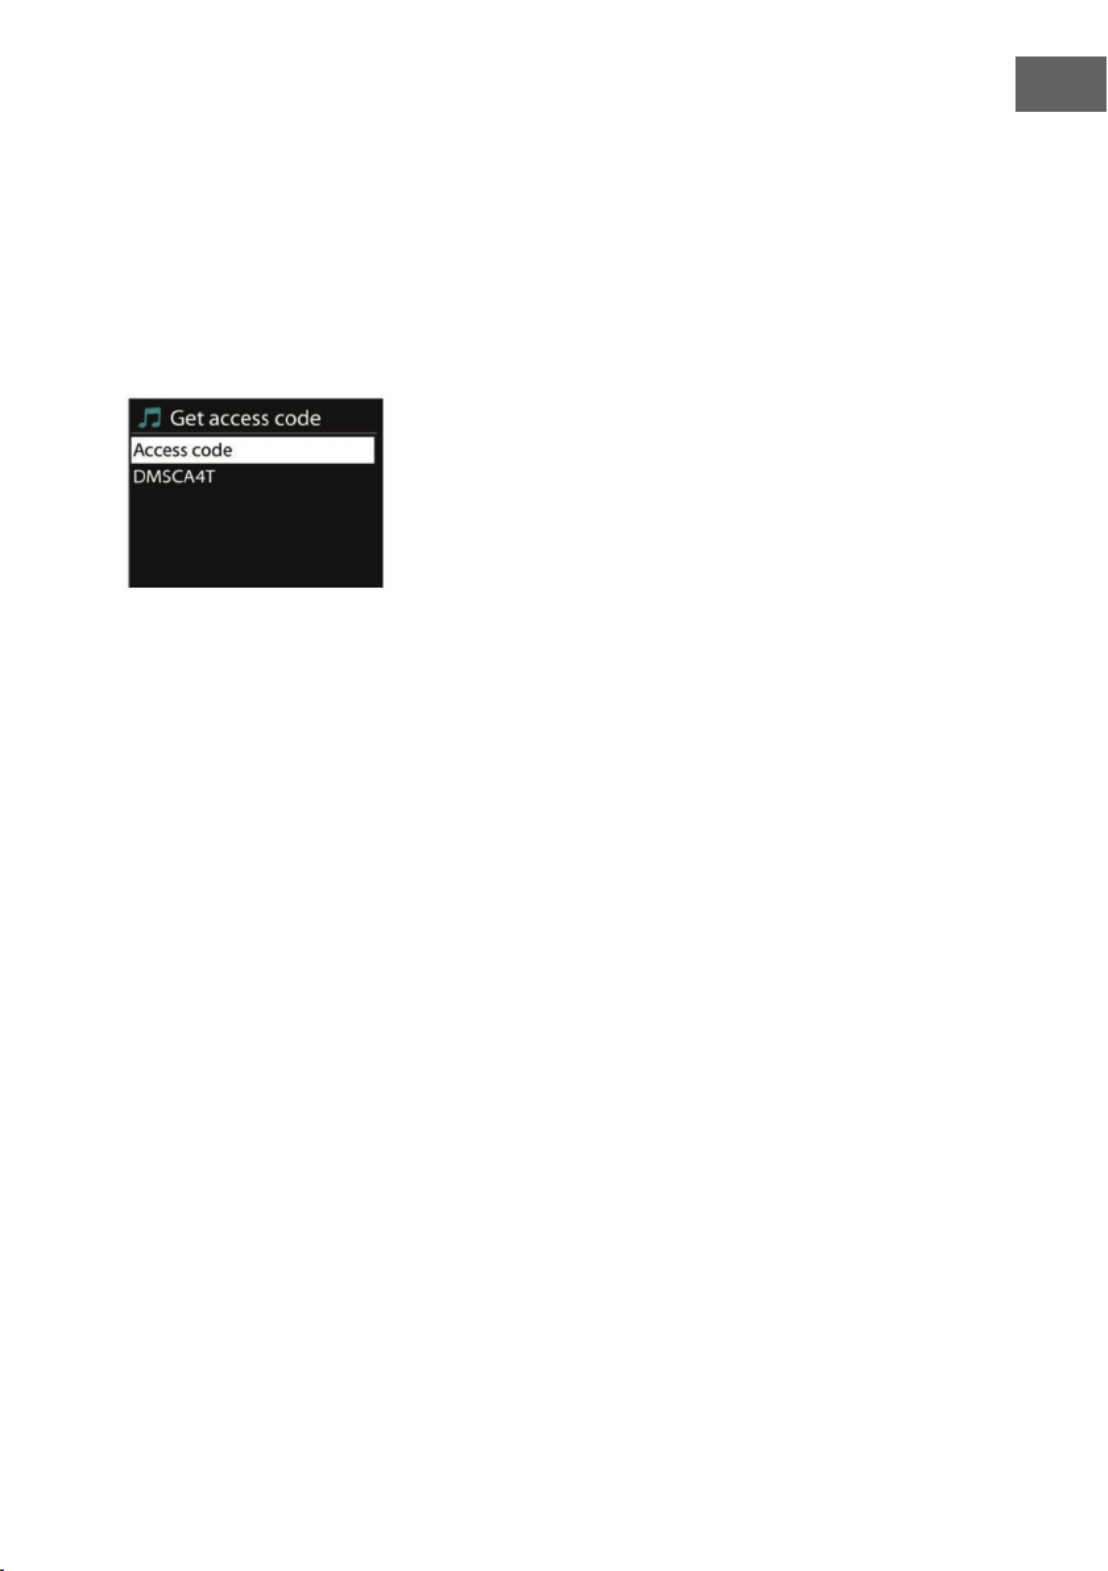
• To register your kitchen radio choose Station list > Help > Get access
code to get your radio’s unique portal access code rst. (Do not confuse
the portal access code with the Radio ID from System settings.
• Visit the portal website at www.wiradio-frontier.com. If this is your rst
visit to the portal, register for a new account, entering the following
information:
- access code,
- your e-mail address,
- password,
- radio model.
• If you already have an account and wish to add an additional radio, log
in to your account and select My preferences > Add another Wi-Fi radio.
• Once your radio is registered with the portal, you can immediately use
the Internet radio favourites and added stations features.
• To store a playing station as a favourite, press and hold OK until the
display shows ‘Favourite added’. The station appears in the default
favourites list Stations.
My added stations
Even though the Internet radio portal contains thousands of stations, you
may want to listen to stations not listed. You can add your own via the
portal.

70
EN
Presets
Presets are stored in the radio and cannot be accessed from other radios.
To store an Internet radio preset, press and hold PRESET/BT PAIR until the
display shows the Save preset screen. Select one of the 10 presets to save
the currently playing station. To select a preset, press PRESET/BT PAIR, then
select one of the listed preset stations. When a preset station is playing, it
shows *n (*1, *2, etc) at the bottom of the screen. 1 to 10/0 on the remote
control are for the use of preset station 1-10.
Now playing information
While the stream is playing, the screen shows its name and description.
To view further information, press VOLUME / INFO or INFO/TIMER on
the remote control. Each time you press it, another set of information is
displayed, cycle through name/description, genre/location, reliability,
codec/sampling rate, playback buer and today’s date.
SPOTIFY CONNECT
Spotify Connect lets you play Spotify through your home speakers or TV,
using the Spotify app as remote.
You’ll need Spotify Premium to use Connect – see details overleaf.
1 Add your speakers to your wi network (see product user instructions
for details).
2 Fire up the Spotify app on your phone, tablet or PC using the same wi
network as above.
3 Play a song on Spotify and hit ‘DEVICES AVAILABLE’.
4 Choose your speakers and your music will start playing out loud.
For more information on how to set up and use Spotify Connect please visit
www.spotify.com/connect
Licenses
The Spotify Software is subject to third party licenses found here:
http://www.spotify.com/connect/third-party-licenses

72
EN
There is also a search function which nds tracks in a similar way to Internet
radio search.
From Music, there are numerous ways of selecting tracks including Genre,
Artist, Album, Composer and Rating.
Once you have found a track you want to play, press OK. A short press plays
the track immediately.
Repeat/shule
You can set to repeat tracks or play them in random order. Press on the
remote control for shortcut.
Now playing information
While a track is playing, the screen shows its track and artist (UPnP). There
is also a progress bar with gures for elapsed and total track time. At the
bottom of the screen, an icon indicates UPnP depending on the source.
To view further information, press VOLUME/INFO or INFO/TIMER on the
remote control.
Each time you press it, another set of information is displayed, cycling
through the information:
UPnP: track/artist/progress bar/track times, album, codec/sampling rate,
playback buer and today’s date.
73
EN
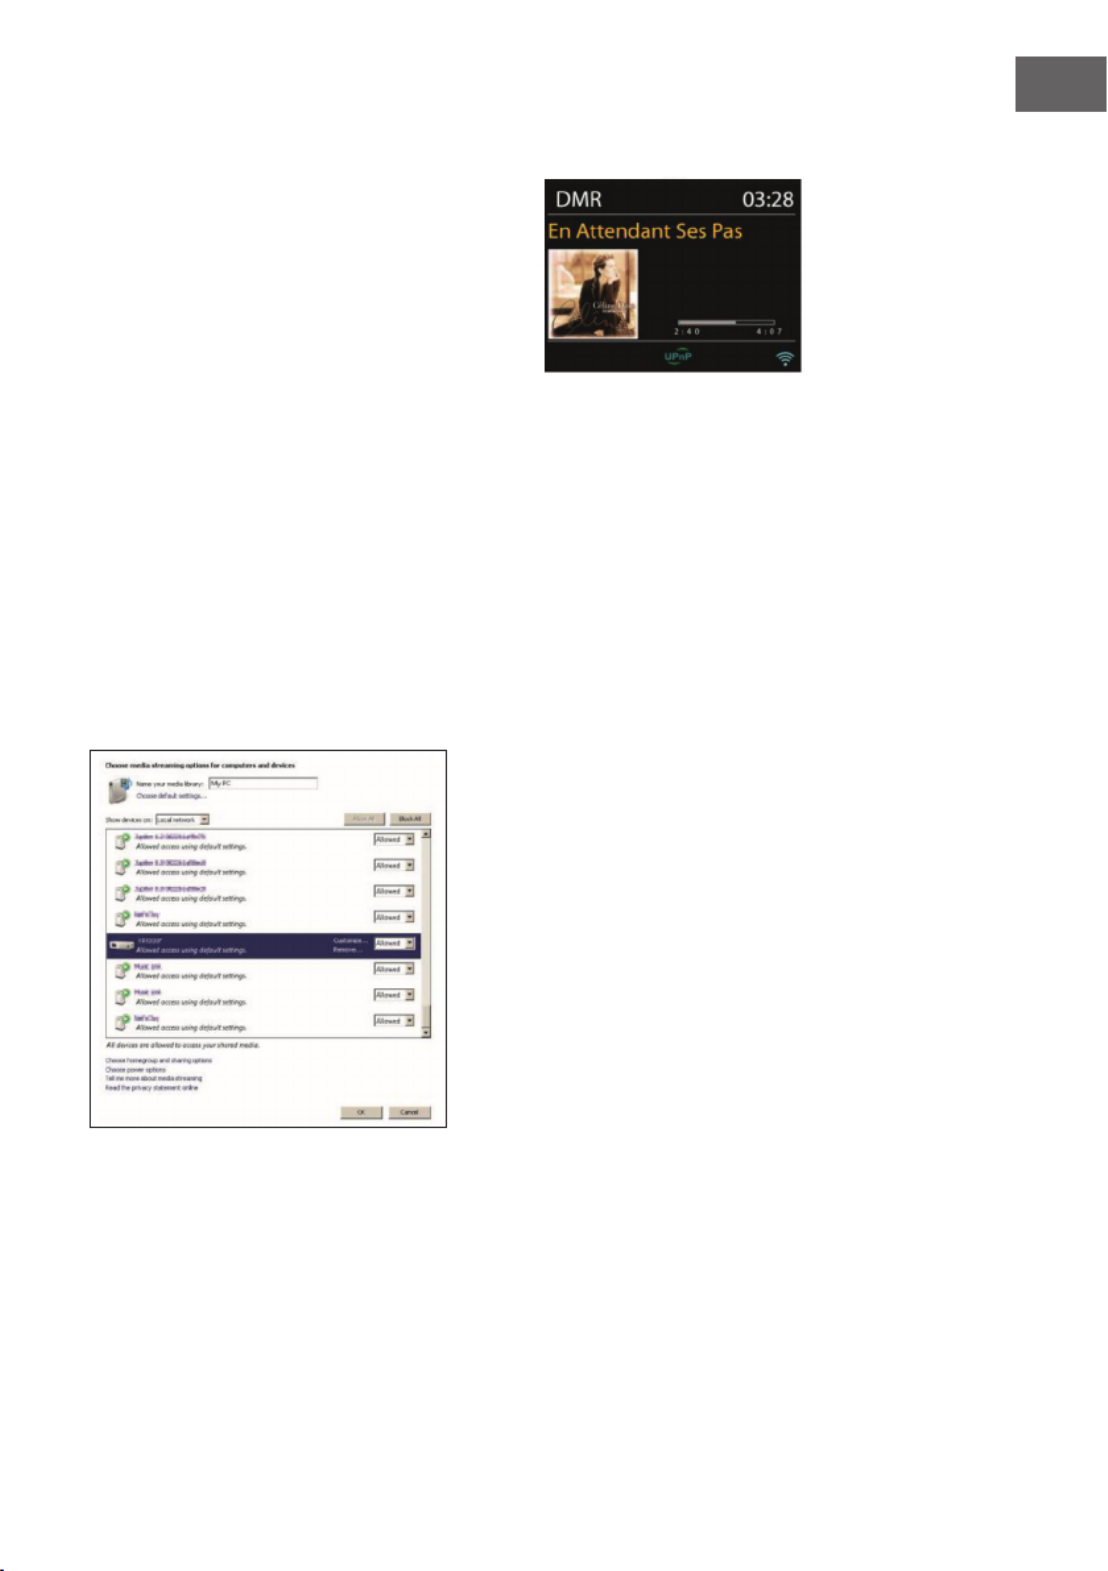
DMR (DLNA-Streaming)
Shared music is a way of music streaming
which you look for the music list and control
playback from the kitchen radio. This topic
will introduce another way to do the music
streaming which is not necessary to control
playback on the kitchen radio.
You can share the music les from PC, Android mobile or tablet, and directly
use your PC, Android mobile, tablet or iPhone / iPad to control music
playback on the kitchen radio. It is simple called DLNA streaming.
Control on PC
The PC system requirements for DLNA are Windows 7 and Windows Media
Player 12. Setup as below:
Firstly, share the media on your PC to the kitchen radio.
Control Panel > Network and Internet > Network and Sharing Center >
Media streaming options

74
EN
Open Windows Media Player to enable Allow remote control of my Player.
Right click any music in the library and choose Play to the kitchen radio.
A box of music playback pops up for the streaming.

75
EN
Control on Smartphone / Tablet
You may search (with keyword: DLNA) and install any free or commercial
DLNA Apps from Google Play or Apple Store if you are using Android
mobile, tablet or iPhone / iPad.
It is suggested to use BubbleUPnp or Twonky Beam on Android mobile,
tablet; or use Twonky Beam on iPhone/iPad.
Procedures for playing shared music on the app are as follows:
1. Select KR-1000 as the player.
2. Select music server and choose the music.
BubbleUpnp
Select player Select server

76
EN
TwonkyBeam
NOTE: Some Apps may not support streaming music from iPhone/iPod
but iPhone/iPod could still be used to control streaming music from
other servers. Some Apps may allow to play the music to multi players
at the same time. Some Apps can create a playlist if you choose several
music.
Study the own instruction of the software or Apps you use to enjoy DLNA
streaming if necessary.

77
EN
DAB
DAB mode receives DAB/DAB+ digital radio and displays information about
the station, stream and track playing.
Scanning for stations
The rst time you select DAB radio mode, or if the station list is empty,
the kitchen radio automatically performs a full scan to see what stations are
available. You may also need to start a scan manually to update the list of
stations for one of the following reasons:
• Available stations change from time to time.
• If reception was not good for the original scan, this may result in an
empty or incomplete list of available stations.
• If you have poor reception of some stations (burbling), you may wish to
list only stations with good signal strength.
To start a scan manually, choose Full scan. To scan only stations with good
signal strength, select Local scan.

78
EN
• Once the scan is complete, the radio shows a list of available stations.
• To remove stations that are listed but not unavailable, choose Prune
invalid.
• Press TUNE- or TUNE+ to view a list of stations. Press TUNE- or TUNE+
or rotate the NAVIGATE knob and then press OK to select. Once
selected, the station plays and the screen shows information about
station, track or show as broadcast.
Presets
To store a DAB preset, press and hold PRESET/BT PAIR until the display
shows the Save preset screen. Select one of the 10 presets to save the
currently playing station.
To select a preset, press PRESET/BT PAIR briey, then select one of the
listed preset stations. When a preset station is playing, it shows *n (*1, * 2,
etc) at the bottom right of the screen.
1 to 10/0 on the remote control are for the use of preset station 1-10.
Now playing information
While the stream is playing, the screen shows its name and DLS (Dynamic
Label Segment) information broadcast by the station giving real-time
information such as programme name, track title and contact details.
Stereo broadcasts are indicated with an icon at the top of the screen. To
view further information, press VOLUME/INFO or INFO/TIMER on the
remote control.
Each time you press it, another set of information is displayed, cycling
through DLS text, programme type, ensemble name/frequency, signal
strength/error rate, bite rate/codec/channels and today’s date.

79
EN
Settings
Dynamic range compression (DRC)
If you are listening to music with a high dynamic range in a noisy
environment, you may wish to compress the audio dynamic range. This
makes quiet sounds louder, and loud sounds quieter. You can change DRC
as o, low or high.
Station order
You can choose the order of the DAB station list to be either Alphanumeric,
Ensemble or Valid.
Ensemble lists groups of stations that are broadcast together on the same
ensemble. Valid lists valid stations rst, alphanumerically, then o-air
stations.
FM RADIO
FM radio mode receives analogue radio from the FM band and displays RDS
(Radio Data System) information about the station and where broadcast.
To nd a station, press OK/SCAN. The frequency display starts to run up as
the kitchen radio scans the FM band. Alternatively, you can scan up or down
by pressing and holding the buttons TUNE- or TUNE+ or tune manually with
quick presses, or by turning the NAVIGATE knob.

80
EN
Preset
• To store a FM preset, press and hold PRESET/BT PAIR until the display
shows the Save preset screen. Select one of the 10 presets to save the
currently playing station.
• To select a preset, press PRESET/BT PAIR briey, then select one of the
listed preset stations. When a preset station is playing, it shows *n (*1,
*2, etc) at the bottom right of the screen.
• 1 to 10/0 on the remote control are for the use of preset station 1-10.
Now playing information
While the stream is playing, the screen shows its frequency, or if RDS
information is available, station name and any further RDS information
such as programme name, track title and contact details. If no information
is available, just the frequency is shown. Stereo broadcasts are indicated
with an icon at the top of the screen, To view further information about the
broadcast, press VOLUME/INFO or INFO/TIMER on the remote control.
Each time you press it, another set of information is displayed, cycling
through RDS text, further RDS text (station/programme type), frequency
and today’s date.
Settings
Scan settings
By default, FM scans stop at any available station. This may result in a poor
signal-to-noise ratio (hiss) from weak stations. To change the scan settings
to stop only at stations with good signal strength, select Yes after choosing
Strong station only?
Audio settings
All stereo stations are reproduced in stereo. For weak stations, this may
result in a poor signal-to-noise ratio (hiss). To play weak stations in mono,
select FM weak reception: Listen in mono only and then YES.

81
EN
BT CONNECTION
• In Bluetooth mode, Radio enters the pairing mode automatically. You
can turn on the Bluetooth of your Bluetooth device and search the radio
to pairing.
• When auna kitchen radio is waiting for pairing, there is a blinking
Bluetooth icon at the bottom. If the pairing is successful, the Bluetooth
icon is on.
• You can control the music playback from your Bluetooth device. You can
use /TUNE+ or /TUNE- to play the previous or next track, press and
hold to rewind or fast forward. Press or the NAVIGATE knob to play
or pause.
• To unpair, press MENU and choose BT disconnect or press and hold
PRESET/BT PAIR to unpair Bluetooth.
• During the Bluetooth mode, you can use the hand free function with
your smartphone. The smartphone must be connected to the kitchen
radio via Bluetooth.
• When the incoming call of smartphone is ringing, press OK to receive
the call. To end the call, press OK again.

82
EN
AUX IN
Aux in mode plays audio from an external source such as an MP3 player. To
play audio with Aux in mode:
• Turn the volume low on both the kitchen radio and, if adjustable, the
audio source device.
• Connect the external audio source to the Aux in 3.5mm stereo socket.
• Either press MODE on the remote control and select AUX IN under Main
menu.
• Adjust the volume of the kitchen radio (and, if necessary, the audio
source device) as required
OTHER FUNCTIONS
Egg Timer
To set the Egg timer, select Egg timer under Main menu. Alternatively, press
and hold TIMER/BACK on the unit or press and hold INFO/TIMER on the
remote control to enter the egg timer.
• On the Egg timer screen, it shows
00:00:00 (hh:mm:ss). Press OK to start
setup the hour, rotate the NAVIGATE
knob or press TUNE- or TUNE+ (0 to 23
hours). Press OK to conrm and set the
minute, rotate the NAVIGATE knob or
press TUNE- or TUNE+ (0 to 59 minutes).
• Press OK again to conrm and set the second, rotate the NAVIGATE
knob or press TUNE- or TUNE+ (0 to 59 seconds).
• After the time counts to the set time, buzzer sound will start , no matter
on the operation mode or standby mode. Press any button to stop the
buzzer.
• You may press and hold TIMER/BACK on the unit or press and hold
INFO/TIMER on the remote control to see how much time is counting.
Press TIMER/BACK on the unit or INFO/TIMER on the remote control to
turn o the timer and reset to 00:00:00.

83
EN
Sleep
To set the sleep timer, select Sleep under Main menu or press on the
remote control. Choose from Sleep OFF, 15 MINS, 30 MINS, 45 MINS or 60
MINS.
Once you select a sleep period, the system returns to the main menu. Press
to return to the Now playing screen.
Alarm
There are two versatile wake-up
alarms with snooze facility, and a sleep
function to turn the system o after a
set period. Each alarm can be set to
start in a particular mode. Select Alarms
under Main menu to set or change an
alarm.
• Select the alarm number (1 or 2) then congure the following
parameters:
- Enable: on/o,
- Frequency: Daily, Once, Weekends or Weekdays,
- Time,
- Mode: Buzzer, Internet Radio, DAB or FM,
- Preset: Last listened 1-10,
- Volume: 0-20
• To activate the new settings, scroll down and select Save.
• The screen shows active alarms with an icon at the bottom left.
• At the set time, the alarm will sound. To temporarily silence, press
any keys on the unit (excepted press MODE or or ALARM. You can
change the snooze period. The radio returns to standby for the set
period, with the silenced alarm icon ashing.

84
EN
Earphone out jack
It allows you to connect an audio cable from the kitchen radio to your
headphone/headset to enhance sound performance.
LED light
You can adjust the LED illumination on the device - either by holding down
the MENU button for a longer time or by pressing the light button on the
remote control. There are 3 dierent brightness levels to choose fromn.
NETREMOTE (UNDOK)
• The device gives a feature of NetRemote by smartphone or tablet in iOS
or Android system. By downloading the assigned app named UNDOK,
you can view all the modes of Internet Radio, Spotify Connect, Music
Player, DAB, FM and AUX IN.
• Search UNDOK from Google Play or Apple Store, and
install it to your smartphone or tablet.
• Before using the UNDOK app, make sure the device and the
smartphone/tablet are in the same WiFi network.
• Launch the app. The app initializes and scans for Internet Radio in the
network. Tap Internet Radio to make the connection of NetRemote.

85
EN
• Once the smartphone / tablet has accessed to the
device, they will be automatically connected next
time when you open the app again.
• Select your desired mode in the main page. You
may then control the selected mode on your
smartphone / tablet and on the display of the
device simultaneously.
• Tap to go to the standby mode. Tap or
“wake up” to go to operation mode.
• Tap „Browse“ to view the details. Tap the list
symbol to view the saved preset stations, and tap
(+) to add the playing station to the desired preset
station number.
Internet Radio
Browse the station list, choose station and view the station rolling text from
the app.

86
EN
Spotify Connect
Go to Spotify app to choose the music from your Spotify playlist.
Tap the Spotify icon on the Spotify app, then choose the preferred device.
It should be displayed in the Spotify app. Once selected, music will be
streaming to the device.
Local Music
Browse the music les from your smartphone/tablet, choose music from the
app.
Music Player
Browse the music les from shared media, choose music from the app.
DAB
Browse the scanned DAB+ stations, choose the station and view the rolling
text of station from the app.

87
EN
FM Radio
Manual search
or scan the
stations from
the app.
From the app, you can also control to operate
STANDBY/ON, EQUALIZER, CHANGE PIN and
RENAME of the device under SETTING menu.
RadioVIS
RadioVIS is a channel for broadcasters to deliver Slideshows over the
Internet. RadioVIS Slideshows appear like the DAB+ slideshows, they are
closely associated with the broadcasted audio service. However it is only
available in some countries around the world. (Visit radioDNS.org for
more details about their broadcasts.) Once RadioVIS is enabled in the app,
and the slideshows are available, the slideshows will be shown from Now
Playing display in the DAB mode or FM mode on the NetRemote app.
NOTE: Be aware that if another smartphone / tablet with the app in the
same network have access with the device, the original connection will
be cut o.

88
EN
CARE AND CLEANING
• Always power o the Radio when cleaning it.
• Never use any harsh or strong solvents to clean the Radio since these
may damage the surface of the device. Dry, soft cloth is appropriate,
however, if the Radio is extremely dirty, it may be wiped o with a
slightly moist cloth. Make sure the device is dried o after cleaning.
• When you are necessary to ship the Radio, store it in its original
package. Save the package for this purpose.
TROUBLESHOOTING
Error Remedy
The device does not
switch on.
Check it the power adaptor is connected properly.
No sound. Turn on the sound as it may be muted
Increase the volume.
Pull any connected headphone or speaker from the
connector jack.
No network
connection can be
established.
Check the WLAN function.
Try to set an IP address at the device.
Activate the DHCP function on the router and make the
connection again at the device.
A rewall is activated on the network – set the respective
program in such a way that access is possible.
Reboot the router
WiFi connection
cannot be
established.
Check the availability of WLAN network on the router.
Place the device closer to the router.
Make sure the password is correct.

89
EN
Error Remedy
No station is found. Check the network as well as the access point and rewall.
The station may not be available currently, try it again later
or select another station.
The link of the station is changed or the station no longer
transmits – ask the provider for information.
The link of manual added station is not correct, make sure
it is correct and re-enter.
Hiss in FM mode Check/move the FM antenna.
Move the radio.
No stations
available/burbling/
intermittent in
DAB mode.
Move the radio.
Rescan local stations only (high-strength).
Check the local DAB coverage
Alarm does not work. Switch on the alarm.
Due to the volume setting, refer to the solutions of “No
sound”.
The source of alarm was set to be station but there is
no network connection. Change the source of alarm or
recongure the connection.
The device cannot
be selected from the
Spotify app.
Make sure that the device is connected to the same
wireless network as your Smartphone or tablet.
You’ll need a Spotify Premium account to use Spotify
Connect. If you don’t have it, just go to
www.spotify.com/freetrial for your free trial.
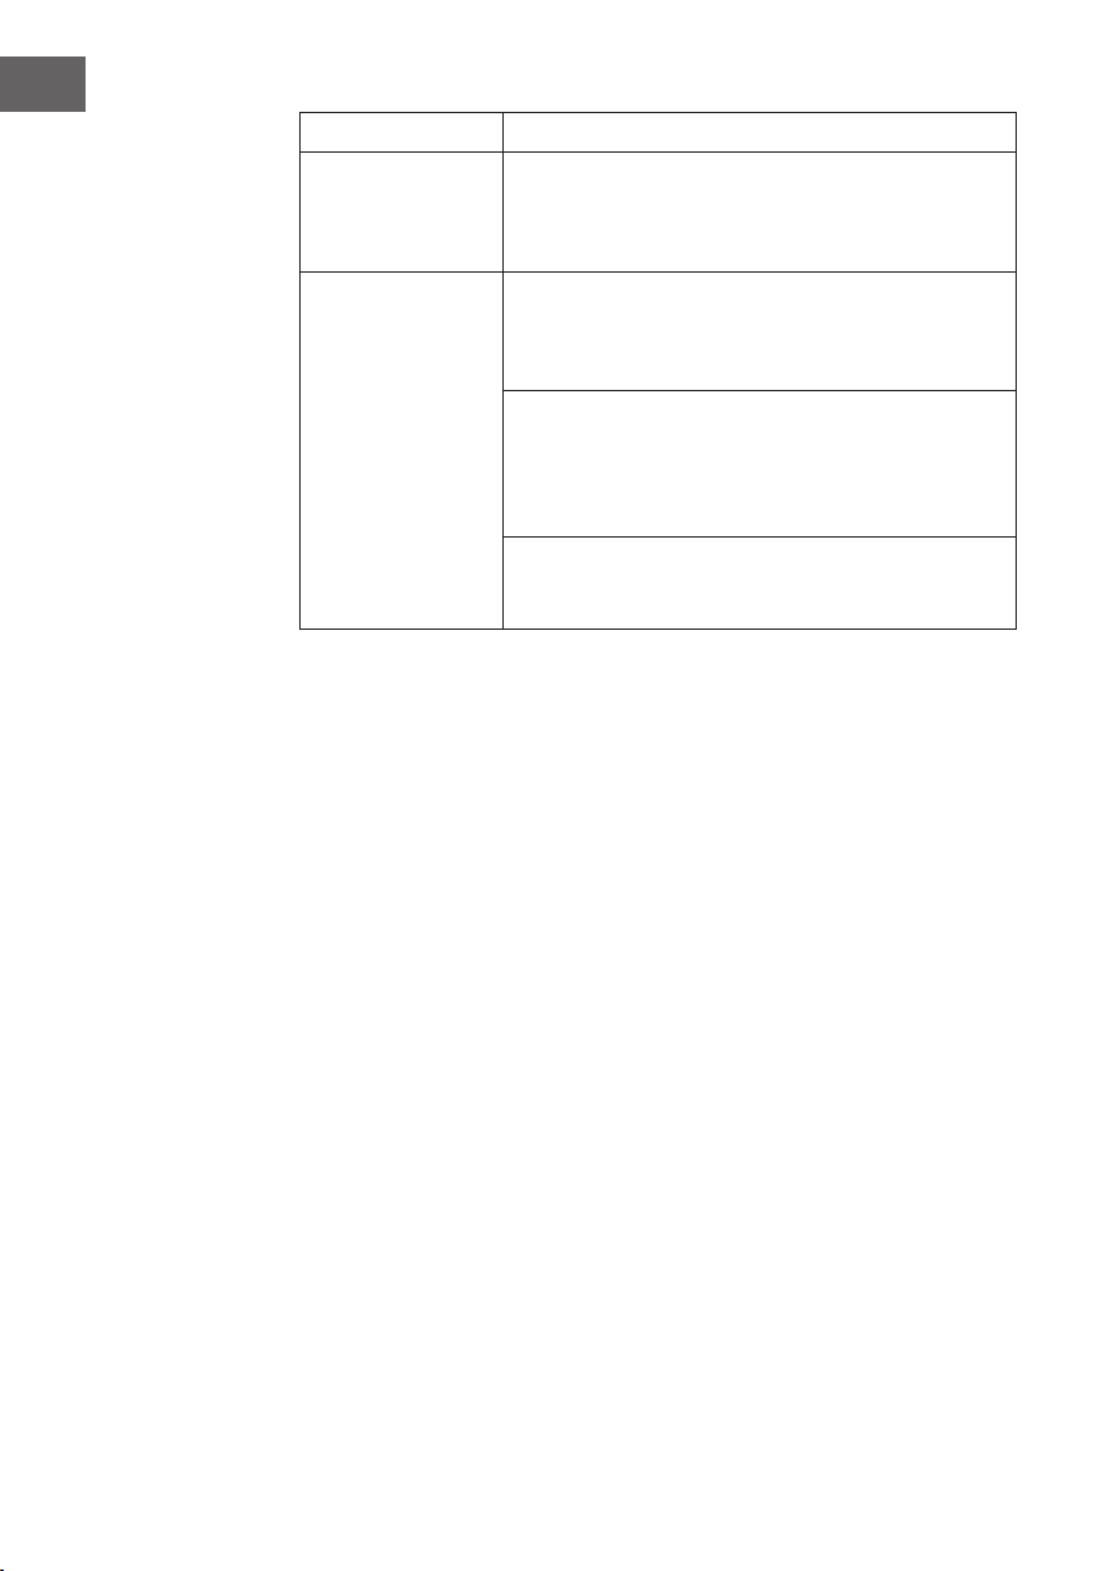
90
EN
Error Remedy
Music continues
streaming on the
device, when you
close the Spotify app.
Restart the Spotify app.
Alle anderen
unbestimmten Fälle.
The kitchen radio may process large amount of data after a
period of operation, no matter in which mode, it will cause
the system freeze or malfunction. Reboot the kitchen radio
if necessary.
The normal function of the product may be disturbed by
strong electro-magnetic interference. If so, simply reset
the product to resume normal operation by following the
instruction manual. In case the function could not resume,
please use the product in other location.
The device may malfunction when used in areas with
strong radio interference. The device will work properly
again once there is no more interference.

91
EN
DISPOSAL CONSIDERATIONS
If there is a legal regulation for the disposal of
electrical and electronic devices in your country,
this symbol on the product or on the packaging
indicates that this product must not be disposed of
with household waste. Instead, it must be taken to
a collection point for the recycling of electrical and
electronic equipment. By disposing of it in accordance
with the rules, you are protecting the environment and
the health of your fellow human beings from negative
consequences. For information about the recycling
and disposal of this product, please contact your local
authority or your household waste disposal service.
This product contains batteries. If there is a legal
regulation for the disposal of batteries in your country, the
batteries must not be disposed of with household waste.
Find out about local regulations for disposing of batteries.
By disposing of them in accordance with the rules, you are
protecting the environment and the health of your fellow
human beings from negative consequences.
DECLARATION OF CONFORMITY
Manufacturer:
Chal-Tec GmbH, Wallstrasse 16, 10179 Berlin,
Germany.
Importer for Great Britain:
Berlin Brands Group UK Ltd
PO Box 1145
Oxford, OX1 9UW
United Kingdom
Hereby, Chal-Tec GmbH declares that the radio
equipment type Connect Soundchef is in compliance with
Directive 2014/53/EU. The full text of the EU declaration
of conformity is available at the following internet
address: use.berlin/10032166
For Great Britain: Hereby, Chal-Tec GmbH declares
that the radio equipment type Connect Soundchef is in
compliance with the relevant statutory requirements. The
full text of the declaration of conformity is available at the
following internet address: use.berlin/10032166

93
ES
Estimado cliente:
Le felicitamos por la adquisición de este producto.
Lea atentamente las siguientes instrucciones y
sígalas para evitar posibles daños. No asumimos
ninguna responsabilidad por los daños causados
por el incumplimiento de las instrucciones y el uso
inadecuado. Escanee el siguiente código QR para
obtener acceso a la última guía del usuario y más
información sobre el producto.
ÍNDICE DE CONTENIDOS
Datos técnicos 92
Indicaciones de seguridad 94
Descripción del aparato 96
Puesta en marcha 98
Funciones y ajustes 101
Radio internet 110
Spotify connect 112
Reproductor de música 113
Dab 119
Radio fm 121
Conexión bt 123
Aux-in 124
Otras funciones 124
Red remota (app undok) 126
Limpieza y cuidado 130
Detección y resolución de problemas 130
Indicaciones para la retirada del aparato 133
Declaración de conformidad 133

94
ES
DATOS TÉCNICOS
Aparato
Número de artículo 10032166, 10032167, 10032168
Monitor 2,4“, 320x240, TFT monitor a color
Red compatible IEEE 802.11a/b/g/n inalámbrica (WiFi)
Respuesta de frecuencia
WiFi: 2.400-2.4836 GHz
Bluetooth: 2,4GHz-2,48GHz
Potencia de frecuencia de radio máxima
transmitida
WiFi:17.432dBm
Transmisión
Codicaciones WEP, WPA,WPA2 (PSK), WPS
Transmisión UPnP, DLNA
Tipos de archivo compatibles MP3, WMA, WAV, FLAC
DAB/DAB+ Band III (170-240MHz)
FM 87.0-180.0 MHz, con RDS
Fuente de alimentación 12 V 2000 mA
Pilas para el mando a distancia 2 x 1,5 V Tipo AAA Pilas
Consumo en modo standby <1,0 W
Consumo de energía en modo standby
con conexión a red <6,0W
Temperatura en funcionamiento 0°C-35°C
Potencia de salida del altavoz 2x7W=14W
Conexiones
3,5 mm conexión AUX-IN, estéreo 3,5
mm Conexión para auriculares, Estéreo
DC IN Toma para suministro eléctrico
Dimensiones en mm (largo x alto x
ancho) 256x72x200
Peso 1,71 kg
Fuente de alimentación
Potencia de entrada 100-240V AC, 50/60 Hz
Potencia de salida 12 V 2000 mA

95
ES
Fuente de alimentación
Fabricante Chal-Tec GmbH, Wallstraße 16,
10179 Berlin, Alemania.
Tensión de entrada AC 100 – 240V
Frecuencia de entrada de corriente
alterna 50/60 Hz
Tensión de salida DC 12.0 V
Corriente de salida 2.0 A
Potencia de salida 24.0 W
Ecacia media activa 87.54% @ 115 V (AC) / 60 Hz
87.47% @ 230 V (AC) / 50 Hz
Grado de ecacia con carga mínima
(10 %)
88.53% @115 V (AC) / 60 Hz
86.19% @230 V (AC) / 50 Hz
Consumo con carga cero 0.052W @115 V (AC) / 60 Hz
0.077W @ 230 V (AC) / 50 Hz

99
ES
Mando a distancia
Utilice las yemas para presionar la tapa
del compartimento de las pilas y extraerla.
Introduzca una pila 1,5 2 AAA en el
compartimneto. Asegúrese de colocar la pila
correctamente.
Existe riesgo de explosión si introduce el tipo
incorrecto de pila. Deseche las pilas usadas de
acuerdo con las disposiciones vigentes en su
país.
AVISO
riesgo de lesiones. No se trague
la pila del mando a distancia.
Existe el riesgo de una quema-
dura química.
Mantenga tanto las pilas nuevas como
las usadas alejadas de los niños. Si el
compartimento de las pilas no puede
cerrarse, deje de utilizar el mando a distancia
y manténgalo alejado de los niños. Si cree
que se alguien se ha podido tragar las pilas
o habérselas introducido en algún ori cio de
su cuerpo, contacte inmediatamente con un
médico.

100
ES
PUESTA EN MARCHA
Contenido del paquete
• Radio internet de cocina
• Set de montaje
• Fuente de alimentación
• Cable de audio con conector de 3,5 mm en ambos extremos
• Manual de instrucciones
Montaje del set de jación bajo una balda
1 Seleccione el lugar de montaje de la radio dependiendo de la
estantería/mueble que se adecue mejor al montaje. Monte el ángulo
de metal con los tornillos de montaje incluidos en el envío. Si el grosor
de la estantería/mueble es menor que el largo de los tornillos, puede
utilizar otros tornillos que se adapten mejor.
2 Desplace la radio por los rieles de metal hasta que se quede ja. Con
motivo del peso, el aparato debe montarse con mucho cuidado. Antes
del montaje, asegúrese de que la estantería/mueble donde desea
instalar el aparato sea lo sucientemente estable como para soportar
el peso de la radio. No coloque el aparato cerca de un radiador ni sin el
separador para reducir el riesgo de incendio.
El aparato puede extraerse de los rieles metálicos y utilizarse como
radio de cocina independiente. En ese caso, puede montar la cubierta
de plástico en el aparato.

102
ES
• En cuanto la encienda, la radio se conectará automáticamente a la red
anteriormente congurada. Si desea modicar la red, vaya a „Ajustes
del sistema“ para establecer la conexión correspondiente.
• Mantenga pulsado el botón MODE
en el aparato o en el mando
a distancia para acceder al modo
standby. El tiempo, la fecha y todas
las alarmas activas aparecen en el
monitor.
• Pulse los botones / para ajustar el volumen. Como alternativa,
puede girar el regulador de la radio VOLUMEN/INFO para ajustar
el volumen. Pulse el botón hasta que el volumen llegue a 0 o pulse
directamente el botón de silenciar el volumen.
Reproducción de música a través del PC
Para transmitir los archivos de audio del PC, siga estos pasos:
1 Conecte el ordenador a la red.
2 Asegúrese de que la radio internet esté encendida y conectada a la
misma red del PC.
3 Abra el reproductor de Windows Media de la plataforma UpnP (11 o
superior). Como alternativa, puede utilizar otros programas, como
Windows Media Connection

104
ES
Actualización automática
• La hora y la fecha pueden congurarse manual o automáticamente a
través de DAB, FM o la red.
• La actualización automática funciona a través de datos que se envían
vía DAB, FM o internet al aparato.
• La hora se actualiza solo en el modo correspondiente, por lo que es
mejor elegir un modo que utilice habitualmente.
• El DAB y FM utilizan señales temporales que se envían a través de
transmisiones de radio. La red utiliza las señales temporales enviados
en el modo red al portal de radio de internet.
Zona horaria, Horario de verano / invierno
• Ajuste la zona horaria. Si su país utiliza el horario de verano/invierno,
seleccione la opción de guardado de horario de verano/invierno.
Actualización manual
• Si selecciona „no actualizar“, el asistente de instalación le requerirá
congurar manualmente la hora y la fecha. La fecha y la hora se muestra
en formato dd-mm-aaaa y hh:mm.
• El valor actual aparece parpadeando. Adapte los valores con la rueda
de navegación del aparato o los botones del mando a distancia.
En cuanto haya congurado el valor, presione „OK“ para ajustar el
siguiente valor.
Conguración de la red
Región WLAN
• Seleccione la región WLAN para obtener una conexión WLAN óptima:
Gran parte de Europa.
Búsqueda de red
• Este aparato es compatible con los protocolos de red y sistemas
comunes de codicación. Busca todas las redes disponibles y las lista
para su selección.
• Existen indicaciones para el tipo de red. Si su dispositivo de red es
compatible con la función WPS, aparecerá [WPS] antes del SSID
(nombre del dispositivo de red). Seleccione la red a la que debe
conectarse la radio.
• Para establecer la conexión inalámbrica, en el siguiente paso se le
pedirá que introduzca la contraseña de la red.
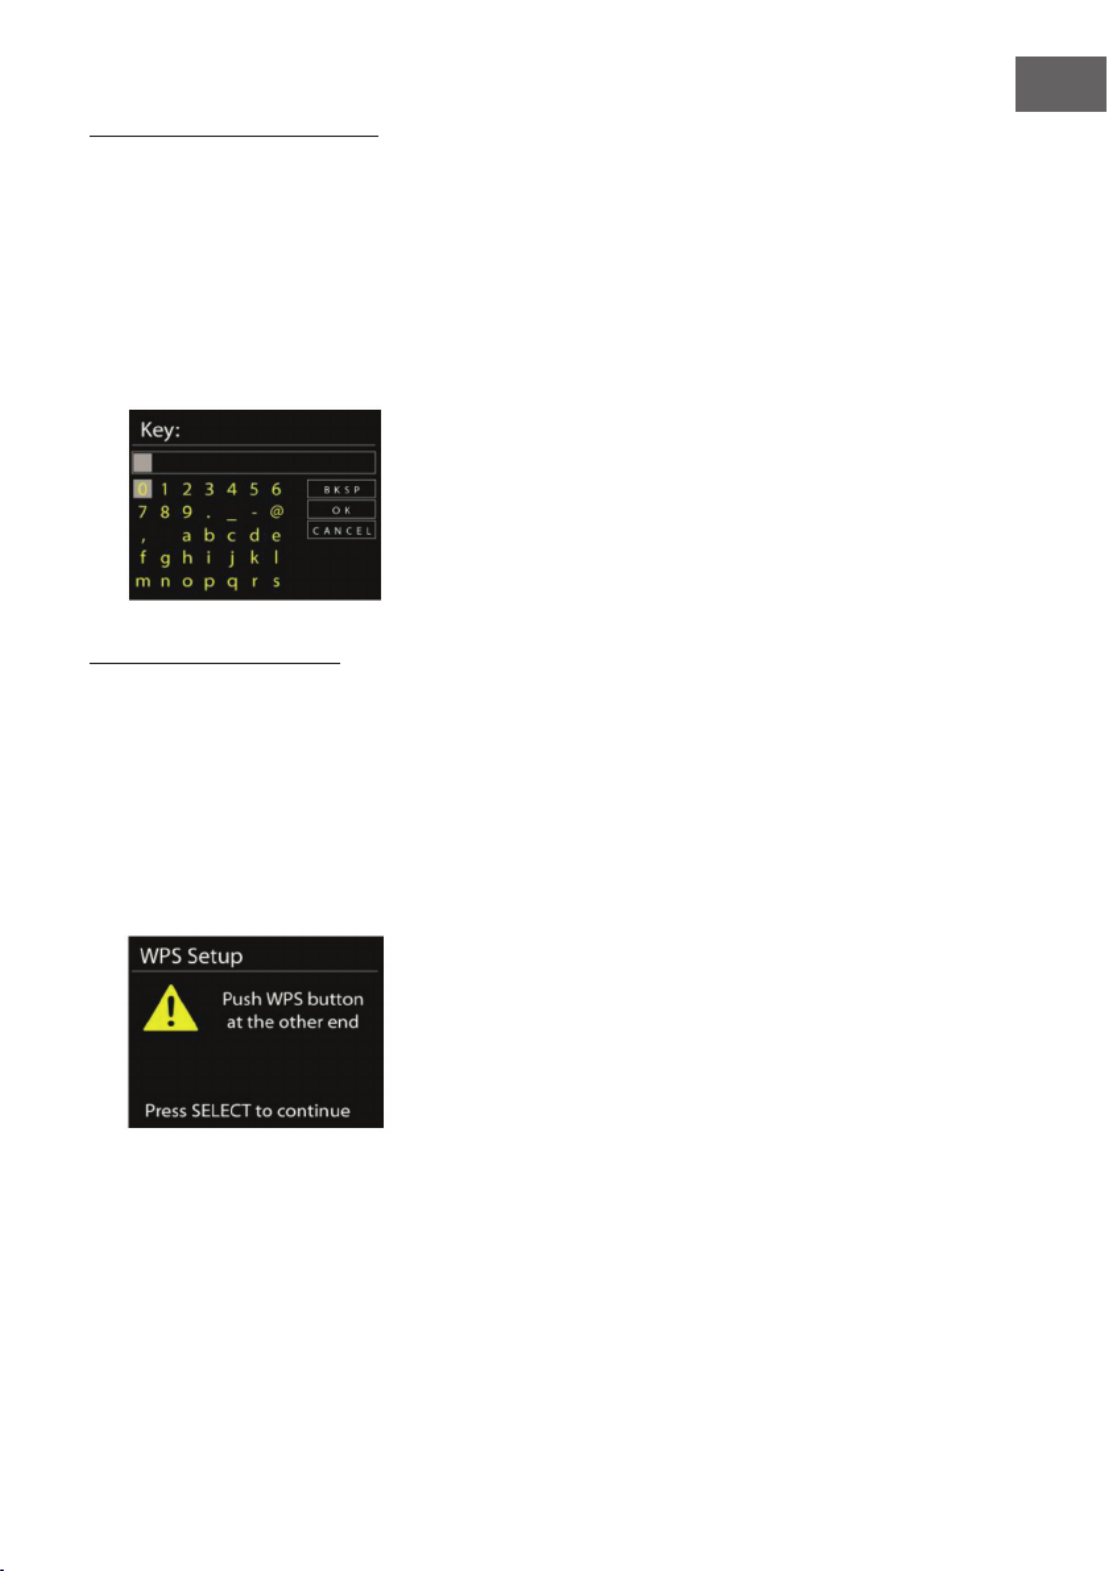
105
ES
Red con codicación estándar
• Para introducir la clave de red, utilice el botón de navegación o las
echas de dirección del mando a distancia para mover el curso del
ratón a los caracteres correspondientes y pulse „OK“ para conrmar.
• Seleccionando cada uno de los caracteres, podrá comprobar en la zona
superior del monitor el código mostrado.
• El cursor del ratón se coloca delante de primer caracter si gira el botón
de navegación y se muestran las tres opciones siguientes: „Atrás“, „OK“
y „Cancelar“.
Red con codicación WPS
Las redes con condicación WPS se reconocen por las letras WPS que
aparecen al comienzo del nombre de la red. Utilice los siguientes métodos
de conexión para establecer la conexión con una red WPS:
• Pulsar un botón
La radio le indica que debe pulsar el botón de conexión del router. A
continuación, busca una red de conexión lista y se conecta.
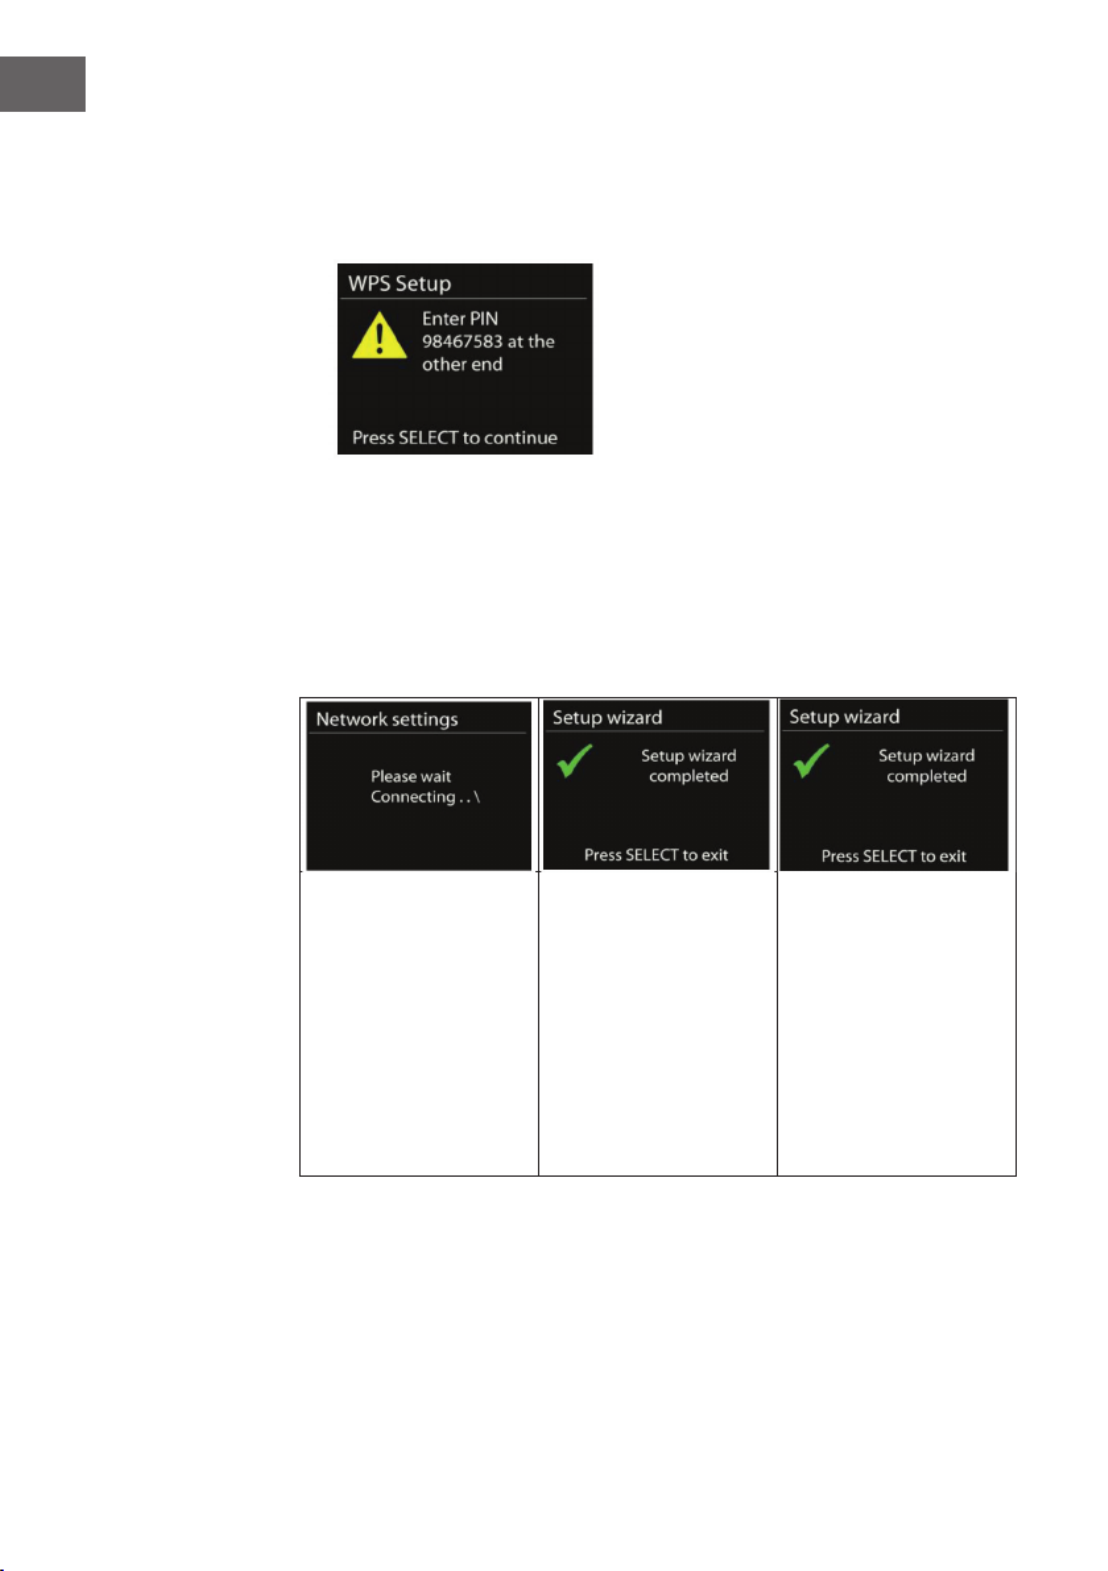
106
ES
• Pin
La radio genera un pin de 8 cifras que debe introducir en el router
inalámbrico, el punto de acceso o un punto de acceso externo.
• Saltar WPS
Introduzca la clave como con una red de codicación estándar.
Si necesita más información sobre la conguración de la red con
codicación WPS, lea el manual de instrucciones de su router.
Conclusión
La radio intenta
conectarse a la red que ha
escogido.
Aparece "conectado"
cuando se haya
establecido
satisfactoriamente la
conexión con los ajustes
que usted haya realizado.
Si no se logra establecer
la conexión, la radio
regresa a la pantalla
anterior para intentar
conectarse de nuevo.
Pulse "OK" para nalizar el
asistente de instalación.

107
ES
Ecualizador
• Existen varios modos EQ para elegir: Normal, Flat, Jazz, Rock, Movie,
Classic, Pop y Noticias.
• También existes ajustes personalizados. Cree su propio EQ con graves,
agudos y ajustes de volumen.
• Pulse el botón EQ del mando a distancia para un acceso rápido al menú
del ecualizador.
Conguración de la red
Asistente de red
Seleccione el asistente de red para buscar AP SSID e introduzca a
continuación la contraseña WEP/WPA o seleccione pulsar botón/ pin/
saltar WPS para conectarse a la red inalámbrica.
Congurar PBC WLAN
Pulse el botón de conguración. Se utiliza para conectar la AP compatible
con WPS.
Visualización
Consulte la información de la red a la que se encuentra conectado.
Conexión activa, dirección MAC, región WLAN, DHCP, SSIP, dirección IP,
máscara de subred, dirección de la puerta de enlace, DNS primarios y
secundarios.
Región WLAN
Seleccione la región WLAN para obtener una conexión WLAN óptima:
Canadá, España, Francia, Japón, Singapur, Australia o la República de Corea.

108
ES
Conguración manual
Seleccione „conexion de red inalámbrica“ y active/desactive el DHCP
(Dynamic Host Conguration Protocol).
Pin de red remota
Congure un pin para poder acceder a la radio mediante control remoto. El
pin por defecto es 1234.
Perles de red
• El aparato guarda las últimas 4 redes a las que se ha conectado e
intenta establecer automáticamente la conexión si las encuentra.
• Aquí puede consultar la lista de las redes guardadas. También puede
eliminar las redes no deseadas girando hasta OK y pulsando a
continuación „SÍ“ para conrmar el borrado.
Mantener la conexión de red
Si se decide por mantener la red conectada, la conexión WiFi no se
interrumpirá en modo standby. De lo contrario, la conexión WiFi solo
estará disponible cuando el aparato esté encendido. Esta opción le permite
al aparato estar listo para la transmisión DLNA en cualquier modo de
funcionamiento.

109
ES
Fecha/Hora
Ajuste el tiempo manualmente o deje que se actualice automáticamente. El
formato horario, la zona horaria y el horario de invierno y verano también
pueden congurarse.
Idioma
La lengua predeterminada es el inglés. Seleccione el idioma deseado.
Restablecer los valores de fábrica
Al restablecer los valores de fábrica, se eliminan todos los ajustes
realizados por el usuario, por lo que se pierden la hora y la fecha, la
conguración de red y las emisoras guardadas. La versión actual de
software de la radio se mantiene, al igual que el registro del aparato en el
portal de la radio de internet. Los favoritos guardados en la radio internet
se mantienen, a menos que registre su radio con otra cuenta en la página
web del portal.
Actualización de software
Cada cierto tiempo tendrá disponibles actualizaciones de software que
contienen características adicionales o solución de fallos. Puede comprobar
si existen dichas actualizaciones de software manualmente o congurando
la radio para que lo haga periódicamente (así está congurado de fábrica).
Si se detecta el nuevo software, se le preguntará si desea actualizar
el aparato. Si acepta, se descargará e instalará el software. Tras la
actualización de software se mantendrán todos los ajustes del usuario.
Advertencia: Antes de iniciar el software, compruebe que el aparato se
encuentre bien conectado y la conexión eléctrica sea estable. Un corte
de luz o apagado durante la actualización puede averiar la radio de
manera permanente.

110
ES
Info
Visualizar la información de la versión del rmware y la detección de la
radio
Iluminación de fondo
Puede ocurrir que desee modicar la intensidad de la iluminación de
fondo de cada modo (encender dispositivo/standby) en alto, medio o bajo.
Además, puede regular la duración tras la cual la radio oscurece la pantalla
si no la utiliza.
Multiroom
Puede utilizar la radio como altavoz en un sistema de audio multiroom en el
modo radio internet, spotify connect, música local, reproductor de música,
DAB o FM. Este menú le permite solicitar el estado y otra información de
la radio internet en su sistema de audio multiroom, así como visualizar los
dispositivos actuales en el sistema de audio multiroom y editar los grupos.
Necesita utilizar el controlador auna (UNDOK) para utilizar la radio como
parte de un sistema de audio multiroom. Puede descargar esta app desde la
App Store o desde la Google Play Store.
A continuación, se muestra un resumen de los ajustes disponibles en el
menú multiroom:
Visualizar detalles
Aquí puede ver a qué grupo del sistema de audio multi room pertenece su
dispositivo.
Crear nuevo grupo
Aquí puede crear un nuevo grupo. Puede añadir la radio internet y otros
dispositivos a los grupos que ha creado.
• Gire el botón de navegación para seleccionar un caracter y pulse OK
para conrmar. También puede utilizar el teclado numérico o el botón
de navegación y el botón OK del mando a distancia.
• Después de haber introducido por esta vía el nombre del grupo, gire
el botón de navegación para seleccionar „OK“ y presione OK para
conrmar.

111
ES
Añadir a un grupo
Puede añadir uno o más dispositivos que están conectados a la misma red
WLAN a su sistema de audio multiroom.
Visualizar dispositivos actuales en el grupo
Muestra los dispositivos que se encuentran actualmente en el grupo.
También es posible eliminar cada uno de los dispositivos del grupo.
Abandonar grupo
Aquí puede eliminar su radio interent del grupo multiroom.
Disolver grupo
Aquí puede eliminar un grupo multiroom completo.
Formato horario standby
Puede elegir entre el formato analógico y el digital en modo standby.

113
ES
Favoritos y registro en el portal de radio internet
• Los favoritos se guardan en el portal de radio internet y están
disponibles en todas las radios internet registradas con la misma
cuenta. Antes de poder utilizar sus favoritos, la radio internet debe estar
registrada en el portal de radio internet.
• Para registrar su aparato, seleccione la lista de
emisoras>ayuda>obtener código de acceso individual para el portal
de radio internet. (No confunda el código de acceso del portal con la
identicación de la radio que aparece en los ajustes del sistema).
• Visita la página web del portal www.wiradio-frontier.com. Si es la
primera vez que visita el portal, regístrese introduciendo la siguiente
información para su nueva cuenta:
- Código de acceso
- Dirección de correo electrónico
- Contraseña
- Modelo de radio
• Si p113-ya tiene una cuenta y desea añadir una radio adicional, inicie sesión
con su cuenta y seleccione Mis preferencias > añadir una radio wi-
spotify nueva.
• En cuanto la radio esté registrada en el portal, puede acceder a sus
favoritos y las opciones de emisoras añadidas.
• Para guardar una emisora en favoritos, mantenga pulsado el botón OK
durante la reproducción de la emisora hasta que aparezca la pantalla
„añadir a favoritos“. La emisora aparece en la lista de favoritos creada
por defecto.
Mis emisoras añadidas
Aunque el portátil de internet contiene miles de emisoras de radio, puede
ocurrir que desee escuchar una emisora que no se encuentre listada en el
portal. Puede añadir las emisoras que desee a través del portal.

115
ES
REPRODUCTOR DE MÚSICA
En el modo de reproductor de música
puede reproducir archivos de audio de
un ordenador conectado a la red local.
Los archivos de audio pueden tener los
siguientes formatos: MP3, WMA, WAV, AAC
o FLAC.
Si p115-ya está reproduciendo un archivo de audio, puede presionar el botón
TIMER/BACK o [<] en el mando a distancia, pues este es más rápido que
pulsar el botón para acceder a la última pantalla del menú visitada.
Puede utilizar los botones o para reproducir la pista siguiente
o anterior. Mantenga pulsado el botón correspondiente para avanzar o
retroceder rápidamente. Para iniciar la reproducción o pausarla, pulse el
botón . Pulse el botón para detener la reproducción y regresar a la
lista de reproducción.
Elementos multimedia compartidos
• Si ha congurado los elementos multimedia compartidos, debería ver
una entrada que se compone de <Nombrede PC<:<Nombre de los
archivos multimedia compartidos>.
• Si tiene más de un ordenador que comparte elementos multimedia, se
mostrarán las alternativas.
• Seleccione el archivo compartido que desea reproducir.
• Desde este punto se generan los menús de los elementos multimedia
compartidos por el servidor. El primer menú muestra una lista con
el tipo de medio, por ejemplo música, vídeo, imágenes y listas de
reproducción. La radio internet solo puede reproducir música y listas de
reproducción.

117
ES
DMR (DLNA-Streaming)
La compartición de música es una forma
de reproducir música visualizándola en
una lista de reproducción y controlando la
reproducción desde su radio. Esta sección
le muestra otro modo de reproducir música,
por lo cual no es necesario controlar la
reproducción desde su radio.
Puede compartir los archivos de audio vía PC, smartphone o tablet, a través
de un uso directo de su PC, android smartphone, tablet o iPhone/iPad para
controlar la reproducción de su radio. Este procedimiento se denomina
transmisión DLNA.
Manejo vía PC
Los requisitos de los PC para utilizar DLNA son Windows 7 y el Reproductor
Windows Media 12. Los ajustes son los siguientes:
Comparta primero los elementos multimedia contenidos en su PC con su
radio de cocina: Panel de control > Redes e internet > Centro de redes y
recursos compartidos > Opciones uso compartido

119
ES
Manejo vía smartphone/ tablet
Puede instalar Apps gratuitas o de pago de DLNA (palabra clave DLNA)
en la Google Play store o en la Apple Store en función de si utiliza un
smartphone/tablet Android o un iPhone/iPad.
Se recomienda utilizar las apps BubbleUpnp o Twonky Beam en
Smartphones Android y tablets y Twonky Beam en iPhone y iPad.
El proceso para reproducir la música compartida a través de la App es el
siguiente:
1 Seleccione el KR-1000 como medio de reproducción.
2 Seleccione el servidor de música y la música
BubbleUpnp
Seleccionar medio de reproducción Seleccionar servidor

120
ES
TwonkyBeam
Advertencia: Algunas app no son compatibles con la transmisión
de música desde iPhone/iPad, pero estos dos dispositivos pueden
utilizarse igualmente para controlar la transmisión de música desde
otros servidores. Algunas App permiten la reproducción de música
simultáneamente en varios medios de reproducción. Con algunas app
puede seleccionar varias canciones y crear una lista de reproducción.
Lea las instrucciones del Software o las App que desee utilizar para la
transmisión DLNA.

121
ES
DAB
En el modo DAB recibe radio digital DAB/DAB+ y puede visualizar
información sobre la emisora, transmisión y pista de reproducción.
Búsqueda de emisoras
Si selecciona el modo DAB por primera vez o si su lista de emisoras está
vacía, la radio realiza una búsqueda automática de emisoras para poder
mostrar las emisoras disponibles. Por alguno de los motivos siguientes,
puede que sea necesario realizar la búsqueda manualmente y actualizar la
lista de emisoras:
• Las emisoras disponibles cambian cada cierto tiempo.
• Si la señal no era buena en la búsqueda automática de emisoras, pude
provocar que la lista esté vacía o incompleta.
• Si algunas emisoras tienen mala señal de recepción (ruidos), puede que
solo quiera listar las emisoras con buena señal.
Para iniciar una búsqueda manual de emisoras, seleccione „búsqueda
completa“. Para buscar solo emisoras con buena señal, elija „emisoras
locales“.

122
ES
• Cuando haya terminado la búsqueda, la radio muestra una lista con las
emisoras disponibles.
• Para eliminar las emisoras que están listadas pero no disponibles,
seleccione „emisoras inválidas“.
• Pulse los botones TUNE- o TUNE+ para visualizar la lista de emisoras.
Pulse TUNE- o TUNE+ para seleccionar o gire el botón de navegación
y pulse OK a continuación. En cuanto haya escogido una emisora, esta
se reproducirá y en el display aparece información sobre la emisora, la
pista, el programa o la emisión.
Guardar emisora
• Mantenga pulsado el botón PRESET/BT PAIR para guardar en el modo
DAB hasta que en el display aparezca „guardar emisora“.
• Seleccione uno de los 10 espacios de memoria para guardar la emisora.
• Para seleccionar una emisora guardada, pulse el botón PRESET/BT PAIR
y elija una de las emisoras que aparecen listadas. Si se reproduce una
emisora guardada en la lista, el display muestra en la parte inferior *n
(*1, *2, etc). Los números de 1 a 10/0 del mando a distancia se utilizan
para congurar las emisoras guardadas.
Información sobre la reproducción actual
Mientras se reproduce la transmisión, el display muestra su nombre e
información DLS (Dynamic Label Segment) que las emisoras difunden en
tiempo real. Entre esta información se encuentra, por ejemplo, la emisora,
la pista de reproducción, información de contacto. Las emisiones de radio
en estéreo se identican a través de un símbolo situado en la parte superior
del display. Para visualizar más información, pulse los botones VOLUME/
INFO o INFO/TIMER en el mando a distancia.
Cada vez que pulse uno de los dos botones, se mostrará distinta
información, como texto DLS, tipo de programa, frecuencia/nombre del
grupo radiofónico, potencia de la señal/tasa de error, tasa de bits/codec/
emisora y fecha actual.

123
ES
Ajustes
Compresión del Rango Dinámico (DRC)
Si escucha música con una compresión del rango elevada en ambientes
muy ruidosos, quizás desee comprimir el rango dinámico de audio. Así los
tonos más suaves sonarán más fuerte y viceversa. Puede ajustar el DRC en
„o“, „bajo“ o „alto“.
Orden de las emisoras
Las emisoras DAB de su lista pueden clasicarse como „alfanuméricas“,
„grupo radiofónico“ o „válidas“. „Grupo“ lista emisoras que tienen la
misma frecuencia, en grupos. „Válidas“ lista emisoras válidas en orden
alfanumérico y a continuación emisoras que no están disponibles en ese
momento.
RADIO FM
En el modo FM puede recibir la radio análoga en frecuencia FM. El monitor
muestra en el modo FM información RDS (Radio Data System) sobre la
emisora y dónde se emite.
Pulse el botón OK/SCAN para buscar una emisora. El indicador de
frecuencia comienza hacia arriba mientras la radio de cocina busca
frecuencias FM. Como alternativa puede buscar emisoras a través de los
botones TUNE- o TUNE+ o buscar las emisoras manualmente pulsando este
botón o girando el botón de navegación.

124
ES
Guardar emisora
• Mantenga pulsado el botón PRESET/BT PAIR para guardar en modo FM
hasta que en el display aparezca „guardar emisora“.
• Seleccione uno de los 10 espacios de memoria para guardar la emisora.
• Para seleccionar una emisora guardada, pulse el botón PRESET/BT PAIR
y elija una de las emisoras que aparecen listadas. Si se reproduce una
emisora guardada en la lista, el display muestra en la parte inferior *n
(*1, *2, etc). Los números de 1 a 10/0 del mando a distancia se utilizan
para congurar las emisoras guardadas.
Información sobre la reproducción actual
Durante la reproducción de la emisión, la pantalla muestra su frecuencia o,
en caso de que exista información RDS disponible, el nombre de la emisora
y otra información RDS, como nombre de la emisora, pista de reproducción
e información de contacto. Si no hay información disponible, el display solo
mostrará la frecuencia. Las emisiones de radio en estéreo se identican a
través de un símbolo situado en la parte superior del display. Para visualizar
más información de una emisora, pulse los botones VOLUME/INFO o INFO/
TIMER en el mando a distancia.
Cada vez que pulsa estos botones, se mostrará esta información en
el orden siguiente: Texto RDS, texto RDS siguiente (emisora/ tipo de
programa), frecuencia y fecha actual.
Ajustes
Ajustes de búsqueda
En el modo de búsqueda FM, según la conguración de fábrica, el
aparato se detiene en cuanto encuentre emisoras disponibles. Esto puede
provocar que se detenga en emisoras con señal débil y que se produzcan
interferencias en la reproducción debido a la relación señal-ruido. Para
modicar los ajustes de búsqueda para que solamente se detenga en
emisoras con buena señal, seleccione „SÍ“ tras seleccionar „Solo emisoras
con buena señal“.
Ajustes de audio
Todas las emisoras se reproducen en estéreo. Para las emisoras con
señal débil, esto puede provocar interferencias en la reproducción. Para
reproducir emisoras con señal débil en mono, seleccione en el modo FM
„señal débil > reproducir solo en mono > SÍ“.

132
ES
LIMPIEZA Y CUIDADO
• Apague siempre el aparato antes de limpiarlo.
• Para limpiar el aparato nunca utilice disolventes potentes, pues estos
pueden dañar su supercie. Limpie la radio con un paño suave y seco.
Para suciedad incrustada, el aparato puede limpiarse con un paño un
poco húmedo. Asegúrese de que el aparato se seque completamente
tras la limpieza.
• Conserve el embalaje de la radio para que pueda transportala en caso
de traslado.
DETECCIÓN Y RESOLUCIÓN DE PROBLEMAS
Problema Posible causa y solución
El aparato no puede
encenderse.
Compruebe que la fuente de alimentación esté conectada
correctamente.
No hay sonido. Active el volumen, pues puede que el aparato esté
silenciado.
Aumente el volumen.
Desconecte el conector de los auriculares o altavoces.
No se puede
establecer una
conexión de red.
Compruebe la función WLAN.
Intente congurar en el aparato una dirección IP.
Active la función DHCP del router e intente establecer una
conexión de nuevo en su dispositivo.
Hay un cortafuegos activado. Congure el programa
correspondiente de tal modo que se pueda crear el acceso.
Reinicie el router.
No se puede
establecer una
conexión WiFi.
Compruebe la disponibilidad de la red WLAN en el lateral
del router.
Termékspecifikációk
| Márka: | Auna |
| Kategória: | rádió |
| Modell: | Connect Soundchef |
Szüksége van segítségre?
Ha segítségre van szüksége Auna Connect Soundchef, tegyen fel kérdést alább, és más felhasználók válaszolnak Önnek
Útmutatók rádió Auna

3 Szeptember 2024
3 Szeptember 2024
19 Augusztus 2024
18 Augusztus 2024
17 Augusztus 2024
17 Augusztus 2024
15 Augusztus 2024
14 Augusztus 2024
13 Augusztus 2024
10 Augusztus 2024
Útmutatók rádió
- rádió Sony
- rádió August
- rádió Yamaha
- rádió Moulinex
- rádió Nedis
- rádió Milwaukee
- rádió Grundig
- rádió Philips
- rádió Pioneer
- rádió Kärcher
- rádió Adler
- rádió Oregon Scientific
- rádió SilverCrest
- rádió Garmin
- rádió Bosch
- rádió Panasonic
- rádió JVC
- rádió AEG
- rádió Sharp
- rádió Einhell
- rádió Harman Kardon
- rádió Toshiba
- rádió Sven
- rádió Ozito
- rádió Makita
- rádió Hyundai
- rádió HQ
- rádió Emos
- rádió Medion
- rádió Onkyo
- rádió Motorola
- rádió Vimar
- rádió Technics
- rádió JBL
- rádió Camry
- rádió DAP-Audio
- rádió Zebra
- rádió Xiaomi
- rádió GoGen
- rádió Futaba
- rádió Boss
- rádió Be Cool
- rádió Thomson
- rádió Technaxx
- rádió Aiwa
- rádió Kenwood
- rádió Tesco
- rádió Duronic
- rádió Clatronic
- rádió Hama
- rádió PEAQ
- rádió Renkforce
- rádió Midland
- rádió Sencor
- rádió GPX
- rádió Bose
- rádió Lowrance
- rádió Hitachi
- rádió BLUEPALM
- rádió Telefunken
- rádió Nevir
- rádió Sennheiser
- rádió Tangent
- rádió Cambridge
- rádió Alpine
- rádió Acoustic Solutions
- rádió Roadstar
- rádió Logitech
- rádió Klein Tools
- rádió Parrot
- rádió Cobra
- rádió Hilti
- rádió Sonoro
- rádió Denver
- rádió Bush
- rádió Power Dynamics
- rádió Black & Decker
- rádió Trevi
- rádió Memphis Audio
- rádió Elta
- rádió Albrecht
- rádió Aluratek
- rádió Audio-Technica
- rádió NGS
- rádió Daewoo
- rádió Lenoxx
- rádió PowerPlus
- rádió Denon
- rádió Muse
- rádió OK
- rádió JL Audio
- rádió Metabo
- rádió SPC
- rádió Hitec
- rádió Mac Audio
- rádió TriStar
- rádió BaseTech
- rádió Bogen
- rádió RYOBI
- rádió Terratec
- rádió DreamGEAR
- rádió HiKOKI
- rádió Intertechno
- rádió Manhattan
- rádió Alecto
- rádió Festool
- rádió Furrion
- rádió Velleman
- rádió Teac
- rádió Clarion
- rádió Scott
- rádió Monacor
- rádió ION
- rádió Manta
- rádió Blaupunkt
- rádió Oricom
- rádió Viper
- rádió Easy Home
- rádió Sagem
- rádió Delta
- rádió Busch-Jaeger
- rádió Olympia
- rádió Logik
- rádió Tronic
- rádió Timex
- rádió La Crosse Technology
- rádió Infinity
- rádió AKAI
- rádió Porter-Cable
- rádió Konig
- rádió Stabo
- rádió TechniSat
- rádió GlobalTronics
- rádió Jensen
- rádió Pyle
- rádió Emerson
- rádió DeWalt
- rádió Sanyo
- rádió Salora
- rádió Telestar
- rádió Lenco
- rádió CRUX
- rádió Schneider
- rádió Roberts
- rádió Audizio
- rádió ECG
- rádió Stanley
- rádió Uniden
- rádió Victrola
- rádió Majority
- rádió Hertz
- rádió Vonroc
- rádió Soundmaster
- rádió Monitor Audio
- rádió Cotech
- rádió Audac
- rádió Rockford Fosgate
- rádió Krüger&Matz
- rádió Dual
- rádió ICOM
- rádió Kathrein
- rádió Yaesu
- rádió RCA
- rádió Imperial
- rádió Kicker
- rádió Sangean
- rádió Topcom
- rádió Sirius
- rádió MB Quart
- rádió H-Tronic
- rádió OneConcept
- rádió ILive
- rádió Schwaiger
- rádió EasyMaxx
- rádió Orava
- rádió Lexon
- rádió Vitek
- rádió Geneva
- rádió Craftsman
- rádió Majestic
- rádió Graphite
- rádió Reflexion
- rádió Smartwares
- rádió Teufel
- rádió Sogo
- rádió Crosley
- rádió REVO
- rádió Artsound
- rádió Matsui
- rádió Quigg
- rádió Acoustic Energy
- rádió Argon
- rádió Icy Box
- rádió Brennenstuhl
- rádió Lexibook
- rádió Tevion
- rádió GPO
- rádió Caliber
- rádió Swan
- rádió Exibel
- rádió Brigmton
- rádió Sunstech
- rádió Maginon
- rádió Marquant
- rádió Nordmende
- rádió AudioAffairs
- rádió Binatone
- rádió Steren
- rádió Audiosonic
- rádió Proline
- rádió Coby
- rádió Envivo
- rádió Bigben Interactive
- rádió Pure
- rádió Audiovox
- rádió Terris
- rádió Switel
- rádió Hager
- rádió Bigben
- rádió Sunwind
- rádió Laser
- rádió Alba
- rádió Clas Ohlson
- rádió Naxa
- rádió Ricatech
- rádió Boston Acoustics
- rádió Mpman
- rádió Sweex
- rádió Ices
- rádió Nikkei
- rádió PerfectPro
- rádió Freecom
- rádió Navman
- rádió Gira
- rádió Jung
- rádió Dnt
- rádió Balance
- rádió MT Logic
- rádió Audio Pro
- rádió Kunft
- rádió Difrnce
- rádió Noveen
- rádió Karcher Audio
- rádió Fusion
- rádió PAC
- rádió IHome
- rádió AIC
- rádió Ruarkaudio
- rádió Tivoli Audio
- rádió Go Green
- rádió Wolfgang
- rádió Linn
- rádió Numan
- rádió Iluv
- rádió TELEX
- rádió Multiplex
- rádió Clint
- rádió Soundstream
- rádió Xoro
- rádió Zolid
- rádió Sagemcom
- rádió Block
- rádió Berker
- rádió Woxter
- rádió Xhdata
- rádió View Quest
- rádió Harley Davidson
- rádió Noxon
- rádió Brionvega
- rádió Ferguson
- rádió Wet Sounds
- rádió Eissound
- rádió Dcybel
- rádió Tecsun
- rádió JGC
- rádió Scansonic
- rádió TFA Dostmann
- rádió Audisse
- rádió ETON
- rádió Kruger Matz
- rádió Equity
- rádió EKO
- rádió Pinell
- rádió Videologic
- rádió Tivoli
- rádió Mtx Audio
- rádió Aquatic AV
- rádió Roswell
- rádió Intek
- rádió Digitalbox
- rádió Whistler
- rádió Xact
- rádió Ruark Audio
- rádió Magnavox
- rádió Digitech
- rádió GME
- rádió NUVO
- rádió Narex
- rádió Tiny Audio
- rádió R-MUSIC
- rádió E-bench
- rádió Konig Electronic
- rádió Peha
- rádió SiriusXM
- rádió Sanwa
- rádió SW-Stahl
- rádió Sailor
- rádió SSV Works
- rádió Microlab
- rádió QFX
- rádió Voxx
- rádió SACK It
- rádió BasicXL
- rádió Roth
- rádió Ices Electronics
- rádió AmpliVox
- rádió Elbe
- rádió GBS Elettronica
- rádió Sang
- rádió Gewiss
- rádió Lutron
- rádió Axxess
- rádió Retekess
- rádió Wintal
- rádió Atlantis Land
- rádió Ranger
- rádió MAAS
- rádió Weather X
- rádió Aconatic
- rádió Mebby
- rádió Yamazen
- rádió Blonder Tongue
- rádió RoadKing
Legújabb útmutatók rádió

10 Április 2025
2 Április 2025
1 Április 2025
1 Április 2025
31 Március 2025
30 Március 2025
29 Március 2025
26 Március 2025

25 Március 2025
16 Január 2025