Használati útmutató Audi Equinox (2016)
Olvassa el alább 📖 a magyar nyelvű használati útmutatót Audi Equinox (2016) (205 oldal) a autó kategóriában. Ezt az útmutatót 2 ember találta hasznosnak és 2 felhasználó értékelte átlagosan 4.5 csillagra
Oldal 1/205


Contents Introduction . . . . . . . . . . . . . . . . . . . . . . 2
In Brief . . . . . . . . . . . . . . . . . . . . . . . . . . . 5
Keys, Doors, and Windows . . . . . 24
Seats and Restraints . . . . . . . . . . . 43
Storage . . . . . . . . . . . . . . . . . . . . . . . . . 89
Instruments and Controls . . . . . . . 92
Lighting . . . . . . . . . . . . . . . . . . . . . . . 129
Infotainment System . . . . . . . . . . 135
Climate Controls . . . . . . . . . . . . . . 136
Driving and Operating . . . . . . . . . 143
Vehicle Care . . . . . . . . . . . . . . . . . . 196
Service and Maintenance . . . . . 271
Technical Data . . . . . . . . . . . . . . . . 284
Customer Information . . . . . . . . . 288
Reporting Safety Defects . . . . . . 298
OnStar . . . . . . . . . . . . . . . . . . . . . . . . 302
Index . . . . . . . . . . . . . . . . . . . . 312

2 Introduction
Introduction
The names, logos, emblems,
slogans, vehicle model names, and
vehicle body designs appearing in
this manual including, but not limited
to, GM, the GM logo, CHEVROLET,
the CHEVROLET Emblem, and
EQUINOX are trademarks and/or
service marks of General Motors
LLC, its subsidiaries, affiliates,
or licensors.
For vehicles first sold in Canada,
substitute the name General“
Motors of Canada Limited for”
Chevrolet Motor Division wherever it
appears in this manual.
This manual describes features that
may or may not be on the vehicle
because of optional equipment that
was not purchased on the vehicle,
model variants, country
specifications, features/applications
that may not be available in your
region, or changes subsequent to
the printing of this owner manual.
Refer to the purchase
documentation relating to your
specific vehicle to confirm the
features.
Keep this manual in the vehicle for
quick reference.
Canadian Vehicle Owners
Propriétaires Canadiens
A French language manual can be
obtained from your dealer, at
www.helminc.com, or from:
On peut obtenir un exemplaire de
ce guide en français auprès du
concessionnaire ou à l'adresse
savant:
Helm, Incorporated
Attention: Customer Service
47911 Halyard Drive
Plymouth, MI 48170
Using this Manual
To quickly locate information about
the vehicle, use the Index in the
back of the manual. It is an
alphabetical list of what is in the
manual and the page number where
it can be found.
Litho in U.S.A.
Part No. 23170178 A First Printing © 2015 General Motors LLC. All Rights Reserved.

Introduction 3
Danger, Warning, and
Caution
Warning messages found on vehicle
labels and in this manual describe
hazards and what to do to avoid or
reduce them.
{Danger
Danger indicates a hazard with a
high level of risk which will result
in serious injury or death.
{Warning
Warning indicates a hazard that
could result in injury or death.
Caution
Caution indicates a hazard that
could result in property or vehicle
damage.
A circle with a slash through it is a
safety symbol which means Do“
Not, Do not do this, or Do not let” “ ” “
this happen.”
Symbols
The vehicle has components and
labels that use symbols instead of
text. Symbols are shown along with
the text describing the operation or
information relating to a specific
component, control, message,
gauge, or indicator.
M:Shown when the owner
manual has additional instructions
or information.
*:Shown when the service
manual has additional instructions
or information.
0:Shown when there is more
information on another page —
“ ”see page.
Vehicle Symbol Chart
Here are some additional symbols
that may be found on the vehicle
and what they mean. For more
information on the symbol, refer to
the Index.
9:Airbag Readiness Light
#:Air Conditioning
!:Antilock Brake System (ABS)
$:Brake System Warning Light
":Charging System
I:Cruise Control
`:Do Not Puncture
^:Do Not Service
B:Engine Coolant Temperature
O:Exterior Lamps
_:Flame/Fire Prohibited
#:Fog Lamps
.:Fuel Gauge

4 Introduction
+:Fuses
3:Headlamp High/Low-Beam
Changer
j:LATCH System Child Restraints
*:Malfunction Indicator Lamp
::Oil Pressure
Q:OnStar
®
}:Power
/:Remote Vehicle Start
>:Safety Belt Reminders
%:Steering Wheel Controls
7:Tire Pressure Monitor
d:Traction Control/StabiliTrak
®
a:Under Pressure
M:Windshield Washer Fluid

In Brief 5
In Brief
Instrument Panel
Instrument Panel . . . . . . . . . . . . . . . . 6
Initial Drive Information
Initial Drive Info rmation . . . . . . . . . . 8
Remot e Keyless Ent ry (RKE)
System . . . . . . . . . . . . . . . . . . . . . . . . 8
Remote Vehicl e Start . . . . . . . . . . . 8
Door Locks . . . . . . . . . . . . . . . . . . . . . 9
Liftgate . . . . . . . . . . . . . . . . . . . . . . . . . . 9
Windows . . . . . . . . . . . . . . . . . . . . . . . 10
Seat Adjustment . . . . . . . . . . . . . . . 10
Memory Features . . . . . . . . . . . . . . 12
Heated Seats . . . . . . . . . . . . . . . . . . 12
Head Restraint Adjustment . . . . 12
Safety Belts . . . . . . . . . . . . . . . . . . . . 13
Passenger Sensing System . . . 13
Mirror Adjustment . . . . . . . . . . . . . . 13
Steering Wheel Adjustment . . . . 14
Interior Lighting . . . . . . . . . . . . . . . . 14
Exterior Lighting . . . . . . . . . . . . . . . 15
Windshield Wiper/Washer . . . . . . 15
Climate Controls . . . . . . . . . . . . . . . 16
Transmission . . . . . . . . . . . . . . . . . . 17
Parking Brake . . . . . . . . . . . . . . . . . 18
Vehicle Features
Infotainment System . . . . . . . . . . . 18
Steering Wheel Controls . . . . . . . 18
Cruise Control . . . . . . . . . . . . . . . . . 19
Driver Information
Center (DIC) . . . . . . . . . . . . . . . . . 19
Forward Col lision Alert (FCA)
System . . . . . . . . . . . . . . . . . . . . . . . 19
Lane Departure
Warning (LDW) . . . . . . . . . . . . . . . 20
Side Blind Zone
Alert (SBZA) . . . . . . . . . . . . . . . . . . 20
Rear Vision Camera (RVC) . . . . 20
Rear Cross Traf fic Alert (RCTA )
System . . . . . . . . . . . . . . . . . . . . . . . 20
Parking Assist . . . . . . . . . . . . . . . . . 20
Power Outlets . . . . . . . . . . . . . . . . . 20
Uni versal Remote System . . . . . 21
Performance and Maintenance
Traction Control/Electronic
Stability Cont rol . . . . . . . . . . . . . . 21
Tire Pressure Monitor . . . . . . . . . . 21
Engine Oil Life System . . . . . . . . 22
E85 or FlexFuel . . . . . . . . . . . . . . . . 22
Driving for Better Fuel
Economy . . . . . . . . . . . . . . . . . . . . . 22
Roadside Assistance
Program . . . . . . . . . . . . . . . . . . . . . 23

6 In Brief
Instrument Panel

In Brief 7
1. .Air Vents 1400
2. Turn Signal Lever. See Turn
and La ne-Change Signals
0 131.
Exterior Lamp Controls 1290.
Fog Lamps 1320(If
Equipped).
3. .Instrument Cluster 980
4. .Windshield Wiper/Washer 930
Rear Window Wiper/Washer
0 94.
5. Light Sensor. See Automatic
Headlamp System 1300.
6. .Infotainment 1350
7. Hazard Warning Flashers
0 131.
8. Driver Information Center
Buttons (If Eq uipped). See
Driver Information Center (DIC)
0 110.
9. .Power Outlets 960
10. Traction Control/Electronic
Stability Control 1710.
11. eco Button (If Equipped) . See
Fuel Economy Mode 1680.
12. Shif t Lever. See Automatic
Transmission 1660.
13. Climate Control Systems 1360
(If Equi pped).
Automatic Climate Control
System 1380(If Equipped).
14. .Ignition Positions 1590
15. .Steering Wheel Controls 930
16. .Horn 930
17. Steering Wheel Adjustment
0 93.
18. .Cruise Control 1730
Forward Col lision Alert (FCA)
Button (If Equipped). See
Forward Collision Alert (FCA )
System 1790.
La ne Departure Warning
(LD W) B utton (If Equipped).
See Lane Departure Warning
(LDW) 1830.
19. Instrument Panel Illumination
Control 1320.
20. Hood Release (Out of View).
See .Hood 1990
21. Data Link Connector (DLC)
(Out of View). Se e Malfunction
Indicator Lamp (Check Engine
Light) 1030.

8 In Brief
Initial Drive
Information
This sectio n provides a brief
overvie w about some of the
important features that may or may
not be on your specific vehicle.
For more detailed inf ormation, refe r
to each of the feat ures which can be
found later in this owner manu al.
Remote Keyless Entry
(RKE) System
The RKE transmitter may w ork up to
6 0 m (197 ft) awa y from the vehicl e.
With Remote Star t and Power
Liftgate Shown
Press this button to extend the key.
The ke y ca n be used for the ignition
and all locks.
K:Press to unlock the driver door
or all doors.
For vehicles with the manual
liftgate, press Ktwice within
five seconds to unlock the liftgate.
Q:Press to lock all doors.
Lock and unlock feedback can be
personalized.
Y:If equipped with the power
li ftgate, press a nd h old until the
liftgate begins to mov e.
7:Press and release to initiate
vehicle locator. Press and hold for at
least three seconds to sound the
panic alarm . Press 7again to
cancel the panic alarm.
/:Press Qand release and then
immediately press and hold /for at
least four seconds to start the
engine from outside the vehicle.
See andKeys 240Remote Keyless
Entry (RKE) System Operation 260.
Remote Vehicle Start
If equipped, the engine can be
started from outsid e of the vehicle.
Starting the Vehicle
1. Pre ss and release on theQ
RKE transm itter.
2. Immediately press and hold /
for at least four seconds or until
the turn signal lamps flash.

In Brief 9
3. Start the vehicle norma lly after
entering.
When the vehicle starts, the parking
lamps will turn on.
Remote start can be extended.
Canceling a Remote Start
To cancel a remote start, do on e o f
the foll owing:
. Press and hold /until the
parking lamps turn off.
. Turn on the hazard warning
flashers.
. Turn the vehicle on and t hen off.
See .Remote Vehicle Start 280
Door Locks
To lock or unlock the vehicle from
the outside, pres s Qor Kon the
Remot e Keyless Ent ry (RKE)
transmitter.
Q:Press to lock the doors.
K:Press to unlock the doors.
See .Door Locks 290
To manually unlock a door from
inside the vehicle, pull once on the
door handle to unlock it, and a
second time to open it.
Liftgate
Manual Liftgate Operation
Unlock the vehicle befo re open ing
the lift gate.
To open th e liftgate, press the to uch
pad u nder th e liftgate handl e and
lift up.
Do not press the touch pad while
clos ing the liftgate. This ma y cause
the lift gate to be unlatched.
Power Liftgate Oper at io n
On vehicles with a power liftgate,
the vehicle must be in P (Park) to
use the power feature. The taillamps
flas h when the po wer liftgate
moves.

10 In Brief
Ch oose the power liftgate mode by
tu rning the dial on the switch to
either the 3/4 or MAX position.
Press 8to open or close the
liftgate.
See .Liftgate 320
Windows
Press the front of the switch to lower
t he window. Pull the s witch up to
raise it.
See .Power Windows 400
Seat Adjustment
Four -Way Power Seat
1. Seat Position Handle
2. Height Adjustment Control
To adjust the seat, if equipped:
. Move the seat for war d or
rearward using the ha ndle under
the front of th e seat cushion (1).
See .Seat Adjustment 450
. Raise or lower the enti re seat by
moving the control (2) up
or down.
See .Power Seat Adjustment 450
Eight-Way Power Seat
To adjust a power seat, if equipped:
. Move the seat for war d or
rearward by sliding the control
forward or rearward.
. Raise or lower the front part of
the seat cushion b y moving the
front of the control up or down.
. Raise or lower the enti re seat by
moving the r ear of the control up
or down.
See .Power Seat Adjustment 450

In Brief 11
Lumbar Adjustment
Eight-Way P ower Seat Shown,
Four-Way Similar
If available, press and hold the front
or rear of t he switch to increase or
decrease lumbar support. Release
the switch when the seatback
reaches the desired level of lumbar
support.
See .Lumbar Adjustment 460
Reclining Seat backs
Manual Reclining Seatbacks
To recline a manual seatback:
1. Lift the lever.
2 . Move the s eatback to the
desired position, and then
release the lever to lock the
seatback in place.
3. Push and pull on the seatback
to make sure it is locked .
To return the seatback t o the upright
position:
1. Lift the lever fully without
applying pressure to the
seatback, and the seatback will
return to the upright pos ition.
2. Push and pull on the seatback
to make sure it is locked .
Power Reclining Seatbacks
To adju st a power seatback,
if available:
. Tilt the t op of the control
rearwar d to recline.
. Tilt the t op of the control forward
to raise.
See .Reclining Seatbacks 470

12 In Brief
Memory Features
If available , the 1, 2, and MEM
(Memory) buttons on the outboard
side of the driver seat are used to
manually st ore and recall the driver
se at and outside mirror positions.
These manually stored p ositions are
referred to as B utton Memory
positions.
The ve hicle will also automatical ly
store driver seat a nd outside mirror
positions to the current driver
Remot e Keyless Ent ry (RKE)
trans mitter when the ignition is
turned off. These automatically
stored positions are referre d t o as
RKE Memory positions.
See andMemory Seats 480
Vehicle Personalization 1200.
Heated Seats
Uplevel Climate Control System
Shown, Base Similar
If available, the buttons are near the
climate controls. To operate, the
ignit ion must be in ON/RUN.
Press z Jor to heat the driver or
passenger seat cushion and
seatback.
Indicator lights on the button show
the temperature setting.
See .Heated Front Seats 500
Head Restraint
Adjustment
Do n ot drive until the head restraints
for all occupants are installed and
adjuste d prope rly.
To achieve a comfortable seating
position, change the seatback
recline angle as little as necessary
while keeping the seat and the head
restraint heigh t in the proper
position.
See andHead Restraints 440Seat
Adjustment 450.
In Brief 13
Safety Belts
Refer to the fol lowing sections for
impor tant information on how to use
safety belts properly:
. Safety Belts 520.
. How to Wear Safety Belts
Properly 530.
. Lap-Shoulder Belt 540.
. Lower Anchors and Tethers for
Children (LATCH System) 770.
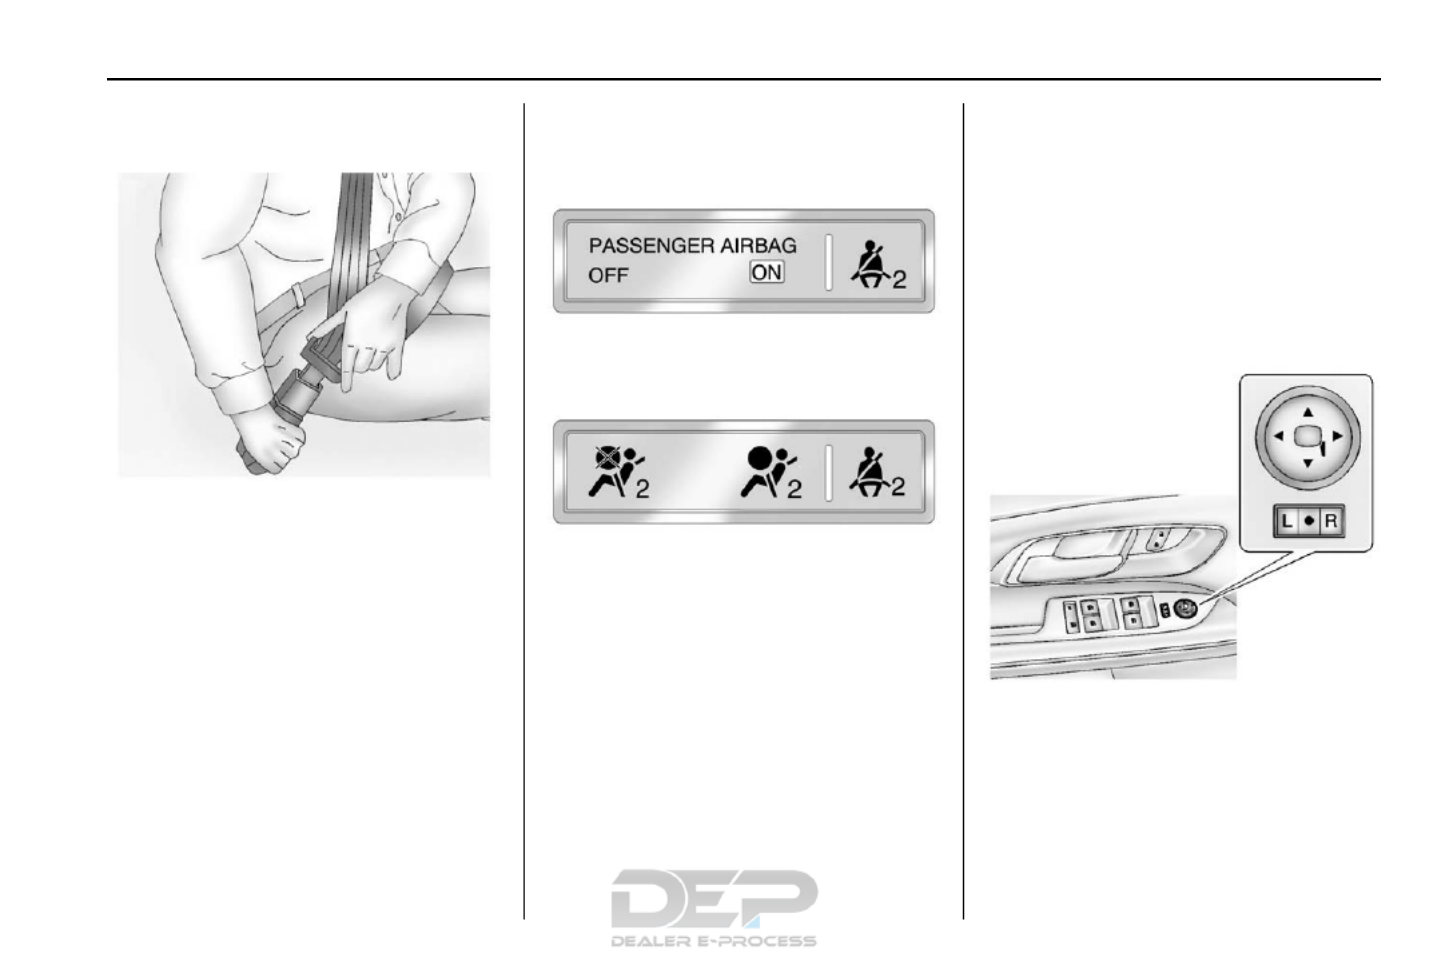
Passenger Sens i ng
System
United States
Canada and Mexico
The passenger sensing system will
turn off the front outboard
passenger frontal airbag under
certain conditions. No other airbag
is affect ed by the passenger
sensing system. See Passenger
Sensing System 650.
The passenger ai rbag status
indicator will be visible on the
overhead console when the vehicle
is started. See Passenger Airbag
Status Indicator 1010.
Mirror Adjustment
Exterior
To adjust the mirrors:
1. Move the selector switch to L
(Left) or R (Right) to choose
the driver or passen ger mirror.
2. Press the arrows on the control
pad to move each m irror in the
desired direct ion.

14 In Brief
3. Return the selector s witch to
the middle positi on.
See .Power Mirrors 380
Interior
Adjustment
Adjust the rearview mirro r to clearly
view the area beh ind the vehicle.
Manual Rearview Mirror
For vehicles with a manual rearview
mirror, push the tab forward for
da ytime use and pull it rearward fo r
nighttime use to avoid the glare of
the headlamps from behind. See
Manual Rearview Mirror 390.
Automatic Dimming Rearview
Mirror
Vehicles with an automatic dimming
inside rearview mirr or automatically
reduce the glare of the headlamps
from behind. The dimming feat ure
com es on when the vehicle is
started. See Automatic Dimming
Rearview Mirror 390.
Steering Wheel
Adjustment
To adjust the steering wheel:
1. Pull th e lever down.
2. Move the steering wheel up
or down.
3. Pull or push t he steering wheel
cl oser or awa y from you.
4. Pull the lever up to lock the
steering wheel in place.
Do not adjust the steering wh eel
while drivi ng.
Interior Lighting
Reading Lamps
These la mps are located on the
overhead console. These lamps
come on aut omatica lly when any
door is opened.
For manual operation, press the
button next to each lamp to turn it
on or off.
Dome Lamps
There are front and rear dome
lamps.
The dome lamp cont rols are located
in the overhead console. To change
the settings, press the following:
*:Turns the lamp off, even when
a door is open.
1:The lamps come on
automatically when a door is
opened.
+:Turns the dome lamps on.
The dome lamps can also be turned
on and off by pressi ng the buttons
next to the lamps.

In Brief 15
For more information on interior
lighting, See Instrument Panel
Illumination Control 1320.
Exterior Lighting
T he exterior lamp control is on the
turn signal lever.
O:Turn to operate the exterior
lamps.
O:Briefly turn to this position to
turn the automatic light control off or
on again.
AUTO : Turns the exterior lamps on
and off automatically d epending on
the exterior light.
;:Turns on the parking lamps
includ ing all lamps, except the
headlamps.
5:Turns on the headlamps,
togeth er with t he park ing lamps and
instrument panel lights.
See:
. Exterior Lamp Controls 1290
. Daytime Running Lamps (DRL)
0 130
. Fog Lamps 1320
Windshield Wiper/Washer
The windshield wiper/washer lever
is lo cated on the r ight side of the
steering column. With the ignition i n
ACC/ACCESSORY or ON/RUN/
START, move the windshield wiper
lever to select the wiper speed.
HI : Use for fast wipes.
LO : Use for slow wipes.
INT : Move the lever up to INT for
intermittent wipes, t hen turn the
3INT band up for more frequent
wipes or d own for less frequent
wipes.
OFF : Use to turn the wipers off.
1X : For a single wipe, briefly move
the wiper lever down. For several
wipes, hold the wiper lever down.
nLFRONT : Pull the windshield
wiper l ever toward you to spray
windsh ield washer fluid and activate
the wipers.
Rear Window Wiper/Washer
The rear wiper controls are on the
end of the windshield wiper lever.

16 In Brief
ON : Press the upper portion of the
button for continuous rear windo w
wipes.
OFF : The rear wiper turns off when
the button is returned to the middle
position.
INT : Press the lower portion of the
button to set a delay between
wipes.
a:Push the windshield wiper lever
forward to spray washer fluid on the
rear window. The lever automatically
returns to its o riginal position when
released.
See Windshield Wiper/Washer 930
and Rear Window Wiper/Washer
0 94.
Climate Controls
The ve hicle's heating, coo ling, defrosting, and ventilation can be controlled
with t hese systems.
Climate Control System
1. Fan Control
2. Air Delivery Mode Cont rols
3. Temperature Control
4. A/C (Air Conditioning)
5. Recirculation
6. Rear Window Defogger
7. Front Defros t
8. Outside Air

In Brief 17
Automatic Climate Control System
1. Fan Control
2. AUTO (Automatic Operation)
3. Air Delivery Mode Controls
4. Front Defros t
5. Recirculation
6. Temperature Control
7. A/C (Air Conditioning)
8. Driver and Passenger Heated
Seats
9. Rear Window Defogger
10. Power
See Climate Control Systems 1360
(If Equipped) or Automatic Climate
Control System 1380(If Equipped).
Transmission
Electronic Range Select
(ERS) Mode
ERS or manual mode allow s for the
selection o f the range of gear
positions. Use this mode when
drivi ng downhill or towing a trailer to
limit the t op gear and vehicle spe ed.
To use this feature:
1. Move the shif t lever to
M (Manual Mode).
2. Press the plus/minus button on
the shift lever to increase or
decrease the gear rang e
available.
See .Manual Mode 1670
Fuel Econ omy Mode
Vehicles with a 2.4L engine have a
Fuel Economy Mode. When
engaged, Fuel Economy Mode can
i mprove the vehicle's fuel economy.

18 In Brief
Press the eco (economy) button to
tur n this f eature on o r off. The eco
light in the instrument cluster will
come on when engaged, and a
Driver Information Center (DIC)
message displays. See Fuel
Economy Mode 1680.
Parking Br a k e
To set the parking brake, hold the
regular br ake pedal down, th en
push the parking brake pedal down.
If the ignition is on, the brake
system warning lig ht will come on.
See Brake System Warning Light
0 104.
To release the park ing brake, hold
the regular brake pedal down, then
push d own momentarily on th e
parking brake pedal until you fe el
the p edal release. Slowly pull your
foot up off the parking brak e pedal.
See .Parking Brake 1700
Vehicle Features
Infotainment System
See the infotainment ma nual for
information on the radio, a udio
players, phone, navigation system,
and voice or speech recognition.
It also includes information on
settings.
Steering Wheel Controls
The infotainment system can be
operated by using the steering
wheel controls . See "Steering
Wheel Contro ls" in the infotainment
manual.

In Brief 19
Cruise Control
o:Press to turn the cruise control
system on and off.
n:Press to disengage cruise
control without erasing the s et
speed from memor y.
RES/+ : If there is a set speed in
memo ry, mo ve the thumbwheel up
briefly to resume to that speed or
hold upward to accelerate. If cruis e
control is already active, use to
increase vehicle speed.
SET/ :−Move the thumbwheel down
briefly to set the speed and activat e
cruise control. If cruise control is
already active, use t o decrease
speed.
See .Cruise Control 1730
Driver Inf ormation
Center (DIC)
Th e DIC d isplay is in th e center of
the instrument cluster. It shows the
status of many vehicl e systems.
The DIC buttons are below t he
climate control s ystem.
MENU : Press this button to get to
the Trip/Fuel M enu and the Veh icle
Information Menu.
Q Ror : Use these buttons to scroll
through the items in each menu.
A small marker will mo ve along the
page as you scroll through the
items. This shows where each page
is i n the menu.
SET/CLR : Use this button to set or
clear the menu item when it is
displayed.
See Driver Information Center (DIC)
0 110.
Forward Collision Alert
(FCA) System
If equipped, FCA may h elp avo id or
reduce the harm caused by
front-end crashes. FCA pr ovides a
green indicato r, V, when a vehicle
is detected ahead. Whe n
approaching a veh icle ahead too
quickly, FCA provides a red fla shing
alert and rapidly beeps. This alert
stays lit if you follow a vehicle much
too clo sely.
See Forward Collision Alert (FCA)
System 1790.

20 In Brief
Lane Departure
Warning (LDW)
If equipped, LDW m ay help avoid
unintent ional lane departures at
speeds of 56 km/h (35 mp h) or
greater. LDW us es a camera se nsor
to detect the lane mark ings. The
LDW light, @, is green if a lane
marking is detected. I f the vehicle
depart s the lane without using a turn
signal in that direction, the li ght will
change to amber and flash. In
addition, beeps will sound.
See Lane Departure Warning (LDW)
0 183.
Side Blind Zone
Alert (SBZA)
If equipped, SBZA will detect
moving vehicles in the next lane
over in the vehicl e's side blind zone
area. Whe n this happens , the SBZA
d isplay will light up in the
corresponding outside side mirror
and will flash if the tu rn signa l is on.
See Side Blind Zone Alert (SBZA)
0 181.
Rear Vision
Camera (RVC)
If equipped, RVC displays a view of
the area behind the vehicle , on the
infotainment system display, when
the vehicle is shifted into
R (Reverse).
See Rear Vision Camera (RVC)
0 175.
Rear Cross Traffic Alert
(RCTA) System
If equipped, the RCTA system uses
a triangl e with an arrow displayed
on the RVC screen to warn of traffic
behind your vehicle that may cross
your vehicle's p ath while in
R (Reverse). In addition, beeps will
sound.
See Rear Cross Tra ffic Alert“
(RCTA) under”Rear Vision Camera
(RVC) 1750.
P a rking Assist
If equipp ed, Rear Parking Assist
(RPA) uses sensors on the rear
bumper to assist with parking and
avoiding objects while in
R (Reverse). It operates at speeds
less than 8 km/h (5 mph) and uses
audible beeps to provide distance
and system i nformation.
Keep the sen sors on the vehicle's
r ear bumper clean to e nsure proper
operation.
See .Parking Assist 1780
Power Outlets
The accessory power outlets can be
used to connect electrical
equipment, such as a ce ll phone or
MP3 player.
There are fo ur accessory p ower
outlets: inside the open storage
area in front of the shift lever, inside
the center console storage, on the
r ear of the center console storage,
and in the rear carg o compart ment.
To use the outlets, remove the cover
and close wh en not in use.
See .Power Outlets 960

In Brief 21
Universal Remote System
If equipped, these buttons are in the
overhead console. Th e system can
repl ace up to three remote con trol
transmitters used to activate
devices such as garage door
openers, se curit y systems, and
home automation devices.
Read the instructions completely
before attempting to program the
Un iversal Remote system. Because
of the steps involved, i t may be
helpful to have another person
available to ass ist w ith programming
the Uni versal Remote system.
See Universal Remote System
0 125.
Performance and
Maintenance
Traction Control /
Electronic Stability
Control
The traction control system limits
wheel spin. The system is on when
the vehicle is started .
The StabiliTrak system assists with
directional control of the vehicle in
difficult drivi ng conditions. The
system is on when the vehicle is
started.
. To turn off traction control, press
and release gon the console.
iilluminates and the
app ropriate DIC message
displays. See Ride Control
System Messages 1170.
. Press and release gagain to
turn traction control back on.
. To turn off both Traction Control
and StabiliTrak, press and hold
g guntil and iilluminate and
the appropriate DIC message
displays. See Ride Control
System Messages 1170.
.Press gagain to turn on both
systems.
See Traction Control/Electronic
Stability Control 1710.
Tire Press ure Monitor
This vehicle may have a Tire
Pressure Monitor Sys tem (TPMS).
The low tire pressure warning light
alerts to a significant loss in
pressur e of one of the vehicle's
tires. If the warning light comes on,
stop as soon as possible and inflate
the tires to the recommended
pressure shown on t he Tire and
Loading Information label. See

22 In Brief
Vehicle Load Limits 1550. The
warni ng light will remain on unt il the
tire pressure is co rrected.
The low tire pressure warni ng light
may come on in cool weath er when
the vehicle is first started, and th en
turn off as the vehicle is driv en. This
may be an early i ndicator that the
tire press ures are getting low and
the tires need to be inflated to the
proper pressure.
The TPMS does not replace no rmal
monthly tire maintenance. Main tain
the correct ti re pressures.
See Tire Pressure Monitor System
0 237.
Engine Oil Life System
The engine oil life system calculates
engine oil life based on vehicle use
and dis plays the CHA NGE ENGINE
OIL SOON message when it is time
to change the engine oil an d filter.
The oil life system sh ould be reset
to 100% only following an oil
change.
Resetting the Oil Life System
1. Turn the ignition to ON/RUN,
with the engine off.
2 . Press th e DIC MENU button to
display the Vehicle
Information menu.
3. Pre ss either the up or down
arrows to view REM AINING
OIL LI FE.
4. Press the SET/CLR button until
100% is displayed.
5. Turn the key to LOCK/OFF.
Or:
1. Turn the ignition to ON/RUN
with the engine off.
2. F ully press a nd release the
accelera tor ped al three times
within five seconds.
See .Engine Oil Life System 2060
E85 or FlexFuel
Vehicles with a yellow fuel cap can
use either unleaded gasoline or
ethanol fuel containing up to 85%
ethanol (E85). See E85 or FlexFuel
0186. For all other vehicles, use
only the unle aded gasoline
described under .Fuel 1840
Driving for Better Fuel
Economy
Driving habits can aff ect fuel
m ileage. Here are some d riving tips
to get the best fuel economy
possible.
. Avoid fast starts and accelerate
smoothly.
. Brake gradually and avoid
abrupt stops.
. Avoid idling the engine f or long
period s of time.
. When road and weather
conditions are appropriate, use
cruise con trol.
. Always follow posted speed
limits or drive more slowly when
conditions require.
. Keep veh icle tires properly
inflated.
. Co mbine several trips into a
single trip .

In Brief 23
. Replace the vehicle's tires with
the same TPC Spec number
molded into t he tire's sidewall
near the size.
. Follow recommended sched uled
maintenance.
Roadside Assistance
Program
U.S.: 1-800-243-8872
TTY Users (U.S. Only):
1-888-889-2438
Canada: 1-800-268-6800
New Chevrolet owners are
automatica lly enrolled in the
Roadside Assistance Program.
See Roadside Assistance Program
0 292.

24 Keys, Doors, and Wi ndows
Keys, Doors, and
Windows
Keys and Locks
Keys . . . . . . . . . . . . . . . . . . . . . . . . . . . 24
Remot e Keyless Ent ry (RKE)
System . . . . . . . . . . . . . . . . . . . . . . . 26
Remot e Keyless Ent ry (RKE)
System Operation . . . . . . . . . . . . 26
Remote Vehicle Start . . . . . . . . . . 28
Door Locks . . . . . . . . . . . . . . . . . . . . 29
Power Door Locks . . . . . . . . . . . . . 30
Delayed Locking . . . . . . . . . . . . . . . 30
Automatic D oor Locks . . . . . . . . . 30
Lockout Protect ion . . . . . . . . . . . . . 31
Safety Locks . . . . . . . . . . . . . . . . . . . 31
Doors
Liftgate . . . . . . . . . . . . . . . . . . . . . . . . 32
Vehicle Security
Vehicle Security . . . . . . . . . . . . . . . . 35
Vehicle Alarm System . . . . . . . . . 35
Immobilize r . . . . . . . . . . . . . . . . . . . . 36
Immobilizer Operati on . . . . . . . . . 37
Exterior Mirr ors
Convex Mirrors . . . . . . . . . . . . . . . . 37
Power Mirrors . . . . . . . . . . . . . . . . . . 38
Heated Mirrors . . . . . . . . . . . . . . . . . 38
Rever se Tilt Mirror s . . . . . . . . . . . . 38
Interior Mir rors
Interi or Rearview Mirrors . . . . . . . 39
Manual Rearview Mirror . . . . . . . . 39
Auto matic Dimming Re arview
Mirror . . . . . . . . . . . . . . . . . . . . . . . . . 39
Windows
Wind ows . . . . . . . . . . . . . . . . . . . . . . . 39
Power Windows . . . . . . . . . . . . . . . 40
Sun Visors . . . . . . . . . . . . . . . . . . . . . 41
Roof
Sunroof . . . . . . . . . . . . . . . . . . . . . . . . 41
Keys and Locks
Keys
{Warning
Leaving children in a vehicle with
th e ignition key is dangerous and
children or ot hers could be
seriously injured or killed. They
could operate the power windows
or other controls or make th e
vehicle mo ve. The windows will
function with the keys in the
ignition, and children or others
could be caught in the path of a
closing window. Do not leave
children in a vehicle with the
ignition key.

Keys, Doors, and Windows 25
{Warning
If the key is unint entio nally
rotated while the vehicle is
running, the ignition could be
m oved out of the RUN position.
Th is could be caused by hea vy
items han ging from the key ring,
o r by larg e or long items a ttached
to the key ring that cou ld be
contacted by the d river or
steering wheel. If the i gnition
moves out of the RUN position,
the e ngine will shut off, braking
and steering pow er assist may b e
(Continued)
Warning (Continued)
impacted, and airba gs may n ot
deplo y. To reduce the risk of
unintentional rotation of the
ignition key, do not change the
way the ignition key and Remote
Keyless En try (RKE) transmi tter,
i f equipped , a re connect ed to the
provided key ring s.
The ignition key, key rings, and RKE
transmitter, if equipped , are
designed to work t ogether. As a
system, it reduce s the risk of
u ninte ntionally moving the key out
of the RUN position. If repl acements
or add itions are required, see your
dea ler. Limit added items to a few
essential keys or small, l ight items
no larger than an RKE transmitter.
The key that is part of the Remote
Keyless Entry (RKE) transmitter can
be used for the ignition and all
locks.
Press the button on the RKE
transmitter to extend th e key. Press
the button and the key blade to
retract the key.
See your dealer if a new key is
needed.
If it becomes difficult to t urn the key,
inspect the key blade for debris.
Periodically clean wit h a brush
or pick.
If locked out of the vehicle, see
Roadside Assistance Program
0 292.

26 Keys, Doors, and Wi ndows
With an act ive OnStar subscription,
an OnStar Advisor may remotely
unlock the vehicle. See OnStar
Overview 3020.
Remote Keyless Entry
(RKE) System
See Radio Frequency Statement
0 298.
If there is a decrease in the RKE
operating range:
. Check the distance. The
transmitter may be t oo far fro m
the vehicle .
. Check the location. Other
vehicles or objects may be
blocking the signal.
. Check the transmitter's battery.
See Battery Replacement later“ ”
in th is section.
. If the transmitter is sti ll not
working correctly, se e your
dealer or a qualified technician
for service .
Remote Keyless Entry
(RKE) System Oper a tion
The RKE transmitter may work up to
60 m (19 7 ft) away f rom the vehicle.
Other conditions can af fect the
pe rformance of the transmitter. See
Remote Key less En try (RKE)
System 260.
With Remote Star t and Power
Liftgate Shown
The following may be available:
Q(Lock) : Press to lock all doors.
The turn signal indicators may flash
and/or the ho rn may sound on
second press to indicate lo cking.
See .Vehicle Personalization 1200
If a passenger door is open when Q
is pressed, all doors lock.
Pressing Qmay also arm the
theft-deterrent s ystem. See Vehicle
Alarm System 350.
K(Unlock) : Press to unlock the
driver door or all doors. See Vehicle
Personalization 1200. The turn
signal indicators may flash to
indicate unlocking has occurred.
See .Vehicle Personalization 1200
Pressing Kmay also disarm the
theft-deterrent s ystem. See Vehicle
Alarm System 350.
For vehicles with t he manual
liftgate, press Ktwice within
five seconds to unlock the liftgate.
Y(Remote Liftgate Release) :
If equipped with the power liftgate,
press an d hold until the liftgate
begins to move. Press again to stop
the power liftgate.
7(Vehicle Locator/Panic
Alarm) : Press and release one
time to initiate vehicle locator. The
exterior lamps flash and t he horn

Keys, Doors, and Windows 27
chirps three times. Press and hold
7for at least three seconds to
sound the panic alar m. Th e horn
so unds and the turn si gnals flash
until 7is pressed again or the key
is placed in the ignition and turned
to ON/RUN.
/(Remote Vehicle Start) :
If equipped, first press and
release Qthen immediately press
and ho ld /for at least
four seconds to st art the en gine
from outside the vehicle using the
RKE transmitter. Se e Remote
Vehicle Start 280.
The buttons on the keys are
disabled when there is a key in the
ignition.
Programming Transmitters to
the Vehicle
Only RKE transmitters programmed
to this vehicle will work. If a
transmitter is lost or stolen, a
replacement can be purchased and
programmed through you r dealer.
When the replacement trans mitter is
programmed to this vehicle, all
remaining trans mitters must a lso be
reprogrammed. Any lost or stolen
transmitters will no longer work
on ce the new transmitter is
programmed. See your dea ler to
have n ew tra nsmitters programmed.
Programming with a Recognized
Transmitter
To program a new key:
1. Insert the original, already
programm ed key in the ignition
and turn to the key to the ON/
RUN position.
2. Turn the k ey to LOCK/OFF,
an d remove the key.
3. Insert the new key to be
programmed and turn it to the
ON/RUN position within
five seconds.
The security light will turn off
once the key has been
programmed.
4. Repeat Steps 1 3 if additional–
keys are to be programmed.
If a key is lost or damaged, see your
deale r to have a new key made.
Programming without a
Recognized Transmitt er
Program a new key to the vehicl e
when a recognized key is not
available. Canadian regulations
require that owners see their dealer.
If there are no currently recognized
ke ys available, fo llow this procedure
to program the first key.
This pro cedure will take
approximat ely 30 minutes to
com plete for the first key. The
vehicle must be off and all of the
keys you wish to program must be
with you.
1. Insert the new vehicle key i nto
the ignition.
2. Turn to O N/RUN. The security
light will come on.
3. Wait 10 minutes u ntil the
security light turns off.
4 . Turn the ignition to LOCK/OF F.
5. Repe at Steps 2 4 two more–
times . After the third time, turn
to ON/RUN; the key is learned

28 Keys, Doors, and Wi ndows
and all previously known keys
will no longer work with the
vehicle.
Remaining keys can b e learned by
following the procedure in
“Programming with a Recognized
Transmitter.”
Battery Replacement
Replace th e b attery if the REPLACE
BAT TERY IN REMOTE KEY
message displays in the DIC. See
Key and Lock Messages 1160.
Caution
When replacing the battery, do
not touch any of the circuitry on
the transmitte r. St atic from your
b ody could damage the
transmitter.
The battery is not rechargeable. To
rep lace the battery:
1. Press the bu tton on the
transmitter to extend t he key.
2. Remov e the battery cover by
prying with a finger.
3. Remove the battery by push ing
on the battery and slidin g it
to ward the key blade.
4. Insert the new battery, pos itive
side facing up. Push the
battery down until it is held in
place. Replace with a CR2032
or equivalent battery.
5. Snap the battery cover back on
to the transm itter.
Remote Vehicle Start
The vehicle may have this feat ure
that allows you to start the en gine
from outside the vehicle.
/(Remote Vehicle Start) : This
butt on will be on the RKE
tran smitter if the vehicle has remote
start.
The cli mate control system will use
the previous settings during a
remote start. The rear defog may
come on during r emote start based
on cold a mbient conditions. The
rear defog i ndicator light does not
come on during remote start.
If the vehicle has heated seats, they
may come on duri ng a remote start.
See .Heated Front Seats 500
Laws in some local communities
may restrict the use of remote
starters. For example, some laws
requ ire a person using remote start
to have the vehicle in view. Check
lo cal regulations for any
requirements.
Other conditions can affect the
pe rformance of the transmitte r. See
Remote Key less En try (RKE)
System 260.
Starting the Engine Using Remote
Start
To start the engine using the remote
start feature:
1 . Press and release Qon the
RKE transm itter.
2. Immediately press and hold /
for at l east four seconds or until
the tu rn signal lamps flash. The
turn si gnal lamps flashing
confirms the r equest to remote
st art the vehicle h as been
received.

Keys, Doors, and Windows 29
The parking lamps will turn on
and remain o n a s long as the
engine is running. The
vehicle' s doors will be locked.
3. The ke y must be insert ed and
turned to ON/RUN before
driving.
The engine will shut off after
10 minutes unless a time
extension is done or the key is
inserted and turned to
ON/RUN.
Extending Engine Run Time
For a 10-minute extens ion, after
30 seconds repeat Steps 1 and 2
while the engine is still running. The
remote start can be extended once.
When the remote start is extended,
the second 10 minutes will start
immediately.
For example, if the engine has been
running for five minutes, and
10 minutes are added, the engine
w ill r un for a total of 15 minutes.
A maximum of two remote s tarts or
remote start attempts are allowed
between ignition cycles.
The vehicle's ignitio n swit ch must
be turned to ON/RUN and then back
to LOCK/OFF using the key, before
the remote start procedure can be
used again.
Canceling a Remote Start
To shut off the engine:
. Press and hold /until the
parking lamps turn off.
. Turn on the hazard warni ng
flashers.
. Insert the key an d turn it to ON/
RUN and then back to
LOCK/OFF.
Conditi ons in Which Remot e Start
Will Not Work
The remote vehicl e start feature will
not oper ate if:
. The key is in the ignition.
. The hood is not clo sed.
. The hazard warning flashers
are on.
. There is an emission control
system malfunction.
. The engine coolant temperature
is too high.
. The oil pressure i s low.
. Two remote v ehicle s tarts have
already been used.
. The vehicl e is not in P (Park).
Remote Start Ready
If the vehicle does not have the
remote vehicle start feature, it may
have the remote start ready feature.
This feat ure allows your dealer to
add the manu factu rer's re mote
vehicle start feature. See your
dealer to add the manufacturer's
remote vehicle start feature t o the
vehicle.
Door Locks
{Warning
Unlocked door s ca n b e
dangerous.
. Pas sengers, especi ally
children, can easily open
the doors and fall out of a
(Continued)

30 Keys, Doors, and Wi ndows
Warning (Continued)
moving vehicle. The chance
of being thrown out of the
vehicle in a crash is
increased if the doors are
not locked. So, all
passengers should wear
safety belts properly and the
doors should be locked
whenever the vehicle is
driven.
. Young children who get into
unlocked vehicles may be
unable to get out. A child
can be overcome by
extreme heat and can suffer
permanent injuries or even
death from heat stroke.
Always lock the vehicle
whenever leaving it.
. Outsiders can easily enter
through an unlocked door
when slowing or stopping
the vehicle. Lock the doors
to help prevent this from
happening.
To lock or unlock a door from the
outside of the vehicle, use the
Remote Keyless Entry (RKE)
transmitter. Pull the handle once
from the inside to unlock the door,
and a second time to open it.
Power Door Locks
Q:Press to lock the doors.
K:Press to unlock the doors.
Delayed Locking
This feature delays the locking of
the doors until five seconds after all
doors are closed.
When Qis pressed on the power
door lock switch while the door is
open, a chime will sound three
times indicating delayed locking is
active.
The doors will lock automatically
five seconds after all doors are
closed. If a door is reopened before
that time, the five-second timer will
reset when all doors are closed
again.
Press Qon the door lock switch
again or press Qon the RKE
transmitter to lock the doors
immediately.
This feature can also be
programmed. See Vehicle
Personalization 1200.
Automatic Door Locks
The doors will lock automatically
when all doors are closed, the
ignition is on, and the shift lever is
moved out of P (Park).
To unlock the doors:
.Press Kon a door.

Keys, Doors, and Windows 31
. Shift the transmission into
P (Park).
Automatic door unlo cking can be
programmed through the D river
Information Center (DIC). See
Vehicle Personalization 1200.
Lockout Protection
When locking is requested with the
dr iver door open a nd the key in the
ignition, all the doors will lock and
then the driver door will unlock.
This can be manually overridden by
pressing and holding Qon the
power doo r lock switch .
Safety Locks
T he rear door safety locks prevent
passengers fr om openin g the rear
doors from inside the vehicle.
Manual Safety Locks
If equipped, the safety lock is
located on the i nside e dge of the
rear doors. To use the safety lock:
1. Insert the key into t he safety
lock slot and turn it so the slot
is in the horizon tal position.
2. Close the door.
3. Do the same for the other
rear door.
To open a rear d oor when the safety
lock is on:
1. Unlock the door by activating
the inside han dle, by using the
power door lock s witch, or by
using the Remote Ke yless
Entry (RKE) transmitter.
2. Open the door from the
outside.
To cance l the safety lock:
1. Unlock the door and open it
from th e o utside.
2. Insert the key into t he safety
lock slot and turn it so the slot
is in the vertical position. Do
the same for the other door.

32 Keys, Doors, and Wi ndows
Doors
Liftgate
{Warning
Exhaust gases can enter the
vehicle if it is driven with the
liftgate or trunk/hatch open,
or with any objects that pass
through the seal between the
body and the trunk/hatch or
liftgate. Engine exhaust co ntain s
carbon monoxide (CO) which
cannot be seen or smelled. It can
cause unconsciousness and even
death.
If the vehicl e m ust be driven with
the liftgate or trunk/h atch open:
. Close a ll of the windows.
. Fully open the air outlets on
or under the instrument
panel.
. Adjust th e climate control
system to a setting that
brings in only outside air
(Continued)
Warning (Continued)
and set the fan speed to the
highes t setting. See
“ ”Climate Control Systems
in the Index.
. If t he vehicle is equipped
with a power lif tgate, disable
the power liftgate function.
See .Engine Exhaust 1650
Caution
To avoid damage to the liftgate o r
liftgat e glass, make sure th e a rea
above and behind the liftgate i s
clear before opening it.
Manual Liftgate
To un lock the lift gate, p ress the
power door lock swit ch or press K
on the Remote Keyless Entry (RKE)
transmitter twice within
five seconds. See Remote Keyless
Entry (RKE) System Operation 260.
To open the liftgat e, pres s the touch
pad u nder th e liftgate handl e and
lift up.
Use the pull cup to lower and close
the lif tgate. Do not press the touch
pad while cl osing the liftga te. This
ma y ca use the liftgate to be
unlatched.
Al ways cl ose the liftgate before
driving.

Keys, Doors, and Windows 33
Power Liftgate
{Warning
You, or others, could be injured if
caught in the path of the power
liftgat e. Make sure there is no one
in the way of the liftgate as it is
opening and closing.
If equipp ed, the power liftgate
switch i s on the overh ead console.
The vehicl e must be in P (Park ) to
operate. The taillamps flash when
the power liftgate moves.
The three modes are:
MAX : Opens to maximum height.
3/4 : Opens to a reduced height
that can be set by the vehicle
oper ator. Use this setting to pr event
the li ftgate from opening into
overhead ob structions such as a
gar age door or roof mounted cargo
during power operation. The l iftgate
can st ill be f ully opened manually.
OFF : Opens manually only.
Manual operation of a li ftgate that
also has power operation requires
more effort than a standard manual
liftgate.
To open or close the liftgate, select
MAX or 3/4 mod e and then:
. Press and hold Yon the RKE
transmitte r until the l iftgate starts
moving. See Remote Keyless
Entry (RKE) System Operation
0 26.
. Press the power liftgate b utton in
the center of t he mode switch on
the overhead console, with the
driver door unlocked.
Press and release on the8
liftgate next to the l atch to cl ose the
liftgate.
Press any liftgate button or th e
touch pad while the liftgate is
moving to stop it. Pressing ag ain
rev erses the direction. There is a
minimum distance that the power
liftgate must already be open fo r the
system to hold it o pen. If movemen t
is stopped below that m inimum, the
liftgate closes.
Do not force the liftgate o pen or
closed durin g a power cycle.

34 Keys, Doors, and Wi ndows
The power liftgate ma y be
temporarily disabled u nder extreme
temperatures or low battery
conditions. If this occurs, the liftgate
can still be operated manually.
If the vehicle is shifted out of
P (Park) while the power function is
in p rogress, the lift gate power
functio n will con tinue to completion.
If the vehicle is shifted out of
P (Park) and accelera ted before the
power liftgate latch is closed , the
liftgate may reverse to the open
positio n. Ca rgo cou ld fall out of the
vehicle. Alw ays make sure the
power l iftgat e is closed and latched
before driving away.
If the lif tgate is power opened and
th e liftgate support struts have lost
pressure, the turn signals flash and
a chime will s ound. The lift gate
stays open temporarily, and then
slowly closes. See your dealer for
service before using the liftgate.
Obstacle Detection Features
If the liftgate encounters an obstacle
during a power open or close cycle,
the liftga te will automatically reverse
direction to the full closed or open
posit ion. After removing the
obstruction, the power liftgate
operation can be used again. If the
liftgate encoun ters multip le
obstacles on the same power cycle,
the power function will deactivate
and a message will d isplay in the
Driver Information Center (DIC).
See Object Detection System
Messages 1160. After removing the
o bstructions, the li ftgate will r esume
normal power operation.
Pin ch s ensors are located on the
side e dges of the lift gate. I f an
object is caught between the liftgate
a nd the vehicle and presses again st
this sensor, the lif tgate will reverse
direction and open fully. The liftgat e
will remain open until it is activated
again or closed manually.
Setting the 3/4 Mode
To change the position the liftgate
stops at when opening:
1. Select MAX or 3/4 mode and
open the liftgate.
2. Stop the liftgate movement at
the desired height by pressing
any liftgate switch. Manually
adju st the liftgate position if
needed.
3 . Press and hold 8on the
liftgate next to the latch until
the turn signals flash and a
beep sounds t o indicate t hat
the new se tting is recorded.
When power opened wi th the 3/4
mode selected, the liftgate stops at
the new set position.
If there is no a udible and visual
feedback when setting the
intermediate stop position, the
liftgate height is being set be low the
3/4 open height minimum
(approximately 1.5 m or 5 ft). The
liftgate cannot be set below that
minimum and the new setting will
not be record ed.

Keys, Doors, and Windows 35
Manual Operat io n of Power
Liftgate
To change the liftgate to manual
operation, turn the mode switch to
the O FF position.
With the power li ftgate disabled and
all of the doors unlocked, the liftga te
can be manually opened and
closed. Manual operation of a
liftgate th at also has power
operation req uires more effort than
a standard manual liftgate.
Caution
Do not use to o much force when
closing the liftgate to avoid
damage.
To o pen the liftgate, press the touch
pad on the han dle on the outside of
the liftgate, and lift t he gate open. To
close the liftgate, use the pull cup to
lower the liftgate a nd close. With the
power liftgate d isabled, the liftgate
el ectri c latch will still power latch
once contact is made with the
striker. Always close the liftgate
before driving.
If Yon the RKE transmitter is
pressed while power operation is
disabled, the turn signals flash and
t he liftgate will not move.
The liftgate has an electric latch.
If the battery is disconnected or has
low voltage, the liftgate will not
open. The liftgate will resume
operation when the battery is
reconne cted and charged.
Vehicle Security
This ve hicle has theft-deterrent
features; however, they do not make
the ve hicle impossible to steal.
Vehicle Alarm System
This vehicle has an anti-theft alarm
system.
The ind icator light, on the
instrument panel ne ar the
windshield, indicates the status of
the system:
Off : Alarm system is disarmed.

36 Keys, Doors, and Wi ndows
On Solid : Vehicle is secured
during the delay to arm the system.
Fast Flash : Vehicle is unsecured.
A doo r, the hood, or the liftgate
is open.
Slow Flash : Alarm system is
armed.
Arming the Alarm System
1. Turn off the vehicl e.
2. Lock the v ehicle in one of
three ways:
. Use the RKE tran smitter.
. With a door open, press the
interior Q.
3. After 30 seconds the alarm
system will arm, and the
indicat or light will be gin to
slowly flash indicating the
alarm system is operating.
Pressing Qon the RKE
transmitter a second time will
bypa ss the 30-second delay
and immediately arm the alarm
system.
The vehicl e a larm syst em will not
arm if the doors a re locked with
the key.
If the driver door is opened w ithou t
first unlocking with the RKE
transmitter, the horn will chirp and
the lights will flash to indicate
pre-alarm. If the vehicle is not
started, or the door is not unlocked
by pressing Kon the RKE
transmitter during the 10-second
pre-alarm, the alarm will be
activated.
If a door , the hood, or the liftgate is
opened without first disarming the
system, t he turn signals will flash
and the horn will sound for about
30 s econds. The alarm system will
then re-arm to m onito r for the next
unauthorize d event.
Disarming the Alarm System
To disarm the alarm system or turn
off the alarm if it has been activate d:
.Press Kon the RKE transmitter.
. Start the vehicle.
To avoid setting off the a larm by
accident:
. L ock the vehicle af ter all
occupants have left the vehicle
and all doors are closed.
. Alw ays unlock a door with the
RKE transm itter.
Unlocking the driver door with the
key will not disarm the system or
turn off the alarm.
How to Detect a Tamper
Condition
If is pressed on the RKEK
transmitter and the horn chirps and
the lights f lash three times, an a larm
occurred previously while the al arm
system was armed.
If the alarm has been activated, a
message will appear on the DIC.
See Security Messages 1180.
Immobilizer
See Radio Frequency Statement
0 298.

42 Keys, Doors, and Wi ndows
Dirt and debris may collect on the
sunroof seal or in the t rack. This
could cause an issue with sunroof
operation or noise. It could also plug
the water drainage system.
Periodically open the s unro of and
remove any obstacles or loose
debris. Wi pe the sunroof seal and
roof sealing area using a clean
cloth, mild soap, and water. Do not
remove grease from the sunroof.

Seats and Restraints 45
Rear Seats
The vehicle's rear seat has head
restraints in the outboard seating
positions that can not be adjusted.
Rear outboard he ad restraints are
not removable.
Front Seats
Seat Adjustment
{Warning
You can lose control of the
ve hicle if you try to adju st a d river
seat while the vehicle is moving.
Adjust the driver seat only when
the vehicle is not moving.
To adjust a manual seat:
1. Pull the handle at the front of
the seat cushion.
2. Move the seat forward or
rearward to adjust the seat
position.
3. Release the handle to stop the
seat from moving.
4. Try to move the seat back and
forth to be sure it i s locked in
place.
Power Seat Adjus tment
Four-Way Power Seat
1. Seat Position Handle
2. Height Adjustment Control

Seats and Restraints 47
Reclining Seatbacks
{Warning
Sitting in a reclined position wh en
the vehicle is in motion can be
dangerous. Even when buckled
up, the safety belts can not do
their job.
The shoulder belt will not be
against your body. I nstead, it will
be in front of you. In a crash, you
coul d go into it, receiving neck or
other i njuries.
The lap belt could go up over
your abdomen. The belt forces
would be th ere, not at your pelvic
bones. This could cause serious
internal injuries.
For proper protection whe n the
vehicle is in motion, have the
seatback upright. Then sit well
back in the seat and wear the
sa fety belt properly.
Do not have a seatback reclined if
the vehicle is moving.
Manual Reclining Seatbacks
{Warning
If either se atback is not locked, it
could move forward in a sudden
stop or crash. That could cause
injur y to t he pers on sitting there.
Always push and pull on the
seatbacks to be sure they are
locked.
To recline a manual seatback:
1. Lift the lever.
2. Move the s eatback to the
desired position, and t hen
release the lever to lock the
seatback in place.
3. Push and pull on the seatback
to make sure it is locked.
To ret urn the seatback t o the upri ght
position:
1. Lift the lever fully without
applying pressure to the
seatback, and the seatback will
return to the upright position.

Seats and Restraints 51
Rear Seats
Split F olding Seatbacks
Ei ther side of the rear seatback can
be folded down for more cargo
space.
Folding the Seatback s
Caution
Folding a rear seat with the safety
belts still fastened may cause
damag e to the seat or the safety
belt s. Always unbuckle the safety
belts and return them to th eir
normal stowed position be fore
folding a rear seat.
To fold the seatback down:
1. Unbuckle the rear safety belts
and place the fr ont seatbacks
in the upright position. See
Reclining Seatbacks 470.
2. Lift the lever on the top of the
seatback.
3. Fold the seatback forward.
K eep the seatback in the upright,
locked po sition when not in use.
Raising the Seat backs
{Warning
If either s eatback is not locke d, it
could m ove forward in a sudden
stop or crash. That could cause
injury to the person s itting there.
(Continued)
Warning (Continued)
Always push and pul l on t he
seatbacks to be sure they are
locked.
{Warning
A safet y belt that i s impr operly
routed, not properly attached,
or twisted will not prov ide the
protection needed in a crash. The
person wearing the belt could be
seriously injured. After raising the
rear seatback, always check t o be
sure that the safety belts are
properly routed and attached, and
are not twisted.
To raise the seatback:
1. Lift the lever on top of the
seatback. Raise the seatback
and release the lever.
2. Push the seatback rearward
until it locks in the upri ght
position.

Seats and Restraints 57
To install:
1. Remove the guide from its
storage po cket on the side of
the seatback.
2. Place t he guide over the belt,
and insert the two edges of the
belt into the slots of the guide.
3. Be s ure tha t the belt is no t
twisted and it l ies flat. The
elastic cord must be behind the
belt with the plastic guide on
the front.
4. Buckle, position, and release
the safety belt as described
prev iously in this section. Make
sure the shoulder portion of the
belt is on the shoulder and no t
falling off of it. T he belt should
be close t o, but not co ntacting,
the neck.
To remove and store the comfort
guide, squeeze the belt edges
together so that the safety belt can
be removed from the guide. Slide
Termékspecifikációk
| Márka: | Audi |
| Kategória: | autó |
| Modell: | Equinox (2016) |
Szüksége van segítségre?
Ha segítségre van szüksége Audi Equinox (2016), tegyen fel kérdést alább, és más felhasználók válaszolnak Önnek
Útmutatók autó Audi

26 Március 2025
8 Október 2024
5 Október 2024
4 Október 2024
30 Szeptember 2024
22 Szeptember 2024
15 Szeptember 2024
14 Szeptember 2024
4 Szeptember 2024
12 Augusztus 2024
Útmutatók autó
- autó Peugeot
- autó Pioneer
- autó Kia
- autó Renault
- autó Citroën
- autó Honda
- autó Opel
- autó Volvo
- autó Toyota
- autó BMW
- autó Hyundai
- autó Mercedes-Benz
- autó Jeep
- autó Suzuki
- autó Ford
- autó Mazda
- autó Chrysler
- autó Fiat
- autó Volkswagen
- autó DS
- autó Chevrolet
- autó Skoda
- autó Subaru
- autó Mitsubishi
- autó Seat
- autó Lexus
- autó Genesis
- autó Nissan
- autó Mercury
- autó Lancia
- autó Alfa Romeo
- autó Smart
- autó Audio-Technica
- autó MG
- autó Tesla
- autó Mini
- autó Dacia
- autó Rover
- autó Acme
- autó Saturn
- autó Land Rover
- autó Jaguar
- autó Dodge
- autó Polaris
- autó Maserati
- autó Saab
- autó Porsche
- autó Acura
- autó Vauxhall
- autó Infiniti
- autó GMC
- autó Buick
- autó Cadillac
- autó Pontiac
- autó Polestar
- autó RAM
- autó Scion
- autó Tata
- autó GEM
- autó VDL
- autó Sharper Image
- autó Abarth
- autó Lincoln
- autó Mahindra
- autó Chery
- autó Lada
- autó Aston Martin
- autó McLaren
Legújabb útmutatók autó

25 Március 2025
18 Március 2025
16 Január 2025
15 Január 2025
14 Január 2025

14 Január 2025
13 Január 2025

13 Január 2025

12 Január 2025
12 Január 2025