Használati útmutató Archos Xenon 101b
Olvassa el alább 📖 a magyar nyelvű használati útmutatót Archos Xenon 101b (180 oldal) a tabletta kategóriában. Ezt az útmutatót 4 ember találta hasznosnak és 2 felhasználó értékelte átlagosan 4.5 csillagra
Oldal 1/180

1
English
Table of contents
For more information, please consult the FAQs on www.archos.com. Make sure to read them before considering any product return.
Your deal may be no big deal. As we are often updating and improving our products, your device’s software may have a slightly dierent
appearance or modied functionality than presented in this Quick Start Guide.
Package contents........................................................................................................................
Getting started..............................................................................................................................
Description of the device..........................................................................................................
Inserting SIM & Micro-SD cards...............................................................................................
3G & WiFi connection.................................................................................................................
The AndroidTM interface.............................................................................................................
ARCHOS Fusion Storage.........................................................................................................
Getting familiar with Android TM...........................................................................................
Troubleshooting........................................................................................................................
2
3
4
5
6
8
12
14
16
Consult the declaration of conformity on http://www.archos.com/products/declaration_conformity.html
114297_ARCHOS_101b_Xenon_QSG_book.indd 1 16/10/2015 12:09:18

2
Warranty
USB cable Charger
QSG booklet
Warranty,
legal & safety booklet
Package Contents
ARCHOS 1 Xenon01b
114297_ARCHOS_101b_Xenon_QSG_book.indd 2 16/10/2015 12:09:18

3
English
Getting Started
TIP:
To receive more complete service, please register your product.
From a computer, go to www.archos.com/register.
Charging 1. Charge your device by plugging your power cable into
the micro-USB port. The ARCHOS device will start charging.
2. Press the Power button to turn on the device.
-You can use your ARCHOS whilst it charges.
-Let your device charge completely the rst time you use it.
-Use only the supplied charger.
When your device is completely discharged, you need
to charge it for at least 10 minutes before the charging
battery icon can be displayed.
114297_ARCHOS_101b_Xenon_QSG_book.indd 3 16/10/2015 12:09:18

4
7
3
5
86
4
91
2
Description of the device
Webcam
Notch
Camera
Micro-USB port
1
2
3
4
5
6
7
Headphone jack
ON/OFF button
Volume buttons
Reset button
8
Loudspeaker
9
114297_ARCHOS_101b_Xenon_QSG_book.indd 4 16/10/2015 12:09:19

5
SIM1
SIM2
TF
3G2G
English
Inserting SIM & Micro-SD cards
WARNING: Make sure to turn o your device before inserting the SIM & memory cards.
Opening
Use the notch to remove the back cover.
Do not bend or twist the back cover excessively. Doing so may damage the cover.
Inserting a SIM card
For your SIM card, slide it facing downwards in the slot.
Inserting a Memory card
Slide it facing downwards in the slot TIF
Closing
Replace the back cover clicking it back into position.
114297_ARCHOS_101b_Xenon_QSG_book.indd 5 16/10/2015 12:09:19

6
3G & WiFi connection
Mobile data connection
If your mobile phone subscription includes a mobile data option, you should be
connected to the Internet without any further setup. The ARCHOS will only have signal
if you are in an area covered by your provider’s 4G or 3G network.
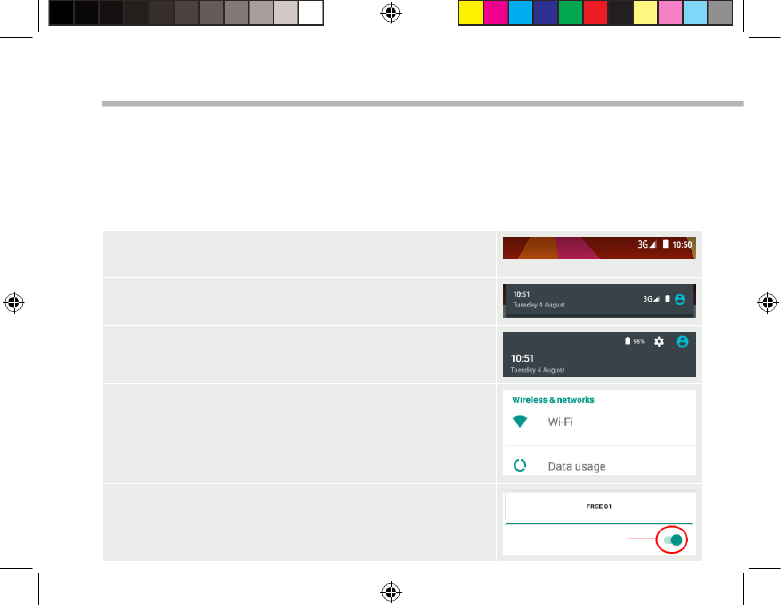
Activating/Deactivating the mobile data
1. Touch and pull down the status bar to display it.
2. Touch again the bar to reveal the quick settings.
3. Select the Settings icon.
4. In Wireless & networks, select Data usage, then the
SIM card tab.
5. Slide the Mobile data switch to turn on/o.
114297_ARCHOS_101b_Xenon_QSG_book.indd 6 16/10/2015 12:09:19
7
English
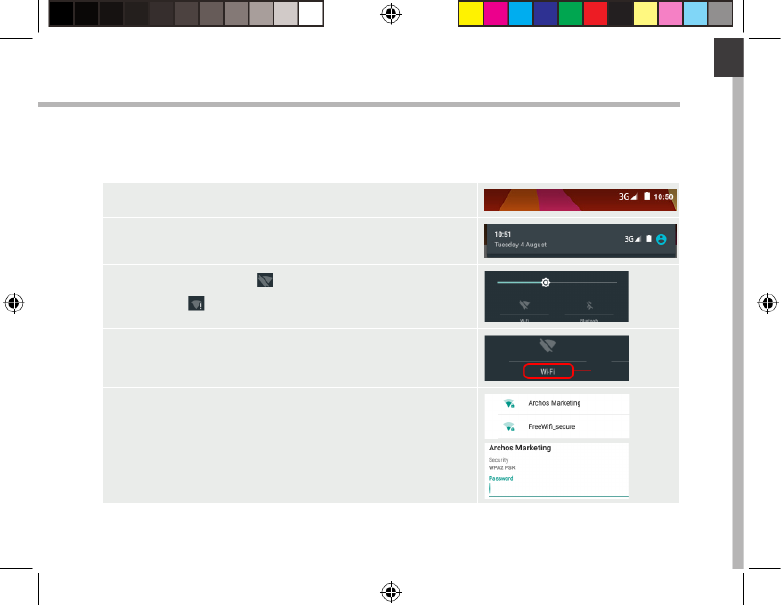
WiFi connection
WARNING: Make sure that you are in a WiFi zone. You can access the WiFi settings
quickly from the status bar.
1. Touch and pull down the status bar to display it.
2. Touch again the bar to reveal the quick settings.
3. Select the WiFi icon to activate the WiFi
connection .
4. Select “WiFi” below the WiFi icon.
5. Touch the name of network you want to connect to.
Private networks are shown with a lock icon and will
require you to enter your password.
114297_ARCHOS_101b_Xenon_QSG_book.indd 7 16/10/2015 12:09:19

8
4
2
1 8
35
6
7
6
The Android
TM
Interface
114297_ARCHOS_101b_Xenon_QSG_book.indd 8 16/10/2015 12:09:20
9
English
Google TM Search
>Touch "Google" for text search or touch the microphone icon for voice search.
Android TM apps shortcuts
> Touch to start an application.
Back button
Home button
Recent apps buttons
Permanent Android TM apps shortcuts
> Touch to start an application
All Apps button
> Touch this icon to show all the applications and widgets installed on your
ARCHOS. All your downloaded applications are here.
The status bar
> Displays notications and quick settings
1
2
3
4
5
6
7
8
114297_ARCHOS_101b_Xenon_QSG_book.indd 9 16/10/2015 12:09:20
10
2
4
6
8 9
5
7
10 11
31
The Android
TM
Interface
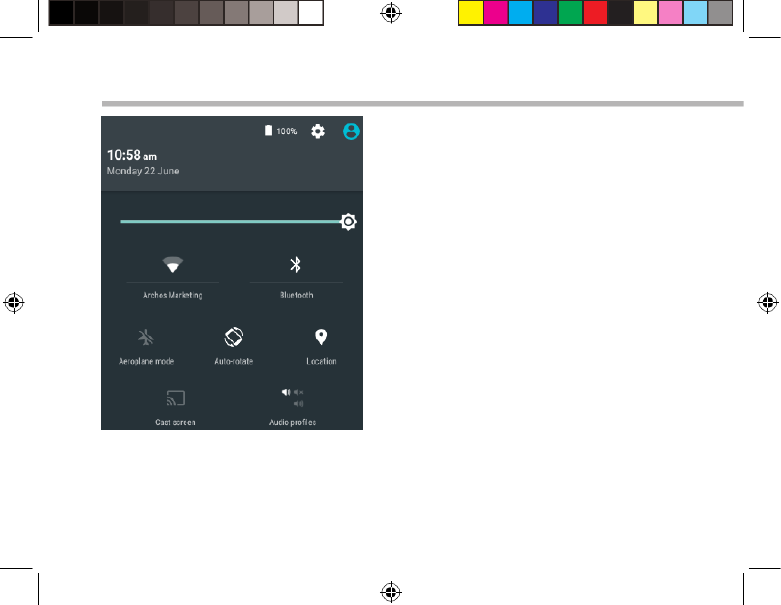
The Quick settings
1Percentage of battery remaining
2To access all your settings.
3Current user *
4To adjust the screen brightness.
5To turn on/o your WiFi connection.
6To turn on/o your Bluetooth connection.
7To activate/deactivate all wireless
connections, especially when ying.
8To activate/deactivate automatic screen
orientation as you turn your ARCHOS.
9Location services
10 To mirror your Android device to the TV so
you can enjoy your great content exactly
as you see it on your mobile device.
11 To select a notication type
*New multi-user support for tablets lets
different users have their own separate,
customizable spaces on a single device.
Add users in Settings > Device.
114297_ARCHOS_101b_Xenon_QSG_book.indd 10 16/10/2015 12:09:20

11
English
Opens a list of thumbnail images of apps you’ve worked with recently:
The Recent Apps
Touch: to open an app. Swipe left or right: to
close an app.
Scroll up or down: to
view other recent apps
114297_ARCHOS_101b_Xenon_QSG_book.indd 11 16/10/2015 12:09:20

12
Setting up fusion storage
1. Insert a micro-SD card in the device’s
micro-SD card slot.
Make sure to insert the card in the right
direction.
Your device will detect the micro-SD card
automatically and oers you to merge
the internal storage with the micro-SD
card.
2. Select “OK”. 2
3. Select “OK” in the Optimizing storage
window to conrm your choice.
3
ARCHOS Fusion Storage
114297_ARCHOS_101b_Xenon_QSG_book.indd 12 16/10/2015 12:09:21

13
English
Tip:
We recommend you to turn off the device before inserting the micro-SD card.
The device will reboot.
-When the device restarts, you are informed that the ARCHOS Fusion storage is
active.
-In the status bar, a notication is displayed.
-Select the Settings app, then ARCHOS Fusion Storage. The merged storage is
displayed.
Disabling fusion storage
1. Select the Settings app.
2. In the Settings app, select ARCHOS Fusion Storage.
3. When the ARCHOS Fusion Storage is active, select
“Disable ARCHOS Fusion Storage” and conrm.
Your device will reboot in order to apply the changes.
114297_ARCHOS_101b_Xenon_QSG_book.indd 13 16/10/2015 12:09:21

14
Getting familiar with Android
TM
Moving a home screen item:
Touch and hold your nger onto it until the positioning gridlines
appear, then slide it to the desired location, and release your
nger.
Removing a home screen item:
Touch and hold it, slide your nger towards the top of the screen
and drop it over the Remove icon.
Uninstalling an item:
From the All apps screens, touch and hold it, slide your nger
towards the top of the screen and drop it over Uninstall bin.
114297_ARCHOS_101b_Xenon_QSG_book.indd 14 16/10/2015 12:09:21

15
English
Creating application folders:
Drop one app icon over another on a home screen and the
two icons will be combined.
Widgets:
Hold your nger on a home screen at an empty location,
then choose from the list: Widgets.
Changing your wallpaper:
Hold your nger on a home screen at an empty location,
then choose from the list: Wallpaper.
114297_ARCHOS_101b_Xenon_QSG_book.indd 15 16/10/2015 12:09:22

16
Troubleshooting
If your device is frozen:
Press the ON/OFF button for 10 seconds or use the reset button. To use the reset button,
press the “pinhole reset” button by using a sharp object such as a toothpick.
If your device doesn’t turn on:
1. Charge your device.
2. Press the ON/OFF button for 10 seconds or use the reset button. To use the reset
button, press the “pinhole reset” button by using a sharp object such as a toothpick.
My tablet cannot connect to a network or “No service” is displayed
Try connecting in another location. Verify the network coverage with your operator.
Unable to make outgoing calls
Make sure your phone is connected to a network, and the network is not overloaded
or unavailable.
Unable to receive incoming calls
Make sure your phone is switched on and connected to a network (check for
overloaded or unavailable network).
SIM card PIN locked
Contact your network operator to obtain the PUK code (Personal Unblocking Key).
If your WiFi reception is too low:
Make sure you are not far from the WiFi hotspot.
Update the rmware of the device: http://www.archos.com/support.
Reset and redene your connection parameters.
Contact your WiFi connection provider.
114297_ARCHOS_101b_Xenon_QSG_book.indd 16 16/10/2015 12:09:22

17
Français
Table des matières
Pour plus d’informations, consultez-les FAQs sur www.archos.com. Consultez-les avant d’envisager un éventuel
retour du produit. Le problème que vous rencontrez peut être résolu facilement. Comme nous mettons à jour
et améliorons régulièrement nos produits, le logiciel de votre appareil peut présenter une interface ou des
fonctionnalités légèrement diérentes de celles décrites dans ce guide.
Consultez la déclaration de conformité sur http://www.archos.com/products/declaration_conformity.html
Contenu de la boîte..................................................................................................................
Mise en route..............................................................................................................................
Description de l’appareil........................................................................................................
Insertion de carte SIM & carte mémoire..........................................................................
Connexion 3G & WiFi...............................................................................................................
L’interface AndroidTM...............................................................................................................
ARCHOS Fusion Storage........................................................................................................
Se familiariser avec AndroidTM.............................................................................................
Dépannage.................................................................................................................................
18
19
20
21
22
24
28
30
32
114297_ARCHOS_101b_Xenon_QSG_book.indd 17 16/10/2015 12:09:22

18
Warranty
Contenu de la boîte
Câble USB Chargeur
Guide d’utilisation rapide
Guide des garanties et des mentions
légales
ARCHOS 10 Xenon1b
114297_ARCHOS_101b_Xenon_QSG_book.indd 18 16/10/2015 12:09:22

19
Français
Mise en route
ASTUCES:
Pour bénéficier d’une assistance complète, enregistrez votre produit.
A partir de votre ordinateur, allez sur www.archos.com/register.
Charger la batterie 1. Connectez le câble d’alimentation à votre produit via
le connecteur d’alimentation. La tablette commence à se
charger.
2. Appuyez sur le bouton On/O pour allumer l’appareil.
-Vous pouvez utiliser votre tablette pendant le chargement.
-Lors de la première utilisation, chargez complètement la
batterie.
-Utilisez uniquement le chargeur fourni.
Lorsque votre tablette est complètement déchargée, il
faut la laisser charger pendant 10 minutes minimum avant
que l’icône de charge ne puisse s’acher.
114297_ARCHOS_101b_Xenon_QSG_book.indd 19 16/10/2015 12:09:22

20
7
3
5
86
4
91
2
Description de l’appareil
Webcam
Encoche
Appareil photo
Port micro-USB
Entrée jack audio
Bouton ON/OFF
Boutons de volume
Bouton de réinitialisation
1
2
3
4
5
6
7
8
Haut-parleur
9
114297_ARCHOS_101b_Xenon_QSG_book.indd 20 16/10/2015 12:09:22

21
SIM1
SIM2
TF
3G2G
Français
Insertion de carte SIM & carte mémoire
ATTENTION : Bien éteindre la tablette avant d’insérer les cartes SIM et la carte mémoire.
Ouvrir
Utilisez l’encoche pour enlever la coque arrière.
Ne pas déformer ou plier la coque arrière excessivement au risque de l’endommager.
Insérer une carte SIM
Glissez-la dans l’emplacement SIM en orientant la face magnétique vers le bas.
Insérer une carte mémoire
Pour insérer la carte mémoire, glissez-la dans l’emplacement TIF en orientant la face
magnétique vers le bas.
Fermer
Remettez en place la coque arrière.
114297_ARCHOS_101b_Xenon_QSG_book.indd 21 16/10/2015 12:09:22

22
Données mobiles & Connexion WiFi
Connexion Données mobiles
Si votre abonnement mobile inclut une option données mobiles, vous devriez être
connecté à Internet automatiquement. Votre téléphone n’aura de signal que si vous
êtes dans une zone de réseau 4G ou 3G couverte par votre opérateur.
Activer/Désactiver les données mobiles
1. Tirez vers le bas la barre de statuts an de
l’acher.
2. Une fois achée, touchez-la à nouveau pour
accéder aux réglages rapides.
3. Sélectionnez l’icône Paramètres.
4. Dans la section “Sans l et réseaux”, sélectionnez
“Consommation de données”, puis l’onglet de la
carte SIM.
5. Faites glisser l’interrupteur Données mobiles pour
activer/désactiver.
114297_ARCHOS_101b_Xenon_QSG_book.indd 22 16/10/2015 12:09:22

23
Français
Connexion WiFi
ATTENTION : assurez-vous d’être dans une zone couverte par un réseau WiFi. Vous
pouvez accéder rapidement aux paramètres WiFi à partir de la barre de statuts.
1. Tirez vers le bas la barre de statuts an de l’acher.
2. Une fois achée, touchez-la à nouveau pour
accéder aux réglages rapides.
3. Sélectionnez l’icône WiFi pour activer la
connexion .
4. Sélectionnez “WiFi” en bas de l’icône WiFi.
5. Sélectionnez le nom du réseau auquel vous voulez
vous connecter. Les réseaux privés sont achés avec
un cadenas . Ils nécessitent un mot de passe.
114297_ARCHOS_101b_Xenon_QSG_book.indd 23 16/10/2015 12:09:22

24
4
2
1 8
35
6
7
6
L’interface Android
TM
114297_ARCHOS_101b_Xenon_QSG_book.indd 24 16/10/2015 12:09:22

25
Français
GoogleTM Search
> Sélectionnez “Google” pour saisir votre recherche ou l’icône microphone pour l’énoncer.
Raccourcis d’applications Android
TM
> Sélectionnez une application pour l’ouvrir.
“Retour”
“Accueil”
“Applications récentes”
Raccourcis permanents d’applications Android
TM
“ Toutes les Applications”
> Sélectionnez pour acher toutes les applications et les widgets installés sur
votre ARCHOS. Vous retrouverez toutes vos applications téléchargées.
Barre de statuts
> Elle ache les notications et permet l’accès aux réglages rapides.
1
2
3
4
5
6
7
8
114297_ARCHOS_101b_Xenon_QSG_book.indd 25 16/10/2015 12:09:22

26
2
4
6
8 9
5
7
10 11
31
L’interface Android
TM
Les Réglages rapides
1Pourcentage de batterie restant
2Pour accéder à tous vos paramètres.
3Ache l’icône de l’utilisateur actuel*.
4Pour ajuster la luminosité de l’écran.
5Pour activer/désactiver votre connexion WiFi.
6Pour activer/désactiver votre connexion
Bluetooth.
7Pour activer/désactiver toutes les connexions
sans l. Par exemple, pour prendre l’avion.
8Pour activer/désactiver l’orientation
automatique de l’écran dès que vous tournez
votre tablette.
9Les options du service de localisation
10 Pour acher l’écran de votre appareil sur
votre télé an de proter d’un achage grand
écran.
11 Pour sélectionner un type de notication
*Cette option permet à différents
utilisateurs d’une même tablette d’avoir
chacun son propre espace personalisable.
Ajoutez des utilisateurs à partir de
Paramètres > Appareil.
114297_ARCHOS_101b_Xenon_QSG_book.indd 26 16/10/2015 12:09:22

27
Français
Les Applications récentes
L’application ache une liste de vignettes des applications utilisées récemment.
Pour acher une
application, sélectionnez-
la.
Pour fermer une
application, faites-la
glisser vers le haut ou vers
le bas.
Pour acher les
applications récentes,
faites-les déler vers le bas
ou vers le haut.
114297_ARCHOS_101b_Xenon_QSG_book.indd 27 16/10/2015 12:09:23

28
Paramètrage du ARCHOS Fusion Storage
1. Insérez une carte micro-SD dans
l’emplacement correspondant.
Assurez-vous d’insérer la carte dans la
bonne direction.
Votre appareil détecte automatiquement
votre carte micro-SD et vous propose de
fusionner la mémoire interne et la carte
micro-SD.
2. Sélectionnez “OK”. 2
3. Sélectionnez “OK” dans la nouvelle
fenêtre pour conrmer votre choix.
3
ARCHOS Fusion Storage
114297_ARCHOS_101b_Xenon_QSG_book.indd 28 16/10/2015 12:09:23

29
Français
Astuce :
Nous vous recommendons d’éteindre votre appareil avant d’insérer la carte micro-SD.
L’appareil redémarre.
-Lorsque l’appareil redémarre, l’ARCHOS Fusion Storage est activé.
-Dans la barre de statuts, une notication s’ache.
-Sélectionnez l’application Paramètres, puis ARCHOS Fusion Storage. Le stockage
fusionné s’ache.
Désactivation de l’ARCHOS Fusion Storage
1. Sélectionnez l’application Paramètres.
2. Dans l’application Paramètres, sélectionnez ARCHOS
Fusion Storage.
3. Lorsque l’ARCHOS Fusion Storage est activé,
sélectionnez “Désactiver ARCHOS Fusion Storage” puis
conrmez.
Votre appareil redémarre pour appliquer les
changements.
114297_ARCHOS_101b_Xenon_QSG_book.indd 29 16/10/2015 12:09:23

30
Se familiariser avec Android
TM
Déplacer une icône de l’écran d’accueil :
Maintenez votre doigt appuyé sur l’icône jusqu’à ce que
s’achent les lignes de positionnement, puis faites-la glisser
vers l’emplacement souhaité, et relâchez.
Supprimer une icône de l’écran d’accueil :
Maintenez votre doigt appuyé sur l’icône, puis faites-la glisser
vers le haut de l’écran, et déposez-la sur l’icône "Supprimer".
Désinstaller une application :
A partir de l’écran "Toutes les applications", maintenez votre
doigt appuyé sur l’icône, puis faites-la glisser vers le haut de
l’écran et déposez-la sur l’icône "Désinstaller".
114297_ARCHOS_101b_Xenon_QSG_book.indd 30 16/10/2015 12:09:23

31
Français
Créer des dossiers d’applications :
A partir d’un écran d’accueil, déposez une icône sur une autre
pour les rassembler.
Widgets :
Maintenez votre doigt appuyé sur un emplacement vide de
l’écran, puis choisissez parmi la liste d’options : Widgets.
Changer le fond d’écran :
Maintenez votre doigt appuyé sur un emplacement vide de
l’écran, puis choisissez parmi la liste d’options : Fonds d’écran.
114297_ARCHOS_101b_Xenon_QSG_book.indd 31 16/10/2015 12:09:23

32
Dépannage
Si votre appareil ne répond pas :
Appuyez sur le bouton ON/OFF pendant 10 secondes ou utilisez le bouton Reset.
Appuyez sur le bouton reset en utilisant un objet pointu tel qu’un trombone.
Si votre appareil ne s’allume pas :
1. Chargez votre appareil.
2. Appuyez sur le bouton ON/OFF pendant 10 secondes ou utilisez le bouton Reset.
Appuyez sur le bouton reset en utilisant un objet pointu tel qu’un trombone.
Ma tablette ne se connecte pas au réseau ou ache “Pas de service”
Tentez de vous connecter à partir d’un autre endroit. Vériez la couverture réseau avec
votre opérateur.
Impossible de passer des appels
Assurez-vous que votre tablette est connectée au réseau et que le réseau n’est ni saturé,
ni indisponible.
Impossible de recevoir des appels
Assurez-vous que la tablette est allumée et connectée au réseau.
Carte SIM bloquée (mauvais code PIN)
Contactez votre opérateur réseau an d’obtenir le code PUK.
Si votre réception WiFi est trop faible :
Assurez-vous de ne pas être trop loin de la borne WiFi.
Mettez à jour le logiciel du produit: http://www.archos.com/support.
Réinitialisez vos paramètres de connexion WiFi.
Contactez le fournisseur d’accès.
114297_ARCHOS_101b_Xenon_QSG_book.indd 32 16/10/2015 12:09:23

33
Deutsch
Inhaltsverzeichnis
Weitere Informationen nden Sie unter den FAQs unter www.archos.com. Bitte lesen Sie diese Informationen
sorgfältig, bevor Sie die Rückgabe eines Produkts erwägen. Möglicherweise läßt sich Ihr Problem leicht
lösen. Da unsere Produkte kontinuierlich aktualisiert und weiterentwickelt werden, kann die Software Ihres
Geräts in Erscheinung und Funktionalität geringfügige Abweichungen zu den Darstellungen in dieser
Kurzbedienungsanleitung aufweisen.
Konsultieren Sie die Konformitätserklärung auf http://www.archos.com/products/declaration_conformity.html
Beschreibung des Packungsinhalts...................................................................................
Erste Schritte..............................................................................................................................
Beschreibung des Geräts.......................................................................................................
Einlegen von SIM-Karte & Speicherkarte........................................................................
WLAN-Verbindung & 3G-Verbindung...............................................................................
Die AndroidTM Benutzeroberfläche......................................................................................
ARCHOS Fusion Storage..........................................................................................................
AndroidTM kennenlernen.........................................................................................................
Fehlersuche.................................................................................................................................
34
35
36
37
38
40
44
46
48
114297_ARCHOS_101b_Xenon_QSG_book.indd 33 16/10/2015 12:09:23

34
Warranty
Beschreibung des Packungsinhalts
USB Kabel Ladegerät
Benutzerhandbuch
Garantie, Impressum und
Sicherheitshinweise
ARCHOS 10 Xenon1b
114297_ARCHOS_101b_Xenon_QSG_book.indd 34 16/10/2015 12:09:23

35
Deutsch
Erste Schritte
TIPP:
Um unseren Service voll nutzen zu können, empfehlen wir Ihnen, Ihr Produkt zu registrieren.
Für die Registrierung mittels Computer gehen Sie zu www.archos.com/register.
Auaden des Akkus 1. Laden Sie das Gerät auf, indem Sie das Netzkabel an den
ARCHOS-anschluss anschließen. Das ARCHOS-Gerät beginnt
zu laden.
2. Drücken Sie die Ein / Aus-Taste, um das Gerät einzuschalten.
-Sie können den ARCHOS auch während des Ladens
verwenden.
-Laden Sie Ihr Gerät vor der ersten Nutzung einmal
vollständig auf.
-Verwenden Sie nur das mitgelieferte Netzgerät.
Hat sich Ihr Gerät komplett entladen, muss es für
mindestens 10 Minuten geladen werden, bevor das
Batterieladesymbol angezeigt werden kann.
114297_ARCHOS_101b_Xenon_QSG_book.indd 35 16/10/2015 12:09:24

36
7
3
5
86
4
91
2
Beschreibung des ARCHOS
Webcam
Einkerbung
Kamera
Micro USB Port
Kopfhöreranschluss
EIN/AUS-Taste
Lautsprecher
Reset-Taste
1
2
3
4
5
6
7
8
Lautstärketaste
9
114297_ARCHOS_101b_Xenon_QSG_book.indd 36 16/10/2015 12:09:24

37
SIM1
SIM2
TF
3G2G
Deutsch
ACHTUNG: Schalten Sie das Gerät aus.
Önen
Entfernen Sie die Rückseitenabdeckung. Die Rückseitenabdeckung nicht übermäßig
biegen oder verdrehen. Die Abdeckung kann sonst beschädigt werden.
Einlegen einer SIM-Karte
Um Ihre SIM-Karte einzuführen, diese mit der Vorderseite nach unten in den Slot schieben.
Einlegen einer Speicherkarte
Um eine Speicherkarte einzuführen, diese mit der Vorderseite nach unten in den Slot TIF
schieben.
Schließen
Die Akkuabdeckung wieder anbringen und einrasten.
Einlegen von SIM-Karte & Speicherkarte
114297_ARCHOS_101b_Xenon_QSG_book.indd 37 16/10/2015 12:09:24
38
3G- & WLAN-Verbindung
Mobildatenverbindung
Beinhaltet Ihr Mobilfunkvertrag eine Mobildatenoption, sollte ohne weitere
Einrichtung eine Verbindung zum Internet hergestellt werden. Beachten Sie, dass
der ARCHOS nur dann ein Signal erhält, wenn Sie sich im Bereich des 4G- oder
3G-Netzwerks Ihres Anbieters benden.
Aktivierung/Deaktivierung der Mobildaten
1. Die Statusleiste berühren und nach unten ziehen, um
diese anzuzeigen.
2. Die Leiste erneut berühren, um die
Schnelleinstellungen anzuzeigen.
3. Wählen Sie das Symbol “Einstellungen”.
4. Unter “WLAN & Netzwerke” wählen Sie “Datennutzung”
und dann die Registerkarte “SIM-Karte”.
5. Schieben Sie den Schalter “Mobilfunkdaten” auf Ein/
Aus.
114297_ARCHOS_101b_Xenon_QSG_book.indd 38 16/10/2015 12:09:24

39
Deutsch
WLAN-Verbindung
ACHTUNG: Überprüfen Sie, ob Sie sich in einer WLAN-Zone benden. Über die
Statusleiste kann schnell auf die WLAN-Einstellungen zugegrien werden.
1. Die Statusleiste berühren und nach unten ziehen,
um diese anzuzeigen.
2. Die Leiste erneut berühren, um die
Schnelleinstellungen anzuzeigen.
3. Wählen Sie das WLAN-Symbol zur Aktivierung
der WLAN-Verbindung .
4. Wählen Sie “WLAN” unter dem WLAN-Symbol.
5. Tippen Sie auf den Namen des Netzwerks, mit
dem eine Verbindung hergestellt werden soll. Private
Netzwerke werden mit einem Schlosssymbol
angezeigt und hier muss das Passwort eingegeben
werden.
114297_ARCHOS_101b_Xenon_QSG_book.indd 39 16/10/2015 12:09:24

40
4
2
1 8
35
6
7
6
Die Android
TM
Benutzeroberäche
114297_ARCHOS_101b_Xenon_QSG_book.indd 40 16/10/2015 12:09:25
41
Deutsch
GoogleTM Suche
> Suchbegri eintippen oder Spracheingabe verwenden.
AndroidTM Apps
> Die Aktivierung einer App erfolgt durch Berühren.
“Zurück”
“Startbildschirm”
“Letzte Apps”
Permanenten AndroidTM Apps-Verknüpfungen
" Alle Apps"
> Berühren Sie dieses Symbol, um alle auf Ihrem ARCHOS installierten Apps und
Widgets anzuzeigen. Alle heruntergeladenen Anwendungen benden sich hier.
Statusleiste
> Auf der Statusleiste werden Benachrichtigungen und die Systemsymbole
angezeigt.
1
2
3
4
5
6
7
8
114297_ARCHOS_101b_Xenon_QSG_book.indd 41 16/10/2015 12:09:25

42
2
4
6
8 9
5
7
10 11
31
Die Android
TM
Benutzeroberäche
Schnelleinstellungen
1Akkurestlaufzeit in Prozent
2Zugri auf alle Einstellungen.
3Aktueller Benutzer*
4Einstellung der Bildschirmhelligkeit.
5Ein- und Ausschalten der WLAN-
Verbindung.
6Ein- und Ausschalten der Bluetooth-
Verbindung.
7Beendet alle WLAN-Verbindungen,
nützlich für Flugreisen.
8Ermöglicht die Aktivierung und
Deaktivierung der automatischen Display-
Drehung.
9Aktivieren / Deaktivieren Sie Ihre GPS-
Verbindung.
10 Für die Wiedergabe Ihres Android-
Geräts auf dem Fernseher, um so Ihre
großartigen Inhalte exakt genauso wie auf
Ihrem Mobilgerät, anzuzeigen.
11 Auswahl eines Benachrichtigungstyps
*Mit dem neuen Multi-User-Support für
Tablets besitzt jeder Benutzer seinen
eigenen separaten und anpassbaren
Bereich auf einem einzelnen Gerät.
Benutzer können unter Settings > Device
[Einstellungen > Gerät] hinzugefügt
werden.
114297_ARCHOS_101b_Xenon_QSG_book.indd 42 16/10/2015 12:09:25

43
Deutsch
Letzte Apps
Önet eine Liste mit Mini-Abbildungen der kürzlich verwendeten Apps:
Tippen: önen einer
Anwendung.
Nach rechts oder links
wischen: Eine Anwendung
schließen.
Auf- und abwärts
scrollen: Anzeige der
zuletzt verwendeten Apps
114297_ARCHOS_101b_Xenon_QSG_book.indd 43 16/10/2015 12:09:25
44
Fusion Storage einrichten
1. Stecken Sie eine micro-SD-Karte in
den micro-SD-Kartensteckplatz des
Geräts ein.
Achten Sie darauf, die Karte in die
korrekte Richtung einzustecken.
Die micro-SD-Karte wird von Ihrem Gerät
automatisch erkannt und es bietet Ihnen
an, den internen Speicher mit der micro-
SD-Karte zu kombinieren.
2. Wählen Sie „OK“.
2
3. Wählen Sie "OK" im Fenster für die
Speicheroptimierung, um Ihre Auswahl
zu bestätigen.
3
ARCHOS Fusion Storage
114297_ARCHOS_101b_Xenon_QSG_book.indd 44 16/10/2015 12:09:26

45
Deutsch
Tipp:
Wir empfehlen das Ausschalten des Geräts vor dem Einstecken der micro-SD-Karte.
Das Gerät wird neu gestartet.
-Sobald das Gerät neu gestartet wurde, werden Sie darüber informiert, dass
ARCHOS Fusion Storage aktiv ist.
-In der Statusleiste wird eine Benachrichtigung angezeigt.
-Wählen Sie die App "Einstellungen" und dann "ARCHOS Fusion Storage". Der
kombinierte Speicher wird angezeigt.
Fusion Storage deaktivieren
1. Wählen Sie die App "Einstellungen".
2. Wählen Sie in der App "Einstellungen" die Option
"ARCHOS Fusion Storage".
3. Ist ARCHOS Fusion Storage aktiv, wählen Sie
"ARCHOS Fusion Storage deaktivieren" und bestätigen.
Ihr Gerät wird jetzt neu gestartet, um die Änderungen
zu übernehmen.
114297_ARCHOS_101b_Xenon_QSG_book.indd 45 16/10/2015 12:09:26

46
Android
TM
kennenlernen
Ein Element vom Startbildschirm verschieben:
Zum Verschieben eines Elements vom Startbildschirm den
Finger darauf legen und so lange halten, bis die Rasterlinien
zur Positionierung erscheinen. Dann an die gewünschte Stelle
schieben und loslassen.
Ein Element vom Startbildschirm entfernen:
Den Finger auf das Element legen und halten. Den Finger auf
dem Bildschirm nach oben bewegen und über dem «Entfernen»-
Symbol loslassen.
Ein Element deinstallieren:
Auf den «Alle Apps»-Bildschirmen das betreende Element
berühren und halten. Den Finger im Bildschirm nach oben
bewegen und über dem «Deinstallieren»-Papierkorb loslassen.
114297_ARCHOS_101b_Xenon_QSG_book.indd 46 16/10/2015 12:09:26

47
Deutsch
Anwendungsordner erstellen:
Ziehen Sie auf einem Startbildschirm ein Anwendungssymbol
über ein anderes. Die beiden Symbole werden kombiniert.
Widgets:
Berühren Sie das «Alle Apps»-Symbol auf dem
Startbildschirm. Berühren Sie «Widgets» oben auf dem
Bildschirm. Auf dem «Widgets»-Hauptbildschirm können Sie
Widgets genau wie Anwendungssymbole auch verschieben.
Hintergrundbild ändern:
Den Finger auf eine freie Stelle des Bildschirms legen und
dann aus der Liste auswählen.
114297_ARCHOS_101b_Xenon_QSG_book.indd 47 16/10/2015 12:09:26

48
Fehlersuche
Das Gerät reagiert nicht mehr:
Halten Sie die EIN/AUS-Taste 10 Sekunden lang gedrückt oder verwenden Sie den
Hardware-Reset. Um den Hardware-Reset auszuführen, führen Sie einen spitzen
Gegenstand, wie etwa eine Büroklammer, in die dafür vorgesehene Önung des Gehäuses
und drücken Sie so die Büroklammer- Reset-Taste.
Wenn sich das Gerät nicht wieder einschaltet:
1. Laden Sie das Gerät für mindestens 10 Minuten lang auf.
2. Halten Sie die EIN/AUS-Taste 10 Sekunden lang gedrückt oder verwenden Sie den
Hardware-Reset – wie zuvor beschrieben.
Mein Telefon kann nicht mit einem Netzwerk verbinden oder es wird „Kein Dienst“
angezeigt
Testen Sie das Gerät an einem anderen Standort.
Überprüfen Sie die Netzwerkabdeckung bei Ihrem Anbieter.
Keine ausgehenden Anrufe möglich
Überprüfen Sie die Verbindung Telefon - Netzwerk und ob das Netzwerk überlastet oder
nicht verfügbar ist.
Eingehende Anrufe können nicht empfangen werden
Überprüfen Sie, ob das Telefon eingeschaltet und mit einem Netzwerk verbunden und ob
das Netzwerk überlastet oder nicht verfügbar ist.
PIN der SIM-Karte gesperrt
Wenden Sie sich an Ihren Netzwerkbetreiber, um den PUK-Code zu erhalten.
WiFi(WLAN)-Empfang ist zu schwach:
Stellen Sie sicher, dass Sie sich in Reichweite eines WiFi(WLAN)-Hotspots benden.
Aktualisieren Sie die Firmware des Gerätes: http://www.archos.com/support.
Setzen Sie die WiFi-Verbindung zurück.
Kontaktieren Sie Ihren WiFi(WLAN)-Provider.
114297_ARCHOS_101b_Xenon_QSG_book.indd 48 16/10/2015 12:09:27

49
Español
Índice
Para obtener más información, consulte la sección de preguntas frecuentes en la dirección www.archos.com.
Asegúrese de leerlos antes de considerar devolver el producto. Puede haber una solución fácil a su problema.
Tenga en cuenta que como estamos actualizando y mejorando constantemente nuestros productos, el software
de su dispositivo puede variar ligeramente con respecto a lo descrito en esta Guía Rápida.
Consulte la declaración de conformidad en http://www.archos.com/products/declaration_conformity.html
Contenido de la caja.................................................................................................................
Procedimientos iniciales.........................................................................................................
Descripción del ARCHOS........................................................................................................
Insertar tarjetas.........................................................................................................................
Conexión 3G & Conexión WiFi..............................................................................................
La interfaz AndroidTM
................................................................................................................
ARCHOS Fusion Storage.........................................................................................................
Para familiarizarse con Android TM
........................................................................................
Solución de problemas............................................................................................................
50
51
52
53
54
56
60
62
64
114297_ARCHOS_101b_Xenon_QSG_book.indd 49 16/10/2015 12:09:27

50
Warranty
Contenido de la caja
Cable USB Cargador
Guía de usuario
Avisos de garantía, legales y de
seguridad
ARCHOS 10 Xenon1b
114297_ARCHOS_101b_Xenon_QSG_book.indd 50 16/10/2015 12:09:27

51
Español
Procedimientos iniciales
CONSEJOS:
Para recibir una asistencia más completa, registre su producto.
Con un ordenador, vaya a www.archos.com/register.
Cargado de la batería
1. Para cargar el dispositivo, conecte el cable de
alimentación al Conector de alimentación. El dispositivo
ARCHOS iniciará la carga.
2. Pulse el botón de encendido / apagado para encender el
producto.
-Puede utilizar el ARCHOS mientras se carga.
-Deje cargar completamente el dispositivo la primera vez
que lo utilice.
-Utilice únicamente el cargador suministrado.
Cuando el dispositivo está completamente descargado,
deberá cargarlo durante al menos 10 minutos antes de
que aparezca el icono de carga de batería.
114297_ARCHOS_101b_Xenon_QSG_book.indd 51 16/10/2015 12:09:27

52
7
3
5
86
4
91
2
Descripción del ARCHOS
Webcam
Muesca
Cámara
Puerto micro-USB
1
2
3
4
5
6
7
8
Toma de auriculares
Botón ON/OFF
Botones de volumen
Botón de restablecimiento
Altavoz
9
114297_ARCHOS_101b_Xenon_QSG_book.indd 52 16/10/2015 12:09:27

53
SIM1
SIM2
TF
3G2G
Español
Insertar tarjetas SIM & Micro-SD
ADVERTENCIA: Apague el dispositivo.
Abrir
Quite la cubierta posterior. No doble ni fuerce excesivamente la cubierta posterior p53-ya
que podría dañarla.
Insertar una tarjeta SIM
Para insertar una tarjeta SIM, introduzca la tarjeta boca abajo en la ranura SIM.
Insertar una tarjeta de memoria
Para insertar una tarjeta de memoria, introduzca la tarjeta boca abajo en la ranura TIF.
Cerrar
Vuelva a colocar la tapa de la batería (oirá un clic de cierre).
114297_ARCHOS_101b_Xenon_QSG_book.indd 53 16/10/2015 12:09:27

55
Español
Conexión WiFi
ADVERTENCIA: Asegúrese de que se encuentra en una zona con cobertura WiFi. Puede
acceder rápidamente a los ajustes WiFi desde la barra de estado.
1. Toque y arrastre hacia abajo la barra de estado para
mostrarla.
2. Vuelva a tocar la barra para mostrar los ajustes
rápidos.
3. Seleccione el icono WiFi para activar la conexión
WiFi .
4. Seleccione “WiFi” bajo el icono WiFi.
5. Toque el nombre de la red a la que se desee
conectar. Las redes privadas aparecen con
un icono de candado, lo que signica que deberá
introducir una contraseña.
114297_ARCHOS_101b_Xenon_QSG_book.indd 55 16/10/2015 12:09:27

56
4
2
1 8
35
6
7
6
El Interfaz Android
TM
114297_ARCHOS_101b_Xenon_QSG_book.indd 56 16/10/2015 12:09:27

58
2
4
6
8 9
5
7
10 11
31
El Interfaz Android
TM
Los ajustes rápidos
1Porcentaje de batería restante
2Para acceder a todos los ajustes.
3Usuario actual*
4Para ajustar el brillo de la pantalla.
5Para activar/desactivar la conexión WiFi.
6Para activar/desactivar la conexión Bluetooth.
7Para activar/desactivar todas las conexiones
inalámbricas, especialmente al volar.
8Para activar/desactivar la orientación
automática de la pantalla al girar el ARCHOS.
9El servicio de ubicación
10 Para reproducir la pantalla del dispositivo
Android en un televisor y poder disfrutar de su
contenido tal y como aparece en el dispositivo
móvil.
11 Para seleccionar un tipo de noticación
*El nuevo soporte multiusuario para tabletas
permite que distintos usuarios tengan
sus propios espacios personalizables e
independientes en un único dispositivo.
Añada usuarios en Settings > Device
[Ajustes > Dispositivo].
114297_ARCHOS_101b_Xenon_QSG_book.indd 58 16/10/2015 12:09:27

59
Español
Aplicaciones recientes
Abre una lista de imágenes en miniatura de las aplicaciones con las que haya trabajado
recientemente:
Tocar: para abrir una
aplicación.
Mover el dedo derecho o
izquierda: para cerrar una
aplicación.
Arrastrar con el dedo
arriba/abajo: para
ver otras aplicaciones
recientes
114297_ARCHOS_101b_Xenon_QSG_book.indd 59 16/10/2015 12:09:28
61
Español
Consejo:
Recomendamos apagar el dispositivo antes de insertar la tarjeta micro SD.
El dispositivo se reiniciará.
-Una vez reiniciado, el dispositivo le indicará que ARCHOS Fusion storage está
activado.
-En la barra de estado, aparecerá una noticación.
-Seleccione la aplicación Ajustes, y luego ARCHOS Fusion Storage. Aparecerá
entonces el almacenamiento fusionado.
Desactivación de Fusion Storage
1. Seleccione la aplicación Ajustes.
2. En la aplicación Ajustes, seleccione ARCHOS Fusion
Storage.
3. Si la aplicación está activa, seleccione “Disable
ARCHOS Fusion Storage” para desactivarla y conrme.
El dispositivo se reiniciará para hacer efectivos los
cambios.
114297_ARCHOS_101b_Xenon_QSG_book.indd 61 16/10/2015 12:09:28

63
Español
Creación de carpetas de aplicaciones:
Deje caer un icono de aplicación sobre otro en una pantalla de
inicio y los dos iconos se combinarán.
Cambio del fondo:
Mantenga el dedo en la pantalla en una ubicación vacía y, a
continuación, elija en la lista.
Widgets:
Mantenga el dedo en la pantalla en una ubicación vacía y, a
continuación, elija en la lista: “Widgets".
114297_ARCHOS_101b_Xenon_QSG_book.indd 63 16/10/2015 12:09:28

65
Italiano
Sommario
Per ulteriori informazioni, consultare le FAQ su www.archos.com. Accertarsi di aver letto questo materiale prima
di considerare l’eventuale restituzione del prodotto. Il problema riscontrato potrebbe non essere davvero un
problema! Poiché i nostri prodotti vengono continuamente aggiornati e migliorati, è possibile che il software
del dispositivo si presenti in modo leggermente diverso o con funzioni modicate rispetto a quanto presentato
nella presente Guida rapida.
Consultare la dichiarazione di conformità su http://www.archos.com/products/declaration_conformity.html
Contenuto della confezione..................................................................................................
Avvio..............................................................................................................................................
Descrizione del ARCHOS........................................................................................................
Inserimento schede SIM & Micro-SD...................................................................................
Connessione 3G & WiFi ..........................................................................................................
L’interfaccia di AndroidTM........................................................................................................
ARCHOS Fusion Storage.........................................................................................................
Conoscere AndroidTM...............................................................................................................
Soluzione dei problemi..........................................................................................................
66
67
68
69
70
72
76
78
80
114297_ARCHOS_101b_Xenon_QSG_book.indd 65 16/10/2015 12:09:28

69
SIM1
SIM2
TF
3G2G
Italiano
Inserimento schede SIM & Micro-SD
ATTENZIONE: Spegnere il dispositivo.
Apertura
Rimuovere la copertura posteriore.
Non piegare o torcere eccessivamente la copertura posteriore. Si potrebbe danneggiare.
Inserimento scheda SIM
Per inserire la scheda SIM, farla scorrere rivolta verso il basso e inserirla nello slot SIM.
Inserimento scheda di memoria
Per inserire una scheda di memoria, farla scorrere rivolta verso il basso e inserirla nello slot
TIF.
Chiusura
Riposizionare la copertura della batteria reincastrandola in sede.
114297_ARCHOS_101b_Xenon_QSG_book.indd 69 16/10/2015 12:09:28
70
Connessione 3G & WiFi
Connessione dati
Se il piano tariario del telefono cellulare include l’opzione della connessione dati, è
possibile connettersi a Internet senza ulteriori congurazioni. Il dispositivo ARCHOS
mostrerà il segnale solo se l’utente si trova in un’area coperta dalla rete 4G o 3G
dell’operatore telefonico.
Attivazione/Disattivazione della connessione dati
1. Toccare e tirare verso il basso la barra di stato per
visualizzarla.
2. Toccare di nuovo la barra per visualizzare le
impostazioni rapide.
3. Selezionare l’icona “Settings” [Impostazioni].
4. In “Wireless & networks” [Wireless e reti], selezionare
“Data usage” [Uso dati], quindi la scheda della SIM card.
5. Scorrere il dito per attivare/disattivare l’opzione
“Mobile data” [Connessione dati].
114297_ARCHOS_101b_Xenon_QSG_book.indd 70 16/10/2015 12:09:29

71
Italiano
Connessione Wi-Fi
AVVERTENZA: assicurarsi di essere in una zona Wi-Fi. È possibile accedere rapidamente
alle impostazioni Wi-Fi dalla barra di stato.
1. Toccare e tirare verso il basso la barra di stato per
visualizzarla.
2. Toccare di nuovo la barra per visualizzare le
impostazioni rapide.
3. Selezionare l’icona del Wi-Fi per attivare la
connessione Wi-Fi .
4. Selezionare “Wi-Fi” sotto l’icona del Wi-Fi.
5. Toccare il nome della rete a cui l’utente desidera
connettersi. Le reti private vengono mostrate con
un’icona di blocco e richiedono l’inserimento della
password.
114297_ARCHOS_101b_Xenon_QSG_book.indd 71 16/10/2015 12:09:29
Termékspecifikációk
| Márka: | Archos |
| Kategória: | tabletta |
| Modell: | Xenon 101b |
Szüksége van segítségre?
Ha segítségre van szüksége Archos Xenon 101b, tegyen fel kérdést alább, és más felhasználók válaszolnak Önnek
Útmutatók tabletta Archos

16 Október 2024
14 Október 2024
27 Szeptember 2024
17 Augusztus 2024
16 Augusztus 2024
11 Augusztus 2024
11 Augusztus 2024
8 Augusztus 2024
7 Augusztus 2024
7 Augusztus 2024
Útmutatók tabletta
- tabletta Samsung
- tabletta Sony
- tabletta Fujitsu
- tabletta Acer
- tabletta LG
- tabletta Grundig
- tabletta Realme
- tabletta Philips
- tabletta Oregon Scientific
- tabletta Panasonic
- tabletta Nokia
- tabletta Lenovo
- tabletta Evolveo
- tabletta Toshiba
- tabletta HP
- tabletta Hyundai
- tabletta Hisense
- tabletta Apple
- tabletta Medion
- tabletta Motorola
- tabletta Alcatel
- tabletta TCL
- tabletta Zebra
- tabletta Xiaomi
- tabletta GoGen
- tabletta CAT
- tabletta Dell
- tabletta Cyrus
- tabletta Gigabyte
- tabletta Thomson
- tabletta Polaroid
- tabletta Aiwa
- tabletta Tesco
- tabletta Huawei
- tabletta Microsoft
- tabletta Asus
- tabletta Vtech
- tabletta PocketBook
- tabletta Haier
- tabletta Navitel
- tabletta Sencor
- tabletta AOC
- tabletta Telefunken
- tabletta Nevir
- tabletta Kobo
- tabletta Doro
- tabletta Logitech
- tabletta Viewsonic
- tabletta Denver
- tabletta Bush
- tabletta Trevi
- tabletta Aluratek
- tabletta Amazon
- tabletta MSI
- tabletta Tesla
- tabletta Energy Sistem
- tabletta Google
- tabletta Honor
- tabletta SPC
- tabletta Control4
- tabletta ZTE
- tabletta ESTAR
- tabletta Vodafone
- tabletta ModeCom
- tabletta Terratec
- tabletta Overmax
- tabletta OnePlus
- tabletta Kogan
- tabletta Honeywell
- tabletta Intenso
- tabletta Prestigio
- tabletta Media-Tech
- tabletta Digiland
- tabletta Manta
- tabletta Blaupunkt
- tabletta IRiver
- tabletta Razer
- tabletta AKAI
- tabletta TechniSat
- tabletta Pyle
- tabletta Salora
- tabletta Lenco
- tabletta Maxell
- tabletta ECG
- tabletta Micromax
- tabletta Best Buy
- tabletta Vorago
- tabletta Newland
- tabletta GoClever
- tabletta Krüger&Matz
- tabletta Getac
- tabletta Allview
- tabletta RCA
- tabletta Orion
- tabletta Creative
- tabletta ECS
- tabletta Adj
- tabletta Wacom
- tabletta Bluebird
- tabletta Packard Bell
- tabletta TechBite
- tabletta Majestic
- tabletta IGET
- tabletta Lava
- tabletta I.safe Mobile
- tabletta Vivitar
- tabletta Xiron
- tabletta Yarvik
- tabletta Lexibook
- tabletta Proscan
- tabletta Trekstor
- tabletta Sonim
- tabletta Gemini
- tabletta Easypix
- tabletta Konrow
- tabletta Cresta
- tabletta Brigmton
- tabletta Sunstech
- tabletta Sylvania
- tabletta Binatone
- tabletta Blackberry
- tabletta Audiosonic
- tabletta Exagerate
- tabletta Coby
- tabletta Bigben Interactive
- tabletta Wolder
- tabletta Audiovox
- tabletta Disgo
- tabletta Olivetti
- tabletta Pantech
- tabletta Laser
- tabletta Naxa
- tabletta RugGear
- tabletta Ricatech
- tabletta Hema
- tabletta Arnova
- tabletta Mpman
- tabletta Vizio
- tabletta Cello
- tabletta Logicom
- tabletta Ematic
- tabletta Hannspree
- tabletta Zagg
- tabletta Ingo
- tabletta Plum
- tabletta Difrnce
- tabletta Nextbook
- tabletta Memup
- tabletta Engel Axil
- tabletta BQ
- tabletta Butler
- tabletta Rand McNally
- tabletta Odys
- tabletta Dragon Touch
- tabletta Primux
- tabletta DEXP
- tabletta Eken
- tabletta Tom-tec
- tabletta Mediacom
- tabletta Xoro
- tabletta Billow
- tabletta Empire
- tabletta Woxter
- tabletta Storage Options
- tabletta Advantech
- tabletta Kurio
- tabletta Linx
- tabletta Ferguson
- tabletta Leap Frog
- tabletta I-onik
- tabletta Microtech
- tabletta Empire Electronix
- tabletta Vulcan
- tabletta Storex
- tabletta Skytex
- tabletta Electrovaya
- tabletta Durabook
- tabletta Mymaga
- tabletta Vinci
- tabletta Vizmo
- tabletta General Dynamics Itronix
- tabletta Xplore
- tabletta Lark
- tabletta Bookeen
- tabletta Elements
- tabletta I-Joy
- tabletta Hamlet
- tabletta Approx
- tabletta Leotec
- tabletta Bauhn
- tabletta ADS-TEC
- tabletta Nabi
- tabletta Barnes And Noble
- tabletta Sungale
- tabletta Aqprox
- tabletta Fossibot
- tabletta Hip Street
Legújabb útmutatók tabletta

9 Április 2025
3 Április 2025
1 Április 2025
1 Április 2025
1 Április 2025
1 Április 2025
1 Április 2025
31 Március 2025

30 Március 2025

30 Március 2025