Használati útmutató AOC Style-line I2267FW
Olvassa el alább 📖 a magyar nyelvű használati útmutatót AOC Style-line I2267FW (66 oldal) a Monitor kategóriában. Ezt az útmutatót 2 ember találta hasznosnak és 2 felhasználó értékelte átlagosan 4.5 csillagra
Oldal 1/66

I 3267F / 2267IFWH/
I2367F I2267FW
/ /I2067F
LED acklightB
L D Monitor User ManualC

2
Safety ........................................................................................................................................................................ 3
National Conventions ......................................................................................................................................... 3
Power 4................................................................................................................................................................
Installation .......................................................................................................................................................... 5
Cleaning ............................................................................................................................................................. 6
Other .................................................................................................................................................................. 7
Setup 8........................................................................................................................................................................
Contents in Box ................................................................................................................................................. 8
Setup Stand & Base 9..........................................................................................................................................
Adjusting Viewing Angle ................................................................................................................................... 11
Connecting the Monitor .................................................................................................................................... 12
Adjustin ................................................................................................................................................................. 14
Setting Optimal Resolution .............................................................................................................................. 14
Windows Vista .......................................................................................................................................... 14
Windows XP ............................................................................................................................................. 16
Windows ME/2000 .................................................................................................................................... 17
Hotkeys ............................................................................................................................................................ 18
OSD Setting ..................................................................................................................................................... 19
Luminanc ................................................................................................................................................ 20
Image Setup ............................................................................................................................................. 22
Color Setup ............................................................................................................................................... 24
Picture Boost ............................................................................................................................................ 26
OSD Setup ............................................................................................................................................... 28
Extra ......................................................................................................................................................... 30
Exit ............................................................................................................................................................ 32
LED Indicator ................................................................................................................................................... 33
Driver ...................................................................................................................................................................... 34
Monitor Driver .................................................................................................................................................. 34
Windows 7 ................................................................................................................................................ 34
Windows Vista .......................................................................................................................................... 37
Windows XP ............................................................................................................................................. 39
Windows 2000 .......................................................................................................................................... 42
Windows ME ............................................................................................................................................. 42
i-Menu .............................................................................................................................................................. 43
e-Saver ............................................................................................................................................................ 44
Screen+ ........................................................................................................................................................... 45
Troubleshoot ........................................................................................................................................................... 46
Specification ............................................................................................................................................................ 47
General Specification ....................................................................................................................................... 47
Preset Display Modes ...................................................................................................................................... 50
Pin Assignments .............................................................................................................................................. 51
Plug and Play ................................................................................................................................................... 52
Regulation ............................................................................................................................................................... 53
FCC Notice
CE Declaration of Conformity
WEEE Declaration ........................................................................................................................................... 54
Service .................................................................................................................................................................... 56
Warranty Statement for Europe ....................................................................................................................... 56
Warranty Statement for North & South America (excluding Brazil) ........................................................... 58
...........................
.
........................................................................................................................... 53
..........................................................................................................................53
g
e

3
Safety
National Conventions
The following subsections describe notational conventions used in this document.
Notes, Cautions, and Warnings
Throughout this guide, blocks of text may be accompanied by an icon and printed in bold type or in italic type.
These blocks are notes, cautions, and warnings, and they are used as follows:
NOTE: A NOTE indicates important information that helps you make better use of your computer system.
CAUTION: A CAUTION indicates either potential damage to hardware or loss of data and tells you how to avoid the
problem.
WARNING: A WARNING indicates the potential for bodily harm and tells you how to avoid the problem. Some
warnings may appear in alternate formats and may be unaccompanied by an icon. In such cases, the specific
presentation of the warning is mandated by regulatory authority.

4
Power
The monitor should be operated only from the type of power source indicated on the label. If you are not sure
of the type of power supplied to your home, consult your dealer or local power company.
The monitor is equipped with a three-pronged grounded plug, a plug with a third (grounding) pin. This plug
will fit only into a grounded power outlet as a safety feature. If your outlet does not accommodate the three-wire
plug, have an electrician install the correct outlet, or use an adapter to ground the appliance safely. Do not defeat
the safety purpose of the grounded plug.
Unplug the unit during a lightning storm or when it will not be used for long periods of time. This will protect
the monitor from damage due to power surges.
Do not overload power strips and extension cords. Overloading can result in fire or electric shock.
To ensure satisfactory operation, use the monitor only with UL listed computers which have appropriate
configured receptacles marked between 100 - 240V ~, Min. 5A
The wall socket shall be installed near the equipment and shall be easily accessible.
For use only with the attached power adapter (Output 1 Vdc) which have UL,CSA listed license (Only for 2
monitors with power adapter).
Manufacturers:
1) TPV ELECTRONICS(FUJIAN) CO., LTD model : ADPC1 245
2) HONOR ELECTRONIC CO.,LTD model: ADS-65LSI-12-1 12045G
1) TPV ELECTRONICS(FUJIAN) CO., LTD model : ADPC1236
2)
HONOR ELECTRONIC CO., LTD model : ADS-45NP-12-1 12036G
I2367FH /I2267FWH
I2367F/I2267F
W/I2067F
5
Installation
Do not place the monitor on an unstable cart, stand, tripod, bracket, or table. If the monitor falls, it can injure a
person and cause serious damage to this product. Use only a cart, stand, tripod, bracket, or table recommended by
the manufacturer or sold with this product. Follow the manufacturer’s instructions when installing the product and
use mounting accessories recommended by the manufacturer. A product and cart combination should be moved
with care.
Never push any object into the slot on the monitor cabinet. It could damage circuit parts causing a fire or
electric shock. Never spill liquids on the monitor.
Do not place the front of the product on the floor.
If you mount the monitor on a wall or shelf, use a mounting kit approved by the manufacturer and follow the kit
instructions.
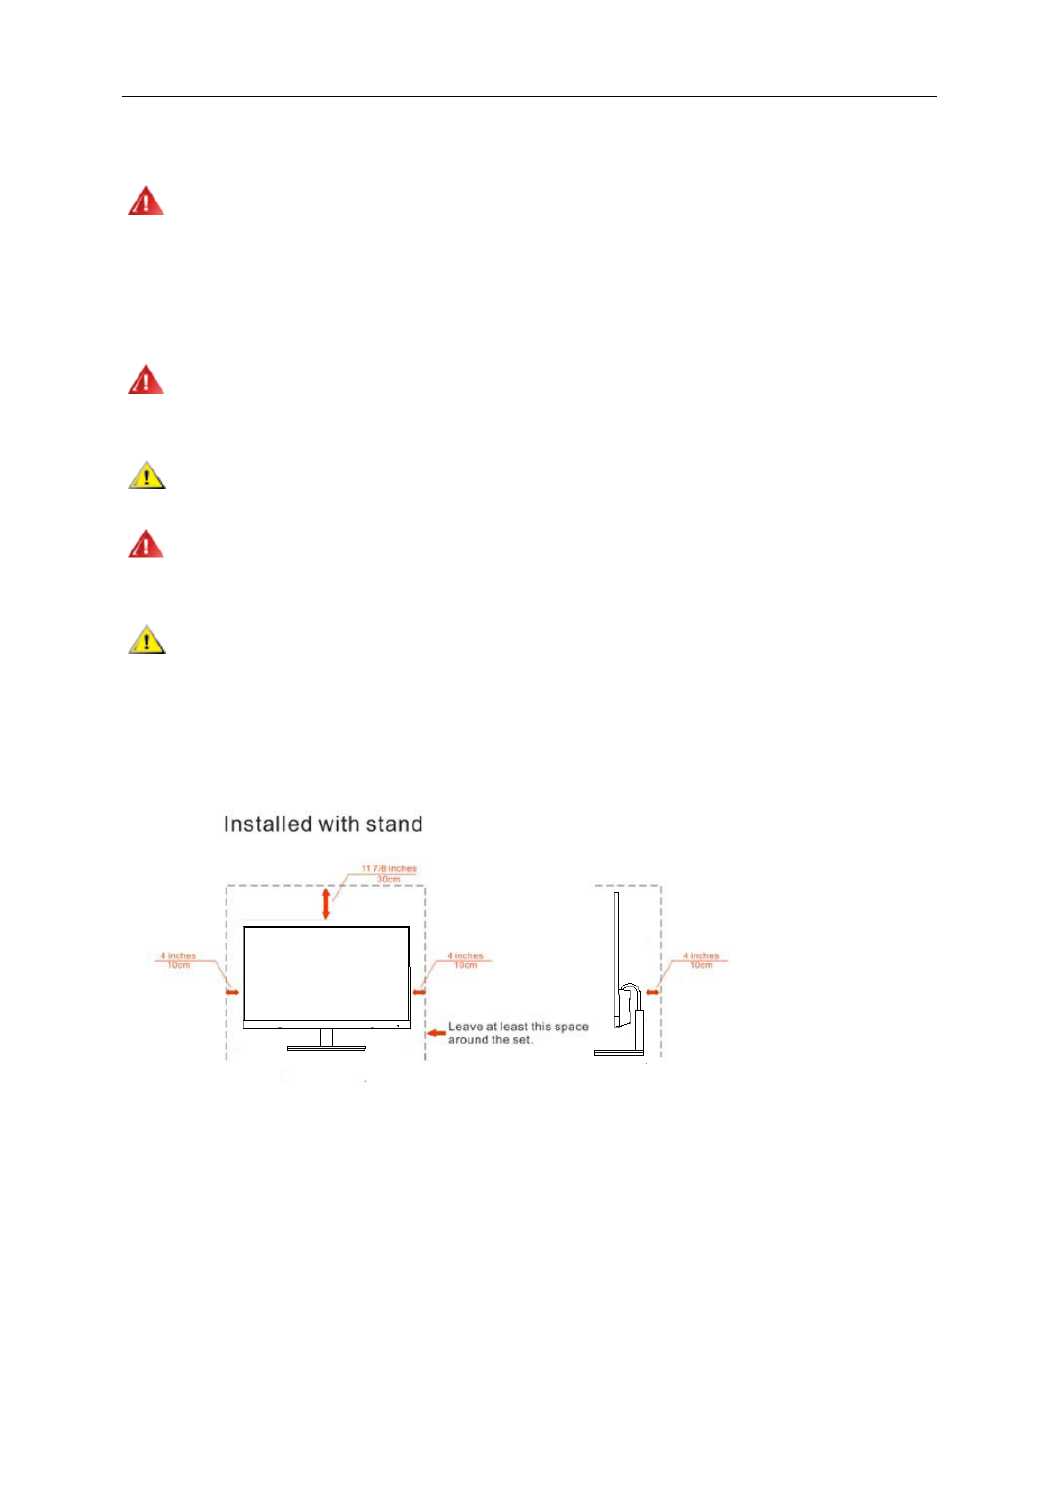
Leave some space around the monitor as shown below. Otherwise, air circulation may be inadequate hence -
overheating may cause a fire or damage to the monitor.
See below the recommended ventilation areas around the monitor when the monitor is installed on
the stand:

6
Cleaning
Clean the cabinet regularly with . You can use softcloth -detergent to wipe out the stain, instead of
strong-detergent which will cauterize the product cabinet.
When cleaning, make sure no detergent is leaked into the product. The cleaning cloth should not be too rough
as it will scratch the screen surface.
Please disconnect the power cord before cleaning the product.

7
Other
If the product is emitting a strange smell, sound or smoke, disconnect the power plug IMMEDIATELY and
contact a Service Center.
Make sure that the ventilating openings are not blocked by a table or curtain.
Do not engage the LCD monitor in severe vibration or high impact conditions during operation.
Do not knock or drop the monitor during operation or transportation.

8
S etup
Contents in Box
check with the local dealer or AOC branch office for confirmation.
Monitor
CD Manual Base Adapter
Power Cable
*
Audio Cable
Not all signal cables (Analog,
and HDMI cables) will be provided for all countries and regions. Please
HDMI Cable
*
Analog Cable
*
*
CableDVI

9
Setup Stand & Base
Please setup or remove the base following the steps as below.
Setup:
Remove:
1
2

10
Unit standing without base is available. (Caution: must put unit in flat surface. Any uneven or sloped surface may
result unit damaged or injury to user.)

Adjusting Viewing Angle
For optimal viewing it is recommended to look at the full face of the monitor, then adjust the monitor's angle to your
own preference.
Hold the stand so you will not topple the monitor when you change the monitor's angle.
You are able to adjust the monitor's angle from - °. 5° to 23
NOTE:
Do not touch the LCD screen when you change the angle. It may cause damage or break the LCD screen.
11
- 253

12
Connecting the Monitor
1. Power
2.
5. HD IM
3.
To protect equipment, always turn off the PC and LCD monitor before connecting.
1 Connect the power cable to the AC port on the back of the monitor.
2 Connect one end of the 15- D-pin Sub /HDMI cable to the back of the monitor and connect the other end to the
computer's D-Sub port. /HDMI
3 Turn on your monitor and computer.
If your monitor displays an image, installation is complete. If it does not display an image, please refer
Troubleshooting.
4. D-Sub
Audio
Earphone
Cable Connections In Back of Monitor and Computer:
1 2 3 4 5

13
Connecting the Monitor
1. Power
2.
DVI
3.
To protect equipment, always turn off the PC and LCD monitor before connecting.
1 Connect the power cable to the AC port on the back of the monitor.
2 Connect one end of the 15- D-pin Sub /DVI cable to the back of the monitor and connect the other end to the
computer's D-Sub port. /DVI
3 Turn on your monitor and computer.
If your monitor displays an image, installation is complete. If it does not display an image, please refer
Troubleshooting.
D-Sub
Cable Connections In Back of Monitor and Computer:
1 2 3
Adjusting
Setting Optimal Resolution
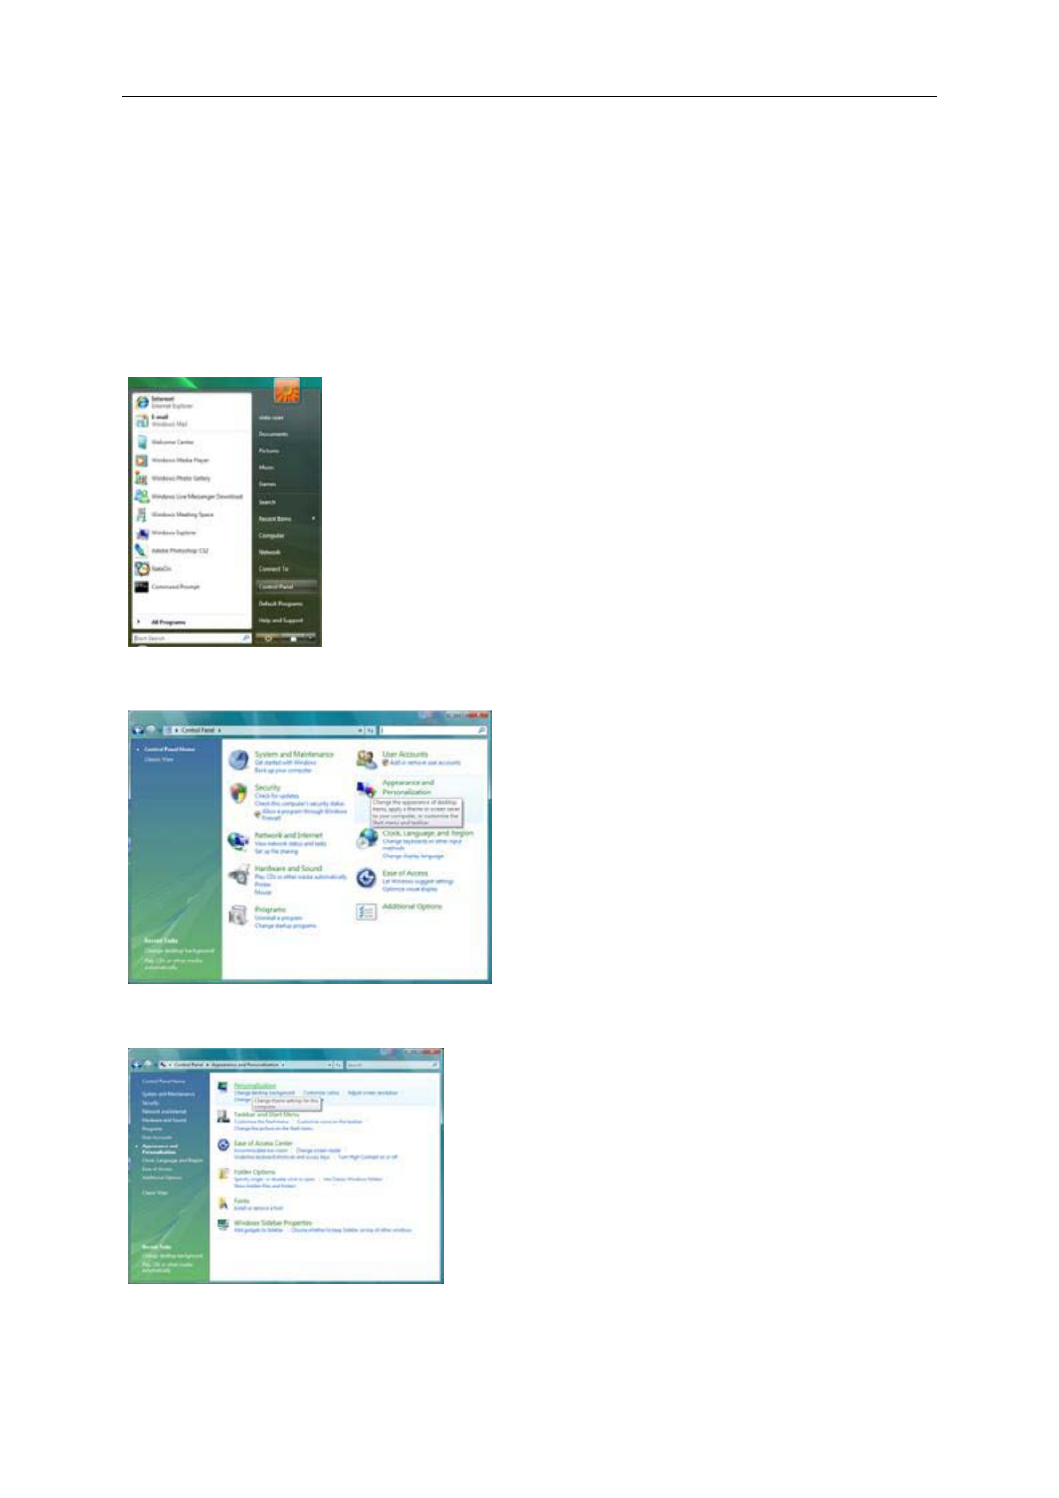
Windows Vista
For Windows Vista:
1 Click START.
2 Click CONTROL PANEL.
3 Click Appearance and Personalization.
4 Click Personalization
1 4
Termékspecifikációk
| Márka: | AOC |
| Kategória: | Monitor |
| Modell: | Style-line I2267FW |
Szüksége van segítségre?
Ha segítségre van szüksége AOC Style-line I2267FW, tegyen fel kérdést alább, és más felhasználók válaszolnak Önnek
Útmutatók Monitor AOC

20 Március 2025
12 Január 2025
11 Január 2025
11 Január 2025
4 Január 2025
30 December 2025
30 December 2025
30 December 2025
30 December 2025
30 December 2025
Útmutatók Monitor
- Monitor Samsung
- Monitor PeakTech
- Monitor Sony
- Monitor Yamaha
- Monitor Fujitsu
- Monitor Acer
- Monitor LG
- Monitor Philips
- Monitor Pioneer
- Monitor Olympus
- Monitor SilverCrest
- Monitor Garmin
- Monitor RCF
- Monitor Bosch
- Monitor Panasonic
- Monitor Canon
- Monitor JVC
- Monitor Sharp
- Monitor Lenovo
- Monitor HyperX
- Monitor Toshiba
- Monitor Neumann
- Monitor Omron
- Monitor HP
- Monitor Hyundai
- Monitor Hisense
- Monitor BenQ
- Monitor Apple
- Monitor Emos
- Monitor Medion
- Monitor Vimar
- Monitor JBL
- Monitor TCL
- Monitor OSEE
- Monitor Viessmann
- Monitor Insignia
- Monitor LC-Power
- Monitor Dell
- Monitor Boss
- Monitor Crestron
- Monitor Gigabyte
- Monitor Tripp Lite
- Monitor Xerox
- Monitor Thomson
- Monitor Speco Technologies
- Monitor Hikvision
- Monitor Eurolite
- Monitor Epson
- Monitor V7
- Monitor Huawei
- Monitor Asus
- Monitor PEAQ
- Monitor Renkforce
- Monitor Haier
- Monitor Mitsubishi
- Monitor M-Audio
- Monitor Citizen
- Monitor Westinghouse
- Monitor Hitachi
- Monitor Continental Edison
- Monitor Asrock
- Monitor Ring
- Monitor Alpine
- Monitor Optoma
- Monitor SPL
- Monitor Smart
- Monitor Dahua Technology
- Monitor Viewsonic
- Monitor Denver
- Monitor Dynaudio
- Monitor Ernitec
- Monitor Qian
- Monitor Joy-It
- Monitor MSI
- Monitor Daewoo
- Monitor Tesla
- Monitor Kali Audio
- Monitor Godox
- Monitor Cisco
- Monitor Newline
- Monitor Behringer
- Monitor APC
- Monitor KRK
- Monitor Cooler Master
- Monitor Chauvet
- Monitor Shure
- Monitor PreSonus
- Monitor Archos
- Monitor Deltaco
- Monitor Tannoy
- Monitor Plantronics
- Monitor Kogan
- Monitor Honeywell
- Monitor SMART Technologies
- Monitor Marshall
- Monitor Kindermann
- Monitor Alesis
- Monitor Velleman
- Monitor Prestigio
- Monitor Monacor
- Monitor IK Multimedia
- Monitor Blaupunkt
- Monitor NZXT
- Monitor Yealink
- Monitor Razer
- Monitor Samson
- Monitor Jay-Tech
- Monitor Mackie
- Monitor Posiflex
- Monitor Peerless-AV
- Monitor Abus
- Monitor AG Neovo
- Monitor Iiyama
- Monitor Konig
- Monitor Seiki
- Monitor 3M
- Monitor ARRI
- Monitor GlobalTronics
- Monitor Jensen
- Monitor Pyle
- Monitor AVer
- Monitor Sanyo
- Monitor Salora
- Monitor IFM
- Monitor DataVideo
- Monitor Maxell
- Monitor Atlona
- Monitor Schneider
- Monitor AJA
- Monitor Brandson
- Monitor Danfoss
- Monitor Vorago
- Monitor Barco
- Monitor NEC
- Monitor Element
- Monitor Marshall Electronics
- Monitor Yorkville
- Monitor Elo
- Monitor IStarUSA
- Monitor Provision-ISR
- Monitor Postium
- Monitor Orion
- Monitor Palmer
- Monitor EverFocus
- Monitor Elvid
- Monitor Gamber-Johnson
- Monitor Focal
- Monitor Adj
- Monitor Legamaster
- Monitor Wohler
- Monitor Packard Bell
- Monitor Vitek
- Monitor Planar
- Monitor Mobile Pixels
- Monitor CSL
- Monitor Newstar
- Monitor SWIT
- Monitor RGBlink
- Monitor Kramer
- Monitor ART
- Monitor AMX
- Monitor Alienware
- Monitor Emachines
- Monitor Caliber
- Monitor Maxdata
- Monitor Sunstech
- Monitor Sunny
- Monitor BlueBuilt
- Monitor Marquant
- Monitor Da-Lite
- Monitor ProXtend
- Monitor Kubo
- Monitor GeoVision
- Monitor LaCie
- Monitor InFocus
- Monitor Midas
- Monitor Festo
- Monitor Swissonic
- Monitor Waeco
- Monitor Ikan
- Monitor IHealth
- Monitor QSC
- Monitor Hannspree
- Monitor ESI
- Monitor Avocor
- Monitor Simrad
- Monitor Jung
- Monitor Genelec
- Monitor Interlogix
- Monitor Eizo
- Monitor POSline
- Monitor Peerless
- Monitor Atomos
- Monitor Mad Catz
- Monitor Krom
- Monitor Monoprice
- Monitor Promethean
- Monitor Odys
- Monitor Fostex
- Monitor Prowise
- Monitor Terra
- Monitor Neets
- Monitor Stairville
- Monitor Soundstream
- Monitor Xoro
- Monitor HKC
- Monitor I3-Technologies
- Monitor CTOUCH
- Monitor Ozone
- Monitor HoverCam
- Monitor Ibm
- Monitor BOOX
- Monitor Aputure
- Monitor Drawmer
- Monitor Blue Sky
- Monitor Zalman
- Monitor Iadea
- Monitor Advantech
- Monitor Hercules
- Monitor Sonifex
- Monitor Avantone Pro
- Monitor Ganz
- Monitor Extron
- Monitor Belinea
- Monitor Adam
- Monitor Triton
- Monitor ITek
- Monitor Akuvox
- Monitor Antelope Audio
- Monitor MicroTouch
- Monitor X-Rite
- Monitor EKO
- Monitor ONYX
- Monitor IBoardTouch
- Monitor Mirai
- Monitor Elite Screens
- Monitor Mitsai
- Monitor Skytronic
- Monitor TV One
- Monitor Christie
- Monitor Hanwha
- Monitor COMMBOX
- Monitor Yiynova
- Monitor Pelco
- Monitor Lilliput
- Monitor LightZone
- Monitor AOpen
- Monitor Planet Audio
- Monitor EC Line
- Monitor Datacolor
- Monitor Fluid
- Monitor HELGI
- Monitor Desview
- Monitor Syscom
- Monitor Allsee
- Monitor Alogic
- Monitor Night Owl
- Monitor ProDVX
- Monitor Varad
- Monitor PureTools
- Monitor DoubleSight
- Monitor CTL
- Monitor Game Factor
- Monitor Nixeus
- Monitor Chimei
- Monitor Blue Sea
- Monitor AMCV
- Monitor Faytech
- Monitor Hamlet
- Monitor Wyse - Dell
- Monitor Approx
- Monitor Bauhn
- Monitor TVLogic
- Monitor Feelworld
- Monitor GeChic
- Monitor Oecolux
- Monitor ADS-TEC
- Monitor Satco
- Monitor Casalux
- Monitor Positivo
- Monitor Jupiter
- Monitor Transvideo
- Monitor Innocn
- Monitor KeepOut
- Monitor Shimbol
- Monitor Raysgem
- Monitor Motrona
- Monitor Ikegami
- Monitor AORUS
- Monitor Portkeys
- Monitor Mimo Monitors
- Monitor Enttec
- Monitor American Dynamics
- Monitor AIS
- Monitor Eve Audio
- Monitor Wortmann AG
- Monitor Viotek
- Monitor Vidi-Touch
- Monitor KTC
- Monitor CoolerMaster
- Monitor Atlantis Land
- Monitor HEDD
- Monitor Colormetrics
- Monitor Monkey Banana
- Monitor SmallHD
- Monitor UPERFECT
- Monitor GVision
- Monitor Voxicon
- Monitor Mybeo
- Monitor Bearware
- Monitor IOIO
- Monitor DTEN
- Monitor Cocopar
- Monitor Titan Army
- Monitor Xenarc
- Monitor Delvcam
- Monitor Wimaxit
- Monitor BookIT
Legújabb útmutatók Monitor

9 Április 2025

9 Április 2025

9 Április 2025

8 Április 2025
8 Április 2025

5 Április 2025

5 Április 2025

4 Április 2025

2 Április 2025
2 Április 2025