Használati útmutató Allview A10 Plus
Allview
okostelefon
A10 Plus
Olvassa el alább 📖 a magyar nyelvű használati útmutatót Allview A10 Plus (129 oldal) a okostelefon kategóriában. Ezt az útmutatót 4 ember találta hasznosnak és 2 felhasználó értékelte átlagosan 4.5 csillagra
Oldal 1/129
1
A10 Plus
USER MAN UAL……………………………………............4
MANUAL DE UTILIZARE…………………….…………..19
РЪКОВОДСТВО ЗА УПОТРЕБА………………...........36
UŽIVATELSKÝ MANUÁL…………………………..........52
MANUAL DE USUARIO…………………………………..69
HASZNÁLATI UTASÍTÁS…………………………………85
INSTRUKCJA OBSŁUGI…………….........………..........97
РУКОВОДСТВО ПОЛЬЗОВАТЕЛЯ..…………........... 115
2

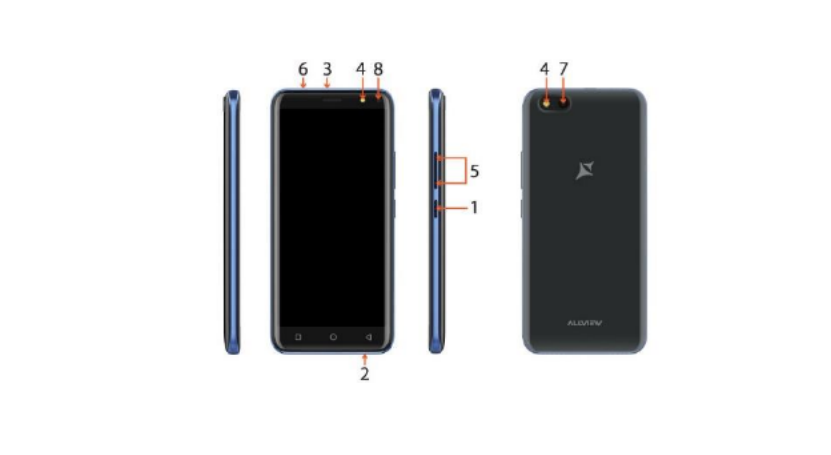
3 EN
EN
RO
BG
CZ
1
Power button
1
Buton pornire
1
Бутонът за
захранване
1
ON/OFF Tlačítko
2
Speaker
2
Difuzor
2
говорител
2
Reproduktor
3
Micro USB
3
Mufă micro USB
3
Микро USB
3
Micro USB
4
Flash
4
Flash
4
флаш
4
Blesk
5
Volume buttons
5
Butoane volum
5
сила на звука
5
Tlačítka hlasitosti
6
Earphones jack
6
Mufă căști
6
слушалки жак
6
Sluchátka jack
7
Main camera
7
Cameră principală
7
Назад камера
7
Zadní fotoaparát
8
Front camera
8
Cameră frontală
8
Предна камера
8
Přední fotoaparát
ES
HU
PL
RU
1
Botón de encendido
1
Bekapcsoló gomb
1
Przycisk zasilania
1
Кнопка включения
2
Altavoz
2
Hangszóró
2
Głośnik
2
Динамик
3
Micro USB
3
Micro USB
3
Micro USB
3
Разъем Микро USB
4
Flash
4
Vaku
4
Błyskać
4
Вспышка
5
Volumen
5
Hangerő gombok
5
Przyciski głośności
5
Клавиша громскости
6
Enchufe auriculares
6
Fülhallgató jack
6
Słuchawki jack
6
Разъем гарнитуры
7
Cámara trasera
7
Hátulsó kamera
7
Tylna kamera
7
Основная камера
8
Cámara frontal
8
Elülső kamera
8
Aparat z przodu
8
Передняя камера

4 EN
Notices for the use of phone
CAUTION! Please read carefully these instructions and follow them, in the case of dangerous situations.
Driving safety: It is recommended not to use the phone while driving. If you use it however, turn on the
Handsfree mode.
Turn off your phone while in an aircraft.
Interference caused by mobile phones affects aviation safety and thus is illegal to use it on the plane. ,
Please make sure t your mobile phone is turned off when you are on the plane. hat
In hospital: When using the phone in a hospital must submit to the relevant rules specified by the
hospital Any interference caused by wireless devices may affect the performance of the phone. .
Approved service: Only approved repair shops can repair mobile phones. If you open the phone and try
to fix it yourself, you will void the warranty of the product.
Accesories and batteries: Only accesories and batteries approved by the producer can be use d.
Emergency calls Make sure the phone is turned on enabled if you wish to make an emergency : and
call, press the call key and confirm the location, explain what happened and close the call. The do not
battery and charging the battery: It is recommended to fully charge before first use of the device.

5 EN
The battery is not removable. Do not puncture or damage the battery in any way. Do not expose / keep /
store close to heat sources / in sunlight. Risk of explosion.
Do not expose the battery/product to temperatures above 40 C. Do not dispose the battery/product in fire
or drop anywhere. Return defective batteries/products in special centers or to the supplier center.
Warning: We take no responsibility for situations where the phone is used other than as provided in the
manual. Our company reserves the right to make changes in the content of the manual without making this
public. These changes will be posted on the company website the product it amends. to
The contents of this manual may different from that in the product this last case will be considered. be . In
To avoid the problems that might occur with the service shops approved by Visual Fan Ltd. (because Visual
Fan reserves the right to stop the collaboration with any service shop which was previously approved and
mentioned in the waranty card on the date on which the product batch was sold on the market), before
taking a product to the service shop, please check the updated list of approved service shps on Allview
website at the section: “Support&Service – Approved service”.
For more product details visit www.allviewmobile.com. Do not cover the antenna with your hand or other
objects Failure to comply resulting in connectivity issues and rapid discharge of the battery.
All applications provided by third parties and installed in this device, may be modified and/or stopped at
any moment. Visual Fan Ltd will not be responsible in any way for modifications of the services or

6 EN
content of these applications. Any request or question regarding third party applications may be
addressed to owners of these applications.
Due to the used enclosure material, the product shall only be connected to a USB
Interface of version 2.0 or higher. The connection to so called power USB is prohibited.
The adapter shall be installed near the equipment and shall be easily accessible.
Do not use the mobile phone in the environment at too high or too low temperature, never expose the
mobile phone under strong sunshine or too wet environment.
The maximum operating ambient temperature of the equipment is 40 ℃
CAUTION RISK OF EXPLOSION IF BATTERY IS REPLACED BY AN INCORRECT TYPE. DISPOSE
OF USED BATTERIES ACCORDING TO THE INSTRUCTIONS
This device has been tested and meets applicable limits for Radio Frequency (RF) exposure. Specific
Absorption Rate (SAR) refers to the rate at which the body absorbs RF energy. SAR limits are 1.6 Watts
per kilogram (over a volume containing a mass of 1 gram of tissue) in countries that follow the United
States FCC limit and 2.0 W/kg (averaged over 10 grams of tissue) in countries that follow the Council of
the European Union limit. Tests for SAR are conducted using standard operating positions with the device
transmitting at its highest certified power level in all tested frequency bands. To reduce exposure to RF
energy, use a han -free accessory or other similar option to keep this device away from your ds

7 EN
head and body. Carry this device at least 5 mm away from your body to ensure exposure levels remain
at or below the as-tested levels. Choose the belt clips, holsters, or other similar body-worn accessories
which do not contain metallic components to support operation in this manner. Cases with metal parts
may change the RF performance of the device, including its compliance with RF exposure guidelines,
in a manner that has not been tested or certified, and use such accessories should be avoided.
For your safety, it is recommended that, during charging, you don’t keep the device near your body, and
that you place it on an inflammable stand. We recommend that, during nighttime, you put the phone
away from you at a minimal distance of 1 meter.
Device power on/off and standby
After inserting the SIM card, memory card and battery (optional), start the phone by holding down
the Power button for 3 seconds. To power off, press and hold the same button and confirm. If you press
the Power button you will set phone in standby mode, to return shortly press the same button.
Unlocking, idle screen and applications menu
To unlock the screen when resuming from standby, slide your finger from the bottom to the top of the
screen. The main screen will be displayed

8 EN
Home screen pages can be customized with shortcuts and widgets. At the top of the screen is placed
the notification bar that contains information about the mobile network signal, WiFi, Bluetooth, battery
level, time and events.
To display the applications menu, touch the Menu icon from the bottom of the main screen. Slide the
screen UP to scroll main menu. Touch the desired application icon to access it. Use the Back button to
return to the main screen.
Dialing
To call a number, from the main screen open the dialer, dial the number and press the call key.
To answer a call, drag the icon to the right, and to reject the call drag the icon to the left.
You can call numbers directly from Call log, touch the dial symbol from the right side of the desired
number.
Messaging
To create and send an SMS, proceed as follows:
- Open the applications menu;
- Open the application; Messaging
- From the bottom-right side of the screen touch symbol; Compose new message
- Write the message;

9 EN
Note: You create an MMS by touching the symbol and adding media content: images, sound or “+”
movies.
- In the top text box add the number or the name of the recipient;
- Tap the symbol from the right side of the text box to send the message. arrow ->
Contacts
Access the Contacts from menu applications.
Add new contact:
- Open from main menu; Contacts
- Tap the + symbol from the bottom-right side of the screen;
- Select the memory where you will store: account or entry; phone
- Enter contact information;
- Finally, tap Save.
Add new contact from call log:
- From the applications menu, the ; open Dialer
- Tap the phone number you want to save;
- Tap button; New contact
- Select the memory where you will store: account or entry;phone

10 EN
- Enter contact information;
-Finally, tap Save.
Import/export contacts
You can import export contacts between memories accounts available, as follows: or and
- Open ;Contacts
- Press the button and select ; Options Import / Export
- Choose memory which to copy contacts; from
- Choose which memory to copy the contacts; in
- Select contacts to copy;
- Press the Copy button;
Synchronize contacts with an account
Note: If you don’t have an account, you can create one which is also necessary for the Google Play .
You can synchronize the contacts of an account by following the next steps:
- Open the applications menu -> Settings -> Applications -> ACCOUNTS;
- Touch the desired account; if you don’t have allready set, you can add a new one by touching the
button ;Add new account
- Tick the option ;Sync contact

11 EN
Customize contacts with photo
Note: The contacts from SIM card cannot be customized with photo.
To add a photo to one contact, follow the steps:
- Open ; Contacts
-Touch the desired contact name;
- On the top-right of the screen touch the contact editing symbol;
- the left corner of the screen touch thes ymbol to add image; In
-Select the input method of image photoshoot from gallery. : or
Google Play
Google Play provides a multitude of applications from various categories games, business: ,
communication, shopping, travel, entertainment, books, education, finance, photography, tools, media,
social, sports, news.
The first time you open Google Play, you will be prompted authenticate If you already have a to .
Google™ account, enter the data. If not, click the Create button to create a new account and follow the
steps on the screen.

12 EN
Settings
Your service provider may default some device settings, so you may not be able to change these
settings.
WLANTouch Wi-Fi switch to activate. Open Wi-Fi to search for available networks automatically.
Networks without password can be used directly, for others you need to enter the password first.
Bluetooth
Touch Bluetooth switch to activate. Touch Bluetooth to enter the device searching screen. You can
modify settings by pressing the Menu button.
Data usage
Here you can activate or deactivate the data connection and see a chart of data usage status. You can
also set the data mobile limit for each SIM.
More
Airplane mode
Virtual Private Networks(VPN) Settings.
Tethering & portable hotspot

13 EN
Mobile network
Sounds
This option allows you to set audio tones for incoming calls e-mail alerts and SMS notifications. ,
Settings include:Vibration, Volume, ToneAudio Reviews ,
Select General / Silent/Meeting/Outdoor profile by touching the right side circle.
Power Saving
You can choose one of the three power schemes:
-Closed
-Normal: calling and messaging are available; data connection remains the same state
-Super-long standby: calling and messaging services remains in the same state.
Display
a. Brightness: adjust the brightness. Wallpaper: change the wallpaper picture for idle screen, lock screen
and main menu
c. Auto rotating screen: rotate phone to change direction
d. Sleep: adjust the delay before the screen automatically locks
e. Font size

14 EN
Battery
Displays information about the charging status and usage of the battery.
Applications
Shows the list of the installed and downloaded applications, which of them are installed on SD CARD.
Location
Access to my location: enable applications to use your location information.
GPS satellites: switch on/off the GPS receiver.
Google Location Service: let applications to use the WiFi or mobile network connection to get
localization.
Security
1) Set up screen locks: you can choose slide, pattern, PIN or password to unlock the screen.
2) Set up SIM card lock: enter 4-8 numbers PIN to set the lock of SIM. If you enter 10 times wrong PUK
code, the SIM card will be permanently locked.
3) Password visible: password visible when enter it
4) Select device administration: add or delete device manager.
5) Unknown sources: install apps from unknown sources

privind modificarea, oprirea ori suspendarea serviciilor / conținutului puse la dispoziție de către terțe
părți prin intermediul acestui dispozitiv. Întrebările sau alte solicitări legate de acest conținut ori servicii
se vor adresa direct furnizorilor proprietari ai acestora.
Din cauza materialului de acoperire utilizat, produsul se va conecta doar la o interfață USB de versiune
2.0 sau mai mare. Conexiunea la așa tul USB cu sursă externă de energie este interzisă. Adaptorul -numi
va fi instalat lângă echipament și va fi ușor de accesat.
Nu utilizați telefonul mobil într un mediu cu temperaturi prea ridicate sau scăzute, nu l expuneți la lumina - -
puternică a soarelui sau unui mediu cu umiditate ridicată.
Temperatura ambientală maximă pentru operarea echipamentului este de 40℃
ATENȚIE: EXISTĂ UN RISC DE EXPLOZIE DACĂ BATERIA ESTE ÎNLOCUITĂ CU UN MODEL
INCORECT. SCOATEȚI BATERIILE UZATE CONFORM INSTRUCȚIUNILOR.
Acest dispozitiv a fost testat și îndeplinește limitele aplicabilității pentru expunerea la Frecvențe Radio
(FR). Rata Specifică de Absorbție (SAR) se referă la rata cu care corpul absoarbe energia FR. Limitele
SAR sunt de 1.6 W/kg (la un volum ce conține o masă de 1 gram de țesut) în țările care aplică limita
FCC a Statelor Unite și 2.0 W/kg (în medie peste 10 grame de țesut) în țările care aplică limita impusă
de Consiliul European. Testele pentru SAR sunt efectuate utilizând poziții de operare standard, cu
dispozitivul care transmite la cel mai ridicat nivel de putere, certificat în toate benzile de frecvență.
19 RO

Deblocare, ecran principal, meniu de aplicații
Pentru a debloca ec ranul la revenirea din standby, glisați cu degetul din partea de jos către partea de
sus a ecranului. Se va afișa ecranul principal.
Paginile ecranului principal pot fi personalizate cu scurtături și widget uri. În partea superioară a -
ecranului se găsește bara de notificări care conține informații despre nivelul semnalului rețelelor mobile,
WiFi, Bluetooth, nivelul bateriei, ceas și evenimente.
Pentru afișarea meniului de aplicații, atingeți simbolul meniu din ecranul principal. Glisați pentru
derularea paginilor meniului principal. Ating eți iconița corespunzătoare pentru accesarea aplicației
d pentru a reveni în ecranul principal. orite. Folosiți butonul Înapoi
Apelare
Pentru apelarea unui număr, din ecranul principal, accesați aplicația de apelare, formați numărul de
telefon și apăsați tasta de apelare. Puteți apela numere direct din Jurnalul de apeluri, atingeți butonul
de apelare din partea dreaptă a numărului dorit.Pentru a răspunde unui apel glisați simbolul central ,
către partea dreaptă, iar pentru a respinge apelul glisați către partea stângă.
21 RO

- Alegeți memoria din care se vor copia contacte;
- Alegeți memoria în care copiați contactele;
- Alegeți contactele de copiat;
- Apăsați butonul Copiere;
Sincronizare contacte cu un cont
Notă: Dacă nu aveți deja un cont creat, puteți crea un cont de utilizator Google
TM necesar accesării
Google Play.
Puteți sincroniza contactele unui cont, astfel:
- - -> CONTURI; Accesați meniul de aplicații > Setări
- Atingeți contul dorit; dacă nu aveți un cont deja introdus, puteți introduce datele unui nou cont apăsând
butonul A . dăugați un cont
- Bifați opțiunea Agendă.
Personalizare contacte cu imagine proprie
Nota: Contactelor de pe memoria SIM nu li se pot asocia sonerie sau imagine proprie.
Pentru a asocia o imagine procedați astfel:
24 RO

- Deschideți Contacte;
- Atingeți numele contactului dorit;
- Din subsolul ecranului atingeți simbolul de editare contact;
- Atingeți simbolul contactului;
- Fotografiați sau alegeți o imagine din galerie pentru a fi asociată contactului.
Google Play
Google Play vă pune la dispoziție o multitudine de aplicații din cele mai diverse categorii: jocuri, afaceri,
comunicare, cumpărături, călătorii, divertisment, cărți, educație, finanțe, fotografie, instrumente, media,
social, sport, știri s.a.
La prima accesare a Google Play vi se solicita autentificarea. Dacă aveți deja un cont Google,
introduceți datele. Daca nu, apăsați butonul Nou pentru a crea un cont nou și urmați pașii afișați pe
ecran.
Setări
Furnizorul de servicii poate activa implicit unele setări ale dispozitivului, astfel încât este posibil să nu ,
puteți schimba aceste setări.
25 RO

Всички приложения, предоставени от трети страни, както и инсталирани на това устройство,
могат да бъдат модифицирани и / или спрени във всеки един момент. S.C. Visual Fan S.R.L. ООД
не носи отговорност по никакъв начин за модификации на услугите или съдържанието на тези
приложения. Всяко искане или въпрос по отношение на приложения на трети лица, може да бъде
адресирано до собствениците на тези приложения.
Следната декларация трябва да бъде добавена в ръководството на потребителя:
Поради използвания материал, продуктът трябва да бъде свързан само към USB
Интерфейс на версия 2.0 или по нова. Свързването към така нареченото захранване е - USB
забранено.
Адаптерът трябва да бъде монтиран в близост до оборудването и да е лесно достъпен.
Не използвайте мобилния телефон при твърде висока или твърде ниска температура на околната
среда.
Никога не излагайте мобилния телефон на силно слънце или прекалено влажна среда.
Максималната допустима температура на околната среда за нормално функциониране на
оборудването е 40 ℃.
34 BG
Termékspecifikációk
| Márka: | Allview |
| Kategória: | okostelefon |
| Modell: | A10 Plus |
Szüksége van segítségre?
Ha segítségre van szüksége Allview A10 Plus, tegyen fel kérdést alább, és más felhasználók válaszolnak Önnek
Útmutatók okostelefon Allview

3 Október 2024
3 Szeptember 2024
26 Augusztus 2024
25 Augusztus 2024
25 Augusztus 2024
22 Augusztus 2024
19 Augusztus 2024
17 Augusztus 2024
16 Augusztus 2024
8 Augusztus 2024
Útmutatók okostelefon
- okostelefon Samsung
- okostelefon Sony
- okostelefon Acer
- okostelefon Nedis
- okostelefon LG
- okostelefon Realme
- okostelefon Philips
- okostelefon SilverCrest
- okostelefon Garmin
- okostelefon Panasonic
- okostelefon AEG
- okostelefon Sharp
- okostelefon Nokia
- okostelefon Lenovo
- okostelefon Evolveo
- okostelefon Toshiba
- okostelefon Oppo
- okostelefon Hyundai
- okostelefon Hisense
- okostelefon BenQ
- okostelefon Apple
- okostelefon TP-Link
- okostelefon Medion
- okostelefon MyPhone
- okostelefon Motorola
- okostelefon Geemarc
- okostelefon Alcatel
- okostelefon TCL
- okostelefon Xiaomi
- okostelefon CAT
- okostelefon Dell
- okostelefon Gigaset
- okostelefon Cyrus
- okostelefon Gigabyte
- okostelefon Vivax
- okostelefon Thomson
- okostelefon Intex
- okostelefon Polaroid
- okostelefon Kyocera
- okostelefon Aiwa
- okostelefon Huawei
- okostelefon Microsoft
- okostelefon Asus
- okostelefon Haier
- okostelefon Mitsubishi
- okostelefon Sencor
- okostelefon Telefunken
- okostelefon Nevir
- okostelefon Kodak
- okostelefon Doro
- okostelefon Denver
- okostelefon Bush
- okostelefon TAG Heuer
- okostelefon Trevi
- okostelefon Amazon
- okostelefon NGS
- okostelefon Tesla
- okostelefon Energy Sistem
- okostelefon OK
- okostelefon Google
- okostelefon Honor
- okostelefon SPC
- okostelefon Bea-fon
- okostelefon ZTE
- okostelefon ESTAR
- okostelefon Vodafone
- okostelefon O2
- okostelefon Hammer
- okostelefon Overmax
- okostelefon OnePlus
- okostelefon Archos
- okostelefon MaxCom
- okostelefon Kogan
- okostelefon Alecto
- okostelefon Honeywell
- okostelefon Prestigio
- okostelefon Media-Tech
- okostelefon Bury
- okostelefon Sony Ericsson
- okostelefon Manta
- okostelefon Blaupunkt
- okostelefon Mio
- okostelefon Facom
- okostelefon Oukitel
- okostelefon Sagem
- okostelefon Razer
- okostelefon Ulefone
- okostelefon Olympia
- okostelefon Tiptel
- okostelefon Sanyo
- okostelefon CRUX
- okostelefon Micromax
- okostelefon NEC
- okostelefon Audioline
- okostelefon CUSTOM
- okostelefon GoClever
- okostelefon Krüger&Matz
- okostelefon RCA
- okostelefon HTC
- okostelefon Bluebird
- okostelefon Majestic
- okostelefon IGET
- okostelefon Tecdesk
- okostelefon Lava
- okostelefon Cubot
- okostelefon CSL
- okostelefon I.safe Mobile
- okostelefon Fysic
- okostelefon Wiko
- okostelefon Yarvik
- okostelefon Aligator
- okostelefon Amplicomms
- okostelefon Amplicom
- okostelefon Ecom
- okostelefon Lexibook
- okostelefon Trekstor
- okostelefon Vestel
- okostelefon Sonim
- okostelefon Blu
- okostelefon Easypix
- okostelefon Konrow
- okostelefon Brigmton
- okostelefon Sunstech
- okostelefon Aspera
- okostelefon Swissvoice
- okostelefon Sunny
- okostelefon Nordmende
- okostelefon Binatone
- okostelefon Blackberry
- okostelefon KPN
- okostelefon Vivo
- okostelefon Wolder
- okostelefon NGM
- okostelefon Profoon
- okostelefon Switel
- okostelefon InFocus
- okostelefon GreatCall
- okostelefon XD
- okostelefon Pantech
- okostelefon Alba
- okostelefon RugGear
- okostelefon Umidigi
- okostelefon Intermec
- okostelefon AT&T
- okostelefon Mpman
- okostelefon Kazam
- okostelefon Logicom
- okostelefon Karbonn
- okostelefon Palm
- okostelefon Emporia
- okostelefon Hannspree
- okostelefon Phicomm
- okostelefon Crosscall
- okostelefon Plum
- okostelefon Lumigon
- okostelefon Infinix
- okostelefon Keneksi
- okostelefon Klipad
- okostelefon T-Mobile
- okostelefon JCB
- okostelefon Casper
- okostelefon Unnecto
- okostelefon Wileyfox
- okostelefon ITT
- okostelefon Yota
- okostelefon Avus
- okostelefon Spice
- okostelefon M3 Mobile
- okostelefon Wolfgang
- okostelefon BQ
- okostelefon ORA
- okostelefon Danew
- okostelefon Echo
- okostelefon Primux
- okostelefon UTStarcom
- okostelefon Zipy
- okostelefon Mediacom
- okostelefon Beafon
- okostelefon BGH
- okostelefon Billow
- okostelefon Telstra
- okostelefon ToughGear
- okostelefon Benefon
- okostelefon Komu
- okostelefon Doogee
- okostelefon Energizer
- okostelefon Tremay
- okostelefon Kurio
- okostelefon Piranha
- okostelefon Coolpad
- okostelefon Mobistel
- okostelefon Itel
- okostelefon Garmin-Asus
- okostelefon Handheld
- okostelefon Fero
- okostelefon AT Telecom
- okostelefon General Mobile
- okostelefon Mustang
- okostelefon Syco
- okostelefon Pharos
- okostelefon Storex
- okostelefon Fairphone
- okostelefon Xtreamer
- okostelefon Freeman
- okostelefon HomTom
- okostelefon Auro
- okostelefon Maxx
- okostelefon ITTM
- okostelefon Posh Mobile
- okostelefon THL
- okostelefon NGM-Mobile
- okostelefon Nothing
- okostelefon Lark
- okostelefon NUU Mobile
- okostelefon Senifone
- okostelefon Tecno
- okostelefon Telme
- okostelefon UMi
- okostelefon Olitech
- okostelefon Mobiola
- okostelefon Meizu
- okostelefon Neffos
- okostelefon Gionee
- okostelefon TIM
- okostelefon Leotec
- okostelefon Leagoo
- okostelefon NTech
- okostelefon Nubia
- okostelefon LeEco
- okostelefon GSmart
- okostelefon Saiet
- okostelefon POCO
- okostelefon Verykool
- okostelefon Aplic
- okostelefon HMD
- okostelefon Opis
- okostelefon Volla
Legújabb útmutatók okostelefon
10 Április 2025
2 Április 2025

30 Március 2025

16 Január 2025
16 Január 2025

15 Január 2025
14 Január 2025
13 Január 2025
12 Január 2025
12 Január 2025