Használati útmutató Acer KA252Q
Acer
LCD monitorok
KA252Q
Olvassa el alább 📖 a magyar nyelvű használati útmutatót Acer KA252Q (15 oldal) a LCD monitorok kategóriában. Ezt az útmutatót 4 ember találta hasznosnak és 2 felhasználó értékelte átlagosan 4.5 csillagra
Oldal 1/15
USER GUIDE
LCD Monitor KA2 series/KA252Q

English
Acer LCD Monitor Quick Start Guide (QSG)
Important safety instructions
Please read the following instructions carefully.
1. To clean the LCD monitor screen:
• TurnotheLCDmonitorandunplugthepowercord.
• Spray a non-solvent cleaning solution onto a rag and clean the screen gently.
2. Do not place the LCD monitor near a window. Exposing the monitor to rain, moisture or sunlight can severely damage
it.
3. Do not apply pressure to the LCD screen. Excessive pressure may cause permanent damage to the display.
4. Do not remove the cover or attempt to service this unit yourself. An authorized technician should perform servicing of
any nature.
5. Store the LCD monitor in a room with a temperature of -20°C to 60°C (-4°F to140°F). Storing the LCD monitor outside
this range may result in permanent damage.
6. Immediately unplug your monitor and call an authorized technician if any of the following circumstances occur:
• Monitor-to-PC signal cable is frayed or damaged.
• Liquid spills onto the LCD monitor or the monitor is exposed to rain.
• The LCD monitor or case is damaged.
Attaching the monitor to the base
1. Remove the monitor from the packaging.
2. Attach the footstand to the base. (for selected models).
3. Turn clockwise to lock. Ensure that the base in locked onto the stand. (for selected models)
4. Secure the base to the stand by turning the screw using the intergrated tab or a suitable coin. (for selected models)
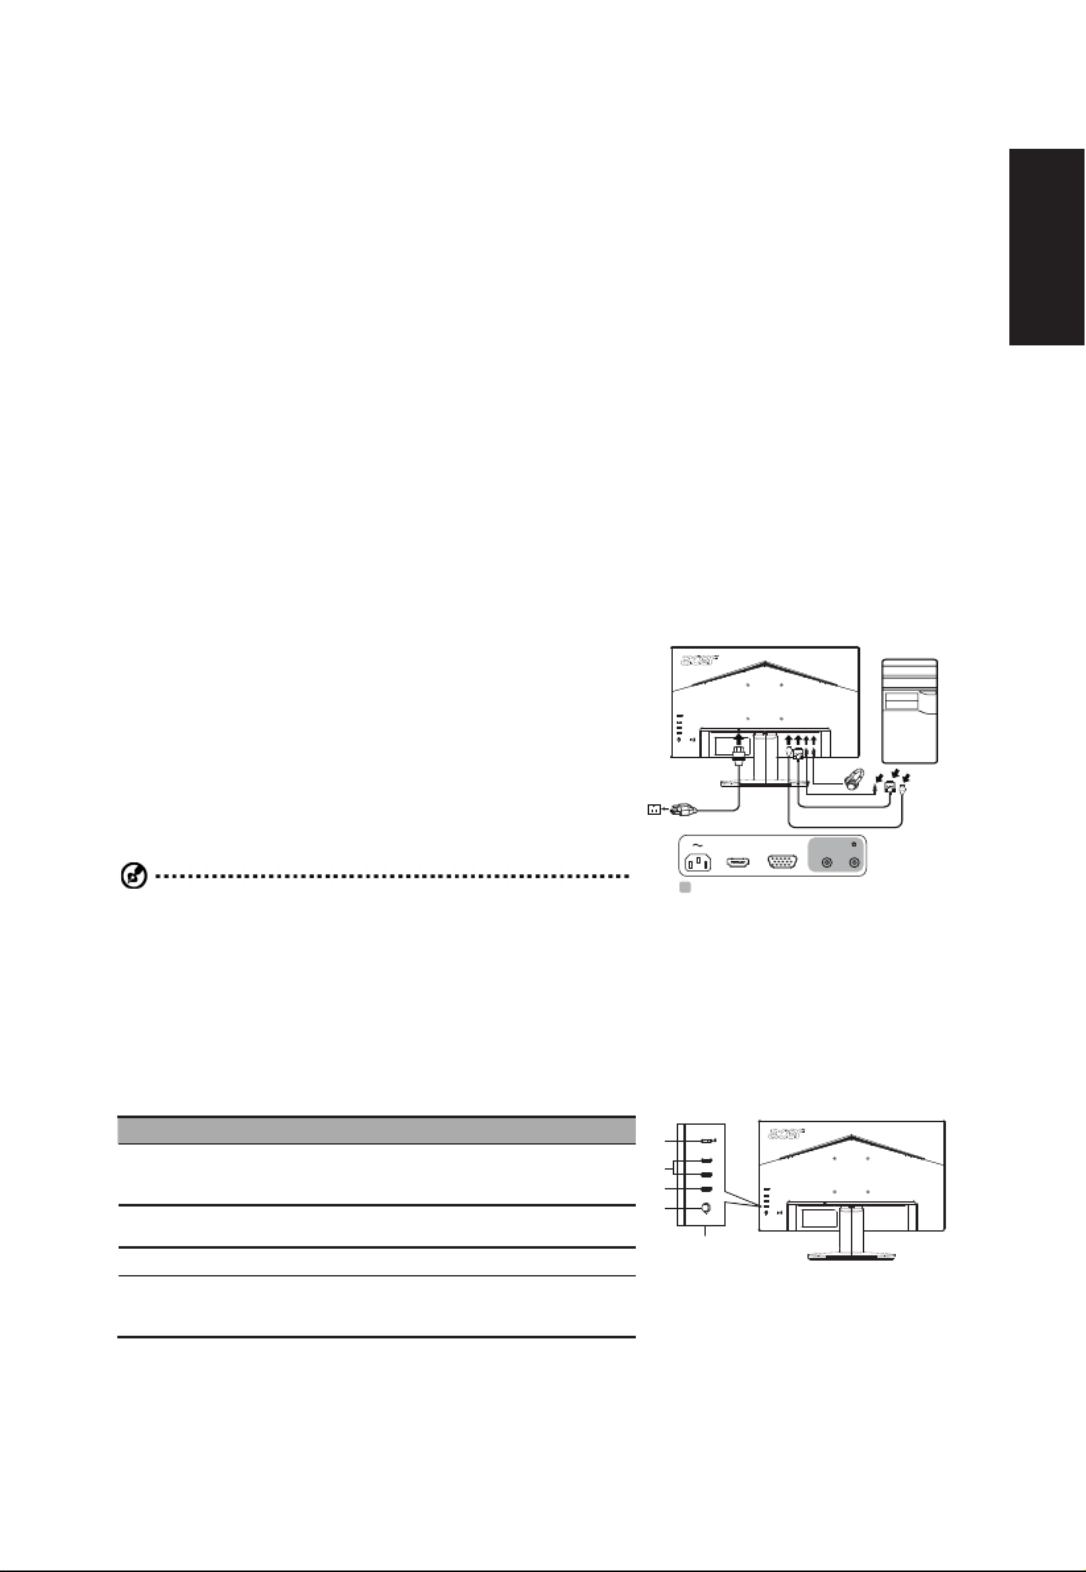
Connecting your monitor to a computer
1. Turnoyourcomputerandunplugyourcomputer'spowercord.
2. Connect the signal cable to the VGA (optional) and/or HDMI
(optional) input socket of the monitor, and the VGA (optional) and/or
HDMI (optional) output socket of the graphics card on the computer.
Then tighten the thumbscrews on the signal cable connector.
3. Optional: Connect the audio input socket (AUDIO IN) of the LCD
monitor and the line-out port on the computer with the audio cable.
4. Insert the monitor power cable into the power port at the back of the
monitor.
5. Plug the power cords of your computer and your monitor into a
nearby electrical outlet.
Note: Audio output is only for audio output model. Please check user
manual for more instruction.
AUDIO INVGA INHDMI
opti alon
AMD Freesync(HDMI):
It can allow a AMD Freesync supported graphics source to dynamically adjust display refresh rate based on typical content
frameratesforpowerecient,virtuallystutterfreeandlow-latencydisplayupdate.
External controls
NO. Item Description
1 Power button/indicator Turnsthemonitoron/o.Blueindicates
power on. Amber indicates standby/power
saving mode.
2 Hotkey 1, 2 buttons Presstoactivateuserdenedhotkey
function.
3 Input button Press to toggle input sources.
4 Navi/OK button Press to activate the OSD menu, then use
it as directional key to highlight the desired
function. Press it again to enter a selection.
1
2
3
4
1
Termékspecifikációk
| Márka: | Acer |
| Kategória: | LCD monitorok |
| Modell: | KA252Q |
Szüksége van segítségre?
Ha segítségre van szüksége Acer KA252Q, tegyen fel kérdést alább, és más felhasználók válaszolnak Önnek
Útmutatók LCD monitorok Acer

13 Január 2025
13 Január 2025
13 Január 2025
16 Október 2024
15 Október 2024
14 Október 2024
13 Október 2024
13 Október 2024
13 Október 2024
11 Október 2024
Útmutatók LCD monitorok
- LCD monitorok Samsung
- LCD monitorok Fujitsu
- LCD monitorok LG
- LCD monitorok Philips
- LCD monitorok HP
- LCD monitorok BenQ
- LCD monitorok Asus
- LCD monitorok AOC
- LCD monitorok Viewsonic
- LCD monitorok Iiyama
- LCD monitorok NEC
- LCD monitorok Planar
- LCD monitorok Gateway
- LCD monitorok LaCie
- LCD monitorok DGM
- LCD monitorok Eizo
- LCD monitorok HKC
- LCD monitorok DoubleSight
Legújabb útmutatók LCD monitorok

16 Január 2025
15 Január 2025

14 Január 2025

14 Január 2025

14 Január 2025
14 Január 2025
16 Október 2024
15 Október 2024
14 Október 2024
13 Október 2024