Használati útmutató AAXA Technologies P700
AAXA Technologies
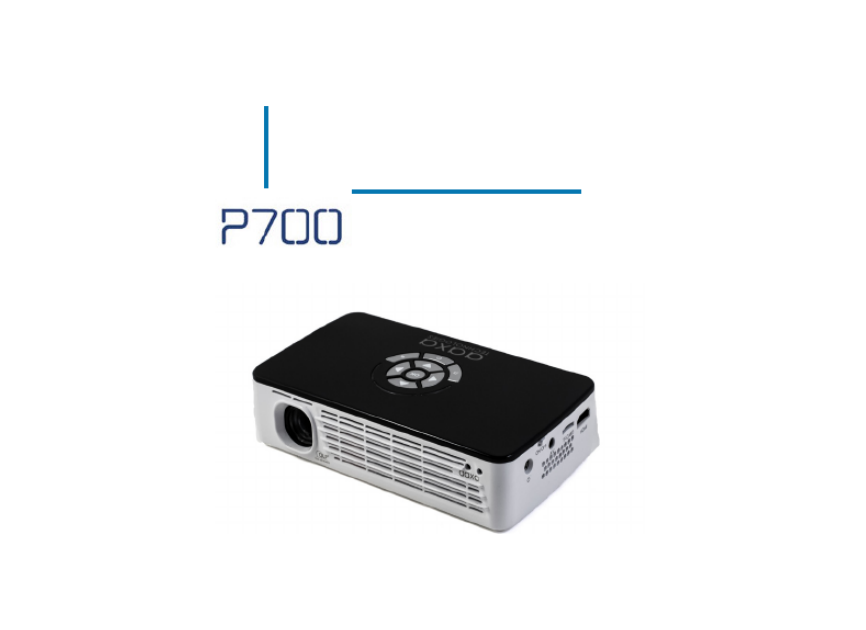
Beamer
P700
Olvassa el alább 📖 a magyar nyelvű használati útmutatót AAXA Technologies P700 (45 oldal) a Beamer kategóriában. Ezt az útmutatót 9 ember találta hasznosnak és 2 felhasználó értékelte átlagosan 4.5 csillagra
Oldal 1/45
aaxa
TECHNOLOGIES
User Guide
Pico Projector

Caution!
WARNING: Please use this product as instructed. Misuse may cause
injury or death.
DO NOT use while driving.
DO NOT expose to water or wet sur-
faces. Electric shock may occur.
DO NOT expose the projected LED
image to your eyes or the eyes of
others.
DO NOT block or restrict airow from
ventilation holes as this may cause
the projector to overheat.
Keep the projector, battery, or
charger away from any heat sources.
Caution for Battery Use
• Do not pierce or puncture the battery
with sharp objects.
• Do not heat the product or expose it to
high temperatures.
• Do not wet it or place it in any liquid.
Caution for Headphone Use
• Prolonged use at high volume may
impair your hearing.
• High volume during walking or driving
may cause distractions and result in
injury or death.

Table of Contents
Chapter 1: P700 at a glance
Main Unit Front/Back
Remote & Keypad
Accessories
Chapter 2: Getting Started
Powering On / OFF
Focus Adjustment / Throw
Distance
Connecting to a Computer VGA
Connecting to a Computer HDMI
Connecting to Composite Video
Connecting to HDMI Video
Connecting to Speaker or Head-
phones
Connecting a Micro SD Card
1
2
3
4
5
6
8
10
12
14
15
17
19
20
21
22
23
25
26
28
29
30
31
33
34
Connecting to a USB Host
Chapter 3: Menu Screens
Portable Media Player
Video Player Menu
Previous/ Next Video
Video FAQ
Photo Viewer Menu
Photo FAQ
Music Player Menu
Music FAQ
Ebook Viewer Menu
Setup Menu
Settings Menu
Picture Settings
Sound Settings

Table of Contents
Option Settings
Keystone Adjustments
Chapter 4: Technical Details
Troubleshooting
Specications
35
36
38
39
40
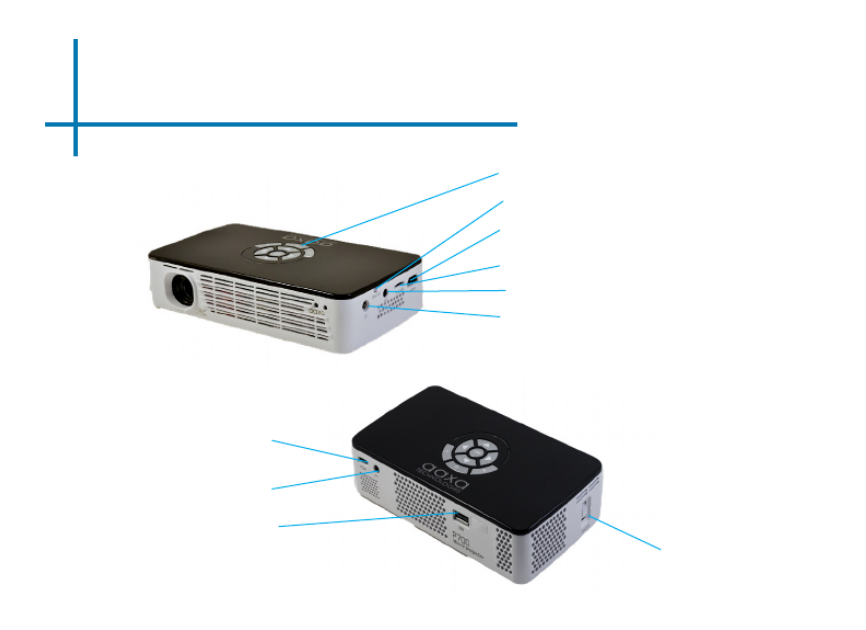
P700 at a Glance
1
Chapter 1
On/ Off Switch
HDMI
VGA Port
USB Port
Main Unit Front/Back
A/V Cable
Headphone Jack
Power Button
DC Adapter Port
Micro SD Card
Focus Adjustment

Remote & Keypad
2
Power On/Off
Main Menu Navigation
Select Source
Media Player Menu
Navigation
Input Exit/Back
Direction Pad
Both the keypad and remote can be used to navigate through the menus. The Main Menu
Navigation on the remote functions exactly the same as the directional pad on the P700 unit.
On / Off
LED Lights
Note: Utilizing the power button on the remote will only put the projector in STANDBY mode.
Please switch the projector into the off position when turning the projector off.

Accessories
3
*Under various circumstances, the actual accessories may be different from
those shown in the pictures above.
Tripod Remote
Power Adapter
VGA Cable
A/V Cable

Getting Started
1. Connect the power cord to the P700.
2. Connect the wall plug into the wall power source.
3. Toggle the On / Off switch on the side of the projector to the “ON” position. (the
projector should automatically turn on)
4. If the projector does not automatically turn on with the “Power Switch” toggled to the
“ON” position, press the “ON/OFF POWER” button on the keypad and hold for 2-3
seconds to start the projector.
4
Powering ON the projector
Chapter 2
Standby Mode
1. Press and hold the power button on the keypad or remote until a blue message box
appears on the screen.
2. The blue message box will prompt you to press the POWER button once more.
3. The optical engine should power off and the fan should stop spinning. The projector
is now in “stand by mode” and can be turned on using the remote control.
Note: “Stand by mode” consumes a little bit of power
Note: The P700 Projector battery does not charge when it is in operation.
Powering OFF the projector
1. To turn off the projector, toggle the POWER Switch to the “OFF” position once you
are in “standby mode”. This will fully turn off the projector.

Focus Adjusment / Throw Distance
Focus Adjustment
• Spin the focus wheel up or down until the image becomes
clear.
5
DIAGONAL SCREEN SIZE
16:9 Aspect Ratio
Throw Distance Chart
Distance inch (“)
20
40
60
80
100
120
140
160
Diagonal inch (“)
16
33
49
66
82
98
115
131
Throw Ratio 1.40
*minimum throw distance: 10 inches

Connecting to a Computer via HDMI
Connect one end of the
8
HDMI Cord
to your computer’s
HDMI Adapter
HDMI Cord
to your P700s
HDMI Adapter
Step 1:
Step 2:
Step 3:
Select “INPUT” icon
In the Main Menu
Connect one end of the
Select “HDMI” icon
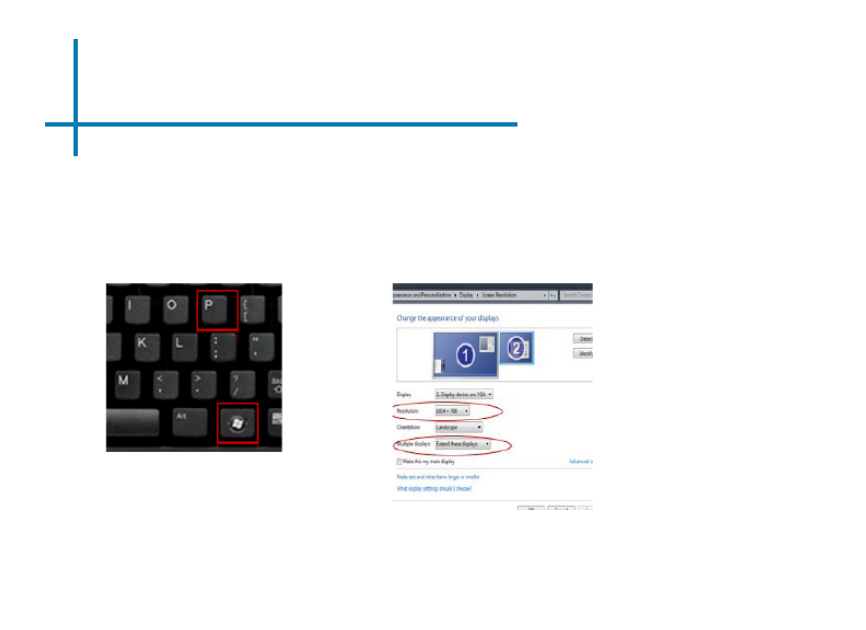
Connecting to a Computer Cont.
Step 4:
Enabling VGA or HDMI output on your Computer – to enable VGA or HDMI output on your com-
puter most computers require “turning on” the video output feature. Each computer is different.
Please consult your owner’s manual for instructions to enable VGA or HDMI output. Below are
standard instructions for a Windows 7 computer – not all systems are the same.
Press Windows+P to toggle through
display settings. Select either “Dupli-
cate” or “Extend” depending on your
viewing option.
*NOTE: different operating systems
may differ
Step 5:
1. Right click on computer
desktop and select “Screen
Resolution”.
2. Display Properties window
will pop up.
3. If a secondary monitor is
grayed out, click on it and se-
lect “Extend these displays”
in the multiple displays drop
down.
4. If the image is blurry or the
text is not legible, adjust
the screen resolution. We
recommend 1280x800.
Step 6:
9
Termékspecifikációk
| Márka: | AAXA Technologies |
| Kategória: | Beamer |
| Modell: | P700 |
Szüksége van segítségre?
Ha segítségre van szüksége AAXA Technologies P700, tegyen fel kérdést alább, és más felhasználók válaszolnak Önnek
Útmutatók Beamer AAXA Technologies

2 Január 2025
22 Augusztus 2024
22 Augusztus 2024
22 Augusztus 2024
22 Augusztus 2024
22 Augusztus 2024
22 Augusztus 2024
22 Augusztus 2024
22 Augusztus 2024
AAXA Technologies LED Android Pico Projector MP-300-03 Útmutató
22 Augusztus 2024Útmutatók Beamer
- Beamer Samsung
- Beamer Sony
- Beamer Yamaha
- Beamer Acer
- Beamer LG
- Beamer Marantz
- Beamer Philips
- Beamer Panasonic
- Beamer Canon
- Beamer JVC
- Beamer Sharp
- Beamer Lenovo
- Beamer Casio
- Beamer Toshiba
- Beamer HP
- Beamer Hisense
- Beamer BenQ
- Beamer Medion
- Beamer Xiaomi
- Beamer Dell
- Beamer Klarstein
- Beamer Prixton
- Beamer Polaroid
- Beamer Technaxx
- Beamer Ricoh
- Beamer Eurolite
- Beamer Epson
- Beamer Asus
- Beamer Hama
- Beamer Renkforce
- Beamer Mitsubishi
- Beamer GPX
- Beamer Hitachi
- Beamer Kodak
- Beamer Optoma
- Beamer Smart
- Beamer Dahua Technology
- Beamer Viewsonic
- Beamer Livoo
- Beamer Smart Tech
- Beamer XGIMI
- Beamer OK
- Beamer Auna
- Beamer Nebula
- Beamer ZTE
- Beamer Showtec
- Beamer Futurelight
- Beamer Overmax
- Beamer Kogan
- Beamer D-Link
- Beamer ION
- Beamer Blaupunkt
- Beamer 3M
- Beamer Pyle
- Beamer Sanyo
- Beamer Steinel
- Beamer Salora
- Beamer Lenco
- Beamer Maxell
- Beamer Leica
- Beamer Barco
- Beamer NEC
- Beamer Cameo
- Beamer Krüger&Matz
- Beamer RCA
- Beamer OKI
- Beamer Adj
- Beamer Anker
- Beamer Microtek
- Beamer Celexon
- Beamer Vivitek
- Beamer EasyMaxx
- Beamer Elmo
- Beamer Planar
- Beamer Smartwares
- Beamer Speaka
- Beamer Vogel's
- Beamer Acco
- Beamer Aiptek
- Beamer ASK Proxima
- Beamer Reflecta
- Beamer Yaber
- Beamer Da-Lite
- Beamer Steren
- Beamer Eiki
- Beamer Derksen
- Beamer InFocus
- Beamer Bauer
- Beamer Naxa
- Beamer Emtec
- Beamer Celly
- Beamer Promethean
- Beamer Odys
- Beamer Stairville
- Beamer Laserworld
- Beamer Ibm
- Beamer La Vague
- Beamer Tzumi
- Beamer EKO
- Beamer MicroVision
- Beamer Elite Screens
- Beamer Fun Generation
- Beamer Christie
- Beamer PLUS
- Beamer Varytec
- Beamer AOpen
- Beamer Ultimea
- Beamer Dracast
- Beamer Dukane
- Beamer Dream Vision
- Beamer Knoll
- Beamer DTS
- Beamer Touchjet
- Beamer Boxlight
- Beamer Miroir
- Beamer Vankyo
- Beamer Mimio
- Beamer AWOL Vision
- Beamer Atlantis Land
- Beamer KickAss
- Beamer VAVA
- Beamer Beghelli
- Beamer Panamorph
- Beamer Mirabella Genio
Legújabb útmutatók Beamer

10 Április 2025
10 Április 2025
10 Április 2025

9 Április 2025
9 Április 2025

2 Április 2025

15 Január 2025
14 Január 2025
13 Január 2025

12 Január 2025